Apollo studio 官网:Apollo开发者社区 (baidu.com)
目录
1 双层状态机
2 决策模块的解析
2.1 参考路径
2.2 交规决策
2.3 路径决策
2.4 速度决策
2.5 场景的调度与管理
3 交规决策实现代码解读
3.1 遍历交规配置文件,存储信息
3.2 交规决策的运行流程
3.3 场景框架代码
3.3.1 Traffic Light 场景的进入
3.3.2 Traffic Light 场景的 stage
3.3.3 Approach阶段
3.3.4 Cruise阶段
3.3.5 交通灯通过检测与停止墙生成
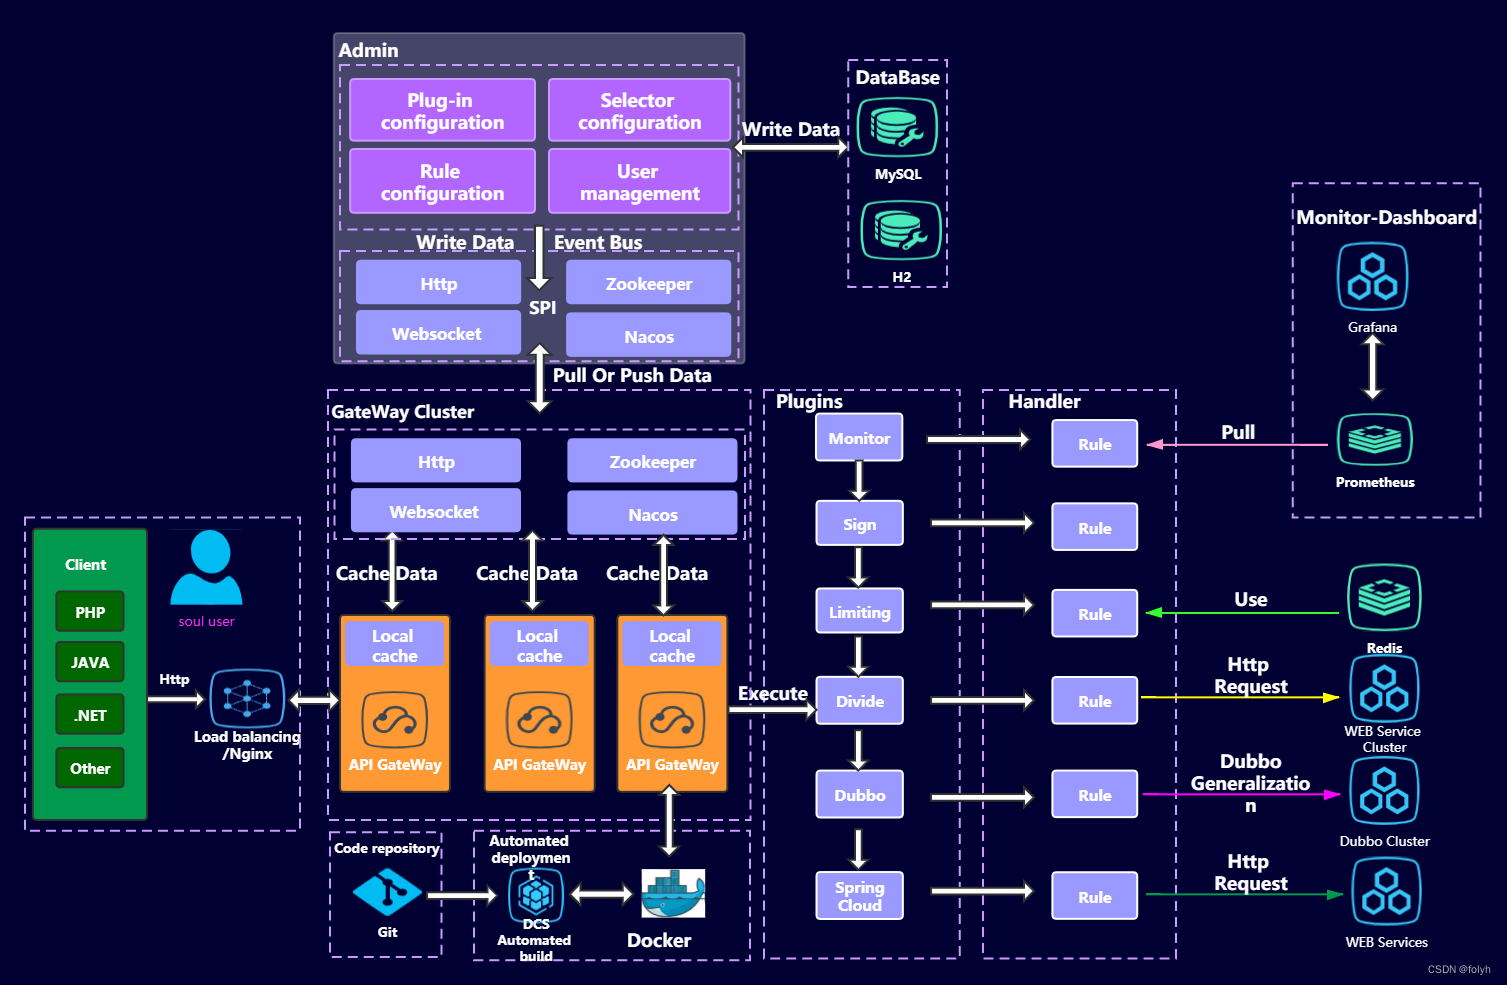
1 双层状态机
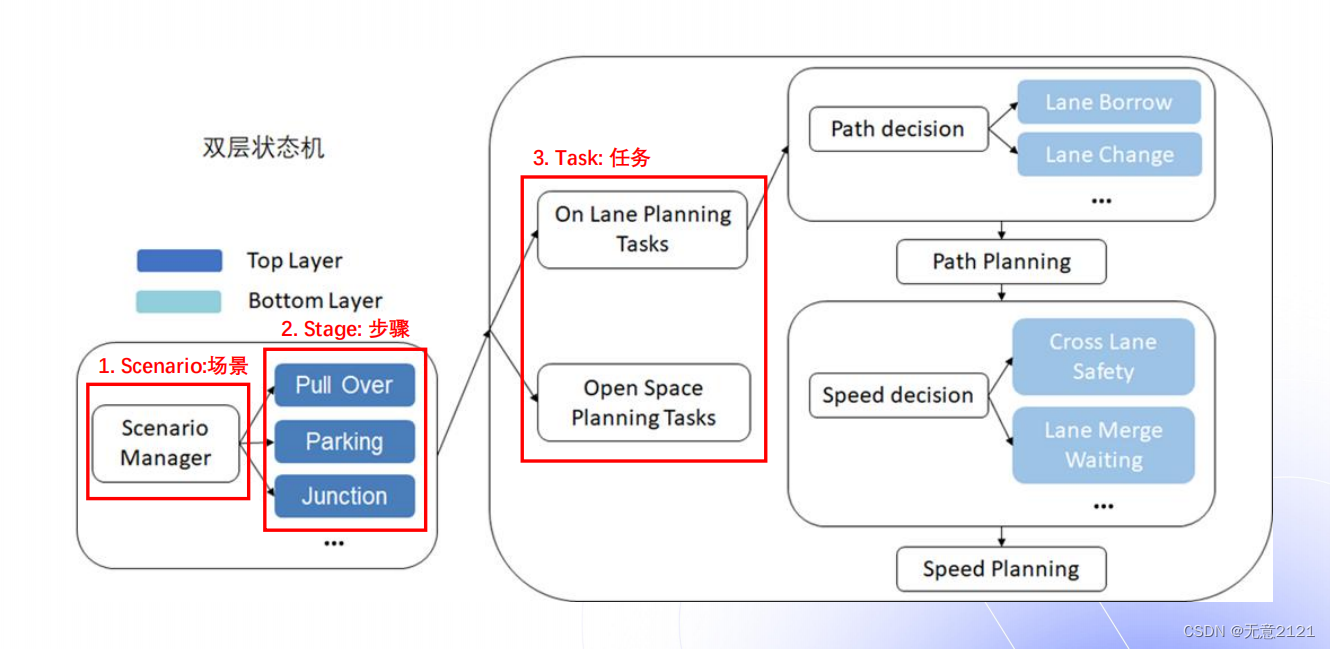
- Apollo主要是通过状态机进行决策,不熟悉状态机的读者请参考【自动驾驶决策算法之有限状态机】_有限状态机 自动驾驶_无意2121的博客-CSDN博客
- 有限状态机不适用于比较复杂的自动驾驶车辆,于是Apollo选择用Top Layer+Bottom Layer的方式,将类似的状态集合到一个底层的状态机中,于是就形成了双层状态机
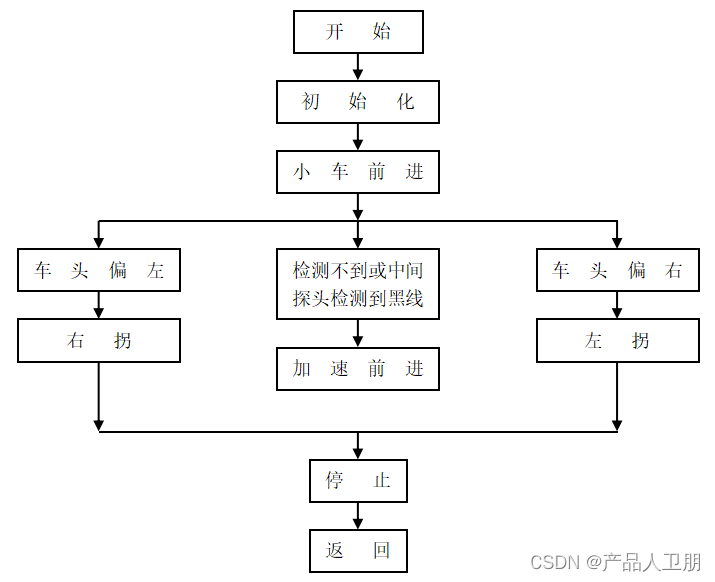
- 同时Apollo通过对scenario进行分类,每个scenario又分为一个或多个stage,每个stage又是由不同的task组成。整体流程图如上图所示
2 决策模块的解析
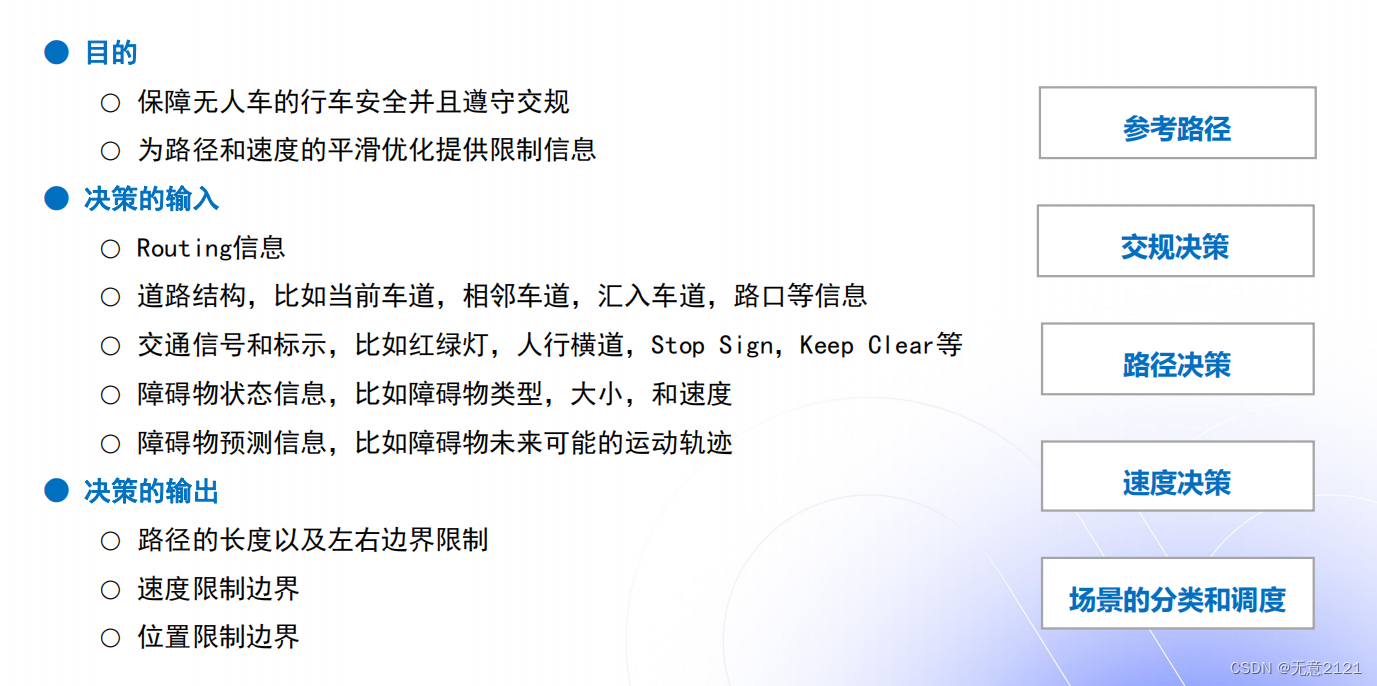
这里介绍了决策模块的目的与作用
- 安全性
- 遵守交规
- 为平滑器提供信息
决策模块的上游有Routing、Prediction、Location、Perception等等module,这作为决策模块的输入。最终的输出则是路径、速度、位置的边界,为优化器提供条件
2.1 参考路径
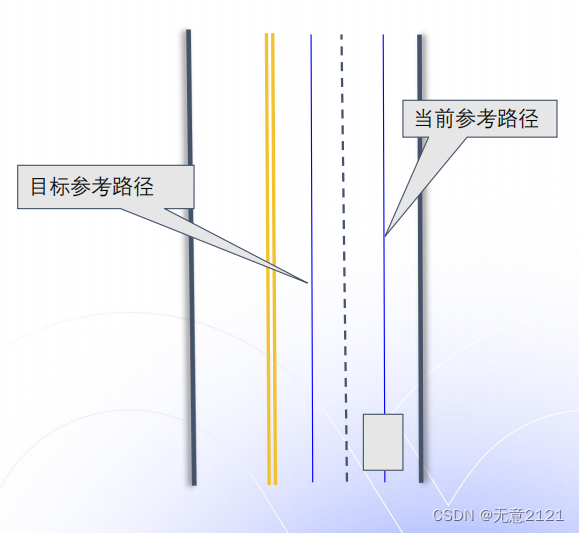
- 没有障碍物情况下的默认行车路径
- 参考路径需要保证连续和平滑(参考线平滑算法,Apollo中默认离散点平滑)
- 参考路径也用于表达换道需求(在Routing模块已经通过A*算法完成了车道级别的搜索)
- 目标参考路径(优先级高)
- 当前参考路径
- 参考路径的一种实现方法
- 根据Routing结果找对对应的道路的中心线
- 对道路中心线进行平滑
2.2 交规决策
- 主要作用
- 处理红绿灯、Stop Sign,人行横道等交通规则
- 输入信息
- 参考路径
- 高精地图
- 信号灯状态
- 输出
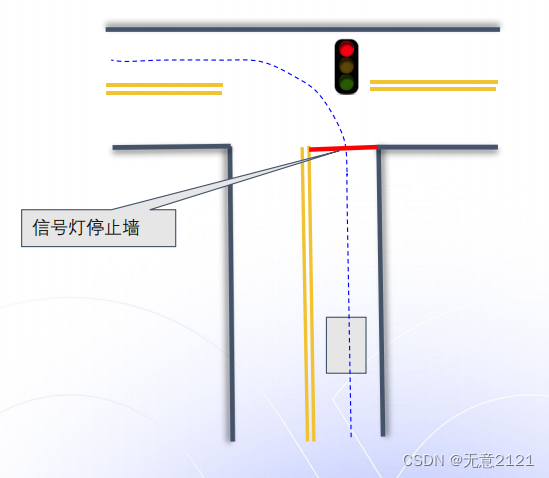
- 虚拟墙(通过对当前交通状态的判断进行是否需要停车的决策)
2.3 路径决策
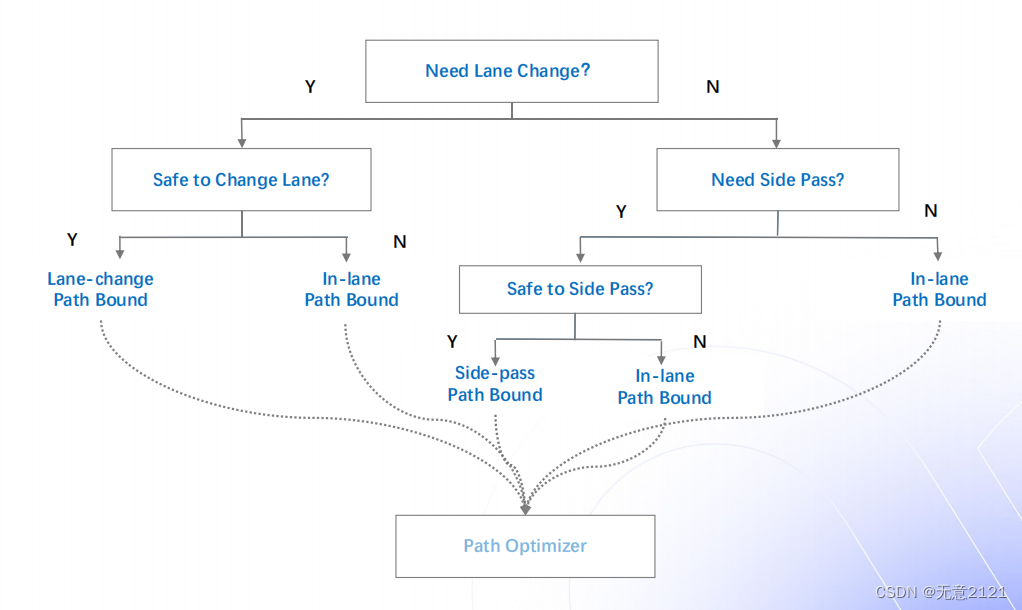
通过一系列类似决策树的是否判断决定当前要生成哪种路径边界输送到优化器中
各种Path Bound的举例如下

2.4 速度决策
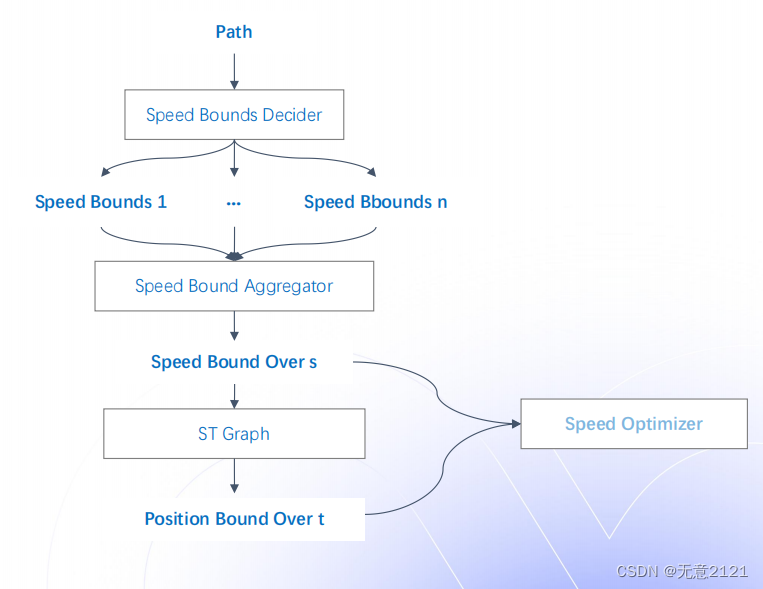
在speed decider中需要通过以下各种各样的判断来生成一个最终的speed bound
- 道路限速
- 路径周边行人,自行车等
- 通过人行横道时
- 减速带
- 路径上过近的车辆,较为拥挤的道路
- 借道避让时
- 换道时
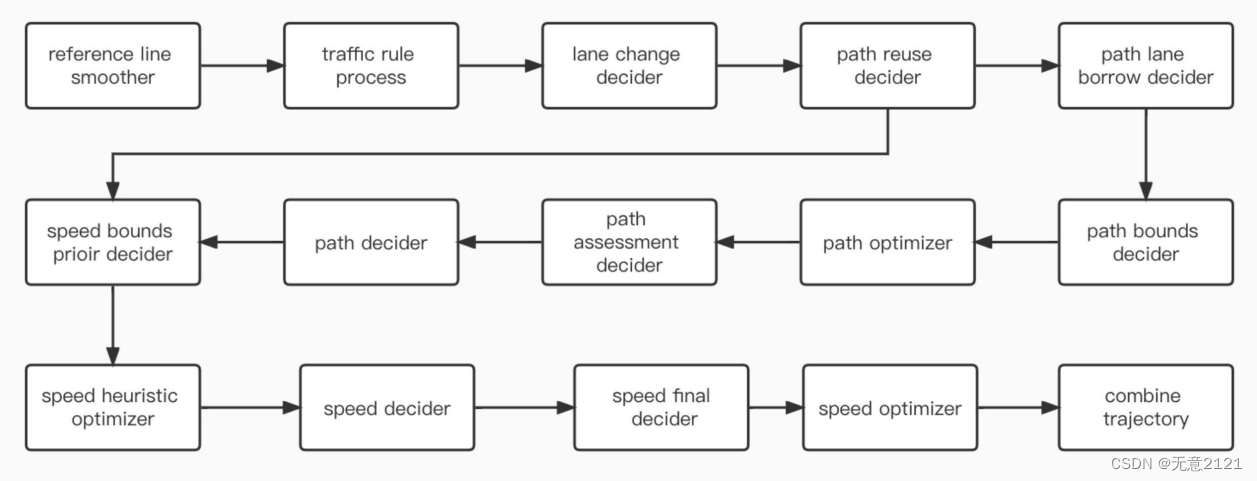
整个 planning 模块的运行流程就如上图所示
2.5 场景的调度与管理
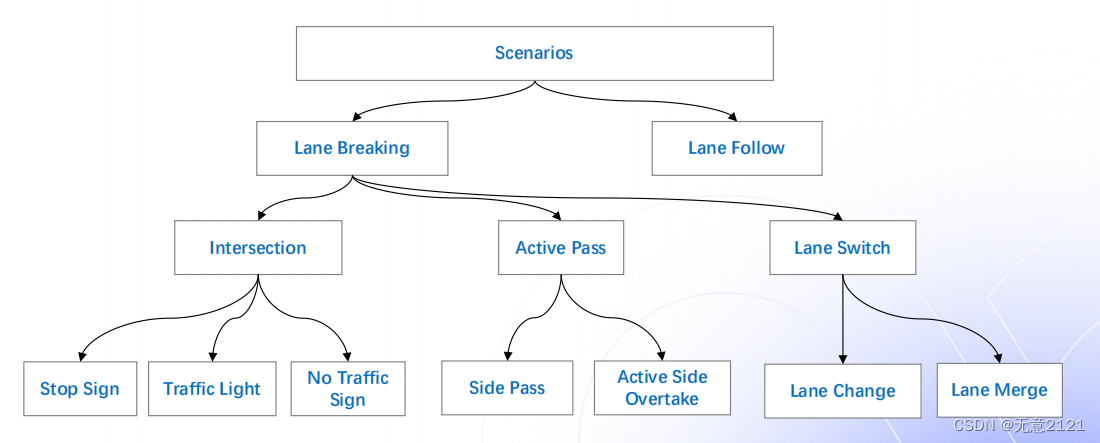
- 场景之间互不干扰,有利于场景并行开发和独立调参,利于维护与开发
- 功能之间相互解耦,开发者可以开发自己的特有场景,但定制化的好处背后就是普遍性的不足
3 交规决策实现代码解读
3.1 遍历交规配置文件,存储信息
| 场景分类 | 解释 |
|---|---|
| Backside_Vehicle | 主车后方来车 |
| Crosswalk | 人行横道 |
| Destination | 主车前往的目的地 |
| Keep_Clear | 禁停区 |
| Reference_Line_End | 参考线结束 |
| Rerouting | 重新全局规划 |
| Stop_Sign | 停车 |
| Traffic_Light | 交通灯 |
| Yield_sign | 让行 |
A p o l l o 对 交 通 规 则 的 处 理 是 通 过 f o r 循 环 来 遍 历 traffic_rule_config.pb.txt 中设置的交通规则,处理后相关信息存入 ReferenceLineInfo 中
//modules\planning\traffic_rules\traffic_decider.cc
Status TrafficDecider::Execute(
    Frame *frame, ReferenceLineInfo *reference_line_info,
    const std::shared_ptr<DependencyInjector> &injector) {
  CHECK_NOTNULL(frame);
  CHECK_NOTNULL(reference_line_info);

  //遍历配置文件
  for (const auto &rule_config : rule_configs_.config()) {
    if (!rule_config.enabled()) {
      ADEBUG << "Rule " << rule_config.rule_id() << " not enabled";
      continue;
    }
    auto rule = s_rule_factory.CreateObject(rule_config.rule_id(), rule_config,
                                            injector);
    if (!rule) {
      AERROR << "Could not find rule " << rule_config.DebugString();
      continue;
    }
    rule->ApplyRule(frame, reference_line_info);
    ADEBUG << "Applied rule "
           << TrafficRuleConfig::RuleId_Name(rule_config.rule_id());
  }
  //处理信息保存在reference_line_info中,作为输入,提供给后续模块。
  BuildPlanningTarget(reference_line_info);
  return Status::OK();
}
3.2 交规决策的运行流程
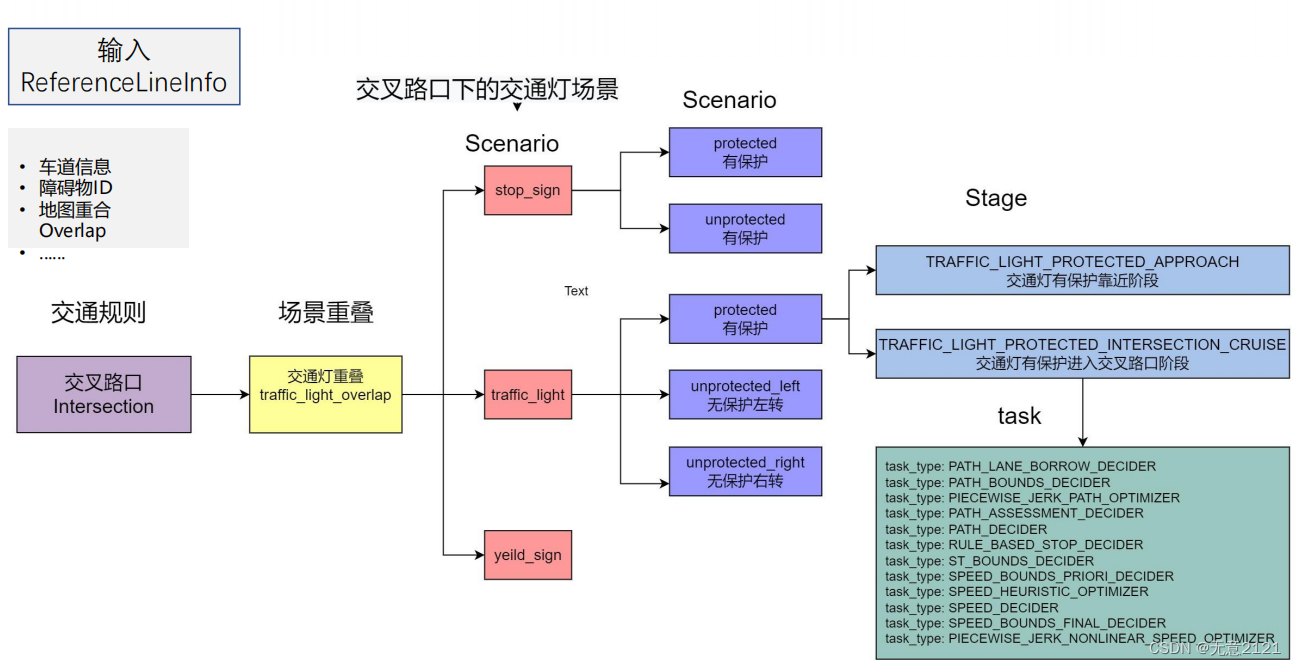
前面遍历配置的信息都存储到ReferenceLineInfo中,通过overlap判断与什么场景重叠,通过交通规则判断需要进入哪个场景,再进行一系列stage,stage中又包含很多task
3.3 场景框架代码
3.3.1 Traffic Light 场景的进入
modules/planning/common/reference_line_info.cc
// signal
hdmap::PathOverlap signal_overlap;
if(GetFirstOverlap(map_path.signal_overlaps(),
&signal_overlap)) {
first_encounter_overlaps_.emplace_back(
SIGNAL, signal_overlap);
}通过overlap重叠进入Traffic Light 场景
modules/planning/scenarios/scenario_manager.cc
if (right_turn && red_light) {
//进入红绿灯无保护右转
const auto& scenario_config =
config_map_[ScenarioConfig::TRAFFIC_LIGHT_UNPROTECTED_RIGHT_TURN]
.traffic_light_unprotected_right_turn_config();
} else if (left_turn) {
//进入红绿灯无保护左转
const auto& scenario_config =
config_map_[ScenarioConfig::TRAFFIC_LIGHT_UNPROTECTED_LEFT_TURN]
.traffic_light_unprotected_left_turn_config();
} else {
//红绿灯有保护
const auto& scenario_config =
config_map_[ScenarioConfig::TRAFFIC_LIGHT_PROTECTED]
.traffic_light_protected_config();
}根据车道信息与交通信号灯的情况进入不同的Scenario
3.3.2 Traffic Light 场景的 stage
stage_type:
TRAFFIC_LIGHT_PROTECTED_APPROACH
#靠近阶段
stage_type:
TRAFFIC_LIGHT_PROTECTED_INTERSECTION_CRUISE
#进入交叉路口阶段
Traffic Light 场景有两个stage,stage_type在配置文件modules/planning/conf/scenario/traffic_light_protected_ config.pb.txt中进行定义
// traffic_light_protected scenario
TRAFFIC_LIGHT_PROTECTED_APPROACH = 400;
TRAFFIC_LIGHT_PROTECTED_INTERSECTION_CRUISE = 401;这是stage优先级的定义,相当于进入一个scenario会有一个stage执行的顺序
s_stage_factory_.Register(
ScenarioConfig::TRAFFIC_LIGHT_PROTECTED_APPROACH,
[](const ScenarioConfig::StageConfig& config,
const std::shared_ptr<DependencyInjector>&
injector) -> Stage* {
return new
TrafficLightProtectedStageApproach(config, injector);
});
s_stage_factory_.Register(
ScenarioConfig::TRAFFIC_LIGHT_PROTECTED_INTERSECTION_CRUISE,
[](const ScenarioConfig::StageConfig& config,
const std::shared_ptr<DependencyInjector>&
injector) -> Stage* {
return new (config, injector);
});这里stage进行了注册
3.3.3 Approach阶段
//modules\planning\scenarios\scenario.cc
const auto& scenario_config =
  config_map_[ScenarioConfig::TRAFFIC_LIGHT_PROTECTED]
      .traffic_light_protected_config();
// 距离判断:主车离停车小于start_traffic_light_scenario_distance时
// 进入TRAFFIC_LIGHT_PROTECTED场景
if (adc_distance_to_traffic_light <
    scenario_config.start_traffic_light_scenario_distance())
{
    traffic_light_protected_scenario = true;
}在approach阶段需要进行了距离判断,若距离满足要求就进入traffic_light_protected场景
//modules\planning\conf\scenario\traffic_light_protected_config.pb.txt
scenario_type: TRAFFIC_LIGHT_PROTECTED
traffic_light_protected_config: {
  start_traffic_light_scenario_distance: 5.0
}
这是配置文件
//modules\planning\scenarios\traffic_light\protected\stage_approach.cc
Stage::StageStatus TrafficLightProtectedStageApproach::Process(
    const TrajectoryPoint& planning_init_point, Frame* frame) {
    ADEBUG << "stage: Approach";
    //APPROACH 正在运行
    CHECK_NOTNULL(frame);
    if (traffic_light_all_done) {
        return FinishStage();
  }
  return Stage::RUNNING;
}

//modules\planning\scenarios\traffic_light\protected\stage_approach.cc
Stage::StageStatus TrafficLightProtectedStageApproach::FinishStage() {
  auto* traffic_light = injector_->planning_context()
                            ->mutable_planning_status()
                            ->mutable_traffic_light();
  traffic_light->clear_done_traffic_light_overlap_id();
  for (const auto& traffic_light_overlap_id :
       GetContext()->current_traffic_light_overlap_ids) {
    traffic_light->add_done_traffic_light_overlap_id(traffic_light_overlap_id);
  }
  //进入下一个Stage:TRAFFIC_LIGHT_PROTECTED_INTERSECTION_CRUISE
  next_stage_ = ScenarioConfig::TRAFFIC_LIGHT_PROTECTED_INTERSECTION_CRUISE;
  return Stage::FINISHED;
  //APPROACH的Stage完成
}
Approach阶段的定义如上
3.3.4 Cruise阶段
Stage::StageStatus TrafficLightProtectedStageIntersectionCruise::Process(
const common::TrajectoryPoint& planning_init_point, Frame* frame) {
bool stage_done =
stage_impl_.CheckDone(*frame, ScenarioConfig::TRAFFIC_LIGHT_PROTECTED,
config_, injector_->planning_context(), true);
//定义交叉路口
if (stage_done)
//如果通过交叉路口
{ return FinishStage();
//INTERSECTION_CRUISE的stage完成
}
return Stage::RUNNING;
//进入INTERSECTION_CRUISE的RUNNING
}
Stage::StageStatus TrafficLightProtectedStageIntersectionCruise::FinishStage() {
return FinishScenario();
//INTERSECTION_CRUISE的stage完成
}
3.3.5 交通灯通过检测与停止墙生成
ObjectDecisionType stop;
//定义一个停止墙
auto* stop_decision = stop.mutable_stop();
//stop决策的停车原因
stop_decision->set_reason_code(stop_reason_code);
stop_decision->set_distance_s(-stop_distance);
//stop决策的停车安全距离
util::BuildStopDecision(virtual_obstacle_id,
traffic_light_overlap.start_s,
config_.traffic_light().stop_distance(),
StopReasonCode::STOP_REASON_SIGNAL,
wait_for_obstacles,TrafficRuleConfig::RuleId_Name(config_.rule_id()),config: {
rule_id: TRAFFIC_LIGHT
enabled: true
traffic_light {
stop_distance: 1.0 #停止距离为1.0 单位 m
max_stop_deceleration: 4.0
}
}配置文件中可以修改停止距离