- 🎥 个人主页:Dikz12
- 🔥个人专栏:Spring Cloud实战
- 📕格言:吾愚多不敏,而愿加学
- 欢迎大家👍点赞✍评论⭐收藏
目录
1.声明项目依赖和项目构建插件
2.完善子项目订单服务
2.1完善启动类和配置文件
2.2 业务代码
3.远程调用
3.1需求
3.2 实现
1.声明项目依赖和项目构建插件
把下面代码分别引入到两个子项目的pom.xml中.
<dependencies>
    <dependency>
        <groupId>org.springframework.boot</groupId>
        <artifactId>spring-boot-starter-web</artifactId>
    </dependency>
    <dependency>
        <groupId>com.mysql</groupId>
        <artifactId>mysql-connector-j</artifactId>
    </dependency>
    <!--mybatis-->
    <dependency>
        <groupId>org.mybatis.spring.boot</groupId>
        <artifactId>mybatis-spring-boot-starter</artifactId>
    </dependency>
</dependencies>

<build>
    <plugins>
        <plugin>
            <groupId>org.springframework.boot</groupId>
            <artifactId>spring-boot-maven-plugin</artifactId>
        </plugin>
    </plugins>
     <resources>
            <resource>
                <directory>src/main/resources</directory>
                <filtering>true</filtering>
                <includes>
                    <include>**/**</include>
                </includes>
            </resource>
    </resources>
</build>
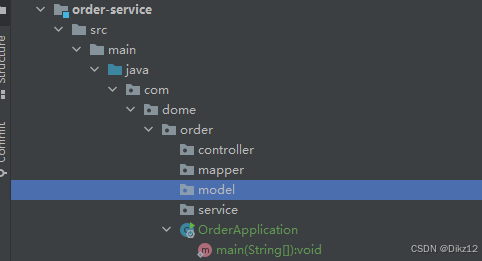
2.完善子项目订单服务
2.1完善启动类和配置文件
启动类
@SpringBootApplication
public class OrderApplication {
    public static void main(String[] args) {
        SpringApplication.run(OrderApplication.class,args);
    }
}
配置文件
配置文件
在resource文件夹中建立,application.yml 文件.
server:
  port: 8080
spring:
  datasource:
    url: jdbc:mysql://127.0.0.1:3306/cloud_order?characterEncoding=utf8&useSSL=false
    username:
    password:
    driver-class-name: com.mysql.cj.jdbc.Driver
mybatis:
  configuration: # 配置打印 MyBatis 执行的 SQL
    log-impl: org.apache.ibatis.logging.stdout.StdOutImpl
    map-underscore-to-camel-case: true  #自动驼峰转换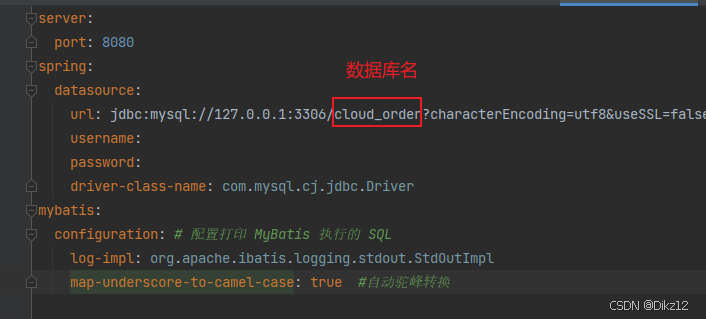
2.2 业务代码
订单服务:根据订单id,获取订单详情..
1. 先搭架子
2. 实体类.
子项目pom并没有引入lombok,但依然可以使用。@Date
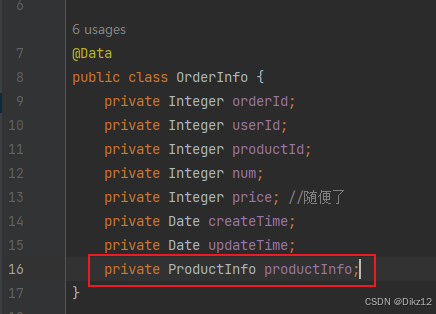
@Data
public class OrderInfo {
    private Integer orderId;
    private Integer userId;
    private Integer productId;
    private Integer num;
    private Integer price; //随便了
    private Date createTime;
    private Date updateTime;
}
3.Controller
import com.dome.order.model.OrderInfo;
import com.dome.order.service.OrderService;
import org.springframework.beans.factory.annotation.Autowired;
import org.springframework.web.bind.annotation.PathVariable;
import org.springframework.web.bind.annotation.RequestMapping;
import org.springframework.web.bind.annotation.RestController;

@RestController
@RequestMapping("/order")
public class OrderController {
    @Autowired
    private OrderService orderService;

    @RequestMapping("/{orderId}")
    public OrderInfo getOrderById(@PathVariable("orderId") Integer orderId) { //从url中拿参数
        return orderService.selectOrderById(orderId);
    }
}
4.Service
import com.dome.order.mapper.OrderMapper;
import com.dome.order.model.OrderInfo;
import org.springframework.beans.factory.annotation.Autowired;
import org.springframework.stereotype.Service;

@Service
public class OrderService {
    @Autowired
    private OrderMapper orderMapper;

    public OrderInfo selectOrderById(Integer orderId) {
        return orderMapper.selectOrderById(orderId);
    }
}
5.Mapper
import com.dome.order.model.OrderInfo;
import org.apache.ibatis.annotations.Mapper;
import org.apache.ibatis.annotations.Select;

@Mapper
public interface OrderMapper {
    @Select("select  * from order_detail where id = #{orderId}")
    OrderInfo selectOrderById(Integer orderId);
}
测试
启动OrderApplication类.
 访问url:http://127.0.0.1:8080/order/1.

完善子项目商品服务,跟上诉过程一样,只需要修改端口号就可以了,因为后⾯需要多个服务⼀起启动,所以要设置为不同的端⼝号。(这里就不在展示了)

3.远程调用
3.1需求
根据订单查询订单信息时,根据订单⾥产品ID,获取产品的详细信息.

3.2 实现
实现思路: order-service服务向product-service服务发送⼀个http请求,把得到的返回结果,和订单结果融合在⼀起,返回给调⽤⽅.
实现⽅式: 采⽤ Spring 提供的 RestTemplate.
实现http请求的⽅式,有很多,可参考:https://zhuanlan.zhihu.com/p/670101467
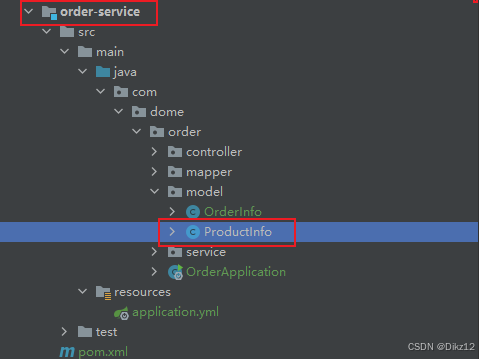
准备工作
把product实体类添加到order-service中的mode中并在OrderInfo中添加product属性.
1. 定义RestTemplate. (第三方对象需要使用@Bean注解)
import org.springframework.context.annotation.Bean;
import org.springframework.context.annotation.Configuration;
import org.springframework.web.client.RestTemplate;

@Configuration
public class BeanConfig {
    @Bean
    public RestTemplate restTemplate() {
        return new RestTemplate();
    }
}
2.修改order-service中的OrderService
@Service
public class OrderService {
    @Autowired
    private OrderMapper orderMapper;
    @Autowired
    private RestTemplate restTemplate;

    public OrderInfo selectOrderById(Integer orderId) {
        OrderInfo orderInfo = orderMapper.selectOrderById(orderId);
        String url = "http://127.0.0.1:9090/product/" + orderInfo.getProductId();
        ProductInfo productInfo = restTemplate.getForObject(url, ProductInfo.class);
        orderInfo.setProductInfo(productInfo);
        return orderInfo;
    }
}
3. 测试.
例 url: http://127.0.0.1:8080/order/1

![[Spring] Spring配置文件](https://i-blog.csdnimg.cn/direct/4bc90838c14f4ff79f71b0278d32ee81.png)