目录
- Web APIs - 第4天
- 日期对象
- 实例化
- 方法
- 案例-页面显示时间
- 时间的另外一个写法
- 时间戳
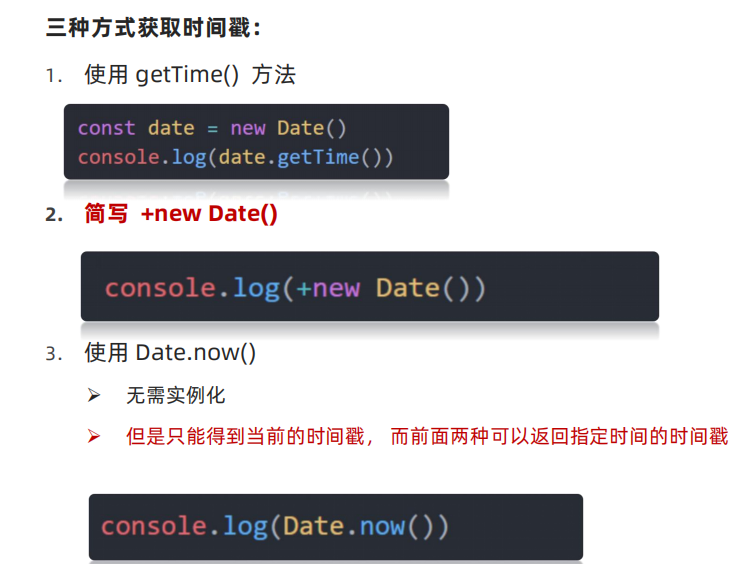
- 三种方式获取时间戳
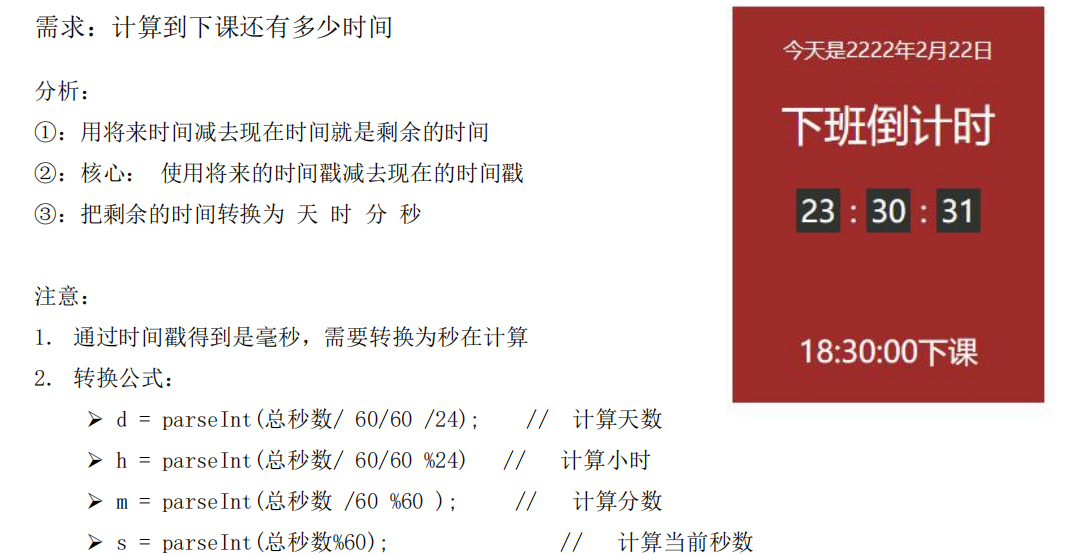
- 案例-毕业倒计时效果
- 节点操作
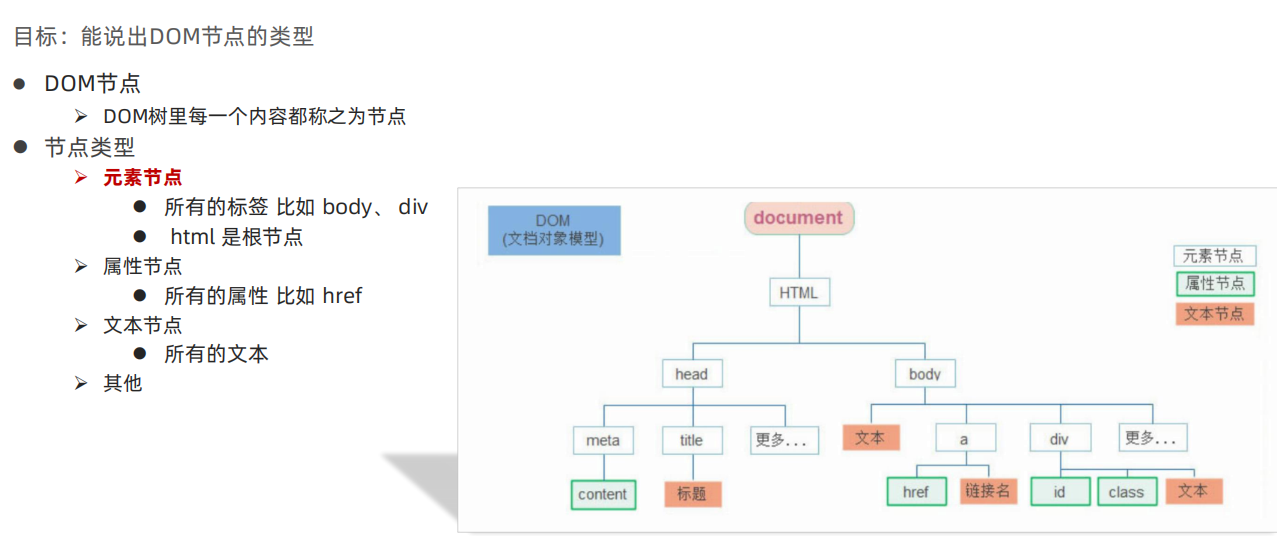
- DOM节点
- 查找节点
- 父节点查找
- 案例-关闭广告
- 子节点查找
- 兄弟关系查找
- 增加节点
- 创建节点
- 追加节点
- 案例-学成在线案例渲染
- 克隆节点
- 删除节点
- M端事件
- 轮播图插件(了解即可)
- 综合案例-学生信息表案例
Web APIs - 第4天
进一步学习 DOM 相关知识,实现可交互的网页特效
- 能够插入、删除和替换元素节点
- 能够依据元素节点关系查找节点
日期对象
掌握 Date 日期对象的使用,动态获取当前计算机的时间。
ECMAScript 中内置了获取系统时间的对象 Date,使用 Date 时与之前学习的内置对象 console 和 Math 不同,它需要借助 new 关键字才能使用。
实例化
在代码中发现了 new 关键字时,一般将这个操作称为实例化
  // 1. 实例化
  // const date = new Date(); // 获得当前时间
  const date = new Date('2020-05-01') // 获得指定时间
  // date 变量即所谓的时间对象

  console.log(typeof date)
方法
  // 1. 实例化
 const date = new Date();
 // 2. 调用时间对象方法
 // 通过方法分别获取年、月、日,时、分、秒
 const year = date.getFullYear(); // 四位年份
 const month = date.getMonth(); // 0 ~ 11
getFullYear 获取四位年份
getMonth 获取月份,取值为 0 ~ 11
getDate 获取月份中的每一天,不同月份取值也不相同
getDay 获取星期,取值为 0 ~ 6
getHours 获取小时,取值为 0 ~ 23
getMinutes 获取分钟,取值为 0 ~ 59
getSeconds 获取秒,取值为 0 ~ 59
案例-页面显示时间
需求:将当前时间以:YYYY-MM-DD HH:mm 形式显示在页面 2008-08-08 08:08
分析:
①:调用日期对象方法进行转换
②:记得数字要补0
③:字符串拼接后,通过 innerText 给 标签
<!DOCTYPE html>
<html lang="en">

<head>
  <meta charset="UTF-8">
  <meta http-equiv="X-UA-Compatible" content="IE=edge">
  <meta name="viewport" content="width=device-width, initial-scale=1.0">
  <title>Document</title>
  <style>
    div {
      width: 300px;
      height: 40px;
      border: 1px solid pink;
      text-align: center;
      line-height: 40px;
    }
  </style>
</head>

<body>
  <div></div>
  <script>
    const div = document.querySelector('div')
    function getMyDate() {
      const date = new Date()
      let h = date.getHours()
      let m = date.getMinutes()
      let s = date.getSeconds()
      h = h < 10 ? '0' + h : h
      m = m < 10 ? '0' + m : m
      s = s < 10 ? '0' + s : s
      return `今天是: ${date.getFullYear()}年${date.getMonth() + 1}月${date.getDate()}号 ${h}:${m}:${s}`
    }

    div.innerHTML = getMyDate()
    setInterval(function () {
      div.innerHTML = getMyDate()
    }, 1000)
  </script>
</body>

</html>
时间的另外一个写法
	<script>
    const div = document.querySelector('div')
    // 得到日期对象
    const date = new Date()
    // div.innerHTML = date.toLocaleString()  // 2022/4/1 09:41:21
   // div.innerHTML = date.toLocaleDateString()  // 2022/4/1
    div.innerHTML = date.toLocaleTimeString()  // 09:41:21
  </script>
时间戳
什么是时间戳:
时间戳是指1970年01月01日00时00分00秒起至现在的毫秒数,它是一种特殊的计量时间的方式。
使用场景: 如果计算倒计时效果,前面方法无法直接计算,需要借助于时间戳完成
算法:
-
将来的时间戳 - 现在的时间戳 = 剩余时间毫秒数
-
剩余时间毫秒数 转换为 剩余时间的 年月日时分秒 就是 倒计时时间
-
比如 将来时间戳 2000ms - 现在时间戳 1000ms = 1000ms
-
1000ms 转换为就是 0小时0分1秒
三种方式获取时间戳
案例-毕业倒计时效果
<!DOCTYPE html>
<html lang="en">

<head>
  <meta charset="UTF-8" />
  <meta http-equiv="X-UA-Compatible" content="IE=edge" />
  <meta name="viewport" content="width=device-width, initial-scale=1.0" />
  <title>Document</title>
  <style>
    .countdown {
      width: 240px;
      height: 305px;
      text-align: center;
      line-height: 1;
      color: #fff;
      background-color: brown;
      /* background-size: 240px; */
      /* float: left; */
      overflow: hidden;
    }

    .countdown .next {
      font-size: 16px;
      margin: 25px 0 14px;
    }

    .countdown .title {
      font-size: 33px;
    }

    .countdown .tips {
      margin-top: 80px;
      font-size: 23px;
    }

    .countdown small {
      font-size: 17px;
    }

    .countdown .clock {
      width: 142px;
      margin: 18px auto 0;
      overflow: hidden;
    }

    .countdown .clock span,
    .countdown .clock i {
      display: block;
      text-align: center;
      line-height: 34px;
      font-size: 23px;
      float: left;
    }

    .countdown .clock span {
      width: 34px;
      height: 34px;
      border-radius: 2px;
      background-color: #303430;
    }

    .countdown .clock i {
      width: 20px;
      font-style: normal;
    }
  </style>
</head>

<body>
  <div class="countdown">
    <p class="next">今天是2222年2月22日</p>
    <p class="title">下班倒计时</p>
    <p class="clock">
      <span id="hour">00</span>
      <i>:</i>
      <span id="minutes">25</span>
      <i>:</i>
      <span id="scond">20</span>
    </p>
    <p class="tips">18:30:00下课</p>
  </div>
  <script>
    // 随机颜色函数
    // 1. 自定义一个随机颜色函数
    function getRandomColor(flag = true) {
      if (flag) {
        // 3. 如果是true 则返回 #ffffff
        let str = '#'
        let arr = ['0', '1', '2', '3', '4', '5', '6', '7', '8', '9', 'a', 'b', 'c', 'd', 'e', 'f']
        // 利用for循环随机抽6次 累加到 str里面
        for (let i = 1; i <= 6; i++) {
          // 每次要随机从数组里面抽取一个
          // random 是数组的索引号 是随机的
          let random = Math.floor(Math.random() * arr.length)
          // str = str + arr[random]
          str += arr[random]
        }
        return str

      } else {
        // 4. 否则是 false 则返回 rgb(255,255,255)
        let r = Math.floor(Math.random() * 256)  // 55
        let g = Math.floor(Math.random() * 256)  // 89
        let b = Math.floor(Math.random() * 256)  // 255
        return `rgb(${r},${g},${b})`
      }

    }

    // 页面刷新随机得到颜色
    const countdown = document.querySelector('.countdown')
    countdown.style.backgroundColor = getRandomColor()
    // 函数封装 getCountTime
    function getCountTime() {
      // 1. 得到当前的时间戳
      const now = +new Date()
      // 2. 得到将来的时间戳
      const last = +new Date('2024-7-4 18:30:00')
      // console.log(now, last)
      // 3. 得到剩余的时间戳 count  记得转换为 秒数
      const count = (last - now) / 1000
      // console.log(count)
      // 4. 转换为时分秒
      // h = parseInt(总秒数 / 60 / 60 % 24)   //   计算小时
      // m = parseInt(总秒数 / 60 % 60);     //   计算分数
      // s = parseInt(总秒数 % 60);
      // let d = parseInt(count / 60 / 60 / 24)               //   计算当前秒数
      let h = parseInt(count / 60 / 60 % 24)
      h = h < 10 ? '0' + h : h
      let m = parseInt(count / 60 % 60)
      m = m < 10 ? '0' + m : m
      let s = parseInt(count % 60)
      s = s < 10 ? '0' + s : s
      console.log(h, m, s)

      //  5. 把时分秒写到对应的盒子里面
      document.querySelector('#hour').innerHTML = h
      document.querySelector('#minutes').innerHTML = m
      document.querySelector('#scond').innerHTML = s
    }
    // 先调用一次
    getCountTime()

    // 开启定时器
    setInterval(getCountTime, 1000)
  </script>
</body>

</html>
节点操作
DOM节点
掌握元素节点创建、复制、插入、删除等操作的方法,能够依据元素节点的结构关系查找节点
回顾之前 DOM 的操作都是针对元素节点的属性或文本的,除此之外也有专门针对元素节点本身的操作,如插入、复制、删除、替换等。
查找节点
DOM 树中的任意节点都不是孤立存在的,它们要么是父子关系,要么是兄弟关系,不仅如此,我们可以依据节点之间的关系查找节点。
父节点查找

案例-关闭广告
<body>
  <div class="box">
    我是广告
    <div class="box1">X</div>
  </div>
  <div class="box">
    我是广告
    <div class="box1">X</div>
  </div>
  <div class="box">
    我是广告
    <div class="box1">X</div>
  </div>
  <script>
    // // 1. 获取事件源
    // const box1 = document.querySelector('.box1')
    // // 2. 事件侦听
    // box1.addEventListener('click', function () {
    //   this.parentNode.style.display = 'none'
    // })

    // 1. 获取三个关闭按钮
    const closeBtn = document.querySelectorAll('.box1')
    for (let i = 0; i < closeBtn.length; i++) {
      closeBtn[i].addEventListener('click', function () {
        // 关闭我的爸爸 所以只关闭当前的父元素
        this.parentNode.style.display = 'none'
      })
    }
  </script>
</body>
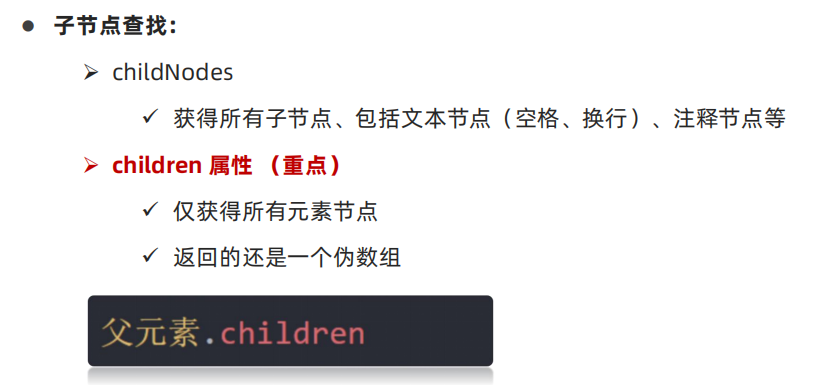
子节点查找
兄弟关系查找
-
下一个兄弟节点
nextElementSibling属性
-
上一个兄弟节点
previousElementSibling属性
增加节点
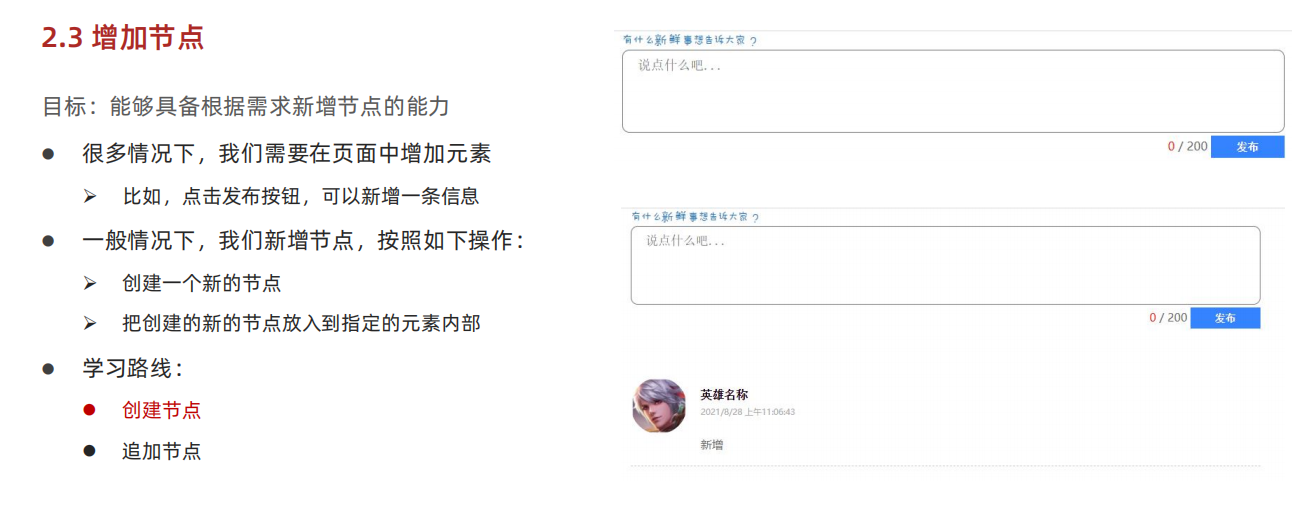
创建节点
即创造出一个新的网页元素,再添加到网页内,一般先创建节点,然后插入节点
创建元素节点方法:
document.createElement('标签名')
追加节点

案例-学成在线案例渲染
需求:按照数据渲染页面
分析:
①:准备好空的ul 结构
②:根据数据的个数,创建一个新的空li
③:li里面添加内容 img 标题等
④:追加给ul
重点练习:创建节点和追加节点
    <script>
        // 1. 重构
        let data = [
            {
                src: 'images/course01.png',
                title: 'Think PHP 5.0 博客系统实战项目演练',
                num: 1125
            },
            {
                src: 'images/course02.png',
                title: 'Android 网络动态图片加载实战',
                num: 357
            },
            {
                src: 'images/course03.png',
                title: 'Angular2 大前端商城实战项目演练',
                num: 22250
            },
            {
                src: 'images/course04.png',
                title: 'Android APP 实战项目演练',
                num: 389
            },
            {
                src: 'images/course05.png',
                title: 'UGUI 源码深度分析案例',
                num: 124
            },
            {
                src: 'images/course06.png',
                title: 'Kami2首页界面切换效果实战演练',
                num: 432
            },
            {
                src: 'images/course07.png',
                title: 'UNITY 从入门到精通实战案例',
                num: 888
            },
            {
                src: 'images/course08.png',
                title: 'Cocos 深度学习你不会错过的实战',
                num: 590
            },
        ]
        const ul = document.querySelector('.box-bd ul')
        // 1. 根据数据的个数,创建 对应的小li
        for (let i = 0; i < data.length; i++) {
            // 2. 创建新的小li
            const li = document.createElement('li')
            // 把内容给li
            li.innerHTML = `
                <a href="#">
                    <img src=${data[i].src} alt="">
                    <h4>
                        ${data[i].title}
                    </h4>
                    <div class="info">
                        <span>高级</span> • <span>${data[i].num}</span>人在学习
                    </div>
                </a>
            `
            // 3. ul追加小li
            ul.appendChild(li)
        }
    </script>
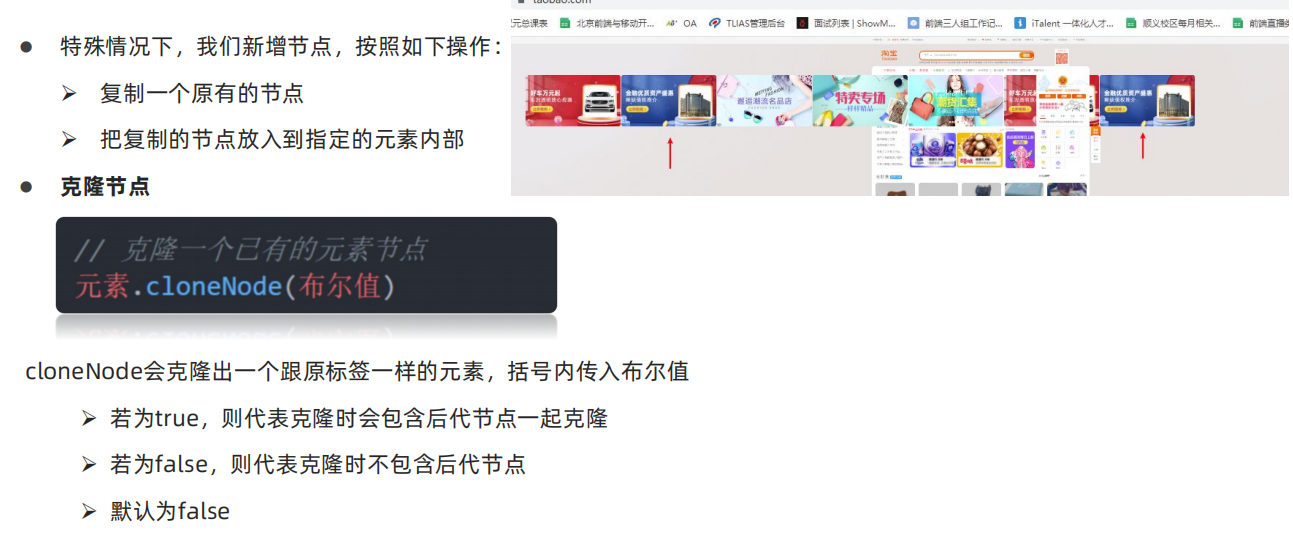
克隆节点
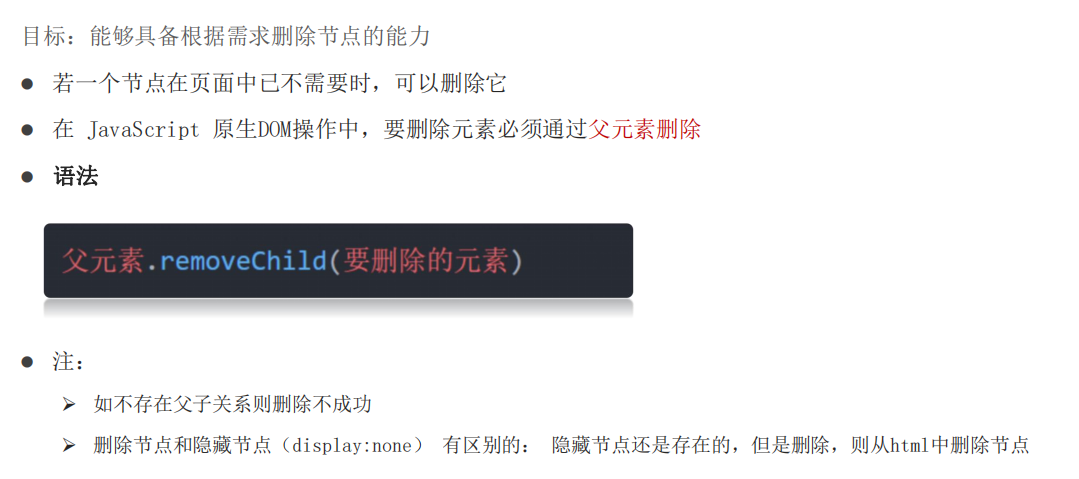
删除节点
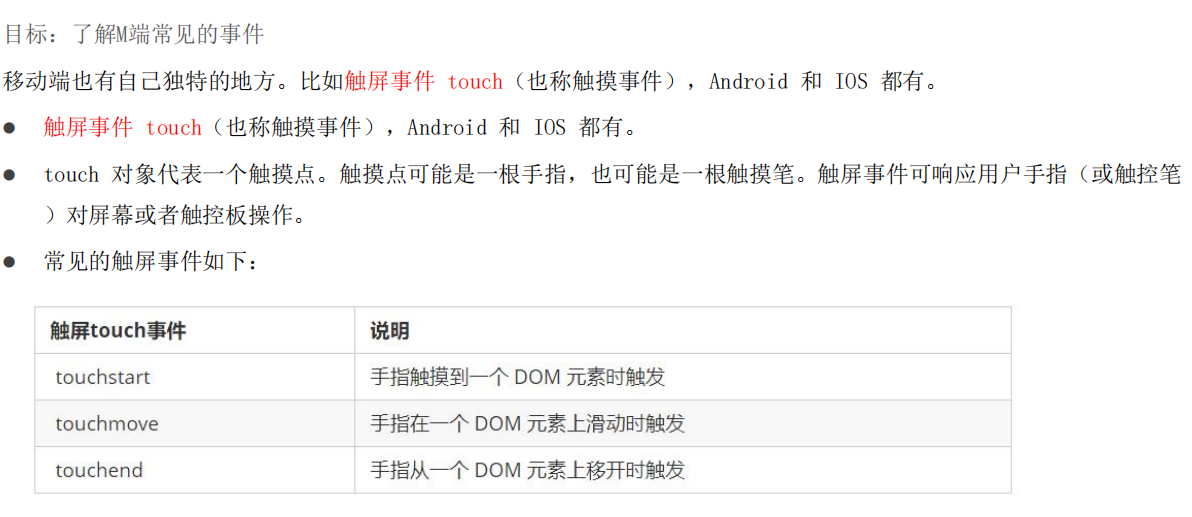
M端事件
<body>
  <div></div>
  <script>
    const div = document.querySelector('div')
    // 1. 触摸
    div.addEventListener('touchstart', function () {
      console.log('开始摸我了')
    })
    // 2. 离开
    div.addEventListener('touchend', function () {
      console.log('离开了')
    })
    // 3. 移动
    div.addEventListener('touchmove', function () {
      console.log('一直摸,移动')
    })
  </script>
</body>
轮播图插件(了解即可)
-
插件: 就是别人写好的一些代码,我们只需要复制对应的代码,就可以直接实现对应的效果
-
学习插件的基本过程
-
熟悉官网,了解这个插件可以完成什么需求 https://www.swiper.com.cn/
-
看在线演示,找到符合自己需求的demo https://www.swiper.com.cn/demo/index.html
-
查看基本使用流程 https://www.swiper.com.cn/usage/index.html
-
查看APi文档,去配置自己的插件 https://www.swiper.com.cn/api/index.html
-
注意: 多个swiper同时使用的时候, 类名需要注意区分
综合案例-学生信息表案例
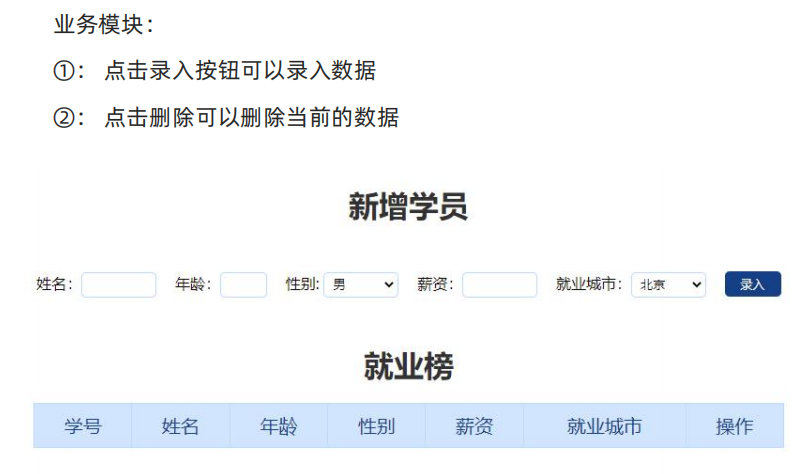
核心思路:
①: 声明一个空的数组
②: 点击录入模块
(1). 首先取消表单默认提交事件
(2). 创建新的对象,里面存储 表单获取过来的数据
(3). 追加给数组
(4). 渲染数据。 遍历数组, 动态生成tr, 里面填写对应td数据, 并追加给 tbody
(5). 重置表单
(6). 注意防止多次生成多条数据,先清空 tbody
③:点击删除模块
(1). 采用事件委托形式,给 tbody 注册点击事件
(2). 点击链接,要删除的是对应数组里面的这个数据,而不是删除dom节点,如何找到这个数据?
(3). 前面渲染数据的时候,动态给a链接添加 自定义属性 data-id=“0”,这样点击当前对象就知道索引号了
(4). 根据索引号,利用 splice 删除这条数据
(5). 重新渲染
④: 点击新增需要验证表单
(1). 获取所有需要填写的表单, 他们共同特点都有 name属性
(2). 遍历这些表单,如果有一个值为空,则return 返回提示输入为空中断程序
(3). 注意书写的位置,应该放到新增数据的前面, 阻止默认行为的后面
<!DOCTYPE html>
<html lang="en">

<head>
  <meta charset="UTF-8" />
  <meta name="viewport" content="width=device-width, initial-scale=1.0" />
  <meta http-equiv="X-UA-Compatible" content="ie=edge" />
  <title>学生信息管理</title>
  <link rel="stylesheet" href="css/index.css" />
</head>

<body>
  <h1>新增学员</h1>
  <form class="info" autocomplete="off">
    姓名:<input type="text" class="uname" name="uname" />
    年龄:<input type="text" class="age" name="age" />
    性别:
    <select name="gender" class="gender">
      <option value="男">男</option>
      <option value="女">女</option>
    </select>
    薪资:<input type="text" class="salary" name="salary" />
    就业城市:<select name="city" class="city">
      <option value="北京">北京</option>
      <option value="上海">上海</option>
      <option value="广州">广州</option>
      <option value="深圳">深圳</option>
      <option value="曹县">曹县</option>
    </select>
    <button class="add">录入</button>
  </form>

  <h1>就业榜</h1>
  <table>
    <thead>
      <tr>
        <th>学号</th>
        <th>姓名</th>
        <th>年龄</th>
        <th>性别</th>
        <th>薪资</th>
        <th>就业城市</th>
        <th>操作</th>
      </tr>
    </thead>
    <tbody>
      <!--
        <tr>
          <td>1001</td>
          <td>欧阳霸天</td>
          <td>19</td>
          <td>男</td>
          <td>15000</td>
          <td>上海</td>
          <td>
            <a href="javascript:">删除</a>
          </td>
        </tr>
        -->
    </tbody>
  </table>
  <script>
    // 获取元素
    const uname = document.querySelector('.uname')
    const age = document.querySelector('.age')
    const gender = document.querySelector('.gender')
    const salary = document.querySelector('.salary')
    const city = document.querySelector('.city')
    const tbody = document.querySelector('tbody')
    // 获取所有带有name属性的 元素
    const items = document.querySelectorAll('[name]')
    // 声明一个空的数组, 增加和删除都是对这个数组进行操作
    const arr = []

    // 1. 录入模块
    // 1.1 表单提交事件
    const info = document.querySelector('.info')
    info.addEventListener('submit', function (e) {
      // 阻止默认行为  不跳转
      e.preventDefault()
      // console.log(11)

      // 这里进行表单验证  如果不通过,直接中断,不需要添加数据
      // 先遍历循环
      for (let i = 0; i < items.length; i++) {
        if (items[i].value === '') {
          return alert('输入内容不能为空')
        }
      }
      // 创建新的对象
      const obj = {
        stuId: arr.length + 1,
        uname: uname.value,
        age: age.value,
        gender: gender.value,
        salary: salary.value,
        city: city.value
      }
      // console.log(obj)
      // 追加给数组里面
      arr.push(obj)
      // console.log(arr)
      // 清空表单  重置
      this.reset()
      // 调用渲染函数
      render()
    })


    // 2. 渲染函数 因为增加和删除都需要渲染
    function render() {
      // 先清空tbody 以前的行 ,把最新数组里面的数据渲染完毕
      tbody.innerHTML = ''
      // 遍历arr数组
      for (let i = 0; i < arr.length; i++) {
        // 生成 tr
        const tr = document.createElement('tr')
        tr.innerHTML = `
          <td>${arr[i].stuId}</td>
          <td>${arr[i].uname}</td>
          <td>${arr[i].age}</td>
          <td>${arr[i].gender}</td>
          <td>${arr[i].salary}</td>
          <td>${arr[i].city}</td>
          <td>
            <a href="javascript:" data-id=${i}>删除</a>
          </td>
        `
        // 追加元素  父元素.appendChild(子元素)
        tbody.appendChild(tr)
      }
    }


    // 3. 删除操作
    // 3.1 事件委托 tbody
    tbody.addEventListener('click', function (e) {
      if (e.target.tagName === 'A') {
        // 得到当前元素的自定义属性 data-id
        // console.log(e.target.dataset.id)
        // 删除arr 数组里面对应的数据
        arr.splice(e.target.dataset.id, 1)
        console.log(arr)
        // 从新渲染一次
        render()
      }
    })
  </script>

</body>

</html>