Spring IOC & DI
文章目录
- Spring IOC & DI
- 一、Spring是什么?
- 二、IOC(控制反转)
- 2.1 通俗理解
- 2.2 造汽车的例子理解IOC
- 2.3 IOC详解
- 1. 获取Bean
- 2. 方法注解——@Bean
- 1. 应用场景:
- 2. 应用方法:
- 3. 注意要点:
- 特别注意:
- 四、DI
- 4.1 属性注入
- 使用方法
- 4.2 构造方法注入
- 使用方法
- 4.3 在setter方法注入
- 使用方法
- 4.4三种注⼊优缺点分析
- 4.5 @Autowired出现多个同类型Bean的情况
- 原因:
- 解决方法:
- 1. 使用 `@Primary` 指定默认匹配的项目
- 2. 使用`autowireCandidate = false`去除默认匹配
- 3. 使用 `@Resource(name="**")`对于特定名称的Bean进行注入
- 4.6 @Autowired和@Rescource的区别
一、Spring是什么?
Spring是一个开发的框架,包含了很多的依赖,比如Spring MVC, Spring Boot等,这些让我们开发变得容易,可以说,Spring是一个包含很多工具方法的容器。
二、IOC(控制反转)
2.1 通俗理解
Inversio of Control ,也就是说,Spring是一个 “控制反转” 的容器。
控制反转就是让一个事物的控制权交由其他人。
2.2 造汽车的例子理解IOC
造汽车的流程:

代码:
汽车类:
package com.example.springioc.v1;

public class Car {
    // 汽车依赖于框架
    private Frame frame;

    public Car() {
        frame = new Frame();
        System.out.println("汽车安装框架中...");
    }
}
框架类:
package com.example.springioc.v1;

public class Frame {
    // 框架依赖于底盘
    private Bottom bottom;
    public Frame() {
        bottom = new Bottom();
        System.out.println("框架安装底盘中...");
    }
}
底盘类:
package com.example.springioc.v1;

import jdk.jfr.Frequency;

public class Bottom {
    // 底盘依赖于轮胎
    private Tire tire;
    // 有了尺寸的需求,需要进行传参
    public Bottom(int size) {
        tire = new Tire(size);
        System.out.println("底盘安装轮胎中...");
    }
}
轮胎类:
package com.example.springioc.v1;

public class Tire {
    public Tire() {
        System.out.println("打造默认尺寸轮胎中...");
    }
}
运行结果:
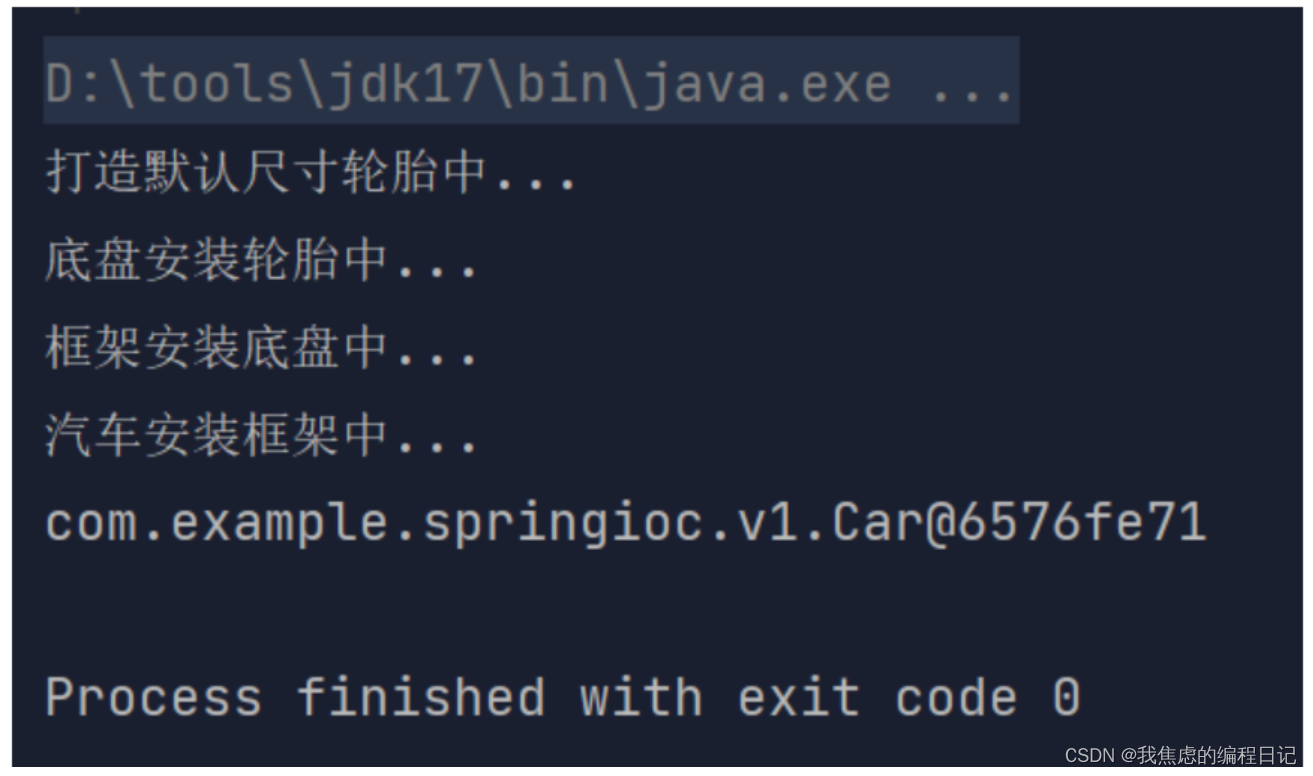
这种代码架构,每个类的控制权都在调用他的那一方中,调用的一方创造了怎样的他,那他就是怎样的。
如果想要更换任意尺寸的轮胎,那就需要传递一个size参数,此时要依次对于代码做修改。
首先是轮胎类,需要增加 size 属性,但是这样最上层的 Car 类并不能够选择自己想要的尺寸,仍然需要对于控制着 Tire 的Bottom进行添加参数以便Frame能够添加参数,这样依赖,Frame也得添加size参数,Car 也需要。
最终代码(对于每一级都添加了size参数):
汽车类:
package com.example.springioc.v1;

public class Car {
    // 汽车依赖于框架
    private Frame frame;

    // 对于汽车类添加了size参数构造
    public Car(int size) {
        frame = new Frame(size);
        System.out.println("汽车安装框架中...");
    }
}
框架类:
package com.example.springioc.v1;

public class Frame {
    // 框架依赖于底盘
    private Bottom bottom;
    public Frame(int size) {
        bottom = new Bottom(size);
        System.out.println("框架安装底盘中...");
    }
}
底盘类:
package com.example.springioc.v1;

import jdk.jfr.Frequency;

public class Bottom {
    // 底盘依赖于轮胎
    private Tire tire;
    public Bottom(int size) {
        tire = new Tire(size);
        System.out.println("底盘安装轮胎中...");
    }
}
轮胎类:
package com.example.springioc.v1;

public class Tire {
    // 轮胎的大小
    private Integer size;

    public Tire() {
        System.out.println("打造默认尺寸轮胎中...");
    }
    public Tire(int size) {
        System.out.println("打造"+size+"号的轮胎中...");
    }
}
显而易见,这样的代码架构维护起来非常臃肿:
每一下级的控制权都由上一级保管,如果对于下一级的需求发生了变化,那么这就需要改动所有的类。(比如:如果现在用户需要对于轮胎的轮毂进行制定,那就还需要给Tire的构造函数增添一个 style 属性,如果还有颜色等的需求,那就还得一直加;只加Tire一个类的还好,因为每一上级都直间或者间接依赖于这个Tire,每一个类都需要进行修改,耦合度非常高。)所以就需要 “控制反转” 思想,将整个控制反转:

修改后的代码:
package com.example.springioc.v2;

import com.example.springioc.v1.Frame;

public class Main {
    static class Tire {
        int size;

        public Tire(int size) {
            this.size = size;
            System.out.println("打造"+size+"号轮胎...");
        }
    }
    static class Bottom{
        Tire tire;

        public Bottom(Tire tire) {
            this.tire = tire;
            System.out.println("打造底盘...");
        }
    }
    static class Framework {
        Bottom bottom;

        public Framework(Bottom bottom) {
            this.bottom = bottom;
            System.out.println("打造框架...");
        }
    }

    static class Car {
        Framework framework;

        public Car(Framework framework) {
            this.framework = framework;
            System.out.println("打造汽车...");
        }
    }

    public static void main(String[] args) {
        Tire tire = new Tire(1);
        Bottom bottom = new Bottom(tire);
        Framework framework = new Framework(bottom);
        Car car = new Car(framework);
    }
}
这样一来,如果用户对于轮胎有新的需求,那也只需要修改轮胎这一个类,完成了整个代码的解耦。
也就是说,我们将控制权转让给了Tire自己,Tire的上级类不再享有控制权,传来什么Tire,就用什么。
2.3 IOC详解
控制反转之后,对象进入Spring容器就会变成Bean,也就是说,Spring中的对象都叫做Bean。
1. 获取Bean
- 注册Bean:使用五大注解,让Spring Boot能够发现@Bean
- 主要方法:使用 context 的 getBean() 进行获取
- 得到的Bean就相当于从Spring Boot中取到了这个对象

2. 方法注解——@Bean
1. 应用场景:
-
当对于外部类的方法,无法通过修改源码进行注册Bean,所以可以使用Spring的
@Import注解来导入一个配置类,在这个配置类中你可以使用@Bean注解来声明这个外部类作为一个Bean,并对其进行配置。 -
如果一个类中需要多个实例,可以使用
@Bean对于实例进行别名命名(value和name),以示区分。
2. 应用方法:
		/**
         * 使用@Bean的演示
         */
        // 使用类,获得整个类的Bean
        User bean1 = context.getBean(User.class);
        System.out.println(bean1);
        // li4是使用name属性定的别名
        User bean2 = (User) context.getBean("li4");
        System.out.println(bean2);
        // user3是方法的名字
        User bean3 = (User) context.getBean("user3");
        System.out.println(bean3);
3. 注意要点:
- @Bean是方法级的注解
- 需要配合类注解进行使用
- 使用value和name属性可以命名别名
- Bean的名字就是方法的名字
autowireCandidate可以消除:当有多个能够匹配的实例的时候,排除这个实例
特别注意:
@ComponentScan 可以定义Spring的扫描路径。
使用方法:
@ComponentScan({"com.example.springioc.bean_test"})
直接在()中使用{}定义路径。
四、DI
DI就是依赖注入。
4.1 属性注入
使用 @Autowired 注入。
使用方法
package com.example.springioc.di_test.controller;

import com.example.springioc.di_test.service.TireSeervice;
import org.springframework.beans.factory.annotation.Autowired;
import org.springframework.stereotype.Controller;

@Controller
public class TireController {
    @Autowired
    TireSeervice tireSeervice;
    public void doTire() {
        System.out.println("成功调用轮胎控制器...");
        tireSeervice.doTire();
    }
}
使用
@Autowired将service属性注入到控制器中。
package com.example.springioc.di_test.service;

import com.example.springioc.di_test.model.Tire;
import org.springframework.beans.factory.annotation.Autowired;
import org.springframework.stereotype.Service;

@Service
public class TireService {
    @Autowired
    Tire tire;
    public void doTire() {
        tire.setSize(12);
        tire.setColor("红");
        System.out.println("制作"+tire.getSize()+"号"+tire.getColor()+"色的轮胎");
    }
}
同时在服务类中将需要的轮胎对象注入。

4.2 构造方法注入
将构造方法使用 @Autowired 注入。
使用方法
package com.example.springioc.di_test2.service;

import com.example.springioc.di_test2.model.Tire;
import org.springframework.beans.factory.annotation.Autowired;
import org.springframework.stereotype.Service;

@Service
public class TireService {
    Tire tire;

    @Autowired //构造函数上注入
    public TireService(Tire tire) {
        this.tire = tire;
        tire.setSize(12);
        tire.setColor("红");
    }

    public void doTire() {
        System.out.println("制作"+tire.getSize()+"号"+tire.getColor()+"色的轮胎");
    }

}
在服务类的构造方法中使用
@Autowired中注入。
package com.example.springioc.di_test2.controller;

import com.example.springioc.di_test2.service.TireService;
import lombok.Data;
import org.springframework.beans.factory.annotation.Autowired;
import org.springframework.stereotype.Controller;

@Controller
public class TireController {
    TireService tireService;

    @Autowired //构造函数上注入
    public TireController(TireService tireService) {
        this.tireService = tireService;
    }

    public void doTire() {
        System.out.println("成功调用轮胎控制器...");
        tireService.doTire();
    }

}
在控制类的构造方法使用
@Autowired中注入。
4.3 在setter方法注入
将构造方法使用 @Autowired 注入。
使用方法
package com.example.springioc.di_test3.service;

import com.example.springioc.di_test3.model.Tire;
import org.springframework.beans.factory.annotation.Autowired;
import org.springframework.stereotype.Service;

@Service
public class TireService {
    Tire tire;

    @Autowired //set方法上注入
    public void setTire(Tire tire) {
        this.tire = tire;
        tire.setSize(1);
        tire.setColor("green");
    }


    public void doTire() {
        System.out.println("制作"+tire.getSize()+"号"+tire.getColor()+"色的轮胎");
    }

}
在服务类的setter方法中使用
@Autowired中注入。
package com.example.springioc.di_test3.controller;

import com.example.springioc.di_test3.model.Tire;
import com.example.springioc.di_test3.service.TireService;
import lombok.Data;
import org.springframework.beans.factory.annotation.Autowired;
import org.springframework.stereotype.Controller;

@Controller
public class TireController {
    private TireService tireService;

    @Autowired //set方法上注入
    public void setTireService(TireService tireService) {
        this.tireService = tireService;
    }

    public void doTire() {
        System.out.println("成功调用轮胎控制器...");
        tireService.doTire();
    }

}
在控制类的setter方法使用
@Autowired中注入。

4.4三种注⼊优缺点分析
-
属性注⼊
◦ 优点: 简洁,使⽤⽅便;
◦ 缺点:
▪ 只能⽤于 IoC 容器,如果是⾮ IoC 容器不可⽤,并且只有在使⽤的时候才会出现 NPE(空指
针异常)
▪ 不能注⼊⼀个Final修饰的属性 -
构造函数注⼊(Spring 4.X推荐)
◦ 优点:
▪ 可以注⼊final修饰的属性
▪ 注⼊的对象不会被修改
▪ 依赖对象在使⽤前⼀定会被完全初始化,因为依赖是在类的构造⽅法中执⾏的,⽽构造⽅法
是在类加载阶段就会执⾏的⽅法.
▪ 通⽤性好, 构造⽅法是JDK⽀持的, 所以更换任何框架,他都是适⽤的
◦ 缺点:
▪ 注⼊多个对象时, 代码会⽐较繁琐 -
Setter注⼊(Spring 3.X推荐)
◦ 优点: ⽅便在类实例之后, 重新对该对象进⾏配置或者注⼊
◦ 缺点:
▪ 不能注⼊⼀个Final修饰的属性
▪ 注⼊对象可能会被改变, 因为setter⽅法可能会被多次调⽤, 就有被修改的⻛险
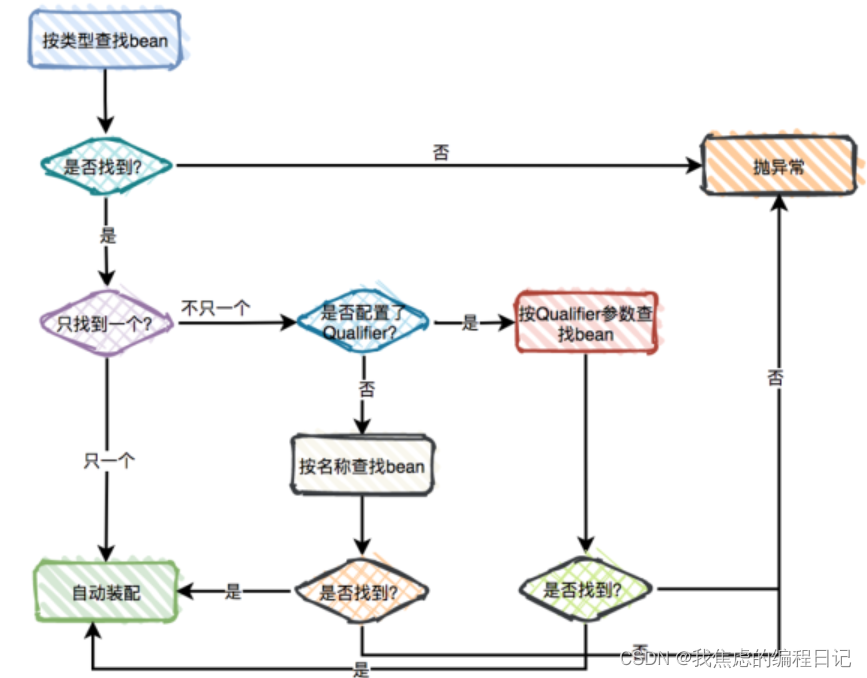
4.5 @Autowired出现多个同类型Bean的情况
会发生报错:

控制器类:
package com.example.springioc.autowired_test;

import org.springframework.beans.factory.annotation.Autowired;
import org.springframework.stereotype.Controller;

@Controller
public class TestController {
    @Autowired// 有两个String类型的Bean
    String name;

    public void sayHi() {
        System.out.println(name);
    }
}
组件类:
package com.example.springioc.autowired_test;

import org.springframework.context.annotation.Bean;
import org.springframework.stereotype.Component;

@Component
public class BeanConfig {
    @Bean
    public String test1() {
        return new String("zhang3");
    }
    @Bean
    public String test2() {
        return new String("li4");
    }
}
可以看出组件中有两个String类型的Bean。
原因:
@Autowired不知道选择哪个Bean进行注入,发生了冲突,需要解决这个冲突。
解决方法:
1. 使用 @Primary 指定默认匹配的项目
2. 使用autowireCandidate = false去除默认匹配
3. 使用 @Resource(name="**")对于特定名称的Bean进行注入

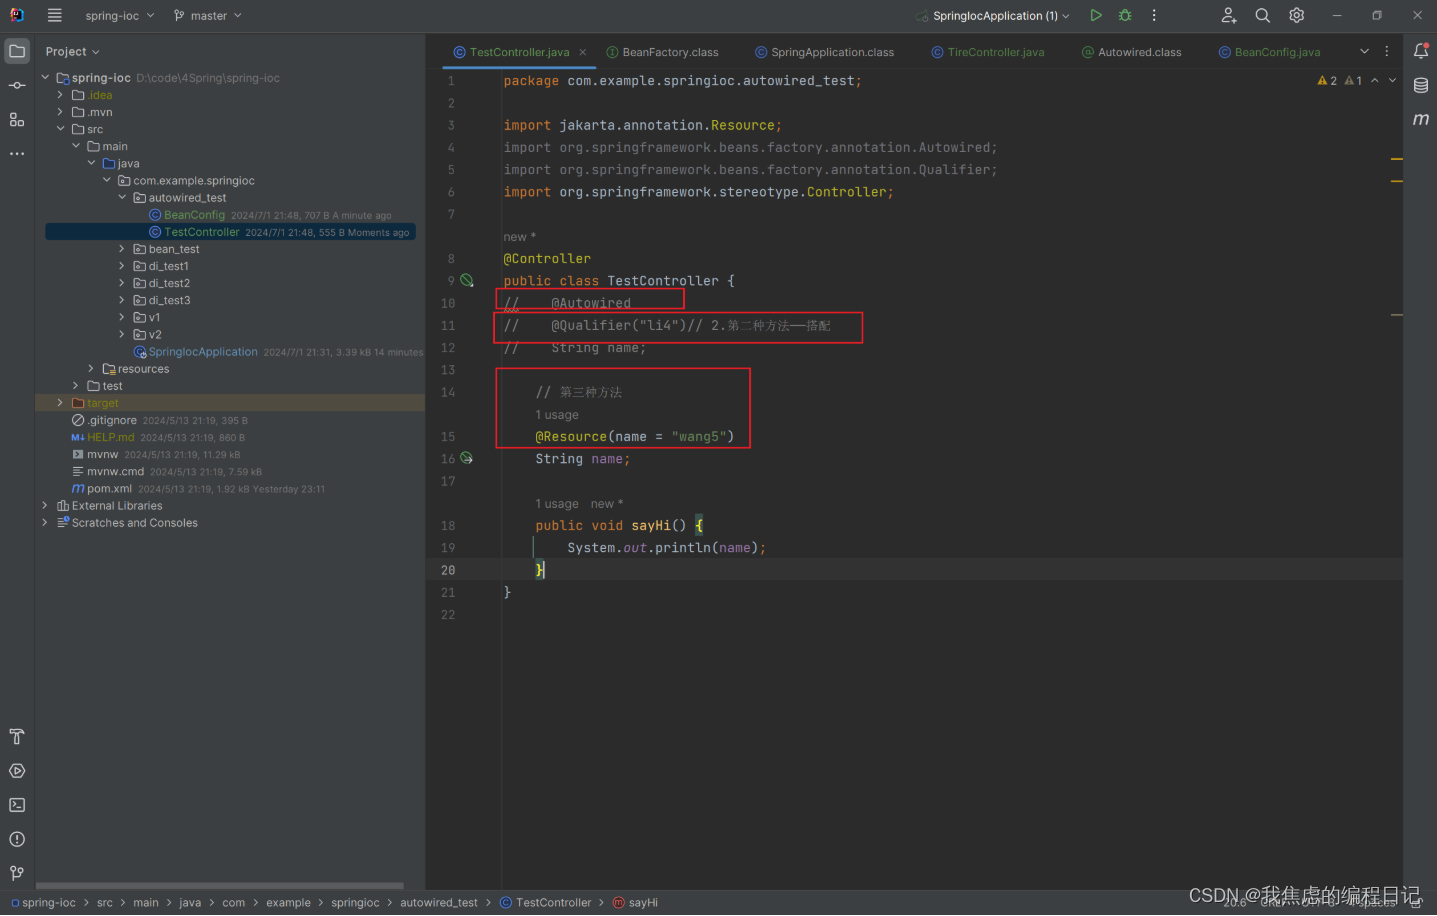
4.6 @Autowired和@Rescource的区别
-
@Autowired 是spring提供的注解,@Rescource是Java EE提供的注解
-
@Autowired按照默认规则进行注入,但是@Rescource根据名称注入,有更多的选项。
默认规则: