1. 认证过程相关源码解析
前后文可接查看
shiro的登陆都是通过subject.login()方法实现,接下来我们就进入login方法查看实现过程:
1.1 进入DelegatingSubject类的login方法:
此类实现了Subject接口:
public void login(AuthenticationToken token) throws AuthenticationException {
    this.clearRunAsIdentitiesInternal();
    // 此处继续调用securityManager.login方法
    Subject subject = this.securityManager.login(this, token);
    String host = null;
    PrincipalCollection principals;
    if (subject instanceof DelegatingSubject) {
        DelegatingSubject delegating = (DelegatingSubject)subject;
        principals = delegating.principals;
        host = delegating.host;
    } else {
        principals = subject.getPrincipals();
    }

    if (principals != null && !principals.isEmpty()) {
        this.principals = principals;
        this.authenticated = true;
        if (token instanceof HostAuthenticationToken) {
            host = ((HostAuthenticationToken)token).getHost();
        }

        if (host != null) {
            this.host = host;
        }

        Session session = subject.getSession(false);
        if (session != null) {
            this.session = this.decorate(session);
        } else {
            this.session = null;
        }

    } else {
        String msg = "Principals returned from securityManager.login( token ) returned a null or empty value.  This value must be non null and populated with one or more elements.";
        throw new IllegalStateException(msg);
    }
}
1.2 进入SecurityManager的login方法
可以看到SecurityManager 实现了认证器、授权器和会话管理。
public interface SecurityManager extends Authenticator, Authorizer, SessionManager {
    Subject login(Subject var1, AuthenticationToken var2) throws AuthenticationException;

    void logout(Subject var1);

    Subject createSubject(SubjectContext var1);
}
此接口方法的实现方法时是DefaultSecurityManager类的login方法:
public Subject login(Subject subject, AuthenticationToken token) throws AuthenticationException {
    AuthenticationInfo info;
    try {
        info = this.authenticate(token);
    } catch (AuthenticationException var7) {
        AuthenticationException ae = var7;

        try {
            this.onFailedLogin(token, ae, subject);
        } catch (Exception var6) {
            if (log.isInfoEnabled()) {
                log.info("onFailedLogin method threw an exception.  Logging and propagating original AuthenticationException.", var6);
            }
        }

        throw var7;
    }

    Subject loggedIn = this.createSubject(token, info, subject);
    this.onSuccessfulLogin(token, info, loggedIn);
    return loggedIn;
}
进入authenticate方法:
public AuthenticationInfo authenticate(AuthenticationToken token) throws AuthenticationException {
   return this.authenticator.authenticate(token);
}
可以看到访问的是认证器的authenticate方法,点击进入:
1.3 进入AbstractAuthenticator认证器的authenticate方法:
public final AuthenticationInfo authenticate(AuthenticationToken token) throws AuthenticationException {
    if (token == null) {
        throw new IllegalArgumentException("Method argument (authentication token) cannot be null.");
    } else {
        log.trace("Authentication attempt received for token [{}]", token);

        AuthenticationInfo info;
        try {
            info = this.doAuthenticate(token);
            if (info == null) {
                String msg = "No account information found for authentication token [" + token + "] by this Authenticator instance.  Please check that it is configured correctly.";
                throw new AuthenticationException(msg);
            }
        } catch (Throwable var8) {
            AuthenticationException ae = null;
            if (var8 instanceof AuthenticationException) {
                ae = (AuthenticationException)var8;
            }

            if (ae == null) {
                String msg = "Authentication failed for token submission [" + token + "].  Possible unexpected error? (Typical or expected login exceptions should extend from AuthenticationException).";
                ae = new AuthenticationException(msg, var8);
                if (log.isWarnEnabled()) {
                    log.warn(msg, var8);
                }
            }

            try {
                this.notifyFailure(token, ae);
            } catch (Throwable var7) {
                if (log.isWarnEnabled()) {
                    String msg = "Unable to send notification for failed authentication attempt - listener error?.  Please check your AuthenticationListener implementation(s).  Logging sending exception and propagating original AuthenticationException instead...";
                    log.warn(msg, var7);
                }
            }

            throw ae;
        }

        log.debug("Authentication successful for token [{}].  Returned account [{}]", token, info);
        this.notifySuccess(token, info);
        return info;
    }
}
1.4 进入ModularRealmAuthenticator的doAuthenticate方法
protected AuthenticationInfo doAuthenticate(AuthenticationToken authenticationToken) throws AuthenticationException {
    this.assertRealmsConfigured();
    // 获取所有域
    Collection<Realm> realms = this.getRealms();
    return realms.size() == 1 ? this.doSingleRealmAuthentication((Realm)realms.iterator().next(), authenticationToken) : this.doMultiRealmAuthentication(realms, authenticationToken);
}
这里,获取realm域,如果是一个,那就是单数据库的,如果是多个,那就是多数据库的,需要从多个数据库中查询用户信息。这里我们看单realm的方法doSingleRealmAuthentication:
protected AuthenticationInfo doSingleRealmAuthentication(Realm realm, AuthenticationToken token) {
    if (!realm.supports(token)) {
        String msg = "Realm [" + realm + "] does not support authentication token [" + token + "].  Please ensure that the appropriate Realm implementation is configured correctly or that the realm accepts AuthenticationTokens of this type.";
        throw new UnsupportedTokenException(msg);
    } else {
        AuthenticationInfo info = realm.getAuthenticationInfo(token);
        if (info == null) {
            String msg = "Realm [" + realm + "] was unable to find account data for the submitted AuthenticationToken [" + token + "].";
            throw new UnknownAccountException(msg);
        } else {
            return info;
        }
    }
}
1.5 进入AuthenticatingRealm的getAuthenticationInfo方法
public final AuthenticationInfo getAuthenticationInfo(AuthenticationToken token) throws AuthenticationException {
	//登录操作,没有缓存,不走这个方法
    AuthenticationInfo info = this.getCachedAuthenticationInfo(token);
    if (info == null) {
    	//进入这个方法
        info = this.doGetAuthenticationInfo(token);
        log.debug("Looked up AuthenticationInfo [{}] from doGetAuthenticationInfo", info);
        if (token != null && info != null) {
        	// 添加缓存
            this.cacheAuthenticationInfoIfPossible(token, info);
        }
    } else {
        log.debug("Using cached authentication info [{}] to perform credentials matching.", info);
    }

    if (info != null) {
        this.assertCredentialsMatch(token, info);
    } else {
        log.debug("No AuthenticationInfo found for submitted AuthenticationToken [{}].  Returning null.", token);
    }

    return info;
}
访问到当前类下的抽象方法:
protected abstract AuthenticationInfo doGetAuthenticationInfo(AuthenticationToken var1) throws AuthenticationException;
此抽象方法有多个:实现方法:项目中如果想要真正的实现登陆,也是需要自定义实现此方法

1.6 用户名校验–进入SimpleAccountRealm的doGetAuthenticationInfo方法
此方法进行用户名校验,只校验用户名,不进行密码校验!
protected AuthenticationInfo doGetAuthenticationInfo(AuthenticationToken token) throws AuthenticationException {
	// 强转token
    UsernamePasswordToken upToken = (UsernamePasswordToken)token;
    // 根据token中的用户名获取用户
    SimpleAccount account = this.getUser(upToken.getUsername());
    if (account != null) {
    	// 判断用户是否被锁
        if (account.isLocked()) {
            throw new LockedAccountException("Account [" + account + "] is locked.");
        }

		// 判断密码是否过期
        if (account.isCredentialsExpired()) {
            String msg = "The credentials for account [" + account + "] are expired";
            throw new ExpiredCredentialsException(msg);
        }
    }

    return account;
}
进入getUser方法:
protected SimpleAccount getUser(String username) {
    this.USERS_LOCK.readLock().lock();

    SimpleAccount var2;
    try {
    	// 通过断点可以看到这里的users的长度跟我们在配置文件中配置的shiro.ini中users的数量相同
    	// 即从我们设置的用户中找到了对应的account(用户名校验正确)
        var2 = (SimpleAccount)this.users.get(username);
    } finally {
        this.USERS_LOCK.readLock().unlock();
    }

    return var2;
}
校验成功后回到AuthenticatingRealm的getAuthenticationInfo方法继续往下走
1.7 密码校验–进入的AuthenticatingRealm的assertCredentialsMatch方法
此方法用于判断获取到的用户中的密码和token中的密码是否一致
protected void assertCredentialsMatch(AuthenticationToken token, AuthenticationInfo info) throws AuthenticationException {
    CredentialsMatcher cm = this.getCredentialsMatcher();
    if (cm != null) {
        if (!cm.doCredentialsMatch(token, info)) {
            String msg = "Submitted credentials for token [" + token + "] did not match the expected credentials.";
            throw new IncorrectCredentialsException(msg);
        }
    } else {
        throw new AuthenticationException("A CredentialsMatcher must be configured in order to verify credentials during authentication.  If you do not wish for credentials to be examined, you can configure an " + AllowAllCredentialsMatcher.class.getName() + " instance.");
    }
}
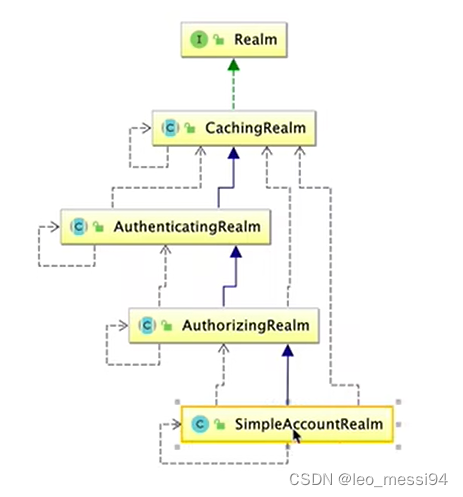
1.8 realm类图
1.8.1 shiro提供的Realm
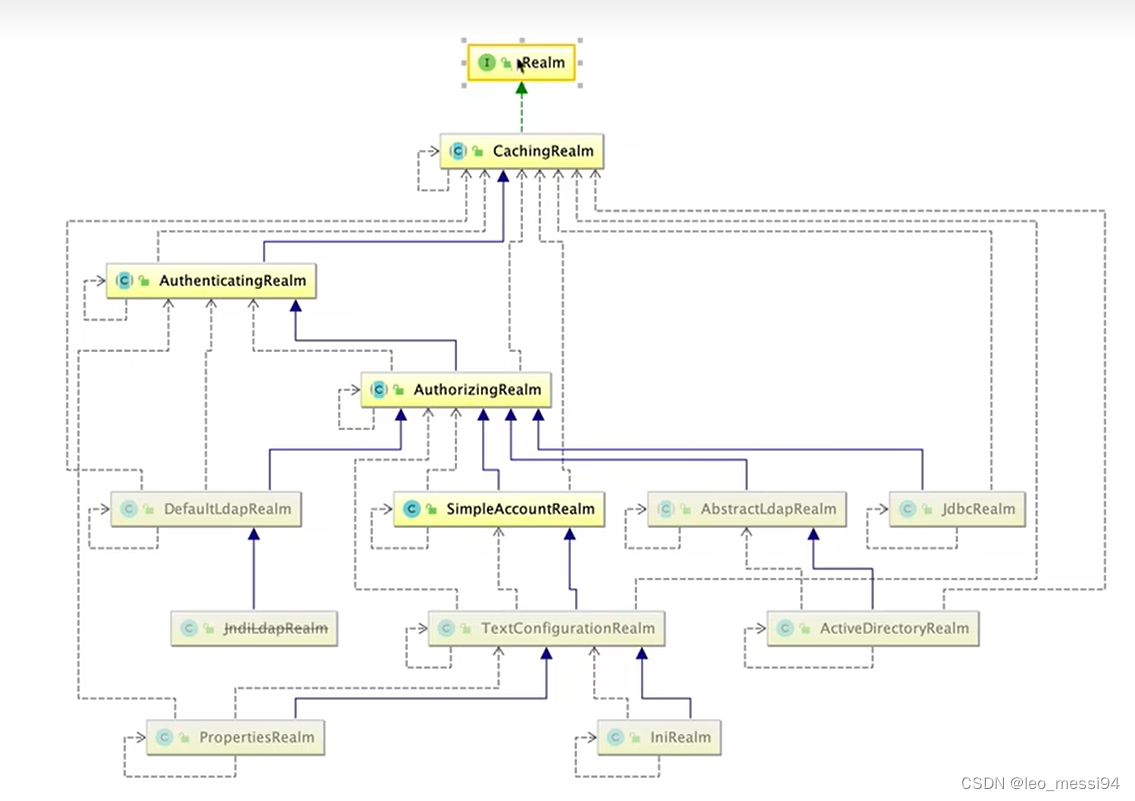
1.8.2 根据认证源码认证使用的是SimpleAccountRealm
1.9 总结:
如果以后我们想要自定义用户名密码校验过程怎么做?
- 定义一个类继承AuthorizingRealm类,并实现doGetAuthorizationInfo方法
- 在方法中自定义用户名校验过程
- 密码校验不需要我们完成,shiro会帮我们实现(通过校验token中的密码和doGetAuthorizationInfo中获取到的info信息中的密码是否一致)
为什么不让我们自己做密码校验?
因为涉及到密码加密,自己做处理可能会影响到shiro的密码加密相关操作。