文章目录
- Ncat 网络工具
- 简介
- 基础说明
- 使用示例
- 基础示例
- 两个 ncat 互相连接
- 访问 WEB 网站
- 充当 WEB 服务器
- 文件传输与 Broker
- 文件传输
- 作为 Broker ,广播消息
- 作为 Broker,成为文件传输中介
- 多人聊天室
- 使用 SSL,提高传输安全性
- 执行命令行
- 访问控制
- 实现代理
Ncat 网络工具
简介
- 官网地址:
- 主页 Ncat - Netcat for the 21st Century
- 文档 Ncat Users’ Guide
- 功能描述
- 读、写网络数据的命令行工具
- 重新实现了 Netcat 的功能,并做了增强
- Ncat 本身是为 Nmap 而写的(nmap 是一款用于网络发现和安全审计的开源工具)
- 下载安装
- 因为集成在了 nmap 里面,直接安装 nmap 即可
- 地址 Download the Free Nmap Security Scanner for Linux/Mac/Windows
- 注意
- Windows 使用时,不要用 PowerShell,用 CMD
- 下面的操作主要参考官方文档做了下介绍,ncat 还有更多结合其他命令产生的神奇功能 😄 ,推荐可以看看官方文档教程的后面一点的讲解
基础说明
- ncat 的工作模式
- connect mode: 连接其他正在监听消息的地方,例如发送请求到服务器
- listen mode: 监听本地进入的消息,例如监听某个端口的 TCP 请求
- 示例
- connect mode :
ncat <host> [<port>]- 不指定
--listen或-l,那就是 connect mode
- 不指定
- listen mode :
ncat -l [<host>] [<port>]-l是--listen的简写,指定为 listen mode- 如果不指定 host,那么会监听本地所有网卡(每个网卡一个 host 或 IP)
- 如果不指定 port,那么默认监听 31337 端口
- 监听模式下,收到一次数据后就会退出,可以使用
--keep-open或-k选项,一直保持监听
- connect mode :
- 默认使用 TCP 协议,手动指定
--udpor-u指定 UDP--sctp指定 SCTP
- 默认同时监听 IPv4 和 IPv6,手动指定
-6强制只使用 IPv6-4强制只使用 IPv4
使用示例
基础示例
两个 ncat 互相连接
- 先在一边启动 listen mode
$ ncat -l localhost 8080 - 再另一边启动 connect mode
$ ncat localhost 8080 - 连上后,输入内容,再按回车,就可以相互发送数据(其实随便先启动哪一边都可以)
- 示例如下

- 最后,一方断开后,另一方也会马上结束进程
访问 WEB 网站
- 命令
$ ncat -C www.baidu.com 80-C可以自动替换每行的换行符为CRLF,因为多数协议(包括 HTTP)都是把CRLF作为换行符- 必须写端口
- 执行命令后,输入要访问路径和协议(如这里的
GET / HTTP/1.0),再按2次回车键,即可发送请求 - 得到响应后,按
Ctrl + C退出
C:\Users\alion\workspace\ncat>ncat -C www.baidu.com 80
GET / HTTP/1.0

HTTP/1.0 200 OK
Accept-Ranges: bytes
Cache-Control: no-cache
Content-Length: 9508
Content-Type: text/html
Date: Sun, 23 Jun 2024 12:59:41 GMT
P3p: CP=" OTI DSP COR IVA OUR IND COM "
P3p: CP=" OTI DSP COR IVA OUR IND COM "
Pragma: no-cache
Server: BWS/1.1
Set-Cookie: BAIDUID=0419D8A04450F96B63F75A6B6B42C149:FG=1; expires=Thu, 31-Dec-37 23:55:55 GMT; max-age=2147483647; path=/; domain=.baidu.com
Set-Cookie: BIDUPSID=0419D8A04450F96B63F75A6B6B42C149; expires=Thu, 31-Dec-37 23:55:55 GMT; max-age=2147483647; path=/; domain=.baidu.com
Set-Cookie: PSTM=1719145660; expires=Thu, 31-Dec-37 23:55:55 GMT; max-age=2147483647; path=/; domain=.baidu.com
Set-Cookie: BAIDUID=0419D8A04450F96BCBB75D0529D373F1:FG=1; max-age=31536000; expires=Mon, 23-Jun-25 12:27:40 GMT; domain=.baidu.com; path=/; version=1; comment=bd
Traceid: 1719145660267156378611114487503947244332
Vary: Accept-Encoding
X-Ua-Compatible: IE=Edge,chrome=1
X-Xss-Protection: 1;mode=block

<!DOCTYPE html><html>省略内容...</html>

^C
PS C:\Users\alion>
- 因为部分网络上 IP 会自动转发多个域名,所以 IP 服务器接收参数时需要接收请求头中的 Host 参数
- 而 ncat 发送请求时,是访问的域名的 IP ,不会像浏览器一样自动为请求头添加 Host,所以需要手动添加(顺着 GET 那一行再换行,输入标准的 HTTP 协议头即可)
- 下面是2个例子
C:\Users\alion>ncat -C www.example.com 80
GET / HTTP/1.0

HTTP/1.0 404 Not Found
Content-Type: text/html
Date: Sun, 23 Jun 2024 12:45:05 GMT
Server: ECAcc (sac/2533)
Content-Length: 345
Connection: close

<?xml version="1.0" encoding="iso-8859-1"?>
<!DOCTYPE html PUBLIC "-//W3C//DTD XHTML 1.0 Transitional//EN"
         "http://www.w3.org/TR/xhtml1/DTD/xhtml1-transitional.dtd">
<html xmlns="http://www.w3.org/1999/xhtml" xml:lang="en" lang="en">
        <head>
                <title>404 - Not Found</title>
        </head>
        <body>
                <h1>404 - Not Found</h1>
        </body>
</html>

^C
C:\Users\alion>
C:\Users\alion>ncat -C www.example.com 80
GET / HTTP/1.0
Host: www.example.com

HTTP/1.0 200 OK
Age: 492171
Cache-Control: max-age=604800
Content-Type: text/html; charset=UTF-8
Date: Sun, 23 Jun 2024 12:40:44 GMT
Etag: "3147526947+ident"
Expires: Sun, 30 Jun 2024 12:40:44 GMT
Last-Modified: Thu, 17 Oct 2019 07:18:26 GMT
Server: ECAcc (sac/2533)
Vary: Accept-Encoding
X-Cache: HIT
Content-Length: 1256
Connection: close

<!doctype html>
<html>
<head>
    <title>Example Domain</title>

    <meta charset="utf-8" />
    <meta http-equiv="Content-type" content="text/html; charset=utf-8" />
    <meta name="viewport" content="width=device-width, initial-scale=1" />
    <style type="text/css">
    body {
        background-color: #f0f0f2;
        margin: 0;
        padding: 0;
        font-family: -apple-system, system-ui, BlinkMacSystemFont, "Segoe UI", "Open Sans", "Helvetica Neue", Helvetica, Arial, sans-serif;

    }
    div {
        width: 600px;
        margin: 5em auto;
        padding: 2em;
        background-color: #fdfdff;
        border-radius: 0.5em;
        box-shadow: 2px 3px 7px 2px rgba(0,0,0,0.02);
    }
    a:link, a:visited {
        color: #38488f;
        text-decoration: none;
    }
    @media (max-width: 700px) {
        div {
            margin: 0 auto;
            width: auto;
        }
    }
    </style>
</head>

<body>
<div>
    <h1>Example Domain</h1>
    <p>This domain is for use in illustrative examples in documents. You may use this
    domain in literature without prior coordination or asking for permission.</p>
    <p><a href="https://www.iana.org/domains/example">More information...</a></p>
</div>
</body>
</html>


^C
C:\Users\alion>
充当 WEB 服务器
- 先创建一个 hello.http 文件,如下
HTTP/1.0 200 OK
Content-Type: text/html; charset=utf-8

<html>
  <body>
    <h1>Hello, world!</h1>
  </body>
</html>
- 这是一个标准的 HTTP 协议的响应内容(包括响应首行、响应头、响应空行、响应体)
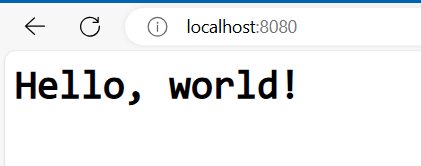
- 执行命令
$ ncat -l localhost 8080 < hello.http-l同--listen,表示执行 listen mode,当前监听 localhost 的 8080 端口<用于指定响应内容的文件,即后面的 hello.http
- 启动示例如下
C:\Users\alion\workspace\ncat>ncat -l localhost 8080 < hello.html
- 此时,使用浏览器访问 http://localhost:8080/ ,即可得到响应
- 注意:再次刷新浏览器页面,将得不到响应,因为 ncat 已经发送完数据了,不会重复发送(可以利用其他参数解决)
- 同时,命令行也会显示出浏览器发送的 HTTP 请求
C:\Users\alion\workspace\ncat>ncat -l localhost 8080 < hello.html
GET / HTTP/1.1
Host: localhost:8080
Connection: keep-alive
Cache-Control: max-age=0
sec-ch-ua: "Not/A)Brand";v="8", "Chromium";v="126", "Microsoft Edge";v="126"
sec-ch-ua-mobile: ?0
sec-ch-ua-platform: "Windows"
Upgrade-Insecure-Requests: 1
User-Agent: Mozilla/5.0 (Windows NT 10.0; Win64; x64) AppleWebKit/537.36 (KHTML, like Gecko) Chrome/126.0.0.0 Safari/537.36 Edg/126.0.0.0
Accept: text/html,application/xhtml+xml,application/xml;q=0.9,image/avif,image/webp,image/apng,*/*;q=0.8,application/signed-exchange;v=b3;q=0.7
Sec-Fetch-Site: none
Sec-Fetch-Mode: navigate
Sec-Fetch-User: ?1
Sec-Fetch-Dest: document
Accept-Encoding: gzip, deflate, br, zstd
Accept-Language: zh-CN,zh;q=0.9,en;q=0.8,en-GB;q=0.7,en-US;q=0.6
Cookie: username-localhost-8888="2|1:0|10:1718619189|23:username-localhost-8888|200:eyJ1c2VybmFtZSI6ICI4Y2Q5OWY2MzQ2Mzk0Yjc2OWVmMDVlMjY4ZDkzN2Q1MCIsICJuYW1lIjogIkFub255bW91cyBPcnRob3NpZSIsICJkaXNwbGF5X25hbWUiOiAiQW5vbnltb3VzIE9ydGhvc2llIiwgImluaXRpYWxzIjogIkFPIiwgImNvbG9yIjogbnVsbH0=|c94abe7443d4e6fc36f00046b59c5f2dc0e4d5db71bd3300ec789e1414ead560"; _xsrf=2|fe53bd8b|241c80727519e3c685add3990190138c|1718619189; JSESSIONID=C5276CB24F9D15A1F82BDDAFC98985AE


C:\Users\alion\workspace\ncat>
- 当然,你也可以用另一个 ncat 直接访问,如
ncat -C localhost 8080,可以直接拿到 hello.http 的内容。
文件传输与 Broker
文件传输
- https://nmap.org/ncat/guide/ncat-file-transfer.html
- 方式一
- 开启监听,并将接收到的数据保存
$ ncat -l --recv-only localhost 8080 -o hello.txt - 发送数据
$ ncat --send-only localhost 8080 < hello.html
- 开启监听,并将接收到的数据保存
- 方式二(类似于文件服务器的方式)
- 开启监听,准备好要发送出去的文件
$ ncat -l --send-only localhost 8080 < hello.html - 发送请求,获取文件
$ ncat --recv-only localhost 8080 -o hello.txt
- 开启监听,准备好要发送出去的文件
- 不用
-o的话,也可以尝试操作系统支持的写入符>
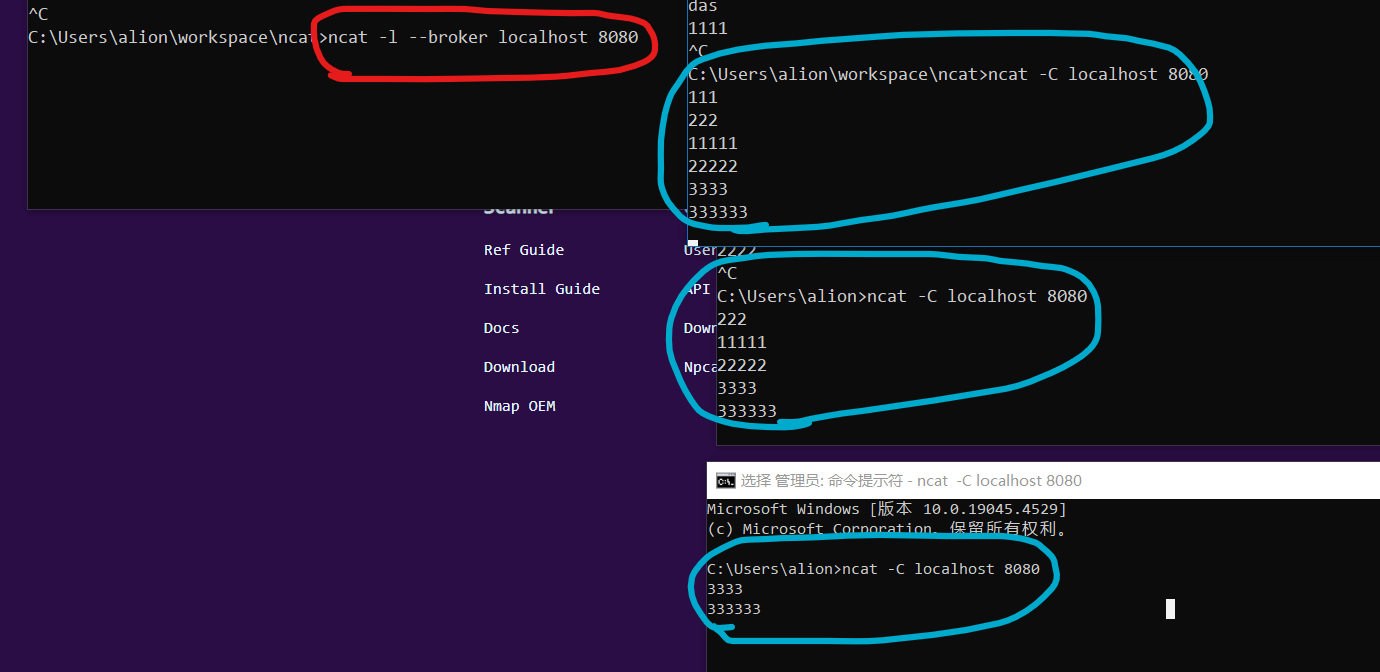
作为 Broker ,广播消息
- https://nmap.org/ncat/guide/ncat-broker.html
- 在 listen mode 下指定
--broker,可以启动 ncat 作为网络数据交换中心 - 当多个客户端连接它时,它会将任一客户端发送的消息转发给每个已经连接上的客户端
- 命令
- server
$ ncat -l --broker localhost 8080 - client 1
$ ncat -C server 8080 - client 2
$ ncat -C server 8080 - client 3
$ ncat -C server 8080
- server
作为 Broker,成为文件传输中介
- 有时候两台服务器不能互相直接访问,传输文件比较麻烦
- 可以找它们都能访问的一台中间服务器,开启 broker 模式
- 两台服务器再连接上这个 broker,再发送文件,即可
# 在 host3 服务器开启 broker
host3$ ncat -l --broker

# host2 服务连接上 host3 的 broker,准备将接收到的数据写入 outputfile
host2$ ncat host3 > outputfile

# host1 连上 host3 直接发送文件
host1$ ncat --send-only host3 < inputfile

# 接着 host2 就会收到数据
多人聊天室
- https://nmap.org/ncat/guide/ncat-chat.html
- 操作
- server
$ ncat -l --chat localhost 8080 - client1
$ ncat -C server 8080 - client2
$ ncat -C server 8080
- server
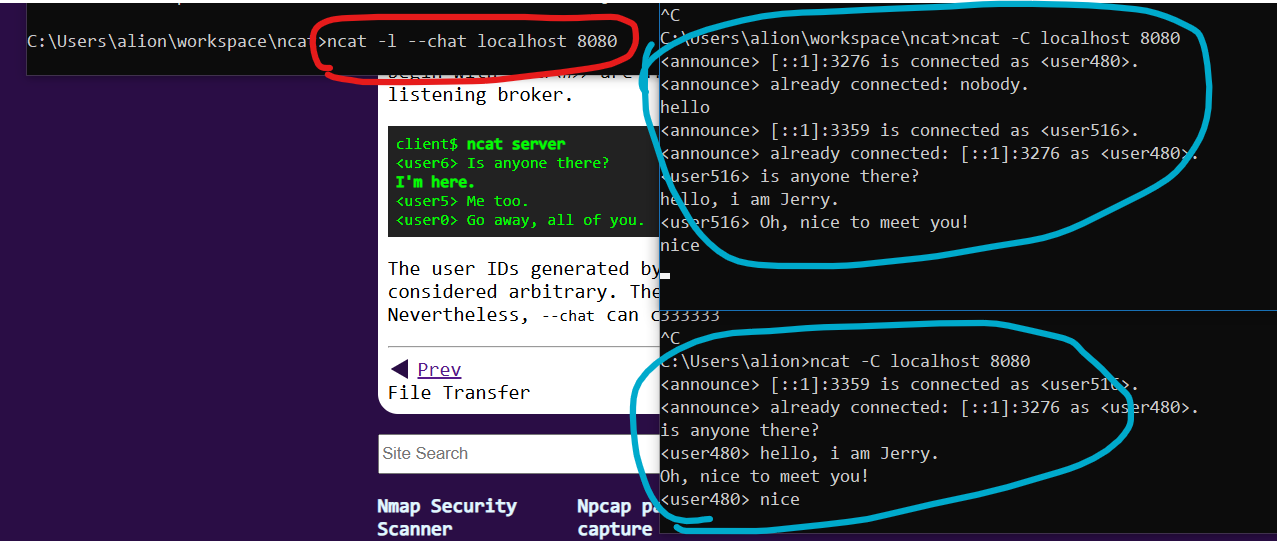
- 加入时,会显示自己的用户 ID,以及已经进入的的用户 ID
- 对话时,会显示不是自己的每个人的临时用户 ID
使用 SSL,提高传输安全性
- https://nmap.org/ncat/guide/ncat-ssl.html
- 先生成 SSL 证书
$ openssl req -new -x509 -keyout test-key.pem -out test-cert.pem - listen 端启动,使用指定的证书做验证
$ ncat -l --ssl --ssl-cert test-cert.pem --ssl-key test-key.pem - connect 端启动,指定证书
$ ncat --ssl-verify --ssl-trustfile test-cert.pem- 需要先将
test-cert.pem文件提前给 connect 端
- 需要先将
执行命令行
- https://nmap.org/ncat/guide/ncat-exec.html
- connect mode 和 listen mode 都可用
- Command Execution 在接收到连接后执行命令
- 网络连接接收到的数据,作为命令的标准输入
- 命令执行的标准输出,作为发送的网络数据
- 支持 3 种命令方式
--exec直接执行,不带 SHELL 解释--sh-exec等价于- /bin/sh -c on Unix ,如
$ ncat -lk -p 8080 --sh-exec "echo -e 'HTTP/1.1 200 OK\r\n'; cat index.html" - cmd.exe /C on Windows,如
$ ncat -lk -p 8080 --sh-exec "echo HTTP/1.1 200 OK& echo(&type index.html"
- /bin/sh -c on Unix ,如
--lua-exec执行 Lua 脚本,ncat 内建有 Lua 解释器
- exec 的示例
# listen 端
ncat -l -k --sh-exec "echo Hello." 8080

# connect 端
ncat -C localhost 8080
-
lua 示例
- 先写一个 lua 脚本
print("Hello, world!")- 在 listen 端执行
ncat -l --lua-exec hello-luaexec.lua - 在 connect 端执行
ncat -C localhost 8080 - 接着就会触发 Lua 脚本,在 connect 端得到
Hello, world! - 还可以编写持续多次交互的 Lua 脚本,如下 conditional.lua
--This is another --lua-exec demo. It displays a menu to a user, waits for her --input and makes a decision according to what the user entered. All happens --in an infinite loop. --This function reads a line of at most 8096 bytes (or whatever the first --parameter says) from standard input. Returns the string and a boolean value --that is true if we hit the newline (defined as "\n") or false if the line had --to be truncated. This is here because io.stdin:read("*line") could lead to --memory exhaustion if we received gigabytes of characters with no newline. function read_line(max_len) local ret = "" for i = 1, (max_len or 8096) do local chr = io.read(1) if chr == "\n" then return ret, true end ret = ret .. chr end return ret, false end while true do print "Here's a menu for you: " print "1. Repeat the menu." print "0. Exit." io.write "Please enter your choice: " io.flush(io.stdout) i = read_line() --WARNING! Without this line, the script will go into an infinite loop --that keeps consuming system resources when the connection gets broken. --Ncat's subprocesses are NOT killed in this case! if i == nil then break end print("You wrote: ", i, ".") if i == "0" then break elseif i == "1" then print "As you wish." else print "No idea what you meant. Please try again." end print() --print a newline end- 使用该脚本,可以一直交互输入、输出,直到 Lua 脚本执行完
- 用 Lua 脚本做类似 apache httpd 的服务,见脚本 httpd.lua
- 在需要作为资源服务的目录下执行命令
$ ncat -l 8080 --keep-open --lua-exec C:\Users\xxx\app\ncat\scripts\lua\httpd.lua - 使用浏览器访问 http://localhost:8080/ ,默认会读取该目录下的 index.html
- 可以自己指定具体的文件名,如 http://localhost:8080/test.txt
- 在需要作为资源服务的目录下执行命令
访问控制
- https://nmap.org/ncat/guide/ncat-access.html
- 可以限制什么 IP、域名能够访问 listen 端
# 只允许某一个能访问,其他的不能访问
ncat -l --allow 192.168.0.125
ncat -l --allow 2001:db8::7d
ncat -l --allow trusted.example.com

# 只拒绝某一个的请求,允许其他所有的
ncat -l --deny 192.168.0.200
ncat -l --deny 2001:db8::c8

# 按范围限定
ncat -l --allow 192.168.0.0/24
ncat -l --allow 192.168.0.0-255
ncat -l --allow 2001:db8::/32

# 从文件指定
ncat -l --allowfile trusted-hosts.txt
ncat -l --denyfile external-hosts.txt
- 限定最大连接数
--max-conns或-m,默认为 100,windows 默认为 60- 示例
$ ncat -l --max-conns 5
- 示例
实现代理
- https://nmap.org/ncat/guide/ncat-proxy.html
- 支持 SOCKS 4、SOCKS 5、HTTP
- 语法样例
ncat --proxy <proxyhost>[:<proxyport>] --proxy-type { http | socks4 | socks5 } <host> [<port>]
- 参数
--proxy-type指定代理类(http/socks4/socks5),默认是 http- 如果有认证,需要指定 auth 配置
- HTTP/SOCKS5 用
--proxy-auth <username>:<password> - SOCKS4 用
--proxy-auth <username>
- HTTP/SOCKS5 用
- 不指定
proxyport的话,默认是 31337
- 方式一
- 将监听本地端的请求,将请求转发到某个代理服务,再由代理服务器发出请求(和常用的本地代理软件一样)
- 方式二(只支持 http)
- 启动监听,将自己作为代理服务器
ncat -l 3128 --proxy-type http

ncat -l 3128 --proxy-type http --proxy-auth <user>:<pass>


![深入理解Qt属性系统[Q_PROPERTY]](https://img-blog.csdnimg.cn/img_convert/45d23b8c079fb5decb293fb6167841c0.png)