IOC基础
IOC发展
初始场景, 不使用IOC如何实现
假定现在有一下需求, 开始使用的数据源是MySQL, 后续数据源变动为Oracle, 那么我们的代码就需要改动
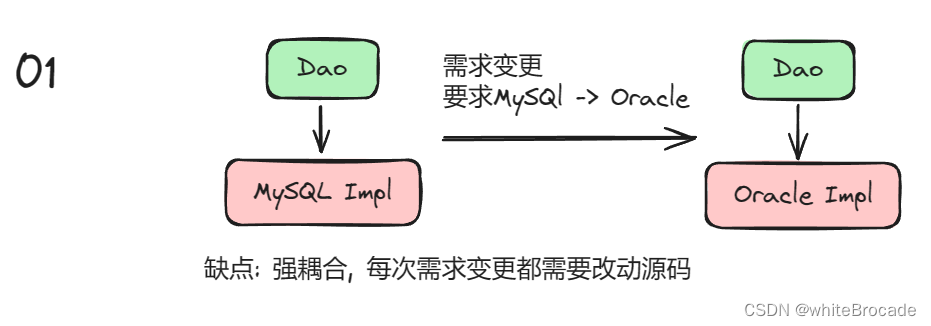
每次切数据源都需要改动, 那么进行优化
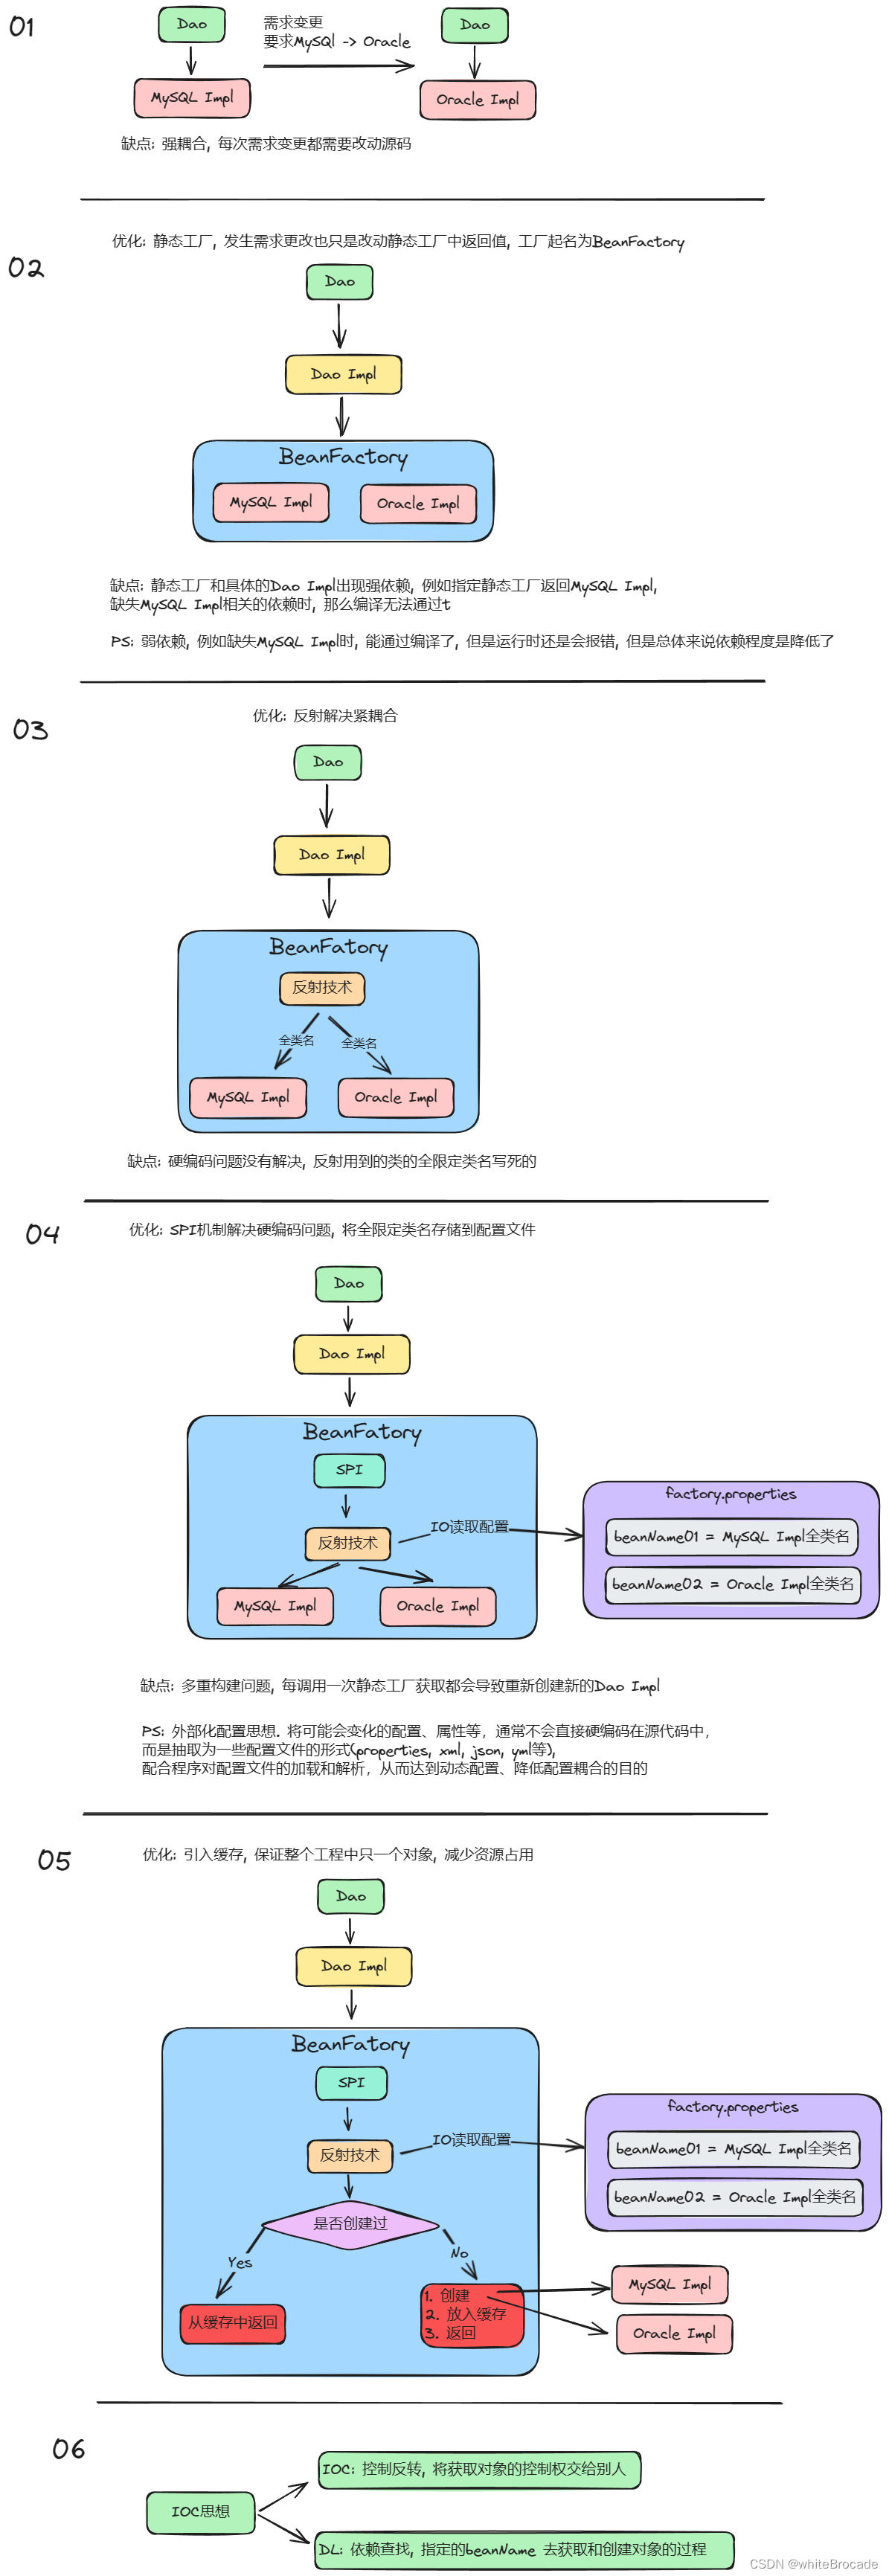
静态工厂解决强依赖
在01版本基础上, 使用静态工厂对多个数据源进行了封装, 要哪个就返哪个, 避免了之前的, 切数据源就得改底层代码的毛病
但是还存在强耦合的臭毛病, 可以使用反射解决

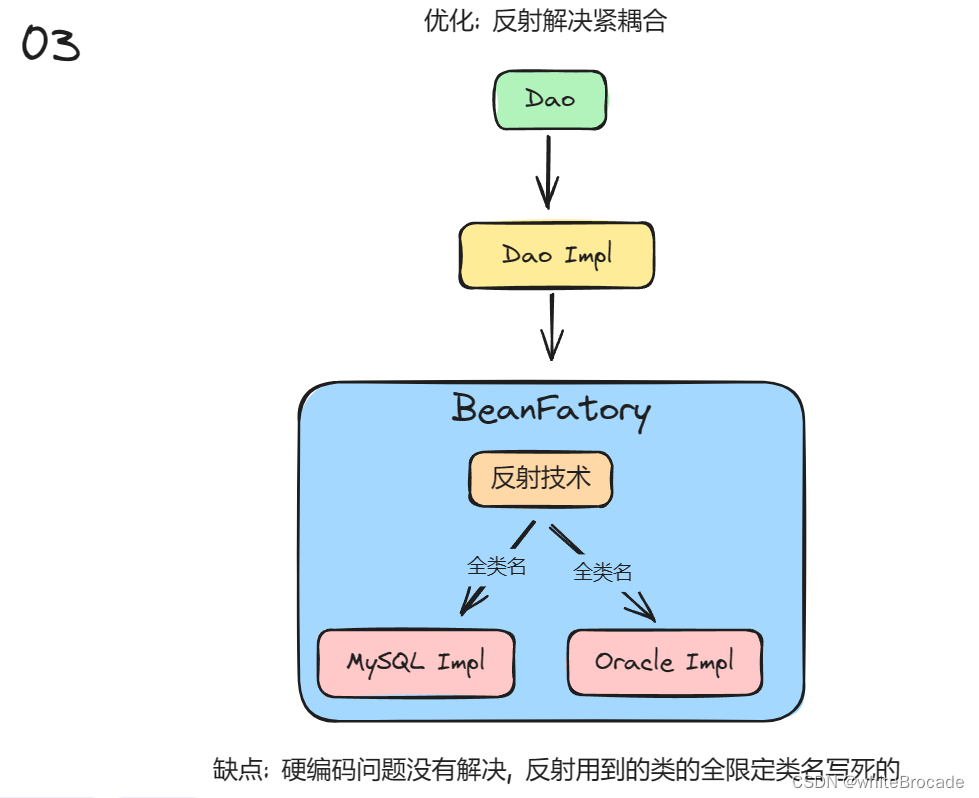
反射解决紧耦合
解决紧耦合问题, 但是还是存在问题–硬编码问题, 对于硬编码可以采用配置进行解决
SPI机制+配置化解决硬编码
单独配置化也可以, 如果加上SPI机制, 那么代码会更加简洁
解决完配置化还存在一个问题–多重构建, 每次调用都会构建一个新的对象, 这个也容易解决, 加多一个缓存就行

缓存解决多重构建
如下图, 一目了然

当然, 有些场景下, 可能就需要每次创建都拿新的, 那么这里还可以加多一个标识符, 用于判断取单例的还是多例的, 这里就不画图了
流程汇总
核心点
- 工厂模式
- 反射+SPI
- 缓存
总的流程图如下
DL–依赖查找
BeanFactory#getBean(id): 通过id获取某个bean
前置准备
前置准备: Bean的xml配置文件, 起名为quickstart-byName.xml, 存放在basic_dl/quickstart-byname.xml中
<?xml version="1.0" encoding="UTF-8"?>
<beans xmlns="http://www.springframework.org/schema/beans"
       xmlns:xsi="http://www.w3.org/2001/XMLSchema-instance"
       xsi:schemaLocation="http://www.springframework.org/schema/beans
        https://www.springframework.org/schema/beans/spring-beans.xsd">

    <bean id="person" class="com.linkedbear.spring.basic_dl.a_quickstart_byname.bean.Person"></bean>
</beans>
运行示例
通过id从BeanFactory中获取bean
public class ByNameApplication {

    public static void main(String[] args) {
        // 通过Context将xml读取到工厂中, Context中传递xml在Resource中的位置
        BeanFactory factory = new ClassPathXmlApplicationContext("basic_dl/quickstart-byname.xml");
        // 从工厂中获取bean, 这里通过id方式进行获取
        Person person = (Person) factory.getBean("person");
        // 打印出来的是内存地址, 如下
        // com.linkedbear.spring.basic_dl.a_quickstart_byname.bean.Person@6500df86
        System.out.println(person);
    }
}
BeanFactory#getBean(全类名): 通过类型获取某个Bean
ByType的意思就是通过类型去获取对象, 我们知道Bean标签中是含有全类名的, 那么又是通过这个方式获取的
前置准备
准备一个xml文件
<?xml version="1.0" encoding="UTF-8"?>
<beans xmlns="http://www.springframework.org/schema/beans"
       xmlns:xsi="http://www.w3.org/2001/XMLSchema-instance"
       xsi:schemaLocation="http://www.springframework.org/schema/beans
        https://www.springframework.org/schema/beans/spring-beans.xsd">

    <bean class="com.linkedbear.spring.basic_dl.b_bytype.bean.Person"></bean>

    <bean class="com.linkedbear.spring.basic_dl.b_bytype.dao.impl.DemoDaoImpl"/>
</beans>
运行示例
public class ByTypeApplication {

    public static void main(String[] args) {
        // 依旧是将xml读取到BeanFacotry中
        BeanFactory factory = new ClassPathXmlApplicationContext("basic_dl/quickstart-bytype.xml");
        // 通过类名中从工厂中获取bean
        Person person = factory.getBean(Person.class);
        System.out.println(person);

        DemoDao demoDao = factory.getBean(DemoDao.class);
        System.out.println(demoDao.findAll());
    }
}
ApplicationContext#ofType(): 获取指定类型所有的Bean
如果一个接口有多个实现, 而咱又想一次性把这些都拿出来, 那 getBean 方法显然就不够用了, 需要使用额外的方式ofType, 获取某个类型所有的Bean
前置准备
声明一个 DemoDao , 并声明 3 种对应的实现类, 分别模拟操作 MySQL 、Oracle 、Postgres 数据库的实现类(类的内容就随意了)
public interface DemoDao {}

@Data
public class DemoMySQLDao implements DemoDao {}

@Data
public class DemoOracleDao implements DemoDao {}

@Data
public class DemoPostgresDao implements DemoDao {}
声明一个xml
<?xml version="1.0" encoding="UTF-8"?>
<beans xmlns="http://www.springframework.org/schema/beans"
       xmlns:xsi="http://www.w3.org/2001/XMLSchema-instance"
       xsi:schemaLocation="http://www.springframework.org/schema/beans
        https://www.springframework.org/schema/beans/spring-beans.xsd">

    <!--实际class地址可以根据自己存放的位置进行更改-->
    <bean id="demoMySQLDao" class="com.linkedbear.spring.basic_dl.c_oftype.dao.impl.DemoMySQLDao"/>
    <bean id="demoOracleDao" class="com.linkedbear.spring.basic_dl.c_oftype.dao.impl.DemoOracleDao"/>
    <bean id="demoPostgreDao" class="com.linkedbear.spring.basic_dl.c_oftype.dao.impl.DemoPostgresDao"/>
</beans>
运行示例
ofType是ApplicationContext中, 不是BeanFactory中!!!
ofType方法传入一个类型, 返回一个 Map, 其中Map中存储的是这个传入类型的类/实现类
public class OfTypeApplication {
    public static void main(String[] args) throws Exception {
        ApplicationContext ctx = new ClassPathXmlApplicationContext("basic_dl/quickstart-oftype.xml");
        Map<String, DemoDao> beans = ctx.getBeansOfType(DemoDao.class);
        beans.forEach((beanName, bean) -> {
            System.out.println(beanName + " : " + bean.toString());
        });
        /* 输出结果如下:
			demoMySQLDao : DemoMySQLDao()
			demoOracleDao : DemoOracleDao()
			demoPostgreDao : DemoPostgresDao()
        */
    }
}
BeanFactory与ApplicationContext的区别
官方文档的这个段落是这样描述的
The
org.springframework.beansandorg.springframework.contextpackages are the basis for Spring Framework’s IoC container. TheBeanFactoryinterface provides an advanced configuration mechanism capable of managing any type of object.ApplicationContextis a sub-interface ofBeanFactory. It adds:
- Easier integration with Spring’s AOP features
- Message resource handling (for use in internationalization)
- Event publication
- Application-layer specific contexts such as the
WebApplicationContextfor use in web applications.翻译过来如下
org.springframework.beans和org.springframework.context包是 SpringFramework 的 IOC 容器的基础。BeanFactory接口提供了一种高级配置机制, 能够管理任何类型的对象。ApplicationContext是BeanFactory的子接口。它增加了:
- 与 SpringFramework 的 AOP 功能轻松集成
- 消息资源处理(用于国际化)
- 事件发布
- 应用层特定的上下文, 例如 Web 应用程序中使用的
WebApplicationContext
抓关键点ApplicationContext`是BeanFactory的子接口, 即Application较于BeanFactory还拓展了一些额外的功能
而且官方推荐使用ApplicationContext, 而不是BeanFactory(就算它不推荐, 大家也会选择功能更加强大哈哈哈), 看看官方推荐的理由是什么, 原本段落
You should use an
ApplicationContextunless you have a good reason for not doing so, withGenericApplicationContextand its subclassAnnotationConfigApplicationContextas the common implementations for custom bootstrapping. These are the primary entry points to Spring’s core container for all common purposes: loading of configuration files, triggering a classpath scan, programmatically registering bean definitions and annotated classes, and (as of 5.0) registering functional bean definitions.翻译如下:
你应该使用
ApplicationContext, 除非能有充分的理由解释不需要的原因。一般情况下, 我们推荐将GenericApplicationContext及其子类AnnotationConfigApplicationContext作为自定义引导的常见实现。这些实现类是用于所有常见目的的 SpringFramework 核心容器的主要入口点:加载配置文件, 触发类路径扫描, 编程式注册 Bean 定义和带注解的类, 以及(从5.0版本开始)注册功能性 Bean 的定义。
同时还提供了一幅对比的的表格(个人对表格进行一些更改, 方便观看)
- √表示支持
- 为空表示不支持
| Feature | BeanFactory | ApplicationContext |
|---|---|---|
| Bean instantiation/wiring—Bean的实例化和属性注入 | √ | √ |
| Integrated lifecycle management —— 生命周期管理 | √ | |
Automatic BeanPostProcessor registration —— Bean后置处理器的支持 | √ | |
Automatic BeanFactoryPostProcessor registration —— BeanFactory后置处理器的支持 | √ | |
Convenient MessageSource access (for internalization) —— 消息转换服务(国际化) | √ | |
Built-in ApplicationEvent publication mechanism —— 事件发布机制(事件驱动) | √ |
BeanFactory与ApplicationContext的对比
BeanFactory 接口提供了一个抽象的配置和对象的管理机制, ApplicationContext 是 BeanFactory 的子接口, 它简化了与AOP的整合、消息机制、事件机制, 以及对 Web 环境的扩展( WebApplicationContext 等), BeanFactory 是没有这些扩展的。
ApplicationContext 主要扩展了以下功能:
- AOP 的支持(
AnnotationAwareAspectJAutoProxyCreator作用于 Bean 的初始化之后 ) - 配置元信息(
BeanDefinition、Environment、注解等 ) - 资源管理(
Resource抽象 ) - 事件驱动机制(
ApplicationEvent、ApplicationListener) - 消息与国际化(
LocaleResolver) Environment抽象( SpringFramework 3.1 以后)
ApplicationContext#getBeansWithAnnotation(注解类): 根据注解获取Bean
前期准备
创建一个注解
@Documented
@Retention(RetentionPolicy.RUNTIME)
@Target(ElementType.TYPE)
public @interface Color {

}
创建几个类
@Data
@Color
public class Black {}

@Data
@Color
public class Red {}

@Data
// 狗不是颜色, 所以这里不添加@Color注解
public class Dog {}
创建xml文件
<?xml version="1.0" encoding="UTF-8"?>
<beans xmlns="http://www.springframework.org/schema/beans"
       xmlns:xsi="http://www.w3.org/2001/XMLSchema-instance"
       xsi:schemaLocation="http://www.springframework.org/schema/beans
        https://www.springframework.org/schema/beans/spring-beans.xsd">

    <bean id="black" class="com.linkedbear.spring.basic_dl.d_withanno.bean.Black"/>
    <bean id="red" class="com.linkedbear.spring.basic_dl.d_withanno.bean.Red"/>
    <bean id="dog" class="com.linkedbear.spring.basic_dl.d_withanno.bean.Dog"/>
</beans>
运行示例
public class WithAnnoApplication {

    public static void main(String[] args) throws Exception {
        ApplicationContext ctx = new ClassPathXmlApplicationContext("basic_dl/quickstart-withanno.xml");
        Map<String, Object> beans = ctx.getBeansWithAnnotation(Color.class);
        beans.forEach((beanName, bean) -> {
            System.out.println(beanName + " : " + bean.toString());
        });
        /*输入结果如下, 发现只获取到
			black : Black()
			red : Red()
        */
    }
}
ApplicationContext.getBeanDefinitionNames(): 获取IOC中所有Bean
运行实例
基于之前的注解的代码, 重新创建运行类
public class BeannamesApplication {

    public static void main(String[] args) throws Exception {
        ApplicationContext ctx = new ClassPathXmlApplicationContext("basic_dl/quickstart-withanno.xml");
        String[] beanNames = ctx.getBeanDefinitionNames();
        Stream.of(beanNames).forEach(System.out::println);
        /*输入结果如下, 所有的Bean都获取到了
			black
			red
			dog
        */
    }
}
延迟查找
使用场景: 对于一些特殊的场景, 需要依赖容器中的某些特定的Bean , 但当它们不存在时也能使用默认 / 缺省策略来处理逻辑
前期准备
准备两个 bean :Cat 和 Dog , 但是在 xml 中咱只注册 Cat , 这样 IOC 容器中就只有 Cat , 没有 Dog
@Data
public class Cat {}

@Data
public class Dog {}
xml文件
<?xml version="1.0" encoding="UTF-8"?>
<beans xmlns="http://www.springframework.org/schema/beans"
       xmlns:xsi="http://www.w3.org/2001/XMLSchema-instance"
       xsi:schemaLocation="http://www.springframework.org/schema/beans
        https://www.springframework.org/schema/beans/spring-beans.xsd">

    <bean id="cat" class="com.linkedbear.spring.basic_dl.f_lazylookup.bean.Cat"/>
</beans>
运行示例
初始版: 使用现有方案实现Bean缺失时的缺省加载
public class ImmediatlyLookupApplication {
    public static void main(String[] args) throws Exception {
        ApplicationContext ctx = new ClassPathXmlApplicationContext("basic_dl/quickstart-lazylookup.xml");
        Cat cat = ctx.getBean(Cat.class);
        System.out.println(cat);

        Dog dog;
        // try-catch处理没有找到时抛出的异常
        try {
            dog = ctx.getBean(Dog.class);
        } catch (NoSuchBeanDefinitionException e) {
            // 找不到Dog时手动创建
            dog = new Dog();
        }
        System.out.println(dog);
    }
}
缺点:
- 不好维护, 编码量大
- 性能低
改良版01–ApplicationContext#containsBean(beanId), 检查Context重是否有指定的Bean
添加这样代码
Dog dog = ctx.containsBean("dog") ? (Dog) ctx.getBean("dog") : new Dog();
改造后如下
public class ImmediatlyLookupApplication {
    public static void main(String[] args) throws Exception {
        ApplicationContext ctx = new ClassPathXmlApplicationContext("basic_dl/quickstart-lazylookup.xml");
        Cat cat = ctx.getBean(Cat.class);
        System.out.println(cat);

        Dog dog = ctx.containsBean("dog") ? (Dog) ctx.getBean("dog") : new Dog();

        System.out.println(dog);
    }
}
上边写法存在缺点
containsBean只能传递Bean的ID, 不能根据类型判断
改良版02-ObjectProvider实现延迟查找
先不报错, 用一个空壳包装一下, 回头用的时候再拆开看里面有还是没有, 在 SpringFramework 4.3 中引入了一个新的 API :ObjectProvider , 它可以实现延迟查找
-
ApplicationContext#getBeanProvider(Bean): 获取**
ObjectProvider** , 此时并不后会报错 -
ObjectProvider#getObject(): 尝试获取Bean, 如果找不到就抛出异常
-
ObjectProvider#getIfAvailable(Supplier<T> defaultSupplier): 找不到 Bean时返回缺省值(如果没有实现Supplier就返回null), 而不抛出异常
-
ObjectProvider#ifAvailable(Consumer<T> dependencyConsumer): Bean存在时执行
Consumer接口的方法
public class LazyLookupApplication {
    public static void main(String[] args) throws Exception {
        ApplicationContext ctx = new ClassPathXmlApplicationContext("basic_dl/quickstart-lazylookup.xml");
        Cat cat = ctx.getBean(Cat.class);
        System.out.println(cat);
        // 下面的代码会报Bean没有定义 NoSuchBeanDefinitionException
        // Dog dog = ctx.getBean(Dog.class);
        // System.out.println(dog);

        // 这一行代码不会报错
        ObjectProvider<Dog> dogProvider = ctx.getBeanProvider(Dog.class);
        // 只有当执行getObject方法时才会检查是否存在, 即实现了延迟查找
        System.out.println(dogProvider.getObject());
        dogProvider.ifAvailable()
        // jdk8后ObjectProvider接口有了新的扩展:借助Supplier接口返回缺省创建
        Dog defaultDog = dogProvider.getIfAvailable(Dog::new);
        System.out.println(defaultDog);
        // 只有存在Bean时才会执行Consumer接口的方法
        dogProvider.ifAvailable(System.out::println);
    }
}
注解驱动+组件注册+组件扫描
SpringFramework 推出 3.0 后, 最低的版本支持来到了 Java 5, Java 5的最大新特性之一就是引入了注解。SpringFramework 3.0 开始也引入了大量注解, 代替xml的方式进行声明式开发
注解驱动IOC的依赖查找
准备工作
Domain类
@Data
public class Person {
    private String name;
    private int age;
}
xml文件作为驱动, 注解驱动需要的是配置类。一个配置类可以类似的理解为一个 xml 。配置类没有特殊的限制, 只需要在类上标注一个 @Configuration 注解即可
@Configuration
public class QuickstartConfiguration {

}
配置类中, 使用 @Bean 注解替换掉<bean>标签
@Configuration
public class QuickstartConfiguration {
    @Bean
    public Person person() {
        return new Person();
    }
}
上述代码表示向IOC容器中注册一个ID为person, 类型为Person的Bean
- 返回类型=Bean类型
- 方法名=Bean的ID
- 只不过在注解驱动中, 不称为ID而是称为name. 并且可以通过@Bean中name属性指定返回Bean的名称, 例如@Bean(name = ‘person’)
运行示例
public class AnnotationConfigApplication {
    public static void main(String[] args) throws Exception {
        // 注意了, 这里用的Context实现类是AnnotationConfig开头的来驱动注解IOC容器
        // AnnotationConfigApplicationContext中传递的是配置类的Class对象
        ApplicationContext ctx = new AnnotationConfigApplicationContext(QuickstartConfiguration.class);
        Person person = ctx.getBean(Person.class);
        // 输出结果Person(name=null, age=0)
        System.out.println(person);
    }
}
注解驱动IOC依赖注入
如下, 修改QuickstartConfiguration类, 在返回之前通过setter()进行属性注入
@Configuration
public class QuickstartConfiguration {
    @Bean
    public Person person() {
        Person person = new Person();
        person.setName("person");
        person.setAge(123);
        return person;
    }
}
等价于
<bean id="person" class="com.linkedbear.spring.basic_di.a_quickstart_set.bean.Person">
    <property name="name" value="test-person-byset"/>
    <property name="age" value="18"/>
</bean>
重新运行AnnotationConfigApplication, 输出结果如下
Person(name=person, age=123)
组件注册
上面配置类中方法上贴@Bean注解的方式, 如果需要注册的组件特别多, 那编写这些 @Bean 方法无疑是超多工作量, 于是SpringFramework 中给咱整了几个注解出来, 可以帮咱快速注册需要的组件, 这些注解被成为模式注解 ( stereotype annotation )
@Component
在类上标注 @Component 注解, 即代表该类会被注册到 IOC 容器中作为一个 Bean
@Data
@Component
public class Person {
    private String name;
    private int age;
}
等价的xml
<bean class="com.linkedbear.spring.basic_dl.a_quickstart_byname.bean.Person"/>
如果想指定 Bean 的名称, 可以直接在 @Component 中声明 value 属性即可:
@Data
@Component("aaa")
public class Person {
    private String name;
    private int age;
}
如果不指定 Bean 的名称, 它的默认规则是 “类名的首字母小写”(例如 Person 的默认名称是 person , DepartmentServiceImpl 的默认名称是 departmentServiceImpl )。
Web开发利器: @Controller, @Service和@Repository
SpringFramework 为了迎合咱在进行Web开发时的三层架构, 它额外提供了三个注解:@Controller 、@Service 、@Repository , 分别代表表现层、业务层、持久层。这三个注解的作用与@Component完全一致, 其实它们的底层也就是@Component
@Target({ElementType.TYPE})
@Retention(RetentionPolicy.RUNTIME)
@Documented
@Component
public @interface Controller { ... }


@Target({ElementType.TYPE})
@Retention(RetentionPolicy.RUNTIME)
@Documented
@Component
public @interface Service { ... }

@Target({ElementType.TYPE})
@Retention(RetentionPolicy.RUNTIME)
@Documented
@Component
public @interface Repository { ... }
@Configuration
@Configuration的底层也是基于@Component
@Target({ElementType.TYPE})
@Retention(RetentionPolicy.RUNTIME)
@Documented
@Component
public @interface Configuration { ... }
组件扫描
只声明了组件, 咱在写配置类时如果还是只写 @Configuration 注解, 随后启动 IOC 容器, 那它是感知不到有 @Component 存在的, 一定会报 NoSuchBeanDefinitionException
原因如下
正常情况下注解驱动IOC和XML对应关系如下, Bean处于IOC容器配置中, 自然是可以感知到Bean
但是如果使用的是声明组件, 那么就长成了这样

@ComponentScan
为了解决这个问题, 咱可以引入一个新的注解:@ComponentScan
在配置类上额外标注一个 @ComponentScan , 并指定要扫描的路径, 它就可以扫描指定路径包及子包下的所有 @Component 组件:
- 如果不指定扫描路径, 则默认扫描本类所在包及子包下的所有
@Component组件 - 另外注意
basePackages是复数, 它可以声明多个扫描包
@Configuration
@ComponentScan("com.linkedbear.spring.annotation.c_scan.bean")
public class ComponentScanConfiguration {

}
如果 SpringFramework 的版本比较老, 可能会看到这样的写法:
@ComponentScan(basePackages = "com.linkedbear.spring.annotation.c_scan.bean")
声明上 @ComponentScan 之后, 重新启动配置类, 可以发现 Person 已经成功被注册
此时效果如下

AnnotationConfigApplicationContext(包)手动扫描指定包以及子包
不写 @ComponentScan , 也是可以做到组件扫描的。在 AnnotationConfigApplicationContext 的构造方法中有一个类型为 String 可变参数的构造方法
ApplicationContext ctx = new AnnotationConfigApplicationContext("com.linkedbear.spring.annotation.c_scan.bean");
xml中启用组件扫描
<context:component-scan base-package="com.linkedbear.spring.annotation.c_scan.bean"/>
<!-- 注意标签是package, 不是packages, 代表一个标签只能声明一个根包 -->
之后使用 ClassPathXmlApplicationContext 驱动, 也是可以获取到相关Bean的
注解驱动和xml驱动互通
@ImportResource(classPath:xml的类路径)注解驱动导入XML驱动
在 xml 中要引入注解配置, 需要开启注解配置, 同时注册对应的配置类:
<?xml version="1.0" encoding="UTF-8"?>
<beans xmlns="http://www.springframework.org/schema/beans"
       xmlns:xsi="http://www.w3.org/2001/XMLSchema-instance"
       xmlns:context="http://www.springframework.org/schema/context"
       xsi:schemaLocation="http://www.springframework.org/schema/beans
        https://www.springframework.org/schema/beans/spring-beans.xsd
        http://www.springframework.org/schema/context
        https://www.springframework.org/schema/context/spring-context.xsd">

    <!-- 开启注解配置 -->
    <context:annotation-config />
    <bean class="com.linkedbear.spring.annotation.d_importxml.config.AnnotationConfigConfiguration"/>
</beans>
在注解配置中引入xml , 需要在配置类上标注 @ImportResource 注解, 并声明配置文件的路径:
@Configuration
@ImportResource("classpath:annotation/beans.xml")
public class ImportXmlAnnotationConfiguration {

}
DI–依赖注入
为什么需要注入?
创建的Bean都是不带属性的!如果我要创建的 Bean 需要一些预设的属性, 那该怎么办呢?那就涉及到 IOC 的另外一种实现了, 就是依赖注入。还是延续IOC的思想, 如果你需要属性依赖, 不要自己去找, 交给IOC容器, 让它帮你找(依赖查找), 并给你赋上值(依赖注入)
属性注入
setter属性注入
XML方式
前置准备
声明两个类, getter/setter, toString都使用Lombok生成(没有添加Lombok依赖的自行添加)
@Data
public class Person {
    private String name;
    private Integer age;
}

@Data
public class Cat {
    private String name;
    private Person master;
    // getter and setter ......
}
resources 目录下新建 basic_di 文件夹, 并声明配置文件 inject-set.xml
<bean>标签中声明property标签, 这里面有两个属性:- name - 属性名
- value - 属性值
<?xml version="1.0" encoding="UTF-8"?>
<beans xmlns="http://www.springframework.org/schema/beans"
       xmlns:xsi="http://www.w3.org/2001/XMLSchema-instance"
       xsi:schemaLocation="http://www.springframework.org/schema/beans
        https://www.springframework.org/schema/beans/spring-beans.xsd">

    <bean id="person" class="com.linkedbear.spring.basic_di.a_quickstart_set.bean.Person">
        <property name="name" value="test-person-byset"/>
        <property name="age" value="18"/>
    </bean>

    <bean id="cat" class="com.linkedbear.spring.basic_di.a_quickstart_set.bean.Cat">
        <property name="name" value="test-cat"/>
        <!--为Cat指定了Person-->
        <property name="master" ref="person"/>
    </bean>
</beans>
运行示例
public class QuickstartInjectBySetXmlApplication {
    public static void main(String[] args) throws Exception {
        BeanFactory beanFactory = new ClassPathXmlApplicationContext("basic_di/inject-set.xml");
        Person person = beanFactory.getBean(Person.class);
        // 输出的是Person(name=test-person-byset, age=18)
        System.out.println(person);

        Cat cat = beanFactory.getBean(Cat.class);
        // 输出结果Cat(name=test-cat, master=Person(name=test-person-byset, age=18))
        System.out.println(cat);
    }
}
注解方式stter注入
运行示例
@Bean
public Person person() {
    Person person = new Person();
    // 直接调用setter()方法
    person.setName("test-person-anno-byset");
    person.setAge(18);
    return person;
}
构造器注入
有一些 bean 的属性依赖, 需要在调用构造器(构造方法)时就设置好;或者另一种情况, 有一些 bean 本身没有无参构造器, 这个时候就必须使用构造器注入了
XML方式
Person类
@Data
@AllArgsConstructor // 全参构造器
public class Person {
    private String name;
    private int age;
}
constructor-arg 标签
- index: 构造器的参数索引
- value: 参数值
<bean id="person" class="com.linkedbear.spring.basic_di.b_constructor.bean.Person">
    <constructor-arg index="0" value="test-person-byconstructor"/>
    <constructor-arg index="1" value="18"/>
</bean>
那么此时使用的就是全参构造器去构造Bean对象
注解方式
注解驱动的 bean 注册中, 也是直接使用编程式赋值即可
@Bean
public Person person() {
    // 直接调用全参构造器进行构造
    return new Person("test-person-anno-byconstructor", 18);
}
注解式属性注入
注册bean的方式不仅有 @Bean 的方式, 还有组件扫描呢!那些声明式注册好的组件, 这个注解式属性注入就是为这些服务的
使用注解@Value在@Component属性注入
前期准备
@Data
public class Black {
    private String name;
    private int order;
}
运行示例
实现注解式属性注入, 可以直接在要注入的字段上标注 @Value 注解
@Data
public class Black {
    @Value("小牛马")
    private String name;

    @Value("114514")
    private int order;
}
组件扫描, 将Black类扫描到IOC容器, 获取并打印出来
public class InjectValueAnnoApplication {

    public static void main(String[] args) throws Exception {
        ApplicationContext ctx = new AnnotationConfigApplicationContext("com.linkedbear.spring.basic_di.c_value_spel.bean");
        Black black = ctx.getBean(Black.class);
        // 打印输出: simple value : Black{name='小牛马', order=114514}
        System.out.println("simple value : " + black);
    }
}
外部配置文件引入–@PropertySource
@PropertySource解决的是 SpringFramework读取properties文件的问题, 用于导入外部配置properties文件, 避免自己每次使用Properties类去IO读取
前期准备
Bean类
@Data
public class Red {
    private String name;
    private int order;
}
red.properties配置文件, 存放在resource目录下
red.name=red123
red.order=123
运行示例
@PropertySource文件导入
将 @PropertySource 注解标注在配置类上, 并声明properties文件的位置, 即可导入外部的配置文件
@Configuration
// 顺便加上包扫描
@ComponentScan("com.linkedbear.spring.basic_di.c_value_spel.bean")
// 配置类导入
@PropertySource("classpath:basic_di/value/red.properties")
public class InjectValueConfiguration {

}
注解中导入属性
属性的注入
对于 properties 类型的属性, @Value 需要配合占位符来表示注入的属性
- 作为一个properties文件, 它加载到 SpringFramework 的 IOC 容器后, 会转换成 Map 的形式来保存这些配置, 而 SpringFramework 中本身在初始化时就有一些配置项, 这些配置项也都放在这个Map 中。占位符的取值就是从这些配置项中取
@Data
@Component
public class Red {
    @Value("${red.name}")
    private String name;

    @Value("${red.order}")
    private Integer order;

}
运行测试类
public class InjectValueAnnoApplication {
    public static void main(String[] args) throws Exception {
        ApplicationContext ctx = new AnnotationConfigApplicationContext(InjectValueConfiguration.class);
        Red red = ctx.getBean(Red.class);
        // 输出结果: properties value : Red{name='red123', order=123}
        System.out.println("properties value : " + red);
    }
}
XML中导入
<bean class="com.linkedbear.spring.basic_di.c_value_spel.bean.Red">
    <property name="name" value="${red.name}"/>
    <property name="order" value="${red.order}"/>
</bean>
导入后, 运行测试类, 输出结果一致
SpEL表达式
如果在属性注入时, 使用了一些特殊的数值(如一个 Bean需要依赖另一个 Bean的某个属性, 或者需要动态处理一个特定的属性值), 这种情况 ${} 的占位符方式就办不了了(占位符只能取配置项), 那么此时就需要SpEL表达式来处理
SpEL 全称 Spring Expression Language , 它从 SpringFramework 3.0开始被支持, 它本身可以算 SpringFramework 的组成部分, 但又可以被独立使用。它可以支持调用属性值、属性参数以及方法调用、数组存储、逻辑计算等功能。
SpEL属性注入
SpEL 的语法统一用 #{} 表示, 花括号内部编写表达式语言
前置准备
@Data
@Component
public class Blue {
    @Value("#{'blue-value-byspel'}")
    private String name;

    @Value("#{2}")
    private Integer order;
}
运行示例
public class InjectValueAnnoApplication {
    public static void main(String[] args) throws Exception {
        ApplicationContext ctx = new AnnotationConfigApplicationContext(InjectValueConfiguration.class);
        Blue blue = ctx.getBean(Blue.class);
        // Blue{name='blue-value-byspel', order=2}
        System.out.println(blue);
    }
}
Bean属性引用
SpEL可以取IOC容器中其它 Bean 的属性
前置准备
创建一个Green的Bean
@Component
public class Green {
    @Value("#{'copy of ' + blue.name}")
    private String name;

    @Value("#{blue.order + 1}")
    private Integer order;
}
运行示例
public class InjectValueAnnoApplication {
    public static void main(String[] args) throws Exception {
        ApplicationContext ctx = new AnnotationConfigApplicationContext(InjectValueConfiguration.class);
        Green green = ctx.getBean(Green.class);
        // Green(name=copy of blue-value-byspel, order=3)
        System.out.println(green);
    }
}
发现属性中注入成功了
xml中使用则如下
<bean class="com.linkedbear.spring.basic_di.c_value_spel.bean.Green">
    <property name="name" value="#{'copy of ' + blue.name}"/>
    <property name="order" value="#{blue.order + 1}"/>
</bean>
方法调用
SpEL 表达式不仅可以引用对象的属性, 还可以直接引用类常量, 以及调用对象的方法等, 下面咱演示方法调用和常量引入
前置准备
新建一个 White
@Data
@Component
public class White {
    // 调用方法
    @Value("#{blue.name.substring(0, 3)}")
    private String name;

    // 调用方法
    @Value("#{T(java.lang.Integer).MAX_VALUE}")
    private Integer order;
}
咱设想一个简单的需求, 让 name 取 blue 属性的前 3 个字符, order 取 Integer 的最大值, 则使用 SpEL 可以这样写:
public class InjectValueAnnoApplication {
    public static void main(String[] args) throws Exception {
        ApplicationContext ctx = new AnnotationConfigApplicationContext(InjectValueConfiguration.class);
        White white = ctx.getBean(White.class);
        // White(name=blu, order=2147483647)
        System.out.println(white);
    }
}
补充说明: 依赖查找与依赖注入的对比
- 作用目标不同
- 依赖注入的作用目标通常是类成员
- 依赖查找的作用目标可以是方法体内, 也可以是方法体外
- 实现方式不同
- 依赖注入通常借助一个上下文被动的接收
- 依赖查找通常主动使用上下文搜索
自动注入
一个 Bean要依赖另一个Bean, 平常需要我们手动注入, 而Spring提供了自动注入避免手动编写复杂的代码, 自动将有依赖关系的Bean进行注入
@Autowired
在 Bean 中直接在 属性 / setter 方法 上标注 @Autowired 注解, IOC 容器会按照属性对应的类型, 从容器中找对应类型的 Bean 赋值到对应的属性上, 实现自动注入
前置工作
创建两个类, Person和Dog
@Data
@Component
public class Person {
    private String name = "administrator";
}

@Data
@Component
public class Dog {
    @Value("dogdog")
    private String name;

    private Person person;
}
属性注入
@Data
@Component
public class Dog {
    // 省略其它代码

    @Autowired // 表示为Dog自动注入Person
    private Person person;
}
运行结果省略
setter()注入
@Component
public class Dog {
    // ......
    private Person person;

    @Autowired // 表示调用setter()方法时进行自动注入
    public void setPerson(Person person) {
        this.person = person;
    }
}
运行结果省略
构造器注入
@Data
@Component
public class Dog {
    // ......
    private Person person;

    @Autowired // 表示调用构造方法的时候自动将传入Person注入到Dog中
    public Dog(Person person) {
        this.person = person;
    }
}
运行结果省略
@Autowired运行原理
先拿属性对应的类型, 去 IOC 容器中找 Bean , 如果找到了一个, 直接返回;如果找到多个类型一样的 Bean , 把属性名拿过去, 跟这些 Bean 的 id 逐个对比, 如果有一个相同的, 直接返回;如果没有任何相同的 id 与要注入的属性名相同, 则会抛出 NoUniqueBeanDefinitionException 异常。
@Autowired的属性required = false
当注入的Bean不存在时, Spring会抛出异常
Caused by: org.springframework.beans.factory.NoSuchBeanDefinitionException: No qualifying bean of type ‘com.linkedbear.spring.basic_di.d_autowired.bean.Person’ available: expected at least 1 bean which qualifies as autowire candidate. Dependency annotations: {}
本来想找一个类型为 Person 的 Bean, 但一个也没找到。 此时两种解决方案
@Component注解被注释掉了, 自然就不会注册了@Autowired注解上加一个属性:required = false。表示这个Bean不是必须项, 没有不用抛异常, 设置为null就行了
Autowired在配置类的使用
@Autowired 不仅可以用在普通 Bean 的属性上, 在配置类中, 注册 @Bean 时也可以标注
@Configuration
public class InjectComplexFieldConfiguration {

    @Bean // 表示交给Spring托管
    @Autowired // 高版本可不标注, 表示Cat构造的时候需要传入Person对象来自动注入依赖
    public Cat cat(Person person) {
        Cat cat = new Cat();
        cat.setName("mimi");
        cat.setPerson(person);
        return cat;
    }
}
多个相同类型Bean的自动注入: @Qualifier和@Primary
@Configuration
public class InjectComplexFieldConfiguration {
    @Bean("master") // 表示交给Spring托管
    public Person person() {
        Person person = new Person();
        return person;
    }
}
@Data
@Component("administrator")
public class Person {
    private String name = "administrator";
}
此时运行启动类会抛出以下异常
Caused by: org.springframework.beans.factory.NoUniqueBeanDefinitionException: No qualifying bean of type ‘com.linkedbear.spring.basic_di.d_complexfield.bean.Person’ available: expected single matching bean but found 2: administrator,master
表示IOC容器发现两个类相同的Person, 不知如何选择, 所以抛出异常
@Qualifier:指定注入Bean的名称
-
使用目标是要注入的 Bean,
-
配合
@Autowired使用, 可以显式的指定要注入哪一个Bean
@Autowired
@Qualifier("administrator") // 表示限定注入的bame为administrator, 类型为Person的Bean
private Person person;
@Primary: 默认Bean
- 使用目标是被注入的 Bean
- 在一个应用中, 一个类型的Bean注册只能有一个
- 它配合
@Bean使用, 可以指定默认注入的Bean
@Configuration
public class InjectComplexFieldConfiguration {
    @Bean
    @Primary
    public Person master() {
        Person master = new Person();
        master.setName("master");
        return master;
    }
}
@Qualifier 不受 @Primary 的干扰, 当同时指定两个注解时, 那么@Qualifier的会覆盖@Primary
对于XML, 可以指定 <bean> 标签中的 primary 属性为 true , 跟上面标注 @Primary 注解是一样的
其它办法
如果不用上述两个注解, 那么修改以下变量名就行, 让变量名和Bean的name名字一样, 那么也会自动注入
多个相同类型Bean全部注入
问题: 一下子把所有指定类型的Bean
解决方案: 注入一个用单个对象接收, 注入一组对象就用集合来接收
@Data
@Component
public class Dog {
    // ......

    @Autowired
    private List<Person> persons; // 注意了, 这里是List类型
}
此时运行就会将Person类型的都注入进来
JSR250-@Resource
JSR全称Java Specification Requests , 它定义了很多 Java 语言开发的规范, 有专门的一个组织叫 JCP ( Java Community Process ) 来参与定制
@Resource 也是用来属性注入的注解, 与 @Autowired 的不同之处在于:@Autowired 是按照类型注入, @Resource 是直接按照属性名/Bean的名称注入, 即@Resouce= @Autowired + @Qualifier
使用示例
创建Bird类, 使用@Resource注入, 并指定name为master
@Data
@Component
public class Bird {
    @Resource(name = "master")
    private Person person;
}
输出结果
public class JSR250Application {
    public static void main(String[] args) throws Exception {
        ApplicationContext ctx = new AnnotationConfigApplicationContext(JSR250Configuration.class);
        Bird bird = ctx.getBean(Bird.class);
        // Bird{person=Person{name='master'}}
        System.out.println(bird);
    }
}
JSR330-@Inject
JSR330 也提出了跟 @Autowired 一样的策略, 它也是按照类型注入。不过想要用 JSR330 的规范, 需要额外导入一个依赖
<!-- JSR330 -->
<dependency>
    <groupId>javax.inject</groupId>
    <artifactId>javax.inject</artifactId>
    <version>1</version>
</dependency>
使用示例
@Data
@Component
public class Cat {
    @Inject // 等同于@Autowired
    @Named("admin") // 等同于@Qualifier
    private Person master;
}
输出结果
public class JSR330Application {
    public static void main(String[] args) throws Exception {
        ApplicationContext ctx = new AnnotationConfigApplicationContext(JSR330Configration.class);
        Cat cat = ctx.getBean(Cat.class);
        // 打印结果: Cat{name='mimi', master=Person{name='admin'}}
        System.out.println(cat);
    }
}
面试题区别
@Autowired与@Inject对比
项目中没有 SpringFramework 了, 那么 @Autowired 注解将失效, 但 @Inject 属于 JSR 规范, 不会因为一个框架失效而失去它的意义, 只要导入其它支持 JSR330 的 IOC 框架, 它依然能起作用
依赖注入的注入方式
| 注入方式 | 被注入成员是否可变 | 是否依赖IOC框架的API | 使用场景 |
|---|---|---|---|
| 构造器注入 | 不可变 | 否(xml、编程式注入不依赖) | 不可变的固定注入 |
| 参数注入 | 不可变 | 否(高版本中注解配置类中的 @Bean 方法参数注入可不标注注解) | 注解配置类中 @Bean 方法注册bean |
| 属性注入 | 不可变 | 是(只能通过标注注解来侵入式注入) | 通常用于不可变的固定注入 |
| setter注入 | 可变 | 否(xml、编程式注入不依赖) | 可选属性的注入 |
自动注入的注解对比
| 注解 | 注入方式 | 是否支持@Primary | 来源 | Bean不存在时处理 |
|---|---|---|---|---|
| @Autowired | 根据类型注入 | 是 | SpringFramework原生注解 | 可指定required=false来避免注入失败 |
| @Resource | 根据名称注入 | 是 | JSR250规范 | 容器中不存在指定Bean会抛出异常 |
| @Inject | 根据类型注入 | 是 | JSR330规范 ( 需要导jar包 ) | 容器中不存在指定Bean会抛出异常 |
-
@Qualifier:如果被标注的成员/方法在根据类型注入时发现有多个相同类型的 Bean , 则会根据该注解声明的 name 寻找特定的 bean -
@Primary:如果有多个相同类型的 Bean 同时注册到 IOC 容器中, 使用 “根据类型注入” 的注解时会注入标注@Primary注解的 bean
复杂类型注入
所谓复杂类型都是指集合类型, 如下所示
- Array
- List / Set
- Map
- Properties
前期准备
配置类
@Configuration
@ComponentScan("com.linkedbear.spring.basic_di.g_complexfield.bean")
public class InjectComplexFieldConfiguration {}
相关的Bean
@Data
@Component("miaomiao")
public class Cat {
    @Value("miaomiao")
    private String name = "cat";
}
@Data
public class Person {
    private String[] names;
    private List<String> tels;
    private Set<Cat> cats;
    private Map<String, Object> events;
    private Properties props;
}
@Data
@Component
public class Person2 {
    @Value("#{new String[] {'张三', '张三丰'}}")
    private String[] names;

    @Value("#{{'333333', '3333', '33'}}")
    private List<String> tels;

    @Value("#{{@miaomiao, new com.linkedbear.spring.basic_di.g_complexfield.bean.Cat()}}")
    private Set<Cat> cats;

    @Value("#{{'喵喵': @miaomiao.name, '猫猫': new com.linkedbear.spring.basic_di.g_complexfield.bean.Cat().name}}")
    private Map<String, Object> events;

    @Value("#{{'123': '牵着手', '456': '抬起头', '789': '我们私奔到月球'}}")
    private Properties props;
}
XML
注册Person, 注意class指向的位置
<?xml version="1.0" encoding="UTF-8"?>
<beans xmlns="http://www.springframework.org/schema/beans"
       xmlns:xsi="http://www.w3.org/2001/XMLSchema-instance"
       xsi:schemaLocation="http://www.springframework.org/schema/beans
        https://www.springframework.org/schema/beans/spring-beans.xsd">

    <bean class="com.linkedbear.spring.basic_di.g_complexfield.bean.Person"></bean>
</beans>
<bean> 标签中, 要想给属性赋值, 统统都是用 <property> 标签, 对于简单注入和 Bean 的注入, 可以通过 value 和 ref 完成, 但复杂类型就必须在标签体内写子标签了
Array
数组采用的标签: <array>, 标签层级如下
- <property name=‘集合名称’>: 表示为一个复杂类型(集合类型), name为Java类中定义的集合名称
- <arrray>: Array顶级标签, 表示声明为一个数组
- <value>: 数组内的元素, 有多少个元素写多少个value标签
- <arrray>: Array顶级标签, 表示声明为一个数组
用法示例如下
<property name="names">
    <array>
        <value>张三</value>
        <value>三三来迟</value>
    </array>
</property>
注意, 数组还可以嵌套使用, 例如<value>继续嵌套<array>继续填写数组
List
List采用的标签和Array差不多(List底层的就是数组): <List>, 标签层级关系如下
- <property name=‘集合名称’>: 表示为一个复杂类型(集合类型), name为Java类中定义的集合名称
- <list>: List的顶级标签, 表示声明为一个List
- <value>: List内的元素, 有多少个就写多少个value
- <list>: List的顶级标签, 表示声明为一个List
用法示例如下
<property name="tels">
    <list>
        <value>13888</value>
        <value>15999</value>
    </list>
</property>
注意, List还可以嵌套使用
Set
Set采用的标签: <Set>, 层级关系如下
- <property name=‘集合名称’>: 表示为一个复杂类型(集合类型), name为Java类中定义的集合名称
- <set>: Set的顶级标签, 表示声明一个Set
- <bean class=‘全类名’>: class属性填写的要注入Bean的全限定类名
- <ref bean=‘bean的name’>: bean属性填写要引用的bean, 后续依赖注入的时候会按照类型和名称去找这个bean, 并注入进来
- <set>: Set的顶级标签, 表示声明一个Set
用法示例如下
将Cat类型且名称为miniBean注入到cats中
<!-- 已经提前声明好的Cat -->
<bean id="mimi" class="com.linkedbear.spring.basic_di.g_complexfield.bean.Cat"/>

<!--Set使用说明-->
<property name="cats">
    <set>
        <bean class="com.linkedbear.spring.basic_di.g_complexfield.bean.Cat"/>
        <ref bean="mimi"/>
    </set>
</property>
Map
Map的底层是键值对, 迭代的时候都是用 Entry 来取 key 和 value , 那在这里面也是这样设计的:( key 和 value 都可以是 Bean 的引用。Map采用的标签: <Map>, 层级关系如下
- <property name=‘集合名称’>: 表示为一个复杂类型(集合类型), name为Java类中定义的集合名称
- <map>:
- <entry key=‘key值’ value=‘原始类型的值’ value-ref=‘要引用bean的名称’>: 按照名称注入Bean
- <bean class=‘要引用bean的全类名’>: 按照类型注入Bean
- <entry key=‘key值’ value=‘原始类型的值’ value-ref=‘要引用bean的名称’>: 按照名称注入Bean
- <map>:
用法示例如下
<property name="events">
    <map>
        <!--注入为普通类型-->
        <entry key="8:00" value="起床"/>
        <!-- 撸猫 -->
        <!--按name注入bean-->
        <entry key="9:00" value-ref="mimi"/>
        <!--按类型注入bean-->
        <entry key="14:00">
            <bean class="com.linkedbear.spring.basic_di.g_complexfield.bean.Cat"/>
        </entry>
        <entry key="18:00" value="睡觉"/>
    </map>
</property>
Properties
Properties 类型与 Map 其实是一模一样的, 注入的方式也基本一样, 只不过有一点:Properties 的 key 和 value 只能是 String 类型。Properties采用的标签: <pros>, 层级关系如下
- <property name=‘集合名称’>: 表示为一个复杂类型(集合类型), name为Java类中定义的集合名称
- <prop key=‘key名称’>
使用示例如下
<property name="props">
    <props>
        <prop key="sex">男</prop>
        <prop key="age">18</prop>
    </props>
</property>
测试启动类
public class ComplexFieldXmlApplication {
    public static void main(String[] args) throws Exception {
        ApplicationContext ctx = new ClassPathXmlApplicationContext("basic_di/complexfield/inject-complexfield.xml");
        Person person = ctx.getBean(Person.class);
        // 打印结果: Person(names=[张三, 三三来迟], tels=[13888, 15999], cats=[Cat(name=cat)], events={8:00=起床, 9:00=Cat(name=cat), 14:00=Cat(name=cat), 18:00=睡觉}, props={age=18, sex=男})
        System.out.println(person);
    }
}
注解
新建一个Person2作为演示, 对标Person类
Person2
@Data
@Component
public class Person2 {
    // 最用还是借助SpEL表达式
    @Value("#{new String[] {'张三', '张仨'}}")
    private String[] names;

    @Value("#{{'333333', '3333', '33'}}")
    private List<String> tels;

    // 引用现有的Bean, 以及创建新的Bean
    @Value("#{{@miaomiao, new com.linkedbear.spring.basic_di.g_complexfield.bean.Cat()}}")
    private Set<Cat> cats;

    @Value("#{{'喵喵': @miaomiao.name, '猫猫': new com.linkedbear.spring.basic_di.g_complexfield.bean.Cat().name}}")
    private Map<String, Object> events;

    @Value("#{{'123': '牵着手', '456': '抬起头', '789': '我们私奔到月球'}}")
    private Properties props;
}
运行结果如下
public class ComplexFieldAnnoApplication {

    public static void main(String[] args) throws Exception {
        ApplicationContext ctx = new AnnotationConfigApplicationContext(InjectComplexFieldConfiguration.class);
        // Person2
        Person2 person2 = ctx.getBean(Person2.class);
        // 打印结果: Person2(names=[张三, 张三丰], tels=[333333, 3333, 33], cats=[Cat(name=miaomiao), Cat(name=cat)], events={喵喵=miaomiao, 猫猫=cat}, props={123=牵着手, 456=抬起头, 789=我们私奔到月球})
        System.out.println(person2);
    }
}
回调注入
回调根源
回调注入的核心是一个叫 Aware 的接口, 来自 SpringFramework 3.1, 是一个空接口, 底下有一系列子接口
public interface Aware {}
常用回到接口
| 接口名 | 用途 |
|---|---|
| BeanFactoryAware | 回调注入BeanFactory |
| ApplicationContextAware | 回调注入ApplicationContext(与上面不同, 后续 IOC 高级讲解) |
| EnvironmentAware | 回调注入Environment(后续IOC高级讲解) |
| ApplicationEventPublisherAware | 回调注入事件发布器 |
| ResourceLoaderAware | 回调注入资源加载器(XML驱动可用) |
| BeanClassLoaderAware | 回调注入加载当前Bean的ClassLoader |
| BeanNameAware | 回调注入当前Bean的名称 |
这里面大部分接口, 其实在当下的 SpringFramework 5版本中, 借助 @Autowired 注解就可以实现注入了, 根本不需要这些接口, 只有最后面两个, 是因Bean而异的, 还是需要 Aware接口来帮忙注入
ApplicationContextAware
这个接口用于回调注入ApplicationContext, 后续举例子说明的时候注意体会回调这个动作的含义(中文博大精深)
新创建一个AwareTestBean类, 实现ApplicationContextAware接口
public class AwareTestBean implements ApplicationContextAware { // 注意实现的类
    /*
    用于接受Spring传递的applicationContext
    */
    private ApplicationContext ctx;

    /*
    打印所有bean的名称
    */
    public void printBeanNames() {
		Stream.of(ctx.getBeanDefinitionNames())
            .forEach(System.out::println);
	}
    // 重写setApplicationContext()方法
    @Override
    public void setApplicationContext(ApplicationContext applicationContext) throws BeansException {
        // 从外界传递applicationContext赋值给内部的ctx, 这里就进行了回调
        this.ctx = applicationContext;
    }
}
由于AwareTestBean实现了ApplicationContextAware, 当Spring调用setApplicationContext()方法的时候, 那么调用的是AwareTestBean的setApplicationContext()方法, 此时Spring传入了一个applicationContext, 而我们在重写了方法, 将Spring传递的applicationContext赋值给我们定义的属性ctx. 也就说此时Spring将applicationContext传递给我们, 我们想怎么用都行
BeanNameAware
如果当前的bean需要依赖它本身的name , 使用 @Autowired 就不好使了(因为自己都还没有注入进来, 所以没法显示name), 这个时候就得使用BeanNameAware接口来辅助注入当前bean的name了
在AwareTestBean基础上实现BeanNameAware接口, 增加getName()方法
public class AwareTestBean implements ApplicationContextAware, BeanNameAware {
    /*
    beanName
    */
    private String beanName;
    private ApplicationContext ctx;

    public String getName() {
		return beanName;
    }

    /*
    打印所有bean的名称
    */
    public void printBeanNames() {
        Stream.of(ctx.getBeanDefinitionNames())
            .forEach(System.out::println);
    }

    @Override
    public void setApplicationContext(ApplicationContext ctx) throws BeansException {
        this.ctx = ctx;
    }

    @Override
    public void setBeanName(String name) {
        this.beanName = name;
    }
}
测试运行类
public class AwareApplication {
    public static void main(String[] args) throws Exception {
        ApplicationContext ctx = new AnnotationConfigApplicationContext(AwareConfiguration.class);
        AwareTestBean bbb = ctx.getBean(AwareTestBean.class);
        // 这个打印结果太多了, 不贴下来, 自行运行查看
        bbb.printBeanNames();
        System.out.println("-----------");
        // 打印结果: awaredTestBean
        System.out.println(bbb.getName());
    }
}
NameBean
BeanNameAware 还有一个可选的搭配接口:NamedBean , 它专门提供了一个 getBeanName 方法, 用于获取 bean 的 name 。
所以说, 如果给上面的 AwareTestBean 再实现 NamedBean 接口, 那就不需要自己定义 getName 或者 getBeanName 方法, 直接实现 NamedBean 定义好的 getBeanName 方法即可
在AwardTestBean基础上再实现NameBean接口
@Component
public class AwardTestBean implements ApplicationContextAware, BeanNameAware, NamedBean {
    private String beanName;
    private ApplicationContext ctx;

    public void printBeanNames() {
        Stream.of(ctx.getBeanDefinitionNames()).forEach(System.out::println);
    }

    @Override
    public void setApplicationContext(ApplicationContext ctx) throws BeansException {
        this.ctx = ctx;
    }

    @Override
    public void setBeanName(String name) {
        this.beanName = name;
    }

    @Override
    public String getBeanName() {
        return this.beanName;
    }
}
测试运行类
public class AwareApplication {
    public static void main(String[] args) throws Exception {
        ApplicationContext ctx = new AnnotationConfigApplicationContext(AwareConfiguration.class);
        AwardTestBean bbb = ctx.getBean(AwardTestBean.class);
        bbb.printBeanNames();
        System.out.println("-----------");
        // System.out.println(bbb.getName());
        // 打印结果: awardTestBean
        System.out.println(bbb.getBeanName());
    }
}
延迟注入
setter()
写setter注入时, 直接在setter中标注 @Autowired , 并注入对应的bean即可。如果使用延迟注入, 则注入的就应该换成 ObjectProvider
@Component
public class Dog {
    private Person person;

    @Autowired
    public void setPerson(ObjectProvider<Person> person) {
        // 有Bean才取出, 注入
        this.person = person.getIfAvailable();
    }
}
防止Bean不存在时出现异常
构造器
效果跟 setter 是一样的, 只不过 setter 的注入时机是创建对象后, 而构造器的注入时机是创建对象时
@Component
public class Dog {
    private Person person;

    @Autowired
    public Dog(ObjectProvider<Person> person) {
        // 如果没有Bean, 则采用缺省策略创建
        this.person = person.getIfAvailable(Person::new);
    }
}
属性字段
属性直接注入是不能直接注入Bean的, 只能注入ObjectProvider , 通常也不会这么干, 因为这样注入了之后, 每次要用这个Bean的时候都得判断一次
@Component
public class Dog {
    @Autowired
    private ObjectProvider<Person> person;

    @Override
    public String toString() {
        // 每用一次都要getIfAvailable一次
        return "Dog{" + "person=" + person.getIfAvailable(Person::new) + '}';
    }
}
依赖注入的注入方式-扩展
| 注入方式 | 被注入成员是否可变 | 是否依赖IOC框架的API | 注入时机 | 使用场景 | 支持延迟注入 |
|---|---|---|---|---|---|
| 构造器注入 | 不可变 | 否(xml、编程式注入不依赖) | 对象创建时 | 不可变的固定注入 | 是 |
| 参数注入 | 不可变 | 是(只能通过标注注解来侵入式注入) | 对象创建后 | 通常用于不可变的固定注入 | 否 |
| setter注入 | 可变 | 否(xml、编程式注入不依赖) | 对象创建后 | 可选属性的注入 | 是 |
依赖注入相关面试题目汇总
依赖注入的目的和优点?
首先,依赖注入作为IOC的实现方式之一,目的就是解耦,我们不再需要直接去new那些依赖的类对象(直接依赖会导致对象的创建机制、初始化过程难以统一控制);而且,如果组件存在多级依赖,依赖注入可以将这些依赖的关系简化,开发者只需要定义好谁依赖谁即可。
除此之外,依赖注入的另一个特点是依赖对象的可配置:通过xml或者注解声明,可以指定和调整组件注入的对象,借助Java的多态特性,可以不需要大批量的修改就完成依赖注入的对象替换(面向接口编程与依赖注入配合近乎完美)。
谁把什么注入给谁了?
由于组件与组件之间的依赖只剩下成员属性 + 依赖注入的注解,而注入的注解又被 SpringFramework 支持,所以这个问题也好回答:IOC容器把需要依赖的对象注入给待注入的组件
使用setter注入还是构造器注入?
- SpringFramework 4.0.2 及之前是推荐setter注入,理由是一个 Bean 有多个依赖时,构造器的参数列表会很长;而且如果 Bean 中依赖的属性不都是必需的话,注入会变得更麻烦;
- 4.0.3 及以后官方推荐构造器注入,理由是构造器注入的依赖是不可变的、完全初始化好的,且可以保证不为 null ;
- 当然 4.0.3 及以后的官方文档中也说了,如果真的出现构造器参数列表过长的情况,可能是这个 Bean 承担的责任太多,应该考虑组件的责任拆解
参考资料
从 0 开始深入学习 Spring