首先我们肯定先说创建线程
1.继承Thread类
o定义一个类MyThread继承Thread类
o在MyThread类中重写run()方法
o创建MyThread类的对象
o启动线程
package Java.thread;

public class first extends  Thread{
    public  void run(){
        for(int i=0;i<50;i++){
            System.out.println("我是小线程"+"名称:"+getName()+",运行结果:"+i);
            try {
                Thread.sleep(50);
            } catch (InterruptedException e) {
                e.printStackTrace();
            }
        }

    }
}
package Java.thread;

public class test {

    public static void main(String[] args) throws InterruptedException {
        System.out.println("我是主线程");
        first f1=new first();
        first f2=new first();
        f1.start();
        f2.start();
        Thread.sleep(50);
        System.out.println("主线程结果。");
    }
}

2.实现Runnable接口
o定义一个类MyRunnable实现Runnable接口
o在MyRunnable类中重写run()方法
o创建MyRunnable类的对象
o创建Thread类的对象,把MyRunnable对象作为构造方法的参数
o启动线程
package Java.thread;

public class second implements Runnable{
    public void run(){
        for(int i=0;i<50;i++){
        //不能直接获取getname,因为不是继承
            System.out.println("我是小线程"+"名称:"+Thread.currentThread().getName()+",运行结果:"+i);
            try {
                Thread.sleep(50);
            } catch (InterruptedException e) {
                e.printStackTrace();
            }
        }
    }
}
package Java.thread;

public class test {

    public static void main(String[] args) throws InterruptedException {
        System.out.println("我是主线程");
   second s1=new second();
   second s2=new second();
   Thread t=new Thread(s1,"小线程1");
   Thread t1=new Thread(s2,"小线程2");
   t.start();
   t1.start();
   Thread.sleep(50);
   System.out.println("主线程结果。");
    }
}

使用lambda简化:
package Java.thread;

public class test {

    public static void main(String[] args) throws InterruptedException {
        System.out.println("我是主线程");
        Runnable s1=()->{
            for(int i=0;i<50;i++){
            //不能直接获取getname,因为不是继承
            System.out.println("我是小线程"+"名称:"+Thread.currentThread().getName()+",运行结果:"+i);
            try {
                Thread.sleep(50);
            } catch (InterruptedException e) {
                e.printStackTrace();
            }
        }};
   Thread t=new Thread(s1,"小线程1");
   Thread t1=new Thread(s1,"小线程2");
   t.start();
   t1.start();
   Thread.sleep(50);
   System.out.println("主线程结果。");
    }
}
3.实现Callable接口
- V call() 计算结果,如果无法计算结果,则抛出一个异常
- FutureTask(Callable callable) 创建一个
FutureTask,一旦运行就执行给定的 Callable - V get() 如有必要,等待计算完成,然后获取其结果
o定义一个类MyCallable实现Callable接口
o在MyCallable类中重写call()方法
o创建MyCallable类的对象
o创建Future的实现类FutureTask对象,把MyCallable对象作为构造方法的参数
o创建Thread类的对象,把FutureTask对象作为构造方法的参数
o启动线程
o再调用get方法,就可以获取线程结束之后的结果。
package Java.thread;

import java.util.concurrent.Callable;

public class thired implements Callable {
    @Override
    public Object call() throws Exception {
        for(int i=0;i<50;i++){
            System.out.println("我是小线程"+"名称:"+Thread.currentThread().getName()+",运行结果:"+i);
            try {
                Thread.sleep(50);
            } catch (InterruptedException e) {
                e.printStackTrace();
            }
        }

        String o="callable";
        return o;
    }
}
public class test {

    public static void main(String[] args) throws InterruptedException, ExecutionException {
   thired s1=new thired();
   thired s2=new thired();
   FutureTask f1=new FutureTask(s1);
   FutureTask f2=new FutureTask(s2);
   Thread t=new Thread(f1,"小线程1");
   Thread t1=new Thread(f2,"小线程2");
   t.start();
   t1.start();
   System.out.println("小线程1结果"+f1.get());
   System.out.println("小线程2结果"+f2.get());
   System.out.println("主线程结果。");
    }
}
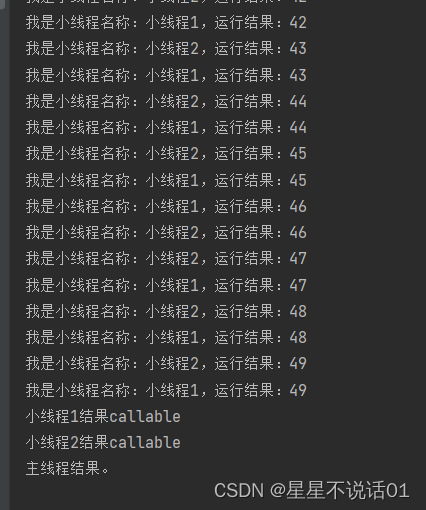
System.out.println(“主线程结果。”); 并不是在所有其他线程都完成之后才执行的,而是取决于 f1.get() 和 f2.get() 的调用顺序和它们的行为。
FutureTask.get() 方法用于获取异步计算的结果。如果计算尚未完成,此方法将阻塞直到它完成。这意味着,如果 f1 或 f2 对应的线程尚未完成其任务,get() 方法将阻塞主线程,直到该任务完成。
主线程会首先等待 f1 完成,然后再等待 f2 完成。
o实现Runnable、Callable接口
o好处: 扩展性强,实现该接口的同时还可以继承其他的类
o缺点: 编程相对复杂,不能直接使用Thread类中的方法
o继承Thread类
o好处: 编程比较简单,可以直接使用Thread类中的方法
o缺点: 可以扩展性较差,不能再继承其他的类
CompletableFuture引入
Future有几个局限,Java1.8就推出了加强版的Future类:CompletableFuture。
来上几个future的局限的代码(部分,下一节重点是completablefuture):
1.阻塞主进程的执行:
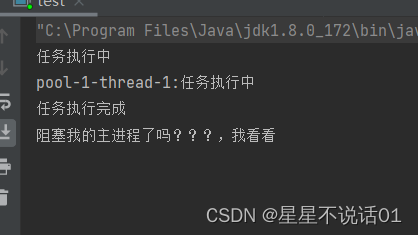
public class test {

    public static void main(String[] args) throws InterruptedException, ExecutionException {
        //自定义线程池 ,使用自定义的拒绝策略
        ThreadPoolExecutor threadPoolExecutor = new ThreadPoolExecutor(2, 4, 60,
                TimeUnit.SECONDS, new ArrayBlockingQueue<>(5));
           Callable callable=()->{
               System.out.println(Thread.currentThread().getName()+":任务执行中");
               Thread.sleep(600);
               return "任务执行完成";
           };

           Future f=threadPoolExecutor.submit(callable);
           System.out.println("任务执行中");
           System.out.println(f.get());
           System.out.println("阻塞我的主进程了吗???,我看看");
           threadPoolExecutor.shutdown();
    }
}
改为completableFuture:
import java.util.concurrent.*;
public class test {
public static void main(String[] args) throws InterruptedException, ExecutionException {
//自定义线程池 ,使用自定义的拒绝策略
ThreadPoolExecutor threadPoolExecutor = new ThreadPoolExecutor(2, 4, 60,
TimeUnit.SECONDS, new ArrayBlockingQueue<>(5));
Callable callable=()->{
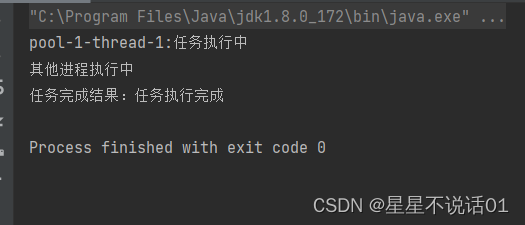
System.out.println(Thread.currentThread().getName()+":任务执行中");
Thread.sleep(600);
return "任务执行完成";
};
CompletableFuture<String> completableFuture= CompletableFuture.supplyAsync(()->{
System.out.println(Thread.currentThread().getName()+":任务执行中");
try {
Thread.sleep(600);
} catch (InterruptedException e) {
e.printStackTrace();
}
return "任务执行完成";
},threadPoolExecutor);
//注册一个回调函数来处理结果
completableFuture.thenAccept(re-> {
System.out.println("任务完成结果:"+re);
});
System.out.println("其他进程执行中");
threadPoolExecutor.shutdown();
}
}
2.链式调用上:
futuretask不能链式调用,任务2无法用任务1的结果
public class test {

    public static void main(String[] args) throws InterruptedException, ExecutionException {
        //自定义线程池 ,使用自定义的拒绝策略
        ThreadPoolExecutor threadPoolExecutor = new ThreadPoolExecutor(2, 4, 60,
                TimeUnit.SECONDS, new ArrayBlockingQueue<>(5));

         Future <String> future=threadPoolExecutor.submit(()->{
             try {
                 Thread.sleep(60);
             } catch (InterruptedException e) {
                 e.printStackTrace();
             }
             return "任务1完成";
         });

         Future <String> future1=threadPoolExecutor.submit(()->{
             //我们想要在这个任务中使用 future 的结果,但我们不能直接链式调用
             try {
                 Thread.sleep(60);
             } catch (InterruptedException e) {
                 e.printStackTrace();
             }
             return "任务2完成";
         });

        System.out.println(future.get());
        System.out.println(future1.get());
        threadPoolExecutor.shutdown();
    }


}
completablefuture:
public class test {

    public static void main(String[] args) throws InterruptedException, ExecutionException {
        //自定义线程池 ,使用自定义的拒绝策略
        ThreadPoolExecutor threadPoolExecutor = new ThreadPoolExecutor(2, 4, 60,
                TimeUnit.SECONDS, new ArrayBlockingQueue<>(5));

          CompletableFuture<String> completableFuture=CompletableFuture.supplyAsync(()->{
              try {
                  Thread.sleep(60);
              } catch (InterruptedException e) {
                  e.printStackTrace();
              }
              return "任务1完成";
          },threadPoolExecutor);


         CompletableFuture<String> completableFuture1=completableFuture.thenApplyAsync(re->{
             //我们想要在这个任务中使用 future 的结果,但我们不能直接链式调用
             try {
                 Thread.sleep(60);
             } catch (InterruptedException e) {
                 e.printStackTrace();
             }
             return "任务2完成并用了任务1的结果:"+re;
         },threadPoolExecutor);

        completableFuture.thenAccept(re->{
            System.out.println("任务1运行结果:"+re);
        });
        completableFuture1.thenAccept(re1->{
            System.out.println("r任务2运行结果:"+re1);
        });

        System.out.println("主线程的任务3");

    }