SpringBoot
概述
- Spring Boot 可以轻松创建独立的、生产级的基于 Spring 的应用程序,您可以“直接运行”。
特征
- 创建独立的 Spring 应用程序
-
直接嵌入Tomcat,Jetty或Undertow(无需部署WAR文件)
-
提供固执己见的“入门”依赖项以简化构建配置
-
尽可能自动配置 Spring 和第三方库
-
提供生产就绪功能,如指标、运行状况检查和外部化配置
-
绝对无需生成代码,也无需 XML 配置
什么是微服务?
- 微服务是一种架构风格,它要求我们在开发一个应用的时候,这个应用必须构建成一系列小服务的组合;可以通过http的方式进行互通。
SpringBoot原理
自动配置:
pox .xml
- spring-boot-dependencies:核心依赖在父工程中
- 当引入一些SpringBoot以来的时候,不需要指定版本,因为有版本仓库
启动器
<dependency>
	  <groupId>org.springframework.boot</groupId>
      <artifactId>spring-boot-staeter</artifactId>
</dependency>
- 启动类:说白了就是SpringBoot的启动场景
- 比如spring-boot-starter-web ,它会帮我们自动导入web环境的所有依赖。
- springboot会将所有的功能场景都变成一个个启动器
主程序
//@SpringBootApplication:标注这个类是一个springboot的应用
@SpringBootApplication
public class AliyunApplication {

    public static void main(String[] args) {
    		//将springboot应用启动
        SpringApplication.run(AliyunApplication.class, args);
    }

}
注解
@SpringBootConfiguration :springboot的配置
	@Configuration :spring配置类
		@Component:说明这是一个spring的组件
@EnableAutoConfiguration 自动配置
	@AutoConfigurationPackage:自动配置包
	@Import({AutoConfigurationImportSelector.class}):导入选择
结论: springboot所有自动加载都是在启动的时候扫描并加载spring.factories所有的自动配置类都在这里面,但不一定生效,要判断条件是否成立,只需要导入对应的start,就有对应的启动器了,有了启动其自动配置就会成效,然后配置成功。
- springboot在启动的时候,从类路径下/META-INF/spring.factories获取指定的值;
- 将这些自动配置的类导入容器,自动配置就会生效,帮我们进行自动配置!
- 以前我们需要自动配置的东西,现在springboot就帮我们做了。
- 整个javaEE解决方案与自动配置的东西都在spring-boot-autoconfigure-2.6.11.jar这个包下
- 它会把所有需要导入的组件,以类名的形式返回,这些组件就会北添加到容器;
- 容器中也会存在非常多的xxxAutoConfiguration的文件(@Bean),就是这邪恶类给容器中导入了所有的组件;并自动配置,@Configuration,JavaConfig
- 有了这些自动配置类,免去了我们手动编写配置文件的工作!
yaml
简介:YAML(/ˈjæməl/,尾音类似camel骆驼)是一个可读性高,用来表达数据序列化的格式。YAML参考了其他多种语言,包括:C语言、Python、Perl,并从XML、电子邮件的数据格式(RFC 2822)中获得灵感。Clark Evans在2001年首次发表了这种语言,另外Ingy döt Net与Oren Ben-Kiki也是这语言的共同设计者。当前已经有数种编程语言或脚本语言支持(或者说解析)这种语言。
基本语法
server:
  port: 8080

#普通的的key-value
name: springboot

#对象
student:
  name: zhangsan
  age: 20

#行内写法
teacher: { name: lisi,age: 22 }

#数组
pets:
  - cat
  - dog
  - pig

Animals: [cat,dog,pig]
yaml可以直接给实体类赋值。
Dog类
package com.example.aliyun.pojo;

import org.springframework.stereotype.Component;

@Component
public class Dog {
    private String name;
    private Integer age;

    public Dog() {
    }

    public Dog(String name, Integer age) {
        this.name = name;
        this.age = age;
    }

    public String getName() {
        return name;
    }

    public void setName(String name) {
        this.name = name;
    }

    public Integer getAge() {
        return age;
    }

    public void setAge(Integer age) {
        this.age = age;
    }

    @Override
    public String toString() {
        return "Dog{" +
                "name='" + name + '\'' +
                ", age=" + age +
                '}';
    }
}
Person类:
package com.example.aliyun.pojo;

import org.springframework.boot.context.properties.ConfigurationProperties;
import org.springframework.stereotype.Component;

import java.util.Date;
import java.util.List;
import java.util.Map;

@Component
@ConfigurationProperties(prefix = "person")
public class Person {
    private String name;
    private Integer age;
    private Boolean happy;
    private Date birthday;
    private Map<String, Object> maps;
    private List<Object> list;
    private Dog dog;

    public Person() {
    }

    public Person(String name, Integer age, Boolean happy, Date birthday, Map<String, Object> maps, List<Object> list, Dog dog) {
        this.name = name;
        this.age = age;
        this.happy = happy;
        this.birthday = birthday;
        this.maps = maps;
        this.list = list;
        this.dog = dog;
    }

    public String getName() {
        return name;
    }

    public void setName(String name) {
        this.name = name;
    }

    public Integer getAge() {
        return age;
    }

    public void setAge(Integer age) {
        this.age = age;
    }

    public Boolean getHappy() {
        return happy;
    }

    public void setHappy(Boolean happy) {
        this.happy = happy;
    }

    public Date getBirthday() {
        return birthday;
    }

    public void setBirthday(Date birthday) {
        this.birthday = birthday;
    }

    public Map<String, Object> getMaps() {
        return maps;
    }

    public void setMaps(Map<String, Object> maps) {
        this.maps = maps;
    }

    public List<Object> getList() {
        return list;
    }

    public void setList(List<Object> list) {
        this.list = list;
    }

    public Dog getDog() {
        return dog;
    }

    public void setDog(Dog dog) {
        this.dog = dog;
    }

    @Override
    public String toString() {
        return "Person{" +
                "name='" + name + '\'' +
                ", age=" + age +
                ", happy=" + happy +
                ", birthday=" + birthday +
                ", maps=" + maps +
                ", list=" + list +
                ", dog=" + dog +
                '}';
    }
}
application.yaml
person:
  name: lisi
  age: 18
  happy: false
  birthday: 2023/1/1
  maps: {hight: 188,weight: 72}
  list:
    - code
    - music
    - film
  dog:
   name: 小黑
   age: 2
Test测试类
package com.example.aliyun;

import com.example.aliyun.pojo.Person;
import org.junit.jupiter.api.Test;
import org.springframework.beans.factory.annotation.Autowired;
import org.springframework.boot.test.context.SpringBootTest;

@SpringBootTest
class AliyunApplicationTests {
   @Autowired
    private Person person;
    @Test
    void contextLoads() {
        System.out.println(person);
    }

}
运行结果

值得注意的是yaml可以使用${}
Dog类
package com.example.aliyun.pojo;

import org.springframework.boot.context.properties.ConfigurationProperties;
import org.springframework.stereotype.Component;

@Component
@ConfigurationProperties(prefix = "dog")
public class Dog {
    private String name;
    private Integer age;

    public Dog() {
    }

    public Dog(String name, Integer age) {
        this.name = name;
        this.age = age;
    }

    public String getName() {
        return name;
    }

    public void setName(String name) {
        this.name = name;
    }

    public Integer getAge() {
        return age;
    }

    public void setAge(Integer age) {
        this.age = age;
    }

    @Override
    public String toString() {
        return "Dog{" +
                "name='" + name + '\'' +
                ", age=" + age +
                '}';
    }
}
applicat.yaml
dog:
  name: 小黑${random.uuid}
  age: ${random.int}
测试类
package com.example.aliyun;

import com.example.aliyun.pojo.Dog;
import com.example.aliyun.pojo.Person;
import org.junit.jupiter.api.Test;
import org.springframework.beans.factory.annotation.Autowired;
import org.springframework.boot.test.context.SpringBootTest;

@SpringBootTest
class AliyunApplicationTests {
   @Autowired
    private Dog dog;
    @Test
    void contextLoads() {
        System.out.println(dog);
    }

}
运行结果

松散绑定
比如我们在yaml中写的是last-name在类中的属性为驼峰命名法的lastName,这两个之间还是可以绑定起来
Dog类
package com.example.aliyun.pojo;

import org.springframework.boot.context.properties.ConfigurationProperties;
import org.springframework.stereotype.Component;

@Component
@ConfigurationProperties(prefix = "dog")
public class Dog {
    private String lastName;
    private Integer age;
    public Dog() {

    }
    public Dog(String lastName, Integer age) {
        this.lastName = lastName;
        this.age = age;
    }

    public String getLastName() {
        return lastName;
    }

    public void setLastName(String lastName) {
        this.lastName = lastName;
    }

    public Integer getAge() {
        return age;
    }

    public void setAge(Integer age) {
        this.age = age;
    }

    @Override
    public String toString() {
        return "Dog{" +
                "lastName='" + lastName + '\'' +
                ", age=" + age +
                '}';
    }
}
application.yaml
dog:
  last-name: 小黑${random.uuid}
  age: ${random.int}
运行结果

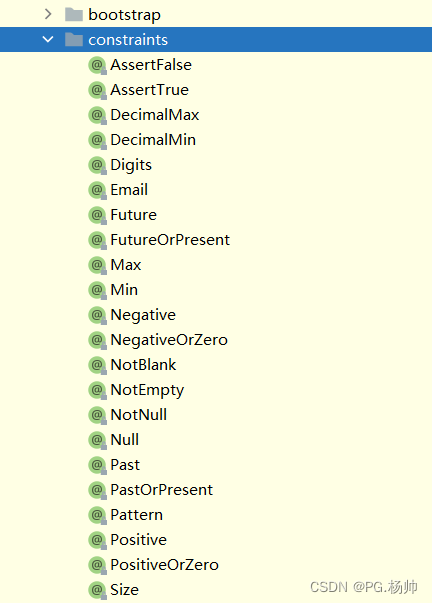
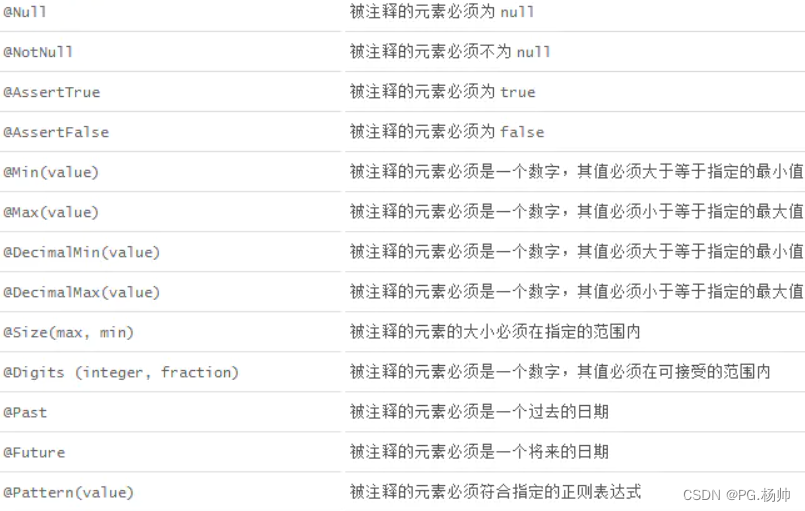
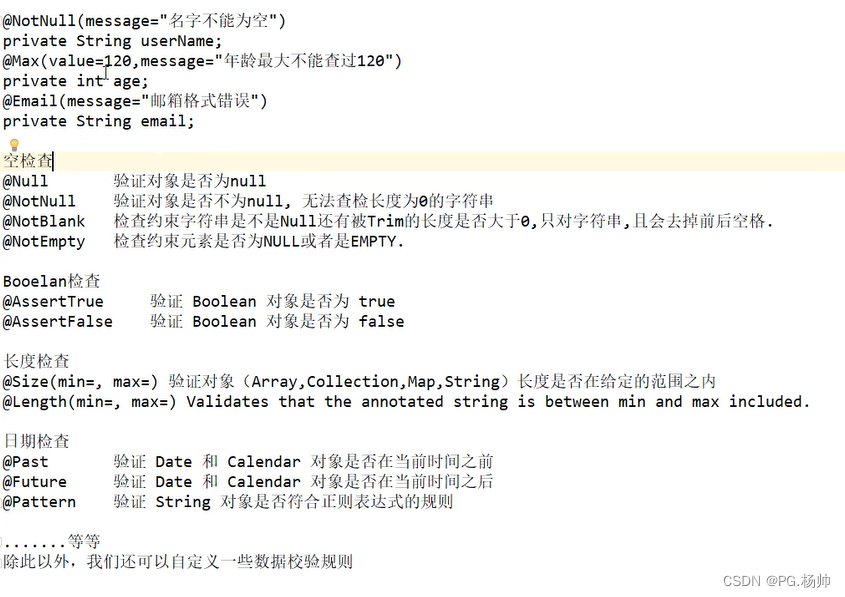
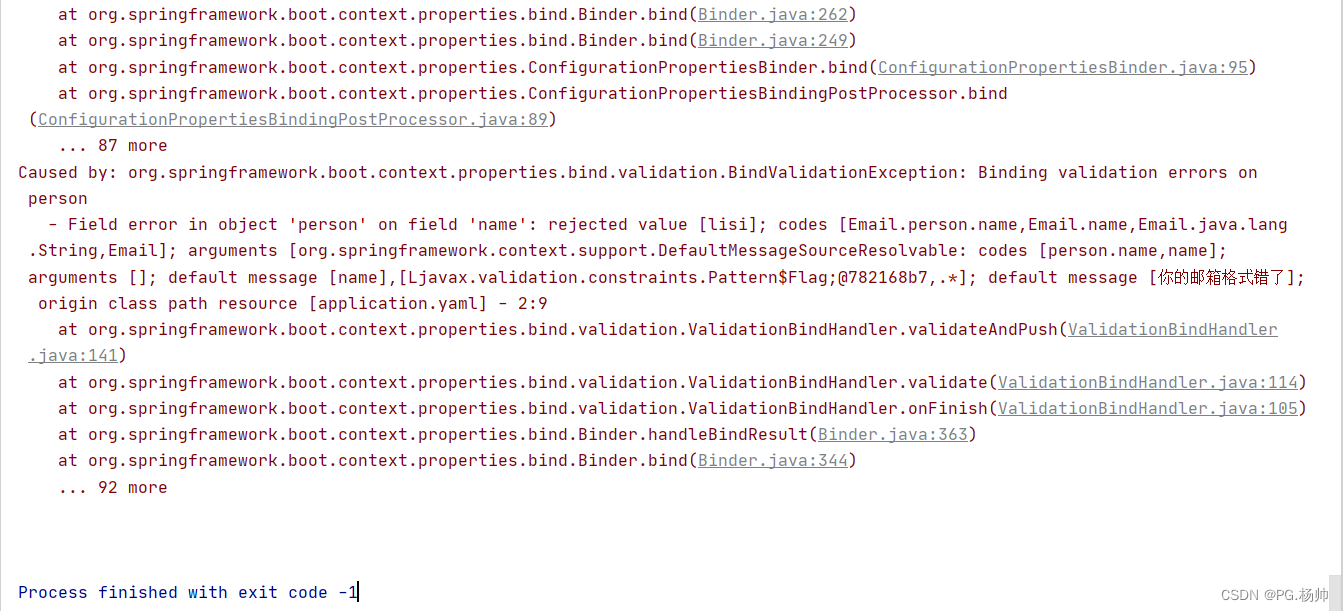
JSR303校验:就是在字段上增加一层过滤器验证,可以保证数据的合法性
测试一下
Person类
package com.example.aliyun.pojo;

import org.springframework.boot.context.properties.ConfigurationProperties;
import org.springframework.stereotype.Component;
import org.springframework.validation.annotation.Validated;

import java.util.Date;
import java.util.List;
import java.util.Map;
import javax.validation.constraints.Email;

@Component
@ConfigurationProperties(prefix = "person")
@Validated
public class Person {

   @Email(message = "你的邮箱格式错了")
    private String name;
    private Integer age;
    private Boolean happy;
    private Date birthday;
    private Map<String, Object> maps;
    private List<Object> list;
    private Dog dog;

    public Person() {
    }

    public Person(String name, Integer age, Boolean happy, Date birthday, Map<String, Object> maps, List<Object> list, Dog dog) {
        this.name = name;
        this.age = age;
        this.happy = happy;
        this.birthday = birthday;
        this.maps = maps;
        this.list = list;
        this.dog = dog;
    }

    public String getName() {
        return name;
    }

    public void setName(String name) {
        this.name = name;
    }

    public Integer getAge() {
        return age;
    }

    public void setAge(Integer age) {
        this.age = age;
    }

    public Boolean getHappy() {
        return happy;
    }

    public void setHappy(Boolean happy) {
        this.happy = happy;
    }

    public Date getBirthday() {
        return birthday;
    }

    public void setBirthday(Date birthday) {
        this.birthday = birthday;
    }

    public Map<String, Object> getMaps() {
        return maps;
    }

    public void setMaps(Map<String, Object> maps) {
        this.maps = maps;
    }

    public List<Object> getList() {
        return list;
    }

    public void setList(List<Object> list) {
        this.list = list;
    }

    public Dog getDog() {
        return dog;
    }

    public void setDog(Dog dog) {
        this.dog = dog;
    }

    @Override
    public String toString() {
        return "Person{" +
                "name='" + name + '\'' +
                ", age=" + age +
                ", happy=" + happy +
                ", birthday=" + birthday +
                ", maps=" + maps +
                ", list=" + list +
                ", dog=" + dog +
                '}';
    }
}
application.yaml
person:
  name: lisi
  age: 18
  happy: false
  birthday: 2023/1/1
  maps: {hight: 188,weight: 72}
  list:
    - code
    - music
    - film
  dog:
   last-name: 小黑
   age: 2
测试类
package com.example.aliyun;

import com.example.aliyun.pojo.Dog;
import com.example.aliyun.pojo.Person;
import org.junit.jupiter.api.Test;
import org.springframework.beans.factory.annotation.Autowired;
import org.springframework.boot.test.context.SpringBootTest;

@SpringBootTest
class AliyunApplicationTests {
   @Autowired
   private Person person;;
    @Test
    void contextLoads() {
        System.out.println(person);

    }

}
运行结果
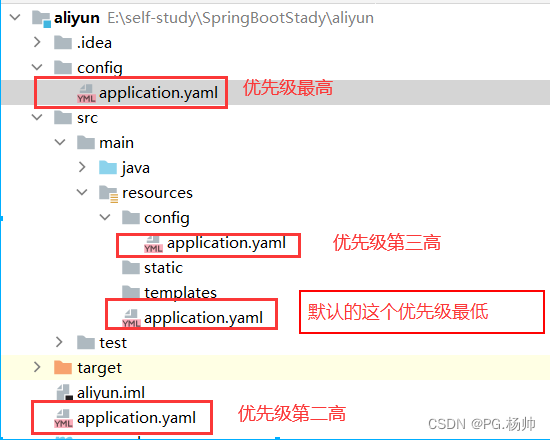
多环境配置以及配置文件位置
配置文件位置
file:./config/file:./classpath:./config/classpath:./
优先级顺序
多环境配置
方式一(application.properties)
现在有三个端口【默认:8081】【开发环境:8081】【测试环境:8082】
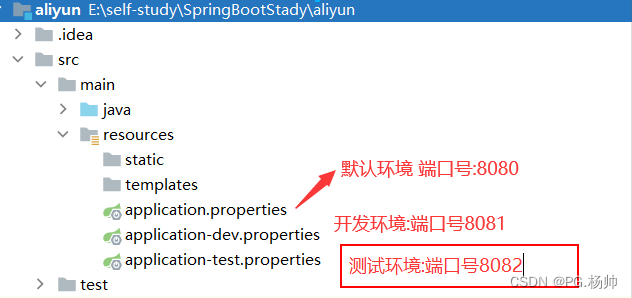
application.properties
server.port=8080
application-dev.properties
server.port=8081
application-test.properties
server.port=8082
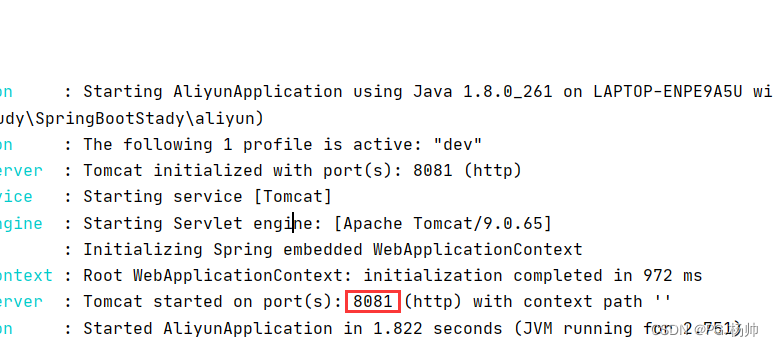
springboot的多环境配置:可以选择激活哪一个文件配置
application.properties
spring.profiles.active=dev
运行结果
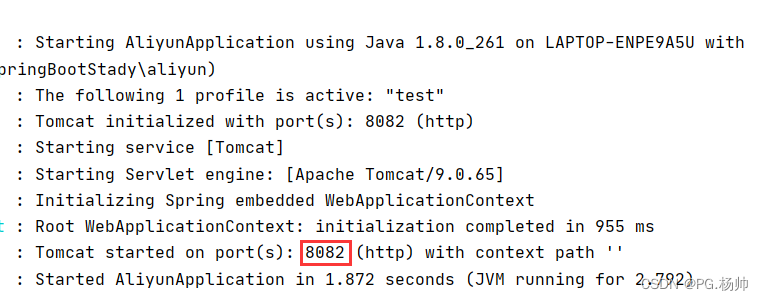
application.properties
spring.profiles.active=test
运行结果
方式二(application.yaml)[推荐使用]
注意:---为分割线,分割其他环境
spring: profiles:的作用相当于起名称
application.yaml
server:
  port: 8080

---
server:
  port: 8081
spring:
  profiles: dev
---
server:
  port: 8082
spring:
  profiles: test
这就相当于方式一的三个文件了
springfiles: active:选择要激活的版本
比如现在需要激活dev环境
applicat.yaml
server:
  port: 8080
spring:
  profiles:
    active: dev
---
server:
  port: 8081
spring:
  profiles: dev
---
server:
  port: 8082
spring:
  profiles: test
运行结果

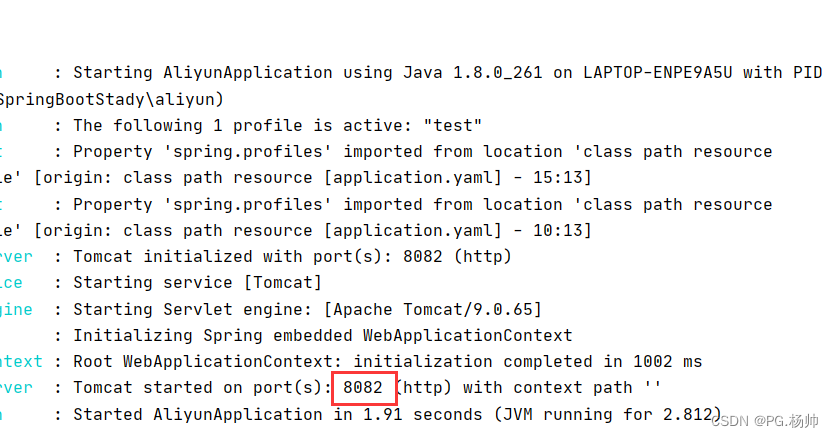
如果现在需要激活test环境
server:
  port: 8080
spring:
  profiles:
    active: test
---
server:
  port: 8081
spring:
  profiles: dev
---
server:
  port: 8082
spring:
  profiles: test
运行结果
由此可以发现yaml格式要方便的多
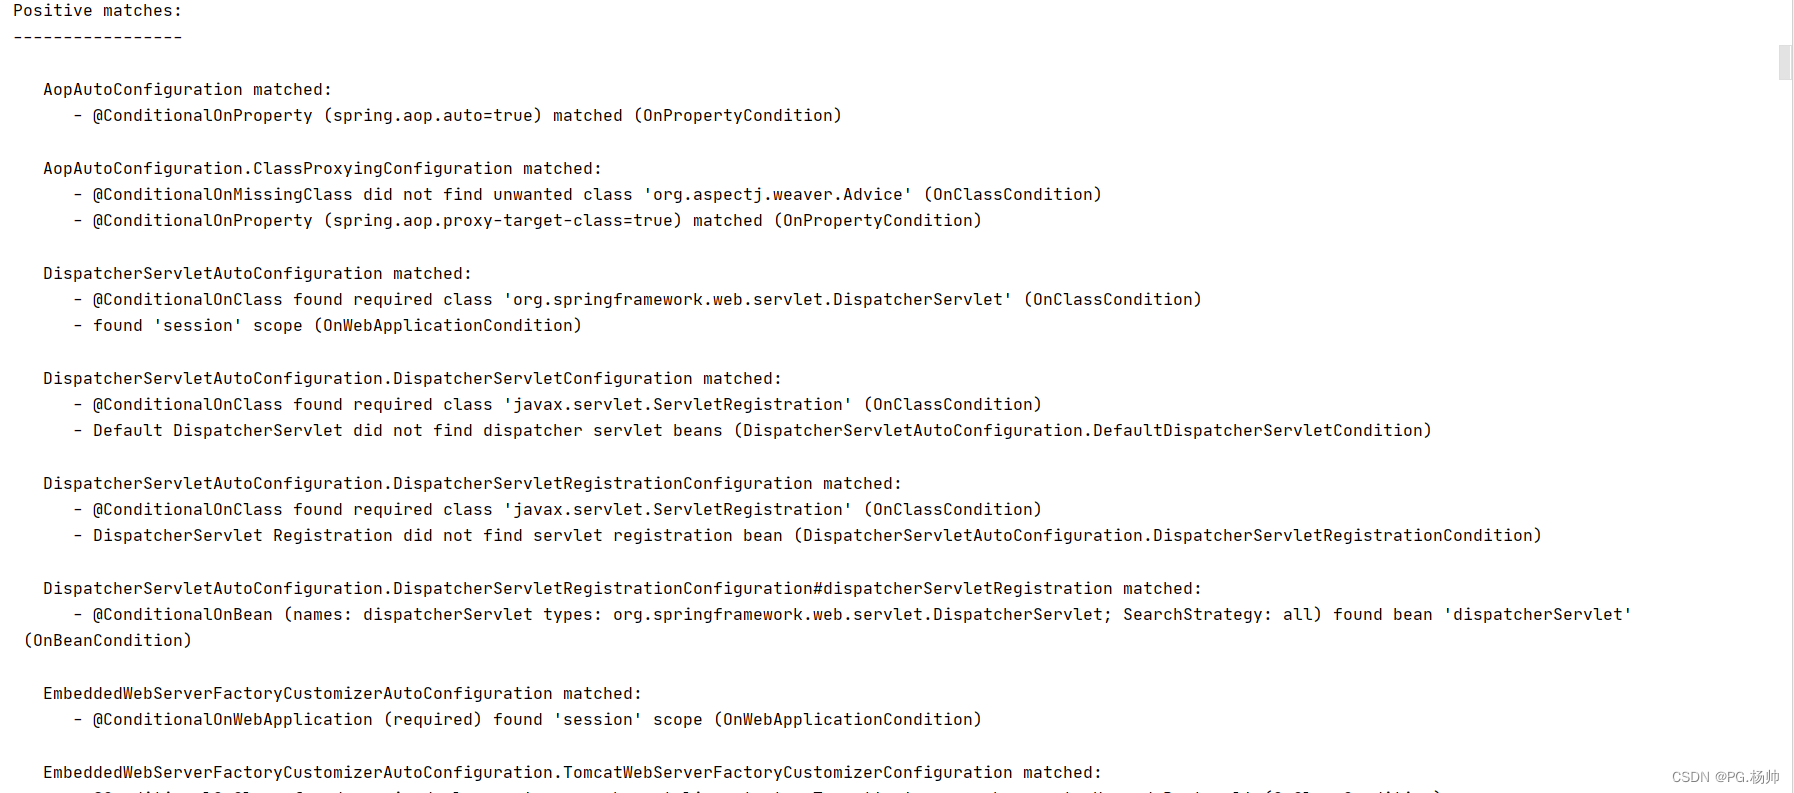
自动装配原理的精髓重点
- SpringBoot启动会加载大量的自动配置类
- 我们看我们需要的功能有没有在SpringBoot默任写好的自动配置类当中;
- 我们再来看这个自动装配类中到底配置了哪些组件;(只要我们要用的组件存在其中,我们就不再需要手动配置了)
- 给容器中自动配置类添加组件的时候,会从properties类中获取某些属性。我们只需要在配置文件中指定这些属性的值即可。
xxxAutoConfiguration:自动配置类;给容器中添加组件;
xxxPeoperties:封装配置文件中的相关属性;
通过springboot配置 ...yaml去修改属性
可以通过debug: ture查看哪些自动配置类生效,哪些自动配置类没有生效
运行结果
springWeb开发
首先要解决的问题
- 导入静态资源…
- 固定首页
- jsp,模板引擎Thymeleaf
- 装配扩展SpringMVC
- 增删改查
- 拦截器
- 国际化
静态资源
@Override
public void addResourceHandlers(ResourceHandlerRegistry registry) {
if (!this.resourceProperties.isAddMappings()) {
logger.debug("Default resource handling disabled");
return;
}
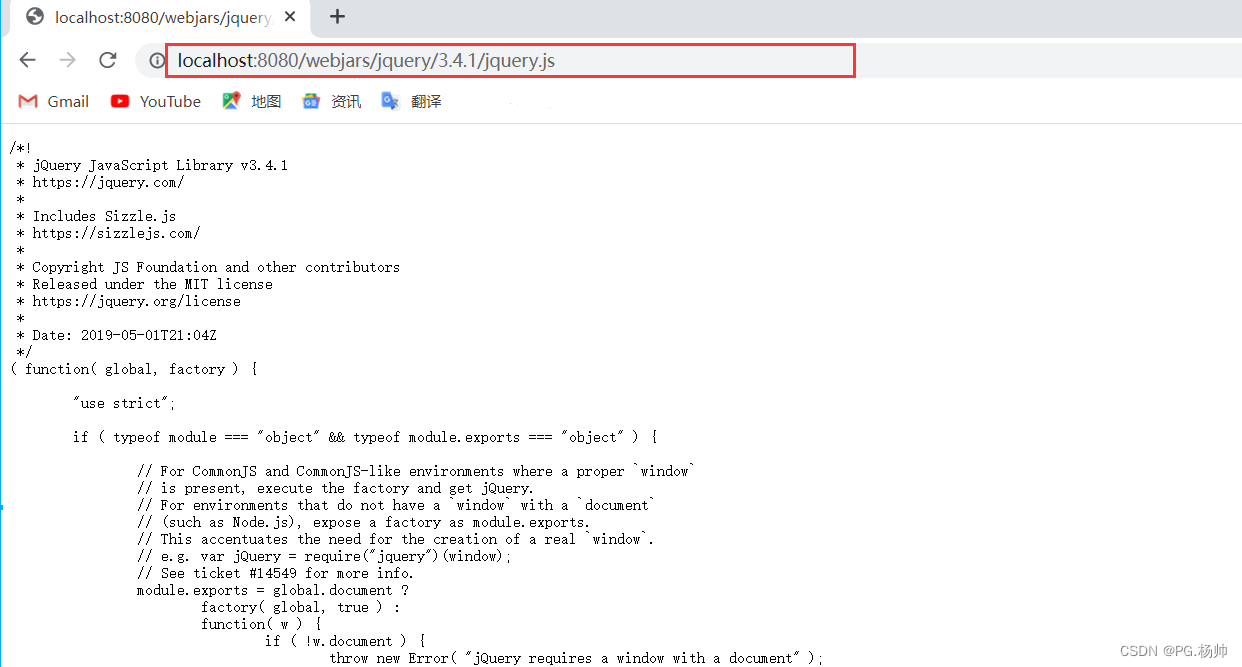
addResourceHandler(registry, "/webjars/**", "classpath:/META-INF/resources/webjars/");
addResourceHandler(registry, this.mvcProperties.getStaticPathPattern(), (registration) -> {
registration.addResourceLocations(this.resourceProperties.getStaticLocations());
if (this.servletContext != null) {
ServletContextResource resource = new ServletContextResource(this.servletContext, SERVLET_LOCATION);
registration.addResourceLocations(resource);
}
});
}
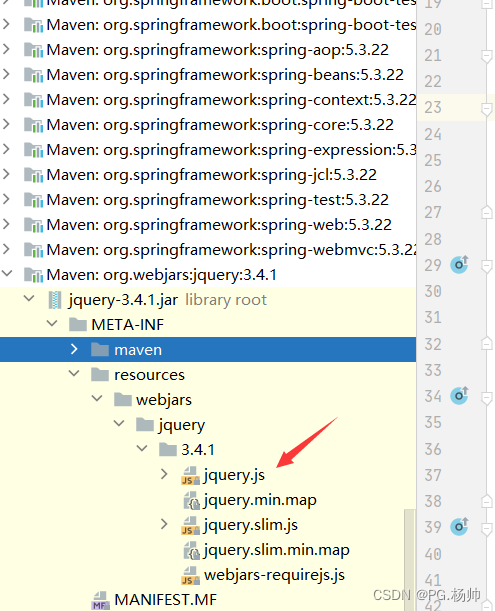
什么是webjars
Webjars本质就是以jar包的方式引入我们的静态资源 , 我们以前要导入一个静态资源文件,直接导入即可。
例如以maven的方式引入jQuery
<dependency>
    <groupId>org.webjars</groupId>
     <artifactId>jquery</artifactId>
    <version>3.4.1</version>
</dependency>
第一种方式
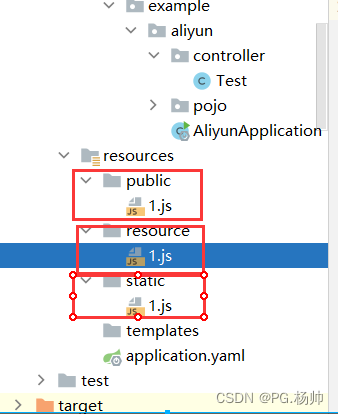
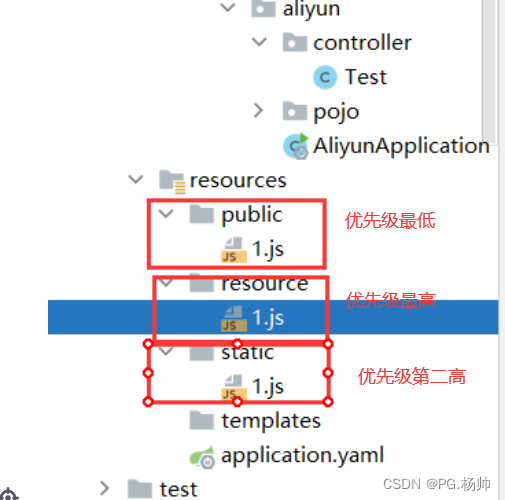
当这三种方式同时存在时比较优先级
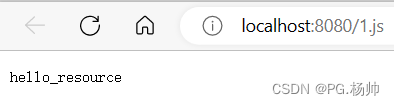
结论:当三种方式同时存在时:resources包下面的优先级最高
删除resources包下的1.js,比较剩下两种的优先级
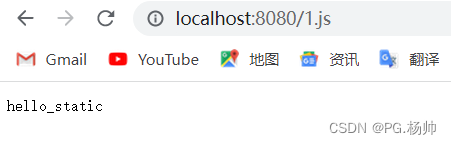
再删除static包下的1.js,
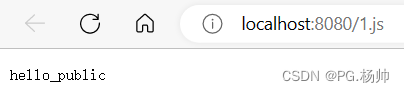
结论 优先级从高到低:resources->static->public
1. 在springboot中我们可以使用以下方式处理静态资源
- webjars 访问方式:localhost:8080/webjars/
- resources、static、public ,/** 访问方式:localhost:8080/
2. 优先级:resource>static>public
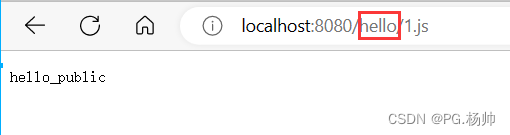
3.当我们自定义了一个访问静态资源的路径,那么默认的路径都会失效
例如:
spring:
  mvc:
    static-path-pattern: "/hello/**"
结果如下:
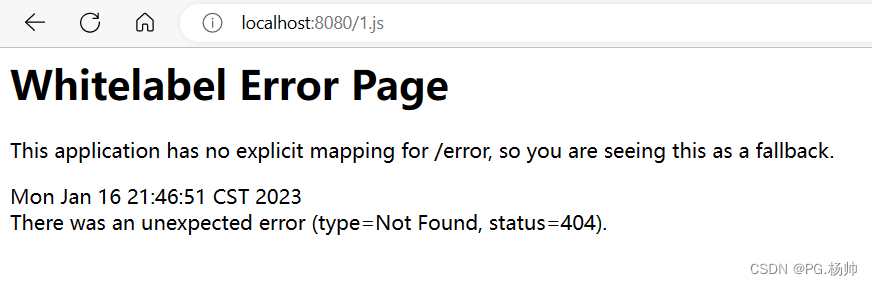
需要用我们自定义的路径去访问
首页和图标的定制
…未完待续

![[oeasy]python0051_ 转义_escape_字符_character_单引号_双引号_反引号_ 退格键](https://img-blog.csdnimg.cn/img_convert/5df40d17e1c9c8b4286963afc6cb5e06.png)