目录
一、SSH远程管理
1.SSH的定义
2.远程传输的种类
3.OpensSSH
4.SSH客户端与服务端
二、配置OpenSSH服务器
1.sshd_config配置文件的常用选项设置
2.sshd 服务支持两种验证方式
1)密码验证
2)密钥对验证
三、使用 SSH 客户端程序
1.ssh 远程登录
2.scp 远程复制
3.sftp 安全 FTP
四、SSH的验证方式
1.密码验证:使用账号和密码进行验证
2.密钥对验证:使用客户端创建的密钥对进行验证
3.案例:ssh密钥对的创建和使用
4.ssh密钥对免交互登录
五、TCP Wrappers 访问控制
1.TCP Wrappers
2.TCP Wrappers 保护机制的两种实现方式
3.TCP Wrappers的运用
4.TCP Wrappers 的访问策略
5.TCP Wrappers 机制的基本原则:
总结:
一、SSH远程管理
1.SSH的定义
SSH(Secure Shell)是一种安全通道协议,主要用来实现字符界面的远程登录、远程复制等功能。
SSH协议对通信双方的数据传输进行了加密处理,其中包括用户登录时输入的用户口令。因此SSH协议具有很好的安全性。
2.远程传输的种类
ssh(tcp/22端口)密文传输,加密,更安全
telnet(tcp/23端口):明文传输,数据容易被劫获;用的极少
3.OpensSSH
OpenSSH----是ssh对应的软件,一般是系统默认安装的;在ubuntu系统中需要自行安装
OpenSSH 是实现 SSH 协议的开源软件项目,适用于各种 UNIX、Linux 操作系统。
CentOS 7系统默认已安装openssh相关软件包,并已将 sshd 服务添加为开机自启动。执行“systemctl start sshd”命令即可启动 sshd 服务
sshd 服务默认使用的是TCP的 22端口
服务名称:sshd
服务端主程序:/usr/sbin/sshd
服务端配置文件:/etc/ssh/sshd_config
客户端配置文件:/etc/ssh/ssh_config
注意:ssh_config和sshd_config都是ssh服务器的配置文件,二者区别在于前者是针对客户端的配置文件,后者则是针对服务端的配置文件。
4.SSH客户端与服务端
SSH客户端:Putty、Xshell、CRT、MobaXterm
SSH服务端:OpenSSH
网络
SSH客户端<--------------------------------------->SSH服务端
数据传输是加密的,可以防止信息泄漏
数据传输是压缩的,可以提高传输速度
注意:在生产环境中,为了保密等措施,Xshell、CRT等外国软件应用较少,多使用国产或开源的终端工具
二、配置OpenSSH服务器
1.sshd_config配置文件的常用选项设置
vim /etc/ssh/sshd_config
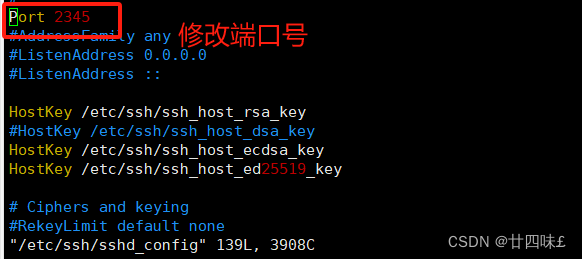
Port 22 #监听端口为 22
ListenAddress 0.0.0.0 #监听地址为任意网段,也可以指定OpenSSH服务器的具体IPLoginGraceTime 2m #登录验证时间为 2 分钟
PermitRootLogin no #禁止 root 用户登录
MaxAuthTries 6 #最大重试次数为 6PermitEmptyPasswords no #禁止空密码用户登录
UseDNS no #禁用 DNS 反向解析,以加快远程连接速度
AllowUsers zhangsan lisi wangwu@192.168.10.120 #只允许zhangsan、lisi、wangwu用户登录,且其中wangwu用户仅能够从IP地址为192.168.10.120的主机远程登录多个,用户以空格分隔
DenyUsers zhangsan #禁止某些用户登录,用法于AllowUsers 类似(注意不要同时使用)
2.sshd 服务支持两种验证方式
1)密码验证
对服务器中本地系统用户的登录名称、密码进行验证。简便,但可能会被暴力破解
2)密钥对验证
要求提供相匹配的密钥信息才能通过验证。通常先在客户端中创建一对密钥文件(公钥、私钥),然后将公钥文件放到服务器中的指定位置。远程登录时,系统将使用公钥、私钥进行加密/解密关联验证。能增强安全性,且可以免交互登录。
公钥和私钥的关系:
●公钥和私钥是成对生成的,这两个密钥互不相同,可以互相加密和解密。
●不能根据一个密钥来推算出另一个密钥。
●公钥对外公开,私钥只有私钥的持有人才知道。
当密码验证、密钥对验证都启用时,服务器将优先使用密钥对验证。可根据实际情况设置验证方式。
vim /etc/ssh/sshd_config
PasswordAuthentication yes #启用密码验证
PubkeyAuthentication yes #启用密钥对验证
AuthorizedKeysFile .ssh/authorized_keys #指定公钥库文件
三、使用 SSH 客户端程序
1.ssh 远程登录
ssh [选项] zhangsan@192.168.10.120
当用户第一次登录SSH服务器时,必须接受服务器发来的ECDSA密钥(根据提示输入“yes”)后才能继续验证。接收的密钥信息将保存到~/.ssh/known_hosts 文件中。密码验证成功以后,即可登录目标服务器的命令行环境中了。
-p:指定非默认的端口号,缺省时默认使用 22端口
ssh -p 2345 zhangsan@192.168.80.10
[root@bogon ~]# systemctl restart sshd    #重启ssh服务

[root@bogon ~]# ssh root@192.168.10.120    #连接请求被拒,ssh服务默认端口号为22
ssh: connect to host 192.168.10.120 port 22: Connection refused

[root@bogon ~]# ssh -p 2345 root@192.168.10.120    #-p指定端口号,连接成功
root@192.168.10.120's password:
Last login: Sun Apr 28 21:10:35 2024 from 192.168.10.1
[root@bogon ~]#
2.scp 远程复制
#下行复制
scp root@192.168.80.11:/etc/passwd /root/passwd10.txt #将远程主机中的/etc/passwd文件复制到本机
#上行复制
scp -r /etc/ssh/ root@192.168.80.10:/opt #将本机的/etc/ssh 目录复制到远程主机
案例:复制文件和目录
被复制主机:
[root@bogon ~]# cd /opt
[root@bogon opt]# ls
rh
[root@bogon opt]# echo 123 > 123.txt
[root@bogon opt]# ls
123.txt  rh
[root@bogon opt]# mkdir xy101
[root@bogon opt]# cd xy101/
[root@bogon xy101]# echo 456 > 456.txt
[root@bogon xy101]# ls
456.txt
[root@bogon xy101]# cd ..
[root@bogon opt]# ls
123.txt  rh  xy101
复制主机:
[root@bogon opt]# scp root@192.168.10.120:/opt/123.txt /opt    #复制文件
The authenticity of host '192.168.10.120 (192.168.10.120)' can't be established.
ECDSA key fingerprint is SHA256:L6wJ0Efd2d4p2puz1SUhKBh8PqQGVZkxLoea4Z5fSdE.
ECDSA key fingerprint is MD5:50:20:53:60:a2:8b:ab:f5:db:1b:5a:29:39:8b:7d:10.
Are you sure you want to continue connecting (yes/no)? yes
Warning: Permanently added '192.168.10.120' (ECDSA) to the list of known hosts.
root@192.168.10.120's password:
123.txt                                                          100%    4     4.5KB/s   00:00
[root@bogon opt]# ls
123.txt  rh

[root@bogon opt]# scp root@192.168.10.120:/opt/xy101 /opt    #复制目录加上-r选项
root@192.168.10.120's password:
scp: /opt/xy101: not a regular file
[root@bogon opt]# scp -r root@192.168.10.120:/opt/xy101 /opt
root@192.168.10.120's password:
456.txt                                                          100%    4     7.2KB/s   00:00
[root@bogon opt]# ls
123.txt  rh  xy101

[root@bogon opt]# scp -r *.txt xy101 root@192.168.10.120:/opt    #同时复制文件和目录
root@192.168.10.120's password:
123.txt                                                          100%    4     7.4KB/s   00:00
456.txt                                                          100%    4     6.3KB/s   00:00
[root@bogon opt]#
3.sftp 安全 FTP
由于使用了加密/解密技术,所以传输效率比普通的FTP要低,但安全性更高。操作语法sftp与ftp几乎一样。
sftp zhangsan@192.168.80.10
Connecting to 192.168.80.10...
tsengyia@172.16.16.22's password: #输入密码
sftp> ls
sftp> get 文件名 #下载文件到ftp目录
sftp> put 文件名 #上传文件到ftp目录
sftp> quit #退出
[root@bogon ~]# sftp root@192.168.10.120
root@192.168.10.120's password:
Connected to 192.168.10.120.
sftp> ls
anaconda-ks.cfg         initial-setup-ks.cfg
sftp> cd /opt
sftp> ls
123.txt  rh       xy101

sftp> get 123.txt    #传输文件
Fetching /opt/123.txt to 123.txt
/opt/123.txt                                                     100%    4     6.7KB/s   00:00

sftp> get xy101    #sftp是文件传输,并不能传输目录
Fetching /opt/xy101/ to xy101
Cannot download non-regular file: /opt/xy101/

sftp> cd /opt/xy101
sftp> get 456.txt
Fetching /opt/xy101/456.txt to 456.txt
/opt/xy101/456.txt                                               100%    4     7.6KB/s   00:00
sftp>
四、SSH的验证方式
1.密码验证:使用账号和密码进行验证
PasswordAuthentication yes
2.密钥对验证:使用客户端创建的密钥对进行验证
PubkeyAuthentication yes
AuthorizedKeysFile .ssh/authorized_keys #服务端的公钥文件默认保存路径
3.案例:ssh密钥对的创建和使用
1)确保服务端开启了ssh密钥对验证 /etc/ssh/sshd_config --> PubkeyAuthentication yes
2)在客户端创建密钥对 ssh-keygen [-t rsa/dsa/ecdsa] #生成的密钥对默认存放在当前用户家目录的 .ssh/ 目录中,私钥是留给自己使用的,公钥(XXX.pub)是给服务端使用的
3)上传公钥至服务端 ssh-copy-id [-i 公钥文件] 用户名@目标主机IP #公钥信息会自动保存到服务端的 ~/.ssh/authorized_keys 文件里
4)客户端 ssh 远程登录,使用密钥对的密码进行验证
注意:密钥对在客户端是谁创建的,只能谁使用;密钥对上传给服务端的哪个用户,那么就只能使用那个用户去登录
在客户端创建密钥对
[root@bogon ~]# ssh-keygen -t rsa    #在客户端创建密钥对
Generating public/private rsa key pair.
Enter file in which to save the key (/root/.ssh/id_rsa):
Enter passphrase (empty for no passphrase):
Enter same passphrase again:
Your identification has been saved in /root/.ssh/id_rsa.
Your public key has been saved in /root/.ssh/id_rsa.pub.
The key fingerprint is:
SHA256:2i1XSm6tbPDVkH7JjvDCIxNZEO/6Kxp+bN7duSyvuro root@bogon
The key's randomart image is:
+---[RSA 2048]----+
|        ..       |
|        ..       |
|         ..  .   |
|         .. o    |
|        Soo..+ . |
|       o+=.+o =  |
|      o.+=*+.+   |
|     . .BB*o+o.. |
|      o=EBO*o+*. |
+----[SHA256]-----+

[root@bogon ~]# cd /root
[root@bogon ~]# ls -A
123.txt          .bash_logout   .config    .ICEauthority         .tcshrc      模板  下载
456.txt          .bash_profile  .cshrc     initial-setup-ks.cfg  .viminfo     视频  音乐
anaconda-ks.cfg  .bashrc        .dbus      .local                .Xauthority  图片  桌面
.bash_history    .cache         .esd_auth  .ssh                  公共         文档

[root@bogon ~]# cd .ssh/
[root@bogon .ssh]# ls
id_rsa  id_rsa.pub  known_hosts    #私钥id_rsa是留给自己使用的,公钥id_rsa.pub是给服务端使用的

[root@bogon .ssh]# ssh-copy-id -i id_rsa.pub root@192.168.10.120    #上传公钥至服务端
/usr/bin/ssh-copy-id: INFO: Source of key(s) to be installed: "id_rsa.pub"
/usr/bin/ssh-copy-id: INFO: attempting to log in with the new key(s), to filter out any that are already installed
/usr/bin/ssh-copy-id: INFO: 1 key(s) remain to be installed -- if you are prompted now it is to install the new keys
root@192.168.10.120's password:

Number of key(s) added: 1

Now try logging into the machine, with:   "ssh 'root@192.168.10.120'"
and check to make sure that only the key(s) you wanted were added.

[root@bogon .ssh]#
查看服务端秘钥对信息

客户端 ssh 远程登录,使用密钥对的密码进行验证
4.ssh密钥对免交互登录
1)使用空密码的密钥对
ssh-keygen 一路回车,不设置密码
ssh-copy-id2)创建ssh会话代理(只能在当前会话中有效)
ssh-agent bash
ssh-add
[root@bogon ~]# ssh-keygen
Generating public/private rsa key pair.
Enter file in which to save the key (/root/.ssh/id_rsa):
Created directory '/root/.ssh'.
Enter passphrase (empty for no passphrase):
Enter same passphrase again:
Your identification has been saved in /root/.ssh/id_rsa.
Your public key has been saved in /root/.ssh/id_rsa.pub.
The key fingerprint is:
SHA256:M1bqICRSCzSTcWYGFGZ8nq2SEMcnB28V8oxsR5sgnPg root@bogon
The key's randomart image is:
+---[RSA 2048]----+
|=#OBo +.         |
|==&*oO o         |
|.+=+X *   .      |
|..EB o   o       |
|. . o . S        |
| o . . + o       |
|  .     .        |
|                 |
|                 |
+----[SHA256]-----+
[root@bogon ~]# cd ~/.ssh/
[root@bogon .ssh]# ll
总用量 8
-rw-------. 1 root root 1679 4月  28 22:40 id_rsa
-rw-r--r--. 1 root root  392 4月  28 22:40 id_rsa.pub

[rcot@bogon ~l# ssh-agent bash
[root@bogon ~]# ssh-add
Enter passphrase for /root/.ssh/id ecdsa:
Identity added:/root/.ssh/id_ecdsa (/root/.ssh/id_ecdsa)
[root@bogon ~]#ssh root@192.168.10.120
Last login: Fri Apr 28 23:20:18 2024 from 192.168.10.120
[root@bogon ~]#
注意:ssh密钥对免交互登录时,创建ssh会话代理(只能在当前会话中有效)
五、TCP Wrappers 访问控制
1.TCP Wrappers
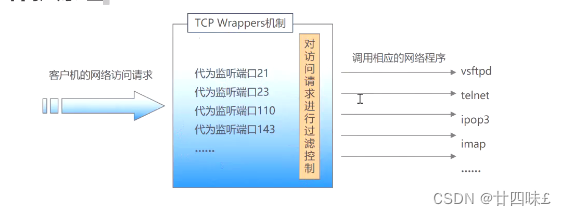
TCP Wrappers(TCP封套) 是一个简单的防火墙机制。用来将TCP服务程序“包裹”起来,代为监听TCP服务程序的端口,增加了一个安全检测过程,外来的连接请求必须先通过这层安全检测,获得许可后才能访问真正的服务程序。
大多数 Linux 发行版,TCP Wrappers 是默认提供的功能。rpm -q tcp_wrappers
2.TCP Wrappers 保护机制的两种实现方式
1)直接使用 tcpd 程序对其他服务程序进行保护,需要运行 tcpd 程序。
2)由其他网络服务程序调用 libwrap.so.* 动态函数库,不需要运行 tcpd 程序。此方式的应用更加广泛,也更有效率。
由于支持 TCP Wrappers 的服务必定包含 libwrap 这一个动态函数库,因此可以使用 ldd 来查看服务即可
ldd $(which sshd) | grep libwrap
libwrap.so.0 => /lib64/libwrap.so.0 (0x00007f91d0bdb000)
ldd $(which vsftpd) | grep libwrap
libwrap.so.0 => /lib64/libwrap.so.0 (0x00007f4304f3b000)
ldd $(which xinetd) | grep libwrap
libwrap.so.0 => /lib64/libwrap.so.0 (0x00007f8b17ec6000)
3.TCP Wrappers的运用
/etc/hosts.allow 设置允许访问 tcp 服务程序的策略(白名单)
/etc/hosts.deny 设置禁止访问 tcp 服务程序的策略 (黑名单)
假设引用
只允许IP地址为192.168.73.110的用户访问sshd服务,其他地址被拒绝。
[root@bogon ~]# vim /etc/hosts.allow
[root@bogon ~]# vim /etc/hosts.deny
[root@bogon ~]# cat /etc/hosts.allow
#
# hosts.allow	This file contains access rules which are used to
#		allow or deny connections to network services that
#		either use the tcp_wrappers library or that have been
#		started through a tcp_wrappers-enabled xinetd.
#
#		See 'man 5 hosts_options' and 'man 5 hosts_access'
#		for information on rule syntax.
#		See 'man tcpd' for information on tcp_wrappers
#
sshd:192.168.10.120        #设置允许访问 tcp 服务程序的策略

[root@bogon ~]# cat /etc/hosts.deny
#
# hosts.deny	This file contains access rules which are used to
#		deny connections to network services that either use
#		the tcp_wrappers library or that have been
#		started through a tcp_wrappers-enabled xinetd.
#
#		The rules in this file can also be set up in
#		/etc/hosts.allow with a 'deny' option instead.
#
#		See 'man 5 hosts_options' and 'man 5 hosts_access'
#		for information on rule syntax.
#		See 'man tcpd' for information on tcp_wrappers
#
sshd:192.168.10.122        #设置拒绝访问 tcp 服务程序的策略
[root@bogon ~]#
4.TCP Wrappers 的访问策略
TCP Wrappers 机制的保护对象为各种网络服务程序,针对访问服务的客户端地址进行访问控制。
通过 /etc/hosts.allow,/etc/hosts.deny 这两个文件来管理的一个类似防火墙的机制,分别用来设置允许和拒绝的策略。
格式: <服务程序列表>:<客户端地址列表>
1)服务程序列表
ALL:代表所有的服务。
单个服务程序:如“vsftpd”。
多个服务程序组成的列表:如“vsftpd,sshd”。2)客户端地址列表
ALL:代表任何客户端地址。
LOCAL:代表本机地址。
多个地址以逗号分隔
允许使用通配符 “*” 和 “?” ,前者代表任意长度字符,后者仅代表一个字符
网段地址,如 “192.168.80.” 或者 192.168.80.0/255.255.255.0 (掩码只支持 netmask 的地址显示方式)
区域地址,如 “.benet.com”匹配 benet.com 域中的所有主机。
5.TCP Wrappers 机制的基本原则:
首先检查/etc/hosts.allow文件,如果找到相匹配的策略,则允许访问;
否则继续检查/etc/hosts.deny文件,如果找到相匹配的策略,则拒绝访问;
如果检查上述两个文件都找不到相匹配的策略,则允许访问。
“允许所有,拒绝个别”
只需在/etc/hosts.deny文件中添加相应的拒绝策略
“允许个别,拒绝所有”
除了在/etc/hosts.allow中添加允许策略之外,还需要在/etc/hosts.deny文件中设置“ALL:ALL”的拒绝策略。
#同时设置黑白名单,还是会放通,原理是从上往下依次匹配,匹配到即停止
[root@bogon ~]# cat /etc/hosts.allow
#
# hosts.allow	This file contains access rules which are used to
#		allow or deny connections to network services that
#		either use the tcp_wrappers library or that have been
#		started through a tcp_wrappers-enabled xinetd.
#
#		See 'man 5 hosts_options' and 'man 5 hosts_access'
#		for information on rule syntax.
#		See 'man tcpd' for information on tcp_wrappers
#
sshd:192.168.10.120

[root@bogon ~]# cat /etc/hosts.deny
#
# hosts.deny	This file contains access rules which are used to
#		deny connections to network services that either use
#		the tcp_wrappers library or that have been
#		started through a tcp_wrappers-enabled xinetd.
#
#		The rules in this file can also be set up in
#		/etc/hosts.allow with a 'deny' option instead.
#
#		See 'man 5 hosts_options' and 'man 5 hosts_access'
#		for information on rule syntax.
#		See 'man tcpd' for information on tcp_wrappers
#
sshd:192.168.10.120
[root@bogon ~]#
注意:从上往下依次匹配,匹配到即停止,如果放通,后面的策略就不会进行匹配了
总结:
配置OpenSSH服务端:监听选项、用户登录控制、登录验证方式
使用SSH客户端程序: ssh、scp、sftp、Xshell
构建密钥对验证的SSH体系的步骤
TCP Wrappers访问控制