qdbus
- ## 一些简单的使用<font color = red>(重要)
- QtDBus编程
- 1、创建服务并创建对象
- 2、通过QDBusMessage访问Service
- 3、通过QDBusInterface 访问Service
- 4、从D-Bus XML自动生成Proxy类
- 5、使用Adapter注册Object
- 6、自动启动Service
qdbus是对dbus的进一步封装,dbus是基于c实现的,在这里不做过多介绍,一些基本的概念可以参考以下链接
IPC之十一:使用D-Bus实现客户端向服务端请求服务的实例
QtDBus快速入门
## 一些简单的使用(重要)
qdbus 服务(连接) 对象 DBus接口GetAll方法 接口名字
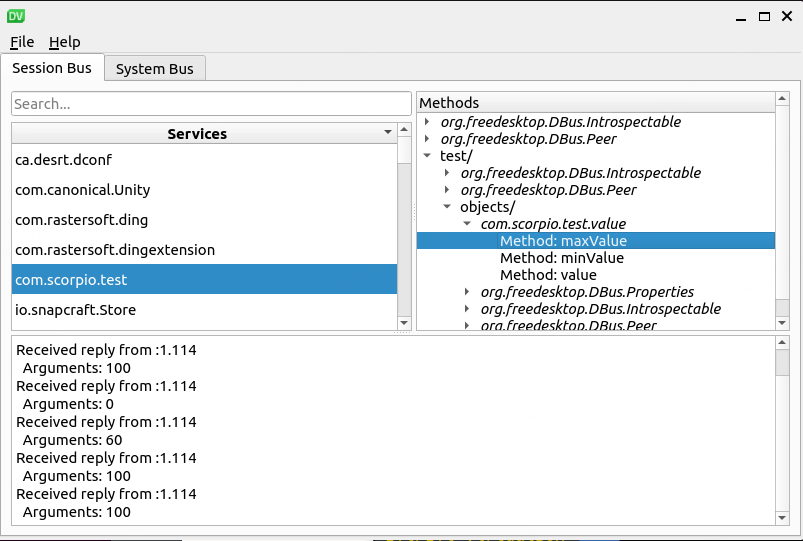
参数的具体值可以通过qdbusviewer查看
qdbus --literal org.freedesktop.FileManager1 /org/freedesktop/FileManager1 org.freedesktop.DBus.Properties.GetAll org.freedesktop.FileManager1

qdbus --literal org.freedesktop.FileManager1 /org/freedesktop/FileManager1 org.freedesktop.DBus.Properties.Get org.freedesktop.FileManager1 OpenLocations

查看org.freedesktop.FileManager1服务下 /org/freedesktop/FileManager1对象的所有method和signal
qdbus org.freedesktop.FileManager1 /org/freedesktop/FileManager1

QtDBus编程
1、创建服务并创建对象
test.h
#ifndef TEST_H
#define TEST_H
#include <QObject>

class test: public QObject
{
    Q_OBJECT
    //定义Interface名称为com.scorpio.test.value
    Q_CLASSINFO("D-Bus Interface", "com.scorpio.test.value")
public:
    test(int value);

public slots:
    int maxValue();
    int minValue();
    int value();
private:
    int m_value;
};

#endif // TEST_H
test.cpp
#include "test.h"

test::test(int value)
{
    m_value = value;
}

int test::maxValue()
{
    return 100;
}
int test::minValue()
{
    return 0;
}
int test::value()
{
    return m_value;
}
main.cpp
#include <QCoreApplication>
#include <QDBusConnection>
#include <QDebug>
#include <QDBusError>
#include "test.h"

int main(int argc, char *argv[])
{
    QCoreApplication a(argc, argv);

    //建立到session bus的连接
    QDBusConnection connection = QDBusConnection::sessionBus();
    //在session bus上注册名为com.scorpio.test的服务
    if(!connection.registerService("com.scorpio.test"))
    {
        qDebug() << "error:" << connection.lastError().message();
        exit(-1);
    }
    test object(60);
    //注册名为/test/objects的对象,把类Object所有槽函数导出为object的method
    connection.registerObject("/test/objects", &object,QDBusConnection::ExportAllSlots);

    return a.exec();
}
可以看到服务已经注册,其实我们说的服务,也叫做总线上的一个连接
2、通过QDBusMessage访问Service
确保com.scorpio.test服务运行在总线上。
编写一个控制台程序,使用消息访问com.scorpio.test服务。
#include <QCoreApplication>
#include <QDBusMessage>
#include <QDBusConnection>
#include <QDebug>

int main(int argc, char *argv[])
{
    QCoreApplication a(argc, argv);
    //构造一个method_call消息,服务名称为:com.scorpio.test,对象路径为:/test/objects
    //接口名称为com.scorpio.test.value,method名称为value
    QDBusMessage message = QDBusMessage::createMethodCall("com.scorpio.test",
                           "/test/objects",
                           "com.scorpio.test.value",
                           "value");
    //发送消息
    QDBusMessage response = QDBusConnection::sessionBus().call(message);
    //判断method是否被正确返回
    if (response.type() == QDBusMessage::ReplyMessage)
    {
        //从返回参数获取返回值
        int value = response.arguments().takeFirst().toInt();
        qDebug() << QString("value =  %1").arg(value);
    }
    else
    {
        qDebug() << "value method called failed!";
    }

    return a.exec();
}
3、通过QDBusInterface 访问Service
编写一个控制台程序,使用接口访问com.scorpio.test服务。
#include <QCoreApplication>
#include <QDBusMessage>
#include <QDBusConnection>
#include <QDBusReply>
#include <QDBusInterface>
#include <QDebug>

int main(int argc, char *argv[])
{
    QCoreApplication a(argc, argv);
    // 创建QDBusInterface接口
    QDBusInterface interface("com.scorpio.test", "/test/objects",
                             "com.scorpio.test.value",
                             QDBusConnection::sessionBus());
    if (!interface.isValid())
    {
        qDebug() << qPrintable(QDBusConnection::sessionBus().lastError().message());
        exit(1);
    }
    //调用远程的value方法
    QDBusReply<int> reply = interface.call("value");
    if (reply.isValid())
    {
        int value = reply.value();
        qDebug() << QString("value =  %1").arg(value);
    }
    else
    {
        qDebug() << "value method called failed!";
    }

    return a.exec();
}
4、从D-Bus XML自动生成Proxy类
Proxy Object提供了一种更加直观的方式来访问Service,如同调用本地对象的方法一样。
生成Proxy类的流程如下:
A、使用工具qdbuscpp2xml从object.h生成XML文件;
qdbuscpp2xml -M test.h -o com.scorpio.test.xml
B、使用工具qdbusxml2cpp从XML文件生成继承自QDBusInterface的类
qdbusxml2cpp com.scorpio.test.xml -p valueInterface
生成两个文件:valueInterface.cpp和valueInterface.h
调用Proxy类访问Service如下:
#include <QCoreApplication>
#include <QDBusMessage>
#include <QDBusConnection>
#include <QDBusReply>
#include <QDBusInterface>
#include <QDebug>
#include "valueInterface.h"

int main(int argc, char *argv[])
{
    QCoreApplication a(argc, argv);
    // 初始化自动生成的Proxy类com::scorpio::test::value
    com::scorpio::test::value test("com.scorpio.test",
                                   "/test/objects",
                                   QDBusConnection::sessionBus());
    // 调用value方法
    QDBusPendingReply<int> reply = test.value();
    //qdbusxml2cpp生成的Proxy类是采用异步的方式来传递Message,
    //所以需要调用waitForFinished来等到Message执行完成
    reply.waitForFinished();
    if (reply.isValid())
    {
        int value = reply.value();
        qDebug() << QString("value =  %1").arg(value);
    }
    else
    {
        qDebug() << "value method called failed!";
    }

    return a.exec();
}
5、使用Adapter注册Object
可以直接把test类注册为消息总线上的一个Object,但QT4不推荐。QT4推荐使用Adapter来注册Object。
大多数情况下,可能只需要把自定义的类里的方法有选择的发布到消息总线上,使用Adapter可以很方便的实现选择性发布。
生成Adapter类的流程如下:
A、使用工具 qdbuscpp2xml从test.h生成XML文件
qdbuscpp2xml -M test.h -o com.scorpio.test.xml
B、编辑com.scorpio.test.xml,选择需要发布的method,不需要发布的删除。
C、使用工具qdbusxml2cpp从XML文件生成继承自QDBusInterface的类
qdbusxml2cpp com.scorpio.test.xml -i test.h -a valueAdaptor
生成两个文件:valueAdaptor.cpp和valueAdaptor.h
调用Adaptor类注册Object对象如下:
#include <QCoreApplication>
#include <QDBusConnection>
#include <QDebug>
#include <QDBusError>
#include "test.h"
#include "valueAdaptor.h"

int main(int argc, char *argv[])
{
    QCoreApplication a(argc, argv);
    QDBusConnection connection = QDBusConnection::sessionBus();
    test object(60);
    //ValueAdaptor是qdbusxml2cpp生成的Adaptor类
    ValueAdaptor valueAdaptor(&object);
    if (!connection.registerService("com.scorpio.test"))
    {
        qDebug() << connection.lastError().message();
        exit(1);
    }
    connection.registerObject("/test/objects", &object);
    return a.exec();
}
6、自动启动Service
D-Bus系统提供了一种机制可以在访问某个service时,自动把应用程序运行起来。
需要在/usr/share/dbus-1/services下面建立com.scorpio.test.service文件,文件的内容如下:
[D-BUS Service]
Name=com.scorpio.test
Exec=/path/to/scorpio/test
在访问test的method前,不必手动运行应用程序。
6我没有试过,还不清楚是怎么个情况。


![[Flutter3] Json转dart模型举例](https://img-blog.csdnimg.cn/direct/024da5ebeafd43599f3fe01d1f59061d.png)