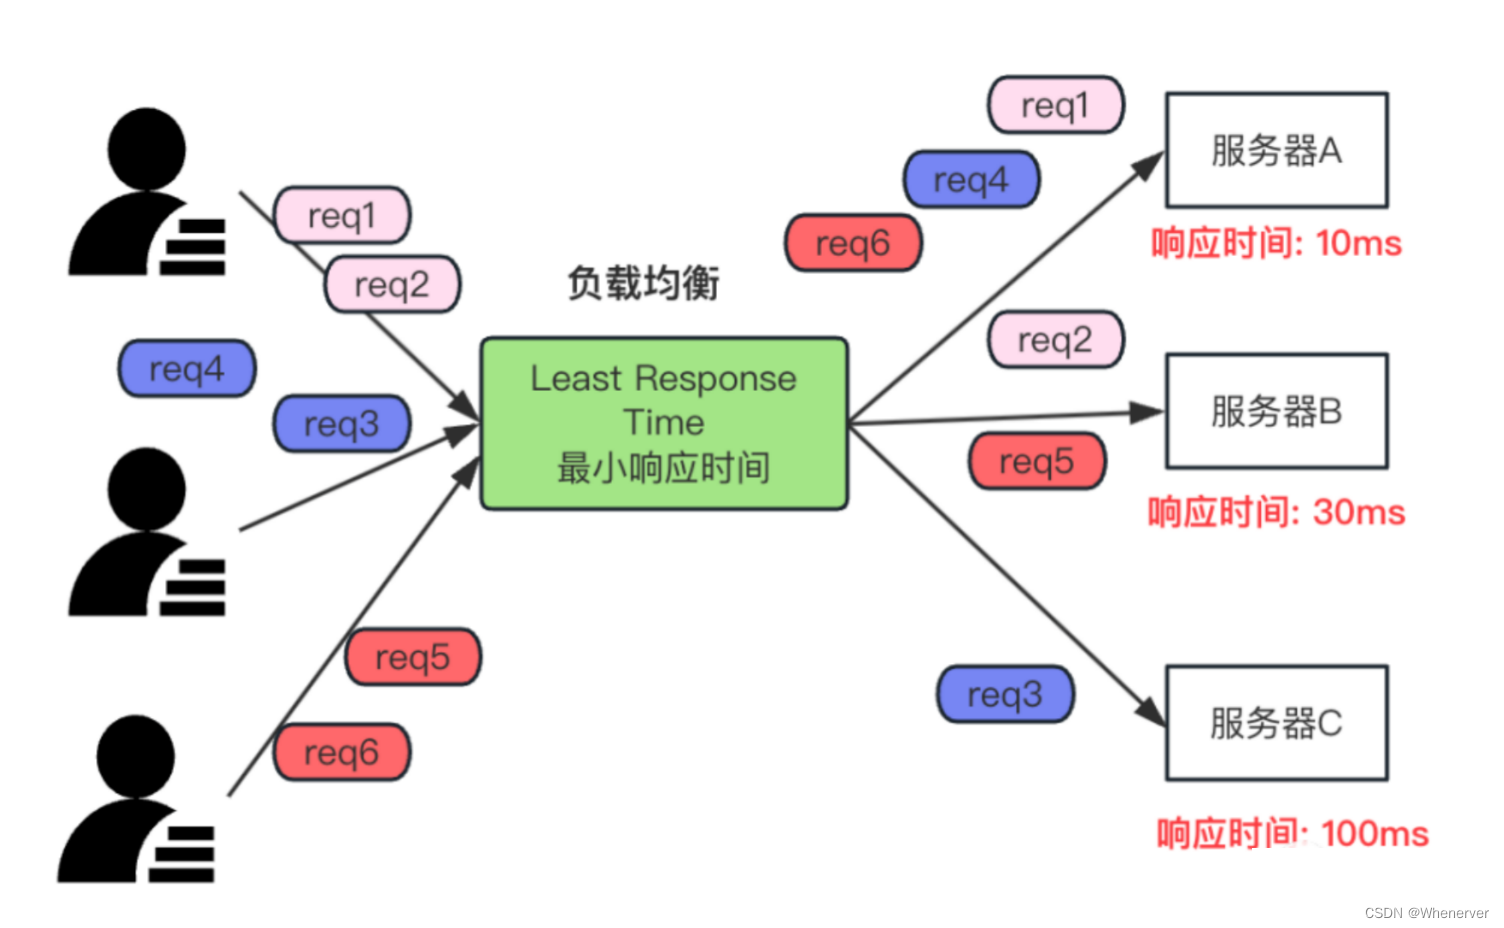
将很多机器组织在一起,作为一个整体对外提供服务 集群在扩展性、性能方面都可以做到很灵活 集群分类
负载均衡集群:Load Balance 高可用集群:High Availability 高性能计算:High Performance Computing LVS:Linux Virtual Server,Linux虚拟服务器实现负载均衡集群 作者:章文嵩。国防科技大学读博士期间编写 LVS的工作模式
NAT:网络地址转换DR:路由模式TUN:隧道模式术语
调度器:LVS服务器 真实服务器:提供服务的服务器 VIP:虚拟地址,提供给用户访问的地址DIR:指定地址,LVS服务器上与真实服务器通信的地址RIP:真实地址,真实服务器的地址 常见的调度算法,共10个,常用的有4个
轮巡rr:真实服务器轮流提供服务(一共有两台服务器,第一个给A,第二个给B,第三个再给A…) 加权轮巡wrr:根据服务器性能设置权重,权重大的服务器得到分配的请求就越多 最少连接lc:根据真实服务器的连接数分配请求,优先分配连接少的 加权最少连接wlc:类似wrr,根据权重分配请求 ipvsadm使用说明
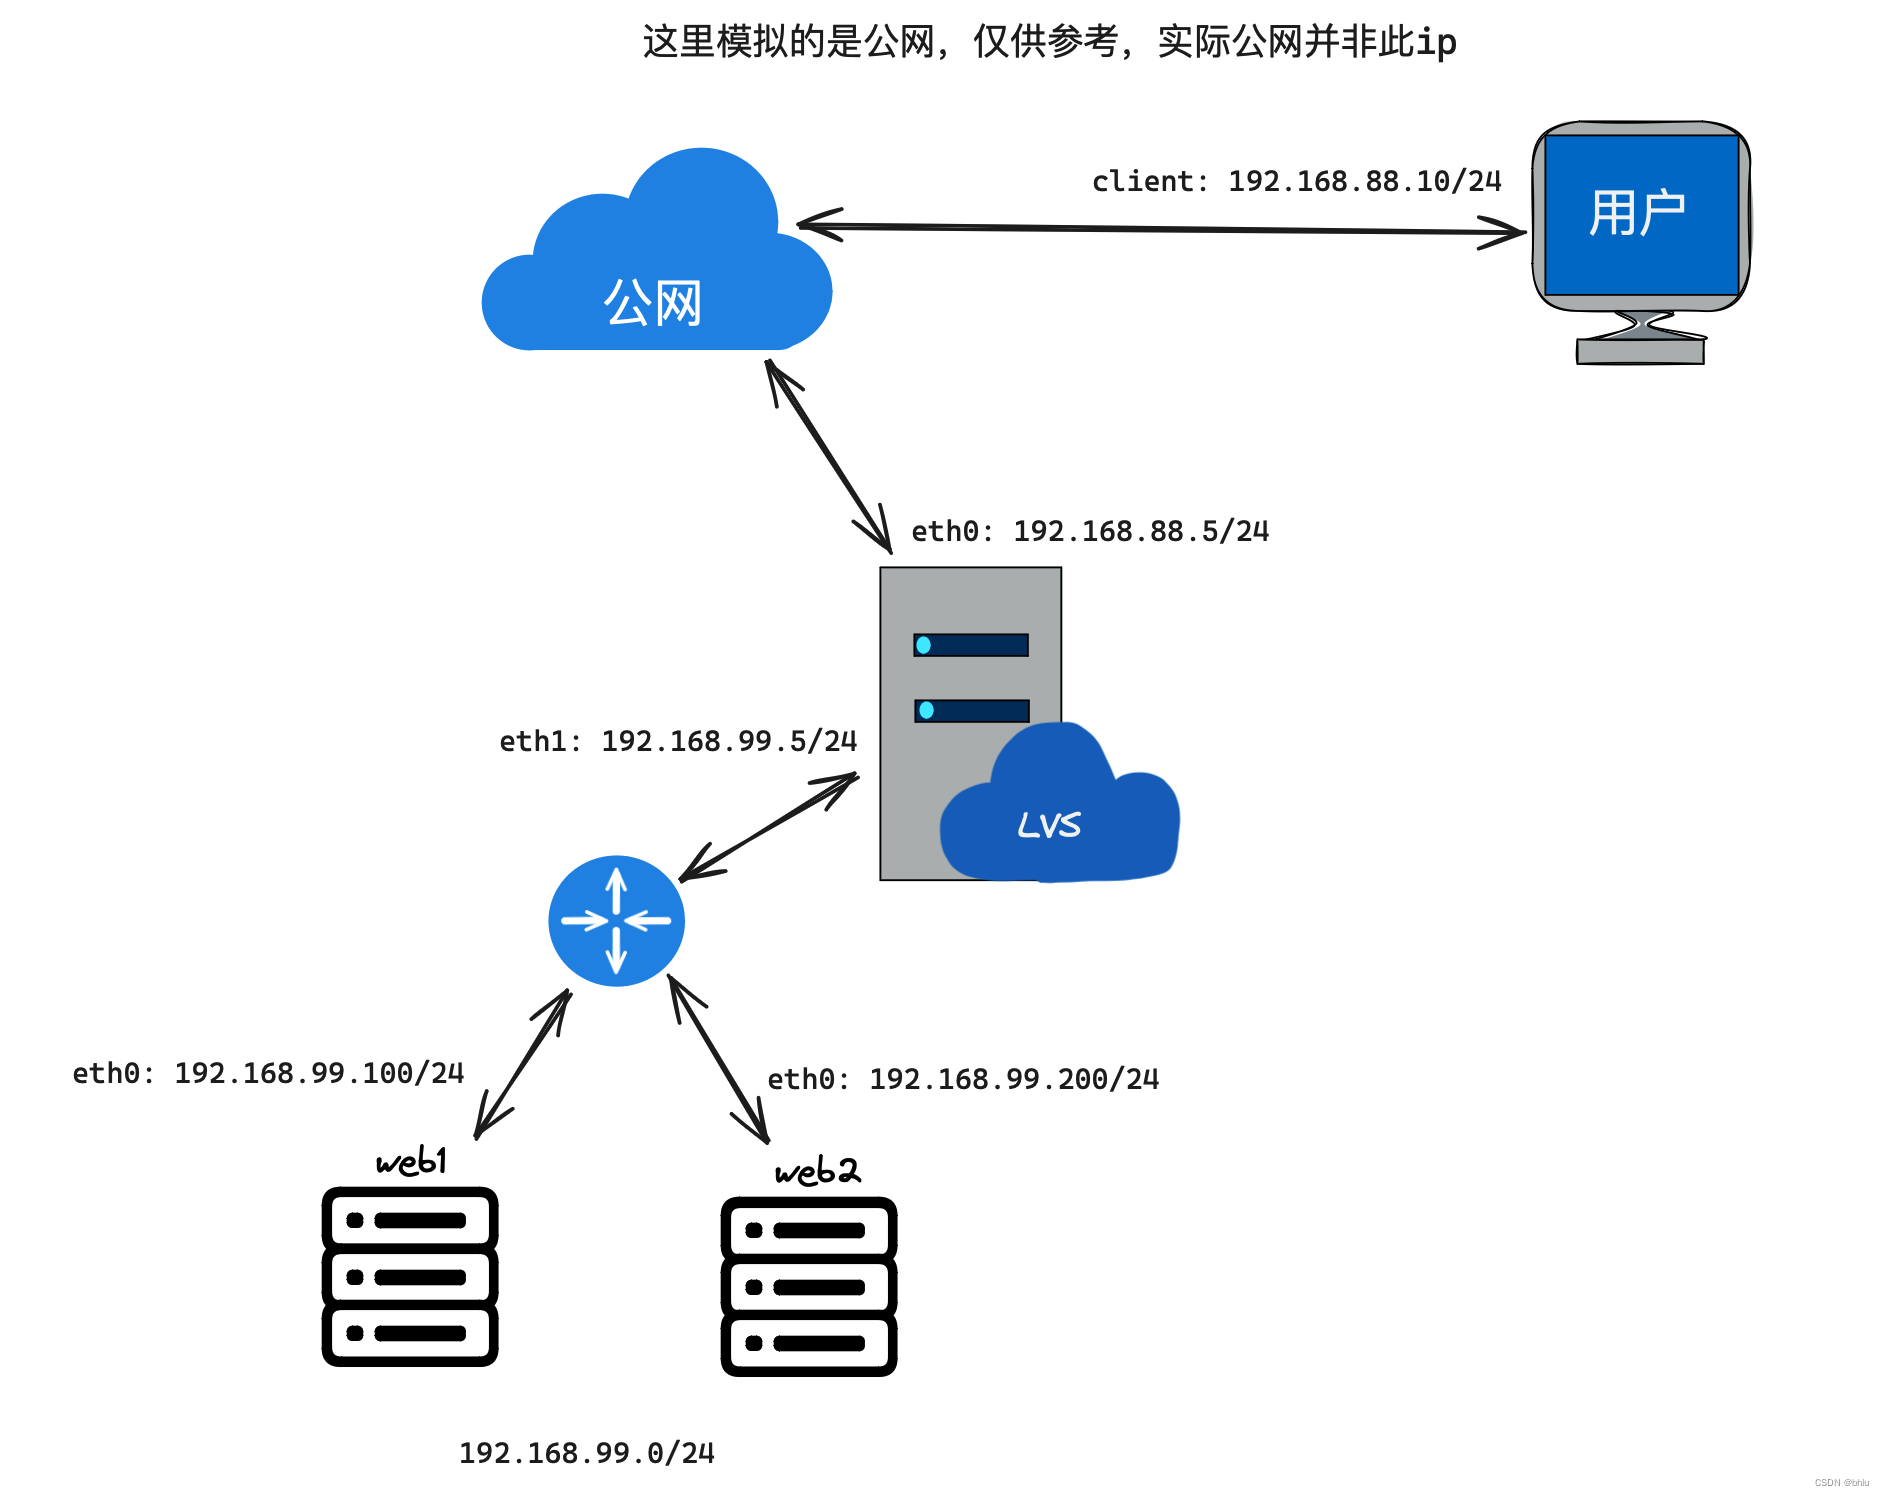
-A:添加虚拟服务器-E:编辑虚拟服务器-D:删除虚拟服务器-t:添加tcp服务器-u:添加udp服务器-s:指定调度算法。如轮巡rr、加权轮巡wrr、最小连接lc、加权最小连接wlc-a:添加虚拟服务器后,向虚拟服务器中加入真实服务器-r:指定真实服务器-w:设置权重-m:指定工作模式为NAT-g:指定工作模式为DRNAT模式:通过lvs服务器来接收用户的请求,然后通过调度算法分配请求到真实服务器,然后真实服务器返回数据给lvs服务器,再有lvs服务器返回给用户
client:eth0->192.168.88.10,gateway->192.168.88.5lvs:eth0->192.168.88.5;eth1->192.168.99.5web1:eth0->192.168.99.100,gateway->192.168.99.5web2:eth0->192.168.99.200,gateway->192.168.99.5
nmcli connection modify eth0 ipv4.method manual ipv4.addresses 192.168 .88.10/24 ipv4.gateway 192.168 .88.5 connection.autoconnect yes
nmcli connection up eth0
nmcli connection modify eth0 ipv4.method manual ipv4.addresses 192.168 .88.5/24 connection.autoconnect yes
nmcli connection up eth0
nmcli connection modify eth1 ipv4.method manual ipv4.addresses 192.168 .99.5/24 connection.autoconnect yes
nmcli connection up eth1
sysctl -a
sysctl -a | grep ip_forward
echo "net.ipv4.ip_forward = 1" >> /etc/sysctl.conf
sysctl -p
nmcli connection modify eth0 ipv4.method manual ipv4.addresses 192.168 .99.100/24 ipv4.gateway 192.168 .99.5 connection.autoconnect yes
nmcli connection up eth0
yum install -y httpd
systemctl enable httpd --now
echo "web1" > /var/www/html/index.html
nmcli connection modify eth0 ipv4.method manual ipv4.addresses 192.168 .99.200/24 ipv4.gateway 192.168 .99.5 connection.autoconnect yes
nmcli connection up eth0
yum install -y httpd
systemctl enable httpd --now
echo "web1" > /var/www/html/index.html
yum install -y ipvsadm
ipvsadm -A -t 192.168 .88.5:80 -s rr
ipvsadm -a -t 192.168 .88.5:80 -r 192.168 .99.100 -m
ipvsadm -a -t 192.168 .88.5:80 -r 192.168 .99.200 -m
ipvsadm -Ln
ipvsadm -D -t 192.168 .88.5:80 -s wrr
ipvsadm -a -t 192.168 .88.5:80 -r 192.168 .99.100 -w 1 -m
ipvsadm -a -t 192.168 .88.5:80 -r 192.168 .99.200 -w 2 -m
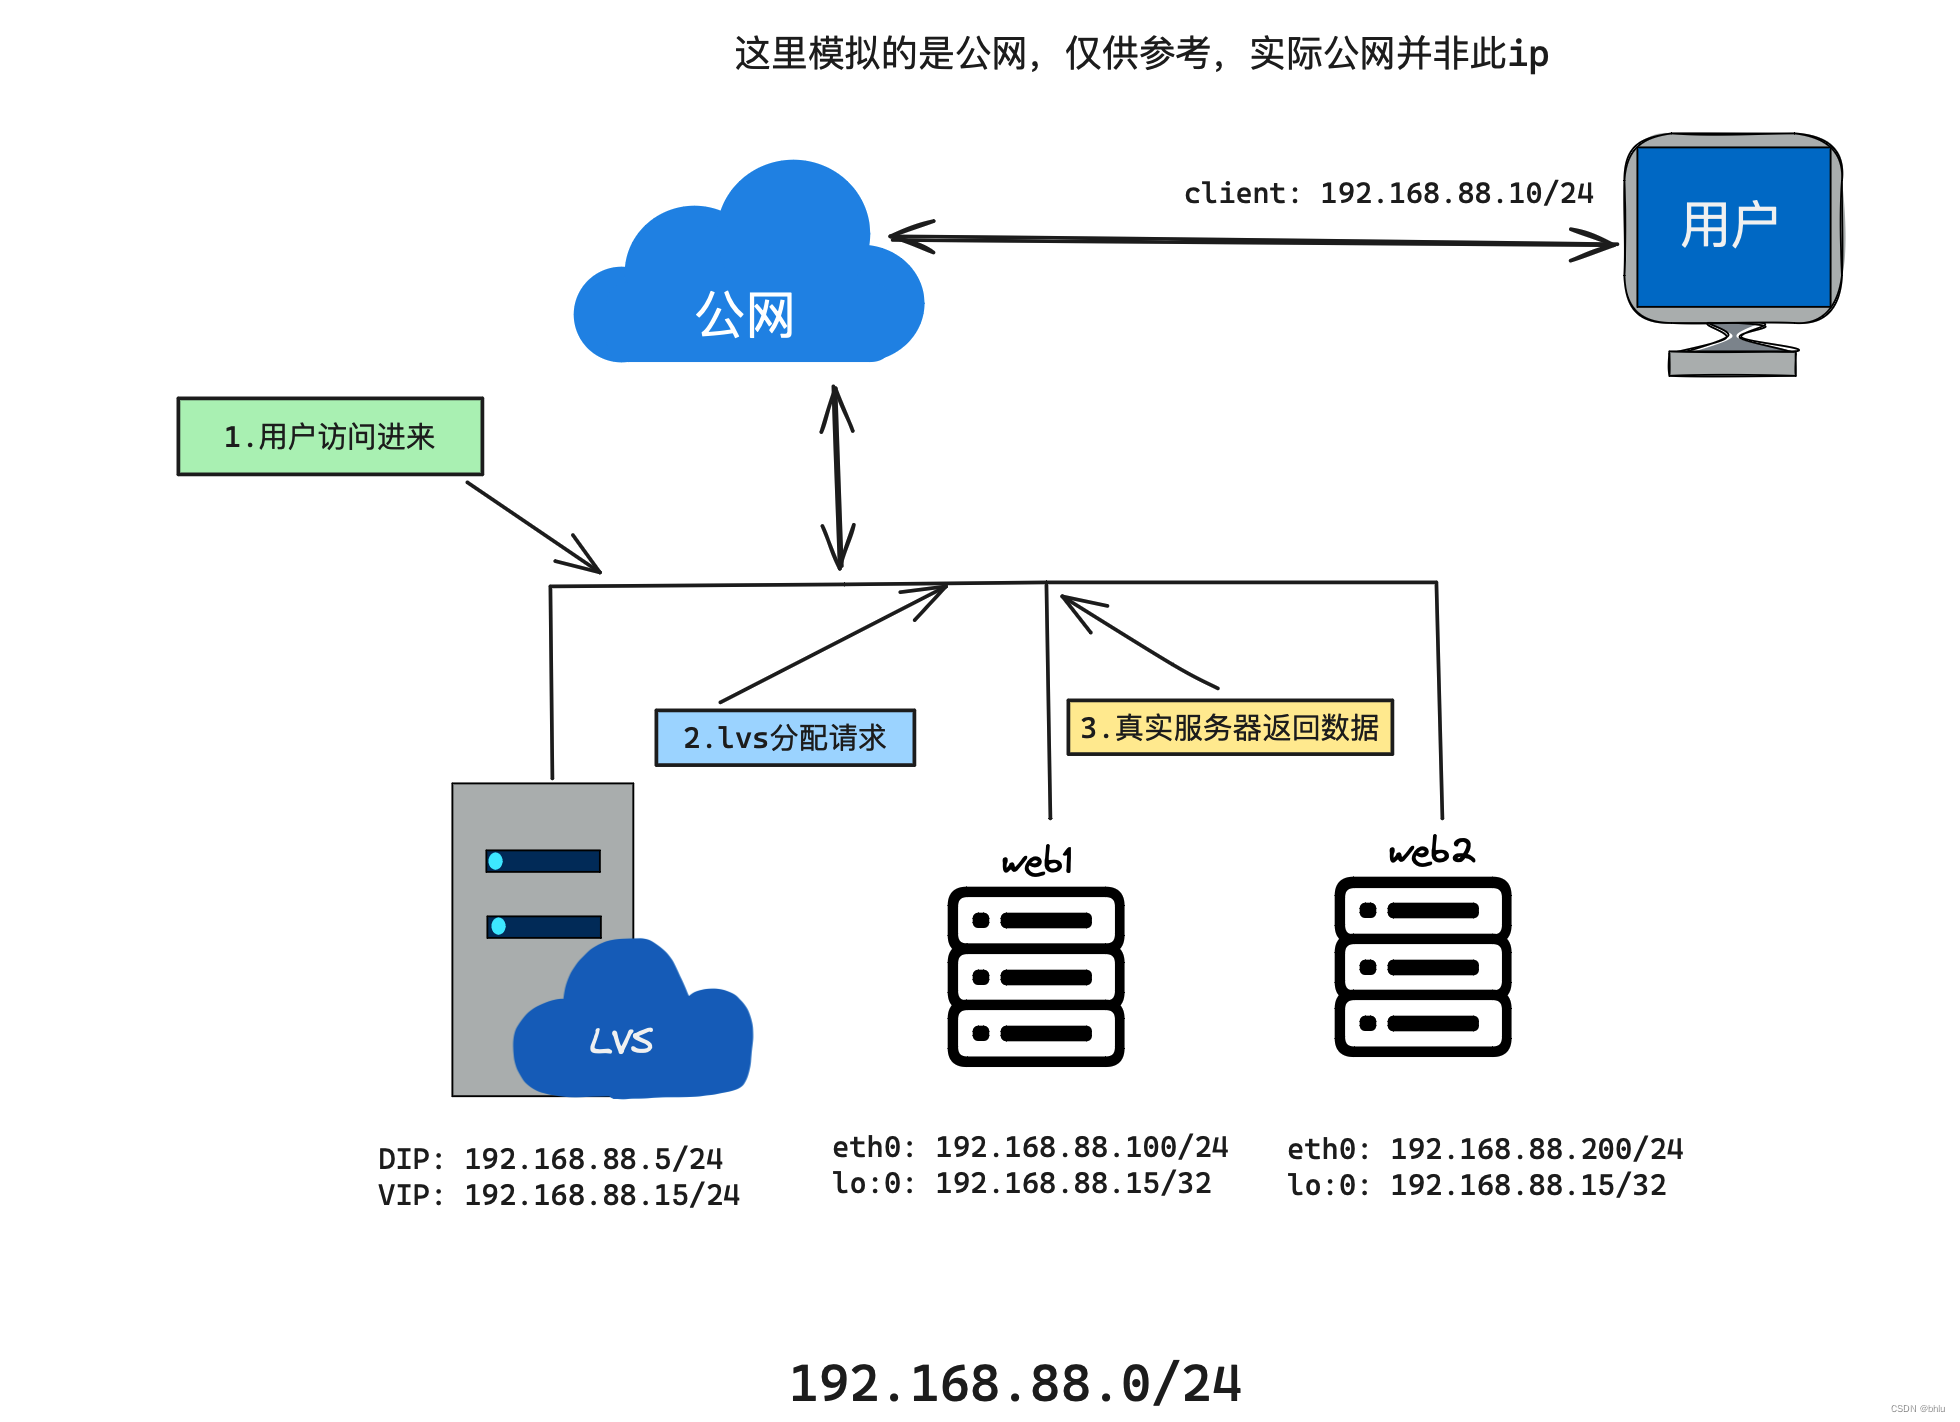
DR模式相比于NAT模式,它不会因为lvs服务器的带宽而影响业务DR模式:通过lvs服务器来接收请求,然后分配请求到真实服务器,然后通过真实服务器的虚拟网卡直接返回给用户
client:eth0->192.168.88.10lvs:eth0->192.168.88.5;eth0:0->192.168.88.15web1:eth0->192.168.88.100;lo:0->192.168.88.15/32web2:eth0->192.168.88.200;lo:0->192.168.88.15/32
nmcli connection delete eth1
vim ifcfg-eth0
TYPE = Ethernet
BOOTPROTO = none
NAME = eth0
DEVICE = eth0
ONBOOT = yes
IPADDR = 192.168 .88.5
PREFIX = 24
GATEWAY = 192.168 .88.254
ifdown eth0; ifup eth0
cd /etc/sysconfig/network-scripts/
cp ifcfg-eth0 ifcfg-eth0:0
vim ifcfg-eth0:0
TYPE = Ethernet
BOOTPROTO = none
NAME = eth0:0
DEVICE = eth0:0
ONBOOT = yes
IPADDR = 192.168 .88.15
PREFIX = 24
ifdown eth0:0; ifup eth0:0
ifconfig
cd /etc/sysconfig/network-scripts/
vim ifcfg-eth0
TYPE = Ethernet
BOOTPROTO = none
NAME = eth0
DEVICE = eth0
ONBOOT = yes
IPADDR = 192.168 .88.200
PREFIX = 24
GATEWAY = 192.168 .88.254
ifdown eth0; ifup eth0
cp ifcfg-eth0 ifcfg-lo:0
TYPE = Ethernet
BOOTPROTO = none
NAME = lo:0
DEVICE = lo:0
ONBOOT = yes
IPADDR = 192.168 .88.15
PREFIX = 32
ifdown lo:0; ifup lo:0
ifconfig
vim /etc/sysctl.conf
net.ipv4.conf.all.arp_ignore = 1
net.ipv4.conf.lo.arp_ignore = 1
net.ipv4.conf.all.arp_announce = 2
net.ipv4.conf.lo.arp_announce = 2
sysctl -p
cd /etc/sysconfig/network-scripts/
vim ifcfg-eth0
TYPE = Ethernet
BOOTPROTO = none
NAME = eth0
DEVICE = eth0
ONBOOT = yes
IPADDR = 192.168 .88.100
PREFIX = 24
GATEWAY = 192.168 .88.254
ifdown eth0; ifup eth0
cp ifcfg-eth0 ifcfg-lo:0
TYPE = Ethernet
BOOTPROTO = none
NAME = lo:0
DEVICE = lo:0
ONBOOT = yes
IPADDR = 192.168 .88.15
PREFIX = 32
ifdown lo:0; ifup lo:0
ifconfig
vim /etc/sysctl.conf
net.ipv4.conf.all.arp_ignore = 1
net.ipv4.conf.lo.arp_ignore = 1
net.ipv4.conf.all.arp_announce = 2
net.ipv4.conf.lo.arp_announce = 2
sysctl -p
ipvsadm -D -t 192.168 .88.5:80
ipvsadm -A -t 192.168 .88.15:80 -s lc
ipvsadm -a -t 192.168 .88.15:80 -r 192.168 .88.100 -w 100 -g
ipvsadm -a -t 192.168 .88.15:80 -r 192.168 .88.200 -w 200 -g
ipvsadm -E -t 192.168 .88.15:80 -s wlc
ipvsadm -Ln