![![[Pasted image 20240418143649.png]]](https://img-blog.csdnimg.cn/direct/9bd823eedcdd4935ac4a552831a287a9.png)
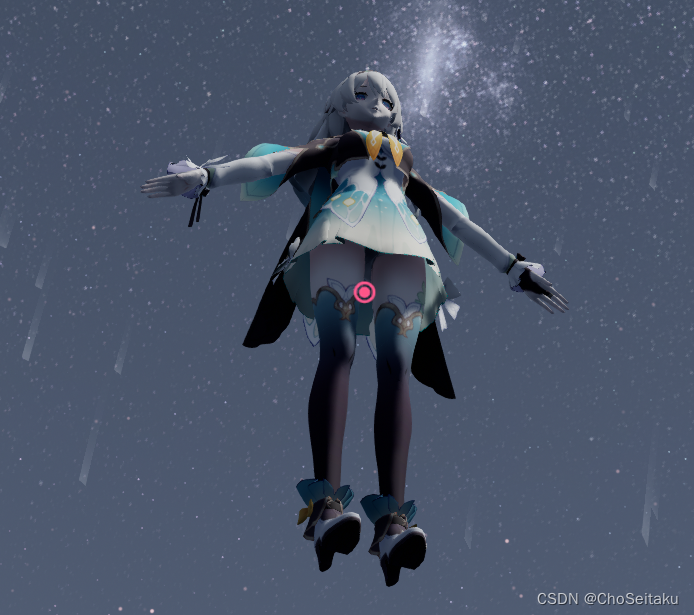
现在已经有了一个TDAMiku的模型
1. Sky with box
-
导入Sky with box.pmx 天空盒
-
再把ray.x和ray_controler.pmx放进去
![![[Pasted image 20240418143936.png]]](https://img-blog.csdnimg.cn/direct/22aa505244ee4f04ac5ca258f04d222c.png)
-
调节背景模型绘制顺序
![![[Pasted image 20240418144038.png]]](https://img-blog.csdnimg.cn/direct/8aa31ada9fa242599110e6c3f880715f.png)
- 天空盒在最上面
![![[Pasted image 20240418144104.png]]](https://img-blog.csdnimg.cn/direct/48b6faa72c774724a17f1333f896a286.png)
- 上材质
-
给miku上main.fx材质
![![[Pasted image 20240418144151.png]]](https://img-blog.csdnimg.cn/direct/59d85d1e4bc5474096d2e2be03a40a7b.png)
-
在自发光一栏给天空盒添加对应的材质
Sky with lighting.fx
![![[Pasted image 20240418144319.png]]](https://img-blog.csdnimg.cn/direct/09b90e6110954742bc63ebb15cc7635f.png)
-
![![[Pasted image 20240418144347.png]]](https://img-blog.csdnimg.cn/direct/06c3f9085e1a46659e99072e3cca243b.png)
- 调节参数
按TAB键,切换到天空盒子这一栏
![![[Pasted image 20240418144429.png]]](https://img-blog.csdnimg.cn/direct/fcf3038656e94069a325cf3dbd4ec3a1.png)
![![[Pasted image 20240418144502.png]]](https://img-blog.csdnimg.cn/direct/fe07ae8ecb1a41d89e8b7ac203453817.png)
- BanlanceR+指偏红的颜色,把数值调高,背景就会越来越红
![![[Pasted image 20240418144559.png]]](https://img-blog.csdnimg.cn/direct/1dbd7129fd5f4074944d8f79be66d17f.png)
- G+就是越来越绿
- B+就是越来越蓝
- Gray+就是越来越灰
- EnvDiffLight是天空盒的光源强度
把它调高,对模型的影响就是越高越亮 - EnvSpecLight是指漫反射的强度
数值越高,模型漫反射的强度也越高 - DiffuseR+就是指模型本身的漫反射偏红
- G+就是漫射偏绿
- B+就是漫射偏蓝
- …
2. Sky Hemisphere
![![[Pasted image 20240418145128.png]]](https://img-blog.csdnimg.cn/direct/3421c39a152443d0be665578a0272044.png)
-
拖入Sky with box.pmx
-
修改模型绘制顺序
![![[Pasted image 20240418145216.png]]](https://img-blog.csdnimg.cn/direct/70180964457642f6bbc79d4686b07767.png)
-
添加材质
![![[Pasted image 20240418145255.png]]](https://img-blog.csdnimg.cn/direct/d3832e0c675b4bdfb2dbfebe4fe3465a.png)
![![[Pasted image 20240418145305.png]]](https://img-blog.csdnimg.cn/direct/c94f91a84c4b4def818d61216163863a.png)
这两个天空盒的差别可以看到,颜色背景不同,这个天空盒是一个纯白的,适用于实景合成,对室内环境也方便进行调整
4. 看参数
![![[Pasted image 20240418145445.png]]](https://img-blog.csdnimg.cn/direct/89c23bc39af4416b9fec6621b64ca2dc.png)
- Top是头顶的意思
- medium中间
- bottom底部
![![[Pasted image 20240418145627.png]]](https://img-blog.csdnimg.cn/direct/2bf8d931b606423ca063f72fa8de54f7.png)
当把H+S+和V+全部调高,会发现头顶变成红色
如何调节成自己喜欢的颜色
S和V可以改变头顶的颜色
- Medium和bottom同理
3. Sky Night
和前者是一样的效果
只不过是晚上
4. Time of day
![![[Pasted image 20240418150114.png]]](https://img-blog.csdnimg.cn/direct/37a3c881b56241e2810f5d6c2d409953.png)
-
导入Time of day.pmx
-
导入ray.x和ray_controler.pmx
-
修改模型绘制顺序
![![[Pasted image 20240418150307.png]]](https://img-blog.csdnimg.cn/direct/f3783e5e4f394684b8f8b0a7adb54f82.png)
-
给模型和天空盒添加相应的材质
![![[Pasted image 20240418150421.png]]](https://img-blog.csdnimg.cn/direct/e5392623091249caa054f62a2e7e9fe8.png)
切换到照明模式,找一下太阳

![![[Pasted image 20240418150622.png]]](https://img-blog.csdnimg.cn/direct/569fc0ada3764a259ee7b6ef76ade673.png)
-
SunRadius+,调整太阳大小
数值越高,太阳越大 -
EnvDiffLight,光源强度
数值越大,太阳光源越强- EnvSpecLight是调节漫反射的
-
MiePhase+,如果添加了Fog雾气的话
调高这个数值,会让丁达尔效应更明显
![![[Pasted image 20240418150917.png]]](https://img-blog.csdnimg.cn/direct/29b04acc8f1849cc9877cf106b229c86.png)
FogRange是与雾气的距离
FogIntensity,如果导入了带雾气的一个效果文件的话
这个数值越高,雾气的效果会越强 -
Cloud就是云
调高以后云会越来越多- CloudSpeed
调高了云的速度会变快
- CloudSpeed
5. Time of night
和Time of day 差不多
同样导入后调节模型绘制顺序,添加对应材质
有一个夜晚的效果