文章目录
- 1. MNIST 手写数字识别
- 2. 聚焦数据集扩充后的模型训练
- 3. pytorch 手写数字识别基本实现
- 3.1完整代码及 MNIST 测试集测试结果
- 3.1.1代码
- 3.1.2 MNIST 测试集测试结果
- 3.2 使用自己的图片进行测试
- 3.2.1 测试图片预处理代码
- 3.2.2 测试图片结果
- 4. 数据增强
- 4.1 手动读取 MNIST 数据集
- 4.2 数据增强
- 4.2.1 像素反转
- 4.2.2 图像旋转
- 4.2.2.1 图像类别统计
- 4.2.2.2 根据类别进行等量均类划分
- 4.2.3 像素反转 + 图像旋转
- 4.2.4 选择加载不同的处理后的数据集
- 4.3 完整代码
- 5. 模型再训练
- 5.1 怎么加载 split 后的数据?
- 5.1.1 创建自己的 dataset 类
- 5.1.2 load 分割好的数据
- 5.2 加载完成后怎么和原始数据合并,然后送入模型进行训练?
- 5.3 完整代码
- 5.4 训练结果
- 5.4.1 只进行像素反转
- 5.4.1.1 测试结果
- 5.4.1.2 在自己的数据上测试
- 测试代码
- 测试结果
- 5.4.2 只进行图像旋转
- 5.4.2.1 测试结果
- 5.4.2.2 在自己的数据上测试
- 测试代码
- 测试结果
- 5.4.3 二者同时进行
- 5.4.3.1 测试结果
- 5.4.3.2 在自己的数据上测试
- 测试代码
- 测试结果
- 5.5 结果整合
- 结语
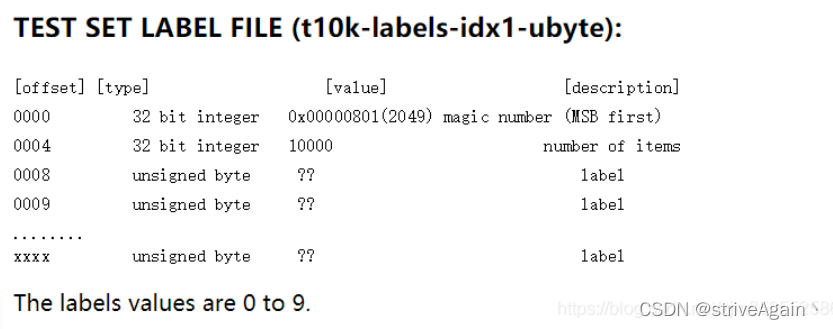
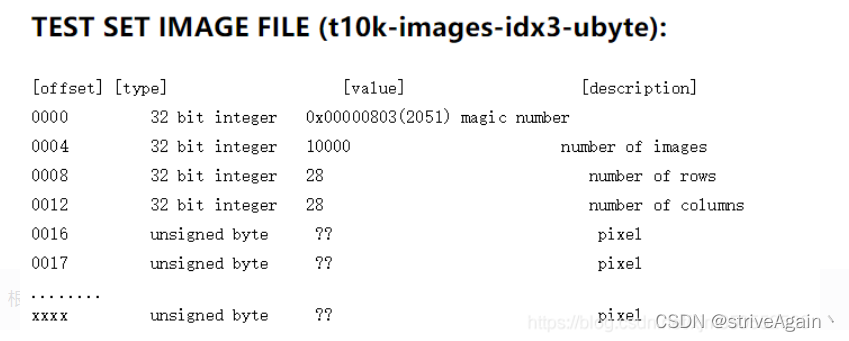
1. MNIST 手写数字识别
MNIST 数据集分为两部分,分别是训练集和测试集,其中训练集含有 60000 张图片,测试集中含有 10000 张图片。从官网下载的数据集主要包括有 4 个文件:
| 文件名称 | 文件用途 |
|---|---|
| train-images-idx3-ubyte.gz | 训练集图像 |
| train-labels-idx1-ubyte.gz | 训练集 label |
| t10k-images-idx3-ubyte.gz | 测试集图像 |
| t10k-labels-idx1-ubyte.gz | 测试集 label |
参考:
MNIST 数据集介绍 1
MNIST 数据集介绍 2
2. 聚焦数据集扩充后的模型训练
Internet 中有很多关于 pytorch 实现手写数字识别的博客了,所以本文不再对这一方面作过多的叙述。更多地,本文对 MNIST 数据集进行了扩充,利用 3 中不同的数据集构成对模型进行训练,每类数据集构成都包含了 12000 张图片。这 3 种不同的数据集构成如下:
- 原始数据集(60000 张)+ 像素反转后的图片(60000 张)
- 原始数据集(60000 张)+ 对图像进行 90°, 180°, 270° 等量均类旋转后的图片(60000 张)(注意:此处的等量均类是指对每个角度都旋转了 20000 张图片,同时,这 20000 张图片中包含了数字 0-9 这十个类别的图片各 2000 张)
- 原始数据集(60000 张)+ 像素反转后的图片(30000 张)+ 等量均类旋转的图片(30000 张)
建议自己尝试进行数据分割,也可以利用分割好了的数据[链接](资源还在审核,占个坑)
3. pytorch 手写数字识别基本实现
3.1完整代码及 MNIST 测试集测试结果
3.1.1代码
完整代码如下:
import torch
import torch.nn as nn
import torchvision.datasets
import torchvision.transforms as transforms
import matplotlib.pyplot as plt
import numpy as np
from PIL import Image


class CNN(nn.Module):
    def __init__(self):
        super(CNN, self).__init__()
        self.conv1 = nn.Sequential(
            nn.Conv2d(in_channels=1, out_channels=16, kernel_size=3, stride=1, padding=1),
            nn.ReLU(),
            nn.MaxPool2d(kernel_size=2, stride=2),
        )

        self.conv2 = nn.Sequential(
            nn.Conv2d(in_channels=16, out_channels=32, kernel_size=3, stride=1, padding=1),
            nn.ReLU(),
            nn.MaxPool2d(kernel_size=2, stride=2),
        )

        self.conv3 = nn.Sequential(
            nn.Conv2d(in_channels=32, out_channels=64, kernel_size=3, stride=1, padding=1),
            nn.ReLU(),
        )

        self.fullyConnected = nn.Sequential(
            nn.Flatten(),
            nn.Linear(in_features=7 * 7 * 64, out_features=128),
            nn.ReLU(),
            nn.Linear(in_features=128, out_features=10),
        )

    def forward(self, img):
        output = self.conv1(img)
        output = self.conv2(output)
        output = self.conv3(output)
        output = self.fullyConnected(output)
        return output


def get_device():
    if torch.cuda.is_available():
        train_device = torch.device('cuda')
    else:
        train_device = torch.device('cpu')

    return train_device


def get_data_loader(dat_path, bat_size, trans, to_train=False):
    dat_set = torchvision.datasets.MNIST(root=dat_path, train=to_train, transform=trans, download=True)
    if to_train is True:
        dat_loader = torch.utils.data.DataLoader(dat_set, batch_size=bat_size, shuffle=True)
    else:
        dat_loader = torch.utils.data.DataLoader(dat_set, batch_size=bat_size)

    return dat_set, dat_loader


def show_part_of_image(dat_loader, row, col):
    iteration = enumerate(dat_loader)
    idx, (exam_img, exam_label) = next(iteration)

    fig = plt.figure(num=1)
    for i in range(row * col):
        plt.subplot(row, col, i + 1)
        plt.tight_layout()
        plt.imshow(exam_img[i][0], cmap='gray', interpolation='none')
        plt.title('Number: {}'.format(exam_label[i]))
        plt.xticks([])
        plt.yticks([])
    plt.show()


def train(network, dat_loader, device, epos, loss_function, optimizer):
    for epoch in range(1, epos + 1):
        network.train(mode=True)
        for idx, (train_img, train_label) in enumerate(dat_loader):
            train_img = train_img.to(device)
            train_label = train_label.to(device)

            outputs = network(train_img)
            optimizer.zero_grad()
            loss = loss_function(outputs, train_label)
            loss.backward()
            optimizer.step()

            if idx % 100 == 0:
                cnt = idx * len(train_img) + (epoch - 1) * len(dat_loader.dataset)
                print('epoch: {}, [{}/{}({:.0f}%)], loss: {:.6f}'.format(epoch,
                                                                         idx * len(train_img),
                                                                         len(dat_loader.dataset),
                                                                         (100 * cnt) / (
                                                                                 len(dat_loader.dataset) * epos),
                                                                         loss.item()))
        print('------------------------------------------------')
    print('Training ended.')

    return network


def test(network, dat_loader, device, loss_function):
    test_loss_avg, correct, total = 0, 0, 0
    test_loss = []
    network.train(mode=False)

    with torch.no_grad():
        for idx, (test_img, test_label) in enumerate(dat_loader):
            test_img = test_img.to(device)
            test_label = test_label.to(device)

            total += test_label.size(0)

            outputs = network(test_img)
            loss = loss_function(outputs, test_label)
            test_loss.append(loss.item())

            predictions = torch.argmax(outputs, dim=1)
            correct += torch.sum(predictions == test_label)
        test_loss_avg = np.average(test_loss)
        print('Total: {}, Correct: {}, Accuracy: {:.2f}%, AverageLoss: {:.6f}'.format(total, correct,
                                                                                      correct / total * 100,
                                                                                      test_loss_avg))


def show_part_of_test_result(network, dat_loader, row, col):
    iteration = enumerate(dat_loader)
    idx, (exam_img, exam_label) = next(iteration)

    with torch.no_grad():
        outputs = network(exam_img)

        fig = plt.figure()
        for i in range(row * col):
            plt.subplot(row, col, i + 1)
            plt.tight_layout()
            plt.imshow(exam_img[i][0], cmap='gray', interpolation='none')
            plt.title('Number: {}, Prediction: {}'.format(
                exam_label[i], outputs.data.max(1, keepdim=True)[1][i].item()
            ))
            plt.xticks([])
            plt.yticks([])
        plt.show()


batch_size, epochs = 64, 10
transform = transforms.Compose([transforms.ToTensor(), transforms.Normalize(mean=[0.1307], std=[0.3081])])
my_device = get_device()

path = './data'
_, train_data_loader = get_data_loader(path, batch_size, transform, True)
print('Training data loaded.')

show_part_of_image(train_data_loader, 3, 3)

_, test_data_loader = get_data_loader(path, batch_size, transform)
print('Testing data loaded.')

cnn = CNN()
loss_func = nn.CrossEntropyLoss()
optim = torch.optim.Adam(cnn.parameters(), lr=0.01)

cnn = train(cnn, train_data_loader, my_device, epochs, loss_func, optim)
test(cnn, test_data_loader, my_device, loss_func)

show_part_of_test_result(cnn, test_data_loader, 5, 2)

torch.save(cnn, './cnn.pth')
3.1.2 MNIST 测试集测试结果
模型测试结果:
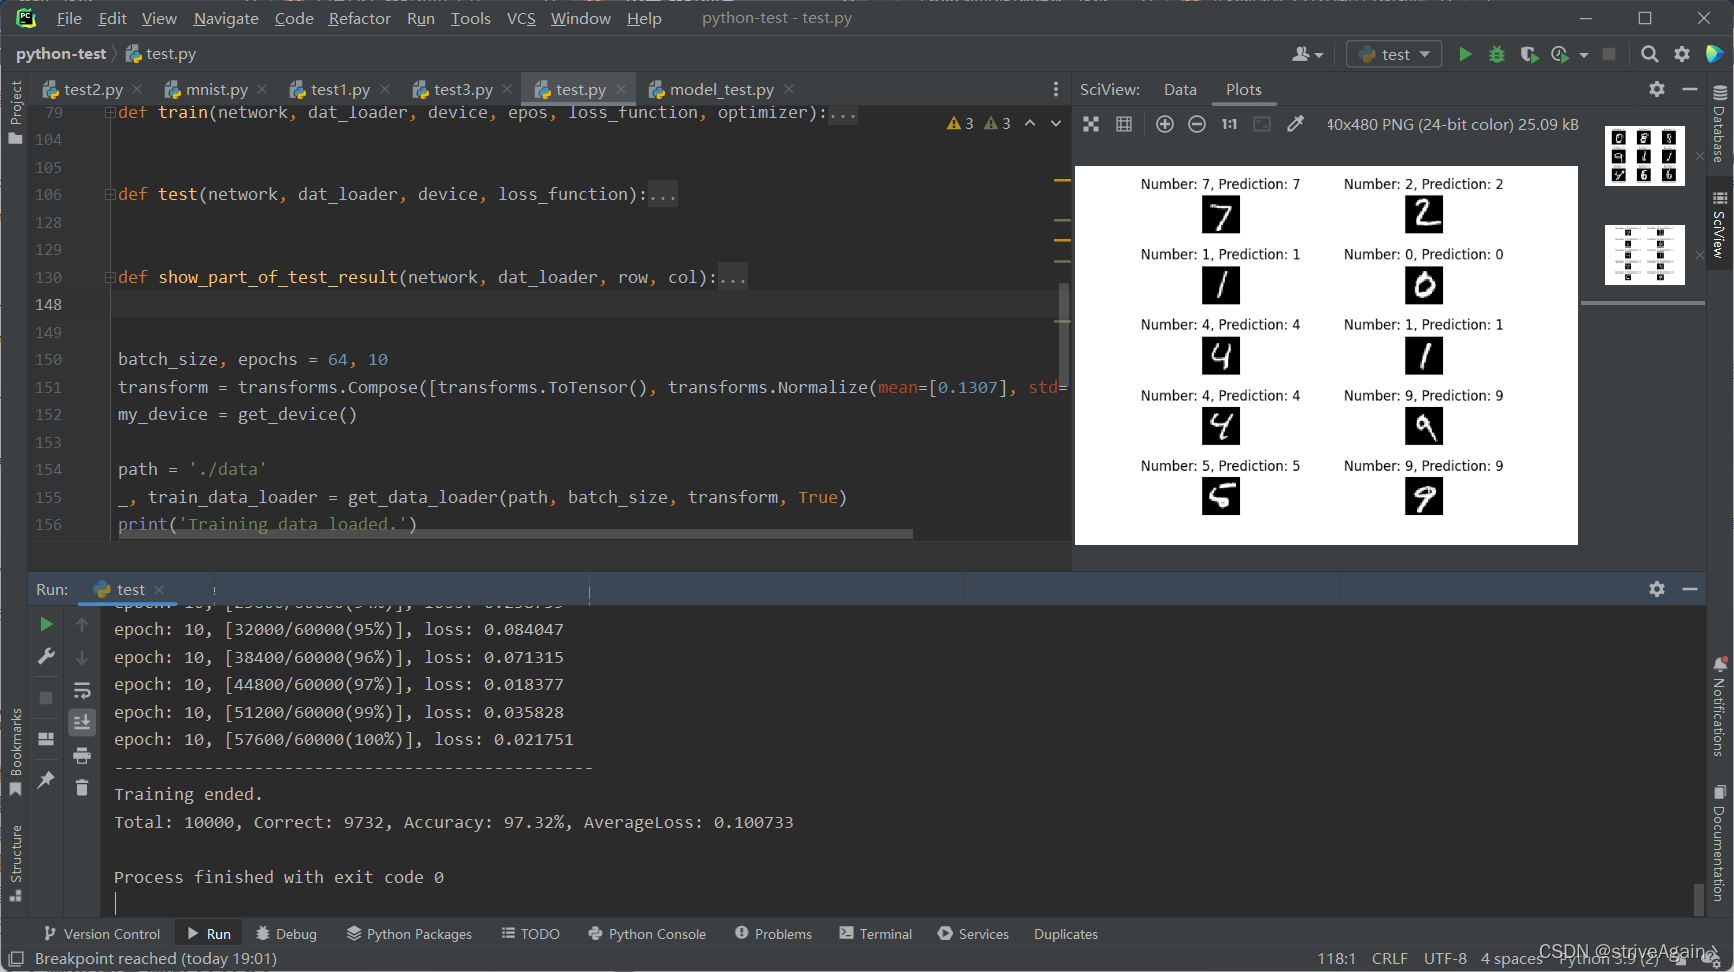
其中一些超参数如下:
batch_size: 64epochs: 10
同时,采用交叉熵 CrossEntropyLoss 来计算 loss,Adam 来进行优化:

模型在测试集上的准确率达到了 97.32%,从右侧的测试集采样结果来看,正确率也相对较高;
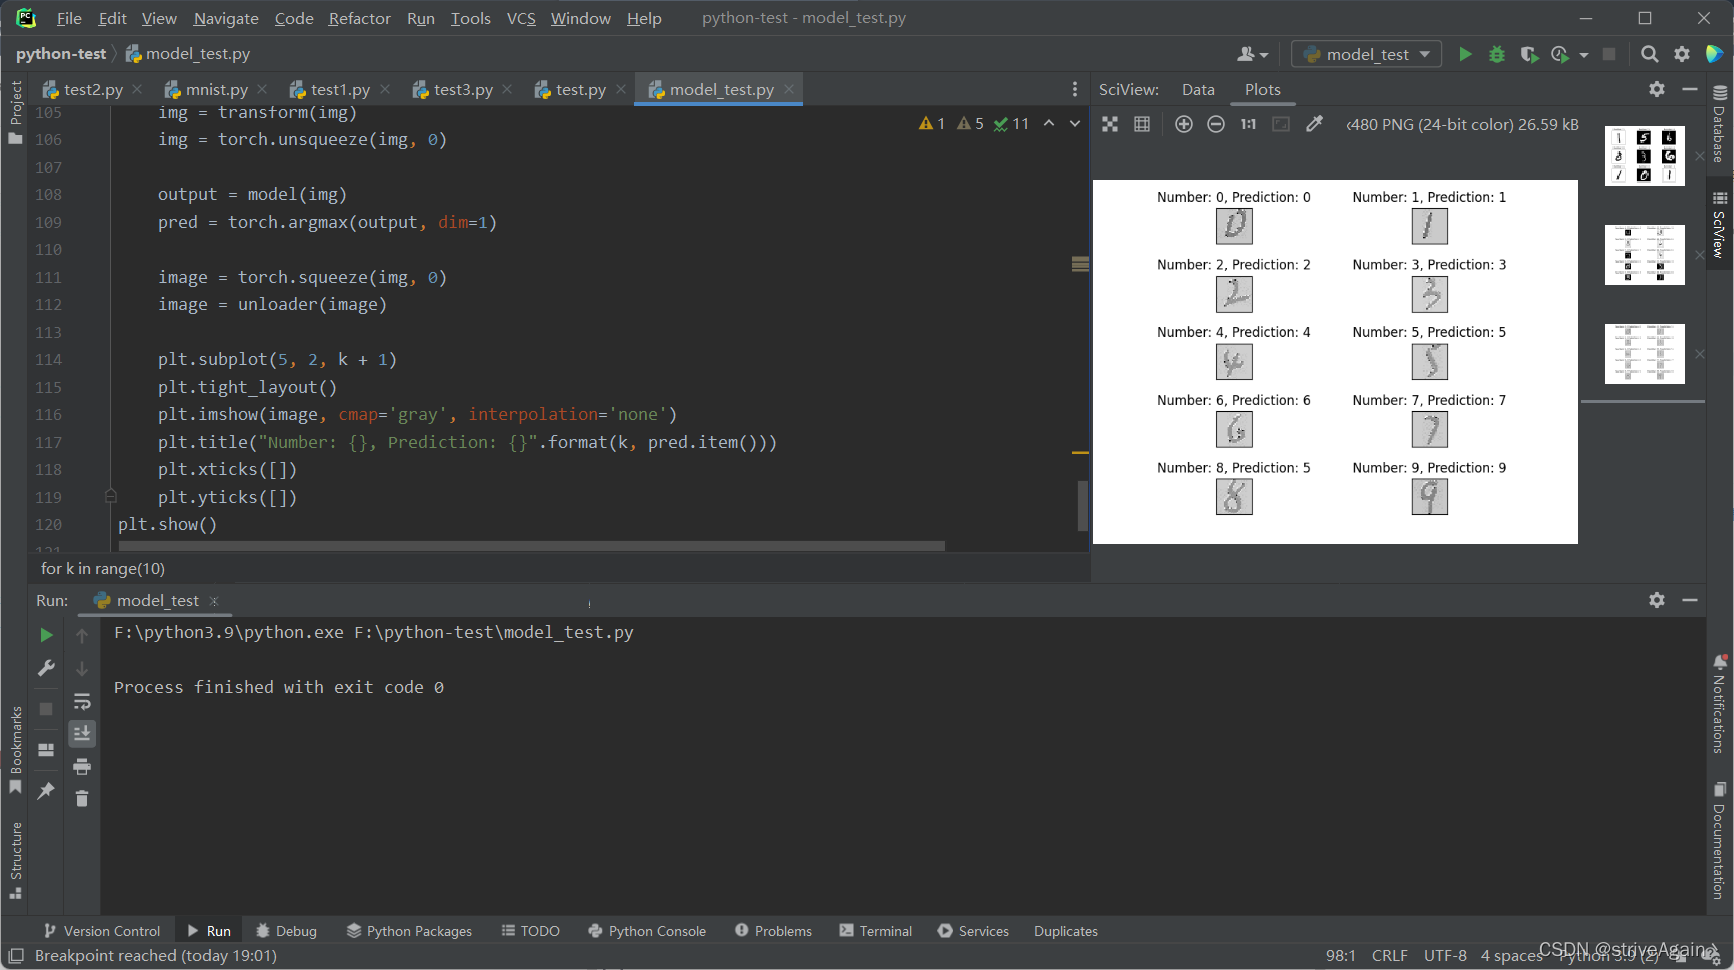
3.2 使用自己的图片进行测试
另外,还在画图中做了 0-9 这 10 个数字代入模型进行识别。注意:在画图中做的图片必须要是 28 * 28 的大小(当然也可以用 python 进行裁剪,这里就偷个懒~)
还需要注意的是,MNIST 数据集中的图片是黑底白字的,而通过画图做出的图片是白底黑字的,因此若想得到准确结果的话,必须要对需要测试的图片进行像素反转的预处理操作;
3.2.1 测试图片预处理代码
注意:由于将模型保存进了 cnn.pth 文件,测试时直接 torch.load('./cnn.pth') 即可(当然也可以用官方推荐的只保存参数的方法);需要注意的是:记得把网络结构的定义复制过来,否则会报错;
import torch
import numpy as np
from PIL import Image
from torchvision import transforms
import torch.nn as nn
import matplotlib.pyplot as plt


class CNN(nn.Module):
    def __init__(self):
        super(CNN, self).__init__()
        self.conv1 = nn.Sequential(
            nn.Conv2d(in_channels=1, out_channels=16, kernel_size=3, stride=1, padding=1),
            nn.ReLU(),
            nn.MaxPool2d(kernel_size=2, stride=2),
        )

        self.conv2 = nn.Sequential(
            nn.Conv2d(in_channels=16, out_channels=32, kernel_size=3, stride=1, padding=1),
            nn.ReLU(),
            nn.MaxPool2d(kernel_size=2, stride=2),
        )

        self.conv3 = nn.Sequential(
            nn.Conv2d(in_channels=32, out_channels=64, kernel_size=3, stride=1, padding=1),
            nn.ReLU(),
        )

        self.fullyConnected = nn.Sequential(
            nn.Flatten(),
            nn.Linear(in_features=7 * 7 * 64, out_features=128),
            nn.ReLU(),
            nn.Linear(in_features=128, out_features=10),
        )

    def forward(self, input):
        output = self.conv1(input)
        output = self.conv2(output)
        output = self.conv3(output)
        output = self.fullyConnected(output)
        return output


model = torch.load('./cnn.pth')
model.eval()

transform = transforms.Compose([transforms.ToTensor(), transforms.Normalize(mean=[0.1307], std=[0.3081])])
unloader = transforms.ToPILImage()

for k in range(10):
    infile = './testImgs/raw/' + '{}.jpg'.format(k)

    img = Image.open(infile)
    img = img.convert('L')
    img_array = np.array(img)

	# 像素反转
    for i in range(28):
        for j in range(28):
            img_array[i, j] = 255 - img_array[i, j]
    # print(img_array)
    img = Image.fromarray(img_array)
    # img.show()
    img = transform(img)
    img = torch.unsqueeze(img, 0)

    output = model(img)
    pred = torch.argmax(output, dim=1)

    image = torch.squeeze(img, 0)
    image = unloader(image)

    plt.subplot(5, 2, k + 1)
    plt.tight_layout()
    plt.imshow(image, cmap='gray', interpolation='none')
    plt.title("Number: {}, Prediction: {}".format(k, pred.item()))
    plt.xticks([])
    plt.yticks([])
plt.show()
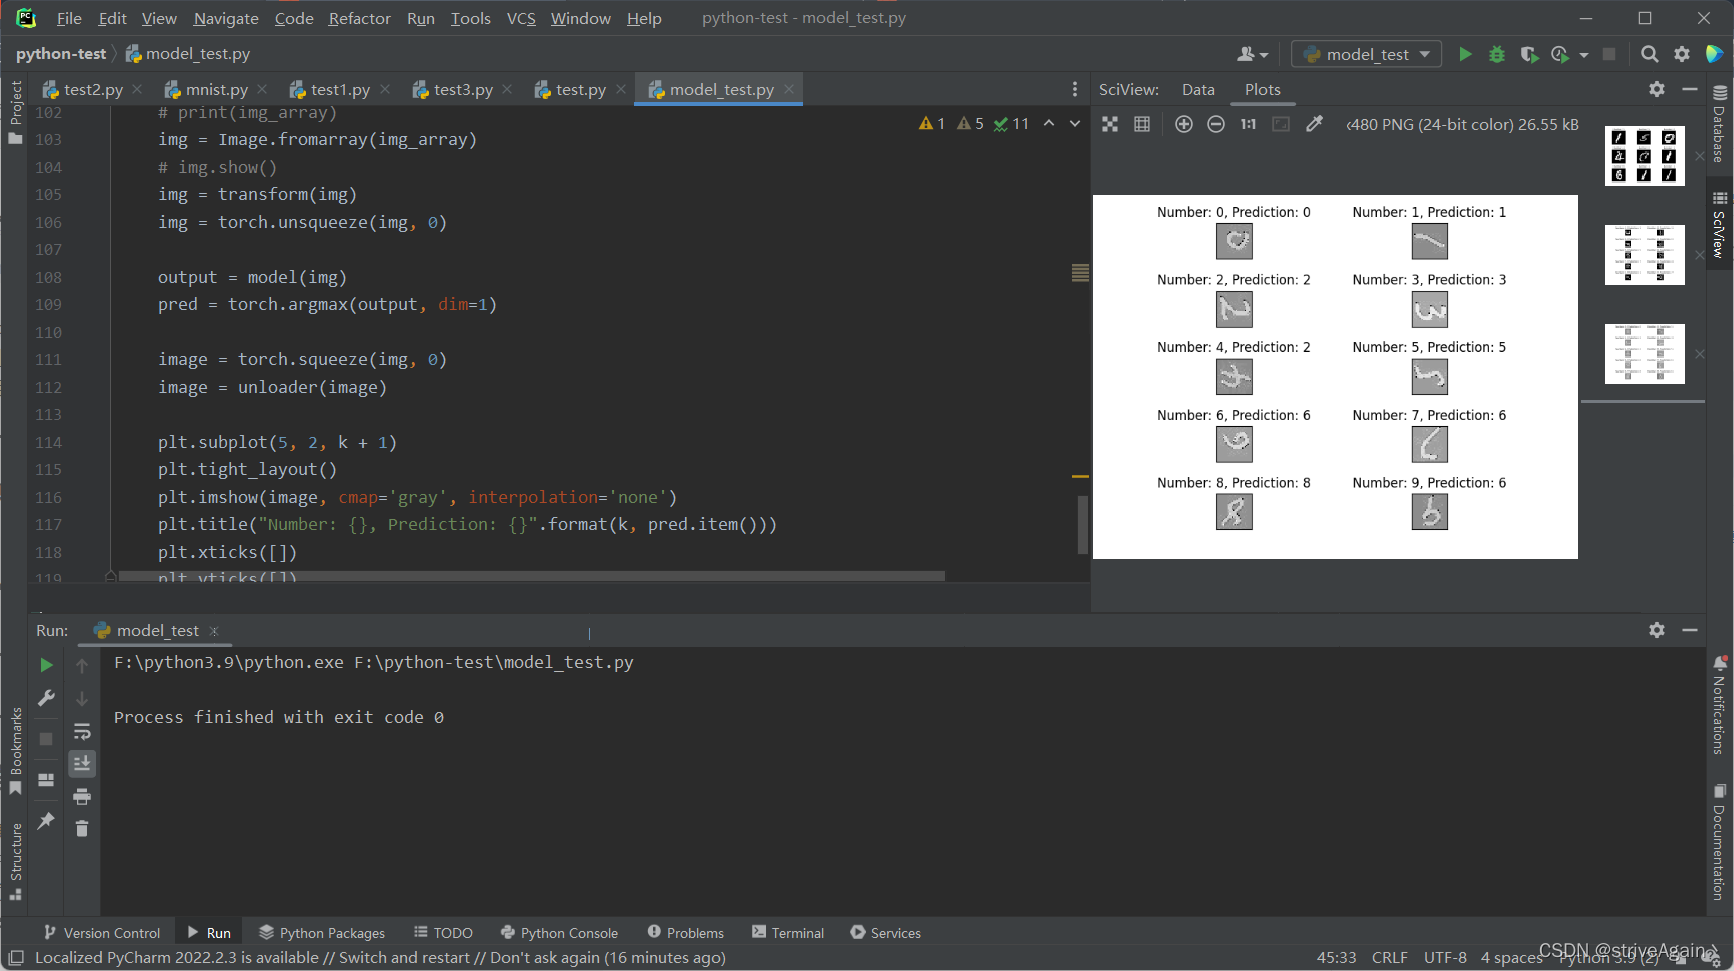
3.2.2 测试图片结果
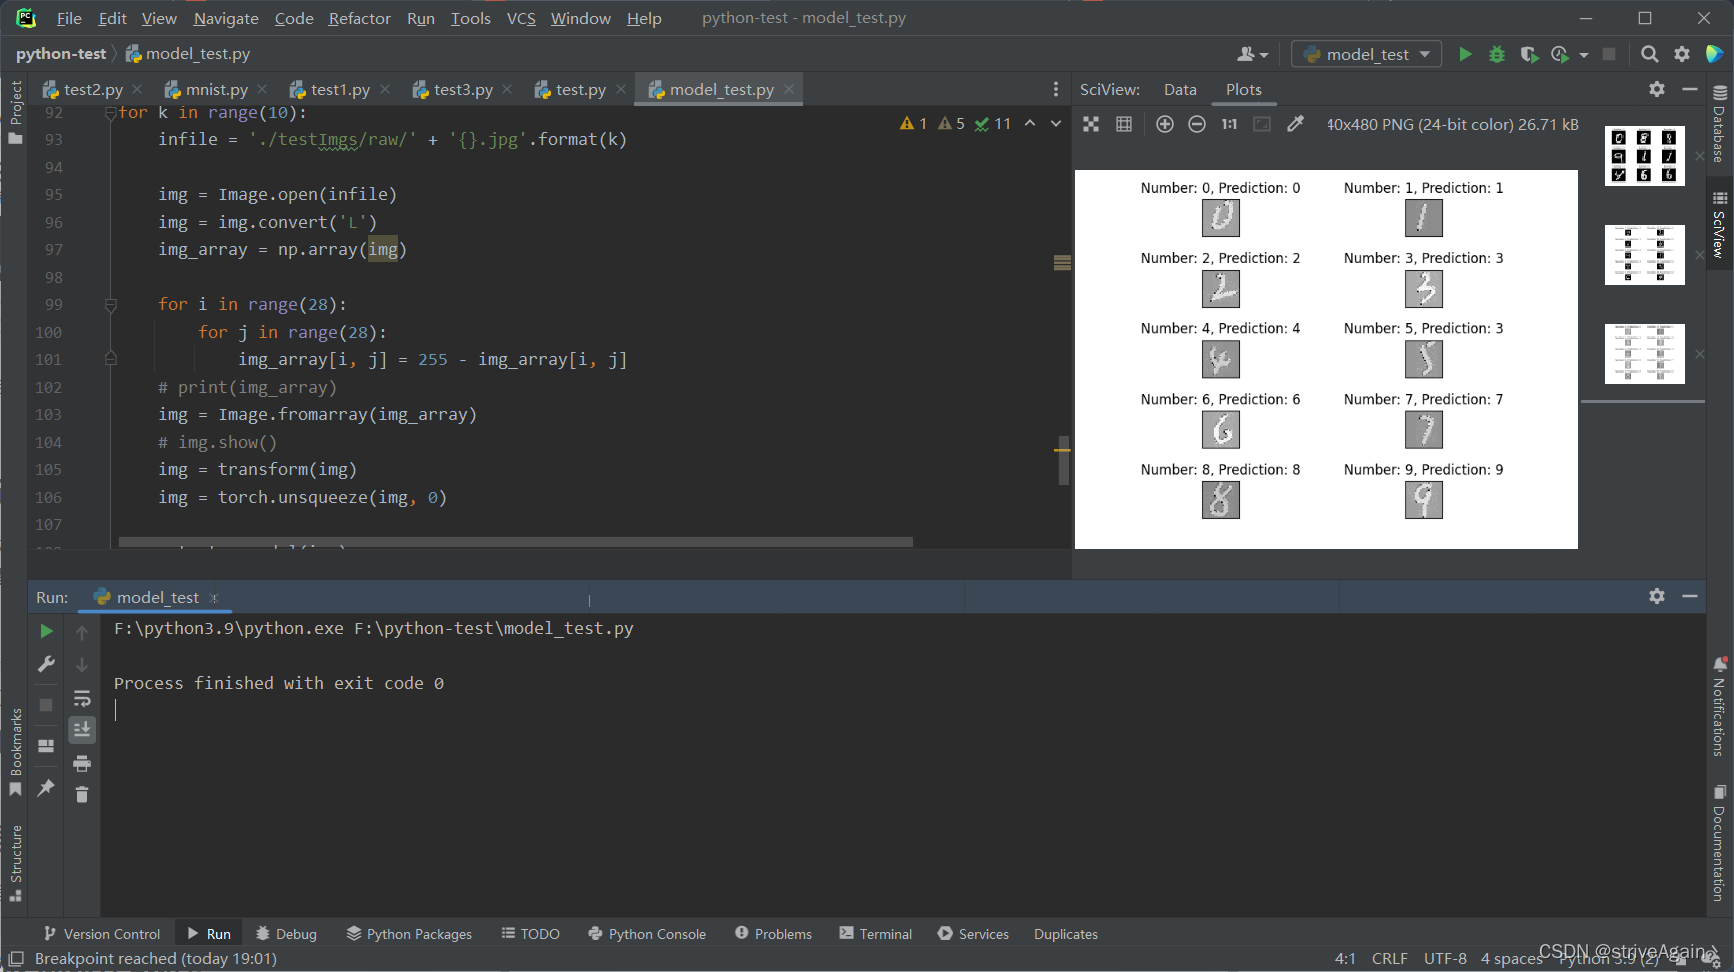
(虽然结果正确率挺高,但是那些图片看起来怎么是灰底呢!?)
4. 数据增强
由于我们需要对数据进行处理,因此需要单独将数据读取出来,再进行相应的处理后保存;
4.1 手动读取 MNIST 数据集
关于如何从 .gz 文件中读取图片和图片的 label,参考了这篇文章 手动读取 MNIST 数据集;
主要代码:
def load_mnist(folder, img_file_name, label_file_name):
    with gzip.open(os.path.join(folder, label_file_name), 'rb') as lbpath:
        y_set = np.frombuffer(lbpath.read(), np.uint8, offset=8)

    with gzip.open(os.path.join(folder, img_file_name), 'rb') as imgpath:
        x_set = np.frombuffer(imgpath.read(), np.uint8, offset=16).reshape(len(y_set), 28, 28)

    return x_set, y_set
注意,offset 的0000-0003是 magic number,offset的0004-0007是items数目,所以跳过不读,因此将 offset 设置为 8 开始读取;同理:
将 offset 设置为 16,开始读取图片数据;
4.2 数据增强
4.2.1 像素反转
主要操作就是用 255 - 原像素,代码如下:
def all_divert(x, save_path):
	# 使 numpy 矩阵可以读写
    x = np.require(x, dtype='f4', requirements=['O', 'W'])

    for i in range(len(x)):
        for pixel in np.nditer(x[i], op_flags=['readwrite']):
            pixel[...] = 255 - pixel

        save_img = Image.fromarray(x[i])
        save_img = save_img.convert('L')
        save_img.save(save_path + '{}.jpg'.format(i))
4.2.2 图像旋转
4.2.2.1 图像类别统计
在对图像进行旋转的时候,需要做到等量均类,这两个条件缺一不可(因为你不可能让一个人看到一个陌生的动物却能准确说出这个动物是什么),因此首先对图片数据根据它们的 label 进行一个统计。
def classify_img(y):
    cnt = {0: [], 1: [], 2: [], 3: [], 4: [], 5: [], 6: [], 7: [], 8: [], 9: []}
    for i in range(len(y)):
        label = y[i]
        cnt[label].append(i)

    return cnt
这里返回的字典 cnt 中每个字典项保存有属于该 key(label) 的图像的编号;
4.2.2.2 根据类别进行等量均类划分
有了对每个 label 的统计,从中进行划分即可。此处是对全部图像进行 90°,180°,270° 这三类旋转,因此对于每个 label 都将其编号集合进行三等分
def all_rotate(x, cnt_seq, save_path):
	'''
	x: 图像数据集
	cnt_seq: 统计后的 cnt 字典
	save_path: 图像保存路径
	'''
    x = np.require(x, dtype='f4', requirements=['O', 'W'])

    for i in range(10):
        # 将数据集分为 3 份
        data_len = int(len(cnt_seq[i]) / 3)
        for split in range(3):
            left = split * data_len
            if split == 2:
            	# 最后一份包含剩下的所有图像
                right = len(cnt_seq[i])
            else:
                right = (split + 1) * data_len

            for j in range(left, right):
            	# split + 1 表示旋转 90° 的 (split + 1) 倍
                x[cnt_seq[i][j]] = np.rot90(x[cnt_seq[i][j]], split + 1)
                save_img = Image.fromarray(x[cnt_seq[i][j]])
                save_img = save_img.convert('L')
                save_img.save(save_path + '{}.jpg'.format(cnt_seq[i][j]))
4.2.3 像素反转 + 图像旋转
就是上面两种操作的综合,只不过将原始数据集划分为 4 等分:
def divert_and_rotate(x, cnt_seq, save_path):
	'''
	x: 图像数据集
	cnt_seq: 统计后的 cnt 字典
	save_path: 图像保存路径
	'''
    x = np.require(x, dtype='f4', requirements=['O', 'W'])

    for i in range(10):
        # 将数据集分为 4 份
        data_len = int(len(cnt_seq[i]) / 4)
        for split in range(4):
            left = split * data_len
            if split == 3:
                right = len(cnt_seq[i])
            else:
                right = (split + 1) * data_len

            if split == 0:
           		# 第一等份进行像素反转
                for j in range(left, right):
                    for pixel in np.nditer(x[cnt_seq[i][j]], op_flags=['readwrite']):
                        pixel[...] = 255 - pixel

                    save_img = Image.fromarray(x[cnt_seq[i][j]]).convert('L')
                    save_img.save(save_path + '{}.jpg'.format(cnt_seq[i][j]))
            else:
            	# 后面的进行图像旋转
                for j in range(left, right):
                    x[cnt_seq[i][j]] = np.rot90(x[cnt_seq[i][j]], split)
                    save_img = Image.fromarray(x[cnt_seq[i][j]]).convert('L')
                    save_img.save(save_path + '{}.jpg'.format(cnt_seq[i][j]))
4.2.4 选择加载不同的处理后的数据集
上面的三个函数可以实现将不同的处理方式处理后的数据集进行保存,需要注意的是:测试集进行了划分,训练集也要进行划分! 因此下面的 split_and_save() 函数用来选择不同的处理模式;
def split_and_save(x, y, save_img_path, to_divert=False, to_rotate=False):
	'''
	x: 图像数据; y: label 数据
	save_img_path: 图像保存路径
	to_divert: 是否进行像素反转
	to_rotate: 是否进行图像旋转
	'''
    count_seq = classify_img(y)

    if to_divert is True and to_rotate is False:
        all_divert(x, save_img_path)
    elif to_divert is False and to_rotate is True:
        all_rotate(x, count_seq, save_img_path)
    elif to_divert is True and to_rotate is True:
        divert_and_rotate(x, count_seq, save_img_path)
    else:
        return
接下来就是图像处理了:
root_path = './data/MNIST/raw'
# 加载训练集
img_file_path = 'train-images-idx3-ubyte.gz'
label_file_path = 'train-labels-idx1-ubyte.gz'

raw_x, raw_y = load_mnist(root_path, img_file_path, label_file_path)

save_root_path = './testImgs'
split_and_save(raw_x, raw_y, save_root_path + '/divert/', True, False)
split_and_save(raw_x, raw_y, save_root_path + '/rotate/', False, True)
split_and_save(raw_x, raw_y, save_root_path + '/divert_and_rotate/', True, True)

# 将训练集 label 保存在 label_train.txt 中
with open(save_root_path + '/label_train.txt', 'w') as f:
    for label in raw_y:
        f.write(str(label))
        f.write('\n')
f.close()

# 加载测试集
img_file_path = 't10k-images-idx3-ubyte.gz'
label_file_path = 't10k-labels-idx1-ubyte.gz'

raw_x, raw_y = load_mnist(root_path, img_file_path, label_file_path)
split_and_save(raw_x, raw_y, save_root_path + '/divert_test/', True, False)
split_and_save(raw_x, raw_y, save_root_path + '/rotate_test/', False, True)
split_and_save(raw_x, raw_y, save_root_path + '/divert_and_rotate_test/', True, True)

# 将测试集 label 保存在 label_test.txt 中
with open(save_root_path + '/label_test.txt', 'w') as f:
    for label in raw_y:
        f.write(str(label))
        f.write('\n')
f.close()
4.3 完整代码
import gzip
import os
import numpy as np
from PIL import Image


def load_mnist(folder, img_file_name, label_file_name):
    with gzip.open(os.path.join(folder, label_file_name), 'rb') as lbpath:
        y_set = np.frombuffer(lbpath.read(), np.uint8, offset=8)

    with gzip.open(os.path.join(folder, img_file_name), 'rb') as imgpath:
        x_set = np.frombuffer(imgpath.read(), np.uint8, offset=16).reshape(len(y_set), 28, 28)

    return x_set, y_set


def all_divert(x, save_path):
    x = np.require(x, dtype='f4', requirements=['O', 'W'])

    for i in range(len(x)):
        for pixel in np.nditer(x[i], op_flags=['readwrite']):
            pixel[...] = 255 - pixel

        save_img = Image.fromarray(x[i])
        save_img = save_img.convert('L')
        save_img.save(save_path + '{}.jpg'.format(i))


def classify_img(y):
    cnt = {0: [], 1: [], 2: [], 3: [], 4: [], 5: [], 6: [], 7: [], 8: [], 9: []}
    for i in range(len(y)):
        label = y[i]
        cnt[label].append(i)

    return cnt


def all_rotate(x, cnt_seq, save_path):
    x = np.require(x, dtype='f4', requirements=['O', 'W'])

    for i in range(10):
        # 将数据集分为 3 份
        data_len = int(len(cnt_seq[i]) / 3)
        for split in range(3):
            left = split * data_len
            if split == 2:
                right = len(cnt_seq[i])
            else:
                right = (split + 1) * data_len

            for j in range(left, right):
                x[cnt_seq[i][j]] = np.rot90(x[cnt_seq[i][j]], split + 1)
                save_img = Image.fromarray(x[cnt_seq[i][j]])
                save_img = save_img.convert('L')
                save_img.save(save_path + '{}.jpg'.format(cnt_seq[i][j]))


def divert_and_rotate(x, cnt_seq, save_path):
    x = np.require(x, dtype='f4', requirements=['O', 'W'])

    for i in range(10):
        # 将数据集分为 4 份
        data_len = int(len(cnt_seq[i]) / 4)
        for split in range(4):
            left = split * data_len
            if split == 3:
                right = len(cnt_seq[i])
            else:
                right = (split + 1) * data_len

            if split == 0:
                for j in range(left, right):
                    for pixel in np.nditer(x[cnt_seq[i][j]], op_flags=['readwrite']):
                        pixel[...] = 255 - pixel

                    save_img = Image.fromarray(x[cnt_seq[i][j]]).convert('L')
                    save_img.save(save_path + '{}.jpg'.format(cnt_seq[i][j]))
            else:
                for j in range(left, right):
                    x[cnt_seq[i][j]] = np.rot90(x[cnt_seq[i][j]], split)
                    save_img = Image.fromarray(x[cnt_seq[i][j]]).convert('L')
                    save_img.save(save_path + '{}.jpg'.format(cnt_seq[i][j]))


def split_and_save(x, y, save_img_path, to_divert=False, to_rotate=False):
    count_seq = classify_img(y)

    if to_divert is True and to_rotate is False:
        all_divert(x, save_img_path)
    elif to_divert is False and to_rotate is True:
        all_rotate(x, count_seq, save_img_path)
    elif to_divert is True and to_rotate is True:
        divert_and_rotate(x, count_seq, save_img_path)
    else:
        return


root_path = './data/MNIST/raw'
img_file_path = 'train-images-idx3-ubyte.gz'
label_file_path = 'train-labels-idx1-ubyte.gz'

raw_x, raw_y = load_mnist(root_path, img_file_path, label_file_path)

save_root_path = './testImgs'
split_and_save(raw_x, raw_y, save_root_path + '/divert/', True, False)
split_and_save(raw_x, raw_y, save_root_path + '/rotate/', False, True)
split_and_save(raw_x, raw_y, save_root_path + '/divert_and_rotate/', True, True)

with open(save_root_path + '/label_train.txt', 'w') as f:
    for label in raw_y:
        f.write(str(label))
        f.write('\n')
f.close()

img_file_path = 't10k-images-idx3-ubyte.gz'
label_file_path = 't10k-labels-idx1-ubyte.gz'

raw_x, raw_y = load_mnist(root_path, img_file_path, label_file_path)
split_and_save(raw_x, raw_y, save_root_path + '/divert_test/', True, False)
split_and_save(raw_x, raw_y, save_root_path + '/rotate_test/', False, True)
split_and_save(raw_x, raw_y, save_root_path + '/divert_and_rotate_test/', True, True)

with open(save_root_path + '/label_test.txt', 'w') as f:
    for label in raw_y:
        f.write(str(label))
        f.write('\n')
f.close()
5. 模型再训练
模型再训练需要解决 2 个问题:
- 怎么加载 split 后的数据?
- 加载完成后怎么和原始数据合并,然后送入模型进行训练?
5.1 怎么加载 split 后的数据?
5.1.1 创建自己的 dataset 类
为了使自己的数据集和原始数据集进行合并,可以继承 torch.utils.data.Dataset 类开发自己的 my_dataset 类:
class my_dataset(torch.utils.data.Dataset):
    def __init__(self, img, label, transform=None):
        super(my_dataset, self).__init__()
        self.dataset = img
        self.label = label
        self.transform = transform

    def __getitem__(self, item):
        data = self.dataset[item]
        lb = self.label[item]
        if self.transform is not None:
            data = self.transform(data)
        return data, lb

    def __len__(self):
        return len(self.dataset)
这里,__init(self)__, __getitem(self, item)__, __len(self)__ 是必须实现的,当把之前分割好的 img, label 数据加载进来后,放入 my_dataset 类即可;
5.1.2 load 分割好的数据
加载分割好的数据,返回 my_dataset 对象;
def load(trans, to_divert=False, to_rotate=False, train=False):
	'''
	trans: torchvision.transforms 对象
	to_divert: 是否进行像素反转
	to_rotate: 是否进行图像旋转
	train: 是否是用于训练的数据
	'''
    x, y = [], []
    root_path = './testImgs/'
    # 加载训练数据
    if train is True:
        num = 6e4
        label_path = root_path + 'label_train.txt'
        if to_divert is True and to_rotate is False:
            load_path = root_path + 'divert/'
        elif to_divert is False and to_rotate is True:
            load_path = root_path + 'rotate/'
        elif to_divert is True and to_rotate is True:
            load_path = root_path + 'divert_and_rotate/'
        else:
            return
    else:
        num = 1e4
        label_path = root_path + 'label_test.txt'
        if to_divert is True and to_rotate is False:
            load_path = root_path + 'divert_test/'
        elif to_divert is False and to_rotate is True:
            load_path = root_path + 'rotate_test/'
        elif to_divert is True and to_rotate is True:
            load_path = root_path + 'divert_and_rotate_test/'
        else:
            return

    for i in range(int(num)):
        path = load_path + '{}.jpg'.format(i)

        img = Image.open(path).convert('L')
        x.append(img)

	# 加载 label
    with open(label_path, 'r') as f:
        for i in range(int(num)):
            label = f.readline()
            label = label.strip('\n')
            y.append(int(label))
    f.close()

    dataset = my_dataset(x, y, trans)
    return dataset
5.2 加载完成后怎么和原始数据合并,然后送入模型进行训练?
以原始训练集和数据增强后的训练集合并为例:
	path = './data'
	# get_data_loader() 就是基本实现中定义好的函数
    train_data_set, _ = get_data_loader(path, batch_size, transform, True)
    # 增强后的数据集
    enhanced_train_data_set = load(transform, True, True, True)
    # 采用 ConcatDataset() 进行连接
    train_data_set = torch.utils.data.dataset.ConcatDataset([enhanced_train_data_set, train_data_set])
    print('Training data loaded.')
	# 将 dataset 放入 loader 中
	train_data_loader = torch.utils.data.DataLoader(train_data_set, batch_size=batch_size, shuffle=True)
5.3 完整代码
完整代码和基本实现中的差不多,主要区别在于:
- 增加了
my_dataset类; - 加载自己的数据集的
load()函数; - 主函数里面对数据进行了加载和合并;
import torch
import torch.nn as nn
import torchvision.datasets
import torchvision.transforms as transforms
import matplotlib.pyplot as plt
import numpy as np
from PIL import Image


class CNN(nn.Module):
    def __init__(self):
        super(CNN, self).__init__()
        self.conv1 = nn.Sequential(
            nn.Conv2d(in_channels=1, out_channels=16, kernel_size=3, stride=1, padding=1),
            nn.ReLU(),
            nn.MaxPool2d(kernel_size=2, stride=2),
        )

        self.conv2 = nn.Sequential(
            nn.Conv2d(in_channels=16, out_channels=32, kernel_size=3, stride=1, padding=1),
            nn.ReLU(),
            nn.MaxPool2d(kernel_size=2, stride=2),
        )

        self.conv3 = nn.Sequential(
            nn.Conv2d(in_channels=32, out_channels=64, kernel_size=3, stride=1, padding=1),
            nn.ReLU(),
        )

        self.fullyConnected = nn.Sequential(
            nn.Flatten(),
            nn.Linear(in_features=7 * 7 * 64, out_features=128),
            nn.ReLU(),
            nn.Linear(in_features=128, out_features=10),
        )

    def forward(self, img):
        output = self.conv1(img)
        output = self.conv2(output)
        output = self.conv3(output)
        output = self.fullyConnected(output)
        return output


class my_dataset(torch.utils.data.Dataset):
    def __init__(self, img, label, transform=None):
        super(my_dataset, self).__init__()
        self.dataset = img
        self.label = label
        self.transform = transform

    def __getitem__(self, item):
        data = self.dataset[item]
        lb = self.label[item]
        if self.transform is not None:
            data = self.transform(data)
        return data, lb

    def __len__(self):
        return len(self.dataset)


def get_device():
    if torch.cuda.is_available():
        train_device = torch.device('cuda')
    else:
        train_device = torch.device('cpu')

    return train_device


def get_data_loader(dat_path, bat_size, trans, to_train=False):
    dat_set = torchvision.datasets.MNIST(root=dat_path, train=to_train, transform=trans, download=True)
    if to_train is True:
        dat_loader = torch.utils.data.DataLoader(dat_set, batch_size=bat_size, shuffle=True)
    else:
        dat_loader = torch.utils.data.DataLoader(dat_set, batch_size=bat_size)

    return dat_set, dat_loader


def show_part_of_image(dat_loader, row, col):
    iteration = enumerate(dat_loader)
    idx, (exam_img, exam_label) = next(iteration)

    fig = plt.figure(num=1)
    for i in range(row * col):
        plt.subplot(row, col, i + 1)
        plt.tight_layout()
        plt.imshow(exam_img[i][0], cmap='gray', interpolation='none')
        plt.title('Number: {}'.format(exam_label[i]))
        plt.xticks([])
        plt.yticks([])
    plt.show()


def train(network, dat_loader, device, epos, loss_function, optimizer):
    for epoch in range(1, epos + 1):
        network.train(mode=True)
        for idx, (train_img, train_label) in enumerate(dat_loader):
            train_img = train_img.to(device)
            train_label = train_label.to(device)

            outputs = network(train_img)
            optimizer.zero_grad()
            loss = loss_function(outputs, train_label)
            loss.backward()
            optimizer.step()

            if idx % 100 == 0:
                cnt = idx * len(train_img) + (epoch - 1) * len(dat_loader.dataset)
                print('epoch: {}, [{}/{}({:.0f}%)], loss: {:.6f}'.format(epoch,
                                                                         idx * len(train_img),
                                                                         len(dat_loader.dataset),
                                                                         (100 * cnt) / (
                                                                                 len(dat_loader.dataset) * epos),
                                                                         loss.item()))
        print('------------------------------------------------')
    print('Training ended.')

    return network


def test(network, dat_loader, device, loss_function):
    test_loss_avg, correct, total = 0, 0, 0
    test_loss = []
    network.train(mode=False)

    with torch.no_grad():
        for idx, (test_img, test_label) in enumerate(dat_loader):
            test_img = test_img.to(device)
            test_label = test_label.to(device)

            total += test_label.size(0)

            outputs = network(test_img)
            loss = loss_function(outputs, test_label)
            test_loss.append(loss.item())

            predictions = torch.argmax(outputs, dim=1)
            correct += torch.sum(predictions == test_label)
        test_loss_avg = np.average(test_loss)
        print('Total: {}, Correct: {}, Accuracy: {:.2f}%, AverageLoss: {:.6f}'.format(total, correct,
                                                                                      correct / total * 100,
                                                                                      test_loss_avg))


def show_part_of_test_result(network, dat_loader, row, col):
    iteration = enumerate(dat_loader)
    idx, (exam_img, exam_label) = next(iteration)

    with torch.no_grad():
        outputs = network(exam_img)

        fig = plt.figure()
        for i in range(row * col):
            plt.subplot(row, col, i + 1)
            plt.tight_layout()
            plt.imshow(exam_img[i][0], cmap='gray', interpolation='none')
            plt.title('Number: {}, Prediction: {}'.format(
                exam_label[i], outputs.data.max(1, keepdim=True)[1][i].item()
            ))
            plt.xticks([])
            plt.yticks([])
        plt.show()


def load(trans, to_divert=False, to_rotate=False, train=False):
    x, y = [], []
    root_path = './testImgs/'
    if train is True:
        num = 6e4
        label_path = root_path + 'label_train.txt'
        if to_divert is True and to_rotate is False:
            load_path = root_path + 'divert/'
        elif to_divert is False and to_rotate is True:
            load_path = root_path + 'rotate/'
        elif to_divert is True and to_rotate is True:
            load_path = root_path + 'divert_and_rotate/'
        else:
            return
    else:
        num = 1e4
        label_path = root_path + 'label_test.txt'
        if to_divert is True and to_rotate is False:
            load_path = root_path + 'divert_test/'
        elif to_divert is False and to_rotate is True:
            load_path = root_path + 'rotate_test/'
        elif to_divert is True and to_rotate is True:
            load_path = root_path + 'divert_and_rotate_test/'
        else:
            return

    for i in range(int(num)):
        path = load_path + '{}.jpg'.format(i)

        img = Image.open(path).convert('L')
        x.append(img)

    with open(label_path, 'r') as f:
        for i in range(int(num)):
            label = f.readline()
            label = label.strip('\n')
            y.append(int(label))
    f.close()

    dataset = my_dataset(x, y, trans)
    return dataset


if __name__ == '__main__':
    batch_size, epochs = 128, 10
    transform = transforms.Compose([transforms.ToTensor(), transforms.Normalize(mean=[0.1307], std=[0.3081])])
    my_device = get_device()

    path = './data'
    train_data_set, _ = get_data_loader(path, batch_size, transform, True)
    enhanced_train_data_set = load(transform, True, True, True)
    train_data_set = torch.utils.data.dataset.ConcatDataset([enhanced_train_data_set, train_data_set])
    print('Training data loaded.')

    train_data_loader = torch.utils.data.DataLoader(train_data_set, batch_size=batch_size, shuffle=True)
    show_part_of_image(train_data_loader, 3, 3)

    test_data_set, _ = get_data_loader(path, batch_size, transform)
    enhanced_test_data_set = load(transform, True, True, False)
    test_data_set = torch.utils.data.dataset.ConcatDataset([enhanced_test_data_set, test_data_set])
    print('Testing data loaded.')

    test_data_loader = torch.utils.data.DataLoader(test_data_set, batch_size=batch_size, shuffle=True)

    cnn = CNN()
    loss_func = nn.CrossEntropyLoss()
    optim = torch.optim.Adam(cnn.parameters(), lr=0.01)

    cnn = train(cnn, train_data_loader, my_device, epochs, loss_func, optim)
    test(cnn, test_data_loader, my_device, loss_func)

    show_part_of_test_result(cnn, test_data_loader, 5, 2)

    torch.save(cnn, './cnn2.pth')
5.4 训练结果
5.4.1 只进行像素反转
5.4.1.1 测试结果
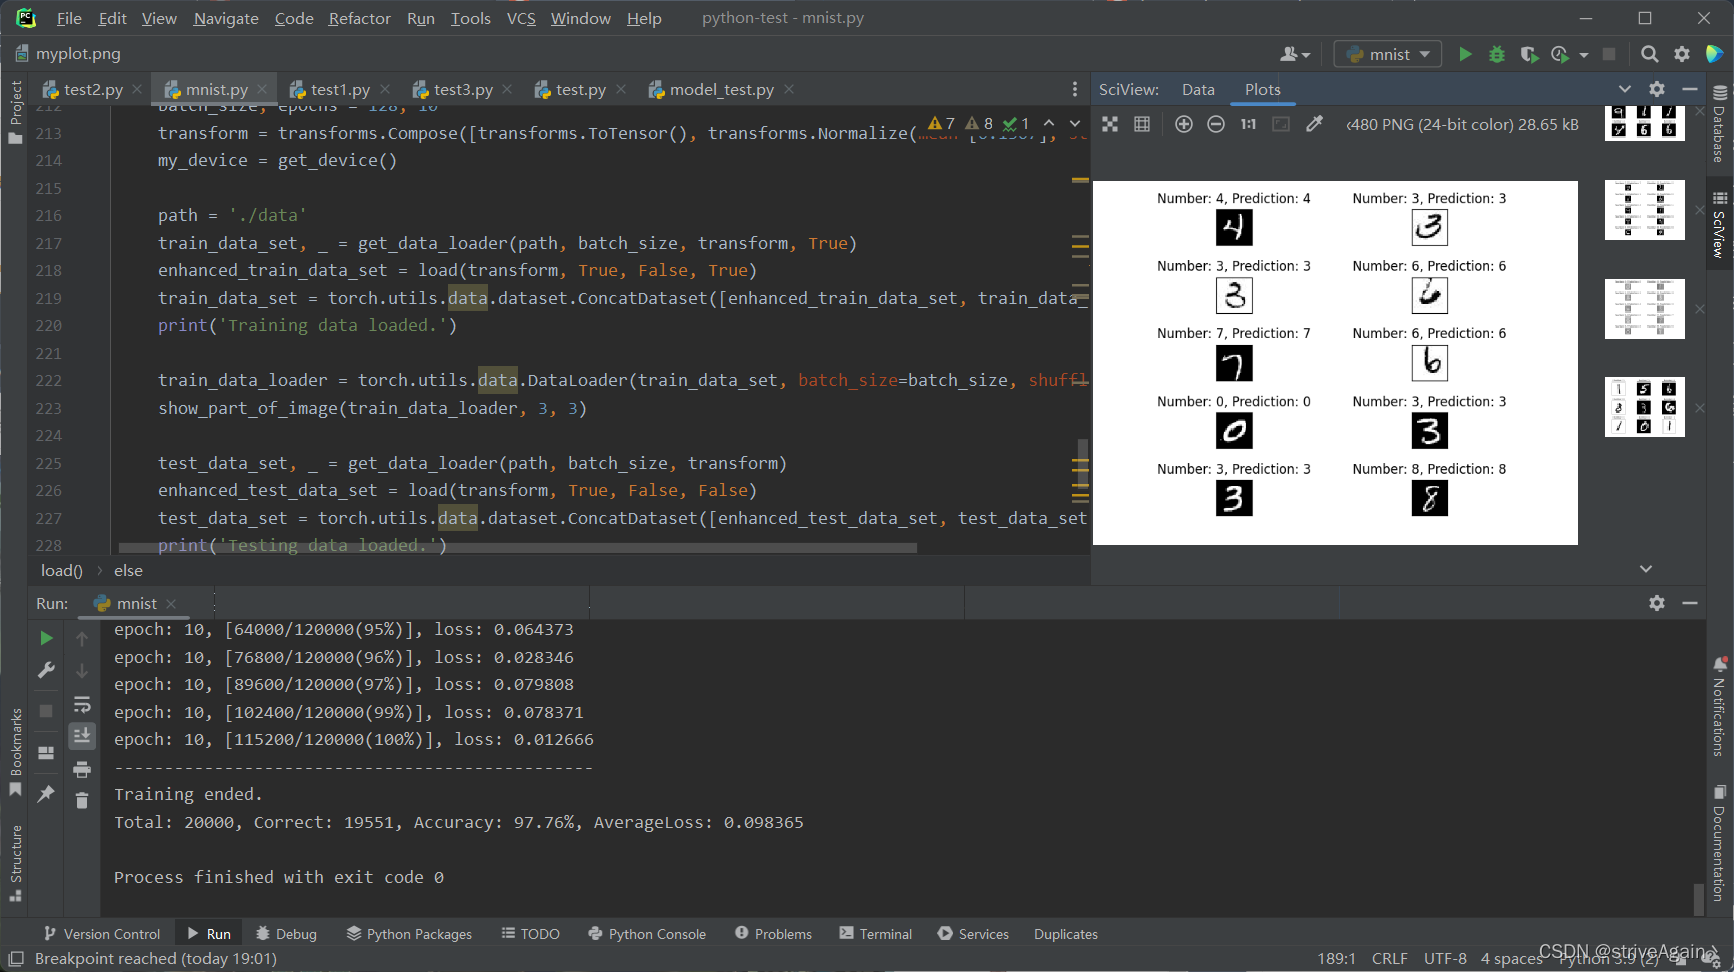
其中一些超参数如下:
- batch_size: 128
- epochs: 10
模型在测试集上的准确率达到了 97.76%,从右侧的测试集采样结果来看,正确率也相对较高;
5.4.1.2 在自己的数据上测试
测试代码
import torch
# from test import CNN
import numpy as np
from PIL import Image
from torchvision import transforms
import torch.nn as nn
import matplotlib.pyplot as plt


class CNN(nn.Module):
    def __init__(self):
        super(CNN, self).__init__()
        self.conv1 = nn.Sequential(
            nn.Conv2d(in_channels=1, out_channels=16, kernel_size=3, stride=1, padding=1),
            nn.ReLU(),
            nn.MaxPool2d(kernel_size=2, stride=2),
        )

        self.conv2 = nn.Sequential(
            nn.Conv2d(in_channels=16, out_channels=32, kernel_size=3, stride=1, padding=1),
            nn.ReLU(),
            nn.MaxPool2d(kernel_size=2, stride=2),
        )

        self.conv3 = nn.Sequential(
            nn.Conv2d(in_channels=32, out_channels=64, kernel_size=3, stride=1, padding=1),
            nn.ReLU(),
        )

        self.fullyConnected = nn.Sequential(
            nn.Flatten(),
            nn.Linear(in_features=7 * 7 * 64, out_features=128),
            nn.ReLU(),
            nn.Linear(in_features=128, out_features=10),
        )

    def forward(self, input):
        output = self.conv1(input)
        output = self.conv2(output)
        output = self.conv3(output)
        output = self.fullyConnected(output)
        return output


model = torch.load('./cnn2.pth')
model.eval()

transform = transforms.Compose([transforms.ToTensor(), transforms.Normalize(mean=[0.1307], std=[0.3081])])
unloader = transforms.ToPILImage()

for k in range(10):
    infile = './testImgs/raw/' + '{}.jpg'.format(k)

    img = Image.open(infile)
    img = img.convert('L')
    img_array = np.array(img)

    img = Image.fromarray(img_array)
    # img.show()
    img = transform(img)
    img = torch.unsqueeze(img, 0)

    output = model(img)
    pred = torch.argmax(output, dim=1)

    image = torch.squeeze(img, 0)
    image = unloader(image)

    plt.subplot(5, 2, k + 1)
    plt.tight_layout()
    plt.imshow(image, cmap='gray', interpolation='none')
    plt.title("Number: {}, Prediction: {}".format(k, pred.item()))
    plt.xticks([])
    plt.yticks([])
plt.show()
测试结果
可以从右侧的结果中看出,准确率比较高(除了看起来比较讨厌的灰底?);
5.4.2 只进行图像旋转
5.4.2.1 测试结果
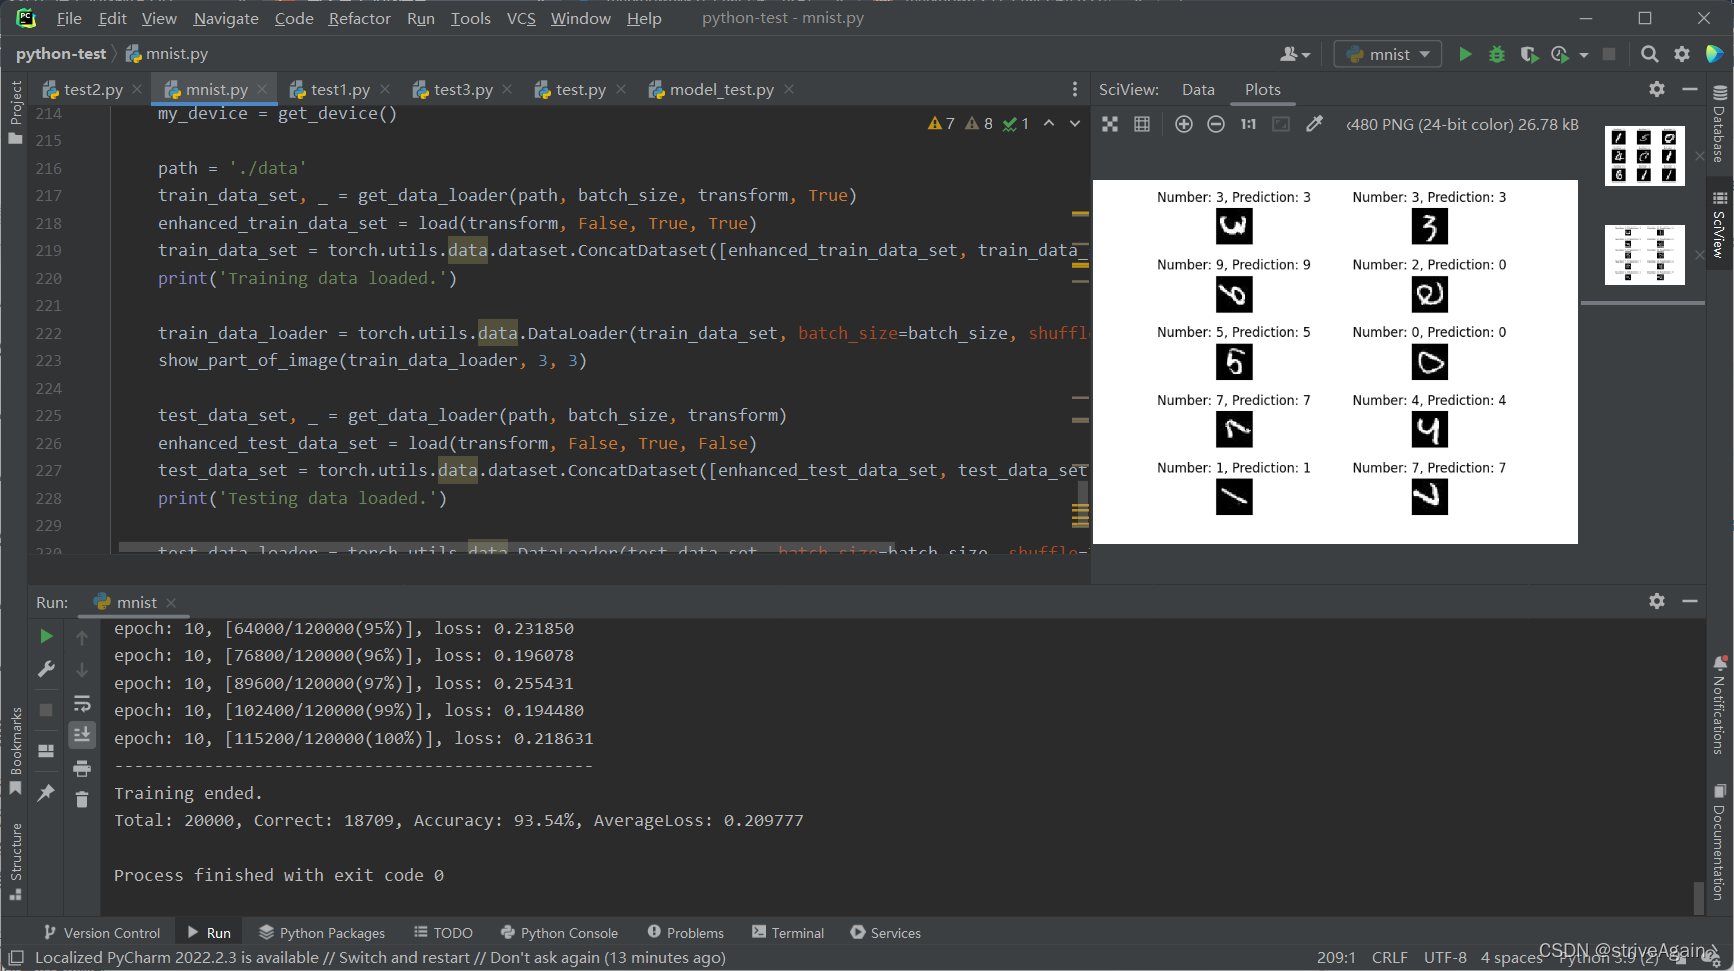
用到的 batch_size, epochs 和上面的一样。
模型在测试集上的准确率达到了 93.54%,从右侧的测试集采样结果来看,正确率也相对较高;
5.4.2.2 在自己的数据上测试
测试代码
import torch
# from test import CNN
import numpy as np
from PIL import Image
from torchvision import transforms
import torch.nn as nn
import matplotlib.pyplot as plt


class CNN(nn.Module):
    def __init__(self):
        super(CNN, self).__init__()
        self.conv1 = nn.Sequential(
            nn.Conv2d(in_channels=1, out_channels=16, kernel_size=3, stride=1, padding=1),
            nn.ReLU(),
            nn.MaxPool2d(kernel_size=2, stride=2),
        )

        self.conv2 = nn.Sequential(
            nn.Conv2d(in_channels=16, out_channels=32, kernel_size=3, stride=1, padding=1),
            nn.ReLU(),
            nn.MaxPool2d(kernel_size=2, stride=2),
        )

        self.conv3 = nn.Sequential(
            nn.Conv2d(in_channels=32, out_channels=64, kernel_size=3, stride=1, padding=1),
            nn.ReLU(),
        )

        self.fullyConnected = nn.Sequential(
            nn.Flatten(),
            nn.Linear(in_features=7 * 7 * 64, out_features=128),
            nn.ReLU(),
            nn.Linear(in_features=128, out_features=10),
        )

    def forward(self, input):
        output = self.conv1(input)
        output = self.conv2(output)
        output = self.conv3(output)
        output = self.fullyConnected(output)
        return output


model = torch.load('./cnn2.pth')
model.eval()

transform = transforms.Compose([transforms.ToTensor(), transforms.Normalize(mean=[0.1307], std=[0.3081])])
unloader = transforms.ToPILImage()

for k in range(10):
    infile = './testImgs/raw/' + 'r{}.jpg'.format(k)

    img = Image.open(infile)
    img = img.convert('L')
    img_array = np.array(img)

	# 注意进行需要是黑底白字的图片
    for i in range(28):
        for j in range(28):
            img_array[i, j] = 255 - img_array[i, j]
    img = Image.fromarray(img_array)
    img = transform(img)
    img = torch.unsqueeze(img, 0)

    output = model(img)
    pred = torch.argmax(output, dim=1)

    image = torch.squeeze(img, 0)
    image = unloader(image)

    plt.subplot(5, 2, k + 1)
    plt.tight_layout()
    plt.imshow(image, cmap='gray', interpolation='none')
    plt.title("Number: {}, Prediction: {}".format(k, pred.item()))
    plt.xticks([])
    plt.yticks([])
plt.show()
测试结果
比较有趣的就是 9 旋转 180° 就变成 6 了hhh
5.4.3 二者同时进行
5.4.3.1 测试结果
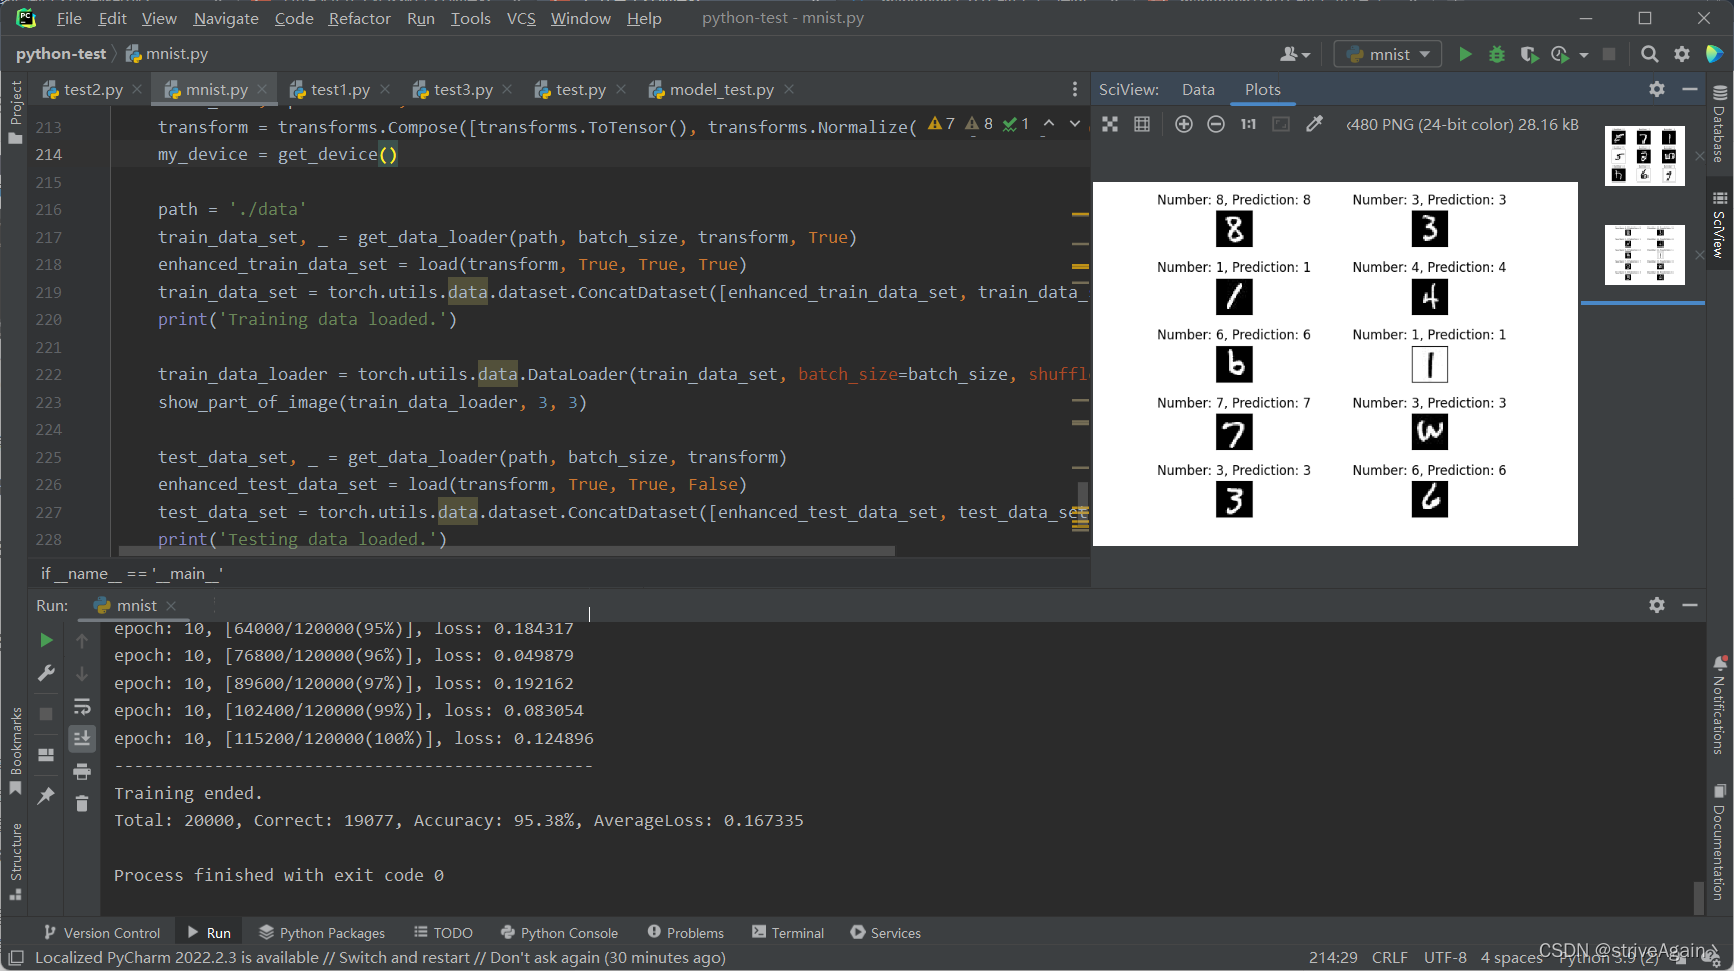
用到的 batch_size, epochs 同样是 128 和 10;
模型在测试集上的准确率达到了 95.38%,从右侧的测试集采样结果来看,正确率也相对较高;
5.4.3.2 在自己的数据上测试
测试代码
import torch
# from test import CNN
import numpy as np
from PIL import Image
from torchvision import transforms
import torch.nn as nn
import matplotlib.pyplot as plt


class CNN(nn.Module):
    def __init__(self):
        super(CNN, self).__init__()
        self.conv1 = nn.Sequential(
            nn.Conv2d(in_channels=1, out_channels=16, kernel_size=3, stride=1, padding=1),
            nn.ReLU(),
            nn.MaxPool2d(kernel_size=2, stride=2),
        )

        self.conv2 = nn.Sequential(
            nn.Conv2d(in_channels=16, out_channels=32, kernel_size=3, stride=1, padding=1),
            nn.ReLU(),
            nn.MaxPool2d(kernel_size=2, stride=2),
        )

        self.conv3 = nn.Sequential(
            nn.Conv2d(in_channels=32, out_channels=64, kernel_size=3, stride=1, padding=1),
            nn.ReLU(),
        )

        self.fullyConnected = nn.Sequential(
            nn.Flatten(),
            nn.Linear(in_features=7 * 7 * 64, out_features=128),
            nn.ReLU(),
            nn.Linear(in_features=128, out_features=10),
        )

    def forward(self, input):
        output = self.conv1(input)
        output = self.conv2(output)
        output = self.conv3(output)
        output = self.fullyConnected(output)
        return output


model = torch.load('./cnn2.pth')
model.eval()

transform = transforms.Compose([transforms.ToTensor(), transforms.Normalize(mean=[0.1307], std=[0.3081])])
unloader = transforms.ToPILImage()

# 前 3 张图片是像素反转后的图片,后 3 张是未作处理的图片,最后 4 张二者同时进行的图片(注意像素反转是指将黑底白字转换为白底黑字)
for k in range(10):
    if k < 3:
        infile = './testImgs/raw/' + '{}.jpg'.format(k)

        img = Image.open(infile)
        img = img.convert('L')
        img_array = np.array(img)
    elif 3 <= k < 6:
        infile = './testImgs/raw/' + 'r{}.jpg'.format(k)

        img = Image.open(infile)
        img = img.convert('L')
        img_array = np.array(img)

        for i in range(28):
            for j in range(28):
                img_array[i, j] = 255 - img_array[i, j]
    else:
        infile = './testImgs/raw/' + 'r{}.jpg'.format(k)

        img = Image.open(infile)
        img = img.convert('L')
        img_array = np.array(img)

    img = Image.fromarray(img_array)
    img = transform(img)
    img = torch.unsqueeze(img, 0)
    output = model(img)
    pred = torch.argmax(output, dim=1)

    image = torch.squeeze(img, 0)
    image = unloader(image)

    plt.subplot(5, 2, k + 1)
    plt.tight_layout()
    plt.imshow(image, cmap='gray', interpolation='none')
    plt.title("Number: {}, Prediction: {}".format(k, pred.item()))
    plt.xticks([])
    plt.yticks([])
plt.show()
测试结果
5.5 结果整合
| 原始数据 | 只进行像素反转 | 只进行图像旋转 | 二者同时进行 | |
|---|---|---|---|---|
| batch_size, epochs | 64, 10 | 128, 10 | 128, 10 | 128, 10 |
| accuracy | 97.32% | 97.76% | 93.54% | 95.38% |
结语
这样的想法来源于在对 MNIST 手写数字识别进行基本实现并利用自己做的图进行进行测试的时候,开始由于没有认识到黑底白字和白底黑字的问题,因此模型测试结果很差;然后就是写的数字必须比较端正,否则测试结果也很差;
因此在学长的启发下对数据集进行了拓展,使之能够应用于更广的场景中;
另外,在这里我只进行了 90°, 180°, 270° 这三种旋转,如果有兴趣的话可以尝试更多不同角度的旋转;