一、spring Cache基本介绍(其实是通过代理对象来进行操作的)
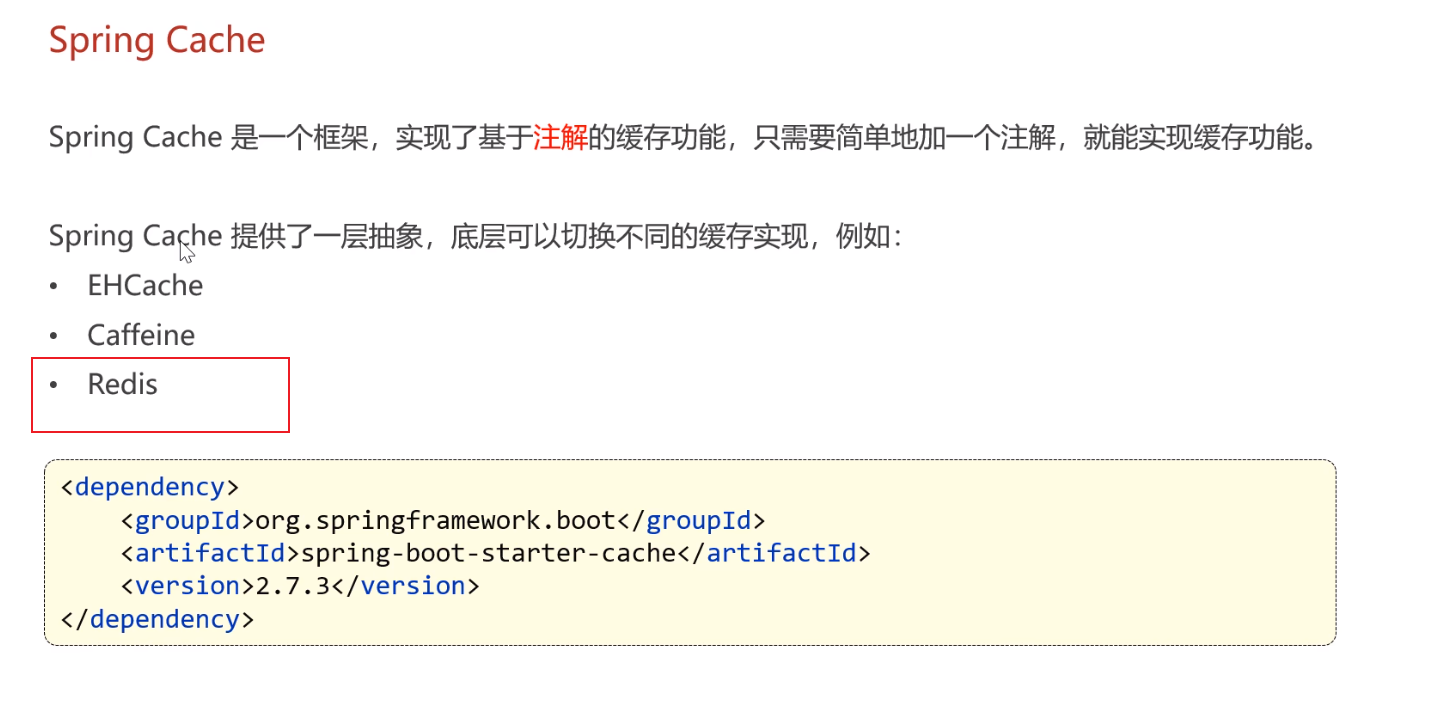
- Spring Cache 是 Spring 框架提供的一个缓存抽象,它能够轻松地集成到 Spring 应用程序中,为方法调用的结果提供缓存支持,从而提高应用程序的性能和响应速度。Spring Cache 提供了一种声明式的缓存机制,可以在方法上使用注解来指定需要进行缓存的方法,而无需编写繁琐的缓存代码。
- Spring Cache 的基本介绍:
-
- 声明式缓存支持:Spring Cache 提供了一种声明式的缓存机制,通过在方法上使用注解来声明需要进行缓存的方法,如
@Cacheable、@CachePut、@CacheEvict等。
- 声明式缓存支持:Spring Cache 提供了一种声明式的缓存机制,通过在方法上使用注解来声明需要进行缓存的方法,如
-
- 灵活的缓存策略:Spring Cache 提供了多种灵活的缓存策略,可以根据具体需求选择合适的缓存方案,如基于内存的缓存、基于 Redis、Ehcache 等第三方缓存框架的集成。
-
- 支持缓存管理器:Spring Cache 支持多种缓存管理器,可以根据需要选择适合的缓存管理器,如 ConcurrentMapCacheManager、EhCacheCacheManager、RedisCacheManager 等。
-
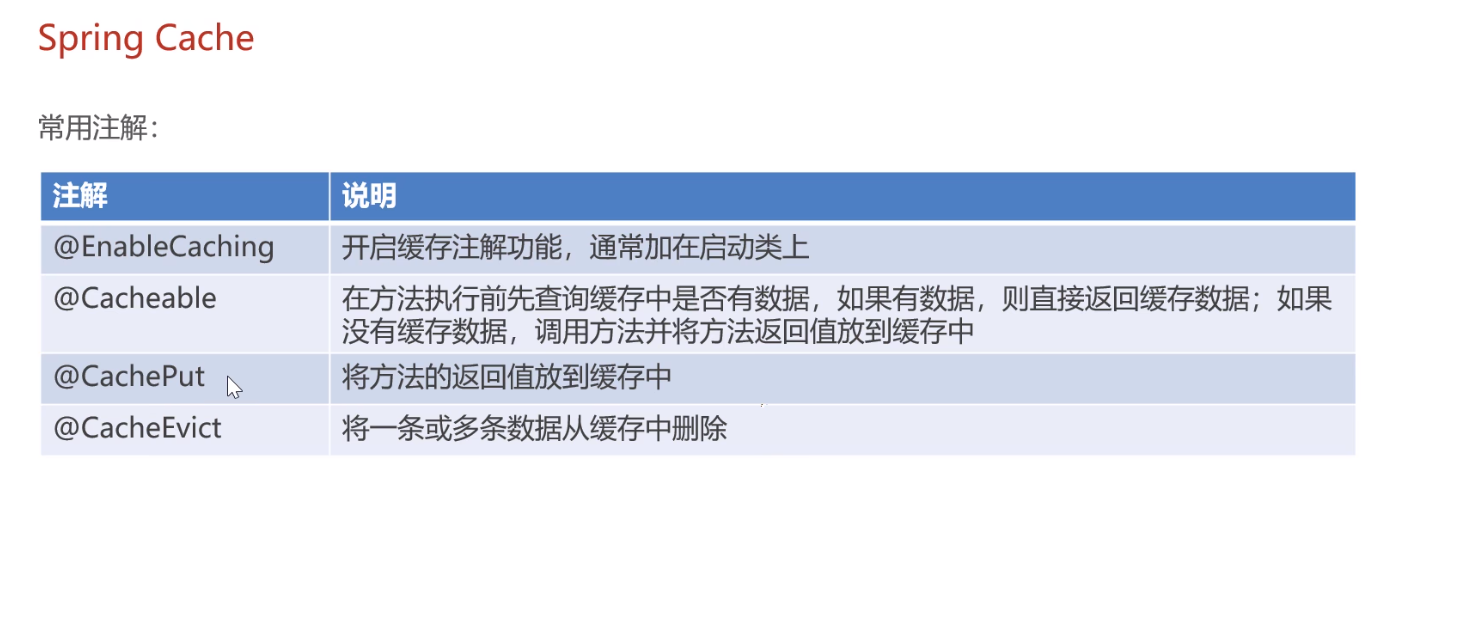
- 缓存注解:
@Cacheable:用于声明方法的返回值可以被缓存,当下次使用相同的参数调用该方法时,直接从缓存中获取结果,而不会执行方法体。@CachePut:用于声明方法的结果应该被更新到缓存中,即使缓存中已经存在相同键的条目。@CacheEvict:用于声明方法执行后将缓存中的某些条目清除。
-
- 缓存注解的属性:缓存注解支持一系列属性,例如
value、key、condition、unless等,用于配置缓存的键、条件判断等。
- 缓存注解的属性:缓存注解支持一系列属性,例如
-
- 适用于各种应用场景:Spring Cache 适用于各种应用场景,可以用于缓存方法的返回值、类级别的缓存、缓存的条件判断等。
-
通过使用 Spring Cache,可以轻松地为应用程序中的方法调用提供缓存支持,从而提高应用程序的性能和响应速度,减少对数据库或其他资源的频繁访问。
二、基本使用1
- Spring Cache 的基本使用通常涉及以下几个步骤:
-
- 添加依赖:首先,需要在项目中添加 Spring Cache 的依赖。如果使用 Spring Boot,则无需额外添加依赖,因为 Spring Boot 已经自动集成了 Spring Cache。如果使用的是普通的 Spring 项目,则需要手动添加依赖。
-
- 配置缓存管理器:在 Spring 配置文件中配置缓存管理器,以便选择和配置合适的缓存提供者。常见的缓存管理器有 ConcurrentMapCacheManager、EhCacheCacheManager、RedisCacheManager 等。
-
- 在方法上使用缓存注解:在需要进行缓存的方法上使用 Spring Cache 提供的缓存注解,如
@Cacheable、@CachePut、@CacheEvict等。根据方法的功能需求选择合适的注解。
- 在方法上使用缓存注解:在需要进行缓存的方法上使用 Spring Cache 提供的缓存注解,如
-
- 触发缓存操作:调用被缓存注解修饰的方法,触发缓存操作。根据缓存注解的配置,方法的返回值将被缓存起来,以便后续使用。
-
下面是一个简单的示例,演示了如何在 Spring Boot 中使用 Spring Cache:
- 添加 Spring Boot Starter Cache 依赖。在
pom.xml中添加以下依赖:
<dependency>
    <groupId>org.springframework.boot</groupId>
    <artifactId>spring-boot-starter-cache</artifactId>
</dependency>
- 配置缓存管理器。在
application.properties文件中配置缓存管理器,例如使用 ConcurrentMapCacheManager:
spring.cache.type=simple
- 在服务类中添加缓存注解。在需要进行缓存的方法上添加
@Cacheable注解:
import org.springframework.cache.annotation.Cacheable;
import org.springframework.stereotype.Service;

@Service
public class MyService {

    @Cacheable("myCache")
    public String cachedMethod(String param) {
        // Simulate time-consuming operation
        try {
            Thread.sleep(2000);
        } catch (InterruptedException e) {
            e.printStackTrace();
        }
        return "Cached result for " + param;
    }
}
- 调用缓存方法。在其他类中调用被缓存注解修饰的方法:
import org.springframework.beans.factory.annotation.Autowired;
import org.springframework.web.bind.annotation.GetMapping;
import org.springframework.web.bind.annotation.RestController;

@RestController
public class MyController {

    @Autowired
    private MyService myService;

    @GetMapping("/getData")
    public String getData() {
        // Calling cached method
        return myService.cachedMethod("param");
    }
}
这样,在第一次调用 getData() 方法时,cachedMethod() 方法将被执行,并将返回值缓存起来。在后续调用 getData() 方法时,将直接从缓存中获取结果,而不会再执行方法体。
三、基本使用2
Spring Cache 的基本使用可以通过以下步骤完成:
- 添加依赖:首先,在项目的依赖管理文件(如 Maven 的
pom.xml)中添加 Spring Cache 相关的依赖。
<dependency>
    <groupId>org.springframework.boot</groupId>
    <artifactId>spring-boot-starter-cache</artifactId>
</dependency>
- 启用缓存:在 Spring Boot 的主类上添加
@EnableCaching注解,以启用 Spring Cache 功能。
import org.springframework.boot.SpringApplication;
import org.springframework.boot.autoconfigure.SpringBootApplication;
import org.springframework.cache.annotation.EnableCaching;

@SpringBootApplication
@EnableCaching
public class Application {
    public static void main(String[] args) {
        SpringApplication.run(Application.class, args);
    }
}
- 声明需要缓存的方法:在需要进行缓存的方法上使用
@Cacheable、@CachePut或@CacheEvict等注解,以实现缓存的功能。
import org.springframework.cache.annotation.Cacheable;
import org.springframework.stereotype.Service;

@Service
public class MyService {

    @Cacheable("myCache") // 声明方法的返回值可以被缓存,缓存名称为 "myCache"
    public String getCachedData(String key) {
        // 此处通常为从数据库或其他数据源获取数据的逻辑
        return "Data for key: " + key;
    }
}
- 配置缓存管理器(可选):Spring Cache 默认使用 ConcurrentMapCacheManager 作为缓存管理器,但你也可以根据需求配置其他缓存管理器,如 EhCache、Redis 等。
import org.springframework.cache.CacheManager;
import org.springframework.cache.annotation.EnableCaching;
import org.springframework.context.annotation.Bean;
import org.springframework.context.annotation.Configuration;
import org.springframework.data.redis.cache.RedisCacheManager;
import org.springframework.data.redis.connection.RedisConnectionFactory;
import org.springframework.data.redis.core.RedisTemplate;

@Configuration
@EnableCaching
public class CacheConfig {

    @Bean
    public CacheManager cacheManager(RedisConnectionFactory connectionFactory) {
        RedisCacheManager cacheManager = RedisCacheManager.create(connectionFactory);
        return cacheManager;
    }

    @Bean
    public RedisTemplate<String, String> redisTemplate(RedisConnectionFactory connectionFactory) {
        RedisTemplate<String, String> template = new RedisTemplate<>();
        template.setConnectionFactory(connectionFactory);
        return template;
    }
}
- 使用缓存:调用声明了
@Cacheable、@CachePut或@CacheEvict注解的方法时,Spring Cache 将会自动根据缓存的配置情况来处理缓存。
import org.springframework.beans.factory.annotation.Autowired;
import org.springframework.web.bind.annotation.GetMapping;
import org.springframework.web.bind.annotation.PathVariable;
import org.springframework.web.bind.annotation.RestController;

@RestController
public class MyController {

    @Autowired
    private MyService myService;

    @GetMapping("/data/{key}")
    public String getData(@PathVariable String key) {
        return myService.getCachedData(key);
    }
}
以上就是 Spring Cache 的基本使用步骤。通过上述配置,你就可以在 Spring Boot 应用程序中使用缓存来提高方法调用的性能和响应速度。
1、@CachePut注解
-
@CachePut是 Spring Cache 中的一个注解,用于更新缓存中的数据。与@Cacheable不同,@CachePut不会检查缓存中是否已经存在相同键的条目,而是直接将方法的返回值更新到缓存中。 -
@CachePut注解有以下几个属性:-
- value:与
cacheNames相同,用于指定要操作的缓存名称或缓存管理器的名称。可以是一个字符串,也可以是一个字符串数组,用于指定多个缓存名称。
- value:与
-
- key:指定缓存条目的键,用于唯一标识缓存中的条目。SpEL 表达式可以用于动态地生成键值。如果不指定 key,Spring Cache 将会使用默认的键生成策略来生成键值。
-
- condition:指定一个 SpEL 表达式,用于判断是否执行缓存操作。只有当表达式的值为 true 时,才会执行缓存操作。默认为空,表示始终执行缓存操作。
-
- unless:指定一个 SpEL 表达式,用于判断是否不执行缓存操作。只有当表达式的值为 false 时,才会执行缓存操作。默认为空,表示始终执行缓存操作。
-
- keyGenerator:指定一个自定义的键生成器,用于生成缓存条目的键值。默认为空,表示使用默认的键生成策略。
-
- cacheManager:指定一个自定义的缓存管理器,用于指定缓存的实现。默认为空,表示使用默认的缓存管理器。
-
- cacheResolver:指定一个自定义的缓存解析器,用于解析缓存的实现。默认为空,表示使用默认的缓存解析器。
-
- condition:指定一个 SpEL 表达式,用于判断是否执行缓存操作。只有当表达式的值为 true 时,才会执行缓存操作。默认为空,表示始终执行缓存操作。
-
-
@CachePut注解通常用于更新缓存中的数据,例如在更新数据库中的数据后,同时更新缓存中的数据。因此,@CachePut注解常常与@Cacheable注解一起使用,前者用于更新缓存,后者用于读取缓存。 -
以下是
@CachePut的一些使用示例:
使用 SpEL 表达式作为缓存键:
import org.springframework.cache.annotation.CachePut;

@Service
public class MyService {

    @CachePut(cacheNames = "userCache_", key = "#user.id")
    public User updateUser(User user) {
        // update user in the database
        return user;
    }
}
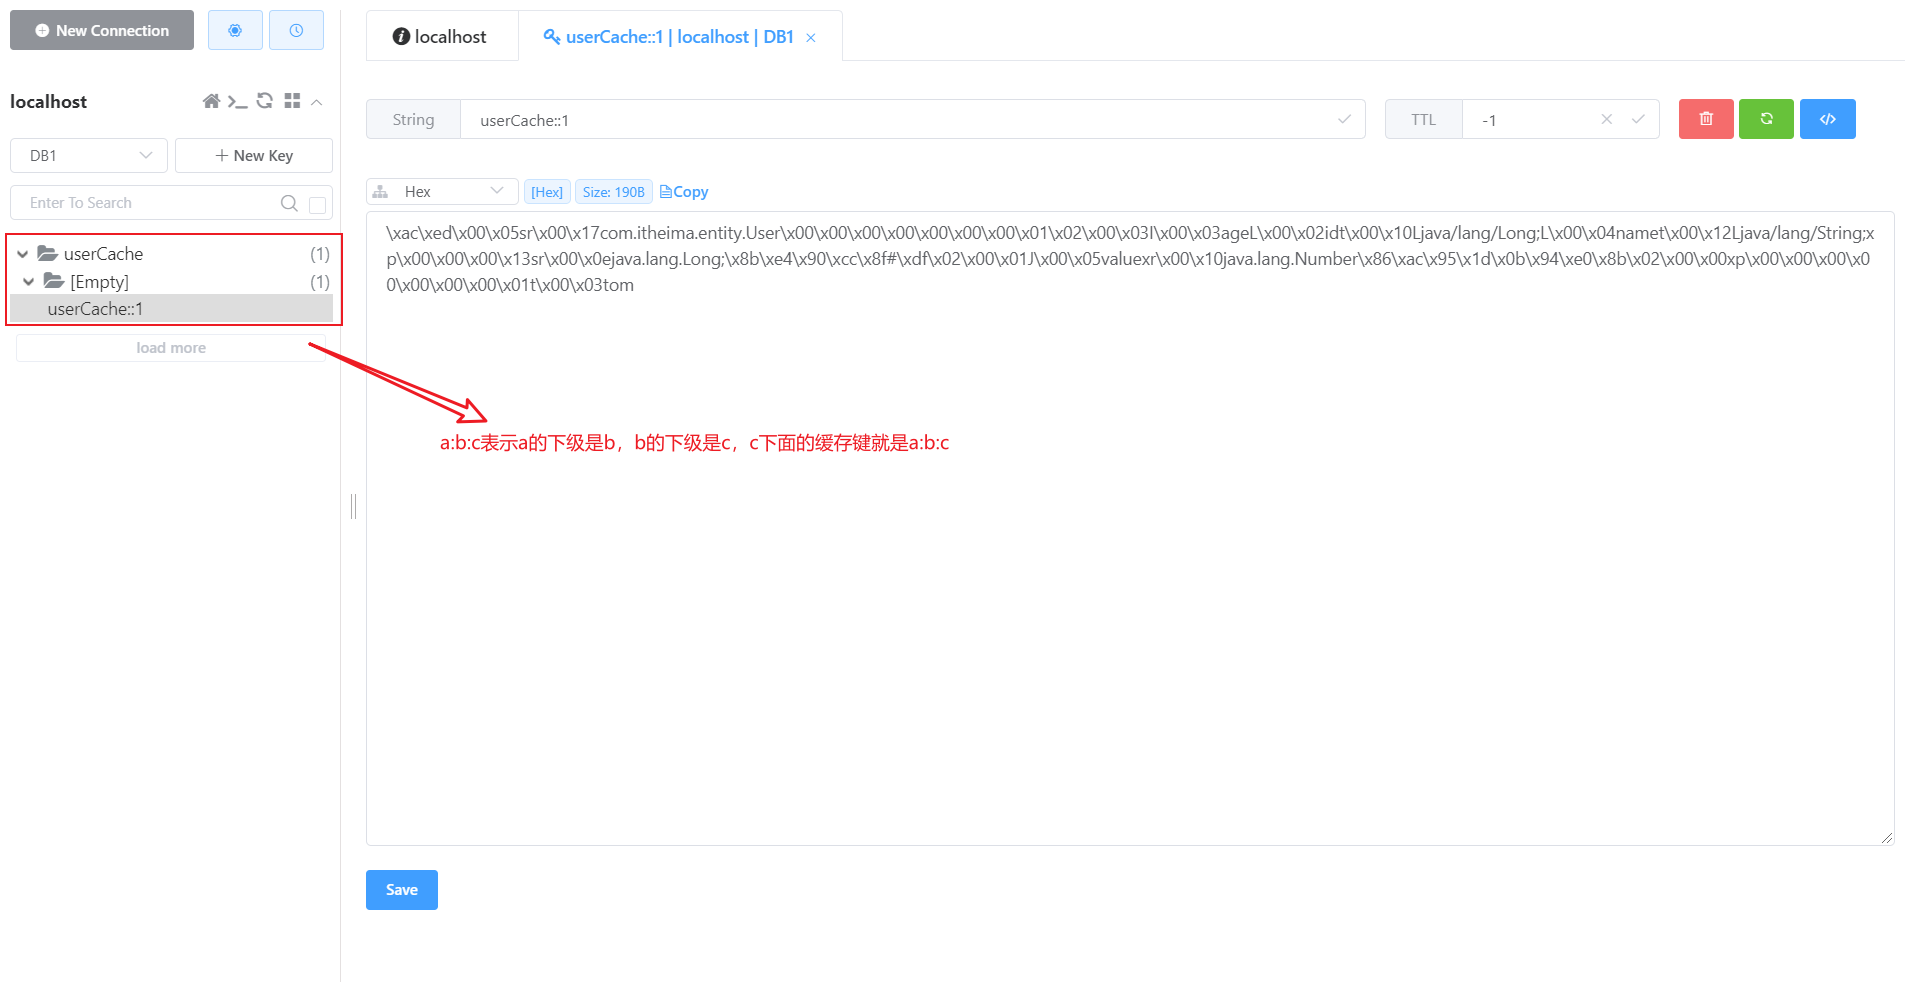
在这个示例中,Spring 表达式语言 (SpEL) #user.id 将作为缓存键,表示使用cacheNames的属性值 +::+ User 对象的 id 属性值作为缓存键。(这里的user对象是值updateUser方法的参数)
加入user的id=1,那么这里缓存键的值=userCache::1
还有其他方式:
- 总之,
@CachePut注解用于指示 Spring 在方法执行后将结果放入缓存中,并始终执行方法以确保缓存中的数据是最新的。
2、@Cacheable注解
-
@Cacheable是 Spring Cache 中的一个注解,用于声明方法的返回值可以被缓存。当调用被@Cacheable注解修饰的方法时,Spring Cache 会首先检查缓存中是否已经存在相同键的条目,如果存在,则直接从缓存中获取结果,而不会执行方法体;如果不存在,则执行方法体,并将方法的返回值缓存起来,以便下次使用相同参数调用时直接从缓存中获取结果。 -
@Cacheable注解有以下几个属性:-
- value:与
cacheNames相同,用于指定要操作的缓存名称或缓存管理器的名称。可以是一个字符串,也可以是一个字符串数组,用于指定多个缓存名称。
- value:与
-
- key:指定缓存条目的键,用于唯一标识缓存中的条目。SpEL 表达式可以用于动态地生成键值。如果不指定 key,Spring Cache 将会使用默认的键生成策略来生成键值。
-
- condition:指定一个 SpEL 表达式,用于判断是否执行缓存操作。只有当表达式的值为 true 时,才会执行缓存操作。默认为空,表示始终执行缓存操作。
-
- unless:指定一个 SpEL 表达式,用于判断是否不执行缓存操作。只有当表达式的值为 false 时,才会执行缓存操作。默认为空,表示始终执行缓存操作。
-
- keyGenerator:指定一个自定义的键生成器,用于生成缓存条目的键值。默认为空,表示使用默认的键生成策略。
-
- cacheManager:指定一个自定义的缓存管理器,用于指定缓存的实现。默认为空,表示使用默认的缓存管理器。
-
- cacheResolver:指定一个自定义的缓存解析器,用于解析缓存的实现。默认为空,表示使用默认的缓存解析器。
-
- sync:指定是否启用同步模式。如果设置为 true,那么缓存操作将在调用方法的同一线程中执行,否则将在后台线程中异步执行。默认为 false。
-
-
@Cacheable注解可以应用于类或方法上。当应用于类上时,表示该类的所有方法的返回值都可以被缓存;当应用于方法上时,表示特定方法的返回值可以被缓存。 -
@Cacheable的使用
下面是一个示例:
@Service
public class MyService {

    @Cacheable(value = "myCache", key = "#key")
    public String getCachedData(String key) {
        // 此处通常为从数据库或其他数据源获取数据的逻辑
        return "Data for key: " + key;
    }
}
在这个示例中,getCachedData 方法使用 @Cacheable 注解,将方法的返回值缓存到名为 “myCache” 的缓存中,并使用参数 key 作为缓存条目的键。每次调用 getCachedData 方法时,Spring Cache 会首先检查缓存中是否存在相同键的条目,如果存在,则直接从缓存中获取结果,而不会执行方法体;如果不存在,则执行方法体,并将方法的返回值缓存起来,以便下次使用相同参数调用时直接从缓存中获取结果。
3、@CacheEvict注解
-
@CacheEvict是 Spring Cache 中的一个注解,用于从缓存中移除指定的条目。当调用被@CacheEvict注解修饰的方法时,Spring Cache 会从指定的缓存中移除与方法参数匹配的条目。 -
@CacheEvict注解有以下几个属性:-
- value:与
cacheNames相同,用于指定要操作的缓存名称或缓存管理器的名称。可以是一个字符串,也可以是一个字符串数组,用于指定多个缓存名称。
- value:与
-
- key:指定缓存条目的键,用于唯一标识缓存中的条目。SpEL 表达式可以用于动态地生成键值。如果不指定 key,Spring Cache 将会使用默认的键生成策略来生成键值。
-
- condition:指定一个 SpEL 表达式,用于判断是否执行缓存操作。只有当表达式的值为 true 时,才会执行缓存操作。默认为空,表示始终执行缓存操作。
-
- keyGenerator:指定一个自定义的键生成器,用于生成缓存条目的键值。默认为空,表示使用默认的键生成策略。
-
- cacheManager:指定一个自定义的缓存管理器,用于指定缓存的实现。默认为空,表示使用默认的缓存管理器。
-
- cacheResolver:指定一个自定义的缓存解析器,用于解析缓存的实现。默认为空,表示使用默认的缓存解析器。
-
- beforeInvocation:指定是否在方法调用之前或之后执行缓存操作。如果设置为 true,则在方法调用之前执行缓存操作;如果设置为 false(默认值),则在方法调用之后执行缓存操作。
-
-
@CacheEvict注解通常用于清除缓存中的数据,例如在更新数据库中的数据后,需要清除缓存中相应的数据以保持一致性。因此,@CacheEvict注解常常与@Cacheable或@CachePut注解一起使用,前者用于清除缓存,后者用于更新缓存或执行其他操作。 -
@CacheEvict是 Spring Cache 中的一个注解,用于从缓存中移除指定的条目。基本使用步骤如下:-
- 在需要清除缓存的方法上添加
@CacheEvict注解。
- 在需要清除缓存的方法上添加
-
- 配置
@CacheEvict注解的属性,指定要操作的缓存名称、缓存条目的键等信息。
- 配置
-
下面是一个基本使用示例:
@Service
public class MyService {

    @CacheEvict(value = "myCache", key = "#key")
    public void clearCache(String key) {
        // 此处通常为清除缓存的逻辑
    }
}
在这个示例中,clearCache 方法使用 @CacheEvict 注解,指定了要清除的缓存名称为 “myCache”,并使用参数 key 作为缓存条目的键。每次调用 clearCache 方法时,Spring Cache 会从名为 “myCache” 的缓存中移除与参数 key 匹配的条目。
需要注意的是,@CacheEvict 注解默认是在方法调用之后执行缓存操作的。如果想在方法调用之前执行缓存操作,可以设置 beforeInvocation 属性为 true。例如:
@CacheEvict(value = "myCache", key = "#key", beforeInvocation = true)
这样配置之后,@CacheEvict 注解会在方法调用之前先清除缓存,然后再执行方法体。
四、使用spring Cache
- 使用springCache其实就是使用它的注解
四、1、项目起始状态
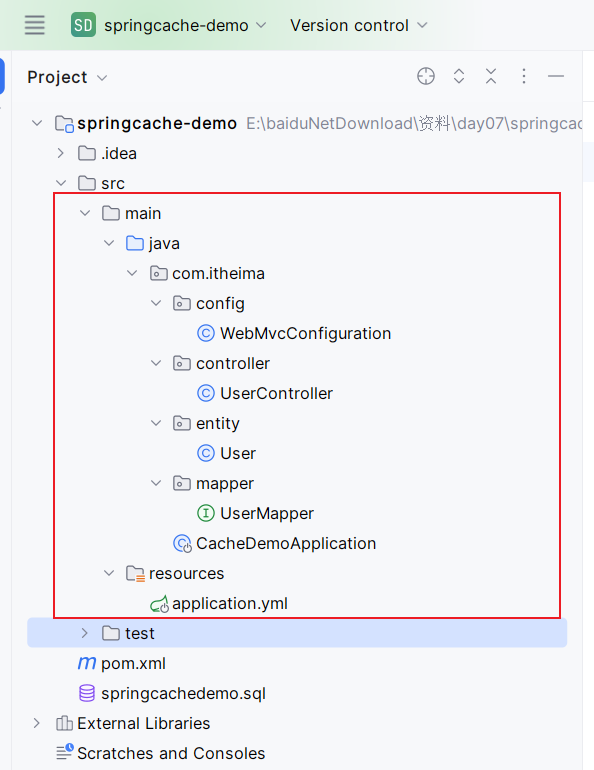
项目结构:
数据库:
DROP TABLE IF EXISTS `user`;
CREATE TABLE `user` (
  `id` bigint NOT NULL AUTO_INCREMENT,
  `name` varchar(45) DEFAULT NULL,
  `age` int DEFAULT NULL,
  PRIMARY KEY (`id`)
);
pom.xml
<?xml version="1.0" encoding="UTF-8"?>
<project xmlns="http://maven.apache.org/POM/4.0.0"
         xmlns:xsi="http://www.w3.org/2001/XMLSchema-instance"
         xsi:schemaLocation="http://maven.apache.org/POM/4.0.0 http://maven.apache.org/xsd/maven-4.0.0.xsd">
    <modelVersion>4.0.0</modelVersion>
    <parent>
        <groupId>org.springframework.boot</groupId>
        <artifactId>spring-boot-starter-parent</artifactId>
        <version>2.7.3</version>
        <relativePath/>
    </parent>
    <groupId>com.itheima</groupId>
    <artifactId>springcache-demo</artifactId>
    <version>1.0-SNAPSHOT</version>

    <properties>
        <maven.compiler.source>11</maven.compiler.source>
        <maven.compiler.target>11</maven.compiler.target>
    </properties>

    <dependencies>
<!--        web依赖-->
        <dependency>
            <groupId>org.springframework.boot</groupId>
            <artifactId>spring-boot-starter-web</artifactId>
            <scope>compile</scope>
        </dependency>
<!--        lombok依赖-->
        <dependency>
            <groupId>org.projectlombok</groupId>
            <artifactId>lombok</artifactId>
            <version>1.18.20</version>
        </dependency>

        <dependency>
            <groupId>com.alibaba</groupId>
            <artifactId>fastjson</artifactId>
            <version>1.2.76</version>
        </dependency>

        <dependency>
            <groupId>commons-lang</groupId>
            <artifactId>commons-lang</artifactId>
            <version>2.6</version>
        </dependency>
<!--        缓存依赖-->
        <dependency>
            <groupId>org.springframework.boot</groupId>
            <artifactId>spring-boot-starter-cache</artifactId>
        </dependency>

<!--        redis依赖-->
        <dependency>
            <groupId>org.springframework.boot</groupId>
            <artifactId>spring-boot-starter-data-redis</artifactId>
        </dependency>

<!--        mysql-->
        <dependency>
            <groupId>mysql</groupId>
            <artifactId>mysql-connector-java</artifactId>
            <scope>runtime</scope>
        </dependency>

<!--        mybatis-->
        <dependency>
            <groupId>org.mybatis.spring.boot</groupId>
            <artifactId>mybatis-spring-boot-starter</artifactId>
            <version>2.2.0</version>
        </dependency>

<!--        druid-->
        <dependency>
            <groupId>com.alibaba</groupId>
            <artifactId>druid-spring-boot-starter</artifactId>
            <version>1.2.1</version>
        </dependency>

<!--        knife4j(swagger)-->
        <dependency>
            <groupId>com.github.xiaoymin</groupId>
            <artifactId>knife4j-spring-boot-starter</artifactId>
            <version>3.0.2</version>
        </dependency>

<!--        测试依赖-->
        <dependency>
            <groupId>org.springframework.boot</groupId>
            <artifactId>spring-boot-starter-test</artifactId>
        </dependency>
    </dependencies>
    <build>
        <plugins>
            <plugin>
                <groupId>org.springframework.boot</groupId>
                <artifactId>spring-boot-maven-plugin</artifactId>
                <version>2.7.3</version>
            </plugin>
        </plugins>
    </build>
</project>
application.yml
server:
  port: 6688
spring:
  datasource:
    druid:
      driver-class-name: com.mysql.cj.jdbc.Driver
      url: jdbc:mysql://localhost:3306/spring_cache?serverTimezone=Asia/Shanghai&useUnicode=true&characterEncoding=utf-8&zeroDateTimeBehavior=convertToNull&useSSL=false&allowPublicKeyRetrieval=true
      username: root
      password: dadao
  redis:
    host: localhost
    port: 6379
    password: 123456
    database: 1
logging:
  level:
    com:
      itheima:
        mapper: debug
        service: info
        controller: info
config
@Configuration
@Slf4j
public class WebMvcConfiguration extends WebMvcConfigurationSupport {

    /**
     * 生成接口文档配置
     * @return
     */
    @Bean
    public Docket docket(){
        log.info("准备生成接口文档...");

        ApiInfo apiInfo = new ApiInfoBuilder()
                .title("接口文档")
                .version("2.0")
                .description("接口文档")
                .build();

        Docket docket = new Docket(DocumentationType.SWAGGER_2)
                .apiInfo(apiInfo)
                .select()
                //指定生成接口需要扫描的包
                .apis(RequestHandlerSelectors.basePackage("com.itheima.controller"))
                .paths(PathSelectors.any())
                .build();

        return docket;
    }

    /**
     * 设置静态资源映射
     * @param registry
     */
    protected void addResourceHandlers(ResourceHandlerRegistry registry) {
        log.info("开始设置静态资源映射...");
        registry.addResourceHandler("/doc.html").addResourceLocations("classpath:/META-INF/resources/");
        registry.addResourceHandler("/webjars/**").addResourceLocations("classpath:/META-INF/resources/webjars/");
    }
}
controller
@RestController
@RequestMapping("/user")
@Slf4j
public class UserController {

    @Autowired
    private UserMapper userMapper;

    @PostMapping
    public User save(@RequestBody User user){
        userMapper.insert(user);
        return user;
    }

    @DeleteMapping
    public void deleteById(Long id){
        userMapper.deleteById(id);
    }

	@DeleteMapping("/delAll")
    public void deleteAll(){
        userMapper.deleteAll();
    }

    @GetMapping
    public User getById(Long id){
        User user = userMapper.getById(id);
        return user;
    }

}
entity
@Data
public class User implements Serializable {

    private static final long serialVersionUID = 1L;

    private Long id;

    private String name;

    private int age;

}
mapper
@Mapper
public interface UserMapper{

    @Insert("insert into user(name,age) values (#{name},#{age})")
    @Options(useGeneratedKeys = true,keyProperty = "id")
    void insert(User user);

    @Delete("delete from user where id = #{id}")
    void deleteById(Long id);

    @Delete("delete from user")
    void deleteAll();

    @Select("select * from user where id = #{id}")
    User getById(Long id);
}
引导类
@Slf4j
@SpringBootApplication
@EnableCaching //第一步:开启缓存注解
public class CacheDemoApplication {
    public static void main(String[] args) {
        SpringApplication.run(CacheDemoApplication.class,args);
        log.info("项目启动成功...");
    }
}
四、2、修改后的controller(其实就加了几个注解)
@RestController
@RequestMapping("/user")
@Slf4j
public class UserController {
@Autowired
private UserMapper userMapper;
@PostMapping
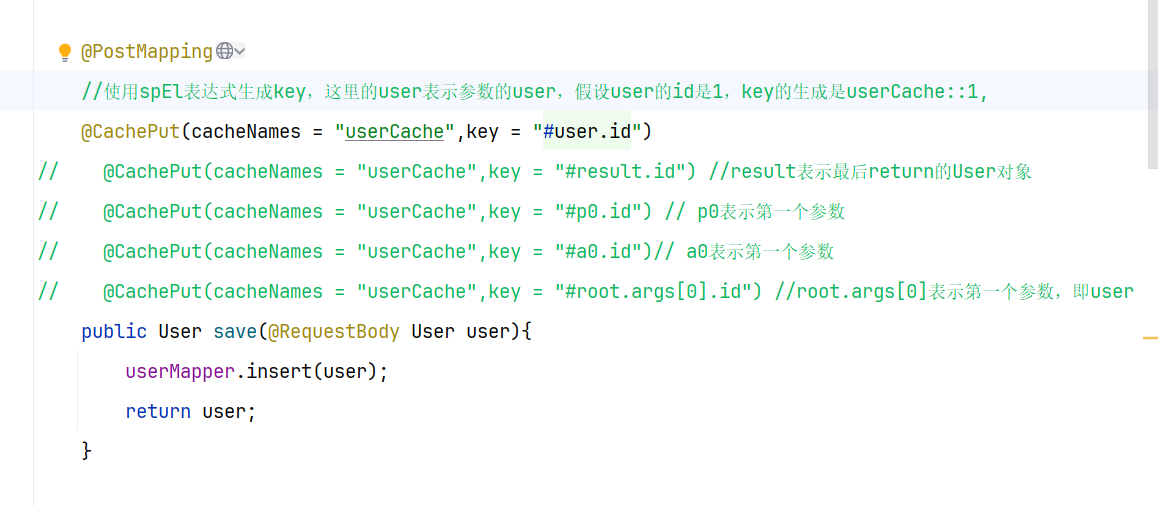
//使用spEl表达式生成key,这里的user表示参数的user,假设user的id是1,key的生成是userCache::1,
// @CachePut(cacheNames = "userCache",key = "#user.id")
@CachePut(value = "userCache",key = "#user.id")
// @CachePut(cacheNames = "userCache",key = "#result.id") //result表示最后return的User对象
// @CachePut(cacheNames = "userCache",key = "#p0.id") // p0表示第一个参数
// @CachePut(cacheNames = "userCache",key = "#a0.id")// a0表示第一个参数
// @CachePut(cacheNames = "userCache",key = "#root.args[0].id") //root.args[0]表示第一个参数,即user
public User save(@RequestBody User user){
userMapper.insert(user);
return user;
}
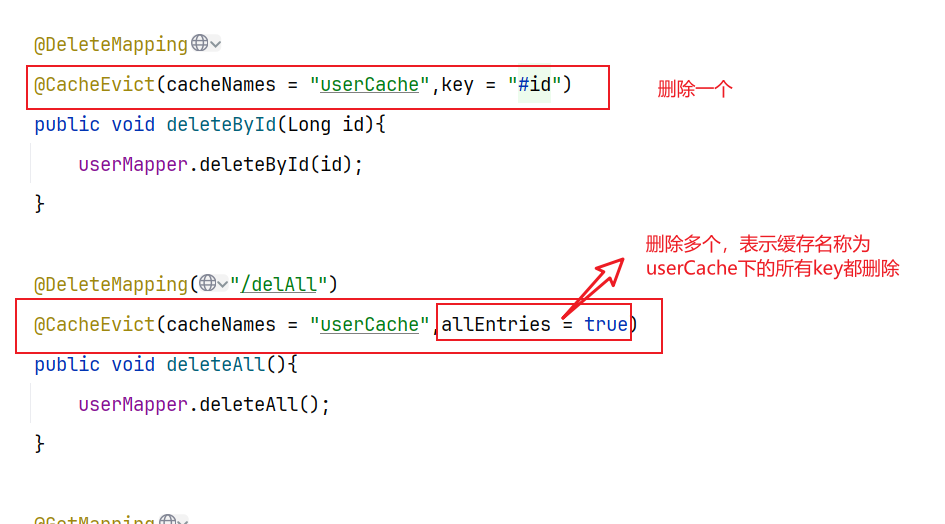
@DeleteMapping
@CacheEvict(cacheNames = "userCache",key = "#id") // 根据id进行删除缓存
public void deleteById(Long id){
userMapper.deleteById(id);
}
@DeleteMapping("/delAll")
@CacheEvict(cacheNames = "userCache",allEntries = true) //删除缓存名称为userCache缓存的所有缓存键
public void deleteAll(){
userMapper.deleteAll();
}
@GetMapping
@Cacheable(cacheNames = "userCache",key = "#id") // key对应形参的名称
public User getById(Long id){
User user = userMapper.getById(id);
return user;
}
}
五、spring Cache的实现原理
-
Spring Cache 的实现原理基本上遵循了标准的缓存机制。它的核心思想是在方法执行时,首先检查缓存中是否存在与方法调用相关联的结果,如果存在,则直接返回缓存中的结果,避免重复执行方法体;如果缓存中不存在相关结果,则执行方法体,并将结果存储到缓存中。
-
具体来说,Spring Cache 的实现原理如下:
-
- 缓存管理器(Cache Manager):Spring Cache 提供了一个抽象的缓存管理器接口,用于管理缓存的创建、查询和更新等操作。缓存管理器负责与实际的缓存实现(如 ConcurrentMap、EhCache、Redis 等)进行交互,将缓存操作委托给具体的缓存实现来处理。
-
- 缓存注解:Spring Cache 提供了一系列的缓存注解,如
@Cacheable、@CachePut、@CacheEvict等,用于声明方法的缓存行为。通过在方法上添加这些注解,可以指定方法的返回值可以被缓存、更新缓存或清除缓存等操作。
- 缓存注解:Spring Cache 提供了一系列的缓存注解,如
-
- 缓存操作拦截器(Cache Operation Interceptor):Spring Cache 使用 AOP(Aspect-Oriented Programming)技术,通过代理模式在方法调用前后执行缓存操作。在方法调用前,缓存操作拦截器会检查缓存中是否存在与方法调用相关联的结果,如果存在则直接返回缓存中的结果;在方法调用后,缓存操作拦截器会将方法的返回值存储到缓存中,以便下次使用相同参数调用时直接从缓存中获取结果。
-
- 缓存键生成器(Cache Key Generator):Spring Cache 使用缓存键来唯一标识缓存中的条目。缓存键通常由方法的参数、类名、方法名等信息组成。Spring Cache 提供了灵活的缓存键生成器接口,允许开发者根据需求自定义缓存键的生成策略。
-
- 缓存适配器(Cache Adapter):Spring Cache 提供了一个抽象的缓存适配器接口,用于封装不同缓存实现之间的差异,使得缓存操作可以统一处理。通过缓存适配器,Spring Cache 可以与不同的缓存实现(如 ConcurrentMap、EhCache、Redis 等)进行无缝集成。
-
-
总之,Spring Cache 的实现原理是基于缓存管理器、缓存注解、缓存操作拦截器、缓存键生成器和缓存适配器等组件共同协作,实现了对方法调用结果的缓存管理。通过合理配置这些组件,可以实现灵活、高效的缓存功能,提升系统的性能和响应速度。
六、spring Cache通过代理对象实现的
-
Spring Cache 通过代理对象来实现缓存功能。Spring Cache 使用了 AOP(Aspect-Oriented Programming)技术,利用动态代理机制在运行时生成代理对象,从而在方法调用前后执行缓存操作。
-
具体来说,当一个 Bean 中的方法被
@Cacheable、@CachePut或@CacheEvict等注解修饰时,Spring Cache 会在运行时生成一个代理对象来包装这个 Bean,使得方法调用时可以被代理对象拦截。当方法被调用时,代理对象会首先检查缓存中是否存在与方法调用相关联的结果,如果存在,则直接返回缓存中的结果;如果不存在,则执行原始方法体,并将方法的返回值存储到缓存中,以便下次使用相同参数调用时直接从缓存中获取结果。 -
这种基于代理对象的缓存机制有以下几个优点:
-
- 透明性:开发者无需手动编写缓存逻辑,只需在方法上添加相应的缓存注解即可。代理对象会自动处理缓存操作,使得缓存逻辑与业务逻辑分离,提高了代码的清晰度和可维护性。
-
- 灵活性:代理对象可以根据配置动态生成,支持在方法调用前后执行不同的缓存操作。通过合理配置缓存注解的属性,可以实现灵活的缓存策略,满足不同场景下的需求。
-
- 扩展性:Spring Cache 提供了丰富的缓存注解和缓存管理器等组件,支持与各种缓存实现(如 ConcurrentMap、EhCache、Redis 等)无缝集成。开发者可以根据需求自定义缓存键生成器、缓存解析器等组件,实现更灵活、更高效的缓存功能。
-
-
总之,Spring Cache 通过代理对象实现了对方法调用结果的缓存管理,提供了一种简单、灵活、高效的缓存解决方案,帮助开发者提升系统性能和响应速度。