Trime同文输入法JNI加载过程
- JNI初始化顺序
- 第一步、加载librime_jni.so库
- 第二步、自动注册机制
- 第三步、正式加载librime_jni.so库
- 插入一个话题、简化打印记录
- 第四步、执行Rime.java中的init()方法
- LoadModules()
- LoadModule()
- rime_core_initialize()调用顺序
- Class不是class关键字,仅仅是个结构体名称
- check(boolean full_check)
- start_maintenance()
- `is_maintenance_mode()`,`join_maintenance_thread()`
- ConfigFileUpdate::Run()
- WorkspaceUpdate::Run()
- create_session()
- initSchema()
- 第五步
- 问题
- 发现
- 类Deployer的理解
- 创建方案对象
- 有个问题
- 各个类的包含关系
- 第六步、加载script_translator
- 第七步 deployTheme()
- 第八步、编译词典
- 插入一个话题,格式化makelist.txt
JNI初始化顺序
在追溯中文模式下按下w时发生的调用,跟踪到ProcessKey()函数中,出现processors_变量弄不明白,跟踪processors_变量发现在InitializeComponents()函数中被初始化。越看越迷糊,很多东西得从头开始看。
第一步、加载librime_jni.so库
librime_jni.so放在目录..\trime-develop\app\src\main\jniLibs\x86_64下,在loadLibrary()函数中只需要写rime_jni。
static {
        System.out.println("获取系统的属性:====================================");
        String lib = System.getProperty("java.library.path");

        // 加载C++库
        System.loadLibrary("rime_jni");
}
第二步、自动注册机制
gcc对c语言做了很多扩展,使得c语言的表现力得到了很大的增强,主要介绍一下constructor扩展,这个扩展和C++的构造函数很像,它会在main函数之前由程序加载器自动调用。利用constructor属性,我们可以定义一些宏来实现模块的自动注册机制。也就是说我们用宏自动构造注册函数,然后把注册函数赋予constructor属性,这样我们在添加新的模块的时候就不需要显示的调用注册函数来,只需要在模块文件内加上一个宏调用即可。
因为有下面这段代码,所以等函数最先执行。
#if defined(__GNUC__)
#define RIME_MODULE_INITIALIZER(f)                        \
        static void f(void) __attribute__((constructor)); \
        static void f(void)
#elif defined(_MSC_VER)
#pragma section(".CRT$XCU", read)
#define RIME_MODULE_INITIALIZER(f)                                       \
        static void __cdecl f(void);                                     \
        __declspec(allocate(".CRT$XCU")) void(__cdecl * f##_)(void) = f; \
        static void __cdecl f(void)
#endif
预编译时,宏RIME_MODULE_INITIALIZER会被替换成下面两个函数,其中##name会被替换成 core, gears, charcode等词块,成为rime_register_module_core(void), rime_register_module_gears(void), rime_register_module_charcode(void)等函数。
static void rime_register_module_##name(void) __attribute__((constructor));
static void rime_register_module_##name(void)
{
        static RimeModule module = {0};
        if (!module.data_size)
        {
                RIME_STRUCT_INIT(RimeModule, module);
                module.module_name = #name;
                module.initialize = rime_##name##_initialize;
                module.finalize = rime_##name##_finalize;
        }
        rime_get_api()->register_module(&module);
}
下面的函数最先执行,即先于main()函数执行。
core_module.cc rime_register_module_core(void)
setup.cc rime_register_module_default()
setup.cc rime_register_module_deployer()
dict_module.cc rime_register_module_dict()
gears_module.cc rime_register_module_gears(void)
levers_module.cc rime_register_module_levers()
rime_api.h里要注意!宏嵌套宏,宏又嵌套宏。在setup.cc中有两个宏RIME_REGISTER_MODULE_GROUP,
RIME_REGISTER_MODULE_GROUP(default, "core", "dict", "gears")
RIME_REGISTER_MODULE_GROUP(deployer, "core", "dict", "levers")
该宏包含:

预编译后RIME_REGISTER_MODULE_GROUP(default, "core", "dict", "gears")被替换成:
// RIME_MODULE_LIST替换成
static const char *rime_default_module_group[] = {"core", "dict", "gears"};

static void rime_default_initialize()
{
        rime::LoadModules(rime_default_module_group);
}
static void rime_default_finalize()
{
}

// 以下是RIME_REGISTER_MODULE(name)内容
void rime_require_module_default() {}

static void rime_register_module_default(void) __attribute__((constructor));
static void rime_register_module_default(void)
{
        static RimeModule module = {0};
        if (!module.data_size)
        {
                module.data_size = sizeof(RimeModule) - sizeof(module.data_size);
                module.module_name = default;
                module.initialize = rime_default_initialize;
                module.finalize = rime_default_finalize;
        }

        // 在rime_api.cc中有s_api.register_module = &RimeRegisterModule;
		// rime_get_api()获得s_api,register_module指向函数 RimeRegisterModule(RimeModule *module)
		// 所以此处调用的是RimeRegisterModule()
        rime_get_api()->register_module(&module);
}
函数执行顺序:
FF:   115行 core_module.cc rime_register_module_core()   RIME_REGISTER_MODULE() core
FF:   34行 setup.cc rime_register_module_default()   RIME_REGISTER_MODULE() default
FF:   38行 setup.cc rime_register_module_deployer()   RIME_REGISTER_MODULE() deployer
FF:   70行 dict_module.cc rime_register_module_dict()   RIME_REGISTER_MODULE() dict
FF:   118行 gears_module.cc rime_register_module_gears()   RIME_REGISTER_MODULE() gears
第三步、正式加载librime_jni.so库
Java JNI有两种方法,一种是通过javah,获取一组带签名函数,然后实现这些函数。 这种方法很常用,也是官方推荐的方法。
还有一种就是JNI_OnLoad方法。 当Android的VM(Virtual Machine)执行到C组件(即*so档)里的System.loadLibrary()函数时, 首先会去执行C组件里的JNI_OnLoad()函数。
它的用途有二:
- 告诉VM此
C组件使用那一个JNI版本。 如果你的*.so档没有提供JNI_OnLoad()函数,VM会默认该*.so档是使用最老的JNI 1.1版本。由于新版的JNI做了许多扩充,如果需要使用JNI的新版功能,例如JNI 1.4的java.nio.ByteBuffer,就必须藉由JNI_OnLoad()函数来告知VM。 - 由于VM执行到
System.loadLibrary()函数时,就会立即先呼叫JNI_OnLoad(),
所以C组件的开发者可以藉由JNI_OnLoad()来进行C组件内的初期值之设定(Initialization) 。
其实Android中的so文件就像是Windows下的DLL一样,JNI_OnLoad和JNI_OnUnLoad函数就像是DLL中的PROCESS ATTATCH和DEATTATCH的过程一样,可以同样做一些初始化和反初始化的动作。
jint JNI_OnLoad(JavaVM *vm, void *reserved)
{
        JNIEnv *env;
        if (vm->GetEnv(reinterpret_cast<void **>(&env), JNI_VERSION_1_6) != JNI_OK)
        {
                return -1;
        }
        registerNativeMethods(env, CLASSNAME, sMethods, NELEMS(sMethods));
        return JNI_VERSION_1_6;
}
插入一个话题、简化打印记录
logcat输出时特别讨厌输出下面这样的内容,前面没用的信息太多了。
2022-07-15 22:42:43.758 26700-26700/com.osfans.trime D/KeyboardView: I am in  onBufferDraw() 3
2022-07-15 22:42:43.758 26700-26700/com.osfans.trime D/KeyboardView: I am in  onBufferDraw() end
2022-07-15 22:42:43.759 26700-26700/com.osfans.trime D/KeyboardView: I am in  invalidateKey() 1 end
2022-07-15 22:42:43.759 26700-26700/com.osfans.trime D/KeyboardView: I am in  onModifiedTouchEvent() end. mLastX = 106, mLastY = 472
2022-07-15 22:42:43.759 26700-26700/com.osfans.trime D/KeyboardView: I am in  performClick()
2022-07-15 22:42:43.770 26700-26700/com.osfans.trime D/Trime: I am in onComputeInsets()
2022-07-15 22:42:43.770 26700-26700/com.osfans.trime D/KeyboardView: I am in  onDraw()
在找解决方案时发现在cmd中配置一下adb logcat -s就可以在logcat的run窗口输出精简的内容。
PS D:\project\andriod\trime-develop\app\src\main\jniLibs\x86_64> cmd
Microsoft Windows [版本 10.0.19044.1826]
(c) Microsoft Corporation。保留所有权利。

D:\project\andriod\trime-develop\app\src\main\jniLibs\x86_64>adb logcat -c

D:\project\andriod\trime-develop\app\src\main\jniLibs\x86_64>adb logcat -s
如图显示:

第四步、执行Rime.java中的init()方法
接着执行Rime.java中的private static void init(boolean full_check)函数。init()由Config.java 中的 prepareRime()调用。
调用顺序:
Config.java Config() -> prepareRime() -> Rime.java get() -> Rime() -> init()

LoadModules()
setup.cc中的LoadModules()函数需要注意,形参module_names的值就是kDefaultModules的值。宏RIME_EXTRA_MODULES的值为lua。
// RIME_EXTRA_MODULES 来源于app\src\main\jni\librime\CMakeLists.txt中的add_definitions(-DRIME_EXTRA_MODULES=${list})
namespace rime
{
#define Q(x) #x
        RIME_API RIME_MODULE_LIST(kDefaultModules, "default" RIME_EXTRA_MODULES);
- 功能:
通过字符串查找要调用的模块函数 - 描述:
- 第一次被
RimeInitialize()调用,由"defualt"关键字找到default模块,将default模块传递给LoadModule()函数。再由LoadModule()函数通过module->initialize()调用rime_default_initialize()函数。 - 第二次被
rime_default_initialize()调用,rime_default_initialize()函数定义在宏RIME_REGISTER_MODULE_GROUP中,在rime_default_initialize()函数中将数组rime_default_module_group[]传递给了此函数。rime_default_module_group[]数组的第一个元素是"core",根据"core"找到core模块,传递给LoadModule()函数。再由LoadModule()函数通过module->initialize()调用rime_core_initialize()函数。
- 第一次被
- 总结:
调用关系:RimeInitialize()->LoadModules()->LoadModule()->rime_default_initialize()->LoadModules()->.....
RIME_API void LoadModules(const char *module_names[])
{
        //  module_names: default
        ModuleManager &mm(ModuleManager::instance());
        for (const char **m = module_names; *m; ++m)
        {
                // 为什么能找到default,因为在RimeRegisterModule()已经调用了Register()
                if (RimeModule *module = mm.Find(*m))
                {
                        mm.LoadModule(module); // 调用module.h
                }
        }
}
mm.Find(*m)之所以能找到default找不到lua是因为rime_api.cc RimeRegisterModule()中调用module.cc Register()注册了default模块。而RimeRegisterModule()被RIME_REGISTER_CUSTOM_MODULE(name)中定义的函数rime_get_api()->register_module(&module)调用。因为s_api.register_module = &RimeRegisterModule;调用s_api.register_module()就是调用RimeRegisterModule()。
// 此函数被rime_api.cc中的RimeRegisterModule()调用
void ModuleManager::Register(const string &name, RimeModule *module)
{
        map_[name] = module;
}
LoadModule()
module.cc中的LoadModule()函数由setup.cc中的LoadModules()函数调用。
- 功能:
通过字符串查找要调用的模块函数 - 描述:
LoadModule()被setup.cc中的LoadModules()函数调用。- 一:由于
module->initialize在本库被加载时由宏RIME_REGISTER_MODULE()初始化了。在宏RIME_REGISTER_MODULE()中将default模块的initialize = rime_default_initialize()因此调用module->initialize()时其实是在调用rime_default_initialize()函数。rime_default_initialize()函数定义在宏RIME_REGISTER_MODULE_GROUP()中,先于main()函数执行。 - 二:
rime_default_initialize()函数调用LoadModules()函数,在LoadModules()函数中,根据rime_default_module_group[] = {"core", "dict", "gears"}中的元素依次找到对应的模块,传递到LoadModule()再执行rime_core_initialize()函数。"core"对应的模块在rime_register_module_core()函数中被初始化。rime_register_module_core()函数定义在宏RIME_MODULE_INITIALIZER()中先于main()执行,宏RIME_MODULE_INITIALIZER()包含在宏RIME_REGISTER_MODULE()中,宏RIME_REGISTER_MODULE(core)在core_module.cc中,加载.so文件时是第一个执行的,先于main()函数执行。
- 一:由于
void ModuleManager::LoadModule(RimeModule *module)
{
        if (!module || loaded_.find(module) != loaded_.end())
        {
                return;
        }
        loaded_.insert(module);
        if (module->initialize != NULL)
        {
                // RIME_REGISTER_MODULE
                module->initialize();
        }
        else
        {
                LOG(WARNING) << "missing initialize() function in module: " << module;
        }
}
调用随着LoadModules()中module->initialize()被循环调用会依次调用rime_core_initialize(),rime_dict_initialize(),rime_gears_initialize()进行各个部件的注册。
rime_core_initialize()调用顺序
核心部件初始化
setup.cc LoadModules() -> LoadModule() -> setup.cc rime_default_initialize() -> LoadModules() -> LoadModule() -> core_module.cc rime_core_initialize()

Class不是class关键字,仅仅是个结构体名称
全局搜索": public Class<"就能看到所有继承结构体Class的类,非常重要。
14 个结果 - 14 文件

librime\src\rime\deployer.h:
  32:         class DeploymentTask : public Class<DeploymentTask, TaskInitializer>

librime\src\rime\filter.h:
  37:         class Filter : public Class<Filter, const Ticket &>

librime\src\rime\formatter.h:
  20:         class Formatter : public Class<Formatter, const Ticket &>

librime\src\rime\processor.h:
  50:         class Processor : public Class<Processor, const Ticket &>

librime\src\rime\segmentor.h:
  38:         class Segmentor : public Class<Segmentor, const Ticket &>

librime\src\rime\translator.h:
  59:         class Translator : public Class<Translator, const Ticket &>

librime\src\rime\config\config_component.h:
  25:         class Config : public Class<Config, const string &>, public ConfigItemRef

librime\src\rime\dict\corrector.h:
  64:         class Corrector : public Class<Corrector, const Ticket &>

librime\src\rime\dict\db.h:
  37:         class Db : public Class<Db, const string &>

librime\src\rime\dict\dictionary.h:
  68:         class Dictionary : public Class<Dictionary, const Ticket &>

librime\src\rime\dict\reverse_lookup_dictionary.h:
  66:         class ReverseLookupDictionary : public Class<ReverseLookupDictionary, const Ticket &>

librime\src\rime\dict\user_dictionary.h:
  57:         class UserDictionary : public Class<UserDictionary, const Ticket &>

librime\src\rime\gear\grammar.h:
  12:         class Grammar : public Class<Grammar, Config *>

librime\test\component_test.cc:
  13: class Greeting : public Class<Greeting, const string &>
check(boolean full_check)
check()中调用3个函数,分别是start_maintenance(),is_maintenance_mode(),join_maintenance_thread()。下图只画了start_maintenance()。
start_maintenance()
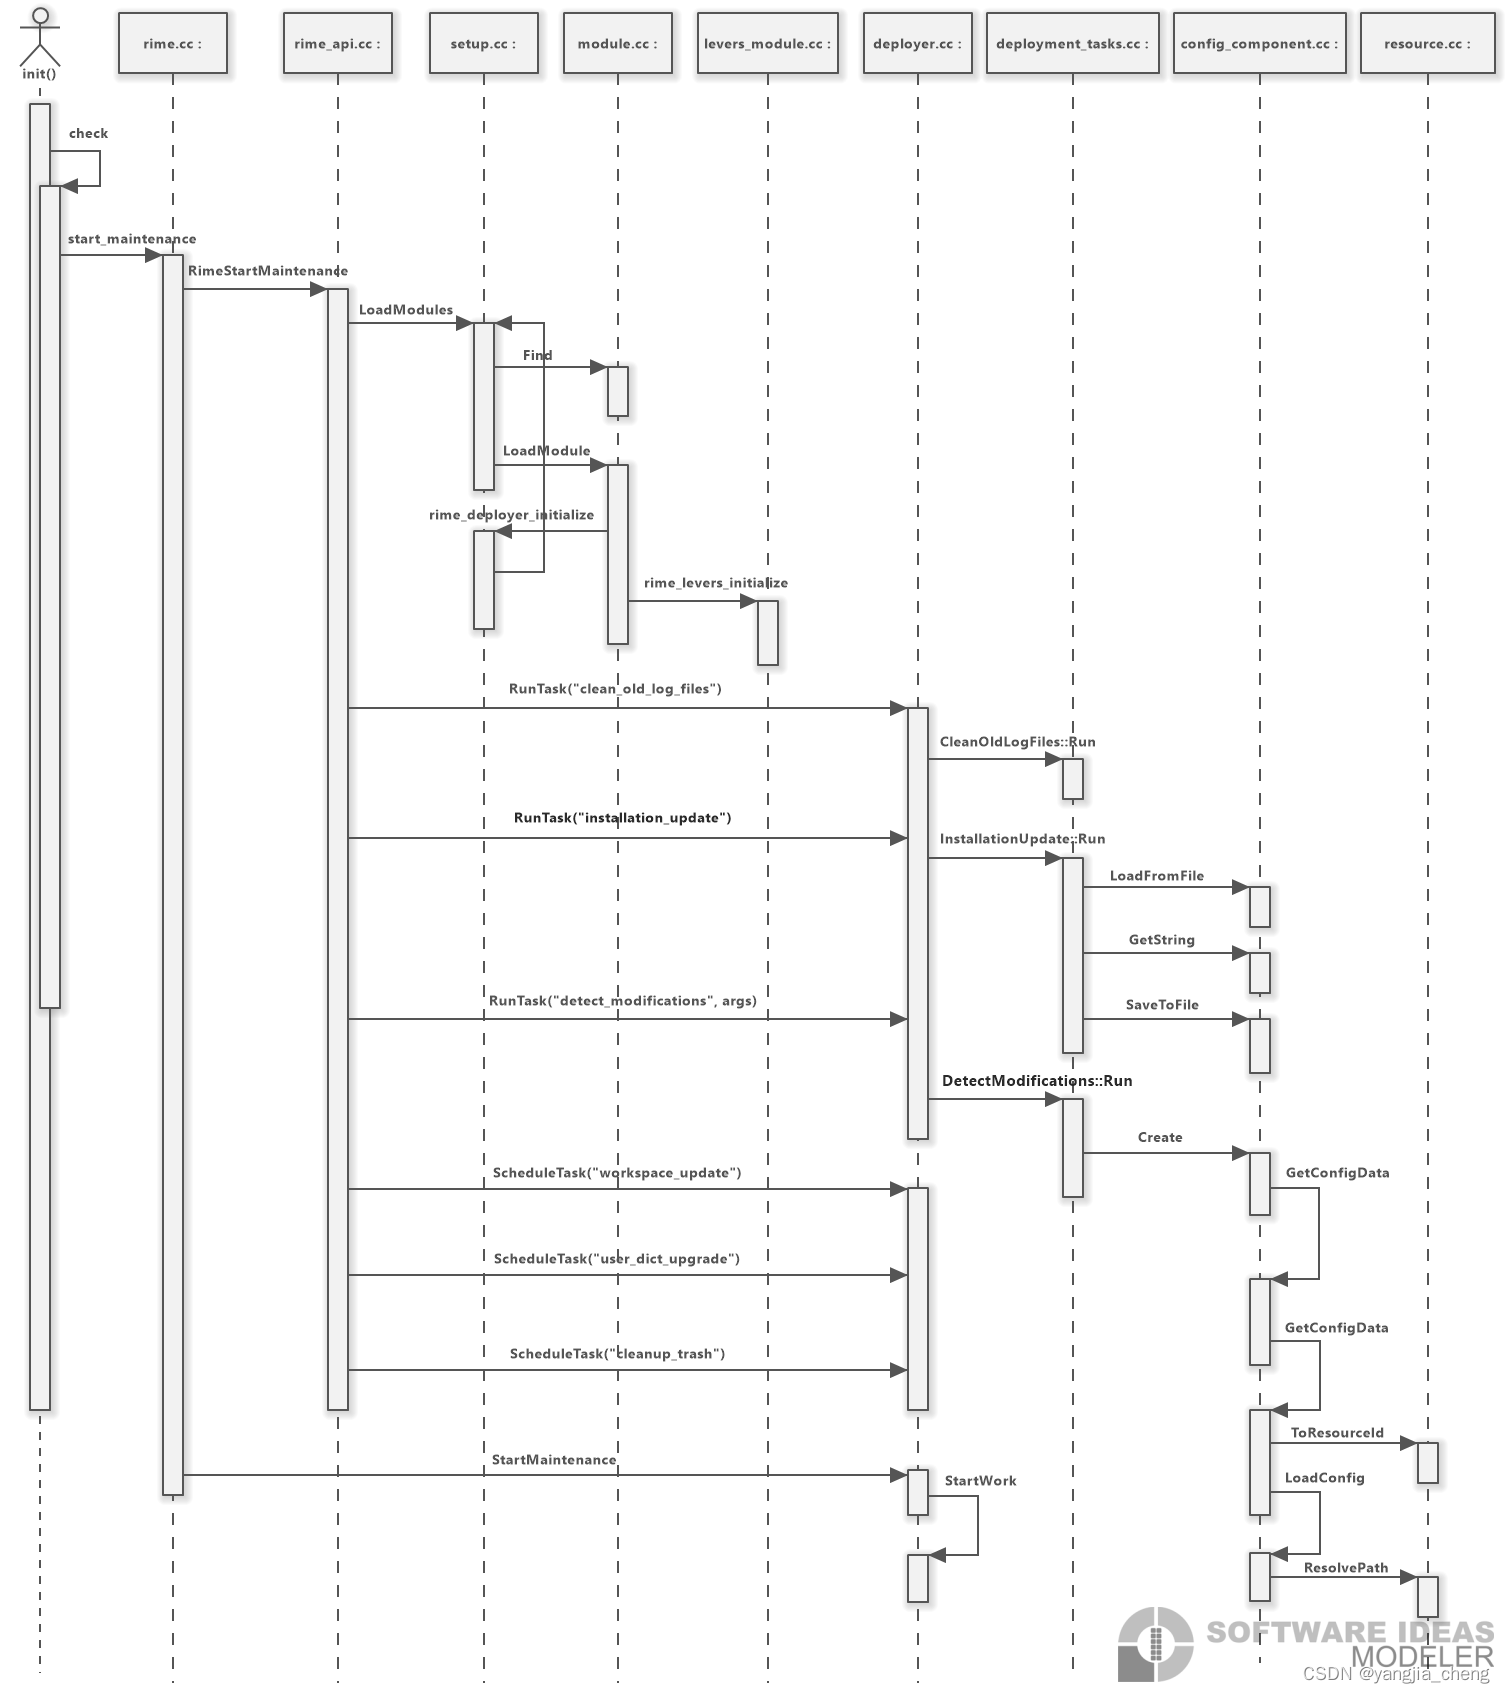
bool CleanOldLogFiles::Run(Deployer *deployer) 顾名思义似乎是清理日志文件的
bool InstallationUpdate::Run(Deployer *deployer) 顾名思义,安装目录更新
bool DetectModifications::Run(Deployer *deployer) 顾名思义,检测是否有修改,是否需要更新。
resource.cc ResolvePath()的作用是加上前后缀,user变成user.yaml。deployer.cc StartWork()搞不清这个函数是干什么用的
is_maintenance_mode(),join_maintenance_thread()

很多细节函数没画,这个软件太难用了
ConfigFileUpdate::Run()
ConfigFileUpdate::Run()函数很复杂。WorkspaceUpdate::Run()还没完,后面还有一张。

WorkspaceUpdate::Run()
94行 config_cow_ref.h Cow() start. key = menu
I/: . . . . . . . . . . . . . . . . . . . . . . . . . . . . . . . 21行 config_cow_ref.h ConfigCowRef() 1.
I/: . . . . . . . . . . . . . . . . . . . . . . . . . 74行 config_compiler_impl.h IncludeReference()
太长了,很多函数没画出来,比如上面这些。这张图将上面的包含进来了。


create_session()
图中config_component.cc 中的GetConfigData()函数,会调用一系列函数前面的图中已有这张图没画出来。

initSchema()
initSchema() -> get_schema_list() -> RimeGetSchemaList()。
执行步骤:
- 在RimeGetSchemaList()中首先创建default_schema对象,RimeGetSchemaList() -> Schema() -> FetchUsefulConfigItems()。读取default.yaml文件,因为此前已经读取过了所以此处不再读取。FetchUsefulConfigItems()直接从集合root中读取一些default.yaml中的数据项。
- 有没有发现,每次调用config_component.cc GetConfigData()函数的时候都要先执行component.h Require(const string &name),需要先根据name获取到对应的对象。以Config::Require(“schema”)->Create(schema_id))为例,通过"schema"获取到的对象早就在core_module.cc的rime_core_initialize()函数中创建好了。
// 不同于上下两个,此构造函数没有参数
// 创建一个ConfigComponent对象,其中包含一个成员变量ConfigLoader和一个成员函数LoadConfig()
auto config_loader = new ConfigComponent<ConfigLoader, DeployedConfigResourceProvider>;

r.Register("config", config_loader);
r.Register("schema", new SchemaComponent(config_loader));
并且在构造函数SchemaComponent()中将创建的ConfigComponent对象赋给了成员变量Config::Component *config_component_,在创建ConfigComponent对象时同时创建父类对象ConfigComponentBase。父类ConfigComponentBase中有成员变量cache_,所以子类ConfigComponent中也有成员变量cache_。同时ConfigComponent 继承自 ConfigComponentBase 继承自 Config::Component 继承自 ComponentBase,Config 继承自 ConfigItemRef。父类ConfigItemRef中有成员变量an<ConfigData> data_,所以ConfigComponent类中也有成员变量data_。
// 那么cache_在哪里初始化的??在GetConfigData()初始化。
// 从default.yaml和luna_pinyin.schema.yaml中读取到的内容,根据string键值放到此cache_中。
// root在
// ConfigData::Traverse()被读取。
map<string, weak<ConfigData>> cache_;
那么通过Config::Require(“schema”)获取到的对象中也包含成员变量cache_,cache_中存储的是ConfigData对象,ConfigData对象中又包含成员变量an<ConfigItem> root。而GetConfigData()的功能是根据file_name的值从集合(map)类型的变量cache_中获取ConfigData类型的对象,如果cache_中有该对象,则直接返回该对象。如果没有则重新加载并解析file_name.yaml后,重新创建一个ConfigData类型对象放入cache_中,并返回该对象。
an<ConfigData> ConfigComponentBase::GetConfigData(const string &file_name)
{
        auto config_id = resource_resolver_->ToResourceId(file_name);
        weak<ConfigData> &wp(cache_[config_id]);

        if (wp.expired()) // 如果已经加载了一次default.yaml,第二次不会进入
        {
                auto data = LoadConfig(config_id);
                wp = data;

                return data;
        }
        return wp.lock();
}
所以在schema.cc Schema()中:
config_.reset(boost::starts_with(schema_id_, L".") ?
	Config::Require("config")->Create(schema_id.substr(1)) :
	 	Config::Require("schema")->Create(schema_id));
获取到的是根据"luna_pinyin"得到的ConfigData对象中的成员变量root中保存的是解析luna_pinyin.schema.yaml后的内容。在Schema::FetchUsefulConfigItems()函数中通过config_->GetString(“schema/name”, &schema_name_)进而调用ConfigData::Traverse()读取"schema/name"。所以Traverse()函数从root中可以获取luna_pinyin.schema.yaml中的内容。
schema:
  schema_id: luna_pinyin
  name: 朙月拼音
  version: "0.14.test"
- 获取方案列表,"schema_list"数据项在default.yaml文件中。
schema_list:
  - schema: luna_pinyin
  - schema: cangjie5

第五步
Rime.java文件中的init()函数执行完毕之后会执行prepareRime()函数。他们都在Config.java中的Config()函数中被调用。
/**
 * 很重要的方法,newOrReset() -> Config.get() -> Config()
 * newOrReset() -> Config.get() -> Config()
 * @param context
 */
public Config(@NonNull Context context) {
    self = this;
    assetManager = context.getAssets();
    themeName = getPrefs().getLooks().getSelectedTheme();
    prepareRime(context);
    deployTheme();
    init();
    prepareCLipBoardRule();
}
.yaml文件示例
# android_keys,symbols,when,property,action为map键值对
# name 为列表
android_keys:
  name: [VoidSymbol, SOFT_LEFT, SOFT_RIGHT, HOME, BACK, CALL, ENDCALL,
    exclam, quotedbl, dollar, percent, ampersand, colon, less, greater,
    question, asciicircum, underscore, braceleft, bar, braceright, asciitilde]
  symbols: 'ABCDEFGHIJKLMNOPQRSTUVWXYZ!"$%&:<>?^_{|}~'
  when:
    ascii: 西文標籤
    paging: 翻頁標籤
    swipe_down: 下滑
  property:
    width: 寬度
    height: 高度
    gap: 間隔
  action:
    command: 命令
    option: 參數
init() -> loadMap() -> config_get_map() -> _get_map() -> _get_value()
执行loadMap()的时候,已经将.yaml文件中的数据加载并解析完放入root变量了,config_get_map()中开始获取第一个数据项__build_info,此数据项不在.yaml文件中应该是c++程序中添加的。在_get_map()中获取map对象,键值对,交给_get_value()处理,如果是纯量(scalars):单个的、不可再分的值,则创建对象并返回。如果是map则调用_get_map(),在_get_map()中遍历每个数据项交给_get_value()处理,若又遇到map在继续调用_get_map()处理。遇到list同理,如此递归直到所有数据项处理完毕。

想把trime的界面改成简体,在设置界面找了一圈没找到能改成简体的设置方法。.yaml文件中也都是繁体没有简体数据项。
问题
- 全局搜索
user_config的时候在config_component.cc中看这样一段代码不明白啥意思。
const ResourceType UserConfigResourceProvider::kDefaultResourceType = {
    "user_config", "", ".yaml"};

ResourceResolver *UserConfigResourceProvider::CreateResourceResolver(
    const ResourceType &resource_type)
{
        LOG(INFO) << " ";
        return Service::instance().CreateUserSpecificResourceResolver(resource_type);
}
- 有一个问题,
tongwenfeng.trime.yaml,trime.yaml,default.yaml,luna_pinyin.schema.yaml这些文件读取出来都是放在同一个变量中吗?还是trime.yaml中的内容放在Engine对象里?luna_pinyin.schema.yaml中的内容放在Switcher对象中?问题已解决请看initSchema - Session,Engine,Context,Schema,Service,Ticket这些类各自之间有什么关系??
- 崩溃报错:
D/Config:   I am in deployTheme() config = tongwenfeng.trime.yaml
I/ rime.cc:
I/ rime.cc: --------- beginning of crash
A/libc: Fatal signal 11 (SIGSEGV), code 1 (SEGV_MAPERR),
			fault addr 0xd5 in tid 29411 (DefaultDispatch), pid 29331 (om.osfans.trime)
D/EGL_emulation: app_time_stats: avg=8.53ms min=1.99ms max=32.68ms count=60
D/EGL_emulation: app_time_stats: avg=5.11ms min=1.94ms max=30.59ms count=49
原因是%d错位:
__android_log_print(ANDROID_LOG_INFO,
" rime.cc", "deploy_config_file() file%s  %d,_name =行  version_key= %s,", s, s2, __LINE__);
改正:
__android_log_print(ANDROID_LOG_INFO,
" rime.cc", " %d行 deploy_config_file() file_name = %s, version_key= %s,", __LINE__, s, s2);
- 解决ResolvePath()中无法打印全路径问题。这个问题困扰了我很久。
在resource.cc文件中FallbackResourceResolver::ResolvePath(const string &resource_id)函数内一直想打印获得的文件路径到底是那个,代码如下:
boost::filesystem::path
FallbackResourceResolver::ResolvePath(const string &resource_id)
{
    auto default_path = ResourceResolver::ResolvePath(resource_id);
    // LOG(INFO) << "default_path = " << (default_path.filename().string()).c_str();
    // LOG(INFO) << "default_path = " << (default_path.filename().string());
    // LOG(INFO) << "default_path = " << (default_path.string());
    // __android_log_print(ANDROID_LOG_INFO, " resource.cc", " %d行 ResolvePath() default_path = %s,",
    //                 __LINE__, default_path.filename().string()); // 报错
    __android_log_print(ANDROID_LOG_INFO, " resource.cc", " %d行 ResolvePath() default_path = %s",
                    __LINE__, default_path.string().c_str());

    // LOG(INFO) << "default_path.relative_path() = " << default_path.relative_path();
    // __android_log_print(ANDROID_LOG_INFO, "resource.cc", "ResolvePath()  %d行, value = %d", __LINE__, value);
    // LOG(INFO) << "default_path = " << boost::filesystem::system_complete(default_path);
    // LOG(INFO) << "default_path.string() = " << default_path.string();
    // LOG(INFO) << "default_path.filename() = " << default_path.filename();

    if (!boost::filesystem::exists(default_path))
    {
        auto fallback_path = boost::filesystem::absolute(
            boost::filesystem::path(type_.prefix + resource_id + type_.suffix), fallback_root_path_);

        // LOG(INFO) << "fallback_path = " << boost::filesystem::system_complete(fallback_path);
        // LOG(INFO) << "fallback_path.filename() = " << (fallback_path.filename());
// __android_log_print(ANDROID_LOG_INFO, "resource.cc",
// "ResolvePath()  %d行, fallback_path = %s", __LINE__, fallback_path);
        if (boost::filesystem::exists(fallback_path))
        {
                return fallback_path;
        }
    }
    return default_path;
}
ResolvePath()函数返回的是全路径,用
LOG(INFO) << "default_path = " << (default_path.filename().string());
打印出来是:
68行 resource.cc ResolvePath() default_path = default.yaml
用
LOG(INFO) << "default_path = " << (default_path.string());
打印出来是:
69行 resource.cc ResolvePath() default_path = 1
试了其他很多办法都没法全路径打印出来,上面注释掉的打印语句基本不能用,最后用
__android_log_print(ANDROID_LOG_INFO, " resource.cc",
	" %d行 ResolvePath() default_path = %s", __LINE__, default_path.string().c_str());
打印出来是:
resource.cc: 73行 ResolvePath() default_path = /sdcard/rime/build/default.yaml
- 当我查看打印结果时出现了"__build_info"和"timestamps"这两个标签,明明原始文件中没有。
I/ FF:   78行  config_data.cc LoadFromFile() config file = default.yaml
I/ FF:   98行  config_data.cc LoadFromFile() loading the file_name_ = default.yaml
I/ FF:   508行  config_data.cc ConvertFromYaml() key = rime_version
I/ FF:   508行  config_data.cc ConvertFromYaml() key = default
I/ FF:   508行  config_data.cc ConvertFromYaml() key = default.custom
I/ FF:   508行  config_data.cc ConvertFromYaml() key = timestamps
I/ FF:   508行  config_data.cc ConvertFromYaml() key = __build_info
I/ FF:   508行  config_data.cc ConvertFromYaml() key = Control_L
I/ FF:   508行  config_data.cc ConvertFromYaml() key = Control_R
于是查看模拟器中的default.yaml文件,也有"__build_info"和"timestamps"这两个标签。我想应该是部署输入法时加入进去的吧。
emulator64_x86_64_arm64:/sdcard/rime/build $ cat default.yaml
__build_info:
  rime_version: 1.7.3
  timestamps:
    default: 1620664065
    default.custom: 1662284347
ascii_composer:
  switch_key:
    Control_L: noop
    Control_R: noop
    Shift_L: inline_ascii
    Shift_R: commit_text
config_version: 0.15.minimal
key_binder:
发现
- 要想获得二级标签
"hotkeys"前面必须有一级标签"switcher"
if (auto hotkeys = config->GetList("switcher/hotkeys")) // 要想获得二级标签"hotkeys"必须前面有一级标签"switcher"
{
        hotkeys_.clear();
        for (size_t i = 0; i < hotkeys->size(); ++i)
        {
                auto value = hotkeys->GetValueAt(i);

                if (!value)
                        continue;
                hotkeys_.push_back(KeyEvent(value->str()));
        }
}
app\src\main\assets\rime\tongwenfeng.trime.yaml和app\src\main\assets\rime\trime.yaml主要用于绘制软键盘按键界面,不属于rime项目属于trime项目。- 发现一个现象,
AsciiComposer,KeyBinder,Recognizer、PunctConfig、都有一个LoadConfig()函数。處理各類按鍵消息的組件一般都有这个函数ProcessKeyEvent()。 - 全局搜索Require(“config”)->Create(可以找到所有加载default.yaml文件的地方。
- 在模块文件core_module.cc、dict_module.cc、gears_module.cc中都是用rime_get_api()函数,只有在levers_module.cc中用rime_levers_get_api()函数。另外前三个文件中用宏
RIME_REGISTER_MODULE()只有在levers_module.cc中用宏RIME_REGISTER_CUSTOM_MODULE()。 - 所有继承类Translator的类,原本以为Translator没什么用,类名中都包含Translator。看来Segmentor、Formatter、Filter、Processor也都是如此。
11 个结果 - 11 文件

librime\sample\src\trivial_translator.h:
  22:         class TrivialTranslator : public Translator

librime\src\rime\gear\echo_translator.h:
  17:         class EchoTranslator : public Translator

librime\src\rime\gear\history_translator.h:
  17:         class HistoryTranslator : public Translator

librime\src\rime\gear\punctuator.h:
  70:         class PunctTranslator : public Translator

librime\src\rime\gear\reverse_lookup_translator.h:
  24:         class ReverseLookupTranslator : public Translator

librime\src\rime\gear\schema_list_translator.h:
  18:         class SchemaListTranslator : public Translator

librime\src\rime\gear\script_translator.h:
  31:         class ScriptTranslator : public Translator, public Memory, public TranslatorOptions

librime\src\rime\gear\switch_translator.h:
  17:         class SwitchTranslator : public Translator

librime\src\rime\gear\table_translator.h:
  29:         class TableTranslator : public Translator, public Memory, public TranslatorOptions

librime-charcode\src\codepoint_translator.h:
  17:         class CodepointTranslator : public Translator

librime-lua\src\lua_gears.h:
  70:         class LuaTranslator : public Translator
- rime中有4个最基本的类,分别是ModuleManager、PluginManager、Service、Registry这些类只有一个单例,通过单例模式生成。那么这些类之间有什么关系呢??
module.h中的成员变量和module.cc中的注册函数:
// module registry
using ModuleMap = map<string, RimeModule *>; // map容器
ModuleMap map_;

// 此函数只被rime_api.cc中的RimeRegisterModule()调用
void ModuleManager::Register(const string &name, RimeModule *module)
{
        map_[name] = module;
}
类ModuleManager、Registry中都有注册函数,一个用来注册模块一个用来注册部件。
类Deployer的理解
Deployer类是与部署相关的类,在rime_api.cc中有大量用到。Deployer类中有很多与目录相关的属性。
// 部署者; 部署人员; 部署工具; 部署器; 部署商;
class Deployer : public Messenger
{
    public:
        // read-only access after library initialization {
        string shared_data_dir;
        string user_data_dir;
        string prebuilt_data_dir;
        string staging_dir;
        string sync_dir;
        string user_id;
        string distribution_name;
        string distribution_code_name;
        string distribution_version;
        // }
		........
    private:
        std::queue<of<DeploymentTask>> pending_tasks_;
        std::mutex mutex_;

        // C++11中的std::future是一个模板类。std::future提供了一种用于访问异步操作结果的机制。
        // std::future所引用的共享状态不能与任何其它异步返回的对象共享
        std::future<void> work_;
        bool maintenance_mode_ = false;
};
rime_api.cc中只用到下列语句,因为Service对象是单例所以返回的Deployer对象也是唯一的。
Deployer &deployer(Service::instance().deployer());
获得Deployer对象是为了使用Deployer中的函数:
// 部署者; 部署人员; 部署工具; 部署器; 部署商;
class Deployer : public Messenger
{
    public:
		......
        bool RunTask(const string &task_name, TaskInitializer arg = TaskInitializer());
        bool ScheduleTask(const string &task_name, TaskInitializer arg = TaskInitializer());
        void ScheduleTask(an<DeploymentTask> task);
        an<DeploymentTask> NextTask();
        bool HasPendingTasks();

        bool Run();
        bool StartWork(bool maintenance_mode = false);
        bool StartMaintenance();
        bool IsWorking();
        bool IsMaintenanceMode();

        // the following two methods equally wait until all threads are
        // joined下面的两个方法同样会等到所有线程都加入
        void JoinWorkThread();
        void JoinMaintenanceThread();

        string user_data_sync_dir() const;
};
创建方案对象
default.yaml中有如下内容,这些内容将在schema.cc中的ForEachSchemaListEntry()函数中读取并在ParseSchemaListEntry()中解析,最后在匿名函数process_entry()将luna_pinyin读取出来赋给变量recent,再在CreateSchema()调用构造函数Schema(recent)创建luna_pinyin对象。
schema_list:
  - schema: luna_pinyin
  - schema: cangjie5
在创建luna_pinyin对象的过程从需要加载luna_pinyin.schema.yaml,在构造函数Schema(recent)中有如下代码:
Schema::Schema(const string &schema_id) : schema_id_(schema_id)
{
        config_.reset(boost::starts_with(schema_id_, L".") ?
                Config::Require("config")->Create(schema_id.substr(1)) : Config::Require("schema")->Create(schema_id));

        FetchUsefulConfigItems();
}
主要是调用config_component.cc中Create(),进而调用config_component.cc GetConfigData()。Require()中给出参数不同,就调用不同对象的create()函数。全局搜索")->Create(可以获得如下结果:
librime\src\rime\schema.cc:
  28:  config_.reset(Config::Require("config")->Create("default"));
  38   config_.reset(boost::starts_with(schema_id_, L".") ?
  39:  Config::Require("config")->Create(schema_id.substr(1)) : Config::Require("schema")->Create(schema_id));

librime\src\rime\switcher.cc:
  40:  user_config_.reset(Config::Require("user_config")->Create("user")); // config_component.cc Create()

librime\src\rime\gear\ascii_composer.cc:
  225:  the<Config> preset_config(Config::Require("config")->Create("default"));

librime\src\rime\lever\deployment_tasks.cc:
  109:  the<Config> user_config(Config::Require("user_config")->Create("user"));
  269:  the<Config> config(Config::Require("config")->Create("default"));
  363:  the<Config> user_config(Config::Require("user_config")->Create("user"));
  515:  config.reset(Config::Require("schema")->Create(schema_id));
  524:  the<Dictionary> dict(Dictionary::Require("dictionary")->Create({&schema, "translator"});
  668:  the<Config> config(Config::Require("config")->Create(file_name_)); // config_component.cc Create()
  677:  config.reset(Config::Require("config_builder")->Create(file_name_));
上面搜索到的结果中只有Config::Require("schema")->Create(schema_id)是调用了schema.cc文件中的Create()函数,其他都是直接调用config_component.cc中Create()。
因为ConfigComponent 继承自 ConfigComponentBase 继承自Config::Component继承自ComponentBase。ConfigComponentBase类的成员函数Create(const string &file_name)自然被ConfigComponent继承。而类ConfigComponent在应用程序加载时在rime_core_initialize()中创建,并通过Registry类的Register()函数注册到了Registry类的成员变量map_中。Config::Require("config")等形式利用Registry类的ComponentBase *Registry::Find(const string &name)函数从map_获取与字符串对应的对象。最后执行各自对象中的Create()函数。同理,Config::Require("schema")获取到是早以在rime_core_initialize()中注册好的SchemaComponent对象,并在SchemaComponent中重写了Create()函数。
至于为什么Require("schema")获取的是SchemaComponent对象却可以调用config_component.cc中Create()是因为在schema.cc文件中实现了SchemaComponent::Create()函数。并在Create()中调用了config_component.cc中Create()。
librime\src\rime\schema.cc
// 创建.default.schema方案对象
Config *SchemaComponent::Create(const string &schema_id)
{
        return config_component_->Create(schema_id + ".schema");
}
有个问题
GetConfigData()调用LoadConfig()调用ResolvePath(),在ResolvePath()中可以打印很多type_.name的值。为什么?
type_.name =user_config
type_.name =compiled_config
type_.name = table
type_.name = prism
type_.name =db
type_.name =$config_source_file
目前可以确定的是当执行Config::Require("config")时在ResolvePath()函数中打印出type_.name =compiled_config,执行Config::Require("user_config")时在ResolvePath()函数中打印出type_.name =user_config。
在config_component.cc中有:
const ResourceType DeployedConfigResourceProvider::kDefaultResourceType = {
     "compiled_config", "", ".yaml"};
const ResourceType UserConfigResourceProvider::kDefaultResourceType = {
     "user_config", "", ".yaml"};
因为在config_component.h中有:
template <class Loader, class ResourceProvider = ConfigResourceProvider>
ConfigComponent(const ResourceType &resource_type = ResourceProvider::kDefaultResourceType)
     : ConfigComponentBase(ResourceProvider::CreateResourceResolver(resource_type))
在core_module.cc的rime_core_initialize()中有:
auto config_loader = new ConfigComponent<ConfigLoader, DeployedConfigResourceProvider>;
r.Register("config", config_loader);
auto user_config =
	 new ConfigComponent<ConfigLoader, UserConfigResourceProvider>([](ConfigLoader *loader)
r.Register("user_config", user_config);
所以在core_module.cc文件的rime_core_initialize()中创建ConfigComponent类型的对象config_loader时DeployedConfigResourceProvider替换了ConfigResourceProvider,DeployedConfigResourceProvider::kDefaultResourceType 替换了resource_type,所以config_loader的type_ = {“compiled_config”, “”, “.yaml”}。
创建ConfigComponent类型的对象user_config时config_loader时UserConfigResourceProvider替换了ConfigResourceProvider,DeployedConfigResourceProvider::kDefaultResourceType 替换了resource_type,所以user_config的type_ = {“user_config”, “”, “.yaml”}。
各个类的包含关系
Ticket类包含
Engine *engine = nullptr;
Schema *schema = nullptr;
- Session,Engine,Context,Schema,Service,Ticket,Processor,Switcher这些类各自之间有什么关系??
在service.cc的Service::CreateSession()中调用构造函数Session::Session()创建会话,在构造函数Session::Session()中执行Engine::Create()创建一个Engine对象赋给Session类的成员变量engine_。在Engine::Create()中new一个Engine的子类ConcreteEngine。
Engine类有成员变量如下:
class Engine : public Messenger
{
......
protected:
        Engine();

        the<Schema> schema_;
        the<Context> context_;
        CommitSink sink_;
        Engine *active_engine_ = nullptr;
};
ConcreteEngine类有成员变量如下:
// empty vector of of<Processor>, empty vector of Processor智能指针
vector<of<Processor>> processors_;
vector<of<Segmentor>> segmentors_;
vector<of<Translator>> translators_;
vector<of<Filter>> filters_;
vector<of<Formatter>> formatters_;
vector<of<Processor>> post_processors_;
Context类有成员变量如下:
string input_;
size_t caret_pos_ = 0;
Composition composition_;
CommitHistory commit_history_;
map<string, bool> options_;
map<string, string> properties_;

Notifier commit_notifier_;
Notifier select_notifier_;
Notifier update_notifier_;
Notifier delete_notifier_;
OptionUpdateNotifier option_update_notifier_;
PropertyUpdateNotifier property_update_notifier_;
KeyEventNotifier unhandled_key_notifier_;
Schema类有成员变量如下:
string schema_id_;
string schema_name_;
the<Config> config_;

// frequently used config items常用配置项目
int page_size_ = 5;
bool page_down_cycle_ = false;
string select_keys_;
Processor很特别,Engine的子类ConcreteEngine有一个vector<of<Processor>> processors_成员变量,而Processor类中又有一个成员变量Engine *engine_。
至此清楚了:
- Service类有一个集合(map)类型的成员变量sessions_,根据key值存放Session对象。
- Session类有一个成员变量engine_,在CreateSession()中创建的Engine类的对象存入engine_中。
- Engine类有一个Schema类型成员变量和一个Context类型成员变量。
第六步、加载script_translator
从engin.cc中的InitializeComponents()出发,读取luna_pinyin.schema.yaml文件中的"engine/translators/script_translator"。
engine:
  processors:
......
  segmentors:
......
  translators:
    - punct_translator
    - reverse_lookup_translator
    - script_translator
    - table_translator@cangjie
    - script_translator@pinyin
  filters:
......
根据字符串"script_translator"获取对应的Component对象。
// 脚本翻译器,用于拼音等基于音节表的输入方案
r.Register("script_translator", new Component<ScriptTranslator>);
获得对应的Component对象以后,执行Component对象中的Create()函数,在Create()函数中执行new ScriptTranslator()
an<Translator> t(c->Create(ticket));
然后跳到ScriptTranslator()函数中,执行如下图:

下图是上图的补充

第七步 deployTheme()
- 字面意思,部署主题。在deployTheme()中循环执行deploy_config_file(),被两个地方调用。
Config() -> init() -> deploy_config_file()
Config() -> deployTheme() -> deploy_config_file() - 注意:operator[]是个函数。

第八步、编译词典


插入一个话题,格式化makelist.txt
vscode插件cmake-format无法在windwons上运行,对于windows用户,通过查阅cmake-format的官方文档后并没有找到其对windows系统的任何支持,但好在cmake-format是一个开源的项目,在github上的能找到其开源的项目代码,这一看才知道其没有windows的支持是不足为怪的,因为这个项目原生采用python编写的。既然源码都开源了,那就有办法了,查阅了其源码后发现只要把其封装成一个可供windows执行的可执行文件就可以了。
首先我们需要安装python,我这里安装的是python3.8,然后在python中安装pyinstaller包,这个包可以帮我们把python项目打包发布到windows上。然后在python中安装cmake-format包,同样我们也可以通过pip来安装,然后在python的包目录下我们可以找到安装好的cmake-format包,我这里的文件地址为D:\python-3.8\Lib\site-packages\cmake_format\,根据你的python安装位置会有所不同,之后我们将其用pyinstaller打包成exe就好了,这里直接打包是不行的,会遗漏很多模块。
安装pyinstaller包
PS E:\Python\Python310> pip install pyinstaller
安装cmake-format包
PS E:\Python\Python310\Lib\site-packages> pip install cmake_format
在cmd中执行,就能输出格式化的CMakeLists.txt。
E:\Python\Python310\Lib\site-packages>cmake-format D:\project\andriod\trime-develop\app\src\main\jni\librime\thirdparty\src\CMakeLists.txt -o CMakeLists.txt
加配置文件
E:\Python\Python310\Lib\site-packages>cmake-format D:\project\andriod\trime-develop\app\src\main\jni\librime\thirdparty\src\CMakeLists.txt --config-file formatting.py -o CMakeLists.txt
配置文件 formatting.py
# -----------------------------
# Options effecting formatting.
# -----------------------------
with section("format"):

  # How wide to allow formatted cmake files
  line_width =120

  # How many spaces to tab for indent
  tab_size = 8

  # If true, separate flow control names from their parentheses with a space
  separate_ctrl_name_with_space = False

  # If true, separate function names from parentheses with a space
  separate_fn_name_with_space = False

  # If a statement is wrapped to more than one line, than dangle the closing
  # parenthesis on its own line.
  dangle_parens = False
cmakeclang GitHub地址
格式化详细配置