Linux学习笔记
前言:本系列笔记的参考由 2021韩顺平 一周学会Linux 总结而成,希望能给学习Linux的同学一些帮助。也感谢韩老师录制的视频给我带来了非常巨大的收获!
目录:
- 韩顺平老师的Linux基础学习笔记 (上)
- 韩顺平老师的Linux基础学习笔记 (下)
1. CentOS 7.6 安装注意点
1.1 配置分区
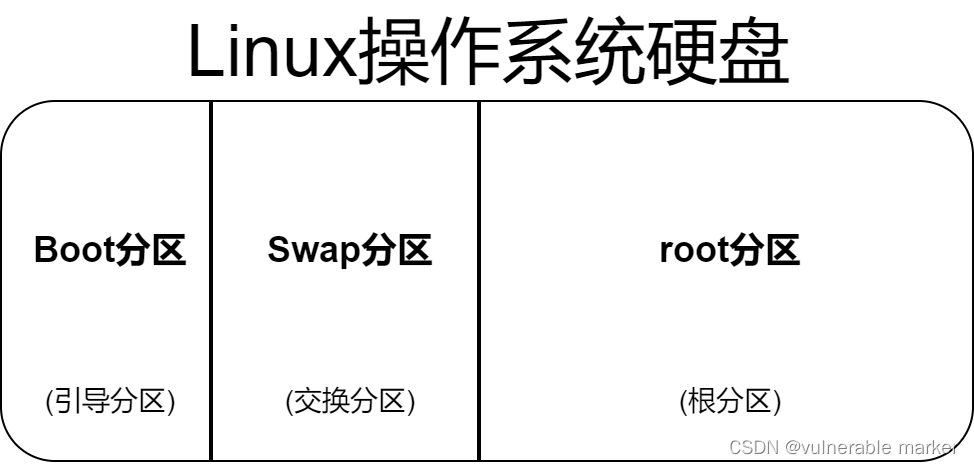
| 分区类型 | 一般大小 | 设备类型 | 文件系统 |
|---|---|---|---|
| Boot | 1GB | 标准分区 | ext4 |
| Swap | 2GB | 标准分区 | swap |
| Root | 分区后余下所有的空间 | 标准分区 | ext4 |
特别的,交换分区是为了使电脑运行多个程序而划分的区域。一旦内存中的进程结束,交换分区中的进程会立即载入内存运行
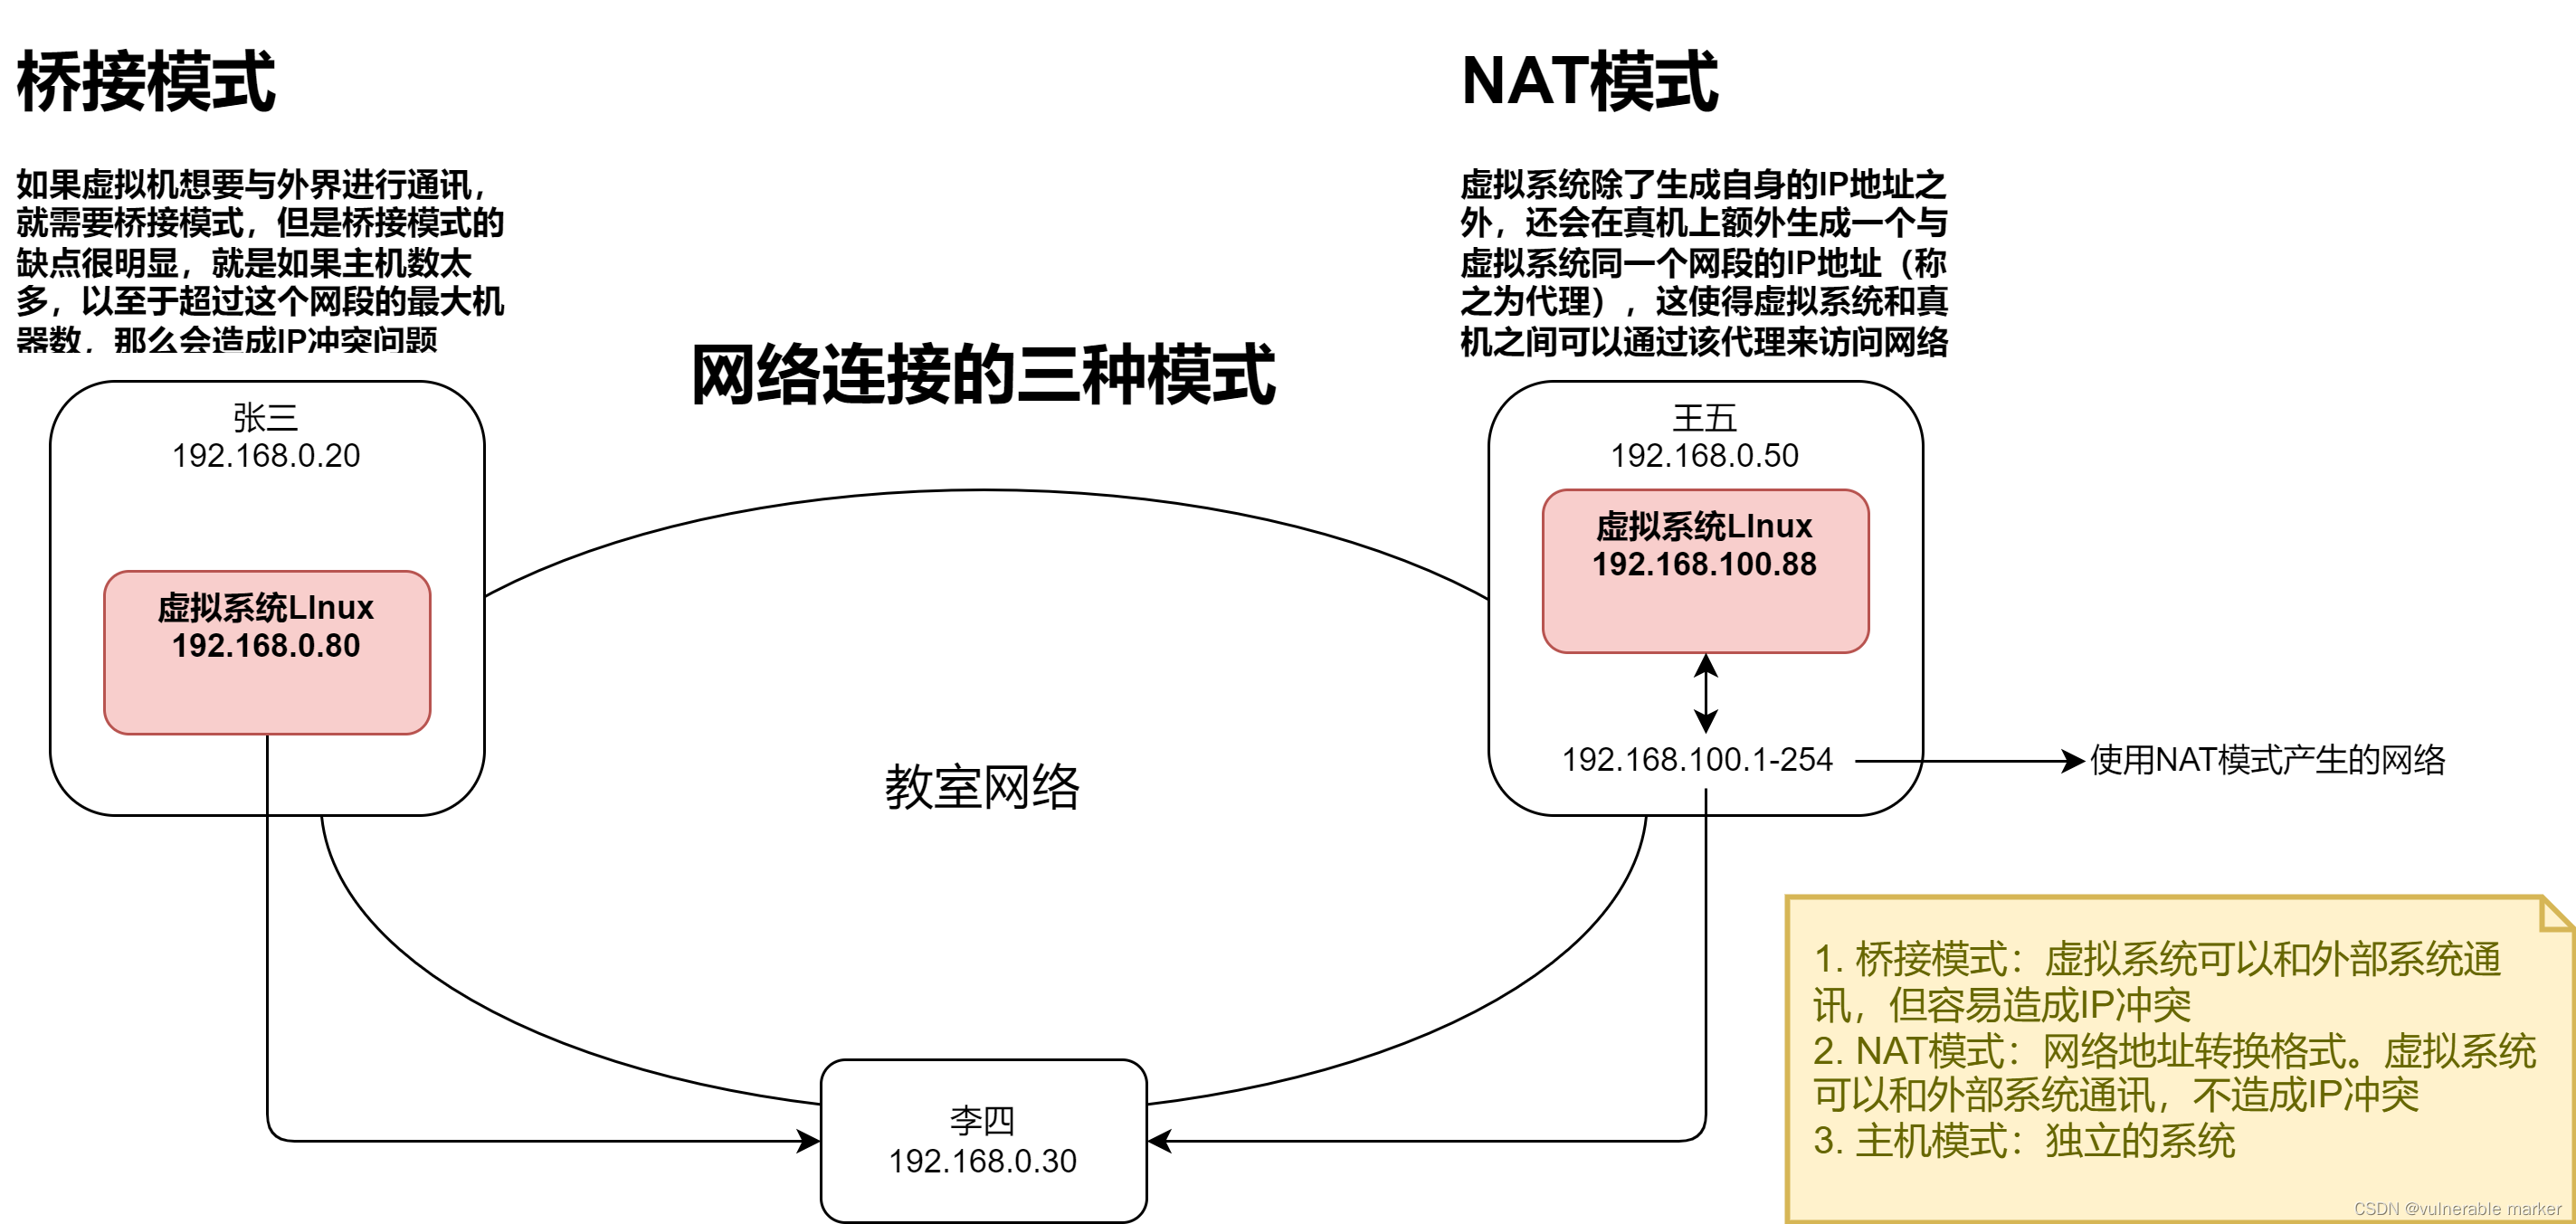
1.2 虚拟机的三种网络模式
2. VMware 功能介绍
2.1 VMTools
- 安装VMTools后,可以让我们在Windows下更好的管理vm虚拟机
- 可以设置Windows和CentOS的共享文件夹

安装步骤:
- 进入CentOS
- 点击VM菜单的 install vmware tools
- CentOS会出现一个VM的安装包,xx.tar.gz
- 拷贝到
/opt - 进入该VM解压的目录,
/opt目录下
tar -zxvf VMwareTools-10.3.23-16594550.tar.gz - 安装
./vmware-install.pl - 全部使用默认设置即可
注意:安装vmtools 需要有gcc,只需要在终端中输入 gcc -v
设置共享文件夹
- 在需要设置共享文件夹的虚拟机上点击右键
- 点击 设置 – 选项 – 共享文件夹 – 总是启用 – 添加共享文件夹目录 – 点击确定
怎么在Linux下读取共享文件?
- 点击主文件夹 – 其他位置 – 计算机 – mnt文件夹 – hgfs文件夹 – 当前的共享文件夹
3. Linux 的各项操作
3.1 Linux 目录结构
Linux 的文件系统是采用层级式的树状目录结构,在此结构中的最上层是 根目录 “/”,然后在此目录下再创建其他的目录

-
/bin 常用 (/usr/bin、/usr/local/bin)
是 Binary 的缩写,这个目录存放着最经常使用的命令 -
/sbin (/usr/sbin、/usr/local/sbin)
s就是Super User的意思,这里存放的是系统管理员使用的系统管理程序 -
/home 常用
存放普通用户的主目录,在Linux中每个用户都有一个自己的目录,一般该目录是以用户的账号命名 -
/root 常用
该目录为系统管理员,也称作超级权限者的用户主目录 -
/lib 系统开机所需要最基本的动态连接共享库,其作用类似于Windows里的DLL文件。几乎所有的应用程序都都需要用到这些共享库
-
/lost + found 这个目录一般情况下是空的,当系统非法关机后,这里就存放了一些文件
-
/etc 常用
所有的系统管理所需要的配置文件和子目录,比如安装 mysql 数据库 my.conf -
/usr 常用
这是一个非常重要的目录,用户的很多应用程序和文件都放在这个目录下,类似与Windows下的program files目录 -
/boot 常用
存放的是启动 Linux 时使用的一些核心文件,包括一些连接文件以及镜像文件 -
/proc [不能碰] 这个目录是一个虚拟目录,它是系统内存的映射,访问这个目录来获取系统信息
-
/srv [不能碰] service缩写,该目录存放一些服务启动之后需要提取的数据
-
/sys [不能碰] 这是Linux 2.6 内核的一个很大的变化。该目录下安装了2.6内核中新出现的一个文件系统 sysfs
-
/tmp 这个目录是用来存放一些临时文件的
-
/dev 类似于Windows的设备管理器,把所有的硬件用文件的形式存储
-
/media 常用
Linux 系统会自动识别一些设备,例如 U盘、光驱等等,当识别后,Linux会把识别的设备挂载到这个目录下 -
/mnt 常用
系统提供该目录是为了让用户临时挂载别的文件系统的,我们可以将外部的存储挂载到 /mnt 上,然后进入该目录就可以直接查看里面的内容了 -
/opt 这是给主机额外安装软件所存放的目录,如安装 ORACLE数据库就可以放到该目录下,默认为空
-
/usr/local 常用
这是另一个给主机额外安装软件所安装的目录。一般是通过编译源码的方式安装程序 -
/var 常用
这个目录中存放着在不断扩充着的东西,习惯将经常被修改的目录放在这个目录下,包括各种日志文件 -
/selinux [security-enhance linux]
SELinux 是一种安全子系统,他能控制程序只能访问特定文件,有三种工作模式,可以自行设置
3.2 Linux 实操-远程登录Linux服务器

场景:
- Linux服务器是开发小组共享
- 正式上线的项目是运行在公网
- 因此程序员需要远程登录到Linux进行项目管理或者开发
- 画出简单的 网络拓扑示意图
- 远程登录客户端有 Xshell6、Xftp6,我们学习使用Xshell和Xftp6,其他远程工具大同小异
3.2.1 如何使用Xshell远程登录
-
先在Linux服务器中查看服务器的IP地址
ifconfig -
获取到 CentOS 的IP地址后,在真机上打开命令提示符窗口使用ping命令看是否能ping通
-
ping通后,在Xshell新建会话属性,如下图所示设置名称和Linux主机的IP地址

-
配置完毕后点击确定,在左侧的会话管理器中双击刚才添加的Linux主机
此时窗口中会弹出选项,选择一次性接收(类似登录的不保存账号密码) 或 接受并保存(类似登录的记住账号密码)

3.3 Linux 实操-远程上传下载文件
是一个基于windows平台的功能强大的SFTP、FTP文件传输软件
使用了Xftp以后,Windows用户能安全地在UNIX/Linux和Windows PC之间传输文件
3.3.1 如何利用Xftp远程上传下载文件
-
先在Linux服务器中查看服务器的IP地址
ifconfig -
获取到 CentOS 的IP地址后,在真机上打开命令提示符窗口使用ping命令看是否能ping通
-
ping通后,在Xshell新建会话属性,如下图所示设置名称和Linux主机的IP地址

-
配置完毕后点击确定,在左侧的会话管理器中双击刚才添加的Linux主机
此时窗口中会弹出选项,选择一次性接收(类似登录的不保存账号密码) 或 接受并保存(类似登录的记住账号密码)
注意事项:Xftp 中文显示乱码问题
- 点击左上角的属性,点击选项,把编码调成UTF8即可

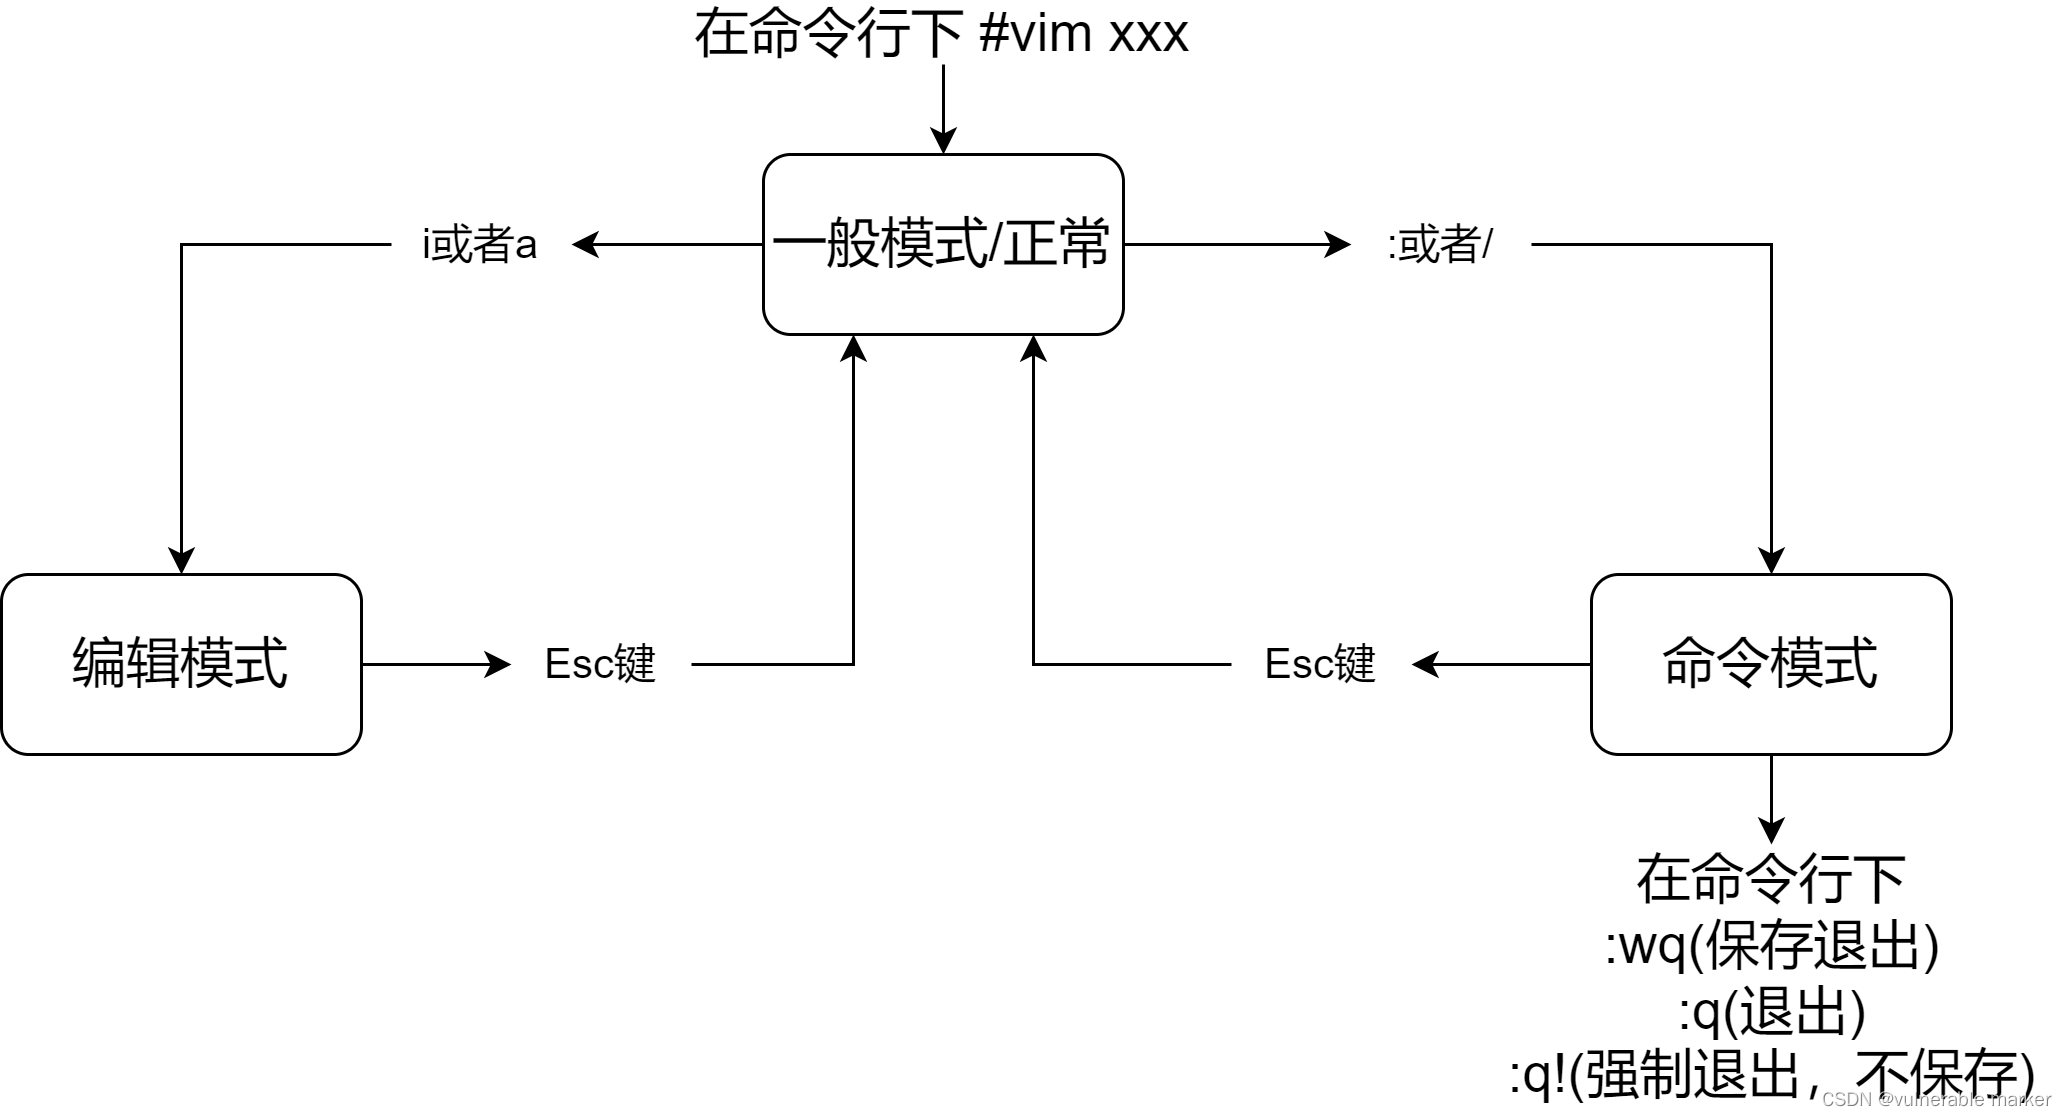
3.4 vi 和 vim 编辑器
Linux系统会内置vi文本编辑器
Vim具有程序编辑的能力,可以看做是Vi的增强版本,可以主动的以字体颜色辨别语法的正确性,方便程序设计。代码补全、编译及错误跳转等方便编程的功能特别丰富,在程序员中被广泛使用
3.4.1 vi和vim常用的3种模式
-
正常模式
以vim打开一个档案就直接进入一般模式了(这是默认的模式)
在这个模式中,你可以使用〖上下左右〗按键来移动光标,你可以使用〖删除字符」或〖删除整行〗来处理档案内容,也可以使用
〖复制、粘贴〗来处理你的文件数据 -
插入模式
按下i、I、o、O、a、A、r、R等任何一个字母之后才会进入编辑模式,一般来说按i即可 -
命令行模式
在这个模式当中,可以提供你相关指令,完成读取、存盘、替换、离开vim、显示行号等的动作则是在此模式中达成的
如何从插入模式进入到命令行模式?
- 先按键盘上的 Esc,然后再输入
:wq。wq的意思是写入并退出
3.4.2 vi和vim各种模式的切换
-
拷贝当前行,拷贝当前行向下的5行,井粘贴
一般模式下 拷贝当前行:yyp 拷贝当前行向下的5行:5yyp -
删除当前行dd,删除当前行向下的5行
一般模式下:dd 5dd -
在文件中查找某个单词
[在命令行下/关键字,回车查找,输入n就是查找下一个] 如 /Hello,按n就是查找下一个 -
设置文件的行号,取消文件的行号
[命令行下 显示行号:set nu 不显示行号:set nonu] -
编辑/etc/profile文件,在一般模式下,使用快捷键到该文档的最末行[G]最首行[gg]
一般模式下 定位到最末尾行G 定位到首行gg -
在一个文件中输入“hello“,在一般模式下,然后又撤销这个动作u
一般模式下 按u撤销操作 -
编辑/etc/profile文件,在一般模式下,井将光标移动到,输入20,再输入shift+g
一般模式下 20+shift+g 定位到第20行

4. Linux 命令实操
4.1 关机&重启
基本介绍:
| 命令 | 作用 |
|---|---|
| shutdown -h now | 立刻进行关机 |
| shutdown -h 1 | 1分钟后关机 |
| shutdown -r now | 现在重新启动计算机 |
| halt(停止) | 关机,和第一条是一样的 |
| reboot | 现在重新启动计算机 |
| sync | 把内存的数据同步到磁盘 |
注意:
- 不管是重启系统还闭系统,首先要运行sync命令,把内存中的数据写到磁盘中
- 目前的 shutdown/reboot/halt 等命令均已经在关机前进行了sync
4.2 用户登录&注销
基本介绍:
- 登录时尽量少用root帐号登录,因为它是系统管理员,最大的权限,避免操作失误。可以利用
普通用户登录,登录后再用 “su-用户名” 命令来切换成系统管理员身份 - 在提示符下输入 logout 即可注销用户
[sanx@SanxCentOS7 ~]$ su - root
密码:
上一次登录:五 10月  7 15:16:14 CST 2022:0 上
[root@SanxCentOS7 ~]# cd /root/
[root@SanxCentOS7 ~]# logout
[sanx@SanxCentOS7 ~]$
注意:
-
logout注销指令在图形运行级别无效,在运行级别3下有效

-
运行级别这个概念,后面给大家介绍
4.3 用户管理
Linux系统是一个多用户多任务的操作系统,任何一个要使用系统资源的用户,都必须首先向系统管理员申请一个账号,然后以这个账号的身份进入系统
1. 添加用户
基本语法:useradd 用户名
[root@SanxCentOS7 ~]# cd /
[root@SanxCentOS7 /]# ls
bin  boot  dev  etc  home  lib  lib64  lost+found  media  mnt  opt  proc  root  run  sbin  srv  sys  tmp  usr  var
[root@SanxCentOS7 /]# cd /home
[root@SanxCentOS7 home]# ls
sanx
[root@SanxCentOS7 home]# useradd Lihua
[root@SanxCentOS7 home]# ls
Lihua  sanx
注意点:
-
当创建用户成功后,会自动的创建和用户同名的家目录(默认目录在/home/xxx)
-
也可以通过
usereadd -d 指定目录 新的用户名,给新创建的用户指定家目录[root@SanxCentOS7 home]# useradd -d /home/test xiaohong [root@SanxCentOS7 home]# ls Lihua sanx test
2. 指定/修改密码
基本语法:passwd 用户名
⚠️注意:如果没有写用户名,那么默认的就是修改当前账户的密码
[root@SanxCentOS7 home]# passwd Lihua
更改用户 Lihua 的密码 。
新的 密码:
无效的密码: 密码少于 7 个字符
重新输入新的 密码:
passwd:所有的身份验证令牌已经成功更新。
[root@SanxCentOS7 home]#

这里少于7个字符也没关系,再输一遍密码就行了
补充:显示当前用户的所在目录命令是 pwd
[Lihua@SanxCentOS7 ~]$ pwd
/home/Lihua
3. 删除用户
基本语法:userdel 用户名
特别的:
- (推荐)
userdel 用户名这个命令并不会删除家目录,它是直接保留在家目录中的 userdel -r 用户名这个命令会直接删除家目录下这个用户的所有文件,谨慎执行
[root@SanxCentOS7 home]# userdel Lihua
[root@SanxCentOS7 home]# ls
Lihua  sanx  test
------------------------------------
[root@SanxCentOS7 ~]# cd /home
[root@SanxCentOS7 home]# ls
Lihua  sanx  test
[root@SanxCentOS7 home]# userdel -r Lihua
[root@SanxCentOS7 home]# ls
sanx  test
4. 查询用户信息指令
基本语法:id 用户名
[root@SanxCentOS7 home]# id root
uid=0(root) gid=0(root) 组=0(root)
[root@SanxCentOS7 home]# id xiaohong
uid=1002(xiaohong) gid=1002(xiaohong) 组=1002(xiaohong)
[root@SanxCentOS7 home]# id Lihua
id: Lihua: no such user
5. 切换用户
在操作Linux中,如果当前用户的权限不够,可以通过 su - 指令,切换到高权限用户,比如root
基本语法:su - 切换用户名
--------创建一个叫ben的用户---------
[root@SanxCentOS7 home]# useradd ben
[root@SanxCentOS7 home]# passwd ben
更改用户 ben 的密码 。
新的 密码:
无效的密码: 密码少于 8 个字符
重新输入新的 密码:
passwd:所有的身份验证令牌已经成功更新。

-----由root用户切换至普通用户-----
[root@SanxCentOS7 home]# su - ben

-----由普通用户切换到root用户-----
[ben@SanxCentOS7 ~]$ su - root
密码:
上一次登录:五 10月  7 15:44:34 CST 2022从 192.168.174.1pts/1 上

-----由root用户注销至普通用户-----
[root@SanxCentOS7 ~]# logout

-----由普通用户注销至退出系统-----
[ben@SanxCentOS7 ~]$ exit
登出
[root@SanxCentOS7 home]# logout

Connection closed.

Disconnected from remote host(192.168.174.129[CentOS7_1]) at 15:58:29.

Type `help' to learn how to use Xshell prompt.
[C:\~]$
注意:
- 从权限高的用户切换到权限低的用户,不需要输入密码,反之需要
- 当需要返回到原来用户时,使用 exit/logout 指令
6. 查看当前用户/登录用户
基本语法:whoami / who am i
[root@SanxCentOS7 ~]# who am i
root     pts/1        2022-10-07 16:03 (xxx.xxx.xxx.1)
[root@SanxCentOS7 ~]# whoami
root
7. 用户组
类似与角色,系统可以对有 共性/权限 的多个用户进行统一的管理
新增组:groupadd 组名
删除组:groupdel 组名
增加用户是直接加上组:useradd -g 用户组 用户名
特别的,如果添加一个用户而没有指定组,那么系统会自动把该用户添加到与该用户同名的组里
[root@SanxCentOS7 ~]# groupadd qingshi
[root@SanxCentOS7 ~]# groupdel qingshi
[root@SanxCentOS7 ~]# groupadd qingshi
[root@SanxCentOS7 ~]# useradd -g qingshi liuwendi
[root@SanxCentOS7 ~]# id liuwendi
uid=1004(liuwendi) gid=1004(qingshi) 组=1004(qingshi)
修改用户的组:usermod -g 新用户组 用户名
[root@SanxCentOS7 ~]# id liuwendi
uid=1004(liuwendi) gid=1004(qingshi) 组=1004(qingshi)
--------------------
[root@SanxCentOS7 ~]# groupadd daibiao
[root@SanxCentOS7 ~]# usermod -g daibiao liuwendi
[root@SanxCentOS7 ~]# id liuwendi
uid=1004(liuwendi) gid=1005(daibiao) 组=1005(daibiao)
用户和组相关的文件
-
/etc/passwd 文件
用户(user)的配置文件,记录用户的各种信息
每行的含义:用户名:口令:用户标识号:组标识号:注释性描述:主目录:登录Shell

-
/etc/shadow 文件
口令的配置文件
每行的含义:登录名:加密口令:最后一次修改时间:最小时间间隔:最大时间间隔:警告时间:不活动时间:失效时间:标志

-
/etc/group 文件
组 (group) 的配置文件,记录 Linux 包含的组信息
每行的含义:组名:口令:组标识号:组内用户列表

5. Linux 实用指令
5.1 指定运行级别
运行级别说明
0:关机
1:单用户〖找回丢失密码〗
2:多用户状态没有网络服务
3:多用户状态有网络服务
4:系统未使用保留给用户
5:图形界面(默认)
6:系统重启
常用运行级别是3和5,也可以指定默认运行级别,后面演示
命令:init[0123456]应用案例:通过init来切换不同的运行级别,比如动5-3,然后关机
指定默认运行级别
在CentOS7以前,在etc/inittab 文件中
之后进行了简化,如下:
multi-user.target:analogous to runlevel 3
graphical.target:analogous to runlevel 5
当前的默认运行级别:systemctl get default
设置默认的运行级别:systemctl set-default TARGET.target
-----将默认运行改为多用户有网络模式-----
[root@SanxCentOS7 ~]# systemctl get-default
graphical.target
[root@SanxCentOS7 ~]# systemctl set-default multi-user.target
Removed symlink /etc/systemd/system/default.target.
Created symlink from /etc/systemd/system/default.target to /usr/lib/systemd/system/multi-user.target.
-----------------------------------

---再改回来---
[root@SanxCentOS7 ~]# systemctl get-default
multi-user.target
[root@SanxCentOS7 ~]# reboot
5.2 找回 root 密码
步骤:
-
在开机界面输入e
-
进入编辑界面,使用键盘上的上下键把光标往下移动,找到以""Linux16”开头内容所在的行数”,在行的最后面输入:init=/bin/sh

-
接着,输入完成后,直接按快捷键 Ctrl+x 进入单用户模式

-
接着,在光标闪烁的位置中输入:
mount -o remount,rw /(注意:各个单词间有空格)完成后按键盘的回车键(Enter)

-
在新的一行最后面输入:passwd,完成后按键盘的回车键(Enter)输入密码,然后再次确认密码即可密码修改成功后,会显示passwd…的样式,说明密码修改成功

-
接着,在鼠标闪烁的位置中(最后一行中)输入:
touch /.autorelabel(注意:touch后面有一个空格)
完成后按键盘的回车键(Enter)

-
继续在光标闪烁的位置中,输入:exec /sbm/mit(注意:exec后面有一个空格),完成后按键盘的回车键 (Enter),等待系统自动修改密码,完成后,系统会自动重启:新的密码生效了

5.3 帮助指令
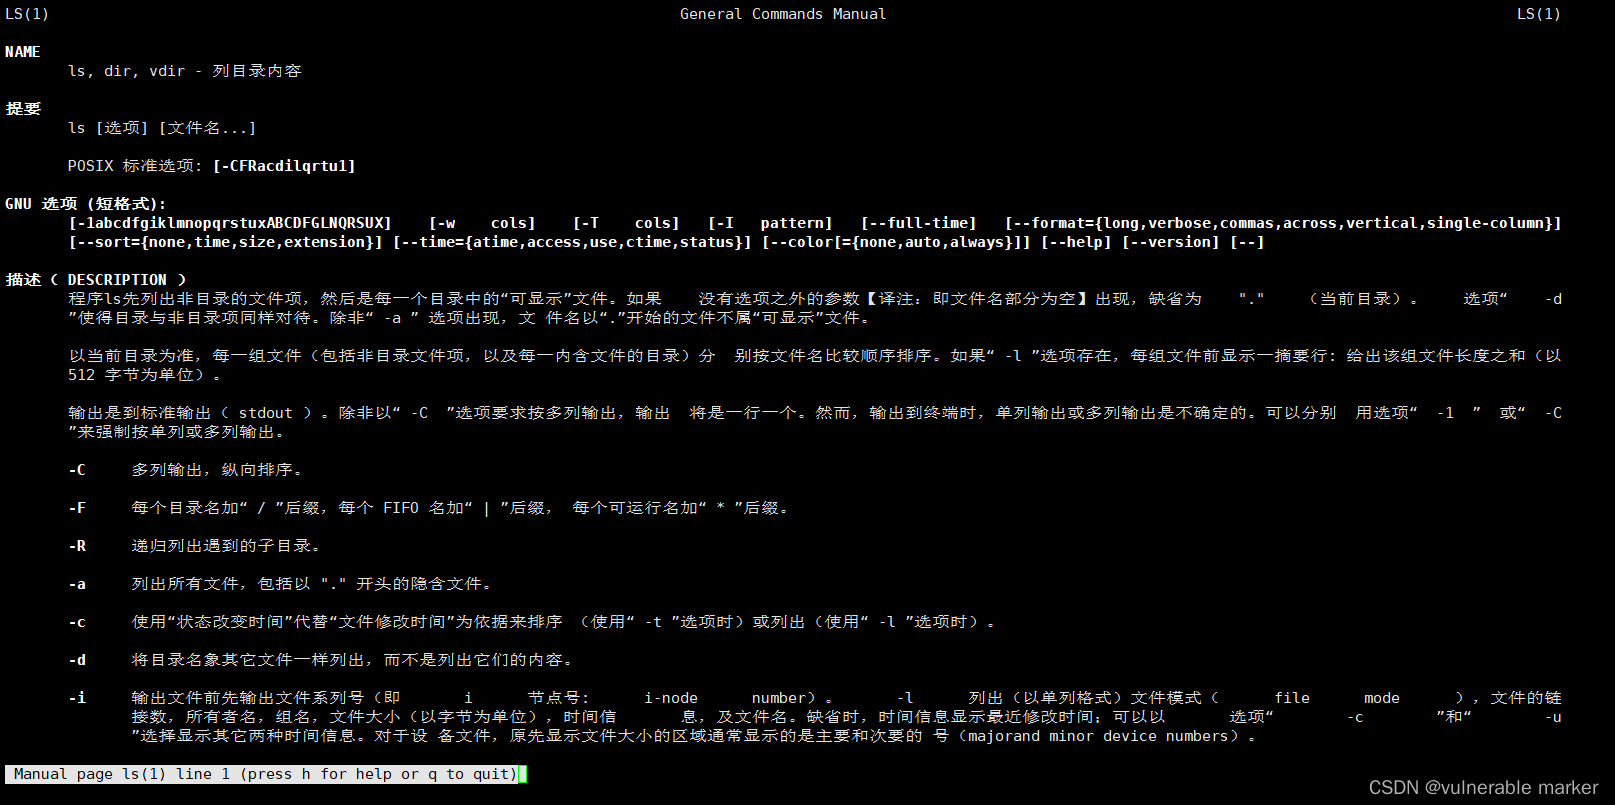
- man 获得帮助信息
基本语法:man [命令或配置文件](功能描述:获得帮助信息)
Linux下,隐藏文件是以
.开头的文件。选项可以组合使用,比如:ls -la
- help 指令
基本语法:help 命令(功能描述:获得shell内置命令的帮助信息)

5.4 文件目录类
pwd 指令
基本语法:pwd(功能描述:显示当前工作目录的绝对路径)
[root@SanxCentOS7 ~]# cd /home
[root@SanxCentOS7 home]# ls
ben  liuwendi  sanx  test
[root@SanxCentOS7 home]# cd ben/
[root@SanxCentOS7 ben]# vim a.txt
[root@SanxCentOS7 ben]# pwd
/home/ben
ls 指令
基本语法:ls [选项] [目录或是文件]
常用选项:
-a:显示当前所有的文件和目录,包括隐藏的
-l:以列表的方式来显示信息
-lh:按照人类的理解来显示该目录下文件的详细信息
cd 指令
基本语法:cd [参数](功能性描述:切换到指定目录)
理解:绝对路径和相对路径
cd ~ 或者 cd: 回到自己的家目录
[root@SanxCentOS7 ben]# whoami
root
[root@SanxCentOS7 ben]# cd ~
[root@SanxCentOS7 ~]# pwd
/root
[root@SanxCentOS7 ~]# su - ben
上一次登录:五 10月  7 15:57:24 CST 2022pts/1 上
[ben@SanxCentOS7 ~]$ cd ~
[ben@SanxCentOS7 ~]$ pwd
/home/ben
---------------------------
[root@SanxCentOS7 ~]# cd /home/ben
[root@SanxCentOS7 ben]# pwd
/home/ben
[root@SanxCentOS7 ben]# cd ..
[root@SanxCentOS7 home]# pwd
/home
[root@SanxCentOS7 home]# cd ..
[root@SanxCentOS7 /]# pwd
/
mkdir 指令
mkdir 指令用于创建目录
基本语法:mkdir [选项] 要创建的目录
常用选项
-p:创建多级目录
-----创建单个目录-----
[root@SanxCentOS7 ~]# mkdir /home/dog
[root@SanxCentOS7 ~]# cd /home
[root@SanxCentOS7 home]# ls
ben  dog  liuwendi  sanx  test

-----尝试创建多级目录-----
[root@SanxCentOS7 home]# mkdir /home/animal/tiger
mkdir: 无法创建目录"/home/animal/dog": 没有那个文件或目录

-----正确的创建多级目录的方法-----
[root@SanxCentOS7 home]# mkdir -p /home/animal/tiger
[root@SanxCentOS7 home]# ls
animal  ben  dog  liuwendi  sanx  test
[root@SanxCentOS7 home]# cd animal/
[root@SanxCentOS7 animal]# ls
tiger
rmdir 指令
rmdir 指令删除空目录
基本语法:rmdir [选项] 要删除的空目录
注意事项:
rmdir删除的是空目录,如果目录下有内容时是无法删除的- 如果需要删除非空目录,需要使用
rm -rf 要删除的目录
-----原本的目录结构-----
[root@SanxCentOS7 home]# ls
animal  ben  dog  liuwendi  sanx  test

-----删除一个目录-----
[root@SanxCentOS7 home]# rmdir /home/dog
[root@SanxCentOS7 home]# ls
animal  ben  liuwendi  sanx  test

-----删除多个目录-----
[root@SanxCentOS7 home]# rmdir /home/animal/
rmdir: 删除 "/home/animal/" 失败: 目录非空
[root@SanxCentOS7 home]# rm -rf /home/animal/
[root@SanxCentOS7 home]# ls
ben  liuwendi  sanx  test
touch 指令
touch 指令创建空文件
基本语法:touch 文件名称
[root@SanxCentOS7 home]# ls
ben  liuwendi  sanx  test
[root@SanxCentOS7 home]# touch hello.txt
[root@SanxCentOS7 home]# ls
ben  hello.txt  liuwendi  sanx  test
cp 指令
cp 指令拷贝文件到指定目录
基本语法:cp [选项] source(需要拷贝的目标文件) dest(拷贝文件粘贴的目的目录)
常用选项
-r:递归复制整个文件夹
注意事项:
- 强制覆盖不提示的方法:
\cp
-----案例1:将/home/hello.txt 拷贝到 /home/bbb/hello.txt-----
[root@SanxCentOS7 home]# mkdir /home/bbb
[root@SanxCentOS7 home]# ls
bbb  ben  hello.txt  liuwendi  sanx  test
[root@SanxCentOS7 home]# cp hello.txt bbb/
[root@SanxCentOS7 home]# ls
bbb  ben  hello.txt  liuwendi  sanx  test
[root@SanxCentOS7 home]# cd bbb/
[root@SanxCentOS7 bbb]# ls
hello.txt

-----案例2:递归复制整个文件夹 将/home/bbb整个目录,拷贝到/opt下-----
[root@SanxCentOS7 bbb]# touch hello2.txt
[root@SanxCentOS7 bbb]# ls
hello2.txt  hello.txt
[root@SanxCentOS7 bbb]# cd /home
[root@SanxCentOS7 home]# cp -r /home/bbb /opt/
bbb  ben  hello.txt  liuwendi  sanx  test
[root@SanxCentOS7 home]# cd /opt/
[root@SanxCentOS7 opt]# ls
bbb  rh
[root@SanxCentOS7 opt]# cd bbb/
[root@SanxCentOS7 bbb]# ls
hello2.txt  hello.txt
[root@SanxCentOS7 bbb]# pwd
/opt/bbb

-----强制覆盖文件且不提示,普通指令过于繁琐,需要询问每一个文件是否需要覆盖-----
[root@SanxCentOS7 bbb]# cp -r /home/bbb /opt/
cp:是否覆盖"/opt/bbb/hello.txt"? y
cp:是否覆盖"/opt/bbb/hello2.txt"? y
加入 "\" 后 就直接覆盖不会再询问了
[root@SanxCentOS7 bbb]# \cp -r /home/bbb /opt/
rm 指令
rm 指令移除文件或目录
基本语法:rm [选项] 要删除的文件或目录
一般 rm 指令后跟的是绝对路径,如果要删除的文件或目录就在当前的工作目录,那么可以直接写文件的名字删除
常用选项
-r:递归删除整个文件夹
-f:强制删除不提示
注意事项:
- 强制删除不提示的方法:带上
-f参数即可
-----案例1:将/home/hello.txt删除-----
[root@SanxCentOS7 home]# cp hello.txt bbb/
[root@SanxCentOS7 home]# ls
bbb  ben  hello.txt  liuwendi  sanx  test

[root@SanxCentOS7 home]# rm hello.txt
rm:是否删除普通空文件 "hello.txt"?y

-----案例2:递归 删除整个文件夹/home/bbb-----
[root@SanxCentOS7 home]# rm -rf bbb/
[root@SanxCentOS7 home]# ls
ben  liuwendi  sanx  test
mv 指令
mv 移动文件与目录或重命名
基本语法:
mv oldNameFile newNameFile(功能描述:重命名)mv /temp/movefile/targetFolder(功能描述:移动文件)
-----案例1:将/home/cat.txt文件重新命名为pig.txt-----
[root@SanxCentOS7 home]# touch cat.txt
[root@SanxCentOS7 home]# ls
ben  cat.txt  sanx  test
[root@SanxCentOS7 home]# mv cat.txt pig.txt
[root@SanxCentOS7 home]# ls
ben  pig.txt  sanx  test

-----案例2:将/home/pig.txt文件移动到/root目录下-----
[root@SanxCentOS7 home]# mv /home/pig.txt /root
[root@SanxCentOS7 home]# ls
ben  sanx  test
[root@SanxCentOS7 home]# cd /root/
[root@SanxCentOS7 ~]# ls
anaconda-ks.cfg  Hello.java  initial-setup-ks.cfg  pig.txt  公共  模板  视频  图片  文档  下载  音乐  桌面

特别的,如果 命令为 # mv /home/pig.txt /root/cow.txt
那么,就是 移动并且重命名

-----案例3:移动整个目录-----
[root@SanxCentOS7 opt]# mv bbb/ /home/
[root@SanxCentOS7 opt]# ls
rh
[root@SanxCentOS7 opt]# cd /home/
[root@SanxCentOS7 home]# ls
bbb  ben  sanx  test
[root@SanxCentOS7 home]# cd bbb/
[root@SanxCentOS7 bbb]# ls
hello2.txt  hello.txt
cat 指令
cat 查看文件内容
基本语法:cat [选项] 要查看的文件
常用选项
-n:显示行号
注意事项:
- cat 只能浏览文件,而不能修改文件,为了浏览方便,一般会带上 管道命令
|more
[root@SanxCentOS7 bbb]# cat -n  /etc/profile
# /etc/profile

# System wide environment and startup programs, for login setup
# Functions and aliases go in /etc/bashrc

# It's NOT a good idea to change this file unless you know what you
# are doing. It's much better to create a custom.sh shell script in
# /etc/profile.d/ to make custom changes to your environment, as this
# will prevent the need for merging in future updates.

pathmunge () {
    case ":${PATH}:" in
        *:"$1":*)
            ;;
        *)
            if [ "$2" = "after" ] ; then
                PATH=$PATH:$1
            else
                PATH=$1:$PATH
            fi
    esac
}
......more......
more 指令
more 指令是一个基于 VI 编辑器的文本过滤器,它以全屏幕的方式按页显示文本文件的内容。more指令中内置了若干快捷键
基本语法:more 要查看的文件
| 操作 | 功能说明 |
|---|---|
| 空白键(space) | 代表向下翻一页 |
| Enter | 代表向下翻 一行 |
| q | 代表立刻离开more,不再显示该文件内容 |
| Ctrl+F | 向下滚动一屏 |
| Ctrl+B | 返回上一屏 |
| = | 输出当前行的行号 |
| :f | 输出文件名和当前行的行号 |
-----案例:采用more查看文件 /etc/profile-----
more /etc/profile
less 指令
less 指令用来分屏查看文件内容,它的功能与more指令类似,但是比more指令更加强大,支持各种显示终端。less 指令在显示文件内容时,并不是一次将整个文件加载之后才显示,而是根据显示需要加载内容,对于显示大型文件具有较高的效率
基本语法:less 要查看的文件
| 操作 | 功能说明 |
|---|---|
| 空白键 | 向下翻动一页 |
| pagedown | 向下翻动一页 |
| pageup | 向上翻动一页 |
| /字串 | 向下搜寻 字串 的功能;n:向下查找;N:向上查找 |
| ?字串 | 向上搜寻 字串 的功能;n:向下查找;N:向上查找 |
| q | 离开 less 这个程序 |
less xxx.txt
echo 指令
echo 输出内容到控制台
基本语法:echo [选项] [输出内容]
注意事项:
- 在输出内容中不能添加感叹号,不然会识别错误
- 在
echo 命令下输出内容尽量使用单引号或者不使用符号

-----案例1:输出环境变量-----
[root@SanxCentOS7 ~]# echo $HOSTNAME
SanxCentOS7

-----案例2:输出内容-----
[root@SanxCentOS7 ~]# echo "hello,world"
hello,world

[root@SanxCentOS7 ~]# echo "hello,world!"
-bash: !": event not found

[root@SanxCentOS7 ~]# echo hello,world
hello,world
[root@SanxCentOS7 ~]# echo hello,world!
hello,world!
[root@SanxCentOS7 ~]# echo 'hello,world!'
hello,world!
head 指令
head用于显示文件的开头部分内容,默认情况下head指令显示文件的前10行内容
基本语法:
head 文件(功能描述:查看文件头10行内容)head -n 5 文件(功能描述:查看文件头5行内容,5可以是任意数)
[root@SanxCentOS7 ~]# head -n 5  /etc/profile
# /etc/profile

# System wide environment and startup programs, for login setup
# Functions and aliases go in /etc/bashrc
tail 指令
tail 用于输出文件中尾部的内容,默认情况下tail指令显示文件的前10行内容
基本语法:
tail 文件(功能描述:查看文件尾10行内容)tail -n 5 文件(功能描述:查看文件尾5行内容,5可以是任意行数)tail -f 文件(功能描述:实时追踪该文档的所有更新)
退出追踪需要使用 Ctrl + C

-----案例1:查看文件尾部内容(默认10行)-----
[root@SanxCentOS7 ~]# tail /etc/profile
        if [ "${-#*i}" != "$-" ]; then
            . "$i"
        else
            . "$i" >/dev/null
        fi
    fi
done

unset i
unset -f pathmunge

-----案例2:查看文件尾部5行的内容-----
[root@SanxCentOS7 ~]# tail -n 5  /etc/profile
    fi
done

unset i
unset -f pathmunge

-----案例3:实时追踪文件变化-----
[root@SanxCentOS7 ~]# cd /home
[root@SanxCentOS7 home]# touch mydate.txt
[root@SanxCentOS7 home]# ls
bbb  ben  mydate.txt  sanx  test
[root@SanxCentOS7 home]# tail -f mydate.txt
hello
命令详解:echo 'hello' > /home/mydate.txt
将 内容 hello 写入到文件 /home/mydate.txt 中,并在终端显示输入的内容
> 指令 和 >> 指令
> 输出重定向 和 >> 追加
简单理解就是 > 作用是覆盖 而 >> 作用是追加
基本语法:
ls -l > 文件(功能描述:列表的内容写入文件中 这里是覆盖写)
如果没有该文件,那么系统会自动创建一个文件ls -al > 文件(功能描述:列表的内容追加到文件的末尾)cat 文件1 > 文件2(功能描述:将文件1的内容覆盖到文件2)echo '内容' >> 文件(功能描述:将文件1的内容覆盖到文件2)
-----案例1:将 /home 目录下的文件列表写入到 /home/info.txt文件中-----
[root@SanxCentOS7 home]# ls -l /home/
drwxr-xr-x. 2 root     root     4096 10月  8 16:15 bbb
drwx------. 5 ben      ben      4096 10月  7 20:41 ben
-rw-r--r--. 1 root     root        6 10月  9 15:06 mydate.txt
drwx------. 5 sanx     sanx     4096 10月  7 15:24 sanx
drwx------. 3 xiaohong xiaohong 4096 10月  7 15:33 test

-----系统自动创建一个叫 info.txt 的文件-----
[root@SanxCentOS7 home]# ls -l /home/ > /home/info.txt
[root@SanxCentOS7 home]# ls -l
drwxr-xr-x. 2 root     root     4096 10月  8 16:15 bbb
drwx------. 5 ben      ben      4096 10月  7 20:41 ben
-rw-r--r--. 1 root     root      363 10月  9 15:30 info.txt
-rw-r--r--. 1 root     root        6 10月  9 15:06 mydate.txt
drwx------. 5 sanx     sanx     4096 10月  7 15:24 sanx
drwx------. 3 xiaohong xiaohong 4096 10月  7 15:33 test
[root@SanxCentOS7 home]# cat info.txt
drwxr-xr-x. 2 root     root     4096 10月  8 16:15 bbb
drwx------. 5 ben      ben      4096 10月  7 20:41 ben
-rw-r--r--. 1 root     root        0 10月  9 15:30 info.txt
-rw-r--r--. 1 root     root        6 10月  9 15:06 mydate.txt
drwx------. 5 sanx     sanx     4096 10月  7 15:24 sanx
drwx------. 3 xiaohong xiaohong 4096 10月  7 15:33 test

-----证明了 >指令 是覆盖写的-----
[root@SanxCentOS7 home]# echo 'ok' > info.txt
[root@SanxCentOS7 home]# cat info.txt
ok

-----将日期信息写入到文件中-----
[root@SanxCentOS7 home]# cal
      十月 2022
日 一 二 三 四 五 六
                   1
 2  3  4  5  6  7  8
 9 10 11 12 13 14 15
16 17 18 19 20 21 22
23 24 25 26 27 28 29
30 31

-----可以看到是自动创建的文件-----
[root@SanxCentOS7 home]# cal >> /home/mycal
[root@SanxCentOS7 home]# ls
bbb  ben  info.txt  mycal  mydate.txt  sanx  test
[root@SanxCentOS7 home]# cat mycal
      十月 2022
日 一 二 三 四 五 六
                   1
 2  3  4  5  6  7  8
 9 10 11 12 13 14 15
16 17 18 19 20 21 22
23 24 25 26 27 28 29
30 31

-----可以看到 >>指令 是追加进行的-----
[root@SanxCentOS7 home]# cal >> /home/mycal
[root@SanxCentOS7 home]# cat mycal
      十月 2022
日 一 二 三 四 五 六
                   1
 2  3  4  5  6  7  8
 9 10 11 12 13 14 15
16 17 18 19 20 21 22
23 24 25 26 27 28 29
30 31
      十月 2022
日 一 二 三 四 五 六
                   1
 2  3  4  5  6  7  8
 9 10 11 12 13 14 15
16 17 18 19 20 21 22
23 24 25 26 27 28 29
30 31

-----案例2:将/etc/profile 下的文件覆盖到 /home/myprofile下------
[root@SanxCentOS7 home]# cat /etc/profile >> /home/myprofile
[root@SanxCentOS7 home]# ls
bbb  ben  info.txt  mycal  mydate.txt  myprofile  sanx  test
ln 指令
软链接也称为符号链接,类似于 Windows 里的快捷方式,主要存放了链接其他文件的路径
基本语法:ln -s [原文件或目录] [软链接名](功能描述:给原文件创建一个软链接)
注意事项:
- 当我们使用
pwd指令 查看目录时,任然看到的是软链接所在的目录
------案例1:在 /home 下创建一个软连接到 /root-----
[root@SanxCentOS7 home]# ln -s /root/ /home/myroot
[root@SanxCentOS7 home]# ls
bbb  ben  info.txt  mycal  mydate.txt  myprofile  myroot  sanx  test
[root@SanxCentOS7 home]# ls -l
drwxr-xr-x. 2 root     root     4096 10月  8 16:15 bbb
drwx------. 5 ben      ben      4096 10月  7 20:41 ben
-rw-r--r--. 1 root     root        3 10月  9 15:31 info.txt
-rw-r--r--. 1 root     root      324 10月  9 15:36 mycal
-rw-r--r--. 1 root     root        6 10月  9 15:06 mydate.txt
-rw-r--r--. 1 root     root     1819 10月  9 15:38 myprofile
lrwxrwxrwx. 1 root     root        6 10月  9 16:36 myroot -> /root/  # 这个就是软链接的指向文件
drwx------. 5 sanx     sanx     4096 10月  7 15:24 sanx
drwx------. 3 xiaohong xiaohong 4096 10月  7 15:33 test

-----ls查看文件目录下的文件,发现都是/root下的文件-----
[root@SanxCentOS7 home]# cd myroot/
[root@SanxCentOS7 myroot]# ls -l
-rw-------. 1 root root 1887 10月  6 23:18 anaconda-ks.cfg
-rw-r--r--. 1 root root  131 10月  7 14:42 Hello.java
-rw-r--r--. 1 root root 1918 10月  6 23:21 initial-setup-ks.cfg
-rw-r--r--. 1 root root    0 10月  8 17:01 pig.txt
drwxr-xr-x. 2 root root 4096 10月  6 23:22 公共
drwxr-xr-x. 2 root root 4096 10月  6 23:22 模板
drwxr-xr-x. 2 root root 4096 10月  6 23:22 视频
drwxr-xr-x. 2 root root 4096 10月  6 23:22 图片
drwxr-xr-x. 2 root root 4096 10月  6 23:22 文档
drwxr-xr-x. 2 root root 4096 10月  6 23:22 下载
drwxr-xr-x. 2 root root 4096 10月  6 23:22 音乐
drwxr-xr-x. 2 root root 4096 10月  6 23:22 桌面

-----删除软链接,rm /home/root 注意,不要加 “/” 不然系统会认为这是一个文件-----
[root@SanxCentOS7 myroot]# cd /home/
[root@SanxCentOS7 home]# rm /home/myroot/
rm: 无法删除"/home/myroot/": 是一个目录
[root@SanxCentOS7 home]# rm /home/myroot
rm:是否删除符号链接 "/home/myroot"?y
[root@SanxCentOS7 home]# ll
drwxr-xr-x. 2 root     root     4096 10月  8 16:15 bbb
drwx------. 5 ben      ben      4096 10月  7 20:41 ben
-rw-r--r--. 1 root     root        3 10月  9 15:31 info.txt
-rw-r--r--. 1 root     root      324 10月  9 15:36 mycal
-rw-r--r--. 1 root     root        6 10月  9 15:06 mydate.txt
-rw-r--r--. 1 root     root     1819 10月  9 15:38 myprofile
drwx------. 5 sanx     sanx     4096 10月  7 15:24 sanx
drwx------. 3 xiaohong xiaohong 4096 10月  7 15:33 test
history 指令
查看已经执行过历史命令,也可以执行历史命令
基本语法:history(功能描述:查看已经执行过历史命令)
注意事项:
! 指令编号可以快速执行这条指令history 你要查看的命令数n 可以快速查看最近执行的n条指令
-----案例1:查看最近执行的10条指令 history 10-----
[root@SanxCentOS7 home]# history 10
  246  ls -l
  247  cd myroot/
  248  ls
  249  ls -l
  250  cd /home/
  251  rm /home/myroot/
  252  rm /home/myroot
  253  ll
  254  history
  255  history 10

-----案例2:执行某个编号的指令 !+编号 -----
  250  cd /home/
  251  rm /home/myroot/
  252  rm /home/myroot
  253  ll
  254  history
  255  history 10
  256  man ln
  257  history
[root@SanxCentOS7 home]# !256
man ln
执行 !256 后的结果,也就是执行 man ln

5.5 时间日期类
date 指令
date 指令 是显示当前的日期
基本语法:
date(功能描述:显示当前时间)date +%Y(功能描述:显示当前年份)date +%m(功能描述:显示当前月份)date +%d(功能描述:显示当前是哪一天)date "+%Y-%m-%d %H:%M:%S"(功能描述:显示年月日时分秒)
[root@SanxCentOS7 home]# date
2022年 10月 09日 星期日 17:03:06 CST

[root@SanxCentOS7 home]# date +%Y
2022
[root@SanxCentOS7 home]# date "+%Y %m"
2022 10
[root@SanxCentOS7 home]# date "+%Y-%m"
2022-10

[root@SanxCentOS7 home]# date "+%Y-%m-%d"
2022-10-09
[root@SanxCentOS7 home]# date "+%Y-%m-%d %H"
2022-10-09 17
[root@SanxCentOS7 home]# date "+%Y-%m-%d %H-%M"
2022-10-09 17-06

-----表达式的符号可以随意改动,中间的符号就是用来符合人类习惯的-----
[root@SanxCentOS7 home]# date "+%Y-%m-%d %H-%M-%S"
2022-10-09 17-06-36
[root@SanxCentOS7 home]# date "+%Y-%m-%d %H:%M:%Ss"
2022-10-09 17:06:54s
date 设置日期
基本语法:date -s 字符串时间
-----手动设置时间-----
[root@SanxCentOS7 home]#  date -s "2020-11-11 12:12:12"
2020年 11月 11日 星期三 12:12:12 CST
[root@SanxCentOS7 home]# date
2020年 11月 11日 星期三 12:12:15 CST

-----恢复网络同步时间-----
[root@SanxCentOS7 home]# ntpdate asia.pool.ntp.org
 9 Oct 17:16:46 ntpdate[16939]: step time server 202.118.1.81 offset 60239058.815056 sec
[root@SanxCentOS7 home]# date
2022年 10月 09日 星期日 17:16:52 CST
设置完想恢复与网络时间同步怎么办?
执行指令:ntpdate asia.pool.ntp.org
cal 指令
查看日历指令 cal
基本语法:cal [选项](功能描述:不加选项,显示本月日历)
-----显示当前的日历-----
[root@SanxCentOS7 home]# cal
      十月 2022
日 一 二 三 四 五 六
                   1
 2  3  4  5  6  7  8
 9 10 11 12 13 14 15
16 17 18 19 20 21 22
23 24 25 26 27 28 29
30 31

-----显示2020年整年的日历-----
[root@SanxCentOS7 home]# cal 2020
                               2020

        一月                   二月                   三月
日 一 二 三 四 五 六   日 一 二 三 四 五 六   日 一 二 三 四 五 六
          1  2  3  4                      1    1  2  3  4  5  6  7
 5  6  7  8  9 10 11    2  3  4  5  6  7  8    8  9 10 11 12 13 14
12 13 14 15 16 17 18    9 10 11 12 13 14 15   15 16 17 18 19 20 21
19 20 21 22 23 24 25   16 17 18 19 20 21 22   22 23 24 25 26 27 28
26 27 28 29 30 31      23 24 25 26 27 28 29   29 30 31

        四月                   五月                   六月
日 一 二 三 四 五 六   日 一 二 三 四 五 六   日 一 二 三 四 五 六
          1  2  3  4                   1  2       1  2  3  4  5  6
 5  6  7  8  9 10 11    3  4  5  6  7  8  9    7  8  9 10 11 12 13
12 13 14 15 16 17 18   10 11 12 13 14 15 16   14 15 16 17 18 19 20
19 20 21 22 23 24 25   17 18 19 20 21 22 23   21 22 23 24 25 26 27
26 27 28 29 30         24 25 26 27 28 29 30   28 29 30
                       31
        七月                   八月                   九月
日 一 二 三 四 五 六   日 一 二 三 四 五 六   日 一 二 三 四 五 六
          1  2  3  4                      1          1  2  3  4  5
 5  6  7  8  9 10 11    2  3  4  5  6  7  8    6  7  8  9 10 11 12
12 13 14 15 16 17 18    9 10 11 12 13 14 15   13 14 15 16 17 18 19
19 20 21 22 23 24 25   16 17 18 19 20 21 22   20 21 22 23 24 25 26
26 27 28 29 30 31      23 24 25 26 27 28 29   27 28 29 30
                       30 31
        十月                  十一月                 十二月
日 一 二 三 四 五 六   日 一 二 三 四 五 六   日 一 二 三 四 五 六
             1  2  3    1  2  3  4  5  6  7          1  2  3  4  5
 4  5  6  7  8  9 10    8  9 10 11 12 13 14    6  7  8  9 10 11 12
11 12 13 14 15 16 17   15 16 17 18 19 20 21   13 14 15 16 17 18 19
18 19 20 21 22 23 24   22 23 24 25 26 27 28   20 21 22 23 24 25 26
25 26 27 28 29 30 31   29 30                  27 28 29 30 31
5.6 搜索查找类
find 指令
find 指令 将从指定目录向下递归地便利其各个子目录,将满足条件的文件或者目录显示在终端
基本语法:find [搜索范围] [选项]
选项说明:
| 选项 | 功能 |
|---|---|
| -name<查询方式> | 按照指定文件名查找模式查找文件 |
| -user<用户名> | 查找属于指定用户名所有文件 |
| -size<文件大小> | 按照指定的文件大小查找文件 |
-----按文件名查找/home目录下的hello.txt文件-----
[root@SanxCentOS7 ~]# find /home -name hello.txt
/home/bbb/hello.txt

-----按用户名查找/opt目录下,用户名称为nobody的文件-----
[root@SanxCentOS7 ~]# find /opt -user nobody #没找到文件就不会显示什么
[root@SanxCentOS7 ~]# find /opt -user root
/opt
/opt/rh

-----查找整个Linux系统下大于200M的文件(+n大于 -n小于 n等于 单位有k、M、G)-----
[root@SanxCentOS7 ~]# find / -size +200M
/proc/kcore
find: ‘/proc/2708/task/2708/fd/5’: 没有那个文件或目录
find: ‘/proc/2708/task/2708/fdinfo/5’: 没有那个文件或目录
find: ‘/proc/2708/fd/6’: 没有那个文件或目录
find: ‘/proc/2708/fdinfo/6’: 没有那个文件或目录
/run/media/root/CentOS 7 x86_64/LiveOS/squashfs.img

[root@SanxCentOS7 ~]# cd /run/media/root/CentOS\ 7\ x86_64/LiveOS/
[root@SanxCentOS7 LiveOS]# ls
squashfs.img  TRANS.TBL
[root@SanxCentOS7 LiveOS]# ls -l
总用量 509393
-rw-r--r--. 3 root root 521617408 10月 27 2020 squashfs.img
-r--r--r--. 1 root root       224 11月  4 2020 TRANS.TBL
[root@SanxCentOS7 LiveOS]# ls -lh
总用量 498M
-rw-r--r--. 3 root root 498M 10月 27 2020 squashfs.img
-r--r--r--. 1 root root  224 11月  4 2020 TRANS.TBL
locate 指令
locate 指令 可以快速定位文件路径
locate指令利用事先建立的系统中所有文件名称及路径的locate数据库,实现快速定位给定的文件
locate指令无需遍历整个文件系统,查询速度较快,为了保证查询结果的准确度,管理员必须定期更新locate时刻
基本语法:locate 搜索文件
特别说明:由于 locate 指令基于数据库进行查询,所以第一次运行前,必须使用 updatedb指令 创建 locate数据库
-----使用locate指令快速定位hello.txt文件所在目录-----
[root@SanxCentOS7 LiveOS]# updatedb
[root@SanxCentOS7 LiveOS]# locate hello.txt
/home/bbb/hello.txt
补充:which指令,可以查看某个指令在哪个目录下
语法:which 你要查看的命令
[root@SanxCentOS7 LiveOS]# which ls
alias ls='ls --color=auto'
	/usr/bin/ls
[root@SanxCentOS7 LiveOS]# which reboot
/usr/sbin/reboot
grep 指令
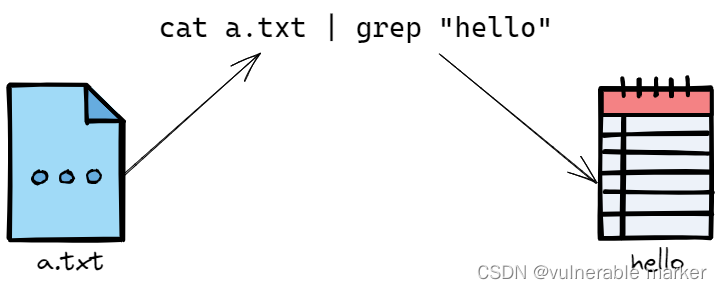
grep指令 过滤查找,管道符 “|”,表示将前一个命令的处理结果输出传递给后面的命令处理
例如我查找一个a.txt文件中是否有字符串'hello'
那么,bash下的命令可以是 cat a.txt | grep "hello"
此处管道符 "|" 就是把前面的命令结果交给后面处理的
基本语法:grep [选项] 查找内容 源文件
常用选项
| 选项 | 功能 |
|---|---|
| -n | 显示匹配行及行号 |
| -i | 忽略字母的大小写 |
-----在hello.txt文件中,查找yes所在行,并显示行号-----
写法1:cat /home/bbb/hello.txt
[root@SanxCentOS7 LiveOS]# cat /home/bbb/hello.txt
ok
fine
yes
ohyes
hello
test
yes
YES
[root@SanxCentOS7 LiveOS]# cat /home/bbb/hello.txt | grep -n "yes"
3:yes
4:ohyes
7:yes

写法2:grep -n "yes" /home/bbb/hello.txt
[root@SanxCentOS7 LiveOS]# grep -n "yes" /home/bbb/hello.txt
3:yes
4:ohyes
7:yes

[root@SanxCentOS7 LiveOS]# cat /home/bbb/hello.txt | grep -n -i "yes"
3:yes
4:ohyes
7:yes
8:YES
在 grep 命令中,“^” 表示行首(即开头)。所以,“^-” 表示以 “-” 开头的行,“$” 表示行尾(即结尾)
5.7 压缩和解压类
gzip/gunzip 指令
gzip用于压缩文件,gunzip用于解压文件
基本语法
gzip 文件(功能描述:压缩文件,只能将文件压缩为 “.gz文件”)gunzip 文件.gz(功能描述:解压缩文件命令)
-----gzip压缩,将/home下的hello.txt文件进行压缩-----
[root@SanxCentOS7 LiveOS]# gzip /home/bbb/hello.txt
[root@SanxCentOS7 LiveOS]# cd /home/bbb/
[root@SanxCentOS7 bbb]# ls -lh
总用量 4.0K
-rw-r--r--. 1 root root  0 10月  8 16:19 hello2.txt
-rw-r--r--. 1 root root 61 10月 30 14:40 hello.txt.gz

-----gunzip压缩,将/home下的hello.txt.gz文件进行解压缩-----
[root@SanxCentOS7 bbb]# gunzip hello.txt.gz
gzip: hello.txt already exists; do you wish to overwrite (y or n)? y
[root@SanxCentOS7 bbb]# ls -lh
总用量 4.0K
-rw-r--r--. 1 root root 37 10月 30 14:40 hello.txt
gzip 压缩,压缩为 hello.txt.gz

zip/unzip 指令
zip 用于压缩文件,unzip 用于解压的,这个在项目打包发布中很有用
基本语法:
zip [选项] xxx.zip 将要压缩的内容(功能描述:压缩文件和目录的命令)unzip [选项] xxx.zip(功能描述:解压缩文件)
zip 常用选项
-r:递归压缩,即压缩目录
uzip 常用选项
-d <目录>:指定解压后文件的存放目录
-----将/home下的所有文件进行压缩成 myhome.zip-----
[root@SanxCentOS7 ~]# zip -r myhome.zip /home/
[root@SanxCentOS7 ~]# ls
anaconda-ks.cfg  Hello.java  initial-setup-ks.cfg  myhome.zip  pig.txt  公共  模板  视频  图片  文档  下载  音乐  桌面

-----将 myhome.zip 解压到 /opt/tmp 目录下-----
[root@SanxCentOS7 ~]# mkdir /opt/tmp
[root@SanxCentOS7 ~]# unzip -d /opt/tmp/ /root/myhome.zip
[root@SanxCentOS7 /]# cd /opt/
[root@SanxCentOS7 opt]# ls
rh  tmp
[root@SanxCentOS7 opt]# cd tmp/
[root@SanxCentOS7 tmp]# ls
home
使用了 zip -r myhome.zip /home/ 的结果

tar 指令
tar 指令 是打包指令,最后打包后的文件是 .tar.gz 的文件
基本语法:tar [选项] xxx.tar.gz 打包的内容(功能描述:打包目录压缩后的文件格式 .tar.gz)
选项说明:
| 选项 | 功能 |
|---|---|
| -c | 产生 .tar打包文件 |
| -v | 显示详细信息 |
| -f | 指定压缩后的文件名 |
| -z | 打包同时压缩 |
| -x | 解包 .tar文件 |
一般的,常用的压缩选项是 -zcvf 连用,解压缩则是 -zxvf
-----案例1:压缩多个文件,将/home/pig.txt和/home/cat.txt压缩成pc.tar.gz-----
[root@SanxCentOS7 home]# ls
bbb  ben  info.txt  mycal  mydate.txt  myprofile  sanx  test
[root@SanxCentOS7 home]# touch pig.txt
[root@SanxCentOS7 home]# touch cat.txt
[root@SanxCentOS7 home]# ls
bbb  ben  cat.txt  info.txt  mycal  mydate.txt  myprofile  pig.txt  sanx  test
[root@SanxCentOS7 home]# tar -zcvf pc.tar.gz /home/pig.txt /home/cat.txt
tar: 从成员名中删除开头的“/”
/home/pig.txt
/home/cat.txt
[root@SanxCentOS7 home]# ls
bbb  ben  cat.txt  info.txt  mycal  mydate.txt  myprofile  pc.tar.gz  pig.txt  sanx  test

-----案例2:将/home的文件夹压缩成myhome.tar.gz-----
[root@SanxCentOS7 home]# tar -zcvf myhome.tar.gz /home/
省略压缩过程......
[root@SanxCentOS7 home]# ls
bbb  ben  cat.txt  info.txt  mycal  mydate.txt  myhome.tar.gz  myprofile  pc.tar.gz  pig.txt  sanx  test

-----案例3:将pc.tar.gz解压到当前目录,切换到/opt/-----
[root@SanxCentOS7 home]# ls
bbb  ben  cat.txt  info.txt  mycal  mydate.txt  myhome.tar.gz  myprofile  pc.tar.gz  pig.txt  sanx  test
[root@SanxCentOS7 home]# rm cat.txt
rm:是否删除普通空文件 "cat.txt"?y
[root@SanxCentOS7 home]# rm pig.txt
rm:是否删除普通空文件 "pig.txt"?y
[root@SanxCentOS7 home]# ls
bbb  ben  info.txt  mycal  mydate.txt  myhome.tar.gz  myprofile  pc.tar.gz  sanx  test
[root@SanxCentOS7 home]# tar -zxvf pc.tar.gz
home/pig.txt
home/cat.txt
[root@SanxCentOS7 home]# ls
bbb  ben  home  info.txt  mycal  mydate.txt  myhome.tar.gz  myprofile  pc.tar.gz  sanx  test
[root@SanxCentOS7 home]# cd home/
[root@SanxCentOS7 home]# ls
cat.txt  pig.txt

-----案例4:将myhome.tar.gz解压到/opt/tmp2目录下-----
[root@SanxCentOS7 home]# mkdir /opt/tmp2
[root@SanxCentOS7 home]# cd /opt/
[root@SanxCentOS7 opt]# ls
rh  tmp  tmp2
[root@SanxCentOS7 opt]# cd /home/
[root@SanxCentOS7 home]# ls
bbb  ben  home  info.txt  mycal  mydate.txt  myhome.tar.gz  myprofile  pc.tar.gz  sanx  test
[root@SanxCentOS7 home]# tar -zxvf /home/myhome.tar.gz -C /opt/tmp2/
[root@SanxCentOS7 home]# cd /opt/tmp2
[root@SanxCentOS7 tmp2]# ls
home
[root@SanxCentOS7 tmp2]# cd home/
[root@SanxCentOS7 home]# ls
bbb  ben  cat.txt  info.txt  mycal  mydate.txt  myprofile  pc.tar.gz  pig.txt  sanx  test
[root@SanxCentOS7 home]# pwd
/opt/tmp2/home

注意:此处的 -C 是 代表着你解压的包需要解压到哪一个文件目录里
tar -zxvf xxx.tar.gz -C 解压目的文件目录
解压xxx.tar.gz 到 解压目的文件目录