SPI机制简介
SPI(Service Provider Interface),是从JDK6开始引入的,一种基于ClassLoader来发现并加载服务的机制。
一个标准的SPI,由3个组件构成,分别是:
- Service:是一个公开的接口或者抽象类,定义了一个抽象的功能模块;
- Service Provider:是Service接口的实现子类;
- ServiceLoader:是SPI机制的核心组件,负责在运行时发现并加载Service Provider。
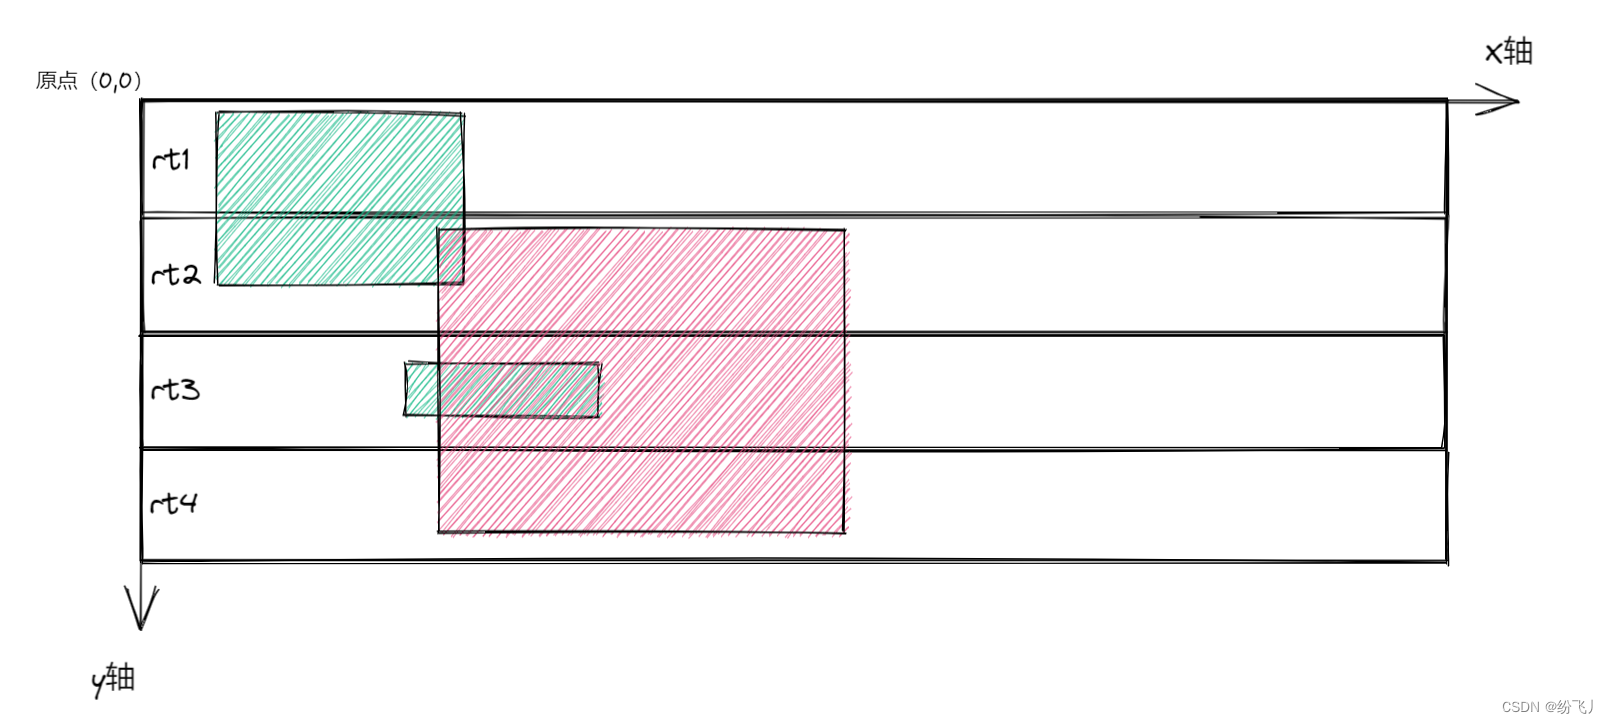
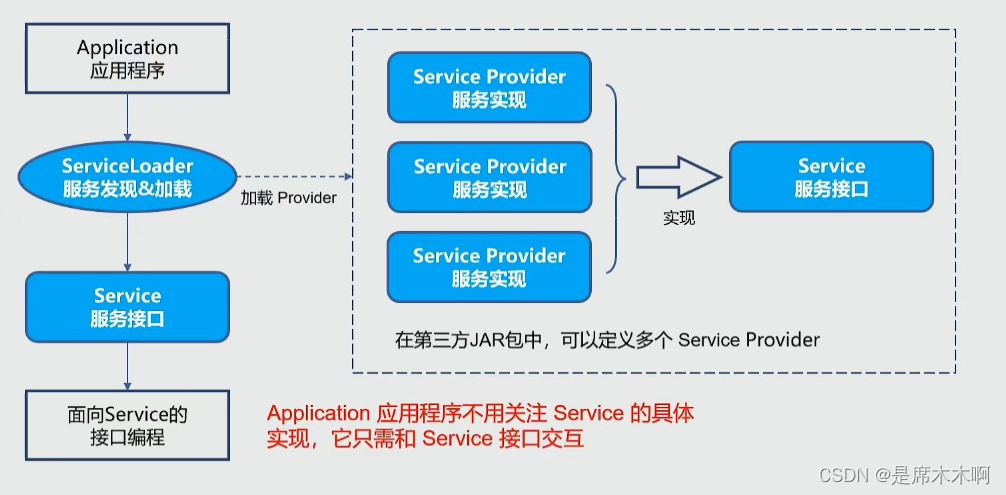
SPI运行流程
SPI运行流程如下图所示,
ServiceLoader类
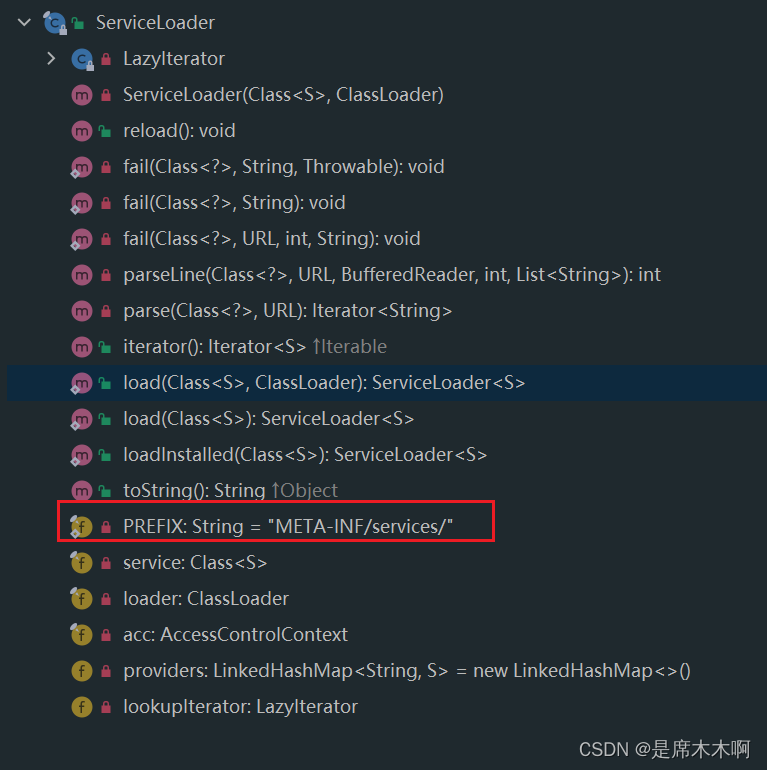
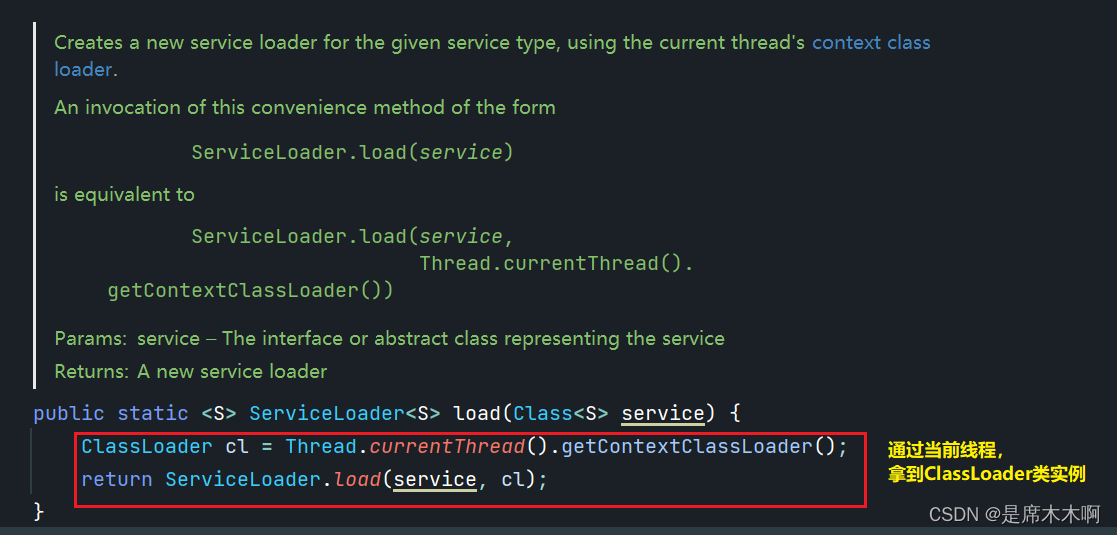
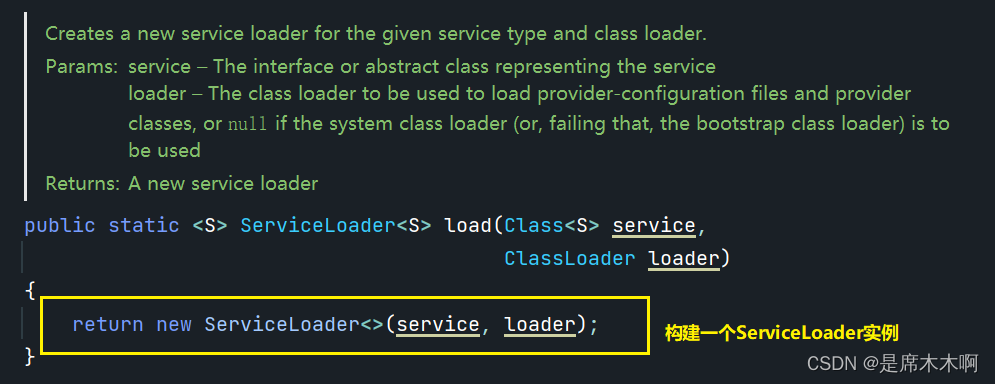
ServiceLoader是SPI机制的核心组件,负责在运行时发现并加载Service Provider。该类提供了load方法,用于在程序运行过程中去加载第三方提供的Service接口实现类,得到接口实例;后续过程中,只需要通过接口实例去执行对应的操作即可。
假设,我们有这样一个InternetService 接口,用来提供网络连接服务。
/**
 * 网络连接服务接口SPI-Service
 */
public interface InternetService {
    void connectInternet();
}
然后为其提供接口实现子类,
package cn.mobile;

import spi.InternetService;

public class BeijingChinaMobileMobile implements InternetService {
    @Override
    public void connectInternet() {
        System.out.println("connect internet By [Beijing China Mobile]");
    }
}
这样写在单体项目中自然是可以的,但是,如果我们要让别人也能在项目中使用这个接口提供的网络连接服务,就有点难受了。好在SPI机制就是用来做服务发现和加载工作的,我们可以将其改造成符合SPI标准的一套通用工具。
service服务定义
接口就是在定义标准,而这个标准需要交由第三方进行实现。
1. 创建maven项目,
<?xml version="1.0" encoding="UTF-8"?>
<project xmlns="http://maven.apache.org/POM/4.0.0"
         xmlns:xsi="http://www.w3.org/2001/XMLSchema-instance"
         xsi:schemaLocation="http://maven.apache.org/POM/4.0.0 http://maven.apache.org/xsd/maven-4.0.0.xsd">
    <parent>
        <artifactId>simple_spi_example</artifactId>
        <groupId>org.example</groupId>
        <version>1.0-SNAPSHOT</version>
    </parent>
    <modelVersion>4.0.0</modelVersion>

    <artifactId>simple-api</artifactId>

    <properties>
        <maven.compiler.source>8</maven.compiler.source>
        <maven.compiler.target>8</maven.compiler.target>
    </properties>

</project>
2.定义接口标准,
package spi;

/**
 * 网络连接服务接口SPI-Service
 */
public interface InternetService {
    void connectInternet();
}
service provider服务的第三方实现
service provider是Service接口的实现子类。以下我们提供两个第三方实现,分别命名为A、B。
第三方A实现
1. 创建Maven项目,引入接口标准依赖,
<?xml version="1.0" encoding="UTF-8"?>
<project xmlns="http://maven.apache.org/POM/4.0.0"
         xmlns:xsi="http://www.w3.org/2001/XMLSchema-instance"
         xsi:schemaLocation="http://maven.apache.org/POM/4.0.0 http://maven.apache.org/xsd/maven-4.0.0.xsd">
    <parent>
        <artifactId>simple_spi_example</artifactId>
        <groupId>org.example</groupId>
        <version>1.0-SNAPSHOT</version>
    </parent>
    <modelVersion>4.0.0</modelVersion>

    <artifactId>simple-spi-mobile</artifactId>

    <properties>
        <maven.compiler.source>8</maven.compiler.source>
        <maven.compiler.target>8</maven.compiler.target>
    </properties>

    <dependencies>
        <dependency>
            <artifactId>simple-api</artifactId>
            <groupId>org.example</groupId>
            <version>1.0-SNAPSHOT</version>
        </dependency>
    </dependencies>

</project>
2. 实现SPI接口,
package cn.mobile;

import spi.InternetService;

public class ChinaMobile implements InternetService {
    @Override
    public void connectInternet() {
        System.out.println("connect internet By [China Mobile]");
    }
}
package cn.mobile;

import spi.InternetService;

public class BeijingChinaMobileMobile implements InternetService {
    @Override
    public void connectInternet() {
        System.out.println("connect internet By [Beijing China Mobile]");
    }
}
3.提供service元数据,
在resources目录下,新建资源文件META-INF\services\spi.InternetService,文件名:spi.InternetService(父接口的全路径名称),
cn.mobile.ChinaMobile
cn.mobile.BeijingChinaMobileMobile
第三方B实现
1. 创建Maven项目,引入接口标准依赖,
<?xml version="1.0" encoding="UTF-8"?>
<project xmlns="http://maven.apache.org/POM/4.0.0"
         xmlns:xsi="http://www.w3.org/2001/XMLSchema-instance"
         xsi:schemaLocation="http://maven.apache.org/POM/4.0.0 http://maven.apache.org/xsd/maven-4.0.0.xsd">
    <parent>
        <artifactId>simple_spi_example</artifactId>
        <groupId>org.example</groupId>
        <version>1.0-SNAPSHOT</version>
    </parent>
    <modelVersion>4.0.0</modelVersion>

    <artifactId>simple-spi-unicom</artifactId>

    <properties>
        <maven.compiler.source>8</maven.compiler.source>
        <maven.compiler.target>8</maven.compiler.target>
    </properties>

    <dependencies>
        <dependency>
            <artifactId>simple-api</artifactId>
            <groupId>org.example</groupId>
            <version>1.0-SNAPSHOT</version>
        </dependency>
    </dependencies>
</project>
2. 实现SPI接口,
package cn.unicom;

import spi.InternetService;

public class ChinaUniCom implements InternetService {
    @Override
    public void connectInternet() {
        System.out.println("connect internet By [ChinaUniCom]");
    }
}
3.提供service元数据,
在resources目录下,新建资源文件META-INF\services\spi.InternetService,文件名:spi.InternetService(父接口的全路径名称),
cn.unicom.ChinaUniComServiceLoader服务发现和服务加载
1. 在主项目中引入service服务的第三方实现相关依赖,
<?xml version="1.0" encoding="UTF-8"?>
<project xmlns="http://maven.apache.org/POM/4.0.0"
         xmlns:xsi="http://www.w3.org/2001/XMLSchema-instance"
         xsi:schemaLocation="http://maven.apache.org/POM/4.0.0 http://maven.apache.org/xsd/maven-4.0.0.xsd">
    <parent>
        <artifactId>simple_spi_example</artifactId>
        <groupId>org.example</groupId>
        <version>1.0-SNAPSHOT</version>
    </parent>
    <modelVersion>4.0.0</modelVersion>

    <artifactId>smaple-company</artifactId>

    <properties>
        <maven.compiler.source>8</maven.compiler.source>
        <maven.compiler.target>8</maven.compiler.target>
    </properties>

    <dependencies>
        <dependency>
            <artifactId>simple-api</artifactId>
            <groupId>org.example</groupId>
            <version>1.0-SNAPSHOT</version>
        </dependency>
        <dependency>
            <groupId>org.example</groupId>
            <artifactId>simple-spi-unicom</artifactId>
            <version>1.0-SNAPSHOT</version>
        </dependency>
        <dependency>
            <groupId>org.example</groupId>
            <artifactId>simple-spi-mobile</artifactId>
            <version>1.0-SNAPSHOT</version>
        </dependency>
    </dependencies>

</project>
2. 通过ServiceLoader发现并加载服务
package com.company;

import spi.InternetService;

import java.util.ServiceLoader;

public class Application {
    public static void main(String[] args) {
        ServiceLoader<InternetService> load = ServiceLoader.load(InternetService.class);
        for (InternetService provider : load) {
            provider.connectInternet();
        }
    }
}
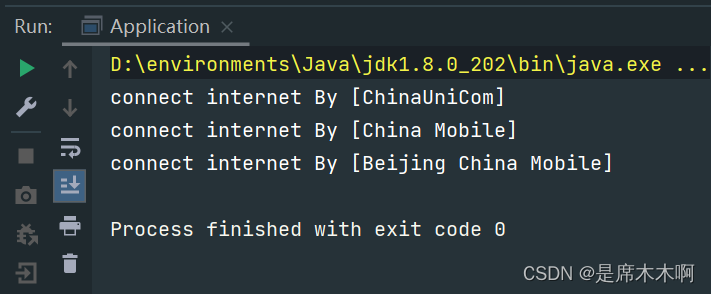
3.执行结果如下
ServiceLoader源码分析

分析,
// ServiceLoader实现了Iterable接口,可以遍历所有的服务实现者
public final class ServiceLoader<S> implements Iterable<S>
{
    // 查找配置文件的目录
    private static final String PREFIX = "META-INF/services/";
    // 表示要被加载的服务的类或接口
    private final Class<S> service;
    // 这个ClassLoader用来定位,加载,实例化服务提供者
    private final ClassLoader loader;
    // 访问控制上下文
    private final AccessControlContext acc;
    // 缓存已经被实例化的服务提供者,按照实例化的顺序存储
    private LinkedHashMap<String,S> providers = new LinkedHashMap<>();
    // 迭代器
    private LazyIterator lookupIterator;
}
// 服务提供者查找的迭代器
public Iterator<S> iterator() {
    return new Iterator<S>() {
        Iterator<Map.Entry<String,S>> knownProviders
            = providers.entrySet().iterator();
        // hasNext方法
        public boolean hasNext() {
            if (knownProviders.hasNext())
                return true;
            return lookupIterator.hasNext();
        }
        // next方法
        public S next() {
            if (knownProviders.hasNext())
                return knownProviders.next().getValue();
            return lookupIterator.next();
        }
    };
}
// 服务提供者查找的迭代器
private class LazyIterator implements Iterator<S> {
    // 服务提供者接口
    Class<S> service;
    // 类加载器
    ClassLoader loader;
    // 保存实现类的url
    Enumeration<URL> configs = null;
    // 保存实现类的全名
    Iterator<String> pending = null;
    // 迭代器中下一个实现类的全名
    String nextName = null;

    public boolean hasNext() {
        if (nextName != null) {
            return true;
        }
        if (configs == null) {
            try {
                String fullName = PREFIX + service.getName();
                if (loader == null)
                    configs = ClassLoader.getSystemResources(fullName);
                else
                    configs = loader.getResources(fullName);
            } catch (IOException x) {
                fail(service, "Error locating configuration files", x);
            }
        }
        while ((pending == null) || !pending.hasNext()) {
            if (!configs.hasMoreElements()) {
                return false;
            }
            pending = parse(service, configs.nextElement());
        }
        nextName = pending.next();
        return true;
    }

    public S next() {
        if (!hasNext()) {
            throw new NoSuchElementException();
        }
        String cn = nextName;
        nextName = null;
        Class<?> c = null;
        try {
            c = Class.forName(cn, false, loader);
        } catch (ClassNotFoundException x) {
            fail(service,"Provider " + cn + " not found");
        }
        if (!service.isAssignableFrom(c)) {
            fail(service, "Provider " + cn  + " not a subtype");
        }
        try {
            S p = service.cast(c.newInstance());
            providers.put(cn, p);
            return p;
        } catch (Throwable x) {
            fail(service, "Provider " + cn + " could not be instantiated: " + x, x);
        }
        throw new Error();          // This cannot happen
    }
}
SPI应用场景举例
在JDBC4.0之前,连接数据库的时候,通常会用
Class.forName("com.mysql.jdbc.Driver")这句先加载数据库相关的驱动,然后再进行获取连接等的操作。而JDBC4.0之后不需要Class.forName来加载驱动,直接获取连接即可,这里使用了Java的SPI扩展机制来实现。
注册数据库连接驱动就是一个典型的例子,以PostGreSQL数据库连接驱动为例,我们知道:java中定义了接口java.sql.Driver,但是并没有提供具体的实现,具体的实现都是由不同厂商来提供的,所以我们实际开发时,需要先去找到对应的数据库连接驱动,把驱动加载到应用中,然后才能去执行数据库的种种操作。
查看postgresql依赖jar包,会发现在META-INFO下的services路径下,也提供了java.sql.Driver驱动类的实现子类信息,
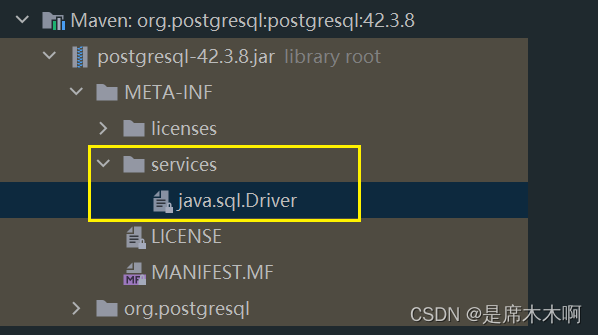
文件内容如下,
org.postgresql.Driver这样,就可以基于SPI机制,动态加载第三方提供的Driver数据库连接驱动,实现数据库相关的操作。