一、使用背景
当MCU的串口不够用时,可以通过IO模拟的方式将任意一个具有输出功能的管脚配置为串口输出,从而方便开发和调试。
二、实现原理
通过IO口模拟串口发送波形,配置对应的波特率等信息,然后映射printf函数,从而实现打印功能。
三、实验环境
硬件平台: CCM4202S
软件平台:MDK
四、软件实现
1.编写串口发送函数
//模拟UART
inline static void Uart_Log_Send(uint16_t ch)
{
    for(int i=0; i<11; i++)
    {
        if(ch & 0x1)
        {
            EPORT3->EPDR |= 0x10;//(Bit_SET<<(4));
        }
        else
        {
            EPORT3->EPDR &= 0xEF;//~(Bit_SET<<(4));
        }
        ch >>= 1;
        Uart_Log_Delay();
    }
}


//重定义fputc函数 (模拟串口)
int fputc(int ch, FILE *f)
{

    /* 初始化IO */
    static uint8_t init_flag = 1;
    if (init_flag)
    {
        init_flag = 0;
        EPORT_ConfigGpio(EPORT_PIN28, GPIO_OUTPUT);
    }

    /* 组一个UART帧 */
    uint16_t value = ch & 0xFF;
    value |= 0X100; //stop  bit
    value <<= 2;    //start bit: "01"
    value |= 1;     // 第一个字符乱码: 起始时额外添加一个'1', 让指令cache稳定,否则起始位bit延时偶尔略宽

    /* 数据输出 */
//    Device_EnterCritical();
	Uart_Log_Send(value);
//    Device_ExitCritical();

	return ch;

}
2.调整延时函数,去控制不同波特率
通过计算,我们可以得出不同波特率对应传输一个Bit所需的时间
9600 ------------------104.16666 us
115200 --------------8.68055 uS
921600 -------------------1.085 us
我们通过调整 bound_cnt的数值,从而实现我们想要的波特率
#define bound_9600 		1400
#define bound_115200   112
#define bound_921600   11
inline static void Uart_Log_Delay(void)
{
	volatile uint16_t bound_cnt = bound_9600;//波特率根据延时在设置 921600波特率
    while(bound_cnt--)
		{
			__nop();
		}
}
五、现象验证
下图是以9600为例,我们可以看出波形和打印均符合我们的预期
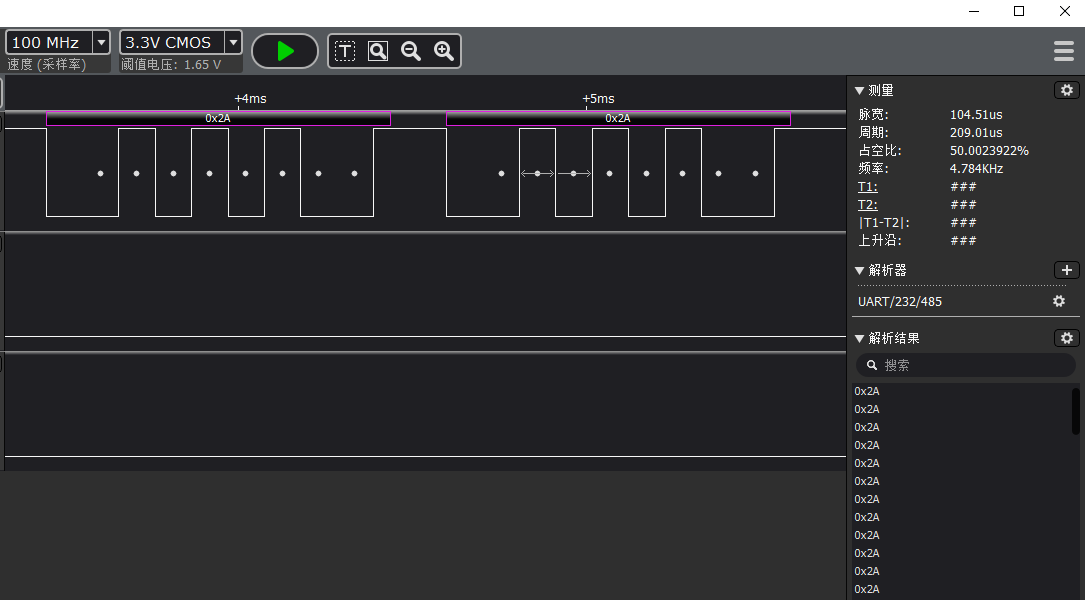
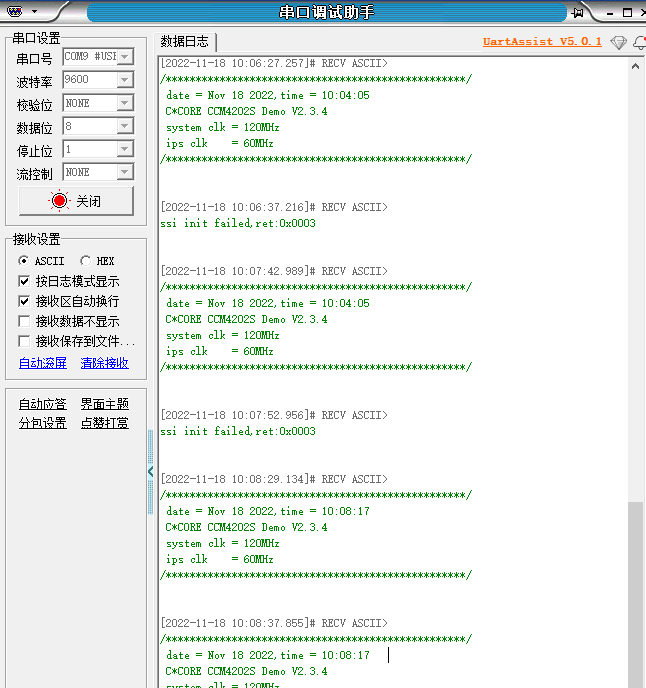


![LeetCode[105]从前序与中序遍历序列构造二叉树](https://img-blog.csdnimg.cn/2cc76c2418674ff88fe5e6eec1966e61.png)

![[附源码]Python计算机毕业设计jspm计算机学院党员积分管理系统](https://img-blog.csdnimg.cn/9f0a1c15c3534d3e9ba0b0c6e9c07f0b.png)