简介

前言
之前vite2刚出的时候其实已经自学过一波,但是老实说学起来完全不入脑,一方面本来这方面的基础就很差(指项目配置),另一方面学的时候没有跟着去动手,纯理论的学那完全就是越看越困。最后就是急躁,想一下就学完。所以到现在来说基本上就是零基础。这次痛并思痛,跟着文档一步一步来。
官方文档
Vitevitejs.dev/guide/
简介[1]

overview
- 重点:
faster and leaner development experience for modern web projects - 关键词:
faster and leaner、development experience、modern web projects
是用来干什么的一目了然:提高开发体验感的,并且仅支持标准(现代)浏览器(>= IE 9`?不清楚9算不算,但是没差,IE已经不再维护了)。
注意这里是”(development)开发“,而打包还是交由rollup处理。
拥抱ES MODULE[2] (现代浏览器天然支持)而非CommonJs[3]。
上手
话不多说,直接上手。如果你不想一步一步配置的话,可以直接看官方的demo[4] 。
不过学习嘛,还是一步一步来好些。
先创建个文件夹,然后初始化下环境
mkdir vite-study
cd vite-study
npm init --yes然后安装下vite,推荐是全局安装,因为cli做了各种框架的基础配置,能快速生成项目。
npm install vite --global
npm install vite -D安装完之后我们先什么都不动,仅新增个index.html文件,记住这里和webpack 不同,直接放根目录,vite会在根目录里找,这是因为vite将index.html当做入口的原因。
 <!DOCTYPE html>
<html lang="en">
<head>
    <meta charset="UTF-8">
    <meta http-equiv="X-UA-Compatible" content="IE=edge">
    <meta name="viewport" content="width=device-width, initial-scale=1.0">
    <title>vite study</title>
</head>
<body>
    <div class="test">555</div>
</body>
</html>然后package.json中配置下script
   "scripts": {
    "dev": "vite"
},然后直接终端执行指令npm run dev
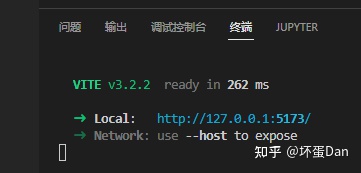
run-result

browser
非常简单,非常傻瓜,这样就跑起来啦。
但其实只是起了个koa[5]服务器而已,和你自己手动起的没差,甚至不需要koa,直接就http[6]模块开就行了。
现在我们再给这个index.html加点js和css文件。
echo > index.css
echo > index.jsindex.css随便搞点样式
.test {
    color: red;
} index.js中import这个index.css文件
import './index.css';
然后重新再跑一下指令npm run dev。
然后你会发现没有任何变化,因为我们压根没有给他们之间建立联系
直接在index.html中引入这个index.js文件,不过需要注意一点,script的type需要是module,这样才能被识别是ES Module,才能支持export import等。
 <!DOCTYPE html>
<html lang="en">
<head>
    <meta charset="UTF-8">
    <meta http-equiv="X-UA-Compatible" content="IE=edge">
    <meta name="viewport" content="width=device-width, initial-scale=1.0">
    <title>vite study</title>
</head>
<body>
    <div class="test">555</div>
    <script type="module" src="./index.js"></script>
</body>
</html>然后ctrl + s自动reload

img-2
如果script的type不是module,你在运行的时候浏览器就会报错。

img-3
如果你细心的话应该会发现你的index.css中的样式被打上了scoped-id:data-vite-dev-id。如果你之前看过我的文章你会知道这里搞个自定义id的作用是啥,一是作用域样式不会污染其它模块样式;二则是热更新可以直接找到这个style标签然后直接覆盖替换。

img-4
然后没啥好说的了,我们接着直接来接入框架了。
不过到现在都没用到vite.config.js,有些憋屈,所以得找个理由改下配置~。
有了,dev的域名端口太丑~,我们来改下。
我们先在根目录创建vite.config.js ,然后配置下servver[7]
 import { defineConfig } from 'vite'

export default defineConfig({
    server: {
        port: 6666
    }
})
然后ctrl + s即可~
配置vue
vite虽然可以和其他框架比如react、svelte等框架配合,但最适合那自然还是vue(非技术方面,纯感性~)。
先安装vue以及能让vite“识别”vue的plugin: @vitejs/plugin-vue[8]
npm install vue --save
npm install @vitejs/plugin-vue -D
然后在vite.config.js中引入,配置到plugins[9]中。
 import { defineConfig } from 'vite'

import vue from '@vitejs/plugin-vue'

export default defineConfig({
    server: {
        port: 6666
    },
    plugins: [
        vue()
    ]
})
接着我们在根目录创建views文件夹,然后在里面创建一个App.vue
<template>
    <div class="test" @click="handleChangeText">{{ text }}</div>
</template>

<script setup>
import { ref } from 'vue';


const text = ref('hello world')

function handleChangeText() {
    text.value = 'study vite !'
}

</script>

<style scoped>
.test {
    cursor: pointer;
    color: #0e0;
}
</style>
然后老规矩index.js中引入
import { createApp } from 'vue'

import './index.css';

import App from './views/App.vue';

createApp(App).mount('#app')
然后老规矩在index.js中引入vue组件入口。
最后别忘了index.html中创建个id为app的元素。
 <!DOCTYPE html>
<html lang="en">
<head>
    <meta charset="UTF-8">
    <meta http-equiv="X-UA-Compatible" content="IE=edge">
    <meta name="viewport" content="width=device-width, initial-scale=1.0">
    <title>vite study</title>
</head>
<body>
    <div id="app"></div>
    <script type="module" src="./index.js"></script>
</body>
</html>ok,让我们在终端运行下指令npm run dev
不过这里还是遇到了问题,同时配置server.port和vue插件时会找不到页面,可能刚没关好,端口还在。。换成port:7777就正常了。。。

img-5
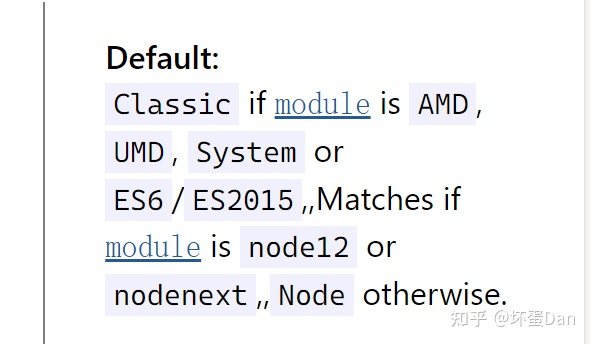
配置typescript[10]
官方还是很推荐vue3 +typescript的。
老规矩如果嫌麻烦可以直接去看线上的demo[11] ,不过学习嘛,最好还是都过一遍。
有一点我们需要知道,vite仅提供.ts文件的加载识别处理,而类型判断需要IDE或者通过tsc等构建过程实现。
可能我说的不是很对。。。。所以还是贴下原文。。。如果说错了麻烦大佬评论里说下,谢谢~

img-6
其他就不多说了,直接来配置
先来安装下我们需要的东西,既然用到了typescript那自然是得先安装它才行,而vue-tsc刚上面提到了一些,是一个包裹了tsc[12]的工具,专门用来识别处理vue[13]文件的。
npm install typescript -D
npm install vue-tsc -D安装完之后我们来配置下tsconfig.json文件
{
  "compilerOptions": {
    "target": "ESNext",
    "useDefineForClassFields": true,
    "module": "ESNext",
    "moduleResolution": "Node",
    "strict": true,
    "jsx": "preserve",
    "resolveJsonModule": true,
    "isolatedModules": true,
    "esModuleInterop": true,
    "lib": ["ESNext", "DOM"],
    "skipLibCheck": true,
    "noEmit": true
  },
  "include": ["src/**/*.ts", "src/**/*.d.ts", "src/**/*.tsx", "src/**/*.vue"],
  "references": [{ "path": "./tsconfig.node.json" }]
}compilerOptions[14]: 顾名思义,编译所需要的配置参数,当然这是可以不配置的,不配置会用默认参数。target[15]: 编译的目标环境,比如es5,常见的配置。ESNext表示最新的ECMA下一代标准。useDefineForClassFields[16]: 这是用来告知ts使用下一代标准runtime,当然语法还是一样的所以不需要考虑兼容性问题。默认值会根据你的target的配置改变,如果是ES2022或者ESNext也就是最新版或者下一代版本,默认值会是true,如果不是默认值则是false。 这里要设置为true,因为vue需要。其他框架具体看情况,比如lint-component就不能是true。module[17]: 设置模块规范,大家应该都知道这一块了,commonJs或者ES2015(ES6)等。ESNext下一代ECMA标准。moduleResolution[18]: 告知ts要怎么处理模块。这里用的ESNext,所以是Node。
moduleResolution-default
strict[19]: 这个就不多说了,严格模式jsx[20]: 这个也是一看就知道是干嘛用的,告知ts如何处理jsx文件和代码,默认是preserve,保持原状。

jsx-mode
resolveJsonModule[21] : 这个也很好理解,就是告知ts支持对json文件的处理,不然当你import了json文件之后会报错处理。isolatedModules[22] : 这个配置还是比较重要的,vite是基于esbuild实现的,而esbuild对typescript的一些东西并不支持,比如type-only的导入或者enum。所以得加上这个字段通知ts提醒你这些语法不支持。esModuleInterop[23]:ts会将commonJs/AMD/CMD转换成和ES6 module类似的,因为这层转换,导致存在两个问题:1.ESM中使用import * as x from 'a'相当于commonJs中的const x = require('a')。乍一看貌似没啥问题,但实际上ESM的* as x是只能用于对象导入的,而对应的CJS中还可以是function等,这就会有问题了。2. 你引入的第三方包不一定都有做这两种规范的入口,所以可能会存在第一点中的问题。开启这个字段后,会从两方面来处理这个问题,一是compiler中,二是导入两个辅助函数。lib[24]: 类型检测需要的包,默认会检测你的target,会根据你的target来判断引入对应的内置api类型判断以及提示。默认也会有浏览器端代码提示,也就是DOM提示。skipLibCheck[25]: 看名字就知道,绕过整个包的检测,只会检测你引入的方法等,可以节省编译的时间。noEmit[26]: 看名字也很好懂,就是不要输出,比如编译后的源码,sourcemap等,这样你引入的typescript就相当于只是类型检测和代码提示的包而已。 然后可以用其它包比如babel转换。include[27]: 这个就不多说了,就是限制只转换这部分的文件,其中/**/*.xx是会检测所有这个文件夹下的文件的,但如果只是*.xx,没有**/就只会检测当前这个文件夹下的xx后缀名字的文件,文件夹会直接绕过。
references[28][29]
这个要单独说下,这是typescript 3.0开始支持的一个特性。
简单地说,你的项目可能有多个文件夹,这些文件夹有自己的想法,所以需要做不同的配置来构建单独的output,而如果没有使用这个特性,你只能是给每个文件夹加上tsconfig.json文件,并且执行多次tsc才行。
由于你可能需要不同的配置针对不同的文件夹,但是配置文件只有一个的时候并不能满足这个需求,当然你可以给每个文件夹配置一个自己的conf文件,但这依旧有一个问题就是tsc并不能帮你给所有的配置文件都处理,有些地方需要你去手动处理,watch也并不能一次性监听所有的配置文件,这也就意味着你也得手动添加才行。
针对上面的问题,3.0开始支持了refercens,能有效的帮你拆分你的项目,分别执行对应的配置。
path:指向对应文件夹中的配置文件,如果只写了文件夹名字,比如./src,那就只会读对应的tsconfig.json,而如果你的配置文件是自定义名字,请务必加上文件名。
然后我们创建tsconfig.node.json文件
 {
  "compilerOptions": {
    "composite": true,
    "module": "ESNext",
    "moduleResolution": "Node",
    "allowSyntheticDefaultImports": true
  },
  "include": ["vite.config.ts"]
}
composite[30]: 这是个必要字段,只要你是references的就都需要配置,方便ts去快速找到output对应的文件夹。不过如果你的文件位置和文件夹位置不是在同一个地方,那么你可以设置rootDir去改变。allowSyntheticDefaultImports[31]: 允许你使用import x from 'a'替换import * as x from 'a'include: 前面提到过include指向需要参与tsc构建的文件,这里单独开了一个reference,就是为了这个vite.config.ts能被正常处理,一般情况下不参与构建,所以这里得单独指明这个文件也是需要参与构建的。
然后我们修改下vite.config.js为vite.config.js。
接着我们新建src目录,将我们的App.vue、index.css迁移到src下。然后新建main.ts文件作为入口。
import { createApp } from 'vue'

import './index.css';

import App from './App.vue';

createApp(App).mount('#app')
这个时候的App.vue会有错误下划线,这是因为typescript并不知道这是什么,我们先不管,稍后会做声明。
然后改下index.html的引入,这里你应该有些好奇居然可以直接引入ts文件,那是因为vite将html作为入口,也是会参与打包的。
<script type="module" src="./src/main.ts"></script>接着我们进入到App.vue文件中,我们需要写点typescript的代码
 <template>
    <div class="test" @click="handleChangeText">{{ text }}</div>
</template>

<script setup lang="ts">
import { ref } from 'vue';
import type { Ref } from 'vue'

const text: Ref<string> = ref('hello world')

function handleChangeText(): void {
    text.value = 123
}

</script>

<style scoped>
.test {
    cursor: pointer;
    color: #0e0;
}
</style>
这个时候,handleChangeText方法中text.value会有红色下划线,这是因为我们定义了text是一个string类型的ref。
上面说到main.ts中引入App.vue时无法识别.vue文件,那是因为我们并没有对vue-sfc文件做声明,typescript自然是不认识的。
我们在src文件夹下新建vue-env.d.ts文件
/// <reference types="vite/client" />

declare module '*.vue' {
  import type { DefineComponent } from 'vue'
  const component: DefineComponent<{}, {}, any>
  export default component
}
/// <reference types="vite/client" />这一行代码是通知vite这是一个client端声明文件,之前讲vitest时也有提到过,感兴趣的大佬可以去看下我之前的文章。
声明的代码也很好理解,就是声明*.vue文件是Component。
我们之前已经在tsconfig.json中include过了.d.ts文件了,所以这里并不需要我们去哪里给他导入。
这个时候你再回去看main.ts,发现已经没有报错了。
最后我们来改下package.json中的一些地方
   "main": "src/main.ts",
  "module": "src/main.ts",
  "scripts": {
    "dev": "vue-tsc && vite"
},这样就配置ok啦,我们在终端运行下npm run dev。

img-7
运行成功!
配置vue-router[32]
既然基础已经可以跑通了,那么我们就来搞个小而五脏俱全的。
npm install vue-router --save这就安装完啦,然后我们在src文件夹下创建一个views文件夹,然后在里面创建Index.vue以及创建A.vue和B.vue用来测试我们的路由。
mkdir src/views
echo > src/views/A.vue
echo > src/views/B.vue
echo > src/views/Index.vue随便给A.vue以及B.vue写点东西,B的代码类似,这里就不展示了。
<template>
    <div class="a">
        {{ text }}
    </div>
</template>

<script setup lang="ts">
import { ref } from 'vue'
import type { Ref } from 'vue'
    const text: Ref<string> = ref('i am A')
</script>

<style scoped>
.a {
    color: red;
}
</style>
然后我们在src下创建router文件夹以及在这个文件夹里新建index.ts
mkdir src/router
echo > src/router/index.ts然后我们在这个index.ts中写下router的配置。
import { createRouter, createWebHashHistory } from 'vue-router'
import type { RouteRecordRaw, Router } from 'vue-router'

const Index = () => import('../views/Index.vue');

const A = () => import('../views/A.vue');
const B = () => import('../views/B.vue');


const routes: RouteRecordRaw[] = [
    {
        path: '/',
        component: Index,
        children: [
            { path: 'a', name: 'a', component: A },
            { path: 'b', name: 'b', component: B },
        ],
        redirect: 'a'
    }
]

const router: Router = createRouter({
    // 跳转方式,这里就不用H5了
    history: createWebHashHistory(),
    routes
})

export default router
主路由是Index.vue然后两个子路由A和B
然后老规矩将这个router给vue use一下。main.ts中引入router
 import { createApp } from "vue";

import router from "./router/index";

import "./index.css";

import App from "./App.vue";

createApp(App).use(router).mount("#app");
然后让我们回过头去到Index.vue中,我们需要写个click事件让路由变化。
 <template>
    <div class="index">
        <div class="change_route" @click="handleChangeRoute">切换</div>
        <router-view></router-view>
    </div>
</template>

<script setup lang="ts">
import { useRoute, useRouter } from 'vue-router';
import type { Router, RouteLocationNormalizedLoaded } from 'vue-router'

const router: Router = useRouter();
const route: RouteLocationNormalizedLoaded = useRoute()

function handleChangeRoute() {
    router.replace({ name: route.name === 'a' ? 'b' : 'a' })
}
</script>
由于组合式api不再使用this,所以这里只能是import再create了[33]。
另外别忘了在App.vue中将路由组件渲染在template中。
 <template>
    <router-view></router-view>
</template>

<script setup lang="ts">

import { ref } from 'vue';
import type { Ref } from 'vue'

const text: Ref<string> = ref('hello world')

function handleChangeText(): void {
    text.value = 'study vite !'
}

</script>

<style scoped>
.test {
    cursor: pointer;
    color: #0e0;
}
</style>
然后就完成啦,我们重新跑下指令npm run dev

router-change
运行成功!
配置pinia[34]
没想到vuex直接被偷家了,目前由于vuex还是4.x版本,存在一些问题,比如同步异步分割的问题(老问题了)。
而pinia完全就是按照vuex5的预案来实现的,所以说是vuex5也不为过,目前这个包是官方接手并且推荐的。
总结下就是pinia轻快好省。 话不多说,感兴趣的可以去看下官方的描述。
Piniapinia.vuejs.org/introduction.html正在上传…重新上传取消
我们直接来安装
npm install pinia --save
mkdir src/store
echo > src/store/index.ts
echo > src/store/user.ts话不多说,先引入pinia并且给vue use下。
 import { createPinia } from 'pinia'
import type { Pinia } from 'pinia'

const pinia: Pinia = createPinia();

export default pinia
然后main.ts引入
 import { createApp } from "vue";

import router from "./router/index";
import pinia from "./store/index";

import "./index.css";

import App from "./App.vue";

createApp(App).use(router).use(pinia).mount("#app");
ok,这就配置完啦~
接着我们来存储一些数据,进入src/store/user.ts
import { reactive, computed } from 'vue';
import { defineStore } from "pinia";

import type { ComputedRef } from 'vue';

// 相当于以前的`module`
const useUserStore = defineStore("user", () => {

    // 会被判定为`state`
    const user = reactive({
        name: '鲲哥',
        age: 24,
        gender: 'man', // 一个真正的man~(神经错乱)
        description: '全民制作人,大家好,我是cxk~',
    })


    // 会被转换为`action`
    function growUp (): void {
        user.age += 1
        console.log(user)
    }

    // 会被替换为getters
    const age: ComputedRef<number> = computed(() => user.age);

    return {
        user,
        age,
        growUp
    }
});

export default useUserStore
当然如果你不习惯写compositionApi的话也是可以的,传入一个options,字段为state, getters, action[35]
然后让我们去到A.vue方法中,将这个user引入
<template>
    <div class="a">
        <div class="btn" @click="store.growUp">
            点击立长一岁~~
        </div>
        <div class="age">当前岁数:{{ age }}</div>
    </div>
</template>

<script setup lang="ts">
import { storeToRefs } from 'pinia'
import useUserStore from '../store/user';

const store = useUserStore()

const { age } = storeToRefs(store);


</script>

<style scoped>
.a {
    color: red;
}
</style>
注意如果你用的是对象解构并且这个数据是一个非引用的数据,你就需要用storeToRefs进行包裹,因为解构导致它失去了响应式,相当于const a = 1这样。
ok,我们直接终端运行npm run dev

store
这样就完成啦~
配置别名[36]
我们接着准备接入vitest[37],不过在这之前,我们要配置下别名,不为什么,只是为了少写几个字而已~
话不多说,直接去到vite.config.ts文件中。 vite别名配置是基于rollup的插件@rollup/plugin-alias[38],所以写法一致。
import { defineConfig } from 'vite'
import vue from '@vitejs/plugin-vue'

// import './server.js'

export default defineConfig({
    resolve: {
        alias: {
            '@/': 'src/',
            '@views/': 'src/views/',
            '@router/': 'src/router/',
            '@store/': 'src/store/',
        }
    },
    plugins: [
        vue()
    ],
    server: {
        port: 7777,
    },
})
但是到这里还没有结束,我们还需要告知ts这个@字符代表什么意思。
 {
  "compilerOptions": {
    // ...
    "baseUrl": ".",
    "paths": {
      "@/*": ["src/*"],
      "@views/*": ["src/views/*"],
      "@store/*": ["src/store/*"],
      "@router/*": ["src/router/*"],
    }
  },
}这样就正常啦~,可以安心的将你的绝对路径改成@/xxx了。
配置vitest[39]
这是一个从vite中抽出去的一个包,我之前也写过一篇文章学习vitest的,感兴趣的大佬可以去看下。
坏蛋Dan:Vitest学习1 赞同 · 0 评论文章正在上传…重新上传取消
话不多说,我们直接配置。这里就不用inline测试了,感兴趣的大佬可以看下我上面提到的这个文章。 另外下面用到的一些东西我就不解释了,这文章里都有说的。
npm install vitest -D
mkdir __tests__
echo > __tests__/testComponentA.spec.ts首先,因为这个包是在src外的,所以我们需要在tsconfig.json文件中将他include了导入文件才能正常。
{
  "include": ["src/**/*.ts", "src/**/*.d.ts", "src/**/*.tsx", "src/**/*.vue", "__tests__/**/*.ts"],
}然后我们直接进入vite.config.ts中配置下。
/// <reference types="vitest" />

import { defineConfig } from 'vite'
import vue from '@vitejs/plugin-vue'

// import './server.js'

export default defineConfig({
    resolve: {
        alias: {
            '@/': 'src/',
            '@views/': 'src/views/',
            '@router/': 'src/router/',
            '@store/': 'src/store/',
        }
    },
    test: {
        environment: 'jsdom',
        globals: true
    },
    plugins: [
        vue()
    ],
    server: {
        port: 7777,
    },
})
这里需要注意几点,如果你是在vite.config.ts文件中配置的,你需要在文件头配置 /// <reference types="vitest" />通知vite这里有配置test 。当然你也可以重开一个vitest.config.ts,然后把这个vite.config.ts注释掉,将里面的配置迁移到vitest.config.ts中。当然你还可以使用mergeConfig将这两个配置文件中的配置合并,这里就不多说了。
environment: jsdom表示我们是在浏览器环境,需要测试dom。
globals: 如果是true你就可以在全局都有vitest的代码提示了。 如果设置了true别忘了通知ts,回到tsconfig.node.json中配置types。
 {
  "compilerOptions": {
    "composite": true,
    "module": "ESNext",
    "moduleResolution": "Node",
    "allowSyntheticDefaultImports": true,
    "types": ["vitest/globals"]
  },
  "include": ["vite.config.ts"]
}然后我们再来安装下我们测试需要的包jsdom[40]和@vue/test-utils[41] 。
npm install jsdom @vue/test-utils -D然后我们进入__tests__/testComponentA.spec.ts中
import { describe, it, expect } from 'vitest';
import { mount } from '@vue/test-utils'

import A from '../src/views/A.vue';

describe('test-component-a-grow-up', () => {
    it('test-a-click', () => {
        const wrapper = mount(A, {});
        // 找到按钮并让他加一岁
        const btn = wrapper.get('.btn');
        btn.trigger('click');

        expect(wrapper.get('.age').text()).contain('25');
    })

})
最后让我们去到package.json文件中新增一个script: "test": "vitest"
然后终端执行npm run test
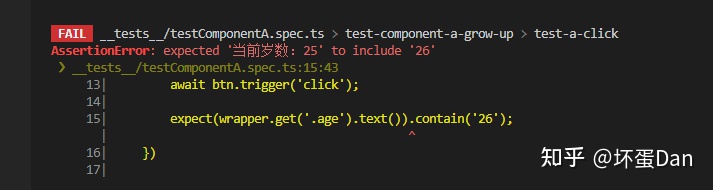
然而直接报错了。

test-run-error
为什么呢,因为这个时候pinia没创建实例,这又是为什么呢?因为项目没有跑起来。。。
那么怎么办呢?那只能是将main.ts也跑了。。另外还发现一个问题,就是点击事件需要异步处理。
 import { describe, it, expect } from 'vitest';
import { mount } from '@vue/test-utils'

import '../src/main';
import A from '../src/views/A.vue';


describe('test-component-a-grow-up', () => {
    it('test-a-click', async () => {
        const wrapper = mount(A, {});
        // 找到按钮并让他加一岁
        const btn = wrapper.get('.btn');
        await btn.trigger('click');

        expect(wrapper.get('.age').text()).contain('26');
    })

})
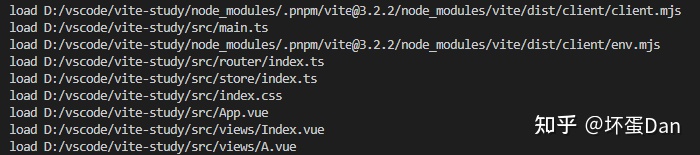
这回重新跑npm run test
test-img
成功啦~,age成功变成25了。
plugin[42]
我们来搞个自己的插件玩下。
vite的plugin接口是基于rollup[43]的接口,然后加了一些自己的东西。
我们先在根目录新建一个plugins的文件夹,然后新建vite-plugin-vue-test.ts。这里需要注意vite的plugin的文件名是一定要vite-plugin-*[44]的,如果你的plugin是只想用于某个框架,那就得是vite-plugin-vue/react-*这样。当然你可以写rollup的插件,命名和rollup的规范一致。
先来看下编写规范,和rollup的其实是一样的。
 export default function myPlugin(options = {}) {
    return {
      name: 'my-plugin', // required, will show up in warnings and errors
      resolveId(id) {
        //...
      },
      load(id) {
        //...
      }
    }
  }
- 首先你得是一个函数并且默认导出。
- 你这个函数需要返回一个
name字段,这是必须的,用来标识你的plugin。 resolved、load都是vite抛出的hook,你可以监听他们,然后返回数据来改变某些东西。
ok,基本了解完毕,接下来就是得想一下我们的plugin要干嘛,就简单的log下吧。。。学习嘛,就是不要有这么多技术含量doge(误).
我们来log下执行过程中的三个hook,看下都是个啥。
 export default function myPlugin() {
    return {
      name: 'my-plugin', // required, will show up in warnings and errors
      resolveId(id) {
        console.log(`resolveId: ${id}`)
      },
      load(id) {
        console.log(`load ${id}`)
      },
      transform (...args) {
        console.log(`transform ${args}`)
      }
    }
  }
resolveId[45]: 模块请求中自定义的解释器?可用来代码第三方包的解析。

hook-resolveId
load[46]: 加载的时候触发,热更新的时候只加载需要的。id指向文件路径。
hook-load
transform[47]: 看名字就知道这肯定是和源码有关的。

hook-transform
其他的hook这里就不log了,知道怎么实现一个plugin就是我们的目标。