一、背景
linux kernel 内存踩踏之KASAN(一)_kasan版本跟hasan版本区别-CSDN博客
linux kernel 内存踩踏之KASAN_SW_TAGS(二)-CSDN博客
最后来介绍一下KASAN_HW_TAGS,ARM64上就是MTE,这个特性在ARMv8.5支持,实际目前市面支持MTE的芯片都是ARMv9了; 由于这个特性依赖硬件支持,本文利用qemu 学习这个feature。
二、KASAN_HW_TAGS (MTE)使能相关配置
内核相关配置
CONFIG_HAVE_ARCH_KASAN=y
CONFIG_HAVE_ARCH_KASAN_SW_TAGS=y
CONFIG_HAVE_ARCH_KASAN_HW_TAGS=y
CONFIG_HAVE_ARCH_KASAN_VMALLOC=y
CONFIG_CC_HAS_KASAN_GENERIC=y
CONFIG_CC_HAS_KASAN_SW_TAGS=y
CONFIG_KASAN=y
# CONFIG_KASAN_GENERIC is not set
# CONFIG_KASAN_SW_TAGS is not set
CONFIG_KASAN_HW_TAGS=y           //mte相关
CONFIG_KASAN_VMALLOC=y
MTE 相关feature 是否打开
  502 # ARMv8.5 architectural features
  503 #
  504 CONFIG_AS_HAS_ARMV8_5=y
  ......
  508 CONFIG_ARM64_AS_HAS_MTE=y
  509 CONFIG_ARM64_MTE=y
确认MTE是否正常打开
geek@geek-virtual-machine:~/workspace/linux/qemu$ ./linux_boot.sh
qemu-system-aarch64: MTE requested, but not supported by the guest CPU
调试时遇到,MTE未打开的情况,可以打断点在 kasan_init_hw_tags
void __init kasan_init_hw_tags(void)
{
	/* If hardware doesn't support MTE, don't initialize KASAN. */
	if (!system_supports_mte())
		return;

	......

	/* KASAN is now initialized, enable it. */
	static_branch_enable(&kasan_flag_enabled);

	pr_info("KernelAddressSanitizer initialized (hw-tags, mode=%s, vmalloc=%s, stacktrace=%s)\n",
		kasan_mode_info(),
		kasan_vmalloc_enabled() ? "on" : "off",
		kasan_stack_collection_enabled() ? "on" : "off");
}
上面的异常最终确认是之前所使用的CPU类型不支持,修改的qemu启动脚本如下:
主要是machine增加mte=on字段,CPU选择支持mte的架构,如:cortex-a710
qemu-system-aarch64 \
    -machine virt,gic-version=3,mte=on \
    -nographic \
    -m size=2048M \
    -cpu cortex-a710 \
    -smp 8 \
    -kernel Image \
    -drive format=raw,file=rootfs.img \
    -append "root=/dev/vda rw nokaslr kasan=on kasan.mode=sync kasan.stacktrace=on kasan.fault=report " \
    -s
成功打开时,内核kmsg会打印:
kasan: KernelAddressSanitizer initialized (hw-tags, mode=sync, vmalloc=on, stacktrace=on)三、KASAN_HW_TAGS(MTE)基本原理

MTE的lock和key模型
MTE中key存放在指针高byte中,lock则是对内存的标记,只有key和lock匹配时,才能正常访问和操作内存。
MTE新增的指令
| Instruction | Name |
| ADDG | Add with Tag |
| CMPP | Compare with Tag |
| GMI | Tag Mask Insert |
| IRG | Insert Random Tag |
| LDG | Load Allocation Tag |
| LDGV | Load Tag Vector |
| ST2G | Store Allocaton Tags to two granules |
| STG | Store Allocation Tag |
| STGP | Store Allocation Tag and Pair |
| STGV | Store Tag Vector |
| STZ2G | Store Allocation Tags to two granules Zeroing |
| STZG | Store Allocation Tag, Zeroing |
| SUBG | Subtract with Tag |
| SUBP | Subtract Pointer |
| SUBPS | Subtract Pointer, setting Flags |
| ... |
基本上MTE的使用分为三步:
1、memtag create(lock)

2、address tag(指针key)

MTE 需要结合ARM64的TBI(Top Byte Ignore)特性,在指针最高byte存储tag信息,这个实现和前面介绍的KASAN_SW_TAGS类似,不过MTE只需要4bit就够了。
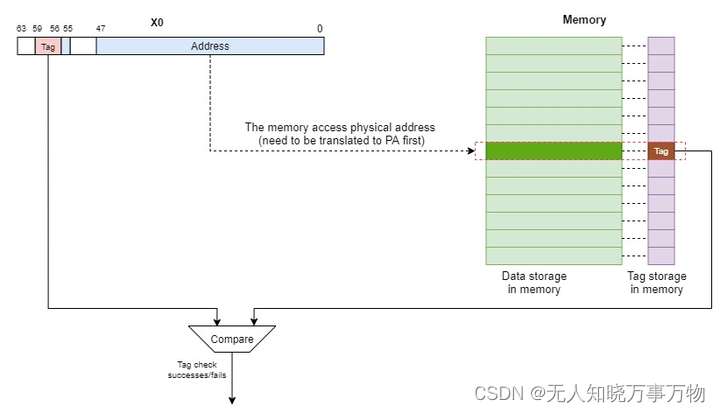
3、tag check
四、Linux中KASAN_HW_TAGS(MTE)关键实现
4.1 先看一个例子日志
还是使用之前的测试程序 linux kernel 内存踩踏之KASAN(一)_kasan版本跟hasan版本区别-CSDN博客:
/test # echo 0 > /dev/kasan_test
[  156.628134] kmalloc_oob_right f9ff0000038b5000
[  156.629125] ==================================================================
[  156.633409] BUG: KASAN: invalid-access in kmalloc_oob_right.constprop.0+0x48/0x64 [kasan_driver]
[  156.634892] Write at addr f9ff0000038b5081 by task sh/179
[  156.635552] Pointer tag: [f9], memory tag: [fe]
[  156.635990]
[  156.636490] CPU: 4 PID: 179 Comm: sh Tainted: G                 N 6.6.1-gf1e080ccc5c5-dirty #19
[  156.637310] Hardware name: linux,dummy-virt (DT)
[  156.637771] Call trace:
[  156.638111]  dump_backtrace+0x90/0xe8
[  156.638721]  show_stack+0x18/0x24
[  156.639046]  dump_stack_lvl+0x48/0x60
[  156.639391]  print_report+0x100/0x600
[  156.639703]  kasan_report+0x84/0xac
[  156.640034]  __do_kernel_fault+0xa4/0x194
[  156.640376]  do_tag_check_fault+0x78/0x8c
[  156.640724]  do_mem_abort+0x44/0x94
[  156.641052]  el1_abort+0x40/0x60
[  156.641367]  el1h_64_sync_handler+0xa4/0xe4
[  156.641719]  el1h_64_sync+0x64/0x68
[  156.642042]  kmalloc_oob_right.constprop.0+0x48/0x64 [kasan_driver]
[  156.642511]  kasan_test_case+0x38/0xb0 [kasan_driver]
[  156.642921]  kasan_testcase_write+0x7c/0xf4 [kasan_driver]
[  156.643350]  vfs_write+0xc8/0x300
[  156.643666]  ksys_write+0x74/0x10c
[  156.643986]  __arm64_sys_write+0x1c/0x28
[  156.644336]  invoke_syscall+0x48/0x110
[  156.644681]  el0_svc_common.constprop.0+0x40/0xe0
[  156.645082]  do_el0_svc+0x1c/0x28
[  156.645415]  el0_svc+0x40/0x114
[  156.645728]  el0t_64_sync_handler+0x120/0x12c
[  156.646092]  el0t_64_sync+0x19c/0x1a0
[  156.646528]
[  156.646749] The buggy address belongs to the object at ffff0000038b5080
[  156.646749]  which belongs to the cache kmalloc-128 of size 128
[  156.647547] The buggy address is located 1 bytes inside of
[  156.647547]  128-byte region [ffff0000038b5080, ffff0000038b5100)
[  156.648270]
[  156.648533] The buggy address belongs to the physical page:
[  156.649067] page:00000000ffd93f36 refcount:1 mapcount:0 mapping:0000000000000000 index:0x0 pfn:0x438b5
[  156.650024] flags: 0x3fffc0000000800(slab|node=0|zone=0|lastcpupid=0xffff|kasantag=0x0)
[  156.651089] page_type: 0xffffffff()
[  156.651723] raw: 03fffc0000000800 f6ff000002c02600 dead000000000122 0000000000000000
[  156.652262] raw: 0000000000000000 0000000080200020 00000001ffffffff 0000000000000000
[  156.652786] page dumped because: kasan: bad access detected
[  156.653183]
[  156.653375] Memory state around the buggy address:
[  156.653836]  ffff0000038b4e00: f7 f7 f7 f7 f7 f7 f7 f7 f7 f7 f7 f7 f7 f7 f7 f7
[  156.654346]  ffff0000038b4f00: f7 f7 f7 f7 f7 f7 f7 f7 f7 f7 f7 f7 f7 f7 f7 f7
[  156.654857] >ffff0000038b5000: f9 f9 f9 f9 f9 f9 f9 f9 fe fe fe fe fe fe fe fe
[  156.655342]                                            ^
[  156.655870]  ffff0000038b5100: fe fe fe fe fe fe fe fe fe fe fe fe fe fe fe fe
[  156.656351]  ffff0000038b5200: fe fe fe fe fe fe fe fe fe fe fe fe fe fe fe fe
[  156.656842] ==================================================================
[  156.657836] Disabling lock debugging due to kernel taint
[  156.659261] kasan_test_case type 0
上面的例子触发越界访问, key 是f9, 访问到越界内存,而越界内存的 memory tag(lock)是fe, 所以触发异常。
4.2 关键代码分析:
测试代码中函数kmalloc_oob_right分析,转化成汇编之后可以看到基于MTE的实现方法在触发越界时不需要像之前kasan/sw_tag kasan那样有读取tag对比的代码了,MTE中这些都是硬件实现的
(gdb) disassemble
Dump of assembler code for function kmalloc_oob_right:
   0xffff80007a8801b0 <+0>:	paciasp
=> 0xffff80007a8801b4 <+4>:	adrp	x0, 0xffff800081a2d000 <cpucap_ptrs+272>
   0xffff80007a8801b8 <+8>:	stp	x29, x30, [sp, #-32]!
   0xffff80007a8801bc <+12>:	mov	x2, #0x80                  	// #128
   0xffff80007a8801c0 <+16>:	mov	w1, #0xcc0                 	// #3264
   0xffff80007a8801c4 <+20>:	mov	x29, sp
   0xffff80007a8801c8 <+24>:	ldr	x0, [x0, #1752]
   0xffff80007a8801cc <+28>:	str	x19, [sp, #16]
   0xffff80007a8801d0 <+32>:	bl	0xffff80008022e498 <kmalloc_trace>
   0xffff80007a8801d4 <+36>:	mov	x19, x0
   0xffff80007a8801d8 <+40>:	adrp	x1, 0xffff80007a884000
   0xffff80007a8801dc <+44>:	add	x1, x1, #0x110
   0xffff80007a8801e0 <+48>:	mov	x2, x0
   0xffff80007a8801e4 <+52>:	add	x1, x1, #0x30
   0xffff80007a8801e8 <+56>:	adrp	x0, 0xffff80007a884000
   0xffff80007a8801ec <+60>:	add	x0, x0, #0x50
   0xffff80007a8801f0 <+64>:	bl	0xffff8000800f45a0 <_printk>
   0xffff80007a8801f4 <+68>:	mov	w1, #0x79                  	// #121
   0xffff80007a8801f8 <+72>:	strb	w1, [x19, #129]     //触发越界写入
   0xffff80007a8801fc <+76>:	mov	x0, x19
   0xffff80007a880200 <+80>:	bl	0xffff80008022f5d0 <kfree>
   0xffff80007a880204 <+84>:	ldr	x19, [sp, #16]
   0xffff80007a880208 <+88>:	ldp	x29, x30, [sp], #32
   0xffff80007a88020c <+92>:	autiasp
   0xffff80007a880210 <+96>:	ret
设置memtag, 还是用kmalloc为例:
kmalloc
-->kmalloc_trace
     -->__kmem_cache_alloc_node
         -->slab_alloc_node
              -->slab_post_alloc_hook
                   -->kasan_slab_alloc

void * __must_check __kasan_slab_alloc(struct kmem_cache *cache,
					void *object, gfp_t flags, bool init)
{
	....

	/*
	 * Generate and assign random tag for tag-based modes.
	 * Tag is ignored in set_tag() for the generic mode.
	 */
	tag = assign_tag(cache, object, false);    // 1、随机数分配tag
	tagged_object = set_tag(object, tag);      // 2、设置tag 到指针

	/*
	 * Unpoison the whole object.
	 * For kmalloc() allocations, kasan_kmalloc() will do precise poisoning.
	 */
	kasan_unpoison(tagged_object, cache->object_size, init);
        3、设置memtag


	/* Save alloc info (if possible) for non-kmalloc() allocations. */
	if (kasan_stack_collection_enabled() && !is_kmalloc_cache(cache))
		kasan_save_alloc_info(cache, tagged_object, flags);


	return tagged_object;
}

#if defined(CONFIG_KASAN_SW_TAGS) || defined(CONFIG_KASAN_HW_TAGS)
#define __tag_shifted(tag)  ((u64)(tag) << 56)
#define __tag_reset(addr)   __untagged_addr(addr)
#define __tag_get(addr)     (__u8)((u64)(addr) >> 56)

1、分配tag
static inline u8 assign_tag(struct kmem_cache *cache,
					const void *object, bool init)
{
	if (IS_ENABLED(CONFIG_KASAN_GENERIC))
		return 0xff;

	/*
	 * If the cache neither has a constructor nor has SLAB_TYPESAFE_BY_RCU
	 * set, assign a tag when the object is being allocated (init == false).
	 */https://www.kernel.org/doc/html/v5.15/arm64/memory-tagging-extension.html
	if (!cache->ctor && !(cache->flags & SLAB_TYPESAFE_BY_RCU))
		return init ? KASAN_TAG_KERNEL : kasan_random_tag();

	/* For caches that either have a constructor or SLAB_TYPESAFE_BY_RCU: */
#ifdef CONFIG_SLAB
	/* For SLAB assign tags based on the object index in the freelist. */
	return (u8)obj_to_index(cache, virt_to_slab(object), (void *)object);
#else
	/*
	 * For SLUB assign a random tag during slab creation, otherwise reuse
	 * the already assigned tag.
	 */
	return init ? kasan_random_tag() : get_tag(object);
#endif
}

static inline u8 kasan_random_tag(void) { return hw_get_random_tag(); }

#ifdef CONFIG_KASAN_HW_TAGS
...
#define hw_get_random_tag()			arch_get_random_tag()
#define hw_get_mem_tag(addr)			arch_get_mem_tag(addr)
#define hw_set_mem_tag_range(addr, size, tag, init) \
			arch_set_mem_tag_range((addr), (size), (tag), (init))

#ifdef CONFIG_KASAN_HW_TAGS
...
#define arch_get_random_tag()			mte_get_random_tag()
#define arch_get_mem_tag(addr)			mte_get_mem_tag(addr)
#define arch_set_mem_tag_range(addr, size, tag, init)	\
			mte_set_mem_tag_range((addr), (size), (tag), (init))
#endif /* CONFIG_KASAN_HW_TAGS */

/* Generate a random tag. */
static inline u8 mte_get_random_tag(void)
{
	void *addr;

	asm(__MTE_PREAMBLE "irg %0, %0"
		: "=r" (addr));

	return mte_get_ptr_tag(addr);
}

设置memtag
static inline void kasan_poison(const void *addr, size_t size, u8 value, bool init)
{
	addr = kasan_reset_tag(addr);

	/* Skip KFENCE memory if called explicitly outside of sl*b. */
	if (is_kfence_address(addr))
		return;

	if (WARN_ON((unsigned long)addr & KASAN_GRANULE_MASK))
		return;
	if (WARN_ON(size & KASAN_GRANULE_MASK))
		return;

	hw_set_mem_tag_range((void *)addr, size, value, init);
}

对比之前的定义:
#define hw_set_mem_tag_range(addr, size, tag, init) \
			arch_set_mem_tag_range((addr), (size), (tag), (init))

#define arch_set_mem_tag_range(addr, size, tag, init)	\
			mte_set_mem_tag_range((addr), (size), (tag), (init))


static inline void mte_set_mem_tag_range(void *addr, size_t size, u8 tag,
					 bool init)
{
	u64 curr, mask, dczid, dczid_bs, dczid_dzp, end1, end2, end3;

	/* Read DC G(Z)VA block size from the system register. */
	dczid = read_cpuid(DCZID_EL0);
	dczid_bs = 4ul << (dczid & 0xf);
	dczid_dzp = (dczid >> 4) & 1;

	curr = (u64)__tag_set(addr, tag);
	mask = dczid_bs - 1;
	/* STG/STZG up to the end of the first block. */
	end1 = curr | mask;
	end3 = curr + size;
	/* DC GVA / GZVA in [end1, end2) */
	end2 = end3 & ~mask;

	/*
	 * The following code uses STG on the first DC GVA block even if the
	 * start address is aligned - it appears to be faster than an alignment
	 * check + conditional branch. Also, if the range size is at least 2 DC
	 * GVA blocks, the first two loops can use post-condition to save one
	 * branch each.
	 */
#define SET_MEMTAG_RANGE(stg_post, dc_gva)		\
	do {						\
		if (!dczid_dzp && size >= 2 * dczid_bs) {\
			do {				\
				curr = stg_post(curr);	\
			} while (curr < end1);		\
							\
			do {				\
				dc_gva(curr);		\
				curr += dczid_bs;	\
			} while (curr < end2);		\
		}					\
							\
		while (curr < end3)			\
			curr = stg_post(curr);		\
	} while (0)

	if (init)
		SET_MEMTAG_RANGE(__stzg_post, __dc_gzva);
	else
		SET_MEMTAG_RANGE(__stg_post, __dc_gva);
#undef SET_MEMTAG_RANGE
}

static inline u64 __stg_post(u64 p)
{
	asm volatile(__MTE_PREAMBLE "stg %0, [%0], #16"
		     : "+r"(p)
		     :
		     : "memory");
	return p;
}
上面的核心实现可以看到,主要是两个指令:一个是IRG, 一个是STG, 完成了key和lock的填充。
4.3 tag存在哪里?
MTE将tags分成两类:
Address Tag:也就是key, 是4bit存放在虚拟地址的最高byte中(利用ARM64的TBI 特性)
Memory Tag:也叫lock, Memeory tag也是4bit, 每4byte代表16 byte, 与kasan, sw tag kasan 不同,MTE中Memory tag的存储是由硬件实现的。
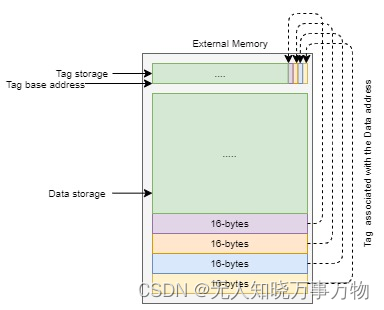
看上图实际MTE的tag也是存储在memory上的,按照tag的消耗是4bit标记16byte, 开启MTE后也是会消耗1/32的物理内存,但是这个memory 的地址我们在内核是看不到的,kernel也没有看到设定的地方。
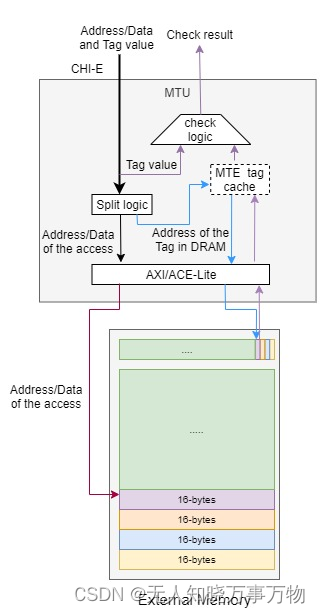
翻看ARM手册,如上图所示有一个Memory Tag Unit(MTU)管理和区分tag storage和data storage。
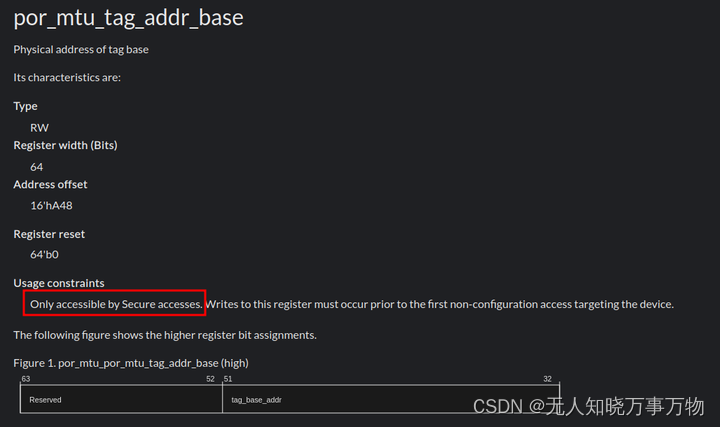
翻看CI-700的手册中有介绍设置MTE tag存储的物理地址的起始地址,其中还描述了这个寄存器只能在secure(EL3)操作,这也是为什么在内核找不到设置的地方(通常MTE使能的硬件平台会在设备树中增加一个保留内存,这个内存也就是在TZ中被设置,用来存储tag信息)
五、用户空间MTE使用方法
前面讲了内核中的MTE实现和使用,用户空间也是类似的,arm官网提供了一个很好的例子:
/*
* Memory Tagging Extension (MTE) example for Linux
*
* Compile with gcc and use -march=armv8.5-a+memtag
* gcc mte-example.c -o mte-example -march=armv8.5-a+memtag
*
* Compilation should be done on a recent Arm Linux machine for the .h files to include MTE support.
*
*/
#include <stdio.h>
#include <stdlib.h>
#include <unistd.h>
#include <sys/auxv.h>
#include <sys/mman.h>
#include <sys/prctl.h>
/*
* Insert a random logical tag into the given pointer.
* IRG instruction.
*/
#define insert_random_tag(ptr) ({ \
uint64_t __val; \
asm("irg %0, %1" : "=r" (__val) : "r" (ptr)); \
__val; \
})
/*
* Set the allocation tag on the destination address.
* STG instruction.
*/
#define set_tag(tagged_addr) do { \
asm volatile("stg %0, [%0]" : : "r" (tagged_addr) : "memory"); \
} while (0)
int main(void)
{
unsigned char *ptr; // pointer to memory for MTE demonstration
/*
* Use the architecture dependent information about the processor
* from getauxval() to check if MTE is available.
*/
if (!((getauxval(AT_HWCAP2)) & HWCAP2_MTE))
{
printf("MTE is not supported\n");
return EXIT_FAILURE;
}
else
{
printf("MTE is supported\n");
}
/*
* Enable MTE with synchronous checking
*/
if (prctl(PR_SET_TAGGED_ADDR_CTRL,
PR_TAGGED_ADDR_ENABLE | PR_MTE_TCF_SYNC | (0xfffe << PR_MTE_TAG_SHIFT),
0, 0, 0))
{
perror("prctl() failed");
return EXIT_FAILURE;
}
/*
* Allocate 1 page of memory with MTE protection
*/
ptr = mmap(NULL, sysconf(_SC_PAGESIZE), PROT_READ | PROT_WRITE | PROT_MTE, MAP_PRIVATE | MAP_ANONYMOUS, -1, 0);
if (ptr == MAP_FAILED)
{
perror("mmap() failed");
return EXIT_FAILURE;
}
/*
* Print the pointer value with the default tag (expecting 0)
*/
printf("pointer is %p\n", ptr);
/*
* Write the first 2 bytes of the memory with the default tag
*/
ptr[0] = 0x41;
ptr[1] = 0x42;
/*
* Read back to confirm the writes
*/
printf("ptr[0] = 0x%hhx ptr[1] = 0x%hhx\n", ptr[0], ptr[1]);
/*
* Generate a random tag and store it for the address (IRG instruction)
*/
ptr = (unsigned char *) insert_random_tag(ptr);
/*
* Set the key on the pointer to match the lock on the memory (STG instruction)
*/
set_tag(ptr);
/*
* Print the pointer value with the new tag
*/
printf("pointer is now %p\n", ptr);
/*
* Write the first 2 bytes of the memory again, with the new tag
*/
ptr[0] = 0x43;
ptr[1] = 0x44;
/*
* Read back to confirm the writes
*/
printf("ptr[0] = 0x%hhx ptr[1] = 0x%hhx\n", ptr[0], ptr[1]);
/*
* Write to memory beyond the 16 byte granule (offsest 0x10)
* MTE should generate an exception
* If the offset is less than 0x10 no SIGSEGV will occur.
*/
printf("Expecting SIGSEGV...\n");
ptr[0x10] = 0x55;
/*
* Program only reaches this if no SIGSEGV occurs
*/
printf("...no SIGSEGV was received\n");
return EXIT_FAILURE;
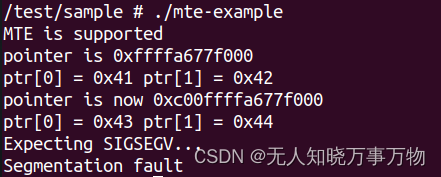
}上面的例子很简单,就是利用irg和stg指令给指定的内存生成lock, 指针tag(生成key),然后进行越界访问,会触发异常。
在qemu中执行结果:
六、小结
对比kernel中内存踩踏检测工具
| 类型 | shadow内存占用 | cpu占用 | 优缺点 |
|---|---|---|---|
| KASAN | 1/8 | 复杂,每次内存访问,需要计算对比shadow值 | 定位准确,8byte内的踩踏也能检测;32位/64位均能使用 |
| KASAN_SW_TAGS | 1/16 | 每次内存访问,需要计算对比shadow值 | 16 byte内的踩踏无法区分, 仅64才能使用(因为依赖arm64 TBI feature) |
| KASAN_HW_TAGS(MTE) | 1/32 | 5%左右消耗,tag的生成和检查由硬件完成 | 16 byte内的踩踏无法区分, 仅支持MTE的平台才能使用 |
其实对比KASAN_SW_TAGS, MTE主要是性能上的提升,缺点和能力与KASAN_SW_TAGS接近,MTE的诞生其实不是用来debug, 而是google希望推动MTE在商用版本上落地,最根本的目的是解决内存安全的问题,当前目前的确有性能上的影响(目前厂商均未应用到用户端),随着MTE本身的优化和CPU性能的进一步提升,也许不久的将来会看到MTE落地到产品商用版本上。
参考:
Memory Tagging Extension (MTE) in AArch64 Linux
Learn about the Arm Memory Tagging Extension: Build and run an example application to learn about MTE
Arm 内存标记扩展 (MTE) | Android NDK | Android Developers
ARM MTE简介-CSDN博客
https://www.qemu.org/docs/master/system/arm/virt.html
https://www.kernel.org/doc/html/v5.15/arm64/memory-tagging-extension.html
Documentation - Arm Developer


![[playbook] playbook运用](https://img-blog.csdnimg.cn/direct/47fad8cc8a904111a6110459a42312d4.png)