一、SpringBoot多环境配置
1.环境的配置信息
(1)application.properties
#指定默认使用dev的配置
spring.profiles.active=dev
(2)application-dev.properties
#开发环境
server.port=8080
branch=dev
(3)application-prod.properties
#测试环境
server.port=8081
branch=test
2.测试类
package com.yh.bootev.controller;

import org.springframework.beans.factory.annotation.Value;
import org.springframework.web.bind.annotation.GetMapping;
import org.springframework.web.bind.annotation.RequestMapping;
import org.springframework.web.bind.annotation.RestController;

/**
 * @Author youHui
 * 检测当前使用的是哪个环境
 **/
@RestController
@RequestMapping("/test")
public class TestController {
    @Value("${branch}")
    private String branch;

    @GetMapping("/branch")
    public String test(){
        return branch;
    }

}
3.打包后在不同环境下运行
java -jar 你打包的jar包名.jar --spring.profiles.active=你要切换的环境
如:java -jar boot-ev-0.0.1-SNAPSHOT.jar --spring.profiles.active=prod
二、SpringBoot devtools热部署配置(自动的不建议,对性能消耗大,建议手动的)
1.引入依赖
<dependency>
    <groupId>org.springframework.boot</groupId>
    <artifactId>spring-boot-devtools</artifactId>
</dependency>2.配置plugin :加入 pligin 且配置一个属性 fork 为 true
    <build>
        <plugins>
            <plugin>
                <groupId>org.springframework.boot</groupId>
                <artifactId>spring-boot-maven-plugin</artifactId>
                <configuration>
                    <fork>true</fork>
                </configuration>
            </plugin>
        </plugins>
    </build>
3.开启自动编译
5.重启IDEA即可实现热部署。
三、SpringBoot过滤器
(一)快速了解过滤器
过滤器是基于Servlet实现的,在web开发中可以帮助过滤一些指定的url,可以过滤掉不需要的东西,比如:一些错误的请求。过滤未登录的用户等。
废话不多说直接上代码:
方式一:@WebFilter
1.创建过滤器
package com.yh.bootfilter.filter;


import org.springframework.core.annotation.Order;

import javax.servlet.*;
import javax.servlet.annotation.WebFilter;
import javax.servlet.http.HttpServletRequest;
import java.io.IOException;

/**
 * @Author youHui
 * 自定义Filter的方式有两种,一种是@WebFilter,另一种是FilterRegistrationBean
 *方式一:
 * @WebFilter用于将一个类声明为过滤器,该注解将在部署时被容器处理,
 * 容器会根据具体的属性配置将相应的类部署为过滤器
 * 其中的来个参数
 * urlPatterns = "/api/*":定义要拦截的url路径
 * filterName = "myFilter":指定过滤器的名称
 **/
@WebFilter(urlPatterns = "/api/*",filterName = "myFilter")
@Order(1) //这个值用来控制过滤的执行顺序,若同时有多个过滤器,该值越大,越往后执行
public class MyFilter implements Filter {//1.实现Filter接口
    //2.重写Filter的三个方法

    @Override
    public void init(FilterConfig filterConfig) throws ServletException {
        System.out.println("MyFilter被初始化了");

    }

    @Override
    public void doFilter(ServletRequest servletRequest, ServletResponse servletResponse, FilterChain filterChain) throws IOException, ServletException {
        //获取所拦截的接口信息
        HttpServletRequest request = (HttpServletRequest) servletRequest;
        String uri = request.getRequestURI();
        String method = request.getMethod();
        System.out.println("请求的接口--"+uri+"请求的方法--"+method);
        filterChain.doFilter(servletRequest,servletResponse);//只用执行了这个方法,才会丸往下执行
    }

    @Override
    public void destroy() {
        System.out.println("MyFilter被销毁");
    }
}
2.测试类
package com.yh.bootfilter.controller;

import org.springframework.web.bind.annotation.GetMapping;
import org.springframework.web.bind.annotation.RequestMapping;
import org.springframework.web.bind.annotation.RestController;

/**
 * @Author youHui
 **/
@RestController
@RequestMapping("/api")
public class FilterTestController {
    @GetMapping("/user/filter")
    public String hello(){
        return "我被myFilter过滤器监控了";
    }
}
3.注:需要在启动类中加
@ServletComponentScan注解过滤器才会生效
方式二:
通过FilterRegistrationBean注入容器的方式实现
1.创建过滤器类
package com.yh.bootfilter.filter;


import javax.servlet.*;
import javax.servlet.http.HttpServletRequest;
import java.io.IOException;

/**
 * @Author youHui
 *FilterRegistrationBean
 **/

public class MyFilter2 implements Filter {//1.实现Filter接口
    //2.重写Filter的三个方法

    @Override
    public void init(FilterConfig filterConfig) throws ServletException {
        System.out.println("MyFilter被初始化了");

    }

    @Override
    public void doFilter(ServletRequest servletRequest, ServletResponse servletResponse, FilterChain filterChain) throws IOException, ServletException {
        //获取所拦截的接口信息
        HttpServletRequest request = (HttpServletRequest) servletRequest;
        String uri = request.getRequestURI();
        String method = request.getMethod();
        System.out.println("请求的接口--"+uri+"请求的方法--"+method);
        filterChain.doFilter(servletRequest,servletResponse);//只用执行了这个方法,才会丸往下执行
    }

    @Override
    public void destroy() {
        System.out.println("MyFilter被销毁");
    }
}
2.创建配置类:目的是为了将过滤器信息注入到Spring容器中去
package com.yh.bootfilter.config;

import com.yh.bootfilter.filter.MyFilter2;
import org.springframework.boot.web.servlet.FilterRegistrationBean;
import org.springframework.context.annotation.Bean;
import org.springframework.context.annotation.Configuration;

/**
 * @Author youHui
 **/
@Configuration
public class FilterConfig {

    //将过滤去注入到容器中
    @Bean
    public MyFilter2 myFilter2(){
        return new MyFilter2();
    }

    @Bean
    public FilterRegistrationBean getFilterRegistrationBean(MyFilter2 myFilter2){
        FilterRegistrationBean filterRegistrationBean = new FilterRegistrationBean();
        filterRegistrationBean.setFilter(myFilter2);//指定过滤器类
        filterRegistrationBean.setOrder(1);//过滤器的顺序
        filterRegistrationBean.addUrlPatterns("/api/*");//指定要拦截的接口
        filterRegistrationBean.setName("myFilter");//指定过滤器名
        return filterRegistrationBean;
    }
}
3.测试类
package com.yh.bootfilter.controller;

import org.springframework.web.bind.annotation.GetMapping;
import org.springframework.web.bind.annotation.RequestMapping;
import org.springframework.web.bind.annotation.RestController;

/**
 * @Author youHui
 **/
@RestController
@RequestMapping("/api")
public class FilterTestController {
    @GetMapping("/user/filter")
    public String hello(){
        return "我被myFilter过滤器监控了";
    }
}
(二)过滤器在开发中的应用
1.配置开发性接口
在application.properties文件中:
#设置白名单接口:凡是请求地址层级带有open都放行
open.url=/**/open/**
2.过滤器
package com.yh.bootfilter.filter;


import org.springframework.beans.factory.annotation.Value;
import org.springframework.util.AntPathMatcher;
import org.springframework.util.StringUtils;

import javax.servlet.*;
import javax.servlet.http.HttpServletRequest;
import java.io.IOException;

/**
 * @Author youHui
 *FilterRegistrationBean
 **/

public class MyFilter2 implements Filter {//1.实现Filter接口
    @Value("${open.url}")
    private String openUrl;//获取开发性api
    //2.重写Filter的三个方法

    @Override
    public void init(FilterConfig filterConfig) throws ServletException {
        System.out.println("MyFilter被初始化了");
    }

    @Override
    public void doFilter(ServletRequest servletRequest, ServletResponse servletResponse, FilterChain filterChain) throws IOException, ServletException {
        //获取所拦截的接口信息
        HttpServletRequest request = (HttpServletRequest) servletRequest;
        String uri = request.getRequestURI();
        String method = request.getMethod();
        System.out.println("请求的接口--"+uri+"请求的方法--"+method);
        //判断是是开放性api
        AntPathMatcher antPathMatcher = new AntPathMatcher();
        if(antPathMatcher.match(openUrl,uri)){
            filterChain.doFilter(servletRequest,servletResponse);//放行
        }else {
            //如果不是开放的接口,就判断它是否有token凭证
            String token = request.getHeader("token");//获取token
            if(StringUtils.isEmpty(token)){
                //跳转到未登录的接口
                servletRequest.getRequestDispatcher("/api/open/unLogin").forward(servletRequest, servletResponse);
            }else {
                filterChain.doFilter(servletRequest,servletResponse);
            }
        }
    }

    @Override
    public void destroy() {
        System.out.println("MyFilter被销毁");
    }
}
3.
package com.yh.bootfilter.config;

import com.yh.bootfilter.filter.MyFilter2;
import org.springframework.boot.web.servlet.FilterRegistrationBean;
import org.springframework.context.annotation.Bean;
import org.springframework.context.annotation.Configuration;

/**
 * @Author youHui
 **/
@Configuration
public class FilterConfig {

    //将过滤去注入到容器中
    @Bean
    public MyFilter2 myFilter2(){
        return new MyFilter2();
    }

    @Bean
    public FilterRegistrationBean getFilterRegistrationBean(MyFilter2 myFilter2){
        FilterRegistrationBean filterRegistrationBean = new FilterRegistrationBean();
        filterRegistrationBean.setFilter(myFilter2);//指定过滤器类
        filterRegistrationBean.setOrder(1);//过滤器的顺序
        filterRegistrationBean.addUrlPatterns("/api/*");//指定要拦截的接口
        filterRegistrationBean.setName("myFilter");//指定过滤器名
        return filterRegistrationBean;
    }
}
4.测试类
package com.yh.bootfilter.controller;

import org.springframework.web.bind.annotation.GetMapping;
import org.springframework.web.bind.annotation.RequestMapping;
import org.springframework.web.bind.annotation.RestController;

import java.util.Map;

/**
 * @Author youHui
 **/
@RestController
@RequestMapping("/api")
public class FilterTestController {
    @GetMapping("/user/filter")
    public String hello(){
        return "我被myFilter过滤器监控了";
    }

    //开放性接口
    @GetMapping("/home/open/info")
    public String setHome(){
        return "欢迎进入首页";
    }

    @GetMapping("/open/unLogin")
    public String setUnLogin(){
        return "登录失效,请重新登录";
    }
}
四、SpringBoot拦截器Interceptor
简单来说,拦截器就是一道阀门,在某个方法被访问之前进行拦截,然后在之前或者之后加入某些操作,拦截器是AOP的一种实现策略。
(一)Interceptor基础
1.自定义拦截器类
package com.yh.bootinterceptor.interceptor;

import jakarta.servlet.http.HttpServletRequest;
import jakarta.servlet.http.HttpServletResponse;
import org.springframework.web.servlet.HandlerInterceptor;
import org.springframework.web.servlet.ModelAndView;

/**
 * @Author youHui
 **/
public class MyInterceptor implements HandlerInterceptor {//1.实现HandlerInterceptor接口

    //2.重写它的三个方法

    @Override
    public boolean preHandle(HttpServletRequest request, HttpServletResponse response, Object handler) throws Exception {
        System.out.println("拦截方法访问之前调用");
        String requestUri = request.getRequestURI();//获取被拦截的接口
        System.out.println(requestUri+"接口被拦截了");
        return true;
    }


    @Override
    public void postHandle(HttpServletRequest request, HttpServletResponse response, Object handler, ModelAndView modelAndView) throws Exception {
        System.out.println("拦截方法访问之后调用");
    }

    @Override
    public void afterCompletion(HttpServletRequest request, HttpServletResponse response, Object handler, Exception ex) throws Exception {
        System.out.println("整个流程结束调用");
    }
}
2.定义开放的接口
#开发性接口
open.url=/**/open/**
3.创建配置类,用来配置拦截器的cel
package com.yh.bootinterceptor.config;

import com.yh.bootinterceptor.interceptor.MyInterceptor;
import org.springframework.beans.factory.annotation.Value;
import org.springframework.context.annotation.Bean;
import org.springframework.context.annotation.Configuration;
import org.springframework.web.servlet.config.annotation.InterceptorRegistry;
import org.springframework.web.servlet.config.annotation.WebMvcConfigurer;

/**
 * @Author youHui
 **/
@Configuration
public class WebApplicationConfig implements WebMvcConfigurer {//1.实现WebMvcConfigurer
    //注入开放性api
    @Value("${open.url}")
    private String openUrl;
    //声明一个拦截器并注入到容器中
    @Bean
    public MyInterceptor myInterceptor(){
        return new MyInterceptor();
    }
    //2.重写addInterceptors方法
    @Override
    public void addInterceptors(InterceptorRegistry registry){
        /**
         * 配置拦截策略
         * addInterceptor(myInterceptor()):指定用哪一个拦截器
         * addPathPatterns("/api/**"):所要拦截的接口
         * excludePathPatterns(openUrl):开放接口
         */
        registry.addInterceptor(myInterceptor()).addPathPatterns("/api/**").excludePathPatterns(openUrl);
    }
}
4.测试类
package com.yh.bootinterceptor.controller;

import org.springframework.web.bind.annotation.GetMapping;
import org.springframework.web.bind.annotation.RequestMapping;
import org.springframework.web.bind.annotation.RestController;

/**
 * @Author youHui
 **/
@RestController
@RequestMapping("/api")
public class InterceptorController {
    @GetMapping("/home/open/info")
    public String home(){
        return "欢迎访问首页";
    }

    @GetMapping("/user/interceptor")
    public String userInfo(){
        return "已经被拦截器监控";
    }
}
(二)拦截器在用户登录中的应用
1.配置类
package com.yh.bootinterceptor.config;

import com.yh.bootinterceptor.interceptor.MyInterceptor;
import org.springframework.beans.factory.annotation.Value;
import org.springframework.context.annotation.Bean;
import org.springframework.context.annotation.Configuration;
import org.springframework.web.servlet.config.annotation.InterceptorRegistry;
import org.springframework.web.servlet.config.annotation.WebMvcConfigurer;

/**
 * @Author youHui
 **/
@Configuration
public class WebApplicationConfig implements WebMvcConfigurer {//1.实现WebMvcConfigurer
    //注入开放性api
    @Value("${open.url}")
    private String openUrl;
    //声明一个拦截器并注入到容器中
    @Bean
    public MyInterceptor myInterceptor(){
        return new MyInterceptor();
    }
    //2.重写addInterceptors方法
    @Override
    public void addInterceptors(InterceptorRegistry registry){
        /**
         * 配置拦截策略
         * addInterceptor(myInterceptor()):指定用哪一个拦截器
         * addPathPatterns("/api/**"):所要拦截的接口
         * excludePathPatterns(openUrl):开放接口
         */
        registry.addInterceptor(myInterceptor()).addPathPatterns("/api/**").excludePathPatterns(openUrl);
    }
}
2.拦截器类
package com.yh.bootinterceptor.interceptor;

import org.springframework.util.StringUtils;
import org.springframework.web.servlet.HandlerInterceptor;
import org.springframework.web.servlet.ModelAndView;

import javax.servlet.http.HttpServletRequest;
import javax.servlet.http.HttpServletResponse;

/**
 * @Author youHui
 **/
public class MyInterceptor implements HandlerInterceptor {//1.实现HandlerInterceptor接口

    //2.重写它的三个方法

    @Override
    public boolean preHandle(HttpServletRequest request, HttpServletResponse response, Object handler) throws Exception {
        System.out.println("拦截方法访问之前调用");
        String requestUri = request.getRequestURI();//获取被拦截的接口
        System.out.println(requestUri+"接口被拦截了");
        //判断用户是否携带凭证
        String token = request.getHeader("token");
        if(StringUtils.isEmpty(token)){
            request.getRequestDispatcher("/api/open/unLogin").forward(request,response);
            return false;
        }
        return true;
    }


    @Override
    public void postHandle(HttpServletRequest request, HttpServletResponse response, Object handler, ModelAndView modelAndView) throws Exception {
        System.out.println("拦截方法访问之后调用");
    }

    @Override
    public void afterCompletion(HttpServletRequest request, HttpServletResponse response, Object handler, Exception ex) throws Exception {
        System.out.println("整个流程结束调用");
    }
}
3.测试类
package com.yh.bootinterceptor.controller;

import org.springframework.web.bind.annotation.GetMapping;
import org.springframework.web.bind.annotation.RequestMapping;
import org.springframework.web.bind.annotation.RestController;

/**
 * @Author youHui
 **/
@RestController
@RequestMapping("/api")
public class InterceptorController {
    @GetMapping("/home/open/info")
    public String home(){
        return "欢迎访问首页";
    }

    @GetMapping("/user/interceptor")
    public String userInfo(){
        return "已经被拦截器监控";
    }

    @GetMapping("/open/unLogin")
    public String getUnLogin(){
        return "登录失效,请重新登录";
    }
}
五、SpringBoot整合JSP
1.添加jsp相关依赖
        <!--jsp标签库支持-->
        <dependency>
            <groupId>javax.servlet</groupId>
            <artifactId>jstl</artifactId>
        </dependency>

        <!--springBoot内置的tomcat对jsp的支持-->
        <dependency>
            <groupId>org.apache.tomcat.embed</groupId>
            <artifactId>tomcat-embed-jasper</artifactId>
        </dependency>
2.jsp相关配置
spring.mvc.view.prefix=/WEB-INF/jsp/
spring.mvc.view.suffix=.jsp
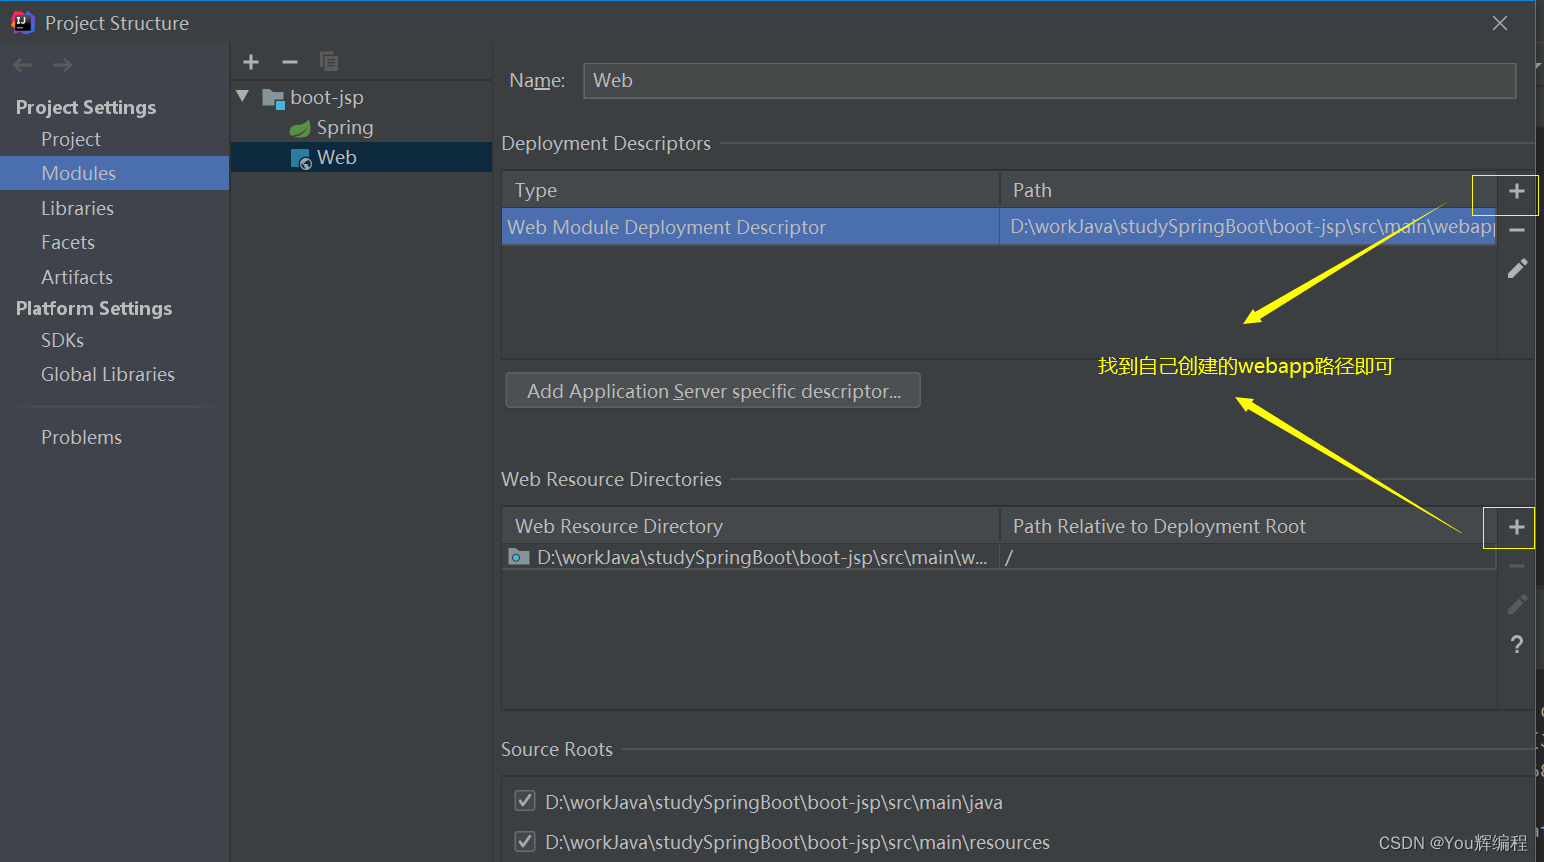
server.port=80883.配置webapp的路径(创建在main目录下)
4.在jsp文件夹下新建index.jsp文件
<%@ page contentType="text/html;charset=UTF-8" language="java" %>
<html>
<head>
    <title>Title</title>
</head>
<body>
    <h1 style="color:blue;font-weight: bold;">成功整合jsp</h1>
</body>
</html>
5.测试类
package com.yh.bootjsp.controller;

import org.springframework.stereotype.Controller;
import org.springframework.web.bind.annotation.GetMapping;
import org.springframework.web.bind.annotation.RequestMapping;

/**
 * @Author youHui
 **/
@Controller
@RequestMapping
public class JspController {
    @GetMapping("/index")
    public String index(){
        return "index";//返回jsp页面
    }
}
六、SpringBoot整合Thymeleaf
1.Thymeleaf配置
spring.thymeleaf.prefix=classpath:/templates
spring.thymeleaf.suffix=.html
spring.thymeleaf.encoding=UTF-8
spring.thymeleaf.servlet.content-type=text/html
2.Thymeleaf依赖
在项目创建时勾选Thymeleaf或到网上找相关依赖引入即可。
3.在templates下创建模板index.html文件
<!DOCTYPE html>
<html lang="en" xmlns:th="http://www.thymeleaf.org">
<head>
    <meta charset="UTF-8">
    <title>Title</title>
</head>
<body>
<p th:text="'hello:'+${username}"></p>
</body>
</html>
4.测试类
@Controller
public class HelloController {
    @GetMapping("/hello")
    public String hello(Model model){
        model.addAttribute("username","zhangsan");
        return "hello";
   }
}
七、SpringBoot整合Freemarker
我这里有提到(123条消息) You辉编程_Java框架之SpringBoot_You辉编程的博客-CSDN博客
八、SpringBoot集成Druid监控数据源
其实就是一个平台,通过配置进入平台查看一些数据。
推展认识:
 <dependency>
    <groupId>com.alibaba</groupId>
    <artifactId>druid-spring-boot-starter</artifactId>
    <version>1.1.10</version>
</dependency>
(2)相关配置
#数据库配置
spring.datasource.type=com.alibaba.druid.pool.DruidDataSource
spring.datasource.druid.driver-class-name=com.mysql.jdbc.Driver
spring.datasource.druid.url=jdbc:mysql://localhost:3306/test_mybatis?
useUnicode=true&characterEncoding=utf-8&useSSL=false
spring.datasource.druid.username=root
spring.datasource.druid.password=root
##################    连接池配置    ################
#连接池建立时创建的初始化连接数
spring.datasource.druid.initial-size=5
#连接池中最大的活跃连接数
spring.datasource.druid.max-active=20
#连接池中最小的活跃连接数
spring.datasource.druid.min-idle=5
# 配置获取连接等待超时的时间
spring.datasource.druid.max-wait=60000
# 打开PSCache,并且指定每个连接上PSCache的大小
spring.datasource.druid.pool-prepared-statements=true
spring.datasource.druid.max-pool-prepared-statement-per-connection-size=20 spring.datasource.druid.validation-query=SELECT 1 FROM DUAL
spring.datasource.druid.validation-query-timeout=30000
#是否在获得连接后检测其可用性
spring.datasource.druid.test-on-borrow=false
#是否在连接放回连接池后检测其可用性
spring.datasource.druid.test-on-return=false
#是否在连接空闲一段时间后检测其可用性
spring.datasource.druid.test-while-idle=true
# 配置间隔多久才进行一次检测,检测需要关闭的空闲连接,单位是毫秒
spring.datasource.druid.time-between-eviction-runs-millis=60000
# 配置一个连接在池中最小生存的时间,单位是毫秒
spring.datasource.druid.min-evictable-idle-time-millis=300000
# 监控后台账号和密码
spring.datasource.druid.stat-view-servlet.login-username=admin
spring.datasource.druid.stat-view-servlet.login-password=66666
spring.devtools.restart.poll-interval=3000ms
spring.devtools.restart.quiet-period=2999ms(3)访问Druid:http://localhost:8080/druid
九、SpringBoot集成Swagger2
(一)使用
1.引入依赖
        <!--swagger2 依赖-->
        <dependency>
            <groupId>io.springfox</groupId>
            <artifactId>springfox-swagger2</artifactId>
        </dependency>
        <dependency>
            <groupId>io.springfox</groupId>
            <artifactId>springfox-swagger-ui</artifactId>
        </dependency>
2.创建配置
@Configuration
@EnableSwagger2
public class SwaggerConfig {

    @Bean
    public Docket createDocket(){

        return new Docket(DocumentationType.SWAGGER_2)
                .apiInfo(apiInfo())
                .select()
                //要暴露的接口
                .apis(RequestHandlerSelectors.basePackage("com.xxx.xxx.controller"))
                .paths(PathSelectors.any())
                .build()
                .globalOperationParameters(parameterList)
    }

    //信息的描述
    private ApiInfo apiInfo(){
        return new ApiInfoBuilder().
                title("Swagger api") //标题
                .description("spring boot 2.x 集成Swagger") //描述
                .version("1.0") //版本
                .build();
    }
}
3.描述
@Data
public class SwaggerReqVO {
@ApiModelProperty(value = "账号") //描述
private String username;
@ApiModelProperty(value = "密码")
private String password;
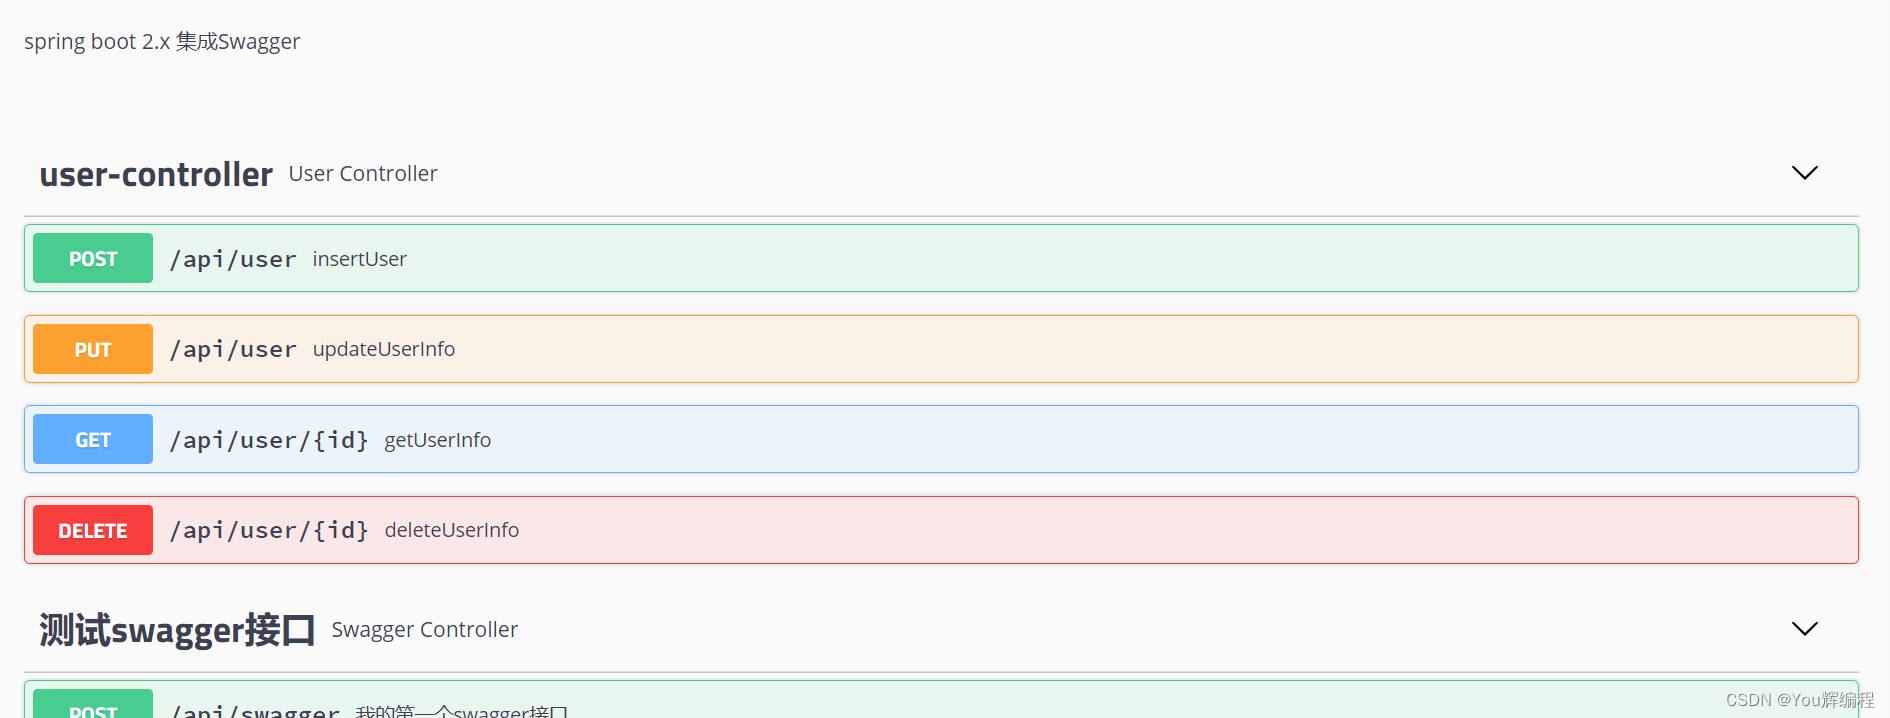
}4.测试类
@RestController
@RequestMapping("/api")
@Api(tags = "测试swagger接口") //描述
public class SwaggerController {
    @ApiOperation(value = "我的第一个swagger接口")
    @PostMapping("/swagger")
    public SwaggerReqVO testSwagger(@RequestBody SwaggerReqVO vo){
     return vo;
    }
}
5.访问http://localhost:8080/swagger-ui.html#/
(二)Swagger常用注解
1.@Api:对一个类进行说明。可以标记一个 Controller 类作为 Swagger 文档资源。
@Api(tags = "用户模块",description = "用户模块相关接口") 2.@ApiModel:对一个类进行说明。一般用于接受前端参数的实体类上。
@ApiModel(value = "实体类的相对路径",description = "接收更新用户数据VO")public class UpdateUserReqVO {
@ApiModelProperty(value = "用户id")//对每个属性进行描述
private String id;
@ApiModelProperty(value = "账号")
private String username;
@ApiModelProperty(value = "密码")
private String password;
@ApiModelProperty(value = "性别(1.男 2.女)")
private Integer sex;
}3.@ApiParam:主要用于Controller中方法参数的说明
value:参数说明
required:是否是必须的
@GetMapping("/getUser")
    public SysUser getUser(@ApiParam(value = "需要传用户id",required = true) @RequestParam(required = true) String id){
        return userService.getUserInfo(id);
    }
4.@ApiOperation:对controller方法的作用进行说明。
@ApiOperation(value = "获取一个用户")
5.@ApiResponse和ApiResponses
@ApiResponse用来说明响应的是哪些信息,ApiResponses表示组装了多个@ApiResponse
 @ApiResponses({
            @ApiResponse(code = 0,message = "响应成功",response = SysUser.class)
    })
6.@ApiImplicitParam和@ApiImplicitParams
用于方法,为单独的请求参数进行说明。
@ApiImplicitParams({
            @ApiImplicitParam(name="id",value = "用户id",dataType = "String",paramType = "query",required = true,
            defaultValue = "1001")
    })
(三)Swagger安全配置
有的环境并不需要Swagger,这时我们可以将其关掉。
1.配置
#swagger 开关
swagger2.enable=true
2.将其注入配置类
@Configuration
@EnableSwagger2
public class SwaggerConfig {
    @Value("${swagger2.enable}")
    private boolean enable;
    @Bean
    public Docket createDocket(){

        return new Docket(DocumentationType.SWAGGER_2)
                .apiInfo(apiInfo())
                .select()
                //要暴露的接口
                .apis(RequestHandlerSelectors.basePackage("com.xxx.xxx.controller"))
                .paths(PathSelectors.any())
                .build()
                .globalOperationParameters(parameterList)
                .enable(enable);
    }

    //信息的描述
    private ApiInfo apiInfo(){
        return new ApiInfoBuilder().
                title("Swagger api") //标题
                .description("spring boot 2.x 集成Swagger") //描述
                .version("1.0") //版本
                .build();
    }
}
(四)Swagger的全局配置
如果想Swagger也能像PostMan一样可以加一些头部信息的话,就需要对Swagger进行全局配置
@Configuration
@EnableSwagger2
public class SwaggerConfig {
    @Value("${swagger2.enable}")
    private boolean enable;
    @Bean
    public Docket createDocket(){

        List<Parameter> parameterList=new ArrayList<>();
        ParameterBuilder parameterBuilder=new ParameterBuilder();//头部信息
        parameterBuilder.name("token").description("swagger调试(模拟传入用户认证凭证)").modelRef(new ModelRef("String"))
                .parameterType("header").required(false);
        parameterList.add(parameterBuilder.build());

        return new Docket(DocumentationType.SWAGGER_2)
                .apiInfo(apiInfo())
                .select()
                //要暴露的接口
                .apis(RequestHandlerSelectors.basePackage("com.yingxue.lesson.web.controller"))
                .paths(PathSelectors.any())
                .build()
                .globalOperationParameters(parameterList)
                .enable(enable);
    }

    //信息的描述
    private ApiInfo apiInfo(){
        return new ApiInfoBuilder().
                title("Swagger api") //标题
                .description("spring boot 2.x 集成Swagger") //描述
                .version("1.0") //版本
                .build();
    }
}
十、SpringBoot封装整合Redis
1.初始Redis:You辉编程_Redis数据库_You辉编程的博客-CSDN博客
2.Srpingboot+jedis
jedis集成了redis的命令擦操作,jedis是redis官方推荐面向Java操作Redis的客户端 。
(1)引入相关依赖
        <!--springboot封装redis的组件依赖-->
        <dependency>
            <groupId>org.springframework.boot</groupId>
            <artifactId>spring-boot-starter-data-redis</artifactId>
        </dependency>
        <!--jedis客户端-->
        <dependency>
            <groupId>redis.clients</groupId>
            <artifactId>jedis</artifactId>
        </dependency>
(2)配置jedisPool连接池管理jedis
#jedisPool的配置开始

# 连接池中的最大空闲连接
redis.maxIdle=30
# 连接池中的最小空闲连接
redis.minIdle=1
#连接池最大连接数(使用负值表示没有限制)
redis.maxTotal=100
# 连接池最大阻塞等待时间(使用负值表示没有限制)10秒redis.maxWait=10000
# Redis服务器地址
redis.host=localhost
# Redis服务器连接端口
redis.port=6379
# Redis链接超时时间 10秒
redis.timeout=10000
(3)配置类
package com.yh.config;

import org.springframework.beans.factory.annotation.Value;
import org.springframework.context.annotation.Bean;
import org.springframework.context.annotation.Configuration;
import redis.clients.jedis.JedisPool;
import redis.clients.jedis.JedisPoolConfig;

/**
 * @Author youHui
 **/
@Configuration
public class RedisConfig {
    @Value("${redis.maxIdle}")
    private int maxIdle;
    @Value("${redis.minIdle}")
    private int minIdle;
    @Value("${redis.maxTotal}")
    private int maxTotal;
    @Value("${redis.timeout}")
    private int timeout;
    @Value("${redis.maxWait}")
    private int maxWait;
    @Value("${redis.host}")
    private String host;
    @Value("${redis.port}")
    private int port;

    /**
     * 把 jedisPool连接池注入到spring容器中
     * @return
     */
    @Bean
    public JedisPool getJedisPool(){
        JedisPoolConfig jedisPoolConfig = new JedisPoolConfig();
        jedisPoolConfig.setMaxIdle(maxIdle);
        jedisPoolConfig.setMinIdle(minIdle);
        jedisPoolConfig.setMaxTotal(maxTotal);
        jedisPoolConfig.setMaxWaitMillis(maxWait);

        JedisPool jedisPool = new JedisPool(jedisPoolConfig,host,port,timeout);
        return jedisPool;
    }

}
(4)创建RedisService类,jedis企业开发工具类的封装
package com.yh.service;

import org.springframework.beans.factory.annotation.Autowired;
import org.springframework.stereotype.Service;
import redis.clients.jedis.Jedis;
import redis.clients.jedis.JedisPool;

/**
 * @Author youHui
 **/
@Service
public class RedisService {
    //注入连接池
    @Autowired
    private JedisPool jedisPool;

    public boolean exists(String key){
        Jedis jedis = null;
        boolean result;
        try {
            jedis = jedisPool.getResource();
            result = jedis.exists(key);
        } finally {
            if(jedis != null){
                jedis.close();
            }
        }
        return result;
    }

    public Long del(final String... keys){
        Jedis jedis = null;
        Long result;
        try {
            jedis = jedisPool.getResource();
            result = jedis.del(keys);
        } finally {
            if(jedis != null){
                jedis.close();
            }
        }
        return result;
    }
}
(5)测试
    @Autowired
    private RedisService redisService;

    @Test
    public void testRedis(){
        redisService.exists("name");
        redisService.del("name","name1");
    }
3.SpringBoot+RedisRedisTemplate工具类封装自定义序列化方式
RedisTemplate类是对Redis api进一步进行封装,使操作Redis更加便捷。
(1)引入相关依赖
        <dependency>
            <groupId>org.springframework.boot</groupId>
            <artifactId>spring-boot-starter-data-redis</artifactId>
        </dependency>
        <dependency>
            <groupId>org.apache.commons</groupId>
            <artifactId>commons-pool2</artifactId>
        </dependency>
(2)配置
# Redis 服务器地址
spring.redis.host=localhost
# Redis 服务器连接端⼝
spring.redis.port=6379
# 连接池最大连接数(使用负值表示没有限制)默认 8
spring.redis.lettuce.pool.max-active=100
# 连接池最大阻塞等待时间(使用负值表示没有限制)默认 -1 spring.redis.lettuce.pool.max-wait=PT10S
# 连接池中的最大空闲连接默认 8
spring.redis.lettuce.pool.max-idle=30
# 连接池中的最小空闲连接默认 0
spring.redis.lettuce.pool.min-idle=1
#链接超时时间
spring.redis.timeout=PT10S
(3)测试
SpirngBoot已经自动把RedisTemplate注入到Spring容器中,直接拿来用即可。并提供了一下方法
    @Test
    public void testRedis(){
        redisTemplate.opsForValue().get("name");
        //指定序列化,使它的key,value可读即显示正常的字符
        redisTemplate.setKeySerializer(new StringRedisSerializer());
        redisTemplate.setValueSerializer(new StringRedisSerializer());
        redisTemplate.opsForValue().set("name","赵六");
    }
注:RedisTemplate默认只支持String类型的数据,要想支持除String以外的数据,则要自己定义序列化方式(需要引入fast json依赖)。
          <!--fastJson-->
        <dependency>
            <groupId>com.alibaba</groupId>
            <artifactId>fastjson</artifactId>
            <version>1.2.49</version>
        </dependency>
自定义序列化方式代码
public class MyStringRedisSerializer implements RedisSerializer<Object> {
    private final Charset charset;

    public MyStringRedisSerializer() {
        this(StandardCharsets.UTF_8);
    }

    public MyStringRedisSerializer(Charset charset) {
        Assert.notNull(charset, "Charset must not be null!");
        this.charset = charset;
    }

    @Override
    public String deserialize(byte[] bytes) {
        return (bytes == null ? null : new String(bytes, charset));
    }

    @Override
    public byte[] serialize(Object object) {
        if (object == null) {
            return new byte[0];
        }
        if(object instanceof String){
            return object.toString().getBytes(charset);
        }else {
            String string = JSON.toJSONString(object);
            return string.getBytes(charset);
        }

    }


}
封装成工具类
package com.yh.service;

import org.springframework.beans.factory.annotation.Autowired;
import org.springframework.data.redis.core.RedisTemplate;
import org.springframework.stereotype.Service;

/**
 * @Author youHui
 **/
@Service
public class RedisService {
    @Autowired
    private RedisTemplate<String,Object> redisTemplate;

    public boolean hasKey(String key){
        if(key == null){
            return false;
        }
        return redisTemplate.hasKey(key);
    }
}
配置类
package com.yh.config;

import com.yh.serializer.MyStringRedisSerializer;
import org.springframework.context.annotation.Bean;
import org.springframework.context.annotation.Configuration;
import org.springframework.data.redis.connection.RedisConnectionFactory;
import org.springframework.data.redis.core.RedisTemplate;
import org.springframework.data.redis.serializer.StringRedisSerializer;

/**
 * @Author youHui
 **/
@Configuration
public class RedisConfig {

    @Bean
    public RedisTemplate<String,Object> redisTemplate(RedisConnectionFactory redisConnectionFactory){
        RedisTemplate<String,Object> redisTemplate = new RedisTemplate<>();
        redisTemplate.setConnectionFactory(redisConnectionFactory);
        redisTemplate.setKeySerializer(new StringRedisSerializer());
        redisTemplate.setHashKeySerializer(new StringRedisSerializer());
        redisTemplate.setValueSerializer(new MyStringRedisSerializer());
        redisTemplate.setHashValueSerializer(new MyStringRedisSerializer());
        return redisTemplate;
    }
}
异常类
package com.yh.exception;

/**
 * @Author youHui
 **/
public class BusinessExcception extends RuntimeException{
    private final int messageCode;
    private final String messageDefault;

    public BusinessExcception(String message,int messageCode) {
        super(message);
        this.messageCode = messageCode;
        this.messageDefault = message;
    }

    public int getMessageCode() {
        return messageCode;
    }

    public String getMessageDefault() {
        return messageDefault;
    }
}
测试
     @Autowired
    private RedisService redisService;

    @Test
    public void testRedis(){
//        redisTemplate.opsForValue().get("name");
//        //指定序列化,使它的key,value可读即显示正常的字符
//        redisTemplate.setKeySerializer(new StringRedisSerializer());
//        redisTemplate.setValueSerializer(new StringRedisSerializer());
//        redisTemplate.opsForValue().set("name","赵六");
        System.out.println(redisService.hasKey("name"));
    }
4.SpringBoot redis实战-分布式Session共享
实现思路
用户提交用户名+密码--->登录成功后生成token--->把用户信息存入Redis(key就是token,value就是userId)--->设置key的过期时间(模拟Session的过期时间,一般我1h)--->拦截器拦截请求校验sessionId
boot-redis-session: redis实行分布式session共享 (gitee.com)
十一、SpringBoot集成定时任务、异步调用
1.定时任务实现方式
注:需要在启动类中加
@EnableScheduling //开启定时任务
package com.yh.bootschedule.task;

import org.springframework.scheduling.annotation.Scheduled;
import org.springframework.stereotype.Component;

import java.text.SimpleDateFormat;
import java.util.Date;

/**
 * @Author youHui
 **/
@Component
public class SchedulerTask {
    private static final SimpleDateFormat f=new SimpleDateFormat("HH:mm:ss");

    /**
     * @Scheduled(fixedRate = 5000) :上一次开始执行时间点之后5秒再执行
     * @Scheduled(fixedDelay = 5000) :上一次执行完毕时间点之后5秒再执行
     * @Scheduled(initialDelay=1000, fixedRate=5000) :第一次延迟1秒后执行,之后按fixedRate的规则每5秒执行一次
     */
    //方式一
    //定时任务5秒执行一次
//    @Scheduled(fixedRate = 5000)
//    public void processFixedRate(){
//        System.out.println("processFixedRate方式:开始定时任务,现在的时间是:"+f.format(new Date()));
//    }

    /**
     * cron 一共有七位,最后一位是年,Spring Boot 定时方案中只需要设置六位即可:
     * 第一位,表示秒,取值 0 ~ 59; 第二位,表示分,取值 0 ~ 59; 第三位,表示小时,取值 0 ~ 23; 第四位,日期天/日,取值 1 ~
     * 31; 第五位,日期月份,取值 1~12; 第六位,星期,取值 1 ~ 7,星期一,星期二...,注,1 表示星期 天,2 表示星期一; 第七位,
     * 年份,可以留空,取值 1970 ~ 2099。 cron 中,还有一些特殊的符号,含义如下: (*)星号,可以理解为每的意思,每秒、每分、
     * 每天、每月、每年...。 (?)问号,问号只能出现在日期和星期这两个位置,表示这个位置的值不确定。 (-)减号,表达一个范围,
     * 如在小时字段中使用“10 ~ 12”,则表示从 10 到 12 点,即 10、11、12。 (,)逗号,表达一个列表值,如在星期字段中使用“1、2、
     * 4”,则表示星期一、星期二、星期四。 (/)斜杠,如 x/y,x 是开始值,y 是步⻓长,比如在第一位(秒),0/15 就是从 0 秒开始,
     * 每隔 15 秒执 行一次。 下面列举几个常用的例子。 0 0 1 * * ? :每天凌晨1 点执行; 0 5 1 * * ?:每天 凌晨1 点 5 分执行;
     * 以上就是 Spring Boot 自定的定时方案,使用起来非常的简单方便。
     */


    //方式二
    @Scheduled(cron="*/5 * * * * ?")
    private void processCron(){
        System.out.println("processCron方式:定时任务开始运行,现在时间:" + f.format(new Date()));
    }
}
2.SpringBoot使用@Async实现异步调用-异步回调结果
注:需要在启动类中添加@EnableAsync注解
package com.yh.task;

import org.springframework.scheduling.annotation.Async;
import org.springframework.scheduling.annotation.AsyncResult;
import org.springframework.scheduling.annotation.EnableAsync;
import org.springframework.stereotype.Component;

import java.util.Random;
import java.util.concurrent.Future;

/**
 * @Author youHui
 **/
@Component
public class AsyncTask {
    /**
     * 这是同步
     */
    public static Random random=new Random();

    @Async
    public Future<String> doTaskOne() throws Exception{
        System.out.println("开始任务一");
        long startTime=System.currentTimeMillis();//当前时间
        Thread.sleep(random.nextInt(100000));
        long endTime=System.currentTimeMillis();
        System.out.println("完成任务一消耗的时间:"+(endTime-startTime)+"毫秒");
        return new AsyncResult<>("任务一已完成");
    }

    @Async
    public Future<String>  doTaskTwo() throws Exception{
        System.out.println("开始任务二");
        long startTime=System.currentTimeMillis();//当前时间
        Thread.sleep(random.nextInt(100000));
        long endTime=System.currentTimeMillis();
        System.out.println("完成任务二消耗的时间:"+(endTime-startTime)+"毫秒");
        return new AsyncResult<>("任务一已完成");
    }

    @Async

    public Future<String>  doTaskThree() throws Exception{
        System.out.println("开始任务三");
        long startTime=System.currentTimeMillis();//当前时间
        Thread.sleep(random.nextInt(100000));
        long endTime=System.currentTimeMillis();
        System.out.println("完成任务三消耗的时间:"+(endTime-startTime)+"毫秒");
        return new AsyncResult<>("任务一已完成");
    }
}
测试:
@Test
    public void testTask() throws Exception{
        Future<String> taskOne=asyncTask.doTaskOne();
        Future<String> taskTwo=asyncTask.doTaskTwo();
        Future<String> taskThree=asyncTask.doTaskThree();

        while (true){
            if(taskOne.isDone()&&taskTwo.isDone()&&taskThree.isDone()){
                //代处理完后统一返回结果集
                break;
            }
            Thread.sleep(10000);
        }
    }
3.SpringBoot使用@Async实现异步调用-自定义线程池
使用@EnableAsync+@Async默认实现SimpleAsyncTaskExecutor 不是真的线程池,这个类不重用线程,每次调用 都会创建一个新的线程,非常的消耗资源。
(1)注入线程池对象
package com.yh;

import org.springframework.boot.SpringApplication;
import org.springframework.boot.autoconfigure.SpringBootApplication;
import org.springframework.context.annotation.Bean;
import org.springframework.scheduling.concurrent.ThreadPoolTaskExecutor;

import java.util.concurrent.Executor;
import java.util.concurrent.ThreadPoolExecutor;

@SpringBootApplication
public class BootAsyncApplication {

    public static void main(String[] args) {
        SpringApplication.run(BootAsyncApplication.class, args);
    }

    @Bean
    public Executor myTaskExecutor(){
        ThreadPoolTaskExecutor executor=new ThreadPoolTaskExecutor();
        //创建线程池,并初始化线程数量
        executor.setCorePoolSize(10);
        //最大线程数
        executor.setMaxPoolSize(15);
        //用来缓冲执行任务的队列
        executor.setQueueCapacity(200);
        //当超过核心先线程数之外的线程在空闲时间到达之后就会被销毁
        executor.setKeepAliveSeconds(60);
        //设置好之后可以方便定位处理任务所在的线程池
        executor.setThreadNamePrefix("myTask");
        //用来设置线程池关闭的时候等待所有任务都完成再继续销毁其他的Bean
        executor.setWaitForTasksToCompleteOnShutdown(true);
        //该方法用来设置线程池中任务的等待时间,如果超过这个时候还没有销毁就强制销毁,以确保应用最后能够被关闭,而不是阻塞住。
        executor.setAwaitTerminationSeconds(60);
        //线程池对拒绝任务的处理策略:这里采用了CallerRunsPolicy策略,当线程池没有处理能力的时候,该策略会直接在execute 方法的调用线程中运行被拒绝的任务;如果执行程序已关闭,则会丢弃该任务
        executor.setRejectedExecutionHandler(new ThreadPoolExecutor.CallerRunsPolicy());
        return executor;
    }

}
package com.yh.task;

import org.springframework.scheduling.annotation.Async;
import org.springframework.scheduling.annotation.AsyncResult;
import org.springframework.scheduling.annotation.EnableAsync;
import org.springframework.stereotype.Component;

import java.util.Random;
import java.util.concurrent.Future;

/**
 * @Author youHui
 **/
@Component
public class AsyncTask {
    /**
     * 这是同步
     */
    public static Random random=new Random();

    @Async("myTaskExecutor")
    public Future<String> doTaskOne() throws Exception{
        System.out.println("开始任务一");
        long startTime=System.currentTimeMillis();//当前时间
        Thread.sleep(random.nextInt(100000));
        long endTime=System.currentTimeMillis();
        System.out.println("完成任务一消耗的时间:"+(endTime-startTime)+"毫秒");
        return new AsyncResult<>("任务一已完成");
    }

    @Async("myTaskExecutor")
    public Future<String>  doTaskTwo() throws Exception{
        System.out.println("开始任务二");
        long startTime=System.currentTimeMillis();//当前时间
        Thread.sleep(random.nextInt(100000));
        long endTime=System.currentTimeMillis();
        System.out.println("完成任务二消耗的时间:"+(endTime-startTime)+"毫秒");
        return new AsyncResult<>("任务一已完成");
    }

    @Async("myTaskExecutor")
    public Future<String>  doTaskThree() throws Exception{
        System.out.println("开始任务三");
        long startTime=System.currentTimeMillis();//当前时间
        Thread.sleep(random.nextInt(100000));
        long endTime=System.currentTimeMillis();
        System.out.println("完成任务三消耗的时间:"+(endTime-startTime)+"毫秒");
        return new AsyncResult<>("任务一已完成");
    }
}
@Test
    public void testTask() throws Exception{
        Future<String> taskOne=asyncTask.doTaskOne();
        Future<String> taskTwo=asyncTask.doTaskTwo();
        Future<String> taskThree=asyncTask.doTaskThree();

        while (true){
            if(taskOne.isDone()&&taskTwo.isDone()&&taskThree.isDone()){
                //代处理完后统一返回结果集
                break;
            }
            Thread.sleep(10000);
        }
    }
十二、SpringBoot权限框架Shiro
subject:主体,可以是用户也可以是程序,主体要访问系统,系统需要对主体进行认证、授权。
security Manager:安全管理器,主体进行认证和授权都是通过securityManager进行。
authenticator:认证器,主体进行认证最终通过authenticator进行的。
authorizer:授权器,主体进行授权最终通过authorizer进行的。
sessionManager:web应用中一般是用web容器对session进行管理,shiro也提供一套session管理的方式。
SessionDao: 通过SessionDao管理session数据,针对个性化的session数据存储需要使用sessionDao。
cache Manager:缓存管理器,主要对session和授权数据进行缓存,比如将授权数据通过cacheManager进行缓存管理,和
ehcache整合对缓存数据进行管理。
Cryptography:加密,保护数据的安全性,如密码加密存储到数据库,而不是明文存储。
realm:域,领域,相当于数据源,通过realm存取认证、授权相关数据。
记住一点,Shiro 不会去维护用户、维护权限;这些需要我们自己去设计/提供;然后通过相应的接口注入给Shiro 即可。 <dependency>
<groupId>org.apache.shiro</groupId>
<artifactId>shiro-spring</artifactId>
<version>1.4.1</version>
</dependency>(2)用户认证
public void authentication(){
        /*****************安全管理器环境**************************/
        //构建安全管理器环境SecurityManager环境
        DefaultWebSecurityManager defaultWebSecurityManager=new DefaultWebSecurityManager();
        //创建数据源
        SimpleAccountRealm simpleAccountRealm=new SimpleAccountRealm();
        simpleAccountRealm.addAccount("zhangwuji","666666");
        //设置到安全管理器
        defaultWebSecurityManager.setRealm(simpleAccountRealm);
        //把安全管理器配置到工具包里
        SecurityUtils.setSecurityManager(defaultWebSecurityManager);
        /*****************安全管理器环境**************************/


        /*****************主体提交验证**************************/
        //获取主体
        Subject subject = SecurityUtils.getSubject();
        //创建主体提交时需要携带的token(由用户名密码组成)
        UsernamePasswordToken usernamePasswordToken=new UsernamePasswordToken("zhangwuji","666666");

        try {
            //主体提交验证
            subject.login(usernamePasswordToken);
            /*****************主体提交验证**************************/
            //验证通过返回true,不通过返回false
            System.out.println("用户认证的状态"+subject.isAuthenticated());
            //退出
            subject.logout();
            System.out.println("用户认证的状态"+subject.isAuthenticated());
        }catch (UnknownAccountException uae){
            System.out.println("用户不存在");
        }catch (IncorrectCredentialsException ice){
            System.out.println("用户名密码不匹配");
        }catch (LockedAccountException lae){
            System.out.println("账号已经被锁定");
        }catch (AuthenticationException ae){
            System.out.println("用户名密码不匹配");
        }

    }
(2)用户授权
public void authorization(){
        /*****************安全管理器环境**************************/
        //构建安全管理器环境SecurityManager环境
        DefaultWebSecurityManager defaultWebSecurityManager=new DefaultWebSecurityManager();
        //创建数据源
        SimpleAccountRealm simpleAccountRealm=new SimpleAccountRealm();
        simpleAccountRealm.addAccount("zhangwuji","666666","admin","test");//更具角色授权
        //设置到安全管理器
        defaultWebSecurityManager.setRealm(simpleAccountRealm);
        //把安全管理器配置到工具包里
        SecurityUtils.setSecurityManager(defaultWebSecurityManager);
        /*****************安全管理器环境**************************/
        /*****************主体提交验证**************************/
        //获取主体
        Subject subject = SecurityUtils.getSubject();
        //创建主体提交时需要携带的token(由用户名密码组成)
        UsernamePasswordToken usernamePasswordToken=new UsernamePasswordToken("zhangwuji","666666");

        try {
            //主体提交验证
            subject.login(usernamePasswordToken);
            /*****************主体提交验证**************************/
            //验证通过返回true,不通过返回false
            System.out.println("用户认证的状态"+subject.isAuthenticated());
            //判断该用户是否拥有这个角色
            subject.checkRoles("admin","user");
            //退出
            subject.logout();
            System.out.println("用户认证的状态"+subject.isAuthenticated());
        }catch (UnknownAccountException uae){
            System.out.println("用户不存在");
        }catch (IncorrectCredentialsException ice){
            System.out.println("用户名密码不匹配");
        }catch (LockedAccountException lae){
            System.out.println("账号已经被锁定");
        }catch (AuthenticationException ae){
            System.out.println("用户名密码不匹配");
        }catch (UnauthorizedException e){
            System.out.println("该用户没有该权限访问");
        }
    }
(3)SpringBoot使用IniRealm进行认证授权
SimpleAccountRealm写死了用户数据,不够灵活,IniRealm是Shiro提供一种Realm实现。用户、角色、权限等信息集中在一个.ini文件里。
①配置.ini文件
在resources目录下创建一个shiro.ini文件(角色的配置文件)
[users] ----->用户的角色
test=666666,test
admin=66666,admin

[roles]------->用户的权限
test=user:list,user:edit
admin=*
②读取角色信息并认证授权
public void testIniRealm(){
        DefaultWebSecurityManager defaultWebSecurityManager=new DefaultWebSecurityManager();
        //读取配置文件的内容
        IniRealm iniRealm=new IniRealm("classpath:shiro.ini");
        defaultWebSecurityManager.setRealm(iniRealm);
        SecurityUtils.setSecurityManager(defaultWebSecurityManager);


        /*****************主体提交验证**************************/
        //获取主体
        Subject subject = SecurityUtils.getSubject();
        //创建主体提交时需要携带的token(由用户名密码组成)
        UsernamePasswordToken usernamePasswordToken=new UsernamePasswordToken("test","666666");

        try {
            //主体提交验证
            subject.login(usernamePasswordToken);
            /*****************主体提交验证**************************/
            //验证通过返回true,不通过返回false
            System.out.println("用户认证的状态"+subject.isAuthenticated());
            //判断该用户是否拥有这个角色
            subject.checkRoles("test");
            //校验是否拥有其权限
            subject.checkPermissions("user:list");//是否拥有用户列表的权限
            //退出
            subject.logout();
            System.out.println("用户认证的状态"+subject.isAuthenticated());
        }catch (UnknownAccountException uae){
            System.out.println("用户不存在");
        }catch (IncorrectCredentialsException ice){
            System.out.println("用户名密码不匹配");
        }catch (LockedAccountException lae){
            System.out.println("账号已经被锁定");
        }catch (AuthenticationException ae){
            System.out.println("用户名密码不匹配");
        }catch (UnauthorizedException e){
            System.out.println("该用户没有该权限访问");
        }

    }
(4)SpringBoot使用JdbcRealm进行认证授权
IniRealm虽然可以通过.ini文件进行配置然后读取其安全信息,但还是得提前写好相关信息,还是不够灵活,JdbcRealm可以直接从db中读取信息,然后再认证授权认证。
①加入数据库相关依赖
         <!--数据库-->
        <dependency>
            <groupId>mysql</groupId>
            <artifactId>mysql-connector-java</artifactId>
        </dependency>
        <!--数据源-->
        <dependency>
            <groupId>com.alibaba</groupId>
            <artifactId>druid</artifactId>
            <version>1.1.10</version>
        </dependency>
②用户权限信息
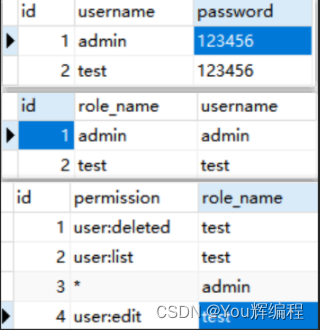
③认证授权
public void testJdbcRealm(){
        //配置数据源
        DruidDataSource druidDataSource=new DruidDataSource();
        druidDataSource.setUrl("jdbc:mysql://localhost:3306/shiro");
        druidDataSource.setDriverClassName("com.mysql.jdbc.Driver");
        druidDataSource.setUsername("root");
        druidDataSource.setPassword("666666");
        //配置文件中的用户权限信息
        JdbcRealm jdbcRealm=new JdbcRealm();
        jdbcRealm.setDataSource(druidDataSource);
        //开启权限开关
        jdbcRealm.setPermissionsLookupEnabled(true);

        //构建SecurityManager环境
        DefaultSecurityManager defaultSecurityManager=new DefaultWebSecurityManager();
        //设置Realm
        defaultSecurityManager.setRealm(jdbcRealm);
        SecurityUtils.setSecurityManager(defaultSecurityManager);
        /*****************主体提交验证**************************/
        //获取主体
        Subject subject = SecurityUtils.getSubject();
        //创建主体提交时需要携带的token(由用户名密码组成)
        UsernamePasswordToken usernamePasswordToken=new UsernamePasswordToken("test","123456");

        try {
            //主体提交验证
            subject.login(usernamePasswordToken);
            /*****************主体提交验证**************************/
            //验证通过返回true,不通过返回false
            System.out.println("用户认证的状态"+subject.isAuthenticated());
            //判断该用户是否拥有这个角色
            subject.checkRoles("test");
            //校验是否拥有其权限
            subject.checkPermissions("user:deleted","role:list");//是否拥有用户列表的权限
            //退出
            subject.logout();
            System.out.println("用户认证的状态"+subject.isAuthenticated());
        }catch (UnknownAccountException uae){
            System.out.println("用户不存在");
        }catch (IncorrectCredentialsException ice){
            System.out.println("用户名密码不匹配");
        }catch (LockedAccountException lae){
            System.out.println("账号已经被锁定");
        }catch (AuthenticationException ae){
            System.out.println("用户名密码不匹配");
        }catch (UnauthorizedException e){
            System.out.println("该用户没有该权限访问");
        }
    }
(5)Springboot使用自定义Realm进行认证授权
JdbcRealm虽然能从数据库读取用户授权信息,但其底层已经固定写好了sql语句,一旦数据库名或表名发生改变有得重新改写底层sql这样一来就造成不灵活,自定义Realm可以解决这个问题。
Realm只需要继承:AuthorizingRealm重写doGetAuthenticationfo(用户认证)、doGetAuthorizationInfo(用户授权)这两个方法即可。
①自定义Realm
package com.yh.shiro;

import org.apache.shiro.authc.AuthenticationException;
import org.apache.shiro.authc.AuthenticationInfo;
import org.apache.shiro.authc.AuthenticationToken;
import org.apache.shiro.authc.SimpleAuthenticationInfo;
import org.apache.shiro.authz.AuthorizationInfo;
import org.apache.shiro.authz.SimpleAuthorizationInfo;
import org.apache.shiro.realm.AuthorizingRealm;
import org.apache.shiro.subject.PrincipalCollection;
import org.springframework.util.StringUtils;

import javax.swing.text.SimpleAttributeSet;
import java.util.ArrayList;
import java.util.HashMap;
import java.util.List;
import java.util.Map;

/**
 * @Author youHui
 **/
public class CustomRealm extends AuthorizingRealm {
    /**
     * mock用户信息
     * @param principalCollection
     * @return
     */
    /************************数据*************************/
    private Map<String,String> userMap=new HashMap<>();
    {
        userMap.put("admin","123456");
        userMap.put("test","123456");
    }
    /************************数据*************************/
    @Override
    protected AuthorizationInfo doGetAuthorizationInfo(PrincipalCollection principalCollection) {
        //用户授权
        String username = (String) principalCollection.getPrimaryPrincipal();
        //获取角色信息
        List<String> roles=getRolesByUserName(username);
        List<String> permissions=getPermissionsByUsername(username);
        SimpleAuthorizationInfo info=new SimpleAuthorizationInfo();
        info.addRoles(roles);
        info.addStringPermissions(permissions);
        return info;
    }

    @Override
    protected AuthenticationInfo doGetAuthenticationInfo(AuthenticationToken authenticationToken) throws AuthenticationException {
        //获取用户数据
        String username = (String) authenticationToken.getPrincipal();
        String password = getPasswordByUsername(username);
        if(StringUtils.isEmpty(password)){
            return null;
        }

        //用户认证
        SimpleAuthenticationInfo info=new SimpleAuthenticationInfo(username,password,getName());
        return info;
    }

    //通过用户名获取到密码
    private String getPasswordByUsername(String username){
        return userMap.get(username);
    }

    //通过用户名获取角色信息
    private List<String> getRolesByUserName(String username){
        List<String> roles=new ArrayList<>();
        if(username.equals("admin")){
            roles.add("admin");
        }else {
            roles.add("test");
        }
        return roles;
    }

    //通过用户名获取权限信息
    private List<String> getPermissionsByUsername(String username){
        List<String> permissions=new ArrayList<>();
        if(username.equals("admin")){
            permissions.add("*");//权限为所有
        }
        permissions.add("user:list");
        permissions.add("user:deleted");
        permissions.add("user:edit");
        return permissions;
    }
}
②认证授权
public void testCustomRealm(){
        DefaultWebSecurityManager defaultWebSecurityManager=new DefaultWebSecurityManager();
        //创建域
        CustomRealm customRealm=new CustomRealm();
        defaultWebSecurityManager.setRealm(customRealm);
        SecurityUtils.setSecurityManager(defaultWebSecurityManager);


        /*****************主体提交验证**************************/
        //获取主体
        Subject subject = SecurityUtils.getSubject();
        //创建主体提交时需要携带的token(由用户名密码组成)
        UsernamePasswordToken usernamePasswordToken=new UsernamePasswordToken("test","123456");

        try {
            //主体提交验证
            subject.login(usernamePasswordToken);
            /*****************主体提交验证**************************/
            //验证通过返回true,不通过返回false
            System.out.println("用户认证的状态"+subject.isAuthenticated());
            //判断该用户是否拥有这个角色
            subject.checkRoles("test");
            //校验是否拥有其权限
            subject.checkPermissions("user:deleted","role:list");//是否拥有用户列表的权限
            //退出
            subject.logout();
            System.out.println("用户认证的状态"+subject.isAuthenticated());
        }catch (UnknownAccountException uae){
            System.out.println("用户不存在");
        }catch (IncorrectCredentialsException ice){
            System.out.println("用户名密码不匹配");
        }catch (LockedAccountException lae){
            System.out.println("账号已经被锁定");
        }catch (AuthenticationException ae){
            System.out.println("用户名密码不匹配");
        }catch (UnauthorizedException e){
            System.out.println("该用户没有该权限访问");
        }
    }
(6)SpringBoot整合shiro——盐值加密
①自定义Realm
package com.yh.shiro;

import org.apache.shiro.authc.AuthenticationException;
import org.apache.shiro.authc.AuthenticationInfo;
import org.apache.shiro.authc.AuthenticationToken;
import org.apache.shiro.authc.SimpleAuthenticationInfo;
import org.apache.shiro.authz.AuthorizationInfo;
import org.apache.shiro.authz.SimpleAuthorizationInfo;
import org.apache.shiro.crypto.hash.Md5Hash;
import org.apache.shiro.realm.AuthorizingRealm;
import org.apache.shiro.subject.PrincipalCollection;
import org.apache.shiro.util.ByteSource;
import org.springframework.util.StringUtils;

import javax.swing.text.SimpleAttributeSet;
import java.util.ArrayList;
import java.util.HashMap;
import java.util.List;
import java.util.Map;

/**
 * @Author youHui
 **/
public class CustomRealm extends AuthorizingRealm {
    /**
     * mock用户信息
     * @param principalCollection
     * @return
     */
    /************************数据*************************/
    private Map<String,String> userMap=new HashMap<>();
    {
        userMap.put("admin","123456");
        userMap.put("test","123456");
    }
    /************************数据*************************/
    @Override
    protected AuthorizationInfo doGetAuthorizationInfo(PrincipalCollection principalCollection) {
        //用户授权
        String username = (String) principalCollection.getPrimaryPrincipal();
        //获取角色信息
        List<String> roles=getRolesByUserName(username);
        List<String> permissions=getPermissionsByUsername(username);
        SimpleAuthorizationInfo info=new SimpleAuthorizationInfo();
        info.addRoles(roles);
        info.addStringPermissions(permissions);
        return info;
    }

    @Override
    protected AuthenticationInfo doGetAuthenticationInfo(AuthenticationToken authenticationToken)
            throws AuthenticationException {
        //获取用户数据
        String username = (String) authenticationToken.getPrincipal();
        String password = getPasswordByUsername(username);
        if(StringUtils.isEmpty(password)){
            return null;
        }

        //用户认证
        // info=new SimpleAuthenticationInfo(username,password,getName());
        //SimpleAuthenticationInfo info=new SimpleAuthenticationInfo(username,getEncPassword(password),getName());
        SimpleAuthenticationInfo info=new SimpleAuthenticationInfo(
                username,getEncPassword(password,username),getName());
        //设置盐值
        info.setCredentialsSalt(ByteSource.Util.bytes(username));
        return info;
    }

    //通过用户名获取到密码
    private String getPasswordByUsername(String username){
        return userMap.get(username);
    }

    //通过用户名获取角色信息
    private List<String> getRolesByUserName(String username){
        List<String> roles=new ArrayList<>();
        if(username.equals("admin")){
            roles.add("admin");
        }else {
            roles.add("test");
        }
        return roles;
    }

    //通过用户名获取权限信息
    private List<String> getPermissionsByUsername(String username){
        List<String> permissions=new ArrayList<>();
        if(username.equals("admin")){
            permissions.add("*");//权限为所有
        }
        permissions.add("user:list");
        permissions.add("user:deleted");
        permissions.add("user:edit");
        return permissions;
    }

    //返回密文密码

    private String getEncPassword(String password,String salt){
        return new Md5Hash(password,salt,3).toString();
    }


    //private String getEncPassword(String password){
        //return new Md5Hash(password,null,3).toString();
    //}
}
②认证授权
public void testSaltMatcher(){
        DefaultWebSecurityManager defaultWebSecurityManager = new DefaultWebSecurityManager();
        CustomRealm customRealm = new CustomRealm();
        //指定解密得方式
        HashedCredentialsMatcher matcher = new HashedCredentialsMatcher();
        matcher.setHashAlgorithmName("md5");//md5加密
        matcher.setHashIterations(3);//加密得次数
        //配置到域中
        customRealm.setCredentialsMatcher(matcher);


        defaultWebSecurityManager.setRealm(customRealm);
        SecurityUtils.setSecurityManager(defaultWebSecurityManager);

        /*****************主体提交验证**************************/
        //获取主体
        Subject subject = SecurityUtils.getSubject();
        //创建主体提交时需要携带的token(由用户名密码组成)
        UsernamePasswordToken usernamePasswordToken = new UsernamePasswordToken("test", "123456");

        try {
            //主体提交验证
            subject.login(usernamePasswordToken);
            /*****************主体提交验证**************************/
            //验证通过返回true,不通过返回false
            System.out.println("用户认证的状态" + subject.isAuthenticated());
            //判断该用户是否拥有这个角色
            subject.checkRoles("test");
            //校验是否拥有其权限
            subject.checkPermissions("user:deleted", "role:list");//是否拥有用户列表的权限
            //退出
            subject.logout();
            System.out.println("用户认证的状态" + subject.isAuthenticated());
        } catch (UnknownAccountException uae) {
            System.out.println("用户不存在");
        } catch (IncorrectCredentialsException ice) {
            System.out.println("用户名密码不匹配");
        } catch (LockedAccountException lae) {
            System.out.println("账号已经被锁定");
        } catch (AuthenticationException ae) {
            System.out.println("用户名密码不匹配");
        } catch (UnauthorizedException e) {
            System.out.println("该用户没有该权限访问");
        }
    }