list 的初始化和遍历
/*list的初始化和遍历*/
#if 1
#include <list>
#include <vector>
#include <iostream>
#include<algorithm>
using namespace std;

void TestList1()
 {
    list<int> L1;
    list<int> L2(10, 5);

     vector<int> v{1,2,3,4,5};

     list<int> L3(v.begin(), v.end());

     list<int> L4(L3);

     // C++11
    list<int> L5{ 1, 2, 3, 4, 5 };

     /
    // 链表遍历
    for (auto e : L2)
        cout << e << " ";
    cout << endl;

     // list<int>::iterator it = L3.begin();
    auto it = L3.begin();
    while (it != L3.end())
    {
        cout << *it << " ";
        ++it;
    }
    cout << endl;

     auto rit = L4.rbegin();
    while (rit != L4.rend())
    {
        cout << *rit << " ";
        ++rit;
    }
    cout << endl;

     // 注意:list不能使用原生态指针,即Node*来遍历链表
    // 因为list没有提供获取头指针的方法
}

int main(){
    TestList1();
 }
#endif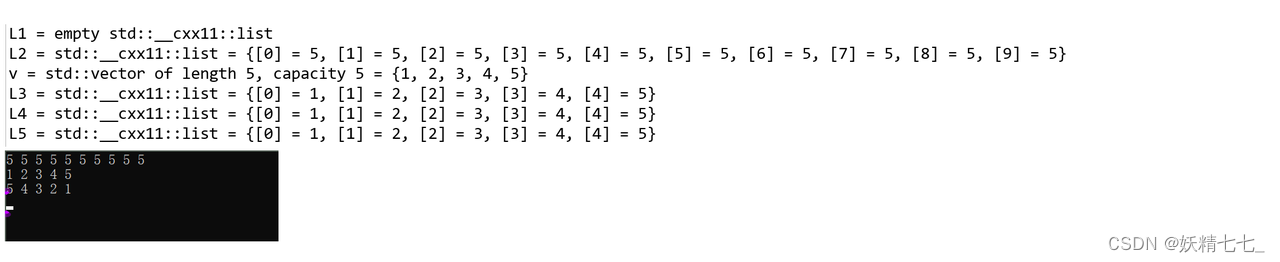
std::list 是一个双向链表,提供了双向序列的特性,包括有效地进行插入、删除操作等,但不支持随机访问。
初始化 std::list
空初始化: list<int> L1; 创建了一个空的 int 类型的 list。
填充初始化: list<int> L2(10, 5); 创建了一个包含 10 个元素,每个元素都初始化为 5 的 list。
范围初始化: list<int> L3(v.begin(), v.end()); 使用 vector<int> v 的迭代器范围来初始化 L3,即将 v 中的元素复制到 L3 中。
拷贝初始化: list<int> L4(L3); 使用另一个 list L3 来初始化 L4,复制 L3 的所有元素。
列表初始化 (C++11): list<int> L5{ 1, 2, 3, 4, 5 }; 使用初始化列表直接初始化 L5。
链表遍历
范围 for 循环: 使用范围 for 循环遍历 L2,打印出其所有元素。这是 C++11 引入的一种简洁的遍历容器的方式。
使用迭代器: 通过迭代器 it 遍历 L3,同样打印出所有元素。std::list 提供的迭代器是双向迭代器。
使用反向迭代器: 通过反向迭代器 rit 遍历 L4,但这次是逆序打印出所有元素。反向迭代器从容器的末尾开始遍历至开始。
注意
代码中提到,“list不能使用原生态指针,即 Node*来遍历链表”,这是因为 std::list 的实现细节被抽象化了,用户无法像操作普通链表那样通过节点指针进行遍历或访问。std::list 提供了迭代器来抽象这些细节,使得操作更安全、更容易。
list 的 resize 操作探究
/*list的resize操作探究*/
#if 1
#include <list>
#include <vector>
#include <iostream>
#include<algorithm>
using namespace std;

void TestList2()
 {
    list<int> L{ 1, 2, 3, 4, 5 };
    cout << L.size() << endl;

     L.resize(10, 6);
    for (auto e : L)
        cout << e << " ";
    cout << endl;

     L.resize(20);
    for (auto e : L)
        cout << e << " ";
    cout << endl;

     L.resize(7);
    for (auto e : L)
        cout << e << " ";
    cout << endl;
 }

int main(){
    TestList2();
 }
#endif

resize 方法用于调整链表的大小,即元素的数量。以下是对 TestList2 函数中各个操作的详细解释:
初始化 std::list
list<int> L{ 1, 2, 3, 4, 5 };
使用初始化列表创建了一个包含元素 {1, 2, 3, 4, 5} 的 list。
调整大小并填充新元素
L.resize(10, 6);
调整 L 的大小至 10 个元素。由于新大小大于当前大小,resize 方法会添加额外的元素。在这个例子中,新增的元素被初始化为 6。因此,调整后的 list 包含元素 {1, 2, 3, 4, 5, 6, 6, 6, 6, 6}。
再次调整大小,使用默认值填充
L.resize(20);
这次 L 的大小被调整至 20 个元素。因为没有指定新元素的初始化值,新增的元素会被默认初始化。对于整数类型,这意味着它们被初始化为 0。现在,list 包含 {1, 2, 3, 4, 5, 6, 6, 6, 6, 6, 0, 0, 0, 0, 0, 0, 0, 0, 0, 0}。
减少 list 的大小
L.resize(7);
L 的大小被减少至 7 个元素。resize 方法会移除超出新大小的元素。因此,list 现在包含 {1, 2, 3, 4, 5, 6, 6}。
在每次调整大小之后,代码通过一个范围 for 循环遍历 L 并打印其所有元素,这样可以直观地看到 resize 操作的结果。
list 的插入删除操作探究
/*list的插入删除操作探究*/
#if 1
#include <list>
#include <vector>
#include <iostream>
#include<algorithm>
using namespace std;


void TestList3()
 {
    list<int> L{ 1, 2, 3, 4, 5 };
    L.push_back(6);
    L.push_back(7);
    L.push_back(8);
    L.push_back(9);
    cout << L.size() << endl;
    cout << L.front() << endl;
    cout << L.back() << endl;

     L.pop_back();
    L.pop_back();
    for (auto e : L)
        cout << e << " ";
    cout << endl;

     L.push_front(0);
    for (auto e : L)
        cout << e << " ";
    cout << endl;

     L.pop_front();
    for (auto e : L)
        cout << e << " ";
    cout << endl;

     L.insert(L.begin(), 0);

     auto pos = find(L.begin(), L.end(), 5);
    if (pos != L.end())
        L.insert(pos, 5, 8);

     int array[] = { 10, 20, 30, 40, 50 };

     L.insert(L.end(), array, array + sizeof(array) / sizeof(array[0]));
 }

int main(){
    TestList3();
 }
#endif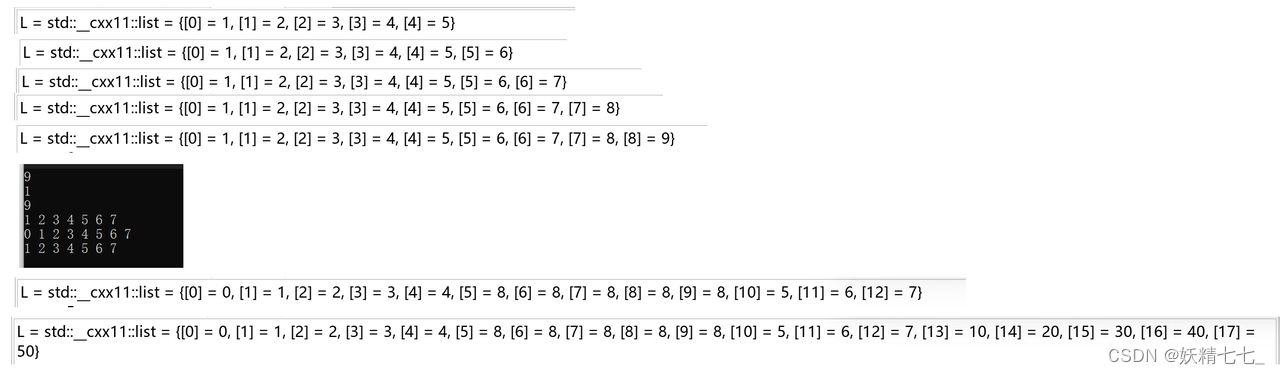
std::list 是一个双向链表,支持在任何位置高效插入和删除元素。
初始化 std::list
list<int> L{ 1, 2, 3, 4, 5 };
使用初始化列表创建了一个包含元素 {1, 2, 3, 4, 5} 的链表 L。
添加元素到链表尾部
通过 push_back 方法,在链表的尾部依次添加了元素 6、7、8 和 9。
L.push_back(6);
L.push_back(7);
L.push_back(8);
L.push_back(9);
这些操作将 L 扩展为 {1, 2, 3, 4, 5, 6, 7, 8, 9}。
移除链表尾部的元素
通过 pop_back 方法移除了链表尾部的两个元素(8 和 9)。
L.pop_back();
L.pop_back();
L 现在包含 {1, 2, 3, 4, 5, 6, 7}。
在链表头部添加元素
通过 push_front 方法在链表的头部添加了元素 0。
L.push_front(0);
L 现在包含 {0, 1, 2, 3, 4, 5, 6, 7}。
移除链表头部的元素
通过 pop_front 方法移除了链表头部的元素 0。
L.pop_front();
L 恢复为 {1, 2, 3, 4, 5, 6, 7}。
在链表特定位置插入元素
首先,在链表的开始位置插入元素 0。
L.insert(L.begin(), 0);
然后,找到元素 5 的位置,并在该位置前插入五个 8。
auto pos = find(L.begin(), L.end(), 5);
if (pos != L.end())
L.insert(pos, 5, 8);
这使得 L 变为 {0, 1, 2, 3, 4, 8, 8, 8, 8, 8, 5, 6, 7}。
从数组中插入多个元素
通过 insert 方法,将一个整型数组 {10, 20, 30, 40, 50} 的所有元素插入到链表的末尾。
int array[] = { 10, 20, 30, 40, 50 };
L.insert(L.end(), array, array + sizeof(array) / sizeof(array[0]));
这将数组中的元素添加到了 L 的末尾,使得 L 最终包含 {0, 1, 2, 3, 4, 8, 8, 8, 8, 8, 5, 6, 7, 10, 20, 30, 40, 50}。
list 的 erase、assign 操作探究
/*list的erase、assign操作探究*/
#if 1
#include <list>
#include <vector>
#include <iostream>
#include<algorithm>
using namespace std;


void TestList4()
 {
    list<int> L{ 1, 2, 3, 4, 5 };
    L.push_back(6);
    L.push_back(7);
    L.push_back(8);
    L.push_back(9);

     L.erase(L.begin());
    L.erase(find(L.begin(), L.end(), 8));
    L.erase(L.begin(), L.end());    // clear();

     L.assign(10, 5);

     int array[] = { 10, 20, 30, 40, 50 };
    L.assign(array, array + sizeof(array) / sizeof(array[0]));
 }

int main(){
    TestList4();
 }
#endif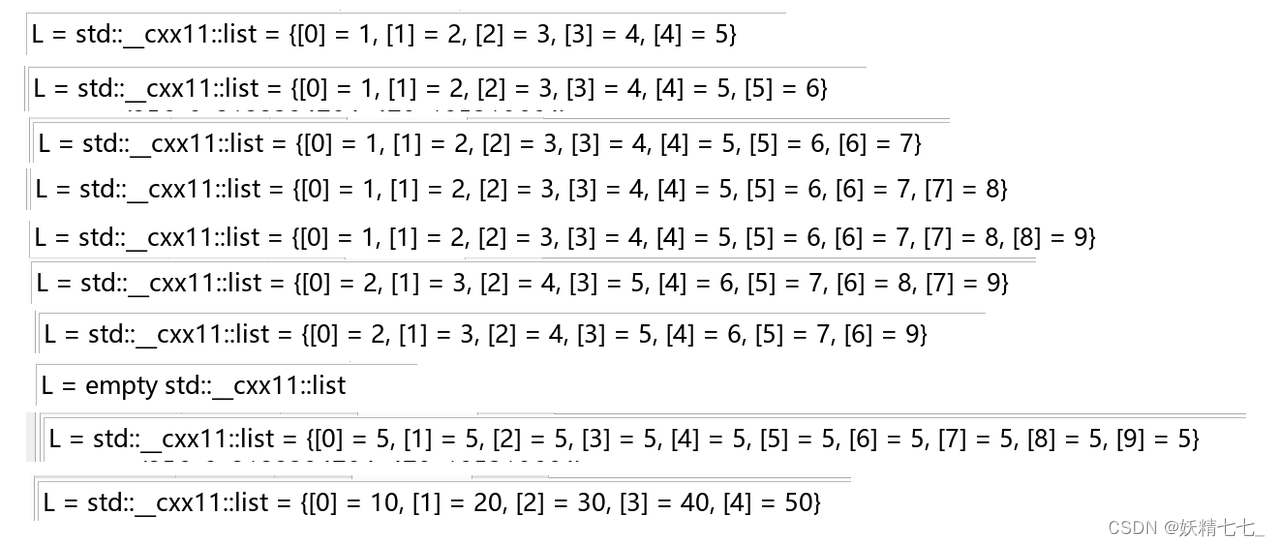
初始链表的创建和元素添加
list<int> L{ 1, 2, 3, 4, 5 };
L.push_back(6);
L.push_back(7);
L.push_back(8);
L.push_back(9);
首先,通过初始化列表创建一个包含 {1, 2, 3, 4, 5} 的 list,然后依次添加元素 6、7、8 和 9 到链表的末尾,使得链表变为 {1, 2, 3, 4, 5, 6, 7, 8, 9}。
删除链表中的元素
L.erase(L.begin());
删除链表的第一个元素(1)。此时链表变为 {2, 3, 4, 5, 6, 7, 8, 9}。
L.erase(find(L.begin(), L.end(), 8));
使用 find 函数查找值为 8 的元素,并将其删除。此时链表变为 {2, 3, 4, 5, 6, 7, 9}。
L.erase(L.begin(), L.end()); // clear();
删除链表中从开始到结束的所有元素,相当于清空整个链表。这行代码实际上清空了链表,使其不包含任何元素。
重新分配链表内容
L.assign(10, 5);
assign 方法用于将链表的内容替换为指定数量(这里是 10)的重复元素(这里是 5)。执行这个操作后,链表包含了 10 个值为 5 的元素。
使用数组重新分配链表内容
int array[] = { 10, 20, 30, 40, 50 };
L.assign(array, array + sizeof(array) / sizeof(array[0]));
再次使用 assign 方法,但这次是用数组的元素来重新分配链表的内容。通过计算数组的大小,将整个 array 的内容赋值给链表 L。执行这个操作后,链表的内容变为 {10, 20, 30, 40, 50}。
list 的 remove、sort、unique、reverse 操作探究
/*list的remove、sort、unique、reverse操作探究*/
#if 1
#include <list>
#include <vector>
#include <iostream>
#include <algorithm>
using namespace std;
void TestList5() {
    list<int> L{ 1, 2, 3, 4, 5, 1, 2, 3, 4, 5, 1, 1, 1};
    L.remove(1);

    L.sort();

    L.unique();

    L.reverse();
 }

int main() {
    TestList5();
 }
#endif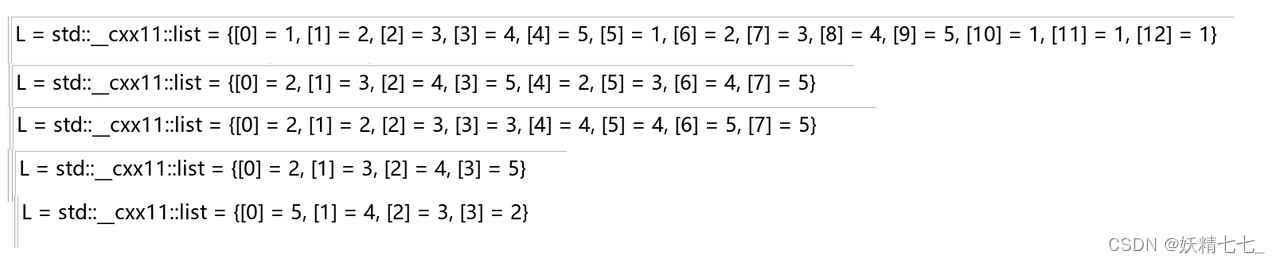
初始链表的创建
list<int> L{ 1, 2, 3, 4, 5, 1, 2, 3, 4, 5, 1, 1, 1};
首先,通过初始化列表创建了一个包含重复元素的 list。
删除特定元素
L.remove(1);
remove 方法从链表中删除所有值为 1 的元素。执行这个操作后,链表中所有的 1 被移除,链表变为 {2, 3, 4, 5, 2, 3, 4, 5}。
对链表进行排序
L.sort();
sort 方法对链表中的元素进行排序。std::list 提供了自己的 sort 成员函数,因为标准算法库中的 std::sort 需要随机访问迭代器,而 list 只提供双向迭代器。排序后,链表变为 {2, 2, 3, 3, 4, 4, 5, 5}。
移除连续重复的元素
L.unique();
unique 方法移除链表中连续重复的元素,只保留了每组重复元素中的第一个元素。在排序后的链表中应用 unique,会移除所有的连续重复项,链表变为 {2, 3, 4, 5}。
反转链表
L.reverse();
reverse 方法将链表中的元素反向排列。执行这个操作后,链表中的元素顺序被反转,即 {5, 4, 3, 2}。
list 的 remove_if 操作探究
/*list的remove_if操作探究*/
#if 1
#include <list>
#include <vector>
#include <iostream>
#include <algorithm>
using namespace std;

bool IsEven(int data) {
    // 5的二进制:0000 0101
    //          0000 0001
    // return 0 == (data & 0x01);
    return 0 == data % 2;
 }


void TestList6() {
    list<int> L{ 1, 2, 3, 4, 5 };
    L.push_back(6);
    L.push_back(7);
    L.push_back(8);
    L.push_back(9);

    L.remove_if(IsEven);
 }

int main() {
    TestList6();
 }
#endif
remove_if 方法允许用户指定一个谓词(一个返回布尔值的函数或函数对象),根据这个谓词来决定哪些元素应该被移除。
定义判定函数
bool IsEven(int data) {
return 0 == data % 2;
}
这个函数 IsEven 检查给定的整数是否为偶数。如果是偶数,返回 true;否则返回 false。
初始化 std::list 并添加元素
list<int> L{ 1, 2, 3, 4, 5 };
L.push_back(6);
L.push_back(7);
L.push_back(8);
L.push_back(9);
首先,通过初始化列表创建了一个包含元素 {1, 2, 3, 4, 5} 的 list,然后依次添加了元素 6、7、8 和 9 到链表的末尾。
使用 remove_if 根据条件移除元素
L.remove_if(IsEven);
remove_if 方法接受一个谓词函数 IsEven 作为参数,并移除 L 中所有使得 IsEven 返回 true 的元素。在这个例子中,它会移除链表中所有的偶数。
执行 remove_if 之后,原始链表 {1, 2, 3, 4, 5, 6, 7, 8, 9} 中的偶数元素被移除,留下了 {1, 3, 5, 7, 9}。
list 的迭代器失效探究
/*list的迭代器失效探究*/
#if 1
#include <list>
#include <vector>
#include <iostream>
#include <algorithm>
using namespace std;
void TestList7() {
list<int> L{ 1, 2, 3, 4, 5 };
L.push_back(6);
L.push_back(7);
L.push_back(8);
L.push_back(9);
//1
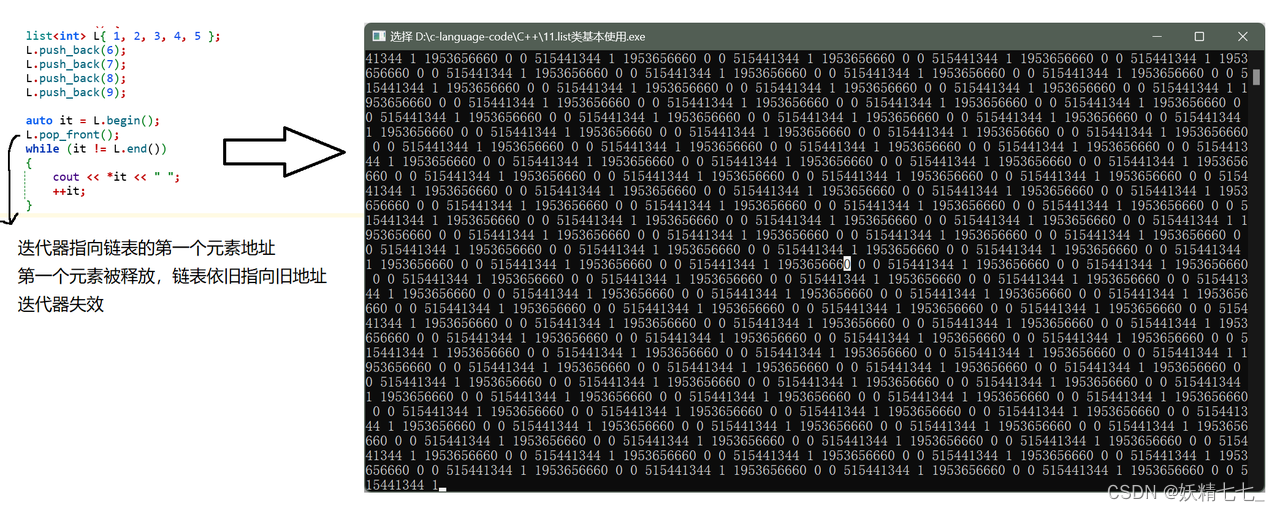
auto it = L.begin();
L.pop_front();
while (it != L.end())
{
cout << *it << " ";
++it;
}
//2
L.resize(0);
while (it != L.end())
{
cout << *it << " ";
++it;
}
//3
L.assign(10, 5);
list<int> L1{ 10, 20, 30, 40, 50 };
L = L1;
while (it != L.end())
{
cout << *it << " ";
++it;
}
//4
while (it != L.end()) {
// L.erase(it);
// ++it;
it = L.erase(it);
}
}
int main() {
TestList7();
}
#endif
初始化列表和添加元素
list<int> L{ 1, 2, 3, 4, 5 };
L.push_back(6);
L.push_back(7);
L.push_back(8);
L.push_back(9);
这段代码初始化了一个包含 {1, 2, 3, 4, 5, 6, 7, 8, 9} 的 list。
删除链表的第一个元素
auto it = L.begin();
L.pop_front();
it 初始化为指向链表的第一个元素。随后,pop_front() 删除了链表的第一个元素。由于 it 此时指向的元素被删除,it 的状态变得未定义,导致迭代器失效。正确的做法是在删除操作之后重新获取 begin() 的迭代器。
清空链表
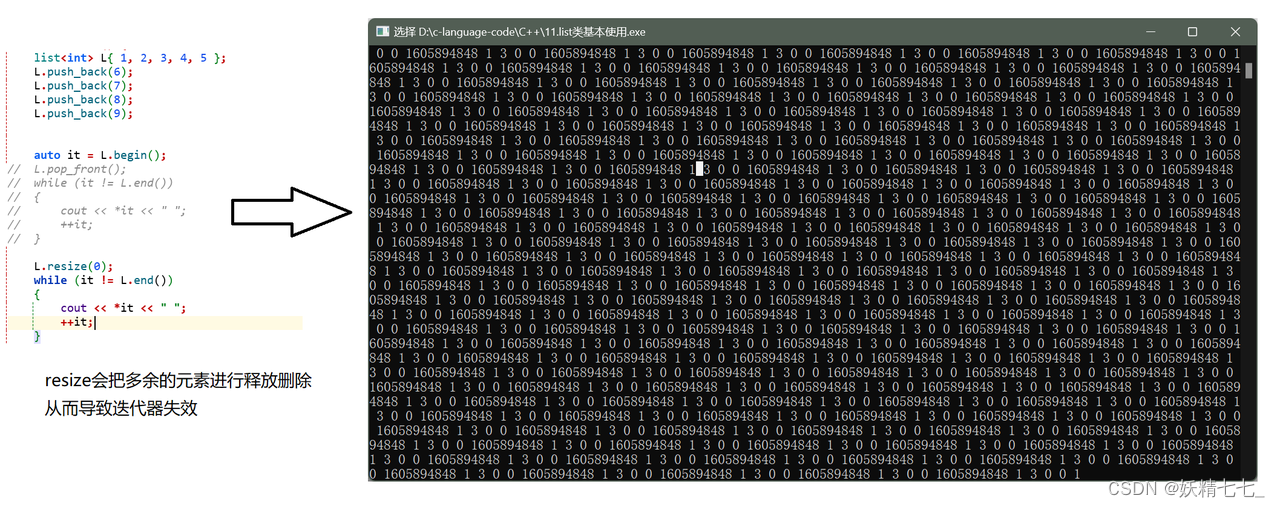
L.resize(0);
这段代码将链表的大小调整为 0,相当于清空了链表。此时,除了 end() 迭代器之外,任何其他迭代器都变得无效,包括之前的 it。
stl_list_h 中"operator ="底层代码
/*operator = 重载*/
template <class T, class Alloc>
list<T, Alloc>& list<T, Alloc>::operator=(const list<T, Alloc>& x) {
  if (this != &x) {
    iterator first1 = begin();
    iterator last1 = end();
    const_iterator first2 = x.begin();
    const_iterator last2 = x.end();
    while (first1 != last1 && first2 != last2) *first1++ = *first2++;
    if (first2 == last2)
      erase(first1, last1);
    else
      insert(last1, first2, last2);
  }
  return *this;
 }
template <class T, class Alloclist<T, Alloc>& list<T, Alloc>::operator=(const list<T, Alloc>& x) {
这一行声明了一个模板函数,这个函数是list类的成员函数,用于重载赋值运算符=。T是列表中存储元素的类型,而Alloc是分配器类型,用于控制元素的内存分配。该函数接收一个常量引用x作为参数,这个参数是另一个list对象,表示要从中复制数据。函数返回对当前对象的引用,允许链式赋值。
if (this != &x) {
这一行检查自赋值的情况。如果被赋值的对象(*this)和赋值来源对象(x)是同一个对象,则不执行任何操作。这是为了防止自我复制时可能发生的资源泄露或不必要的操作。
iterator first1 = begin(); iterator last1 = end(); const_iterator first2 = x.begin(); const_iterator last2 = x.end();
这四行代码初始化四个迭代器。first1和last1分别是当前list对象的起始和结束位置的迭代器。first2和last2是参数x(即要复制的list对象)的起始和结束位置的常量迭代器。
while (first1 != last1 && first2 != last2) *first1++ = *first2++;
这行代码在两个列表都没有遍历完之前,逐个元素地从x复制元素到当前对象。*first1++ = *first2++这个表达式复制元素值,并将两个迭代器分别向前移动到下一个元素。
if (first2 == last2)erase(first1, last1);elseinsert(last1, first2, last2);
在完成上述循环后,会有两种情况:
如果x的元素已经复制完,但当前对象中还有剩余元素,这些剩余元素需要被删除。这通过调用erase(first1, last1)实现,它删除从first1到last1(不包括last1)范围内的所有元素。
如果当前对象的元素已经被完全覆盖,但x中还有未复制的元素,这些元素需要被插入到当前对象的末尾。这通过调用insert(last1, first2, last2)实现,它从first2到last2的范围内插入元素到last1位置之前。
return *this;
最后,函数返回当前对象的引用,使得可以进行链式赋值操作(例如,a = b = c)。
重新分配链表内容
L.assign(10, 5);
list<int> L1{ 10, 20, 30, 40, 50 };
L = L1;
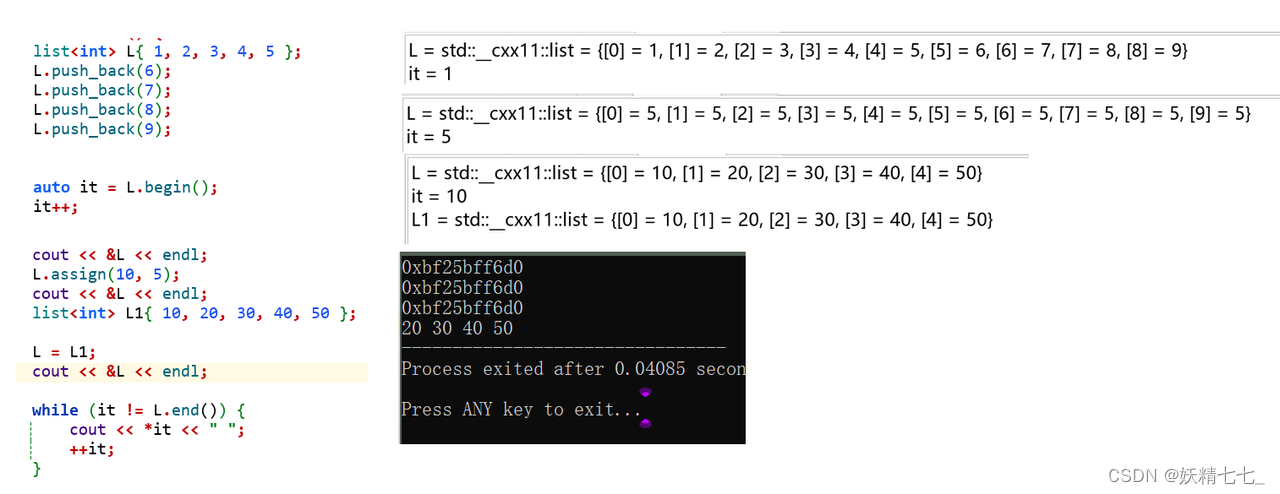
assign底层实现和operator=大致是相同的。根据迭代器指向的位置元素是否被销毁来判断迭代器是否失效。示例代码迭代器没有发生失效。
删除操作
while (it != L.end()) {
it = L.erase(it);
}
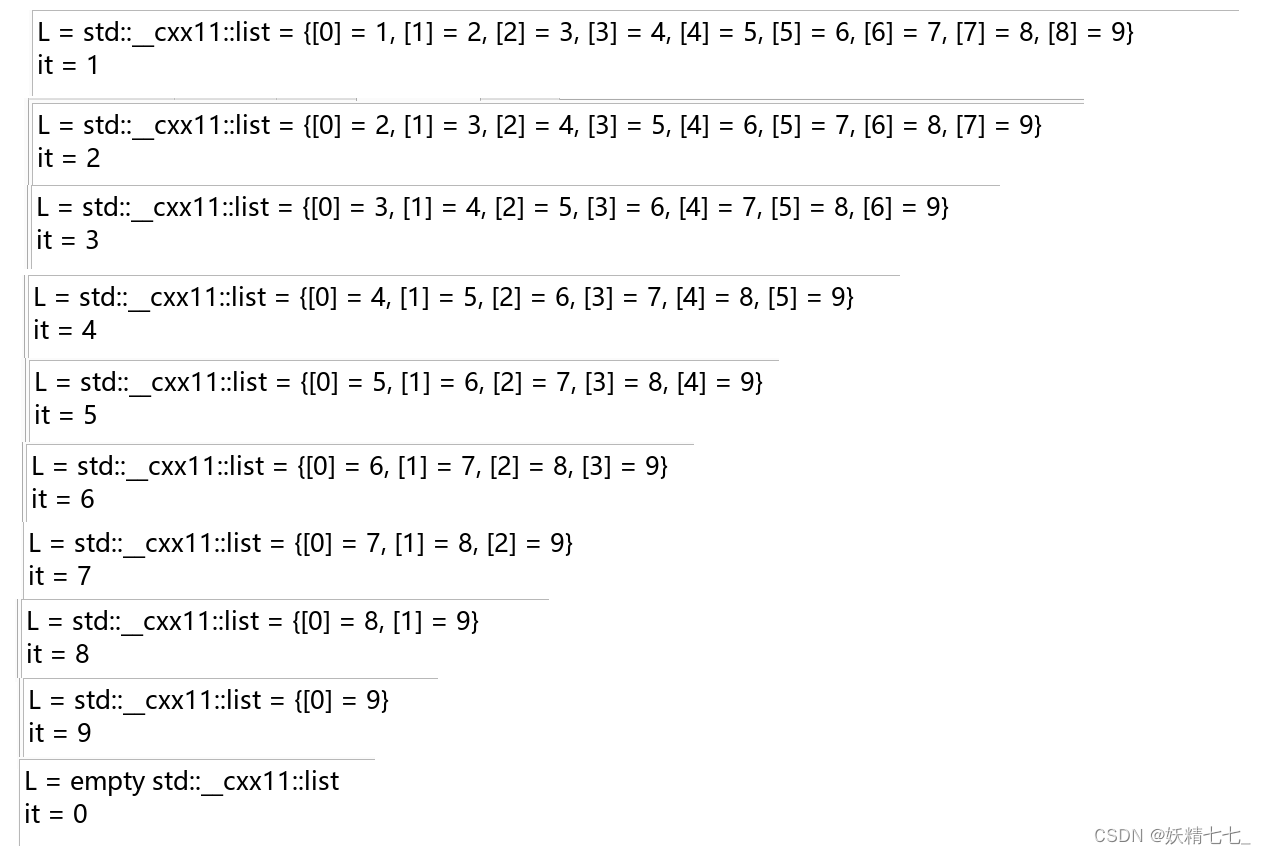
这种模式是正确的方式来删除链表中的元素,因为 erase 返回指向被删除元素下一个元素的迭代器。
结尾
最后,感谢您阅读我的文章,希望这些内容能够对您有所启发和帮助。如果您有任何问题或想要分享您的观点,请随时在评论区留言。
同时,不要忘记订阅我的博客以获取更多有趣的内容。在未来的文章中,我将继续探讨这个话题的不同方面,为您呈现更多深度和见解。
谢谢您的支持,期待与您在下一篇文章中再次相遇!