本文通过脚本,可以快速地部署和配置Kubernetes环境,省去了各插件手动部署、配置的繁琐过程。
先看最终结果:
[root@localhost home]# kubectl get node
NAME        STATUS   ROLES           AGE    VERSION
k8smaster   Ready    control-plane   113m   v1.28.2
k8snode1    Ready    <none>          104m   v1.28.2
k8snode2    Ready    <none>          96m    v1.28.2
K8s集群部署
1. 环境准备
1.1. 准备资源
3 台服务器: Centos 7.6 系统,内核版本:3.10.0-1160.71.1.el7.x86_64,在每个节点上添加 hosts 信息(脚本中会自动添加):
| IP | 备注 | Hosts |
| 10.8.42.15 | master | k8smaster |
| 10.8.42.16 | node1 | k8snode1 |
| 10.8.42.17 | node2 | k8snode2 |
1.2. 准备网络
如果服务器已经可以上网,可忽略此步骤。
检查DNS:cat /etc/resolv.conf
若为空,则配置vi /etc/resolv.conf
插入内容:nameserver 61.139.2.69 (具体根据公司情况添加)
1.3. 准备工具
安装rz/sz命令,方便上传下载文件(可选)。
yum -y install lrzsz1.4. 准备安装包、脚本、配置文件
脚本/安装包/配置下载地址:https://download.csdn.net/download/yqwang75457/88816709

💡下载后不要急着直接安装,建议先看一下install-k8s.sh、install-k8s-common.sh、kubeadm.yaml这3个文件,脚本注释相对完整,先了解一下安装的大体流程。且其中2个文件需要做一些小的修改的(个人觉得vi不好用,因此建议先在本地把文件配置修改正确,再上传到服务器,具体修改内容,详解下文1.5)。
1.5. 相关文件说明及脚本修改
大致了解下载下来的文件,并根据服务器资源、安装版本等情况,可能需要修改脚本部分内容。
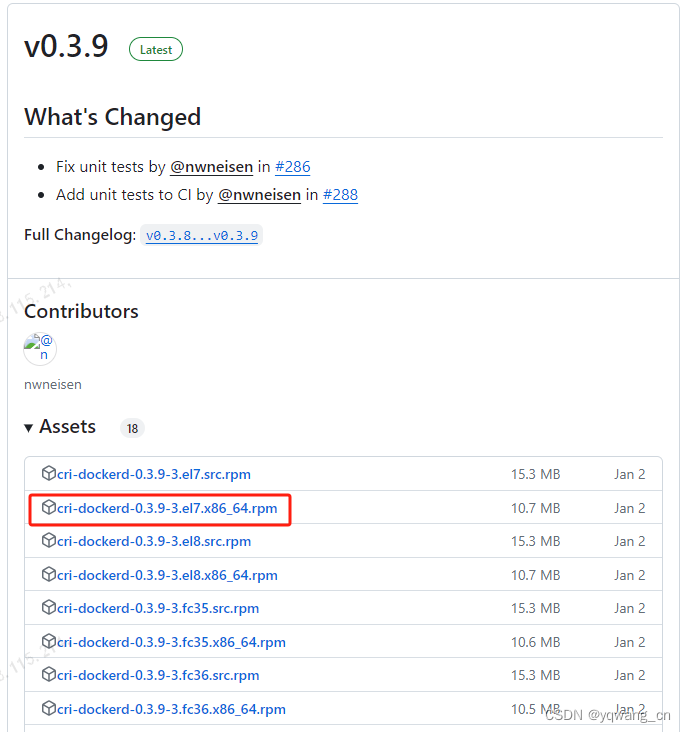
1.5.1. 关于安装包cri-dockerd-0.3.9-3.el7.x86_64.rpm
本想着在安装脚本中下载并使用这玩意儿的,可是这个github老是访问不了!访问不了!访问不了!访问不了!因此只能用手动下载了。
版本替换(可选):
可选择合适版本下载进行替换,替换后记得修改install-k8s-common.sh中cri_dockerd_version变量值,下载地址(GitHub) Releases · Mirantis/cri-dockerd · GitHub
1.5.2. 修改install-k8s-common.sh文件
主要修改集群节点规划、软件版本信息(根据实际情况修改)。
# 指定k8s主节点ip(改!)
k8s_master_ip = "10.8.42.15"

# host配置(按集群规划配置)(改!)
k8snodes[0]='10.8.42.15 k8smaster';
k8snodes[1]='10.8.42.16 k8snode1';
k8snodes[2]='10.8.42.17 k8snode2';

# 容器运行时版本
docker_version="24.0.7"
cri_dockerd_version="0.3.9"

# Docker镜像加速器(用公司账号去阿里云获取!)(改!)
# 详见https://cr.console.aliyun.com/cn-hangzhou/instances/mirrors
docker_registry_mirrors="https://8v0yq4vh.mirror.aliyuncs.com"

# k8s版本
k8s_version="v1.28.2"
k8s_kubeadm_version="1.28.2"
k8s_kubelet_version="1.28.2"
k8s_kubectl_version="1.28.2"
1.5.3. 修改kubeadm.yaml文件
必要修改部分!!!
# 修改1.
localAPIEndpoint下
  advertiseAddress: 10.8.42.15 #改!Master的ip地址

# 修改2.
nodeRegistration下
  criSocket: unix:///var/run/cri-dockerd.sock #改!
  imagePullPolicy: IfNotPresent
  name: k8smaster #改!(主节点域名)

# 修改3.
imageRepository: registry.aliyuncs.com/google_containers  #改!
kubernetesVersion: 1.28.2 #改!k8s版本
# 修改4.
networking下
networking:
  dnsDomain: cluster.local
  serviceSubnet: 10.96.0.0/12
  podSubnet: 10.244.0.0/16 #添加此行!pod子网地址
scheduler: {}

# 修改5.
#↓↓↓要添加的ipvs模式!
---
apiVersion: kubeproxy.config.k8s.io/v1alpha1
kind: KubeProxyConfiguration
mode: ipvs
---
#↑↑↑要添加的ipvs模式!
等安装完成后,可以用这个命令重新生成此配置文件,看看默认的是什么样子:
kubeadm config print init-defaults --component-configs KubeletConfiguration > kubeadm_default.yaml1.5.4. 关于网络插件kube-flannel.yml
上文下载文件中包含kube-flannel.yml,也可以下载最新的进行替换:https://github.com/flannel-io/flannel/releases/tag/v0.22.0
2. 安装
终于开始了~终于开始了~终于开始了~
2.1. 上传安装包
完成修改后,用rz命令或ftp工具将这些文件上传到各服务器的/home目录
1.安装包cri-dockerd-0.3.9-3.el7.x86_64.rpm;
2.安装脚本install-k8s-common.sh、install-k8s.sh;
3.卸载脚本uninstall-k8s.sh;
4.初始化配置文件kubeadm.yaml;
5.网络插件配置文件kube-flannel.yml;
并执行脚本授权:chmod +x *.sh
chmod +x *.sh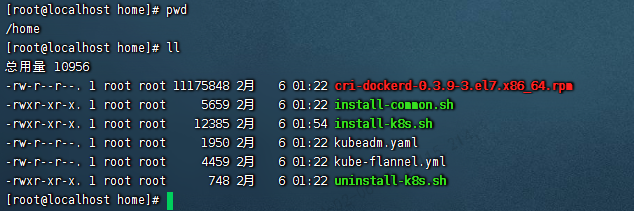
2.2. Master、Node节点均依次执行安装脚本
./install-k8s.sh💡安装过程中有2个确认逻辑:
1.以上↑↑↑↑↑↑↑主机配置hosts是否正确?默认为 no. Enter [yes/no]:yes
2.[reset] Are you sure you want to proceed? [y/N]: y
等待安装完成即可!!!
2.3. Master、Node安装日志
如果安装失败,可以对比我的安装日志(我安装了不下于10次,都是成功的)。
2.3.1. Master安装日志
439行Your Kubernetes control-plane has initialized successfully!显示集群搭建完成;
457行
Then you can join any number of worker nodes by running the following on each as root:

kubeadm join 10.8.42.15:6443 --token abcdef.0123456789abcdef \

--discovery-token-ca-cert-hash sha256:dcb3a92796f3e28eeea7fa4200568da048a20e37f2ccdbb7953db6ac0ecd8804💡注意这里的token在node加入集群需要。如果忘记保存或token已过期?继续查看下文《节点join集群》。
完整日志如下:
[root@localhost home]# ./install-k8s.sh
Hello, Let's Go!
[20240206 01:25:52] [Info] #########################################################################################
[20240206 01:25:52] [Info] ################################# 初始化服务器环境设置... ################################
[20240206 01:25:52] [Info] #########################################################################################
[20240206 01:25:52] [Info] 1.关闭用防火墙
[20240206 01:25:52] [Info] 2.配置域名解析
[20240206 01:25:52] [Info] 确认hosts域名配置--
127.0.0.1 localhost localhost.localdomain localhost4 localhost4.localdomain4
::1 localhost localhost.localdomain localhost6 localhost6.localdomain6
10.8.42.15 k8smaster
10.8.42.16 k8snode1
10.8.42.17 k8snode2
以上↑↑↑↑↑↑↑主机配置hosts是否正确?默认为 no. Enter [yes/no]:yes
[20240206 01:25:52] [Info] 确认已配置hosts
[20240206 01:25:52] [Info] 3.必须关闭swap分区
[20240206 01:25:52] [Info] 4.临时关闭selinux防火墙
[20240206 01:25:52] [Info] 5.配置服务器时间保持一致[工具:chrony]
已加载插件:fastestmirror
Loading mirror speeds from cached hostfile
* base: mirrors.aliyun.com
* extras: mirrors.aliyun.com
* updates: mirrors.ustc.edu.cn
软件包 chrony-3.4-1.el7.x86_64 已安装并且是最新版本
无须任何处理
210 Number of sources = 4
MS Name/IP address Stratum Poll Reach LastRx Last sample
===============================================================================
^- 81.16.177.123 2 6 177 23 -8195us[-8195us] +/- 140ms
^- stratum2-1.ntp.mow01.ru.> 2 7 5 80 +20ms[ +20ms] +/- 101ms
^* time.neu.edu.cn 1 6 177 24 -75us[ -376us] +/- 23ms
^? ntp5.flashdance.cx 0 8 0 - +0ns[ +0ns] +/- 0ns
2024年 02月 06日 星期二 01:25:54 EST
[20240206 01:25:52] [Info] 6.添加网桥过滤和地址转发功能
[20240206 01:25:52] [Info] 6.1.添加网桥过滤和地址转发功能:添加配置
overlay
br_netfilter
net.bridge.bridge-nf-call-ip6tables=1
net.bridge.bridge-nf-call-iptables=1
net.ipv4.ip_forward=1
# 下面的内核参数可以解决ipvs模式下长连接空闲超时的问题
net.ipv4.tcp_keepalive_intvl=30
net.ipv4.tcp_keepalive_probes=10
net.ipv4.tcp_keepalive_time=600
vm.swappiness=0
[20240206 01:25:52] [Info] 6.2.添加网桥过滤和地址转发功能:重新加载配置
* Applying /usr/lib/sysctl.d/00-system.conf ...
net.bridge.bridge-nf-call-ip6tables = 0
net.bridge.bridge-nf-call-iptables = 0
net.bridge.bridge-nf-call-arptables = 0
* Applying /usr/lib/sysctl.d/10-default-yama-scope.conf ...
kernel.yama.ptrace_scope = 0
* Applying /usr/lib/sysctl.d/50-default.conf ...
kernel.sysrq = 16
kernel.core_uses_pid = 1
kernel.kptr_restrict = 1
net.ipv4.conf.default.rp_filter = 1
net.ipv4.conf.all.rp_filter = 1
net.ipv4.conf.default.accept_source_route = 0
net.ipv4.conf.all.accept_source_route = 0
net.ipv4.conf.default.promote_secondaries = 1
net.ipv4.conf.all.promote_secondaries = 1
fs.protected_hardlinks = 1
fs.protected_symlinks = 1
* Applying /etc/sysctl.d/99-sysctl.conf ...
* Applying /etc/sysctl.d/k8s.conf ...
net.bridge.bridge-nf-call-ip6tables = 1
net.bridge.bridge-nf-call-iptables = 1
net.ipv4.ip_forward = 1
net.ipv4.tcp_keepalive_intvl = 30
net.ipv4.tcp_keepalive_probes = 10
net.ipv4.tcp_keepalive_time = 600
vm.swappiness = 0
* Applying /etc/sysctl.conf ...
[20240206 01:25:52] [Info] 6.3.添加网桥过滤和地址转发功能:加载网桥过滤器模块
[20240206 01:25:52] [Info] 6.4.添加网桥过滤和地址转发功能:确认 br_netfilter 和 overlay 模块被加载
br_netfilter 22256 0
bridge 151336 1 br_netfilter
overlay 91659 0
[20240206 01:25:52] [Info] 6.5.添加网桥过滤和地址转发功能:确认系统变量在你的 sysctl 配置中被设置为 1
net.bridge.bridge-nf-call-iptables = 1
net.bridge.bridge-nf-call-ip6tables = 1
net.ipv4.ip_forward = 1
[20240206 01:25:52] [Info] 7.配置ipvs功能
[20240206 01:25:52] [Info] 7.1.配置ipvs功能:安装ipset和ipvsadm
已加载插件:fastestmirror
Loading mirror speeds from cached hostfile
* base: mirrors.aliyun.com
* extras: mirrors.aliyun.com
* updates: mirrors.ustc.edu.cn
软件包 ipvsadm-1.27-8.el7.x86_64 已安装并且是最新版本
软件包 ipset-7.1-1.el7.x86_64 已安装并且是最新版本
软件包 sysstat-10.1.5-20.el7_9.x86_64 已安装并且是最新版本
软件包 conntrack-tools-1.4.4-7.el7.x86_64 已安装并且是最新版本
无须任何处理
[20240206 01:25:52] [Info] 7.2.配置ipvs功能:添加需要加载的模块写入脚本文件
[20240206 01:25:52] [Info] 7.3.配置ipvs功能:重启服务
[20240206 01:25:52] [Info] 7.4.配置ipvs功能:查看对应的模块是否加载成功
nf_conntrack_ipv6 18935 3
nf_defrag_ipv6 35104 1 nf_conntrack_ipv6
nf_conntrack_netlink 36396 0
nf_conntrack_ipv4 15053 5
nf_defrag_ipv4 12729 1 nf_conntrack_ipv4
ip_vs_sh 12688 0
ip_vs_wrr 12697 0
ip_vs_rr 12600 4
ip_vs 145458 10 ip_vs_rr,ip_vs_sh,ip_vs_wrr
nf_conntrack 139264 10 ip_vs,nf_nat,nf_nat_ipv4,nf_nat_ipv6,xt_conntrack,nf_nat_masquerade_ipv4,nf_nat_masquerade_ipv6,nf_conntrack_netlink,nf_conntrack_ipv4,nf_conntrack_ipv6
nfnetlink 14519 3 nf_tables,ip_set,nf_conntrack_netlink
libcrc32c 12644 4 xfs,ip_vs,nf_nat,nf_conntrack
[20240206 01:25:52] [Info] #########################################################################################
[20240206 01:25:52] [Info] ################################# Start Install Docker... ###############################
[20240206 01:25:52] [Info] #########################################################################################
[20240206 01:25:52] [Info] 准备安装Docker,版本:24.0.7
[20240206 01:25:52] [Info] 安装Docker:1.yum-utils软件用于提供yum-config-manager程序
已加载插件:fastestmirror
Loading mirror speeds from cached hostfile
* base: mirrors.aliyun.com
* extras: mirrors.aliyun.com
* updates: mirrors.ustc.edu.cn
软件包 yum-utils-1.1.31-54.el7_8.noarch 已安装并且是最新版本
无须任何处理
[20240206 01:25:52] [Info] 安装Docker:2.使用yum-config-manager创建docker阿里存储库
已加载插件:fastestmirror
adding repo from: http://mirrors.aliyun.com/docker-ce/linux/centos/docker-ce.repo
grabbing file http://mirrors.aliyun.com/docker-ce/linux/centos/docker-ce.repo to /etc/yum.repos.d/docker-ce.repo
repo saved to /etc/yum.repos.d/docker-ce.repo
已加载插件:fastestmirror
Loading mirror speeds from cached hostfile
* base: mirrors.aliyun.com
* extras: mirrors.aliyun.com
* updates: mirrors.ustc.edu.cn
base | 3.6 kB 00:00:00
docker-ce-stable | 3.5 kB 00:00:00
extras | 2.9 kB 00:00:00
kubernetes | 1.4 kB 00:00:00
updates | 2.9 kB 00:00:00
元数据缓存已建立
[20240206 01:25:52] [Info] 安装Docker:3.配置Docker镜像加速器/修改cgroup方式
[20240206 01:25:52] [Info] 安装Docker:4.开始执行安装
已加载插件:fastestmirror
Loading mirror speeds from cached hostfile
* base: mirrors.aliyun.com
* extras: mirrors.aliyun.com
* updates: mirrors.ustc.edu.cn
正在解决依赖关系
--> 正在检查事务
---> 软件包 containerd.io.x86_64.0.1.6.28-3.1.el7 将被 安装
---> 软件包 docker-buildx-plugin.x86_64.0.0.12.1-1.el7 将被 安装
---> 软件包 docker-ce.x86_64.3.24.0.7-1.el7 将被 安装
--> 正在处理依赖关系 docker-ce-rootless-extras,它被软件包 3:docker-ce-24.0.7-1.el7.x86_64 需要
---> 软件包 docker-ce-cli.x86_64.1.24.0.7-1.el7 将被 安装
---> 软件包 docker-compose-plugin.x86_64.0.2.24.5-1.el7 将被 安装
--> 正在检查事务
---> 软件包 docker-ce-rootless-extras.x86_64.0.25.0.2-1.el7 将被 安装
--> 解决依赖关系完成
依赖关系解决
=======================================================================================================================================================================================================================================================
Package 架构 版本 源 大小
=======================================================================================================================================================================================================================================================
正在安装:
containerd.io x86_64 1.6.28-3.1.el7 docker-ce-stable 35 M
docker-buildx-plugin x86_64 0.12.1-1.el7 docker-ce-stable 13 M
docker-ce x86_64 3:24.0.7-1.el7 docker-ce-stable 24 M
docker-ce-cli x86_64 1:24.0.7-1.el7 docker-ce-stable 13 M
docker-compose-plugin x86_64 2.24.5-1.el7 docker-ce-stable 13 M
为依赖而安装:
docker-ce-rootless-extras x86_64 25.0.2-1.el7 docker-ce-stable 9.4 M
事务概要
=======================================================================================================================================================================================================================================================
安装 5 软件包 (+1 依赖软件包)
总下载量:108 M
安装大小:380 M
Downloading packages:
(1/6): docker-buildx-plugin-0.12.1-1.el7.x86_64.rpm | 13 MB 00:00:06
(2/6): docker-ce-24.0.7-1.el7.x86_64.rpm | 24 MB 00:00:12
(3/6): containerd.io-1.6.28-3.1.el7.x86_64.rpm | 35 MB 00:00:20
(4/6): docker-ce-rootless-extras-25.0.2-1.el7.x86_64.rpm | 9.4 MB 00:00:05
(5/6): docker-ce-cli-24.0.7-1.el7.x86_64.rpm | 13 MB 00:00:07
(6/6): docker-compose-plugin-2.24.5-1.el7.x86_64.rpm | 13 MB 00:00:08
-------------------------------------------------------------------------------------------------------------------------------------------------------------------------------------------------------------------------------------------------------
总计 3.1 MB/s | 108 MB 00:00:34
Running transaction check
Running transaction test
Transaction test succeeded
Running transaction
正在安装 : containerd.io-1.6.28-3.1.el7.x86_64 1/6
正在安装 : docker-compose-plugin-2.24.5-1.el7.x86_64 2/6
正在安装 : docker-buildx-plugin-0.12.1-1.el7.x86_64 3/6
正在安装 : 1:docker-ce-cli-24.0.7-1.el7.x86_64 4/6
正在安装 : docker-ce-rootless-extras-25.0.2-1.el7.x86_64 5/6
正在安装 : 3:docker-ce-24.0.7-1.el7.x86_64 6/6
验证中 : docker-buildx-plugin-0.12.1-1.el7.x86_64 1/6
验证中 : 3:docker-ce-24.0.7-1.el7.x86_64 2/6
验证中 : docker-compose-plugin-2.24.5-1.el7.x86_64 3/6
验证中 : containerd.io-1.6.28-3.1.el7.x86_64 4/6
验证中 : docker-ce-rootless-extras-25.0.2-1.el7.x86_64 5/6
验证中 : 1:docker-ce-cli-24.0.7-1.el7.x86_64 6/6
已安装:
containerd.io.x86_64 0:1.6.28-3.1.el7 docker-buildx-plugin.x86_64 0:0.12.1-1.el7 docker-ce.x86_64 3:24.0.7-1.el7 docker-ce-cli.x86_64 1:24.0.7-1.el7 docker-compose-plugin.x86_64 0:2.24.5-1.el7
作为依赖被安装:
docker-ce-rootless-extras.x86_64 0:25.0.2-1.el7
完毕!
[20240206 01:25:52] [Info] 安装Docker:5.启动docker并设置开机自启
Created symlink from /etc/systemd/system/multi-user.target.wants/docker.service to /usr/lib/systemd/system/docker.service.
● docker.service - Docker Application Container Engine
Loaded: loaded (/usr/lib/systemd/system/docker.service; enabled; vendor preset: disabled)
Active: active (running) since 二 2024-02-06 01:26:43 EST; 5ms ago
Docs: https://docs.docker.com
Main PID: 16254 (dockerd)
Tasks: 10
Memory: 31.6M
CGroup: /system.slice/docker.service
└─16254 /usr/bin/dockerd -H fd:// --containerd=/run/containerd/containerd.sock
2月 06 01:26:42 localhost.localdomain systemd[1]: Starting Docker Application Container Engine...
2月 06 01:26:42 localhost.localdomain dockerd[16254]: time="2024-02-06T01:26:42.702034175-05:00" level=info msg="Starting up"
2月 06 01:26:43 localhost.localdomain dockerd[16254]: time="2024-02-06T01:26:43.693937724-05:00" level=info msg="Loading containers: start."
2月 06 01:26:43 localhost.localdomain dockerd[16254]: time="2024-02-06T01:26:43.754164823-05:00" level=info msg="Default bridge (docker0) is assigned with an IP address 172.17.0.0/16. Daemon option --bip can be used to set a preferred IP address"
2月 06 01:26:43 localhost.localdomain dockerd[16254]: time="2024-02-06T01:26:43.784660263-05:00" level=info msg="Loading containers: done."
2月 06 01:26:43 localhost.localdomain dockerd[16254]: time="2024-02-06T01:26:43.800863108-05:00" level=info msg="Docker daemon" commit=311b9ff graphdriver=overlay2 version=24.0.7
2月 06 01:26:43 localhost.localdomain dockerd[16254]: time="2024-02-06T01:26:43.800948561-05:00" level=info msg="Daemon has completed initialization"
2月 06 01:26:43 localhost.localdomain dockerd[16254]: time="2024-02-06T01:26:43.834235503-05:00" level=info msg="API listen on /run/docker.sock"
2月 06 01:26:43 localhost.localdomain systemd[1]: Started Docker Application Container Engine.
Hint: Some lines were ellipsized, use -l to show in full.
[20240206 01:25:52] [Info] 安装Docker:END.完成.安装版本如下:
Client: Docker Engine - Community
Version: 24.0.7
API version: 1.43
Go version: go1.20.10
Git commit: afdd53b
Built: Thu Oct 26 09:11:35 2023
OS/Arch: linux/amd64
Context: default
Server: Docker Engine - Community
Engine:
Version: 24.0.7
API version: 1.43 (minimum version 1.12)
Go version: go1.20.10
Git commit: 311b9ff
Built: Thu Oct 26 09:10:36 2023
OS/Arch: linux/amd64
Experimental: false
containerd:
Version: 1.6.28
GitCommit: ae07eda36dd25f8a1b98dfbf587313b99c0190bb
runc:
Version: 1.1.12
GitCommit: v1.1.12-0-g51d5e94
docker-init:
Version: 0.19.0
GitCommit: de40ad0
[20240206 01:25:52] [Info] #########################################################################################
[20240206 01:25:52] [Info] ############################## Start Install cri-dockerd... #############################
[20240206 01:25:52] [Info] #########################################################################################
[20240206 01:25:52] [Info] 准备安装cri-dockerd
准备中... ################################# [100%]
正在升级/安装...
1:cri-dockerd-3:0.3.9-3.el7 ################################# [100%]
Created symlink from /etc/systemd/system/multi-user.target.wants/cri-docker.service to /usr/lib/systemd/system/cri-docker.service.
[20240206 01:25:52] [Info] #########################################################################################
[20240206 01:25:52] [Info] ################################## Start Install K8s... #################################
[20240206 01:25:52] [Info] #########################################################################################
[20240206 01:25:52] [Info] 准备安装k8s,版本:v1.28.2
[20240206 01:25:52] [Info] 安装k8s:1.阿里云YUM源
[20240206 01:25:52] [Info] 安装k8s:2.卸载旧版本
已加载插件:fastestmirror
参数 kubelet 没有匹配
参数 kubeadm 没有匹配
参数 kubectl 没有匹配
不删除任何软件包
[20240206 01:25:52] [Info] 安装k8s:3.安装kubele-t1.28.2、kubeadm-1.28.2、kubectl-1.28.2 指定版本
已加载插件:fastestmirror
Loading mirror speeds from cached hostfile
* base: mirrors.aliyun.com
* extras: mirrors.aliyun.com
* updates: mirrors.ustc.edu.cn
kubernetes | 1.4 kB 00:00:00
正在解决依赖关系
--> 正在检查事务
---> 软件包 kubeadm.x86_64.0.1.28.2-0 将被 安装
--> 正在处理依赖关系 kubernetes-cni >= 0.8.6,它被软件包 kubeadm-1.28.2-0.x86_64 需要
---> 软件包 kubectl.x86_64.0.1.28.2-0 将被 安装
---> 软件包 kubelet.x86_64.0.1.28.2-0 将被 安装
--> 正在检查事务
---> 软件包 kubernetes-cni.x86_64.0.1.2.0-0 将被 安装
--> 解决依赖关系完成
依赖关系解决
=======================================================================================================================================================================================================================================================
Package 架构 版本 源 大小
=======================================================================================================================================================================================================================================================
正在安装:
kubeadm x86_64 1.28.2-0 kubernetes 11 M
kubectl x86_64 1.28.2-0 kubernetes 11 M
kubelet x86_64 1.28.2-0 kubernetes 21 M
为依赖而安装:
kubernetes-cni x86_64 1.2.0-0 kubernetes 17 M
事务概要
=======================================================================================================================================================================================================================================================
安装 3 软件包 (+1 依赖软件包)
总下载量:59 M
安装大小:250 M
Downloading packages:
(1/4): a24e42254b5a14b67b58c4633d29c27370c28ed6796a80c455a65acc813ff374-kubectl-1.28.2-0.x86_64.rpm | 11 MB 00:00:05
(2/4): cee73f8035d734e86f722f77f1bf4e7d643e78d36646fd000148deb8af98b61c-kubeadm-1.28.2-0.x86_64.rpm | 11 MB 00:00:06
(3/4): 0f2a2afd740d476ad77c508847bad1f559afc2425816c1f2ce4432a62dfe0b9d-kubernetes-cni-1.2.0-0.x86_64.rpm | 17 MB 00:00:08
(4/4): e1cae938e231bffa3618f5934a096bd85372ee9b1293081f5682a22fe873add8-kubelet-1.28.2-0.x86_64.rpm | 21 MB 00:00:10
-------------------------------------------------------------------------------------------------------------------------------------------------------------------------------------------------------------------------------------------------------
总计 3.7 MB/s | 59 MB 00:00:16
Running transaction check
Running transaction test
Transaction test succeeded
Running transaction
警告:RPM 数据库已被非 yum 程序修改。
正在安装 : kubernetes-cni-1.2.0-0.x86_64 1/4
正在安装 : kubelet-1.28.2-0.x86_64 2/4
正在安装 : kubectl-1.28.2-0.x86_64 3/4
正在安装 : kubeadm-1.28.2-0.x86_64 4/4
验证中 : kubelet-1.28.2-0.x86_64 1/4
验证中 : kubectl-1.28.2-0.x86_64 2/4
验证中 : kubernetes-cni-1.2.0-0.x86_64 3/4
验证中 : kubeadm-1.28.2-0.x86_64 4/4
已安装:
kubeadm.x86_64 0:1.28.2-0 kubectl.x86_64 0:1.28.2-0 kubelet.x86_64 0:1.28.2-0
作为依赖被安装:
kubernetes-cni.x86_64 0:1.2.0-0
完毕!
[20240206 01:25:52] [Info] 安装k8s:4.开机启动kubelet
[20240206 01:25:52] [Info] 安装k8s:5.指定容器unix:///var/run/cri-dockerd.sock
W0206 01:27:10.471373 16927 preflight.go:56] [reset] WARNING: Changes made to this host by 'kubeadm init' or 'kubeadm join' will be reverted.
[reset] Are you sure you want to proceed? [y/N]: y
[preflight] Running pre-flight checks
W0206 01:27:25.283590 16927 removeetcdmember.go:106] [reset] No kubeadm config, using etcd pod spec to get data directory
[reset] Deleted contents of the etcd data directory: /var/lib/etcd
[reset] Stopping the kubelet service
[reset] Unmounting mounted directories in "/var/lib/kubelet"
[reset] Deleting contents of directories: [/etc/kubernetes/manifests /var/lib/kubelet /etc/kubernetes/pki]
[reset] Deleting files: [/etc/kubernetes/admin.conf /etc/kubernetes/kubelet.conf /etc/kubernetes/bootstrap-kubelet.conf /etc/kubernetes/controller-manager.conf /etc/kubernetes/scheduler.conf]
The reset process does not clean CNI configuration. To do so, you must remove /etc/cni/net.d
The reset process does not reset or clean up iptables rules or IPVS tables.
If you wish to reset iptables, you must do so manually by using the "iptables" command.
If your cluster was setup to utilize IPVS, run ipvsadm --clear (or similar)
to reset your system's IPVS tables.
The reset process does not clean your kubeconfig files and you must remove them manually.
Please, check the contents of the $HOME/.kube/config file.
当前节点为Master:10.8.42.15,需特殊配置或安装:
[20240206 01:25:52] [Info] #########################################################################################
[20240206 01:25:52] [Info] ############################### Master主节点启动集群... ##################################
[20240206 01:25:52] [Info] #########################################################################################
[20240206 01:25:52] [Info] 安装k8s_主节点_启动集群:拉取所 k8s 需要的容器镜像
[config/images] Pulled registry.aliyuncs.com/google_containers/kube-apiserver:v1.28.2
[config/images] Pulled registry.aliyuncs.com/google_containers/kube-controller-manager:v1.28.2
[config/images] Pulled registry.aliyuncs.com/google_containers/kube-scheduler:v1.28.2
[config/images] Pulled registry.aliyuncs.com/google_containers/kube-proxy:v1.28.2
[config/images] Pulled registry.aliyuncs.com/google_containers/pause:3.9
[config/images] Pulled registry.aliyuncs.com/google_containers/etcd:3.5.9-0
[config/images] Pulled registry.aliyuncs.com/google_containers/coredns:v1.10.1
[20240206 01:25:52] [Info] 安装k8s_主节点_启动集群:现有镜像
REPOSITORY TAG IMAGE ID CREATED SIZE
registry.aliyuncs.com/google_containers/kube-apiserver v1.28.2 cdcab12b2dd1 4 months ago 126MB
registry.aliyuncs.com/google_containers/kube-controller-manager v1.28.2 55f13c92defb 4 months ago 122MB
registry.aliyuncs.com/google_containers/kube-scheduler v1.28.2 7a5d9d67a13f 4 months ago 60.1MB
registry.aliyuncs.com/google_containers/kube-proxy v1.28.2 c120fed2beb8 4 months ago 73.1MB
registry.aliyuncs.com/google_containers/etcd 3.5.9-0 73deb9a3f702 8 months ago 294MB
registry.aliyuncs.com/google_containers/coredns v1.10.1 ead0a4a53df8 12 months ago 53.6MB
registry.aliyuncs.com/google_containers/pause 3.9 e6f181688397 16 months ago 744kB
[20240206 01:25:52] [Info] 安装k8s_主节点_启动集群:初始化
[init] Using Kubernetes version: v1.28.2
[preflight] Running pre-flight checks
[preflight] Pulling images required for setting up a Kubernetes cluster
[preflight] This might take a minute or two, depending on the speed of your internet connection
[preflight] You can also perform this action in beforehand using 'kubeadm config images pull'
[certs] Using certificateDir folder "/etc/kubernetes/pki"
[certs] Generating "ca" certificate and key
[certs] Generating "apiserver" certificate and key
[certs] apiserver serving cert is signed for DNS names [k8smaster kubernetes kubernetes.default kubernetes.default.svc kubernetes.default.svc.cluster.local] and IPs [10.96.0.1 10.8.42.15]
[certs] Generating "apiserver-kubelet-client" certificate and key
[certs] Generating "front-proxy-ca" certificate and key
[certs] Generating "front-proxy-client" certificate and key
[certs] Generating "etcd/ca" certificate and key
[certs] Generating "etcd/server" certificate and key
[certs] etcd/server serving cert is signed for DNS names [k8smaster localhost] and IPs [10.8.42.15 127.0.0.1 ::1]
[certs] Generating "etcd/peer" certificate and key
[certs] etcd/peer serving cert is signed for DNS names [k8smaster localhost] and IPs [10.8.42.15 127.0.0.1 ::1]
[certs] Generating "etcd/healthcheck-client" certificate and key
[certs] Generating "apiserver-etcd-client" certificate and key
[certs] Generating "sa" key and public key
[kubeconfig] Using kubeconfig folder "/etc/kubernetes"
[kubeconfig] Writing "admin.conf" kubeconfig file
[kubeconfig] Writing "kubelet.conf" kubeconfig file
[kubeconfig] Writing "controller-manager.conf" kubeconfig file
[kubeconfig] Writing "scheduler.conf" kubeconfig file
[etcd] Creating static Pod manifest for local etcd in "/etc/kubernetes/manifests"
[control-plane] Using manifest folder "/etc/kubernetes/manifests"
[control-plane] Creating static Pod manifest for "kube-apiserver"
[control-plane] Creating static Pod manifest for "kube-controller-manager"
[control-plane] Creating static Pod manifest for "kube-scheduler"
[kubelet-start] Writing kubelet environment file with flags to file "/var/lib/kubelet/kubeadm-flags.env"
[kubelet-start] Writing kubelet configuration to file "/var/lib/kubelet/config.yaml"
[kubelet-start] Starting the kubelet
[wait-control-plane] Waiting for the kubelet to boot up the control plane as static Pods from directory "/etc/kubernetes/manifests". This can take up to 4m0s
[apiclient] All control plane components are healthy after 4.501826 seconds
[upload-config] Storing the configuration used in ConfigMap "kubeadm-config" in the "kube-system" Namespace
[kubelet] Creating a ConfigMap "kubelet-config" in namespace kube-system with the configuration for the kubelets in the cluster
[upload-certs] Skipping phase. Please see --upload-certs
[mark-control-plane] Marking the node k8smaster as control-plane by adding the labels: [node-role.kubernetes.io/control-plane node.kubernetes.io/exclude-from-external-load-balancers]
[mark-control-plane] Marking the node k8smaster as control-plane by adding the taints [node-role.kubernetes.io/control-plane:NoSchedule]
[bootstrap-token] Using token: abcdef.0123456789abcdef
[bootstrap-token] Configuring bootstrap tokens, cluster-info ConfigMap, RBAC Roles
[bootstrap-token] Configured RBAC rules to allow Node Bootstrap tokens to get nodes
[bootstrap-token] Configured RBAC rules to allow Node Bootstrap tokens to post CSRs in order for nodes to get long term certificate credentials
[bootstrap-token] Configured RBAC rules to allow the csrapprover controller automatically approve CSRs from a Node Bootstrap Token
[bootstrap-token] Configured RBAC rules to allow certificate rotation for all node client certificates in the cluster
[bootstrap-token] Creating the "cluster-info" ConfigMap in the "kube-public" namespace
[kubelet-finalize] Updating "/etc/kubernetes/kubelet.conf" to point to a rotatable kubelet client certificate and key
[addons] Applied essential addon: CoreDNS
[addons] Applied essential addon: kube-proxy
Your Kubernetes control-plane has initialized successfully!
To start using your cluster, you need to run the following as a regular user:
mkdir -p $HOME/.kube
sudo cp -i /etc/kubernetes/admin.conf $HOME/.kube/config
sudo chown $(id -u):$(id -g) $HOME/.kube/config
Alternatively, if you are the root user, you can run:
export KUBECONFIG=/etc/kubernetes/admin.conf
You should now deploy a pod network to the cluster.
Run "kubectl apply -f [podnetwork].yaml" with one of the options listed at:
https://kubernetes.io/docs/concepts/cluster-administration/addons/
Then you can join any number of worker nodes by running the following on each as root:
kubeadm join 10.8.42.15:6443 --token abcdef.0123456789abcdef \
--discovery-token-ca-cert-hash sha256:dcb3a92796f3e28eeea7fa4200568da048a20e37f2ccdbb7953db6ac0ecd8804
[20240206 01:25:52] [Info] 安装k8s_主节点_启动集群:根据初始化提示执行,集群应用客户端管理集群文件准备
/etc/kubernetes/admin.conf
[20240206 01:25:52] [Info] 安装k8s_主节点_启动集群:配置网络插件flannel
namespace/kube-flannel created
serviceaccount/flannel created
clusterrole.rbac.authorization.k8s.io/flannel created
clusterrolebinding.rbac.authorization.k8s.io/flannel created
configmap/kube-flannel-cfg created
daemonset.apps/kube-flannel-ds created
[20240206 01:25:52] [Info] 安装k8s_主节点_启动集群:可视化界面
Unable to find image 'eipwork/kuboard:v3.5.2.6' locally
v3.5.2.6: Pulling from eipwork/kuboard
39cf15d1b231: Pull complete
2ede31ac16cf: Pull complete
7c8ca322b862: Pull complete
41babe9af3c7: Pull complete
1b483e04f7f8: Pull complete
cc94ac4a24df: Pull complete
dc148a404358: Pull complete
a742d61437e3: Pull complete
ae3b6d8cfd32: Pull complete
ba1a1e94e760: Pull complete
7db3c90d5c13: Pull complete
5fc438952344: Pull complete
9e7f80931110: Pull complete
257cbd88320b: Pull complete
12647d10952c: Pull complete
fcefba48defe: Pull complete
d6c13d205407: Pull complete
25f508b5b9d4: Pull complete
Digest: sha256:0501a4840e4e3b76619866cdee946c3ad64ace03e8f73f4aef376906f661137b
Status: Downloaded newer image for eipwork/kuboard:v3.5.2.6
465b98196e4c38d73e6987170909060105ad84b91b3459bcbfac49ef7b147e712.3.2. Node安装日志
日志最后看到“使用kubeadm join ip:port -- token 语法将当前Node加入集群管理。”说明子节点也安装成功!
[root@k8snode1 home]# ./install-k8s.sh
Hello, Let's Go!
[20240206 14:30:36] [Info] #########################################################################################
[20240206 14:30:36] [Info] ################################# 初始化服务器环境设置... ################################
[20240206 14:30:36] [Info] #########################################################################################
[20240206 14:30:36] [Info] 1.关闭用防火墙
[20240206 14:30:36] [Info] 2.配置域名解析
[20240206 14:30:36] [Info] 确认hosts域名配置--
127.0.0.1 localhost localhost.localdomain localhost4 localhost4.localdomain4
::1 localhost localhost.localdomain localhost6 localhost6.localdomain6
10.8.42.15 k8smaster
10.8.42.16 k8snode1
10.8.42.17 k8snode2
以上↑↑↑↑↑↑↑主机配置hosts是否正确?默认为 no. Enter [yes/no]:yes
[20240206 14:30:36] [Info] 确认已配置hosts
[20240206 14:30:36] [Info] 3.必须关闭swap分区
[20240206 14:30:36] [Info] 4.临时关闭selinux防火墙
[20240206 14:30:36] [Info] 5.配置服务器时间保持一致[工具:chrony]
已加载插件:fastestmirror
Repository kubernetes is listed more than once in the configuration
Loading mirror speeds from cached hostfile
* base: mirrors.aliyun.com
* extras: mirrors.aliyun.com
* updates: mirrors.ustc.edu.cn
软件包 chrony-3.4-1.el7.x86_64 已安装并且是最新版本
无须任何处理
210 Number of sources = 4
MS Name/IP address Stratum Poll Reach LastRx Last sample
===============================================================================
^+ dns2.synet.edu.cn 1 10 365 377 +12ms[ +12ms] +/- 34ms
^* time.neu.edu.cn 1 10 377 240 +11ms[ +11ms] +/- 33ms
^- ntp8.flashdance.cx 2 10 337 729 -27ms[ -27ms] +/- 137ms
^- makaki2.miuku.net 3 10 167 178 +23ms[ +23ms] +/- 102ms
2024年 02月 06日 星期二 14:30:39 CST
[20240206 14:30:36] [Info] 6.添加网桥过滤和地址转发功能
[20240206 14:30:36] [Info] 6.1.添加网桥过滤和地址转发功能:添加配置
overlay
br_netfilter
net.bridge.bridge-nf-call-ip6tables=1
net.bridge.bridge-nf-call-iptables=1
net.ipv4.ip_forward=1
# 下面的内核参数可以解决ipvs模式下长连接空闲超时的问题
net.ipv4.tcp_keepalive_intvl=30
net.ipv4.tcp_keepalive_probes=10
net.ipv4.tcp_keepalive_time=600
vm.swappiness=0
[20240206 14:30:36] [Info] 6.2.添加网桥过滤和地址转发功能:重新加载配置
* Applying /usr/lib/sysctl.d/00-system.conf ...
net.bridge.bridge-nf-call-ip6tables = 0
net.bridge.bridge-nf-call-iptables = 0
net.bridge.bridge-nf-call-arptables = 0
* Applying /usr/lib/sysctl.d/10-default-yama-scope.conf ...
kernel.yama.ptrace_scope = 0
* Applying /usr/lib/sysctl.d/50-default.conf ...
kernel.sysrq = 16
kernel.core_uses_pid = 1
kernel.kptr_restrict = 1
net.ipv4.conf.default.rp_filter = 1
net.ipv4.conf.all.rp_filter = 1
net.ipv4.conf.default.accept_source_route = 0
net.ipv4.conf.all.accept_source_route = 0
net.ipv4.conf.default.promote_secondaries = 1
net.ipv4.conf.all.promote_secondaries = 1
fs.protected_hardlinks = 1
fs.protected_symlinks = 1
* Applying /etc/sysctl.d/99-sysctl.conf ...
* Applying /etc/sysctl.d/k8s.conf ...
net.bridge.bridge-nf-call-ip6tables = 1
net.bridge.bridge-nf-call-iptables = 1
net.ipv4.ip_forward = 1
net.ipv4.tcp_keepalive_intvl = 30
net.ipv4.tcp_keepalive_probes = 10
net.ipv4.tcp_keepalive_time = 600
vm.swappiness = 0
* Applying /etc/sysctl.conf ...
[20240206 14:30:36] [Info] 6.3.添加网桥过滤和地址转发功能:加载网桥过滤器模块
[20240206 14:30:36] [Info] 6.4.添加网桥过滤和地址转发功能:确认 br_netfilter 和 overlay 模块被加载
br_netfilter 22256 0
bridge 151336 1 br_netfilter
overlay 91659 0
[20240206 14:30:36] [Info] 6.5.添加网桥过滤和地址转发功能:确认系统变量在你的 sysctl 配置中被设置为 1
net.bridge.bridge-nf-call-iptables = 1
net.bridge.bridge-nf-call-ip6tables = 1
net.ipv4.ip_forward = 1
[20240206 14:30:36] [Info] 7.配置ipvs功能
[20240206 14:30:36] [Info] 7.1.配置ipvs功能:安装ipset和ipvsadm
已加载插件:fastestmirror
Repository kubernetes is listed more than once in the configuration
Loading mirror speeds from cached hostfile
* base: mirrors.aliyun.com
* extras: mirrors.aliyun.com
* updates: mirrors.ustc.edu.cn
软件包 ipvsadm-1.27-8.el7.x86_64 已安装并且是最新版本
软件包 ipset-7.1-1.el7.x86_64 已安装并且是最新版本
软件包 sysstat-10.1.5-20.el7_9.x86_64 已安装并且是最新版本
软件包 conntrack-tools-1.4.4-7.el7.x86_64 已安装并且是最新版本
无须任何处理
[20240206 14:30:36] [Info] 7.2.配置ipvs功能:添加需要加载的模块写入脚本文件
[20240206 14:30:36] [Info] 7.3.配置ipvs功能:重启服务
[20240206 14:30:36] [Info] 7.4.配置ipvs功能:查看对应的模块是否加载成功
nf_conntrack_netlink 36396 0
nf_conntrack_ipv6 18935 2
nf_defrag_ipv6 35104 1 nf_conntrack_ipv6
nf_conntrack_ipv4 15053 4
nf_defrag_ipv4 12729 1 nf_conntrack_ipv4
ip_vs_sh 12688 0
ip_vs_wrr 12697 0
ip_vs_rr 12600 4
ip_vs 145458 10 ip_vs_rr,ip_vs_sh,ip_vs_wrr
nf_conntrack 139264 10 ip_vs,nf_nat,nf_nat_ipv4,nf_nat_ipv6,xt_conntrack,nf_nat_masquerade_ipv4,nf_nat_masquerade_ipv6,nf_conntrack_netlink,nf_conntrack_ipv4,nf_conntrack_ipv6
nfnetlink 14519 3 nf_tables,ip_set,nf_conntrack_netlink
libcrc32c 12644 4 xfs,ip_vs,nf_nat,nf_conntrack
[20240206 14:30:36] [Info] #########################################################################################
[20240206 14:30:36] [Info] ################################# Start Install Docker... ###############################
[20240206 14:30:36] [Info] #########################################################################################
[20240206 14:30:36] [Info] 准备安装Docker,版本:24.0.7
[20240206 14:30:36] [Info] 安装Docker:1.yum-utils软件用于提供yum-config-manager程序
已加载插件:fastestmirror
Repository kubernetes is listed more than once in the configuration
Loading mirror speeds from cached hostfile
* base: mirrors.aliyun.com
* extras: mirrors.aliyun.com
* updates: mirrors.ustc.edu.cn
软件包 yum-utils-1.1.31-54.el7_8.noarch 已安装并且是最新版本
无须任何处理
[20240206 14:30:36] [Info] 安装Docker:2.使用yum-config-manager创建docker阿里存储库
已加载插件:fastestmirror
Repository kubernetes is listed more than once in the configuration
adding repo from: http://mirrors.aliyun.com/docker-ce/linux/centos/docker-ce.repo
grabbing file http://mirrors.aliyun.com/docker-ce/linux/centos/docker-ce.repo to /etc/yum.repos.d/docker-ce.repo
repo saved to /etc/yum.repos.d/docker-ce.repo
已加载插件:fastestmirror
Repository kubernetes is listed more than once in the configuration
Loading mirror speeds from cached hostfile
* base: mirrors.aliyun.com
* extras: mirrors.aliyun.com
* updates: mirrors.ustc.edu.cn
base | 3.6 kB 00:00:00
docker-ce-stable | 3.5 kB 00:00:00
extras | 2.9 kB 00:00:00
kubernetes | 1.4 kB 00:00:00
updates | 2.9 kB 00:00:00
元数据缓存已建立
[20240206 14:30:36] [Info] 安装Docker:3.配置Docker镜像加速器/修改cgroup方式
[20240206 14:30:36] [Info] 安装Docker:4.开始执行安装
已加载插件:fastestmirror
Repository kubernetes is listed more than once in the configuration
Loading mirror speeds from cached hostfile
* base: mirrors.aliyun.com
* extras: mirrors.aliyun.com
* updates: mirrors.ustc.edu.cn
正在解决依赖关系
--> 正在检查事务
---> 软件包 containerd.io.x86_64.0.1.6.28-3.1.el7 将被 安装
---> 软件包 docker-buildx-plugin.x86_64.0.0.12.1-1.el7 将被 安装
---> 软件包 docker-ce.x86_64.3.24.0.7-1.el7 将被 安装
--> 正在处理依赖关系 docker-ce-rootless-extras,它被软件包 3:docker-ce-24.0.7-1.el7.x86_64 需要
---> 软件包 docker-ce-cli.x86_64.1.24.0.7-1.el7 将被 安装
---> 软件包 docker-compose-plugin.x86_64.0.2.24.5-1.el7 将被 安装
--> 正在检查事务
---> 软件包 docker-ce-rootless-extras.x86_64.0.25.0.2-1.el7 将被 安装
--> 解决依赖关系完成
依赖关系解决
=======================================================================================================================================================================================================================================================
Package 架构 版本 源 大小
=======================================================================================================================================================================================================================================================
正在安装:
containerd.io x86_64 1.6.28-3.1.el7 docker-ce-stable 35 M
docker-buildx-plugin x86_64 0.12.1-1.el7 docker-ce-stable 13 M
docker-ce x86_64 3:24.0.7-1.el7 docker-ce-stable 24 M
docker-ce-cli x86_64 1:24.0.7-1.el7 docker-ce-stable 13 M
docker-compose-plugin x86_64 2.24.5-1.el7 docker-ce-stable 13 M
为依赖而安装:
docker-ce-rootless-extras x86_64 25.0.2-1.el7 docker-ce-stable 9.4 M
事务概要
=======================================================================================================================================================================================================================================================
安装 5 软件包 (+1 依赖软件包)
总下载量:108 M
安装大小:380 M
Downloading packages:
(1/6): docker-buildx-plugin-0.12.1-1.el7.x86_64.rpm | 13 MB 00:00:08
(2/6): containerd.io-1.6.28-3.1.el7.x86_64.rpm | 35 MB 00:00:19
(3/6): docker-ce-24.0.7-1.el7.x86_64.rpm | 24 MB 00:00:16
(4/6): docker-ce-cli-24.0.7-1.el7.x86_64.rpm | 13 MB 00:00:08
(5/6): docker-ce-rootless-extras-25.0.2-1.el7.x86_64.rpm | 9.4 MB 00:00:09
(6/6): docker-compose-plugin-2.24.5-1.el7.x86_64.rpm | 13 MB 00:00:07
-------------------------------------------------------------------------------------------------------------------------------------------------------------------------------------------------------------------------------------------------------
总计 3.0 MB/s | 108 MB 00:00:36
Running transaction check
Running transaction test
Transaction test succeeded
Running transaction
正在安装 : containerd.io-1.6.28-3.1.el7.x86_64 1/6
正在安装 : docker-compose-plugin-2.24.5-1.el7.x86_64 2/6
正在安装 : docker-buildx-plugin-0.12.1-1.el7.x86_64 3/6
正在安装 : 1:docker-ce-cli-24.0.7-1.el7.x86_64 4/6
正在安装 : docker-ce-rootless-extras-25.0.2-1.el7.x86_64 5/6
正在安装 : 3:docker-ce-24.0.7-1.el7.x86_64 6/6
验证中 : docker-buildx-plugin-0.12.1-1.el7.x86_64 1/6
验证中 : 3:docker-ce-24.0.7-1.el7.x86_64 2/6
验证中 : docker-compose-plugin-2.24.5-1.el7.x86_64 3/6
验证中 : containerd.io-1.6.28-3.1.el7.x86_64 4/6
验证中 : docker-ce-rootless-extras-25.0.2-1.el7.x86_64 5/6
验证中 : 1:docker-ce-cli-24.0.7-1.el7.x86_64 6/6
已安装:
containerd.io.x86_64 0:1.6.28-3.1.el7 docker-buildx-plugin.x86_64 0:0.12.1-1.el7 docker-ce.x86_64 3:24.0.7-1.el7 docker-ce-cli.x86_64 1:24.0.7-1.el7 docker-compose-plugin.x86_64 0:2.24.5-1.el7
作为依赖被安装:
docker-ce-rootless-extras.x86_64 0:25.0.2-1.el7
完毕!
[20240206 14:30:36] [Info] 安装Docker:5.启动docker并设置开机自启
Created symlink from /etc/systemd/system/multi-user.target.wants/docker.service to /usr/lib/systemd/system/docker.service.
● docker.service - Docker Application Container Engine
Loaded: loaded (/usr/lib/systemd/system/docker.service; enabled; vendor preset: disabled)
Active: active (running) since 二 2024-02-06 14:31:33 CST; 5ms ago
Docs: https://docs.docker.com
Main PID: 7984 (dockerd)
Tasks: 10
Memory: 31.4M
CGroup: /system.slice/docker.service
└─7984 /usr/bin/dockerd -H fd:// --containerd=/run/containerd/containerd.sock
2月 06 14:31:32 k8snode1 systemd[1]: Starting Docker Application Container Engine...
2月 06 14:31:32 k8snode1 dockerd[7984]: time="2024-02-06T14:31:32.811930610+08:00" level=info msg="Starting up"
2月 06 14:31:33 k8snode1 dockerd[7984]: time="2024-02-06T14:31:33.828108957+08:00" level=info msg="Loading containers: start."
2月 06 14:31:33 k8snode1 dockerd[7984]: time="2024-02-06T14:31:33.887577275+08:00" level=info msg="Default bridge (docker0) is assigned with an IP address 172.17.0.0/16. Daemon option --bip can be used to set a preferred IP address"
2月 06 14:31:33 k8snode1 dockerd[7984]: time="2024-02-06T14:31:33.921652410+08:00" level=info msg="Loading containers: done."
2月 06 14:31:33 k8snode1 dockerd[7984]: time="2024-02-06T14:31:33.936547822+08:00" level=info msg="Docker daemon" commit=311b9ff graphdriver=overlay2 version=24.0.7
2月 06 14:31:33 k8snode1 dockerd[7984]: time="2024-02-06T14:31:33.936639591+08:00" level=info msg="Daemon has completed initialization"
2月 06 14:31:33 k8snode1 dockerd[7984]: time="2024-02-06T14:31:33.969004794+08:00" level=info msg="API listen on /run/docker.sock"
2月 06 14:31:33 k8snode1 systemd[1]: Started Docker Application Container Engine.
[20240206 14:30:36] [Info] 安装Docker:END.完成.安装版本如下:
Client: Docker Engine - Community
Version: 24.0.7
API version: 1.43
Go version: go1.20.10
Git commit: afdd53b
Built: Thu Oct 26 09:11:35 2023
OS/Arch: linux/amd64
Context: default
Server: Docker Engine - Community
Engine:
Version: 24.0.7
API version: 1.43 (minimum version 1.12)
Go version: go1.20.10
Git commit: 311b9ff
Built: Thu Oct 26 09:10:36 2023
OS/Arch: linux/amd64
Experimental: false
containerd:
Version: v1.6.10
GitCommit: 770bd0108c32f3fb5c73ae1264f7e503fe7b2661
runc:
Version: 1.1.4
GitCommit: v1.1.4-0-g5fd4c4d1
docker-init:
Version: 0.19.0
GitCommit: de40ad0
[20240206 14:30:36] [Info] #########################################################################################
[20240206 14:30:36] [Info] ############################## Start Install cri-dockerd... #############################
[20240206 14:30:36] [Info] #########################################################################################
[20240206 14:30:36] [Info] 准备安装cri-dockerd
准备中... ################################# [100%]
正在升级/安装...
1:cri-dockerd-3:0.3.9-3.el7 ################################# [100%]
Created symlink from /etc/systemd/system/multi-user.target.wants/cri-docker.service to /usr/lib/systemd/system/cri-docker.service.
[20240206 14:30:36] [Info] #########################################################################################
[20240206 14:30:36] [Info] ################################## Start Install K8s... #################################
[20240206 14:30:36] [Info] #########################################################################################
[20240206 14:30:36] [Info] 准备安装k8s,版本:v1.28.2
[20240206 14:30:36] [Info] 安装k8s:1.阿里云YUM源
[20240206 14:30:36] [Info] 安装k8s:2.卸载旧版本
已加载插件:fastestmirror
Repository kubernetes is listed more than once in the configuration
参数 kubelet 没有匹配
参数 kubeadm 没有匹配
参数 kubectl 没有匹配
不删除任何软件包
[20240206 14:30:36] [Info] 安装k8s:3.安装kubele-t1.28.2、kubeadm-1.28.2、kubectl-1.28.2 指定版本
已加载插件:fastestmirror
Repository kubernetes is listed more than once in the configuration
Loading mirror speeds from cached hostfile
* base: mirrors.aliyun.com
* extras: mirrors.aliyun.com
* updates: mirrors.ustc.edu.cn
kubernetes | 1.4 kB 00:00:00
正在解决依赖关系
--> 正在检查事务
---> 软件包 kubeadm.x86_64.0.1.28.2-0 将被 安装
--> 正在处理依赖关系 kubernetes-cni >= 0.8.6,它被软件包 kubeadm-1.28.2-0.x86_64 需要
---> 软件包 kubectl.x86_64.0.1.28.2-0 将被 安装
---> 软件包 kubelet.x86_64.0.1.28.2-0 将被 安装
--> 正在检查事务
---> 软件包 kubernetes-cni.x86_64.0.1.2.0-0 将被 安装
--> 解决依赖关系完成
依赖关系解决
=======================================================================================================================================================================================================================================================
Package 架构 版本 源 大小
=======================================================================================================================================================================================================================================================
正在安装:
kubeadm x86_64 1.28.2-0 kubernetes 11 M
kubectl x86_64 1.28.2-0 kubernetes 11 M
kubelet x86_64 1.28.2-0 kubernetes 21 M
为依赖而安装:
kubernetes-cni x86_64 1.2.0-0 kubernetes 17 M
事务概要
=======================================================================================================================================================================================================================================================
安装 3 软件包 (+1 依赖软件包)
总下载量:59 M
安装大小:250 M
Downloading packages:
(1/4): a24e42254b5a14b67b58c4633d29c27370c28ed6796a80c455a65acc813ff374-kubectl-1.28.2-0.x86_64.rpm | 11 MB 00:00:06
(2/4): cee73f8035d734e86f722f77f1bf4e7d643e78d36646fd000148deb8af98b61c-kubeadm-1.28.2-0.x86_64.rpm | 11 MB 00:00:08
(3/4): e1cae938e231bffa3618f5934a096bd85372ee9b1293081f5682a22fe873add8-kubelet-1.28.2-0.x86_64.rpm | 21 MB 00:00:12
(4/4): 0f2a2afd740d476ad77c508847bad1f559afc2425816c1f2ce4432a62dfe0b9d-kubernetes-cni-1.2.0-0.x86_64.rpm | 17 MB 00:00:12
-------------------------------------------------------------------------------------------------------------------------------------------------------------------------------------------------------------------------------------------------------
总计 2.8 MB/s | 59 MB 00:00:21
Running transaction check
Running transaction test
Transaction test succeeded
Running transaction
警告:RPM 数据库已被非 yum 程序修改。
正在安装 : kubernetes-cni-1.2.0-0.x86_64 1/4
正在安装 : kubelet-1.28.2-0.x86_64 2/4
正在安装 : kubectl-1.28.2-0.x86_64 3/4
正在安装 : kubeadm-1.28.2-0.x86_64 4/4
验证中 : kubelet-1.28.2-0.x86_64 1/4
验证中 : kubectl-1.28.2-0.x86_64 2/4
验证中 : kubernetes-cni-1.2.0-0.x86_64 3/4
验证中 : kubeadm-1.28.2-0.x86_64 4/4
已安装:
kubeadm.x86_64 0:1.28.2-0 kubectl.x86_64 0:1.28.2-0 kubelet.x86_64 0:1.28.2-0
作为依赖被安装:
kubernetes-cni.x86_64 0:1.2.0-0
完毕!
[20240206 14:30:36] [Info] 安装k8s:4.开机启动kubelet
[20240206 14:30:36] [Info] 安装k8s:5.指定容器unix:///var/run/cri-dockerd.sock
W0206 14:32:06.720581 9535 preflight.go:56] [reset] WARNING: Changes made to this host by 'kubeadm init' or 'kubeadm join' will be reverted.
[reset] Are you sure you want to proceed? [y/N]: y
[preflight] Running pre-flight checks
W0206 14:36:06.783725 9535 removeetcdmember.go:106] [reset] No kubeadm config, using etcd pod spec to get data directory
[reset] Deleted contents of the etcd data directory: /var/lib/etcd
[reset] Stopping the kubelet service
[reset] Unmounting mounted directories in "/var/lib/kubelet"
[reset] Deleting contents of directories: [/etc/kubernetes/manifests /var/lib/kubelet /etc/kubernetes/pki]
[reset] Deleting files: [/etc/kubernetes/admin.conf /etc/kubernetes/kubelet.conf /etc/kubernetes/bootstrap-kubelet.conf /etc/kubernetes/controller-manager.conf /etc/kubernetes/scheduler.conf]
The reset process does not clean CNI configuration. To do so, you must remove /etc/cni/net.d
The reset process does not reset or clean up iptables rules or IPVS tables.
If you wish to reset iptables, you must do so manually by using the "iptables" command.
If your cluster was setup to utilize IPVS, run ipvsadm --clear (or similar)
to reset your system's IPVS tables.
The reset process does not clean your kubeconfig files and you must remove them manually.
Please, check the contents of the $HOME/.kube/config file.
[20240206 14:30:36] [Info] #########################################################################################
[20240206 14:30:36] [Info] ################################### Node join集群... ####################################
[20240206 14:30:36] [Info] #########################################################################################
请使用kubeadm join ip:port -- token 语法将当前Node加入集群管理。
请使用kubeadm join ip:port -- token 语法将当前Node加入集群管理。3. 节点join集群
现在已经在Master、Node中安装部署了k8s,但是还没做集群管理,因此需要将Node Join到Master中。
通过Master安装日志中的信息,依次在各Node节点,执行Join命令:
kubeadm join 10.8.42.15:6443 --token abcdef.0123456789abcdef \
        --discovery-token-ca-cert-hash sha256:c4462505977ef38e27f0ba91c44a315242c9dac37a219a65cc53822e172ae26b \
	   --cri-socket unix:///var/run/cri-dockerd.sock
💡注意join末尾还需要指定:--cri-socket unix:///var/run/cri-dockerd.sock
💡若忘记token信息,则在主节点运行以下命令,重新获取:
#默认24H有效期
kubeadm token create --print-join-command

#永久token
kubeadm token create --ttl 0 --print-join-command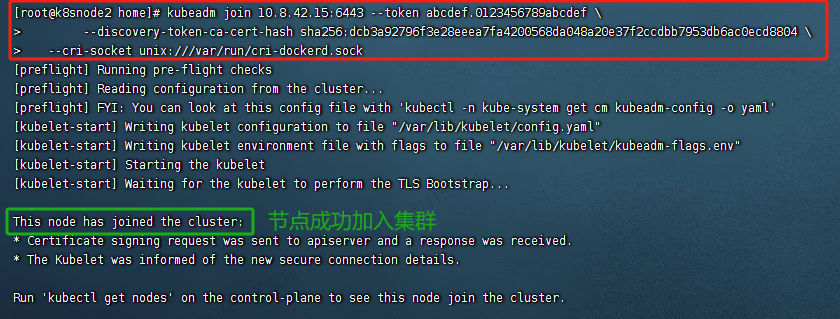
Join后在可Master执行kubectl get node,查看K8s所有的节点:
[root@localhost home]# kubectl get node
NAME        STATUS   ROLES           AGE    VERSION
k8smaster   Ready    control-plane   113m   v1.28.2
k8snode1    Ready    <none>          104m   v1.28.2
k8snode2    Ready    <none>          96m    v1.28.2
到此,集群搭建完成!
4. 管理面板kuboard (可选)
在脚本中,Master主节点会默认安装kuboard多集群管理界面,方便管理k8s容器的一些基本的常用操作,包括服务部署、日志查看、负载导入导出等,虽然简单但是很实用。
使用教程详见官网:https://kuboard.cn/
Kuboard_Kubernetes教程_K8S安装_管理界面Kuboard是一款免费的Kubernetes管理界面_同时该网站还提供Kubernetes安装文档_K8S_部署_入门_免费中文Kubernetes教程_以及在Kubernetes上部署SpringCloud的详细文档![]() https://kuboard.cn/4.1. 登录
https://kuboard.cn/4.1. 登录
访问Master管理界面http://10.8.42.15/
#默认账号:admin
#默认密码:Kuboard123
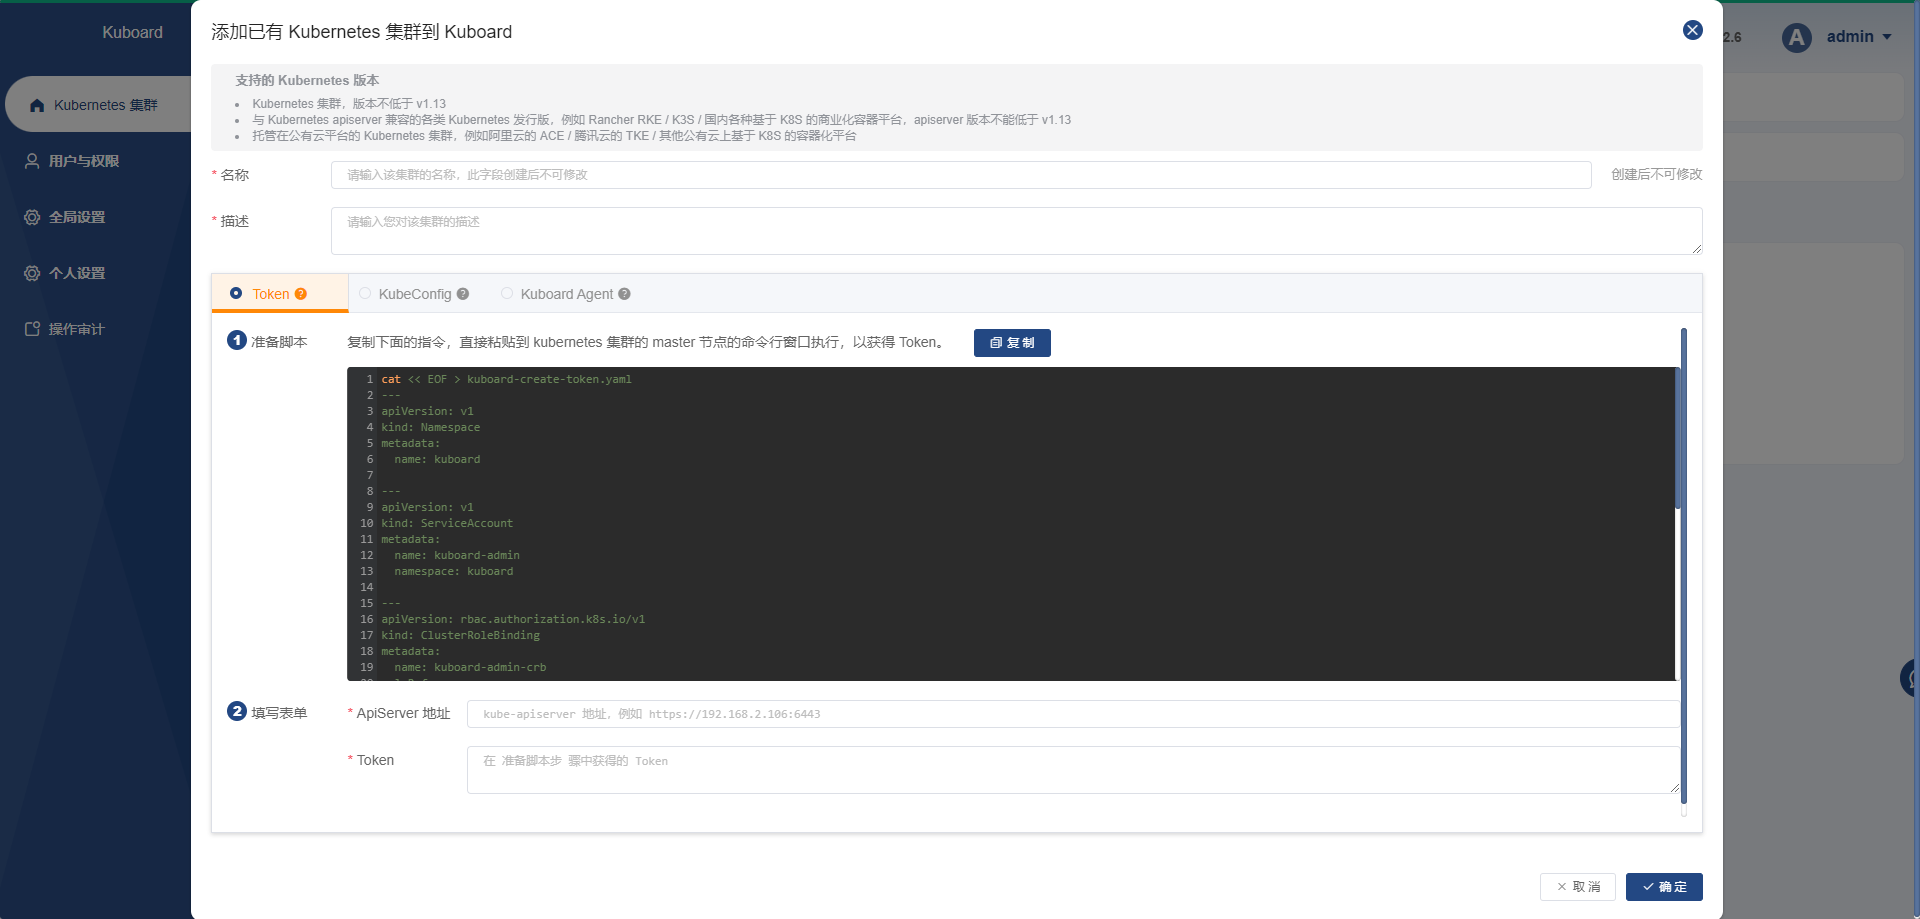
4.2. 添加集群环境
点击+添加集群,根据提示,建议使用Token或kubeconfig方式,填写完后,点击确定即可。
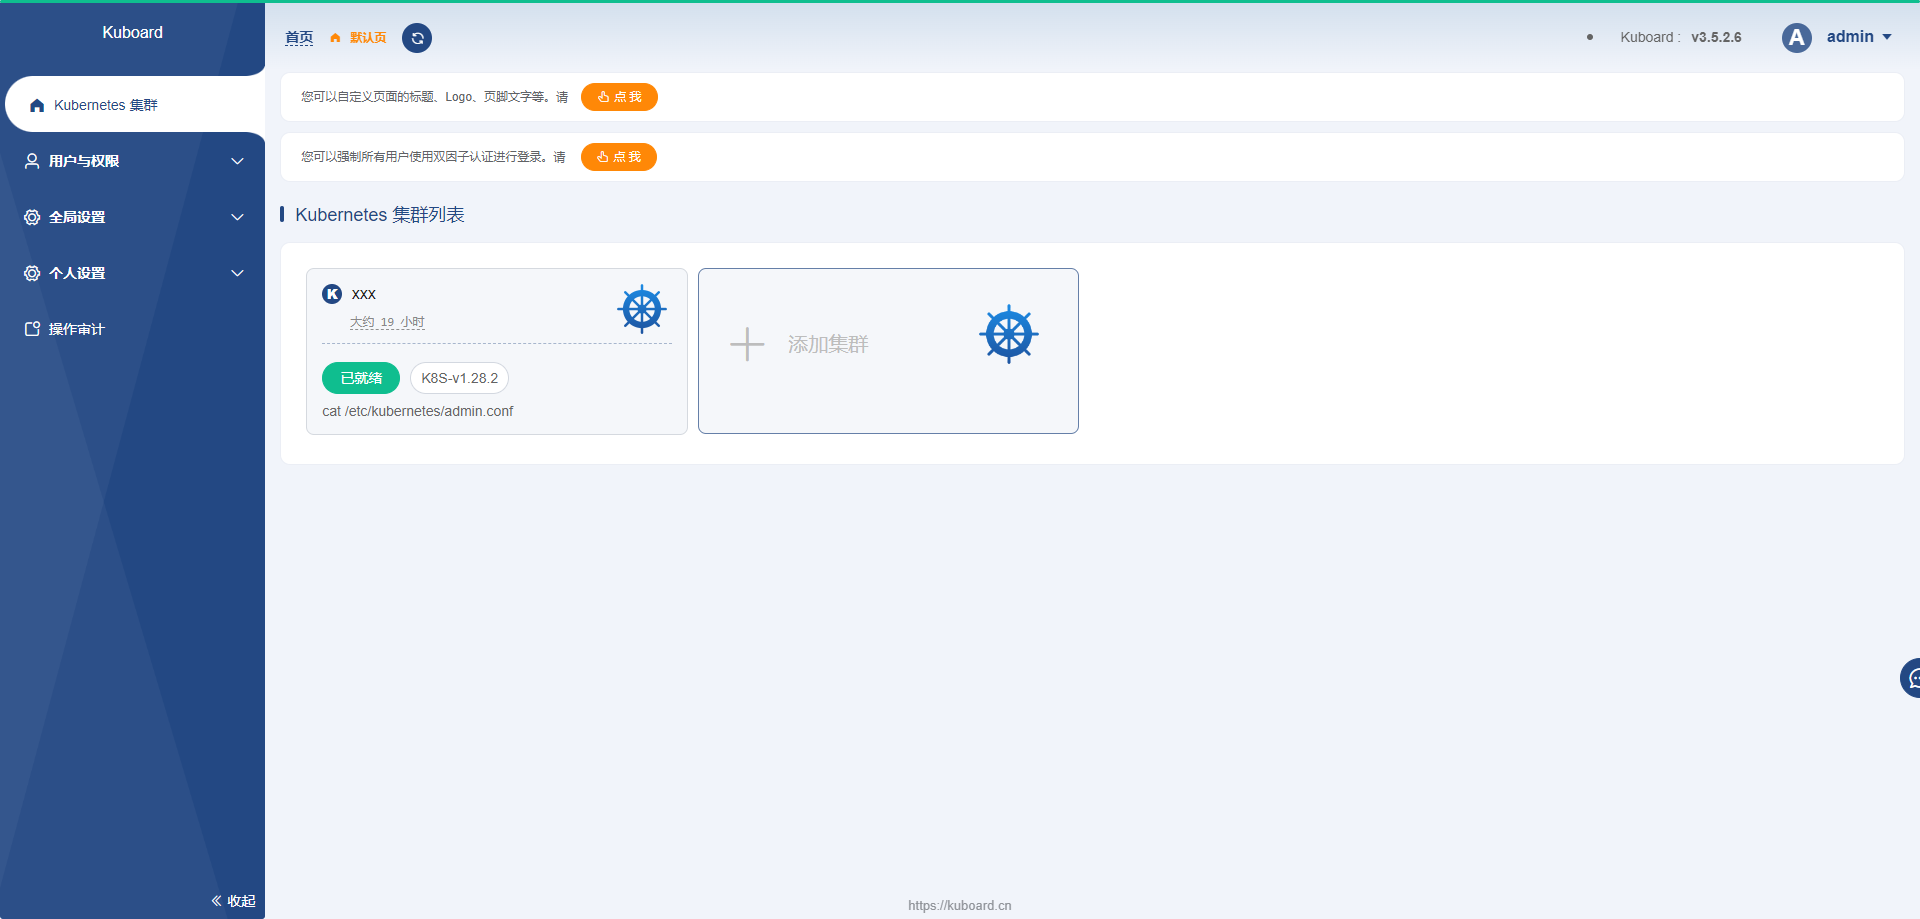
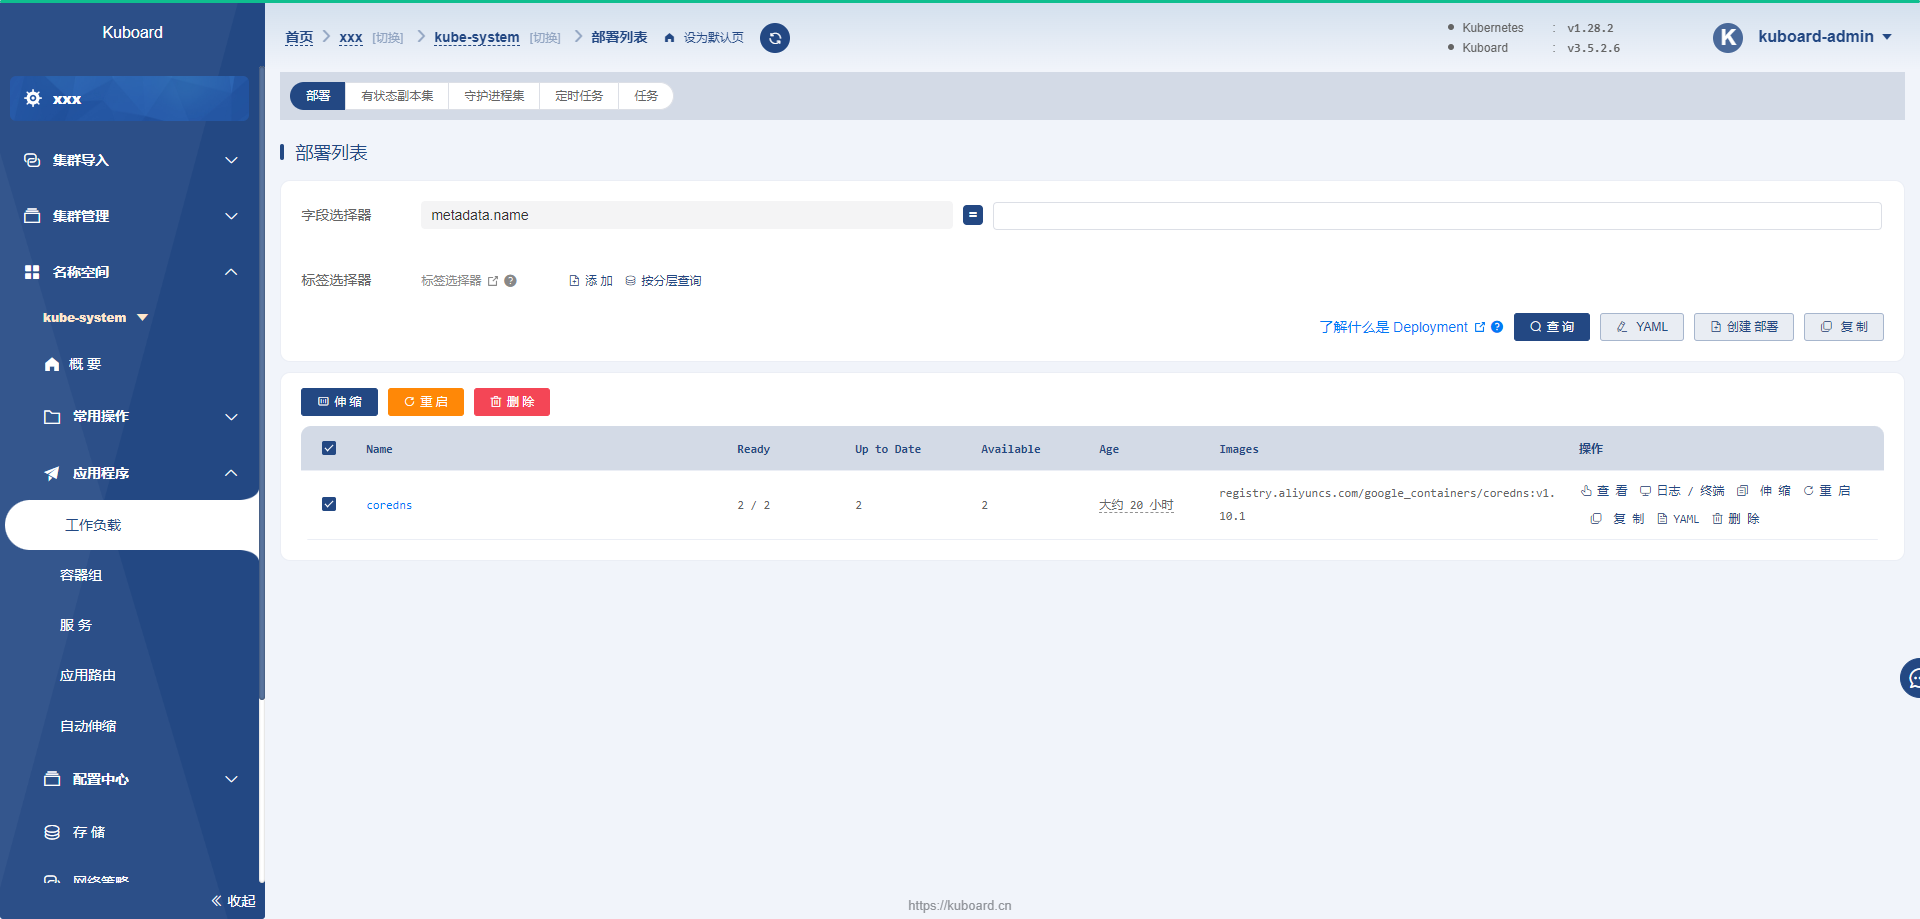
4.3. 查看集群信息


4.4. 部署、伸缩等管理
5.参考文献
《使用部署工具安装 Kubernetes》
https://kubernetes.io/zh-cn/docs/setup/production-environment/tools/kubeadm/install-kubeadm/
《K8S最新版本集群部署(v1.28) + 容器引擎Docker部署(下)》
https://blog.csdn.net/qq_36434219/article/details/132527054
《Kubernetes(k8s)最新版本安装部署》
https://zhuanlan.zhihu.com/p/651734154?utm_id=0


![[HCIE]防火墙基础配置](https://img-blog.csdnimg.cn/direct/271fca66d0834f1183b65c86cbafda3d.png)