目录
Nginx编译安装以及负载均衡配置
Ubuntu 22.04.1 LTS 编译安装 nginx-1.22.1
1.安装依赖包
2. 下载nginx
3. 编译安装
报错解决
解决问题2
4.安装
5启动Nginx:
负载均衡
负载均衡算法
轮询
加权负载均衡
ip_hash算法
算法进行配置演示
加权负载均衡
轮询
IP 哈希
Nginx编译安装以及负载均衡配置
Ubuntu 22.04.1 LTS 编译安装 nginx-1.22.1
1.安装依赖包
sudo apt install libgd-dev

2. 下载nginx
wget http://nginx.org/download/nginx-1.22.1.tar.gz
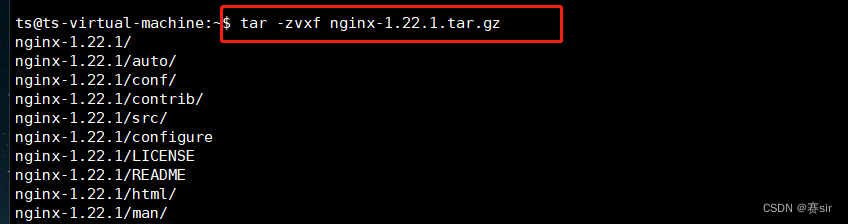
.解压nginx
tar -zvxf nginx-1.22.1.tar.gz

3. 编译安装
cd nginx-1.22.1
编译并指定安装位置,执行安装之后会创建指定文件夹/www/env/nginx
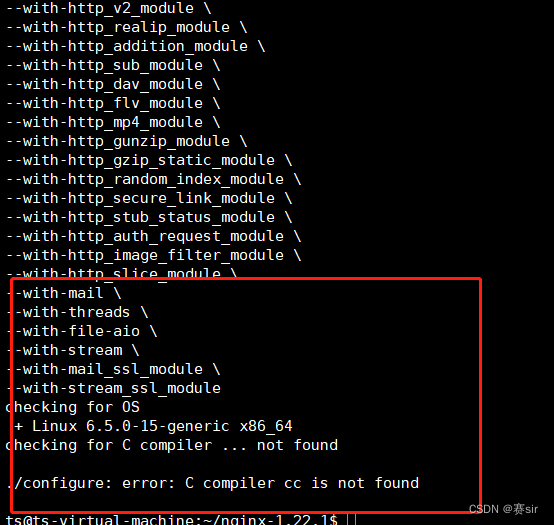
./configure --prefix=/www/env/nginx \
--with-pcre \
--with-http_ssl_module \
--with-http_v2_module \
--with-http_realip_module \
--with-http_addition_module \
--with-http_sub_module \
--with-http_dav_module \
--with-http_flv_module \
--with-http_mp4_module \
--with-http_gunzip_module \
--with-http_gzip_static_module \
--with-http_random_index_module \
--with-http_secure_link_module \
--with-http_stub_status_module \
--with-http_auth_request_module \
--with-http_image_filter_module \
--with-http_slice_module \
--with-mail \
--with-threads \
--with-file-aio \
--with-stream \
--with-mail_ssl_module \
--with-stream_ssl_module
报错解决
在Linux系统上,构建和编译软件通常需要C编译器。此错误可能是由于在您的系统上没有安装C编译器或者C编译器未正确设置所引起的。
要解决此问题,您可以尝试安装C编译器。在大多数Linux发行版中,常用的C编译器是GCC。以下是一些安装GCC编译器的常用命令,您可以在终端上执行:
对于Ubuntu系统:
sudo apt-get update
sudo apt-get install build-essential
解决问题2
./configure: error: the HTTP rewrite module requires the PCRE library. You can either disable the module by using --without-http_rewrite_module option, or install the PCRE library into the system, or build the PCRE library statically from the source with nginx by using --with-pcre= option. PCRE库
PCRE库支持正则表达式。如果我们在配置文件nginx.conf中使用了正则表达式,那么在编译Nginx时就必须把PCRE库编译进Nginx,因为Nginx的HTTP模块需要靠它来解析正则表达式。另外,pcre-devel是使用PCRE做二次开发时所需要的开发库,包括头文件等,这也是编译Nginx所必须使用的。可以这样安装:
sudo apt update
sudo apt install libpcre3 libpcre3-dev

sudo apt-get install openssl libssl-dev
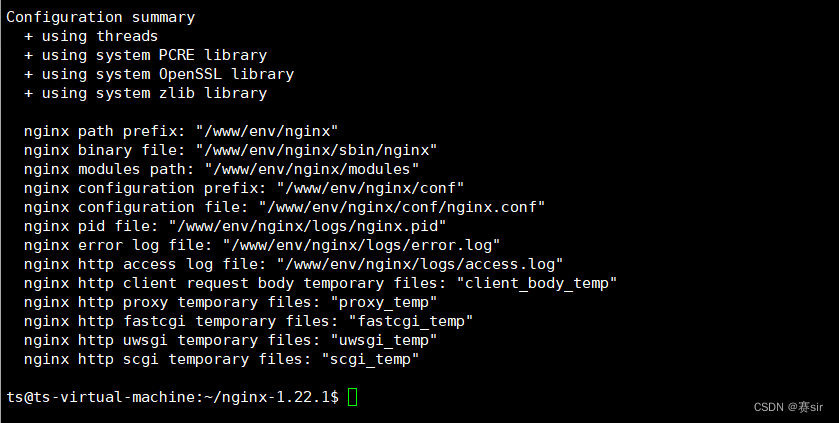
这样成功了
4.安装
make && make install
安装完成在/www/env/nginx 看到下面文件
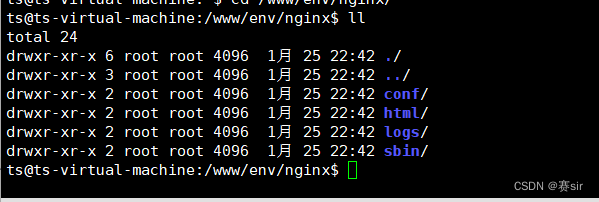
conf/ - 这个目录包含Nginx的配置文件,用于配置服务器的行为,包括虚拟主机配置、代理设置等。
html/ - 这个目录通常包含Nginx服务器的网页文件,也就是网站的内容文件,比如HTML、CSS、JavaScript文件等。
logs/ - 这个目录包含Nginx服务器的日志文件,记录了服务器的活动、访问日志、错误日志等。
sbin/ - 这个目录包含Nginx服务器的可执行文件,是服务器的主要执行文件,用于启动、停止、重载服务器等操作。
5启动Nginx:
sbin/nginx
nginx常用命令 常用命令 nginx -s reload 修改配置后重新加载生效 nginx -s stop 快速停止nginx nginx -s start 启动nginx nginx -s quit 完整有序的停止nginx nginx -v 查看nginx的版本 nginx -V 查看版本和nginx的配置选项 nginx -t -c /path/to/nginx.conf 测试nginx配置文件是否正确 nginx -s reopen 重新打开日志文件
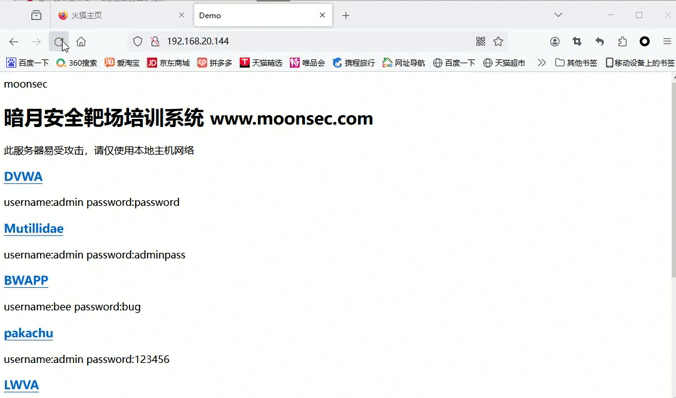
启动访问ubntu的IP地址 看是否有下面页面

负载均衡
什么是负载均衡?
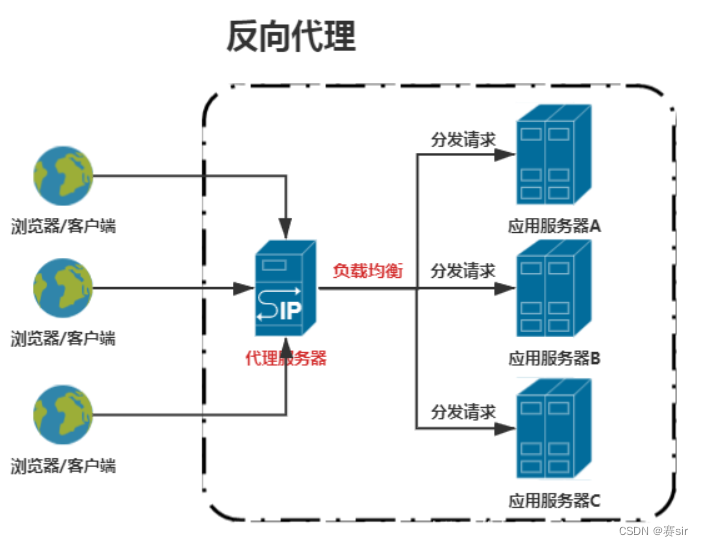
以看到负载均衡的主要作用是采用了负载均衡算法将请求分发到集群模式中的应用服务器上,这样即使某个后台应用服务器挂了,其他应用服务器还可以正常接收请求,实现了高可用,并且集群模式模式下的应用服务器支持纵向扩展,可以应对业务快速增长带来的高并发应用场景
负载均衡算法
负载均衡算法常用的有
轮询
原理是每一个请求按时间顺序逐一被分发到不同的应用服务器,如果接收请求的应用服务器挂了,并且请求超过最大失败次数
max_fails
(
1次
),则在失效时间
fail_timeout
(
10秒
)内不会再转发请求到该节点
加权负载均衡
原理是每一个请求按权重被分发到不同的应用服务器,同样,如果接收请求的应用服务器挂了,并且请求超过最大失败次数max_fails(默认1次或可设置N次),则在失效时间fail_timeout(默认10秒,可设置N秒)内,不会再转发请求到该节点
ip_hash算法
原理是每一个请求按用户访问IP的哈希结果分配,如果请求来自同一个用户IP则固定这台IP访问一台应用服务器,该算法可以有效解决动态网页中存在的session共享问题。
算法进行配置演示
Nginx所在ip:192.168.20.144
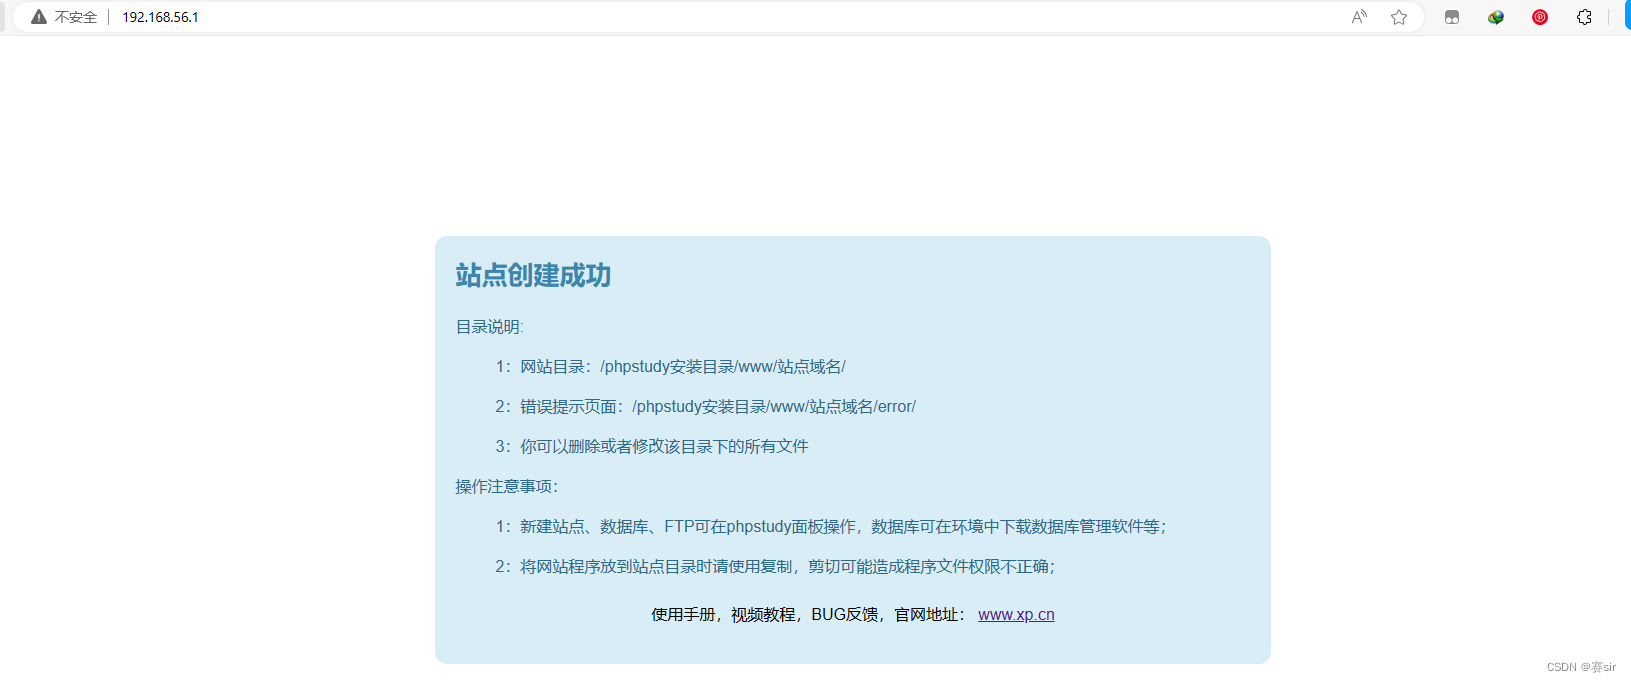
负载1:192.168.56.1 小皮站点
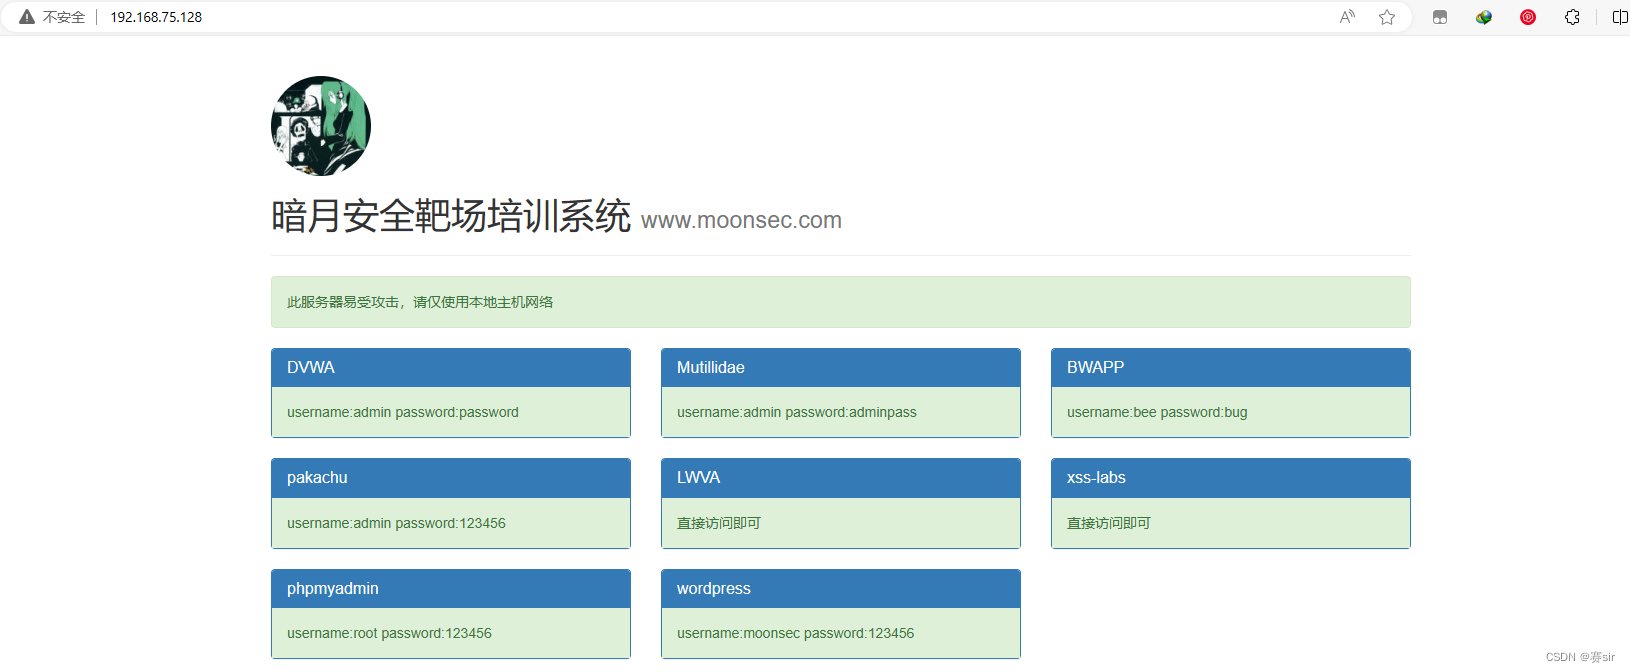
负载2:192.168.75.128暗月靶场
负载1
负载2
加权负载均衡
vim /etc/nginx/nginx.conf
upstream nginx_boot {
server 192.168.56.1 max_fails=2 fail_timeout=30s;
server 192.168.75.128 max_fails=2 fail_timeout=30s;
}
##
# Server Configuration
##
server {
listen 80;
server_name 192.168.20.144;
location / {
root html;
index index.html index.htm index.jsp index.ftl;
proxy_set_header Host $host;
proxy_set_header X-Real-IP $remote_addr;
proxy_set_header X-Forwarded-For $proxy_add_x_forwarded_for;
proxy_pass http://nginx_boot;
}
location ~ .*.(gif|jpg|jpeg|bmp|png|ico|txt|js|css) {
root /usr/local/nginx/html/static;
expires 7d;
}
}
}
nginx
-s reload :修改配置后重新加载生效
然后我们就可以在浏览器中再次访问192.168.20.144
这里是使用的
权重
的方式来实现的,均设置为100,每次刷新都会换另外一个设备响应,在实际应用中是可以根据服务器的性能和流量大小来更加灵活的设置权重

轮询
upstream nginx_boot{
# 30s内检查心跳发送两次包,未回复就代表该机器宕机,请求分发权重比为1:2
server 192.168.56.1 max_fails=2 fail_timeout=30s;
server 192.168.75.128 max_fails=2 fail_timeout=30s;
# 这里的IP请配置成你WEB服务所在的机器IP
}
server {
listen 80;
server_name 192.168.20.144;
location / {
root html; # 配置一下index的地址,最后加上index.ftl。
index index.html index.htm index.jsp index.ftl;
proxy_set_header Host $host;
proxy_set_header X-Real-IP $remote_addr;
proxy_set_header X-Forwarded-For $proxy_add_x_forwarded_for;
# 请求交给名为nginx_boot的upstream上
proxy_pass http://nginx_boot;
}
location ~ .*.(gif|jpg|jpeg|bmp|png|ico|txt|js|css){
root /usr/local/nginx/html/static;
expires 7d;}
}
重启
访问192.168.20.144后会这样分被将流量分到了两个设备个一次,这也就是轮询
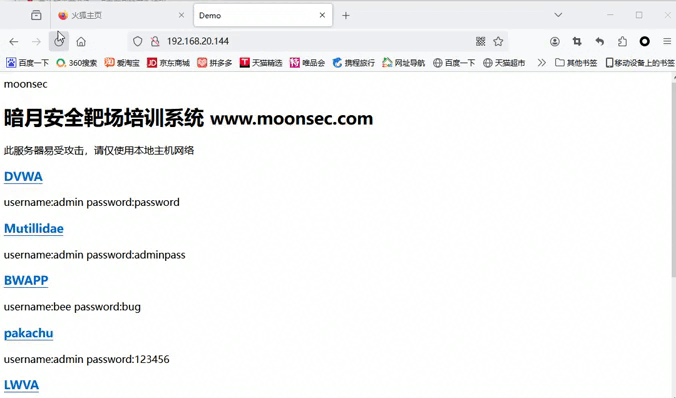
还是两次访问,分被将流量分到了两个设备。
IP 哈希
upstream nginx_boot{
ip_hash;
# 30s内检查心跳发送两次包,未回复就代表该机器宕机,请求分发权重比为1:2
server 192.168.56.211 weight=100 max_fails=2 fail_timeout=30s;
server 192.168.75.128 weight=100 max_fails=2 fail_timeout=30s;
# 这里的IP请配置成你WEB服务所在的机器IP
}
server {
listen 80;
server_name 192.168.20.144;
location / {
root html; # 配置一下index的地址,最后加上index.ftl。
index index.html index.htm index.jsp index.ftl;
proxy_set_header Host $host;
proxy_set_header X-Real-IP $remote_addr;
proxy_set_header X-Forwarded-For $proxy_add_x_forwarded_for;
# 请求交给名为nginx_boot的upstream上
proxy_pass http://nginx_boot;
}
location ~ .*.(gif|jpg|jpeg|bmp|png|ico|txt|js|css){
root /usr/local/nginx/html/static;
expires 7d;}
}
对每个请求,针对 ip 进行 hash, 分配到后台节点,
同一 ip 会被固定分配到下游固定服务上。
这样我们无论刷新页面多少次,响应的始终都是192.168.75.128
![[MQ]常用的mq产品图形管理web界面或客户端](https://img-blog.csdnimg.cn/direct/de1cd254ef1144d9ade10d2dc3a454e7.png)