这篇博文是接着这个系列前面的博文,来讲如何实现医学图像三视图同步视图。我想到的一个思路是用Scrollbar来控制切面的改变,还有一个想法是在三维图像上取点,然后以这个点为切面中心更新三维视图。这篇博文主要介绍的就是第二个想法的三维图像上取点相关实现准备。
在写这个项目的时候我真的琢磨了很久,网上能参考的资料也不多,下面就来和大家详细分享一下我研究这么久的成果吧。(研究不易,如果你觉得这篇文对你有帮助,请给博主点赞收藏评论三连hhh)
我比较懒,所以这个博客用到的主体代码是之前博客里介绍的,一些前面的准备步骤我已经在相关博客里介绍过了,我这里就不重复写了,大家有困惑的话就挪步瞅瞅我之前的博客吧。
VS2022联合Qt5开发学习5(QT5.12.3联合VTK在VS2022上开发医学图像项目)_vs2022 qt5.12-CSDN博客
VS2022联合Qt5开发学习7(QT5.12.3联合VTK在VS2022上开发医学图像项目2——十字叉标注)_qt vs开发-CSDN博客
1. 用VTK实现取点
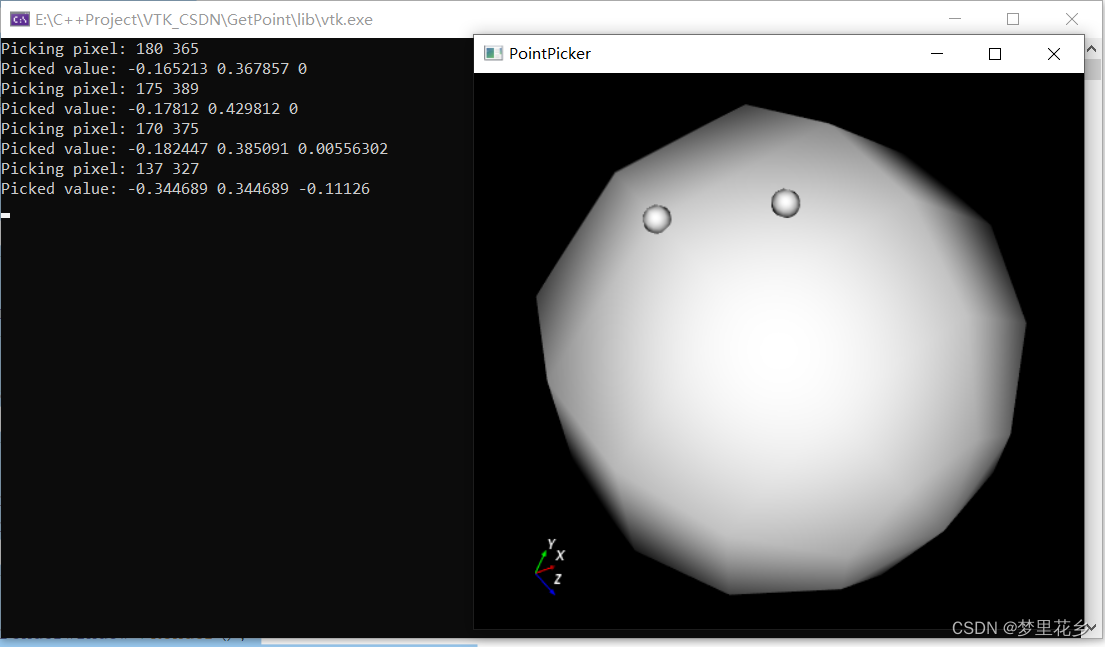
在正式写到如何在stl三维图像上取点之前,我们先练习一下如何在VTK上取点。下面的实例是一个纯VTK项目,我用的是VTK7,VTK9应该运行也没啥问题。
首先是新建一个PointPickerInteractorStyle 类,写一些用鼠标左键取坐标的相关函数。
GetPoint.h
#pragma once
#include <vtkAutoInit.h>
VTK_MODULE_INIT(vtkRenderingOpenGL2)
VTK_MODULE_INIT(vtkRenderingFreeType)
VTK_MODULE_INIT(vtkInteractionStyle)

#include <vtkSmartPointer.h>
#include <vtkSphereSource.h>
#include <vtkPolyDataMapper.h>
#include <vtkActor.h>
#include <vtkRenderer.h>
#include <vtkRenderWindow.h>
#include <vtkRenderWindowInteractor.h>

#include <vtkPointPicker.h>
#include <vtkRendererCollection.h>
#include <vtkInteractorStyleTrackballCamera.h>
#include <vtkObjectFactory.h>  //vtkStandardNewMacro();
#include <vtkProperty.h>

#include <vtkAxesActor.h>
#include <vtkOrientationMarkerWidget.h>

/**************************************************************************************************/
class PointPickerInteractorStyle : public vtkInteractorStyleTrackballCamera
{
public:
	static PointPickerInteractorStyle* New();
	vtkTypeMacro(PointPickerInteractorStyle, vtkInteractorStyleTrackballCamera);

	virtual void OnLeftButtonDown()
	{
		//打印鼠标左键像素位置
		std::cout << "Picking pixel: " << this->Interactor->GetEventPosition()[0]
			<< " " << this->Interactor->GetEventPosition()[1] << std::endl;
		//注册拾取点函数
		this->Interactor->GetPicker()->Pick(
			this->Interactor->GetEventPosition()[0],
			this->Interactor->GetEventPosition()[1], 0,  // always zero.
			this->Interactor->GetRenderWindow()->GetRenderers()->GetFirstRenderer()
		);
		//打印拾取点空间位置
		double picked[3];
		this->Interactor->GetPicker()->GetPickPosition(picked);
		std::cout << "Picked value: " << picked[0] << " " << picked[1] << " " << picked[2] << std::endl;
		//对拾取点进行标记
		vtkSmartPointer<vtkSphereSource> sphereSource =
			vtkSmartPointer<vtkSphereSource>::New();
		sphereSource->Update();

		vtkSmartPointer<vtkPolyDataMapper> mapper =
			vtkSmartPointer<vtkPolyDataMapper>::New();
		mapper->SetInputConnection(sphereSource->GetOutputPort());

		vtkSmartPointer<vtkActor> actor = vtkSmartPointer<vtkActor>::New();
		actor->SetMapper(mapper);
		actor->SetPosition(picked);
		actor->SetScale(0.05);
		actor->GetProperty()->SetColor(1.0, 1.0, 1.0);
		this->Interactor->GetRenderWindow()->GetRenderers()->GetFirstRenderer()->AddActor(actor);

		vtkInteractorStyleTrackballCamera::OnLeftButtonDown();
	}
};
然后在cpp文件上构建VTK的actor、render、window,就是那一套标准化流程。大家不熟悉的话可以瞅瞅我之前这个系列的学习笔记:
VTK项目代码学习_梦里花乡的博客-CSDN博客
GetPoint.cpp
#include <GetPoint.h>

vtkStandardNewMacro(PointPickerInteractorStyle);

int main()
{
	vtkSmartPointer<vtkSphereSource> sphereSource =
		vtkSmartPointer<vtkSphereSource>::New();
	sphereSource->Update();

	vtkSmartPointer<vtkPolyDataMapper> mapper =
		vtkSmartPointer<vtkPolyDataMapper>::New();
	mapper->SetInputConnection(sphereSource->GetOutputPort());
	vtkSmartPointer<vtkActor> actor =
		vtkSmartPointer<vtkActor>::New();
	actor->SetMapper(mapper);

	vtkSmartPointer<vtkRenderer> renderer =
		vtkSmartPointer<vtkRenderer>::New();
	renderer->AddActor(actor);
	renderer->SetBackground(0, 0, 0);

	vtkSmartPointer<vtkRenderWindow> renderWindow =
		vtkSmartPointer<vtkRenderWindow>::New();
	renderWindow->Render();
	renderWindow->SetWindowName("PointPicker");
	renderWindow->AddRenderer(renderer);

	vtkSmartPointer<vtkPointPicker> pointPicker =
		vtkSmartPointer<vtkPointPicker>::New();

	vtkSmartPointer<vtkRenderWindowInteractor> renderWindowInteractor =
		vtkSmartPointer<vtkRenderWindowInteractor>::New();
	renderWindowInteractor->SetPicker(pointPicker);
	renderWindowInteractor->SetRenderWindow(renderWindow);

	vtkSmartPointer<PointPickerInteractorStyle> style =
		vtkSmartPointer<PointPickerInteractorStyle>::New();
	renderWindowInteractor->SetInteractorStyle(style);
	//
	vtkSmartPointer<vtkAxesActor>  Axes = vtkSmartPointer<vtkAxesActor>::New();
	vtkSmartPointer<vtkOrientationMarkerWidget>  widget =
		vtkSmartPointer<vtkOrientationMarkerWidget>::New();
	widget->SetInteractor(renderWindowInteractor);
	widget->SetOrientationMarker(Axes);
	widget->SetOutlineColor(1, 1, 1);
	widget->SetViewport(0, 0, 0.2, 0.2);
	widget->SetEnabled(1);
	widget->InteractiveOn();

	renderWindow->Render();
	renderWindowInteractor->Start();

	return 0;
}
这里需要特别注意,这一行一定不要忘记写了
vtkStandardNewMacro(PointPickerInteractorStyle);运行结果
2. Qt界面取点
关于Qt界面如何取点的相关内容,我已经在之前的博文VS2022联合Qt5开发学习9(QT5.12.3鼠标按下、释放、移动事件以及Qt上取标注点)-CSDN博客里介绍了,在这里就不再做更多说明了。
3. qvtkWidget上显示STL三维图像并取点
这个实例是接着之前的博文做的,所以一些前期的步骤我这里就不重复写了,大家不大清楚的话可以看一下这篇博文:VS2022联合Qt5开发学习7(QT5.12.3联合VTK在VS2022上开发医学图像项目2——十字叉标注)_qt vs开发-CSDN博客
首先我们需要创建一个自定义的交互器样式类,该类继承自vtkInteractorStyleTrackballCamera,覆写了鼠标左键按下事件处理函数 OnLeftButtonDown。在这个函数中,我们使用 vtkPointPicker 实现了鼠标点击位置的三维点选取。
PointPickerInteractorStyle.h
#pragma once
#include <vtkAutoInit.h>
VTK_MODULE_INIT(vtkRenderingOpenGL2)
VTK_MODULE_INIT(vtkRenderingFreeType)
VTK_MODULE_INIT(vtkInteractionStyle)

#include <vtkSmartPointer.h>
#include <vtkSphereSource.h>
#include <vtkPolyDataMapper.h>
#include <vtkActor.h>
#include <vtkRenderer.h>
#include <vtkRenderWindow.h>
#include <vtkRenderWindowInteractor.h>

#include <vtkPointPicker.h>
//this->Interactor->GetRenderWindow()->GetRenderers()->GetFirstRenderer()
#include <vtkRendererCollection.h>
#include <vtkInteractorStyleTrackballCamera.h>
#include <vtkObjectFactory.h>  //vtkStandardNewMacro();
#include <vtkProperty.h>

#include <vtkAxesActor.h>
#include <vtkOrientationMarkerWidget.h>


class PointPickerInteractorStyle : public vtkInteractorStyleTrackballCamera
{
public:
	static PointPickerInteractorStyle* New();
	vtkTypeMacro(PointPickerInteractorStyle, vtkInteractorStyleTrackballCamera);

	virtual void OnLeftButtonDown()
	{
		//打印鼠标左键像素位置
		std::cout << "Picking pixel: " << this->Interactor->GetEventPosition()[0]
			<< " " << this->Interactor->GetEventPosition()[1] << std::endl;
		//注册拾取点函数
		this->Interactor->GetPicker()->Pick(
			this->Interactor->GetEventPosition()[0],
			this->Interactor->GetEventPosition()[1], 0,  // always zero.
			this->Interactor->GetRenderWindow()->GetRenderers()->GetFirstRenderer()
		);
		//打印拾取点空间位置
		double picked[3];
		this->Interactor->GetPicker()->GetPickPosition(picked);
		std::cout << "Picked value: " << picked[0] << " " << picked[1] << " " << picked[2] << std::endl;
		//对拾取点进行标记
		vtkSmartPointer<vtkSphereSource> sphereSource =
			vtkSmartPointer<vtkSphereSource>::New();
		sphereSource->Update();

		vtkSmartPointer<vtkPolyDataMapper> mapper =
			vtkSmartPointer<vtkPolyDataMapper>::New();
		mapper->SetInputConnection(sphereSource->GetOutputPort());

		vtkSmartPointer<vtkActor> actor = vtkSmartPointer<vtkActor>::New();
		actor->SetMapper(mapper);
		actor->SetPosition(picked);
		actor->SetScale(5);
		actor->GetProperty()->SetColor(1.0, 0, 0);
		this->Interactor->GetRenderWindow()->GetRenderers()->GetFirstRenderer()->AddActor(actor);

		vtkInteractorStyleTrackballCamera::OnLeftButtonDown();
	}
};
PointPickerInteractorStyle.cpp
#include "PointPickerInteractorStyle.h"

vtkStandardNewMacro(PointPickerInteractorStyle);
然后我们需要在原来的代码基础上新建这个自定义的交互器样式,其他代码没有什么特别多的变化。
	vtkSmartPointer<vtkRenderWindowInteractor> interactor = ui.qvtkWidget->GetRenderWindow()->GetInteractor();
	vtkSmartPointer<PointPickerInteractorStyle> style = vtkSmartPointer<PointPickerInteractorStyle>::New();
	style->SetDefaultRenderer(renderer);
	interactor->SetInteractorStyle(style);
	interactor->Initialize();
STLpoint_vtk7.h文件
#pragma once

#include <QtWidgets/QMainWindow>
#include "ui_STLpoint_vtk7.h"

#include <vtkAutoInit.h>
#include <vtkBMPReader.h>
#include <vtkFloatArray.h>
#include <vtkImageActor.h>
#include <vtkImageChangeInformation.h>
#include <vtkImageData.h>
#include <vtkImageImport.h>
#include <vtkImageViewer2.h>
#include <vtkInteractorStyleImage.h>
#include <vtkJPEGReader.h>
#include <vtkLookupTable.h>
#include <vtkMetaImageReader.h>
#include <vtkNamedColors.h>
#include <vtkNew.h>
#include <vtkPointData.h>
#include <vtkPolyDataMapper.h>
#include <vtkProperty.h>
#include <vtkRenderWindow.h>
#include <vtkRenderWindowInteractor.h>
#include <vtkRenderer.h>
#include <vtkSTLReader.h>
#include <vtkSmartPointer.h>
#include <vtkXMLImageDataWriter.h>

#include <PointPickerInteractorStyle.h>


class STLpoint_vtk7 : public QMainWindow
{
    Q_OBJECT

public:
    STLpoint_vtk7(QWidget* parent = nullptr);
    ~STLpoint_vtk7();

private slots:
    void openFileSlot();

private:
    Ui::STLpoint_vtk7Class ui;

private:
    vtkSmartPointer<vtkRenderer> m_vtkRenderer;
    vtkSmartPointer<vtkRenderWindow> m_vtkRenderWindow;

private:
    vtkSmartPointer<vtkActor> DrawCross(vtkSmartPointer<vtkActor> _Actor, double _Pos[3]);
};
STLpoint_vtk7.cpp文件
#include "STLpoint_vtk7.h"

#include <QDebug>
#include <QFileDialog>

#include <vtkImageBlend.h>
#include <vtkImageCanvasSource2D.h>
#include <vtkImageChangeInformation.h>
#include <vtkImageData.h>
#include <vtkImageIterator.h>
#include <vtkImageLuminance.h>
#include <vtkImageStencil.h>
#include <vtkImageStencilData.h>
#include <vtkImageViewer.h>
#include <vtkInteractorStyleImage.h>
#include <vtkPNGReader.h>
#include <vtkRenderWindow.h>
#include <vtkRenderWindowInteractor.h>
#include <vtkLine.h>
#include <vtkCamera.h>


STLpoint_vtk7::STLpoint_vtk7(QWidget* parent)
	: QMainWindow(parent)
{
	ui.setupUi(this);

	//test DrawCross
	static vtkSmartPointer<vtkActor> _CrossCenterActor = vtkSmartPointer<vtkActor>::New();
	double _Pos[3];
	_Pos[0] = 0;
	_Pos[1] = 0;
	_Pos[2] = 0;
	_CrossCenterActor = DrawCross(_CrossCenterActor, _Pos);
	_CrossCenterActor->SetPosition(0, 0, 1);

	m_vtkRenderer = vtkSmartPointer<vtkRenderer>::New();
	m_vtkRenderer->AddActor(_CrossCenterActor);
	m_vtkRenderer->SetBackground(.0, .0, .0);

	vtkSmartPointer<vtkRenderWindow> window = vtkSmartPointer<vtkRenderWindow>::New();
	ui.qvtkWidget->SetRenderWindow(window);
	ui.qvtkWidget->GetRenderWindow()->AddRenderer(m_vtkRenderer);
}

STLpoint_vtk7::~STLpoint_vtk7()
{}

void STLpoint_vtk7::openFileSlot()
{
	QString selectFilePath = QFileDialog::getOpenFileName(this, QString("choose STL file"), QString(""), QString("file(*.stl)"));
	if (selectFilePath.isEmpty())
	{
		ui.textBrowser->append("The address of the STL file you choose is null!");
		return;
	}

	// 原始图像
	vtkSmartPointer<vtkSTLReader> reader = vtkSmartPointer<vtkSTLReader>::New();
	reader->SetFileName(selectFilePath.toStdString().c_str());
	reader->Update();

	// 获取图像信息
	vtkSmartPointer<vtkPolyData> polyData = reader->GetOutput();
	vtkSmartPointer<vtkPoints> points = polyData->GetPoints();

	// 计算中心点坐标
	double center[3] = { 0.0, 0.0, 0.0 };
	for (vtkIdType i = 0; i < points->GetNumberOfPoints(); ++i) {
		double point[3];
		points->GetPoint(i, point);
		for (int j = 0; j < 3; ++j) {
			center[j] += point[j];
		}
	}
	for (int j = 0; j < 3; ++j) {
		center[j] /= points->GetNumberOfPoints();
	}
	cout << "The Center of the Picture:" << center[0] << " " << center[1] << " " << center[2] << endl;


	//将source转换成mapper
	vtkSmartPointer<vtkPolyDataMapper> mapper = vtkSmartPointer<vtkPolyDataMapper>::New();
	mapper->SetInputConnection(reader->GetOutputPort());

	//送入渲染引擎进行显示
	vtkSmartPointer<vtkActor> actor = vtkSmartPointer<vtkActor>::New();
	actor->SetMapper(mapper);

	static vtkSmartPointer<vtkActor> _CrossCenterActor = vtkSmartPointer<vtkActor>::New();
	_CrossCenterActor = DrawCross(_CrossCenterActor, center);
	_CrossCenterActor->SetPosition(0, 0, 1);


	//渲染
	vtkSmartPointer<vtkRenderer> renderer = vtkSmartPointer<vtkRenderer>::New();
	renderer->AddActor(actor);
	renderer->SetBackground(.0, .0, .0);
	renderer->AddActor(_CrossCenterActor);
	renderer->SetBackground(.0, .0, .0);
	//renderer->SetActiveCamera(camera);

	//设置渲染窗口
	vtkSmartPointer<vtkRenderWindow> window = vtkSmartPointer<vtkRenderWindow>::New();
	ui.qvtkWidget->SetRenderWindow(window);
	ui.qvtkWidget->GetRenderWindow()->AddRenderer(renderer); //等价于window->AddRenderer(renderer);

	vtkSmartPointer<vtkRenderWindowInteractor> interactor = ui.qvtkWidget->GetRenderWindow()->GetInteractor();
	vtkSmartPointer<PointPickerInteractorStyle> style = vtkSmartPointer<PointPickerInteractorStyle>::New();
	style->SetDefaultRenderer(renderer);
	interactor->SetInteractorStyle(style);
	interactor->Initialize();


	//ok
	ui.textBrowser->append(QString("upload the file:") + selectFilePath + QString(" succeed !"));
}

vtkSmartPointer<vtkActor> STLpoint_vtk7::DrawCross(vtkSmartPointer<vtkActor> _Actor, double _Pos[3])
{
	if (_Actor == nullptr)
	{
		_Actor = vtkSmartPointer<vtkActor>::New();
	}

	vtkSmartPointer<vtkPoints> _Points = vtkSmartPointer<vtkPoints>::New();
	_Points->InsertNextPoint(_Pos[0] - 100, _Pos[1], _Pos[2]);
	_Points->InsertNextPoint(_Pos[0] + 100, _Pos[1], _Pos[2]);
	_Points->InsertNextPoint(_Pos[0], _Pos[1] - 100, _Pos[2]);
	_Points->InsertNextPoint(_Pos[0], _Pos[1] + 100, _Pos[2]);
	_Points->InsertNextPoint(_Pos[0], _Pos[1], _Pos[2] - 100);
	_Points->InsertNextPoint(_Pos[0], _Pos[1], _Pos[2] + 100);

	vtkSmartPointer<vtkLine> _Line0 = vtkSmartPointer<vtkLine>::New();
	_Line0->GetPointIds()->SetId(0, 0);
	_Line0->GetPointIds()->SetId(1, 1);

	vtkSmartPointer<vtkLine> _Line1 = vtkSmartPointer<vtkLine>::New();
	_Line1->GetPointIds()->SetId(0, 2);
	_Line1->GetPointIds()->SetId(1, 3);

	vtkSmartPointer<vtkLine> _Line2 = vtkSmartPointer<vtkLine>::New();
	_Line2->GetPointIds()->SetId(0, 4);
	_Line2->GetPointIds()->SetId(1, 5);

	vtkSmartPointer<vtkCellArray> _Lines = vtkSmartPointer<vtkCellArray>::New();
	_Lines->InsertNextCell(_Line0);
	_Lines->InsertNextCell(_Line1);
	_Lines->InsertNextCell(_Line2);

	vtkSmartPointer<vtkPolyData> _PolyData = vtkSmartPointer<vtkPolyData>::New();
	_PolyData->SetPoints(_Points);
	_PolyData->SetLines(_Lines);

	vtkSmartPointer<vtkPolyDataMapper> _Mapper = vtkSmartPointer<vtkPolyDataMapper>::New();
	_Mapper->SetInputData(_PolyData);

	vtkSmartPointer<vtkProperty> lineProperty = vtkSmartPointer<vtkProperty>::New();
	lineProperty->SetLineWidth(1.0);  // 设置线宽为 1,可以根据需要调整

	_Actor->SetMapper(_Mapper);
	_Actor->SetProperty(lineProperty);
	_Actor->GetProperty()->SetColor(1.0, 0.0, 0.0);

	return _Actor;
}
运行结果
qvtkWidget上显示STL三维图像并取点
备注:
如果按照我的步骤一步一步搭好项目就会发现一个问题:我这么写代码确实可以正常取点,但是我想移动旋转我的.stl图像时也会按鼠标左键,这时候也会出现红色标注球,但这时候我只是想移动转动图像,不想取这个点。
我暂时也没想到什么好办法,就在自定义的交互器样式中添加一个状态标记Ctrl来决定是否应该在点击时放置一个球形标记。最后可以通过按下Ctrl来切换这个状态。
class PointPickerInteractorStyle : public vtkInteractorStyleTrackballCamera
{
public:
	static PointPickerInteractorStyle* New();
	vtkTypeMacro(PointPickerInteractorStyle, vtkInteractorStyleTrackballCamera);

	PointPickerInteractorStyle() : PlaceMarker(false) {}

	virtual void OnLeftButtonDown()
	{
		// 检查是否按下了Ctrl键
		if (this->Interactor->GetControlKey()) {
			PlaceMarker = !PlaceMarker; // 切换放置标记的状态
			if (!PlaceMarker) {
				// 如果现在不放置标记,直接返回,不执行后面的代码
				return;
			}
		}
		if (PlaceMarker) {
			//打印鼠标左键像素位置
			std::cout << "Picking pixel: " << this->Interactor->GetEventPosition()[0]
				<< " " << this->Interactor->GetEventPosition()[1] << std::endl;
			//注册拾取点函数
			this->Interactor->GetPicker()->Pick(
				this->Interactor->GetEventPosition()[0],
				this->Interactor->GetEventPosition()[1], 0,  // always zero.
				this->Interactor->GetRenderWindow()->GetRenderers()->GetFirstRenderer()
			);
			//打印拾取点空间位置
			double picked[3];
			this->Interactor->GetPicker()->GetPickPosition(picked);
			std::cout << "Picked value: " << picked[0] << " " << picked[1] << " " << picked[2] << std::endl;
			//对拾取点进行标记
			vtkSmartPointer<vtkSphereSource> sphereSource =
				vtkSmartPointer<vtkSphereSource>::New();
			sphereSource->Update();

			vtkSmartPointer<vtkPolyDataMapper> mapper =
				vtkSmartPointer<vtkPolyDataMapper>::New();
			mapper->SetInputConnection(sphereSource->GetOutputPort());

			vtkSmartPointer<vtkActor> actor = vtkSmartPointer<vtkActor>::New();
			actor->SetMapper(mapper);
			actor->SetPosition(picked);
			actor->SetScale(5);
			actor->GetProperty()->SetColor(1.0, 0, 0);
			this->Interactor->GetRenderWindow()->GetRenderers()->GetFirstRenderer()->AddActor(actor);
		}

		vtkInteractorStyleTrackballCamera::OnLeftButtonDown();
	}

	void SetPlaceMarker(bool place) {
		PlaceMarker = place;
	}

	bool GetPlaceMarker() {
		return PlaceMarker;
	}

private:
	bool PlaceMarker; // 控制是否放置标记的状态
};
不过我运行起来感觉还是不大灵便,需要按住ctrl键再加上左边鼠标键点一下才能切换成功。。。这步骤让人脑阔疼,如果有朋友有优化这个地方的方法,能在评论区说说不TAT