智能小程序小部件(Widget)导航、地图、画布等组件,以及开放能力、原生组件说明。
导航组件
navigator
页面链接,控制小程序的跳转。navigator 子节点的背景色应为透明色。
属性说明
| 属性名 | 类型 | 默认值 | 必填 | 说明 |
|---|---|---|---|---|
| url | string | 是 | 跳转地址 | |
| delta | number | 1 | 否 | 当 open-type 为 'navigateBack' 时有效,表示回退的层数 |
| open-type | string | navigate | 否 | 跳转方式,详情参见后面的说明 |
| hover-class | string | navigator-hover | 否 | 指定点击时的样式类,当 hover-class="none"时,没有点击态效果类 |
| hover-start-time | number | 50 | 否 | 按住后多久出现点击态,单位毫秒 |
| hover-stay-time | number | 400 | 否 | 手指松开后点击态保留时间,单位毫秒 |
open-type 取值范围:
| 值 | 说明 |
|---|---|
| navigate | 对应 ty.navigateTo |
| redirect | 对应 ty.redirectTo |
| switchTab | 对应 ty.switchTab |
| navigateBack | 对应 ty.navigateBack |
| reLaunch | 对应 ty.reLaunch |
示例代码
TYML
<view class="page-head">
	<view class="page-head-title">navigator</view>
	<view class="page-head-line"></view>
</view>

<view class="btn-area l-r-padding">
  <button class="navigator-btn">
    <navigator url="pages/components/button/index" class="link" hover-class="navigator-hover">跳转到新页面 button</navigator>
  </button>
  <button class="navigator-btn">
    <navigator url="pages/components/view/index" class="link" open-type="redirect" hover-class="other-navigator-hover">在当前页打开 view</navigator>
  </button>
  <button class="navigator-btn">
    <navigator  class="link" open-type="navigateBack" hover-class="other-navigator-hover">返回</navigator>
  </button>
  <button class="navigator-btn">
    <navigator url="pages/components/index" class="link" open-type="switchTab" hover-class="other-navigator-hover">切换到tab</navigator>
  </button>
  <button class="navigator-btn">
    <navigator url="pages/components/input/index" class="link" open-type="reLaunch" hover-class="other-navigator-hover">reLaunch 打开 input</navigator>
  </button>
</view>
地图组件
map
基础库 2.0.12 开始支持, 低版本需做兼容处理。
依赖 MapKit 插件, 插件版本 >= 2.2.2。
Tuya MiniApp Tools 上是通过 WebView 模拟的与真机存在差异,请以真机效果为主。
地图。相关 API:ty.createMapContext。
这是基于异层渲染的原生组件, 请注意原生组件使用限制。
属性说明
| 属性名 | 类型 | 默认值 | 必填 | 说明 |
|---|---|---|---|---|
| longitude | number | 是 | 中心经度 | |
| latitude | number | 是 | 中心纬度 | |
| scale | number | 16 | 否 | 缩放级别,取值范围为 4-19 |
| min-scale | number | 4 | 否 | 最小缩放级别 |
| max-scale | number | 19 | 否 | 最大缩放级别 |
| markers | Array<marker> | 否 | 标记点 | |
| polyline | Array.<polyline> | 否 | 路线。IDE不支持, 请真机查看 | |
| circles | Array.<circle> | 否 | 圆。IDE不支持, 请真机查看 | |
| polygons | Array.<polygon> | 否 | 多边形。 IDE不支持, 请真机查看 | |
| border-width | number | 0 | 否 | 边框的宽度, 单位 px |
| border-style | string | solid | 否 | 边框的样式, 可选值: solid 和 dashed |
| border-color | string | #ffffff | 否 | 边框的颜色, 必须为十六进制格式 |
| border-radius | number | 0 | 否 | 边框的圆角, 单位 px |
| border-radius-top-left | number | 否 | 边框的左上角圆角大小, 单位 px | |
| border-radius-top-right | number | 否 | 边框的右上角圆角大小, 单位 px | |
| border-radius-bottom-left | number | 否 | 边框的左下角圆角大小, 单位 px | |
| border-radius-bottom-right | number | 否 | 边框的右下角圆角大小, 单位 px | |
| background-color | string | #ffffff | 否 | 背景颜色, 必须为十六进制格式 |
| bind:markertap | eventhandle | 否 | 点击标记点时触发,e.detail = {markerId} | |
| bind:callouttap | eventhandle | 否 | 点击标记点对应的气泡时触发 e.detail = {markerId} | |
| bind:regionchange | eventhandle | 否 | 视野发生变化时触发。IDE不支持, 请真机查看 | |
| bind:initdone | eventhandle | 否 | 初始化完成时触发。IDE不支持, 请真机查看 |
regionchange 返回值
视野改变时,regionchange 会触发两次,返回的 type 值分别为 begin 和 end。
marker
标记点用于在地图上显示标记的位置。
| 属性名 | 说明 | 类型 | 必填 | 备注 |
|---|---|---|---|---|
| id | 标记点 ID | number | 是 | marker 点击事件回调会返回此 id。 |
| longitude | 经度 | number | 是 | 浮点数,范围 -180 ~ 180 |
| latitude | 纬度 | number | 是 | 浮点数,范围 -90 ~ 90 |
| title | 标注点名 | string | 否 | 点击时显示,callout 存在时将被忽略 |
| styleId | 气泡样式类型 ID | string | 否 | 由原生实现的 marker 样式类型 id |
| callout | 标记点上方的气泡窗口数据源 | object | 否 | 支持的属性见下表,可识别换行符。存在 styleId 时,根据所选样式类型传入属性 |
| iconPath | 显示的图标 | string | 是 | 项目目录下的图片路径,支持网络路径、代码包路径 |
| rotate | 旋转角度 | number | 否 | 顺时针旋转的角度,范围 0 ~ 360,默认为 0 |
| width | 标注图标宽度 | number/string | 否 | 默认为图片实际宽度 |
| height | 标注图标高度 | number/string | 否 | 默认为图片实际高度 |
marker 上的气泡 callout
| 属性名 | 说明 | 类型 |
|---|---|---|
| content | 文本 | string |
| color | 文本颜色 | string |
| fontSize | 文字大小 | number |
| borderRadius | 边框圆角 | number |
| borderWidth | 边框宽度 | number |
| borderColor | 边框颜色 | string |
| bgColor | 背景色 | string |
| padding | 文本边缘留白 | number |
| textAlign | 文本对齐方式。有效值: left, right, center | string |
| anchorX | 横向偏移量,向右为正数 | number |
| anchorY | 纵向偏移量,向下为正数 | number |
polyline
指定一系列坐标点,从数组第一项连线至最后一项。
| 属性名 | 说明 | 类型 | 必填 | 备注 |
|---|---|---|---|---|
| points | 经纬度数组 | array | 是 | [{latitude: 0, longitude: 0}] |
| color | 线的颜色 | string | 是 | 十六进制 |
| width | 线的宽度 | number | 否 | |
| dottedLine | 是否虚线 | boolean | 否 | 默认 false |
circle
在地图上显示圆
| 属性名 | 说明 | 类型 | 必填 | 备注 |
|---|---|---|---|---|
| latitude | 纬度 | number | 是 | 浮点数,范围 -90 ~ 90 |
| longitude | 经度 | number | 是 | 浮点数,范围 -180 ~ 180 |
| color | 描边的颜色 | string | 是 | 十六进制 |
| fillColor | 填充颜色 | string | 是 | 十六进制 |
| radius | 半径 | number | 是 | |
| strokeWidth | 描边的宽度 | number | 否 |
polygon
指定一系列坐标点,根据 points 坐标数据生成闭合多边形
| 属性名 | 说明 | 类型 | 必填 | 备注 |
|---|---|---|---|---|
| points | 经纬度数组 | array | 是 | [{latitude: 0, longitude: 0}] |
| strokeColor | 描边的颜色 | string | 是 | 十六进制 |
| fillColor | 填充颜色 | string | 是 | 十六进制 |
| strokeWidth | 描边的宽度 | number | 否 |
Bug & Tip
- tip:地图组件的经纬度必填, 如果不填经纬度则默认值是北京的经纬度。
- tip:Tuya MiniApp Tools 上是通过 WebView 模拟的与真机存在差异,请以真机效果为主。
- tip:相关原理请参考 基于异层渲染的原生组件。
- tip:请注意 原生组件使用限制。
示例代码
TYML
<view class="container">
  <map
    id="myMap"
    class="myMap"
    style="border:10px solid red;padding: {{tagTop}}px;marginTop: {{marginTop}}px;"
    latitude="{{latitude}}"
    longitude="{{longitude}}"
    scale="{{scale}}"
    markers="{{markers}}"
    polyline="{{polyline}}"
    circles="{{circles}}"
    polygons="{{polygons}}"
    border-width="{{2}}"
    border-style="solid"
    border-color="#007aff"
    background-color="#ffc300"
    border-radius="{{10}}"
    data-map="{{value}}"
    bind:tap="handleTap"
    bind:markertap="handleMarkertap"
    bind:callouttap="handleCallouttap"
    bind:regionchange="handleRegionchange"
  >
    <view class="tag1" bindtap="clickTag">标签一</view>
  </map>
  <view class="btn-box">
    <button class="btn" bindtap="changeLngLat" type="primary">设置经纬度</button>
    <button class="btn" bindtap="apiMoveToLocation" type="primary">moveToLocation</button>
    <button class="btn" bindtap="apiAddMarkers" type="primary">addMarkers</button>
    <button class="btn" bindtap="apiRemoveMarkers" type="primary">removeMarkers</button>
    <button class="btn" bindtap="scaleIn" type="primary">scale 放大</button>
    <button class="btn" bindtap="scaleOut" type="primary">scale 缩小</button>
    <button class="btn" bindtap="openConfirm" type="primary">显示弹窗</button>
    <mpdialog title="标题" show="{{dialogShow}}" bindbuttontap="tapDialogButton" buttons="{{buttons}}">
      <view>这里是内容,超过部分会自动换行换行。这里是内容,超过部分会自动换行换行</view>
    </mpdialog>
  </view>
</view>
JS
const markers = [
  {
    id: 1,
    latitude: 39.908775,
    longitude: 116.406315,
    name: '王府井',
    iconPath: '/assets/images/marker.png',
    callout: {
      content: '王府井',
      color: '#ffffff',
      fontSize: 12,
      bgColor: '#5C91F6',
      padding: 4,
      borderRadius: 35,
      anchorY: -8,
    },
  },
  {
    id: 2,
    latitude: 39.927761,
    longitude: 116.391467,
    name: '北海公园',
    iconPath: '/assets/images/marker.png',
    callout: {
      content: '北海公园',
      color: '#ff0000',
      fontSize: 12,
      bgColor: '#fff',
      padding: 4,
      borderRadius: 35,
      anchorY: -8,
    },
  },
  {
    id: 3,
    latitude: 39.918203,
    longitude: 116.396923,
    name: '故宫',
    iconPath: '/assets/images/marker.png',
    callout: {
      content: '故宫',
      color: '#ffffff',
      fontSize: 12,
      bgColor: '#5C91F6',
      padding: 4,
      borderRadius: 35,
      anchorY: -8,
    },
  },
];

Page({
  data: {
    latitude: 39.908775,
    longitude: 116.406315,
    scale: 12,
    markers: markers.slice(0, 2),
    tagTop: 20,
    height: 40,
    isShow: false,
    showDialog: false,
    buttons: [
      {
        text: '取消',
      },
      {
        text: '确定',
      },
    ],
    marginTop: 10,
    value: 10,
    polyline:[
      {
        points:[
          {
            latitude: 39.907689,
            longitude: 116.16366,
          },
          {
            latitude: 39.91890,
            longitude: 116.193488
          },
          {
            latitude: 39.90900,
            longitude: 116.397787
          }
        ],
        width: 2,
        borderColor:"#008000", // 绿色
        color:"#0000FF", // 蓝色
        dottedLine: false
      }
    ],
    circles:[
      {
        latitude: 39.927761,
        longitude: 116.391467,
        color: "#800080", // 紫色
        fillColor: "#cccccccc",
        radius: 1000,
        strokeWidth: 2
      }
    ],
    polygons:[
      {
        points:[
          {
            latitude: 39.908775,
            longitude: 116.406315,
          },
          {
            latitude: 39.927761,
            longitude: 116.481667
          },
          {
            latitude: 39.918203,
            longitude: 116.396923
          }
        ],
        strokeWidth: 2,
        strokeColor:"#FF0000", // 红色
        fillColor:"#FFFF00", // 黄色
      }
    ]
  },
  onReady: function () {
    this.mapCtx = ty.createMapContext('myMap');
  },
  openConfirm: function () {
    ty.nativeDisabled(true);
    this.setData({
      dialogShow: true,
      value: this.data.value + 10,
    });
  },
  changeLngLat: function (e) {
    if (this.data.latitude === 39.908775) {
      this.setData({
        latitude: 39.97334,
        longitude: 116.417403,
      });
    } else {
      this.setData({
        latitude: 39.908775,
        longitude: 116.406315,
      });
    }
  },
  scaleIn: function () {
    this.setData({
      scale: this.data.scale + 1,
    });
  },
  scaleOut: function () {
    this.setData({
      scale: this.data.scale - 1,
    });
  },
  changeMarkers: function () {
    this.setData({
      markers: markers,
    });
  },
  apiAddMarkers: function () {
    this.mapCtx.addMarkers({
      markers: [markers[2]],
      clear: false,
      success: (res) => {
        console.log('success addMarkers', res);
      },
    });
  },
  apiRemoveMarkers: function () {
    this.mapCtx.removeMarkers({
      markerIds: [1, 2, 3],
      success: (res) => {
        console.log('success removeMarkers', res);
      },
    });
  },
  apiMoveToLocation: function (e) {
    this.mapCtx.moveToLocation({
      longitude: '121.138398',
      latitude: '30.972688',
      success: (res) => {
        console.log('demo moveToLocation success 回调函数触发', res);
      },
    });
  },
  clickTag: function (e) {
    console.log('demo 热区标签 tap 事件触发', e);
  },
  handleMarkertap: function (e) {
    console.log('demo 地图 markertap 事件触发', e);
  },
  handleCallouttap: function (e) {
    console.log('demo 地图 callouttap 事件触发', e);
  },
  handleRegionchange: function (e) {
    console.log(e);
  },
  tapDialogButton(e) {
    ty.nativeDisabled(false);
    this.setData({
      dialogShow: false,
    });
  },
});
JSON
{
  "navigationBarTitleText": "map",
  "usingComponents": {
    "mpdialog": "@tuya-miniapp/miniapp-components-plus/dialog/index"
  }
}
TYSS
.container {
  display: flex;
  align-items: center;
  flex-direction: column;
  padding: 0 20px 20px;
}

.scrollBox {
  width: 100%;
  border: 2px solid green;
  overflow: hidden;
  padding: 10px;
}

.myMap {
  height: 300px;
  width: 100%;
  margin-top: 50px;
  position: relative;
}

.tag1 {
  width: 80px;
  height: 40px;
  background: yellowgreen;
  display: flex;
  justify-content: center;
  align-items: center;
}

.btn-box {
  width: 100%;
  margin-top: 20px;
  display: flex;
  justify-content: space-between;
  flex-wrap: wrap;
}

.btn {
  width: 160px;
  margin-bottom: 20px;
  display: inline-block;
  padding: 10px 20px;
}

.box {
  background-color: darkorange;
  height: 200px;
  width: 100px;
  position: absolute;
  top: 150px;
  display: flex;
  justify-content: center;
  align-items: center;
}
画布组件
canvas
相关 api: Canvas
画布。使用 JS 操作 Canvas 上下文进行绘制。
属性说明
| 属性名 | 类型 | 默认值 | 必填 | 说明 |
|---|---|---|---|---|
| type | string | 否 | 指定 canvas 类型,有效值值为 2d | |
| canvas-id | string | 是 | canvas 组件的唯一标识符,必须设置该属性 | |
| disable-scroll | boolean | false | 否 | 当在 canvas 中移动时且有绑定手势事件时,禁止屏幕滚动以及下拉刷新 |
| bind:touchstart | eventhandle | 否 | 手指触摸动作开始 | |
| bind:touchmove | eventhandle | 否 | 手指触摸后移动 | |
| bind:touchend | eventhandle | 否 | 手指触摸动作结束 | |
| bind:touchcancel | eventhandle | 否 | 手指触摸动作被打断,如来电提醒,弹窗 | |
| bind:longtap | eventhandle | 否 | 手指长按 500ms 之后触发,触发了长按事件后进行移动不会触发屏幕的滚动 | |
| bind:error | eventhandle | 否 | 当发生错误时触发 error 事件,detail = {errMsg} |
使用方法
-
方法一: 使用 rjs 进行绘制, 可以获取到 canvas 节点, 可以绘制图表, 动画和各种图形等。
-
方法二: 在逻辑层 js 中配合 ty.createCanvasContext API 使用, 此方法获取不到 canvas node 节点。
推荐使用 方法一 rjs 进行绘制, 性能更好。
示例代码
TYML
<canvas style="width: 300px; height: 200px;" canvas-id="firstCanvas"></canvas>JS
Page({
  onReady: function () {
    // 使用 ty.createCanvasContext 获取绘图上下文 context
    const context = ty.createCanvasContext('firstCanvas');

    context.setStrokeStyle('#00ff00');
    context.setLineWidth(5);
    context.rect(0, 0, 200, 200);
    context.stroke();
    context.setStrokeStyle('#ff0000');
    context.setLineWidth(2);
    context.moveTo(160, 100);
    context.arc(100, 100, 60, 0, 2 * Math.PI, true);
    context.moveTo(140, 100);
    context.arc(100, 100, 40, 0, Math.PI, false);
    context.moveTo(85, 80);
    context.arc(80, 80, 5, 0, 2 * Math.PI, true);
    context.moveTo(125, 80);
    context.arc(120, 80, 5, 0, 2 * Math.PI, true);
    context.stroke();
    context.draw();
  },
});
开放能力
web-view
基础库 2.6.0 开始支持, 低版本需做兼容处理。
Tuya MiniApp Tools 上是通过 WebView 模拟的与真机存在差异,请以真机效果为主。
功能描述
承载网页的容器。会自动铺满整个小程序页面。
注意:当页面存在 web-view 标签时,其他标签将不展示,且不支持设置任何样式!
属性说明
| 属性名 | 类型 | 默认值 | 必填 | 说明 |
|---|---|---|---|---|
| src | string | 否 | webview 指向网页的链接。需登录小程序管理后台配置业务域名。 | |
| bind:message | eventhandle | 否 | 网页向小程序 postMessage 时,触发并收到消息。e.detail = { data } | |
| bind:load | eventhandle | 否 | 网页加载成功时候触发此事件。e.detail = { src } | |
| bind:error | eventhandle | 否 | 网页加载失败的时候触发此事件。e.detail = { url, fullUrl },其中 fullUrl 为加载失败时的完整 url |
网页向小程序 postMessage 时,请使用 @tuya-miniapp/jssdk 进行操作,详细用法请查看 [jssdk 文档](@tuya-miniapp/jssdk](https://www.npmjs.com/package/@tuya-miniapp/jssdk)
示例代码
TYML
<web-view src="{{src}}" bind:message="message" bind:load='load' bind:error="error"></web-view>JS
Page({
  data: {
    src: 'https://www.your-domain.com',
  },
  message(e) {
    console.log('bind:message', e);
  },
  load(e) {
    console.log('bind:load', e);
  },
  error(e) {
    console.log('bind:error', e);
  },
});
原生组件说明
native-component
小程序中的部分组件是基于异层渲染的,由客户端创建的原生组件。
原生组件
小程序中基于异层渲染的原生组件,这些组件有:
- map
- ipc-player
- camera
- native-video
- web-view
注意事项
原生组件在开发使用时最好通过真机调试来查看,因为 Tuya MiniApp Tools 中是通过 WebView 来模拟的原生组件,所以与真机的原生组件会有些差异,因此,开发者需要在真机上查看下功能样式,确保上线后运行效果正确。
原生组件异层渲染
异层渲染是为了解决 WebView 中一些复杂组件(如地图, 视频)的渲染性能比较差的问题。异层渲染是在 WebView 层之下再渲染一层 Native 层,通过配合通信来达到目的。

在上层的 WebView 层我们会空出一个区域让视觉穿透到下面的 Native 层,另外如果是覆盖在上面的元素,我们通过计算来获取到热区的占位区域。然后是经过计算来分发事件。

原生组件的使用限制
由于异层渲染模式下,页面分为上下两层,上层是 WebView 层渲染 WebView 组件节点及其子节点,下层是 Native 层渲染原生组件,因此在使用时有以下限制:
- 基于异层渲染的原生组件及其父节点不能设置背景色、背景图等, 如果设置则会导致底层原生视图被遮挡。
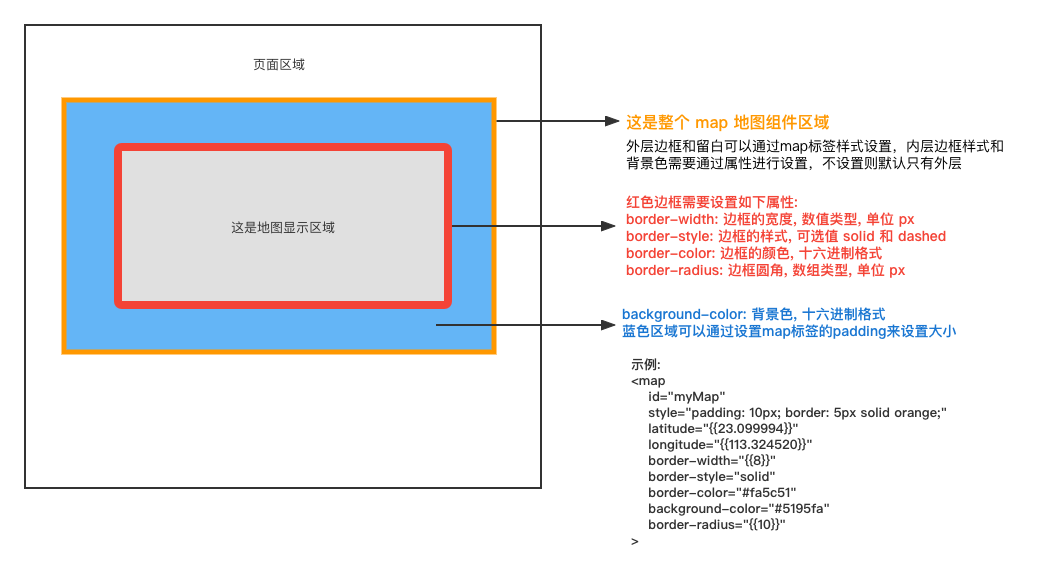
- 如果需要设置背景色和边框,请通过
background-color和border相关属性进行设置,请参考下图以<map/>组件为例进行样式设置。因为原生组件区域是由 Natvie 层原生渲染的,所以背景色和边框样式需要传给 Native 层由原生来处理渲染。原生组件可设置的样式属性如下:
| 属性名 | 类型 | 默认值 | 必填 | 说明 |
|---|---|---|---|---|
| border-width | number | 0 | 否 | 边框的宽度, 单位 px |
| border-style | string | solid | 否 | 边框的样式, 可选值: solid 和 dashed |
| border-color | string | #ffffff | 否 | 边框的颜色, 必须为十六进制格式 |
| border-radius | number | 0 | 否 | 边框的圆角, 单位 px |
| border-radius-top-left | number | 否 | 边框的左上角圆角大小, 单位 px | |
| border-radius-top-right | number | 否 | 边框的右上角圆角大小, 单位 px | |
| border-radius-bottom-left | number | 否 | 边框的左下角圆角大小, 单位 px | |
| border-radius-bottom-right | number | 否 | 边框的右下角圆角大小, 单位 px | |
| background-color | string | #ffffff | 否 | 背景颜色, 必须为十六进制格式 |
- 需要覆盖在地图上的节点必须作为原生组件的子节点,弹窗类型除外。因为只有原生组件的子节点会作为异层渲染的热区,热区内的手势事件由 WebView 层接管,原生组件标签内除热区外的其它区域手势事件都由 Native 层处理,原生组件标签外的节点不会作为热区,这样覆盖到原生组件上的 WebView 手势就会失效。
- 需要覆盖在地图上并且需要监听手势事件的弹窗,在显示时需要调用 ty.nativeDisabled(true) 使地图不接管手势事件,在收起时需要调用 ty.nativeDisabled(false) 使地图继续接管手势事件。因为弹窗是在显示和隐藏之间切换,调用手势接管 API 来控制,这样会减少对弹窗热区的监听,性能比作为原生组件子节点热区会好。
- 需要修改布局样式或者是通过 ty:if 切换显示隐藏时,需要把变化的属性加在原生组件本身才能生效,因为原生组件只有在自身组件上的属性发生变化才会发送消息到 Native 层,触发 Native 层视图同步变化。
- 不能将原生组件放在局部滚动区域中,外层不能嵌套如
scroll-view、swiper等可滚动的组件。因为 Native 层无法监听到局部滚动事件,无法实时更新组件视图位置。
cover-view
为了解决覆盖在原生组件之上的其它组件手势被原生拦截的限制。小程序专门提供了 cover-view 组件,可以覆盖在部分原生组件上面。