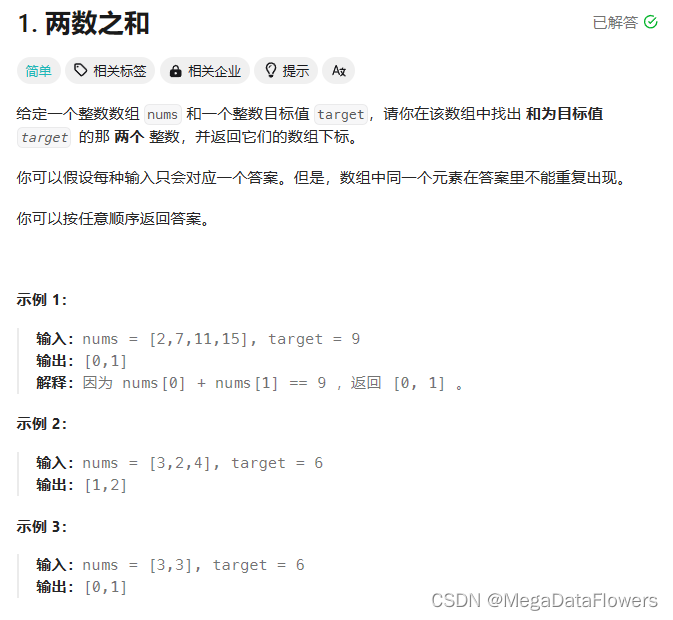
查看命令帮助
[root@Linux01 ~]# virsh -h

——————————————————————————————————————————
查看KVM的配置文件存放目录〈test01 , xml是虚拟机系统实例的配置文件)
[root@Linux01 ~]# ls /etc/libvirt/qemu
——————————————————————————————————————————
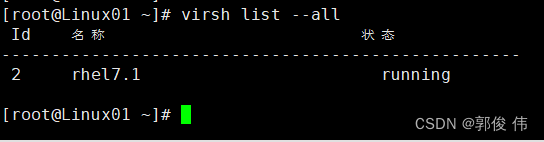
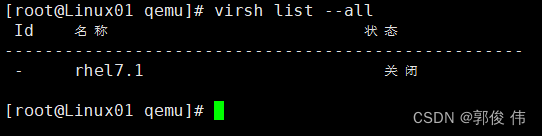
查看虚拟机状态
[root@Linux01 ~]# virsh list --all
———————————————————————————————————————————
虚拟机关机与开机
[root@Linux01 ~]# virsh shutdown rhel7.1    //关机

[root@Linux01 ~]# virsh start rhel7.1    //开机


——————————————————————————————————————————
强制实例系统关闭电源
[root@Linux01 ~]# virsh destroy rhel7.1 //强制关机————————————————————————————————————————
通过配置文件启动虚拟机系统实例
[root@Linux01 ~]# virsh create /etc/libvirt/qemu/rhel7.1.xml

———————————————————————————————————————————
挂起虚拟机
[root@Linux01 ~]# virsh suspend rhel7.1 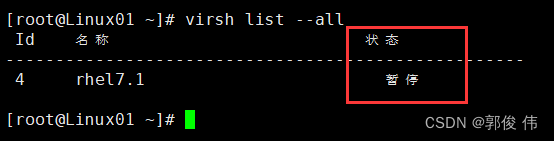
——————————————————————————————————————————
恢复虚拟机
[root@Linux01 ~]# virsh resume rhel7.1
——————————————————————————————————————————
配置虚拟机实例伴随宿主机自动启动
[root@Linux01 ~]# virsh autostart rhel7.1
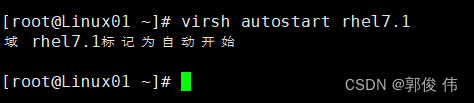
———————————————————————————————————————————
上述命令将创建/etc/libvirt / qemu/ autostart/虽录.目录内容为开机自动启动的系统。10)导出虚拟机配置
[root@Linux01 ~]# virsh dumpxml rhel7.1 > /etc/libvirt/qemu/rhl7.2.xml


[root@Linux01 ~]# cd /etc/libvirt/qemu/
[root@Linux01 qemu]# ls
autostart  networks  rhel7.1.xml  rhl7.2.xml

——————————————————————————————————————————
虚拟机的删除与添加
[root@Linux01 ~]# virsh shutdown rhel7.1    //关闭虚拟机

[root@Linux01 ~]# virsh undefine rhel7.1     //删除虚拟机

ls /etc/libvirt/qemu     //查看删除结果
——————————————————————————————————————————
通过“virsh list --all”查看不到test01的信息.说明此虚拟机被删除。
[root@Linux01 ~]# virsh list --all

——————————————————————————————————————————
通过备份的配置文件重新定义虚拟机:
[root@Linux01 ~]# cd /etc/libvirt/qemu/
[root@Linux01 qemu]# mv rhl7.2.xml rhl7.1.xml 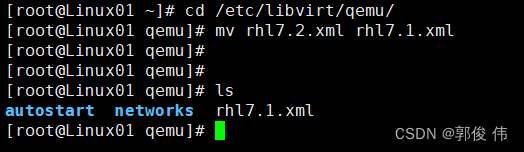
——————————————————————————————————————————-
重新定义虚拟机
[root@Linux01 qemu]# virsh define rhl7.1.xml 
从新查看虚拟机
——————————————————————————————————————————
从新启动并查看虚拟机的状态

——————————————————————————————————————
修改虚拟机配置信息(用来修改系统内存大小、磁盘文件等信息)直接通过vim命令修改:
[root@Linux01 ~]# vim /etc/libvirt/qemu/rhel7.1.xml

或者

[root@Linux01 ~]# virsh edit rhel7.1 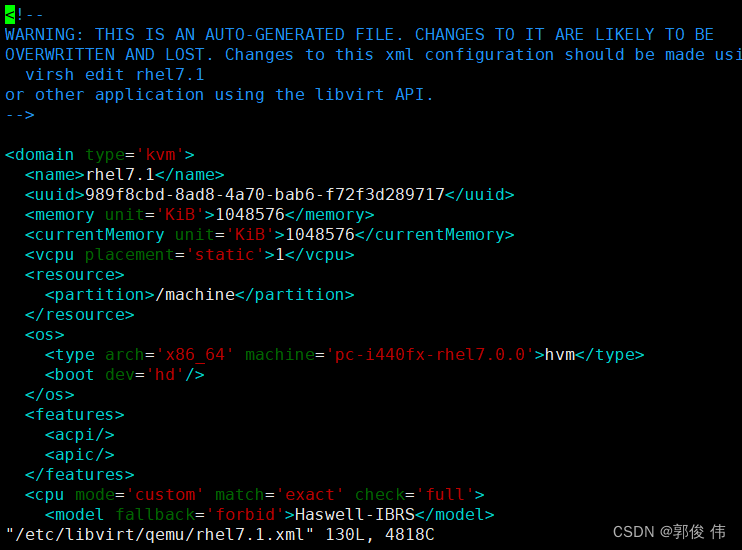
——————————————————————————————————————————
KVM 文件管理
通过文件管理可以直接查看.修改.复制虚拟机的内部文件。例如,当系统因为配置问题无法启动时,可以直接修改虚拟机的文件。虚拟机磁盘文件有raw、qcow2与qed格式,KVM虚拟机默认使用qcow2格式。这里介绍本地YUM安装libguestfs—tools后产生的命令行工具,这个工具可以直接读取qcow2格式的磁盘文件.
[root@Linux01 ~]# mount /dev/cdrom /mnt
mount: /dev/sr0 写保护,将以只读方式挂载
[root@Linux01 ~]# yum -y install libguestfs-tools

——————————————————————————————————————————
查看虚拟机磁盘信息
[root@Linux01 ~]# virt-df -h rhel7.1
——————————————————————————————————————————
克隆 虚拟机
[root@Linux01 ~]# virt-clone -o rhel7.1 -n rhel7.2 -f /root/data_kvm/storage/bdqn_kvm_2.qcow2
——————————————————————————————————————————
克隆完成查看虚拟机状态

——————————————————————————————————————————
虚拟机快照
[root@Linux01 ~]# virsh snapshot-create rhel7.1
——————————————————————————————————————————
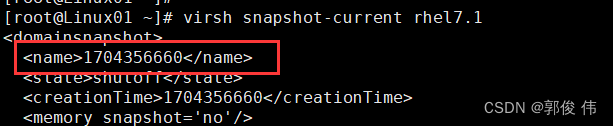
查看快照版本信息
[root@Linux01 ~]# virsh snapshot-current rhel7.1
——————————————————————————————————————
查看快照信息
[root@Linux01 ~]# virsh snapshot-list rhel7.1
——————————————————————————————————————————
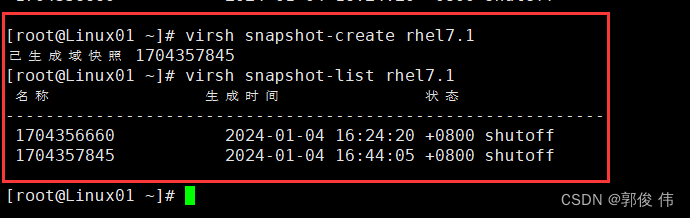
再次创建快照 和查看快照信息
[root@Linux01 ~]# virsh snapshot-create rhel7.1

[root@Linux01 ~]# virsh snapshot-list rhel7.1
———————————————————————————————————————————
恢复虚拟机快照 1704357845
[root@Linux01 ~]# virsh snapshot-revert rhel7.1 1704357845
![]()
——————————————————————————————————————————
删除虚拟机快照
[root@Linux01 ~]# virsh snapshot-delete rhel7.1 1704356660


[root@Linux01 ~]# virsh snapshot-delete rhel7.1 1704357845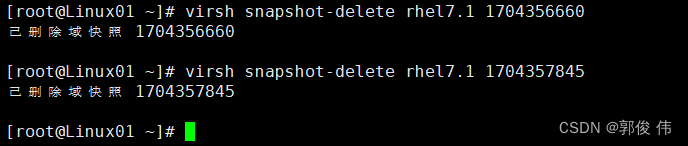
![[一文详解]Base64编码,Url Base64编码,UrlEncode编码,你还傻傻分不清吗?](https://img-blog.csdnimg.cn/a60b6be0f2274ce093ef2ee2b336397a.png?x-oss-process=image/watermark,type_ZHJvaWRzYW5zZmFsbGJhY2s,shadow_50,text_Q1NETiBAQ2Fyc29uJ3MgIGJsb2c=,size_20,color_FFFFFF,t_70,g_se,x_16)