@[TOC](EOS链Ubuntu环境Install Prebuilt Binaries(安装预构建的二进制文件)的安装)
EOS官网:https://eos.io/
第一步
Ubuntu安装命令:
以下有两种安装方式,可以任选其一:
本文章已经上传绑定资源,也可以用命令安装。
1.wget https://github.com/eosio/eos/releases/download/v2.1.0/eosio_2.1.0-1-ubuntu-20.04_amd64.deb
2.sudo apt install ./eosio_2.1.0-1-ubuntu-20.04_amd64.deb
第二步:
需安装依赖文件
1.libssl1.1
本文章已经上传绑定资源,也可以用命令安装。
第一步:echo "deb http://security.ubuntu.com/ubuntu focal-security main" | sudo tee /etc/apt/sources.list.d/focal-security.list
第二步:sudo apt-get update
第三步:sudo apt-get install libssl1.1
如果直接用deb,那就需要
dpkg -i libssl1.1_1.1.1f-1ubuntu2_amd64.deb
2.libicu66
本文章已经上传绑定资源,也可以用命令安装或自行下载
下载链接:
https://mirrors.edge.kernel.org/ubuntu/pool/main/i/icu/
dpkg -i libicu66_66.1-2ubuntu2.1_amd64.deb
第三步
我们的libssl1.1与libicu66依赖安装好后,就可以安装eosio_2.1.0-1-ubuntu-20.04_amd64.deb了
dpkg -i eosio_2.1.0-1-ubuntu-20.04_amd64.deb
安装完毕后,EOS的文件就在该路径下:
/usr/opt/eosio/[version-string]/bin
也可以直接访问官网查看后续的操作等。
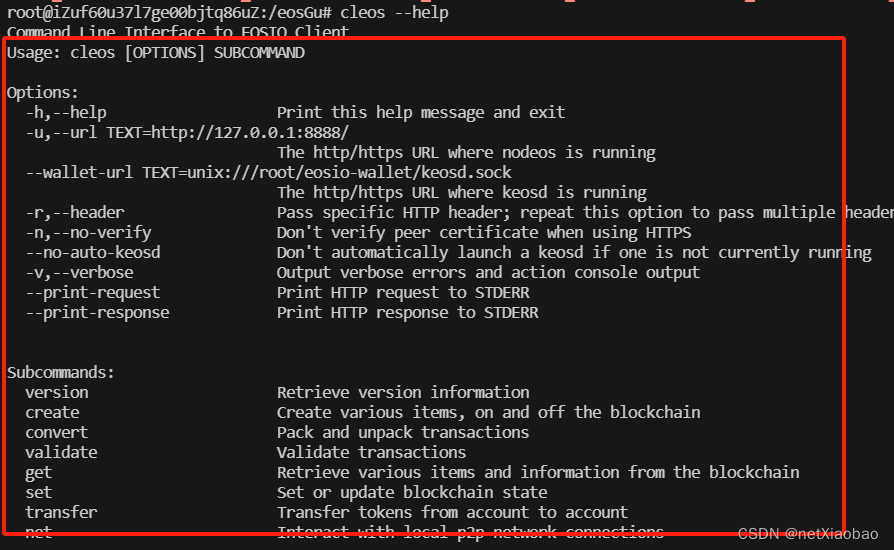
安装好后测试使用
![HLS 2017.4 导出 RTL 报错:ERROR: [IMPL 213-28] Failed to generate IP.](https://img-blog.csdnimg.cn/direct/dd34ed34b085400ca264f79a55f172e7.png)


![Python开发环境[PycharmEclipseAnaconda]](https://img-blog.csdnimg.cn/20190609013619110.png?x-oss-process=image/watermark,type_ZmFuZ3poZW5naGVpdGk,shadow_10,text_aHR0cHM6Ly9ibG9nLmNzZG4ubmV0L2Rhd2VpX3lhbmcwMDAwMDA=,size_16,color_FFFFFF,t_70)