参考资料
- CI/CD workshop for Amazon ECS
- Tutorial: Create a pipeline with an Amazon ECR source and ECS-to-CodeDeploy deployment
- Amazon ECS 计算平台上的部署
- CodeDeploy AppSpec 文件引用
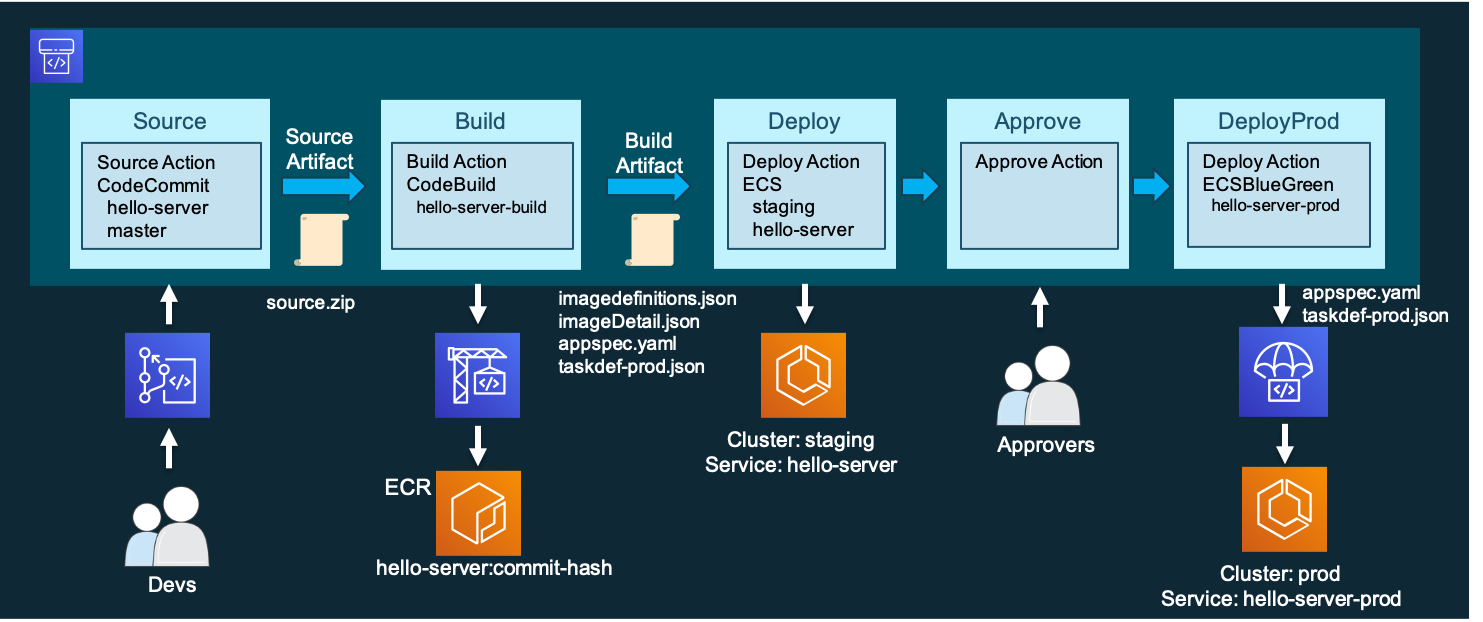
之前的文章介绍了通过codepipeline对ecs服务进行滚动更新,本文主要介绍通过codepipeline创建ecs蓝绿部署的过程
蓝绿部署的好处
-
在将生产流量路由到新部署的环境之前对其进行测试。
-
支持从旧版本立即切换到新版本,避免在使用就地滚动更新时可能出现的任何不一致。
-
如果在新版本启动后检测到问题,将启用即时回滚到以前的版本。
本次涉及到的资源
git clone https://github.com/aws-samples/cicd-for-ecs-workshop-code.git
检查开启container insight功能
aws ecs put-account-setting-default --name containerInsights --value enabled
aws ecs list-account-settings --effective-settings --name containerInsights
确保服务相关角色存在
aws iam get-role --role-name "AWSServiceRoleForElasticLoadBalancing" || aws iam create-service-linked-role --aws-service-name "elasticloadbalancing.amazonaws.com"
aws iam get-role --role-name "AWSServiceRoleForECS" || aws iam create-service-linked-role --aws-service-name "ecs.amazonaws.com"
部署项目创建逻辑如下
- 创建codecommit
- 推送web server
- 创建codepipeline,添加source阶段为codecommit
- 添加build阶段,创建codebuild项目构建image并推送到ecr
- 添加deploy阶段,创建ecs蓝绿部署部署组
创建 ecs 蓝绿部署
web server以及dockerfile
cat > server.js << EOF
'use strict'

const greeting = "Hi there is hello-servre blue green !"  // Change this line to change your greeting

const port = (typeof process.env.PORT !== 'undefined')
  ? process.env.PORT
  : '80'

const express = require('express')
const bodyParser = require('body-parser')

const app = express()
app.use(bodyParser.json())
app.use(bodyParser.urlencoded({extended: true}))

// Constants
const host = '0.0.0.0';

function format(o, pretty) {
  return (pretty)
    ? JSON.stringify(o, null, 2) + '\n'
    : JSON.stringify(o);
}

app.get('/hello/:name', (req, res) => {
  var name = req.params.name
  let timestamp = Date.now()
  res.send(greeting + " " + name + "<br>\n<i>" + timestamp + "</i>\n")
})
app.get('/ping', (req, res) => {
  res.send("ok")
})

const server = app.listen(port, host);
console.log(`Service running on http://${host}:${port}`)

process.on('SIGTERM', () => {
  console.info('SIGTERM signal received.');
  console.log('Closing http server.');
  server.close(() => {
    console.log('Http server closed.');
    process.exit(0);
  })
})
EOF
cat > package.json << EOF
{
  "name": "hello-server",
  "version": "1.0.0",
  "description": "Simple server that says hello to a named person",
  "author": "Mike Rizzo <michariz@amazon.co.uk>",
  "license": "MIT",
  "main": "server.js",
  "scripts": {
    "start": "node server.js"
  },
  "dependencies": {
    "body-parser": "^1.19.0",
    "express": "^4.17.1"
  }
}
EOF
cat > Dockerfile << EOF
FROM node:buster-slim
WORKDIR /usr/src/app
COPY package*.json ./
RUN npm install
COPY . .
EXPOSE 80
CMD ["node", "server.js"]
EOF
通过任务定义创建任务,这里需要随便指定一个image就行
cat > taskdef-prod.json << EOF
{
  "family": "hello-server-prod",
  "networkMode": "bridge",
  "memory": "256",
  "requiresCompatibilities": [
    "EC2"
  ],
  "containerDefinitions": [
    {
      "name": "hello-server",
      "image": "xxxxxx.dkr.ecr.cn-north-1.amazonaws.com.cn/hello-server",
      "logConfiguration": {
        "logDriver": "awslogs",
        "options": {
          "awslogs-group": "/ecs/hello-server-prod",
          "awslogs-region": "cn-north-1",
          "awslogs-stream-prefix": "ecs"
        }
      },
      "portMappings": [
        {
          "containerPort": 80,
          "protocol": "tcp"
        }
      ],
      "essential": true
    }
  ]
}
EOF
aws ecs register-task-definition --cli-input-json file://taskdef-prod.json
创建 ecs 服务,服务绑定目标组,指定deploymentController类型为CODE_DEPLOY
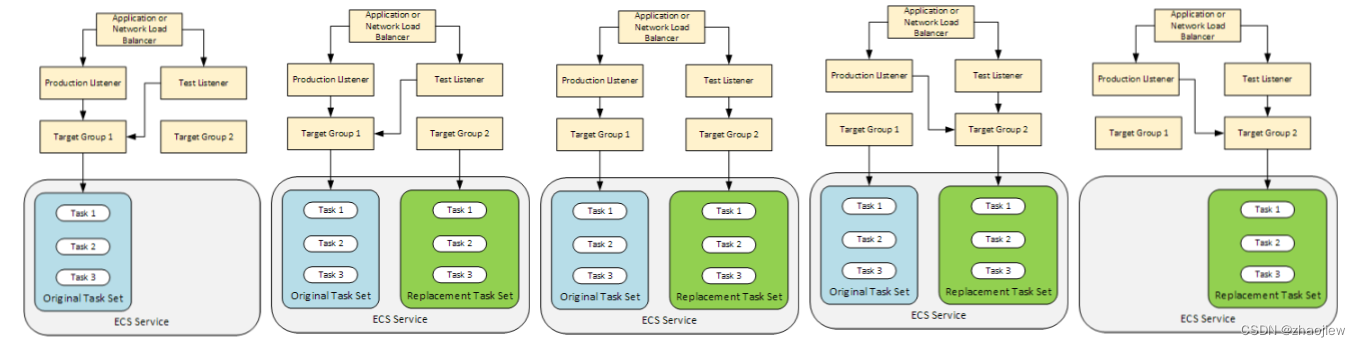
侦听器 由负载均衡器用于将流量定向到目标组。必须提供一个生产侦听器。您可以指定可选的第二个测试侦听器,在您运行验证测试时该侦听器可以将流量定向到替换任务集
目标组 用于将流量路由到一个注册目标。Amazon ECS 部署需要两个目标组:一个用于您的 Amazon ECS 应用程序的原始任务集,另一个用于替换任务集。在部署期间,CodeDeploy 会创建替换任务集,并将流量从原始任务集重新路由到新的任务集
cat > service-prod.json << EOF
{
    "taskDefinition": "hello-server-prod:1",
    "cluster": "worktest",
    "loadBalancers": [
        {
            "targetGroupArn": "arn:aws-cn:elasticloadbalancing:cn-north-1:xxxxxxxxxx:targetgroup/test-deploy-ecs-blue/86c5601b7042a987",
            "containerName": "hello-server",
            "containerPort": 80
        }
    ],
    "desiredCount": 3,
    "launchType": "EC2",
    "schedulingStrategy": "REPLICA",
    "deploymentController": {
        "type": "CODE_DEPLOY"
    },
    "healthCheckGracePeriodSeconds": 8
}
EOF
aws ecs create-service --cli-input-json file://service-prod.json
构建image的过程和ecs滚动更新的项目没有区别, 区别在于post_build阶段的输出文件增加了imageDetail.json
Image definitions file reference
cat > buildspec.yml << EOF
version: 0.2
env:
  exported-variables:
    - AWS_DEFAULT_REGION
phases:
  # install:
  #   runtime-versions:
  #     docker: 18
  pre_build:
    commands:
      - echo Logging in to Amazon ECR...
      - aws --version
      - $(aws ecr get-login --region $AWS_DEFAULT_REGION --no-include-email)
      - REPOSITORY_URI=xxxxxxxxxx.dkr.ecr.cn-north-1.amazonaws.com.cn/hello-server-bluegreen
      - COMMIT_HASH=$(echo $CODEBUILD_RESOLVED_SOURCE_VERSION | cut -c 1-7)
      - IMAGE_TAG=${COMMIT_HASH:=latest}
  build:
    commands:
      - echo Build started on `date`
      - echo Building the Docker image...
      - docker build -t $REPOSITORY_URI:latest .
      - docker tag $REPOSITORY_URI:latest $REPOSITORY_URI:$IMAGE_TAG
  post_build:
    commands:
      - echo Build completed on `date`
      - echo Pushing the Docker images...
      - docker push $REPOSITORY_URI:latest
      - docker push $REPOSITORY_URI:$IMAGE_TAG
      - echo Writing image definitions file...
      - printf '{"ImageURI":"%s"}' $REPOSITORY_URI:$IMAGE_TAG > imageDetail.json
      - cat imagedefinitions.json
      - cat imageDetail.json
artifacts:
  files:
    - imageDetail.json
    - appspec.yaml
    - taskdef-prod.json
EOF
buildspec.yaml中输出的taksdef-prod.json
注意:“image”: “<IMAGE_NAME>” 等待动态填充
$ cat taskdef-prod.json
{
  "family": "hello-server-prod",
  "networkMode": "bridge",
  "memory": "256",
  "requiresCompatibilities": [
    "EC2"
  ],
  "containerDefinitions": [
    {
      "name": "hello-server",
      "image": "<IMAGE_NAME>",
      "logConfiguration": {
        "logDriver": "awslogs",
        "options": {
          "awslogs-group": "/ecs/hello-server-prod",
          "awslogs-region": "cn-north-1",
          "awslogs-stream-prefix": "ecs"
        }
      },
      "portMappings": [
        {
          "containerPort": 80,
          "protocol": "tcp"
        }
      ],
      "essential": true
    }
  ]
}
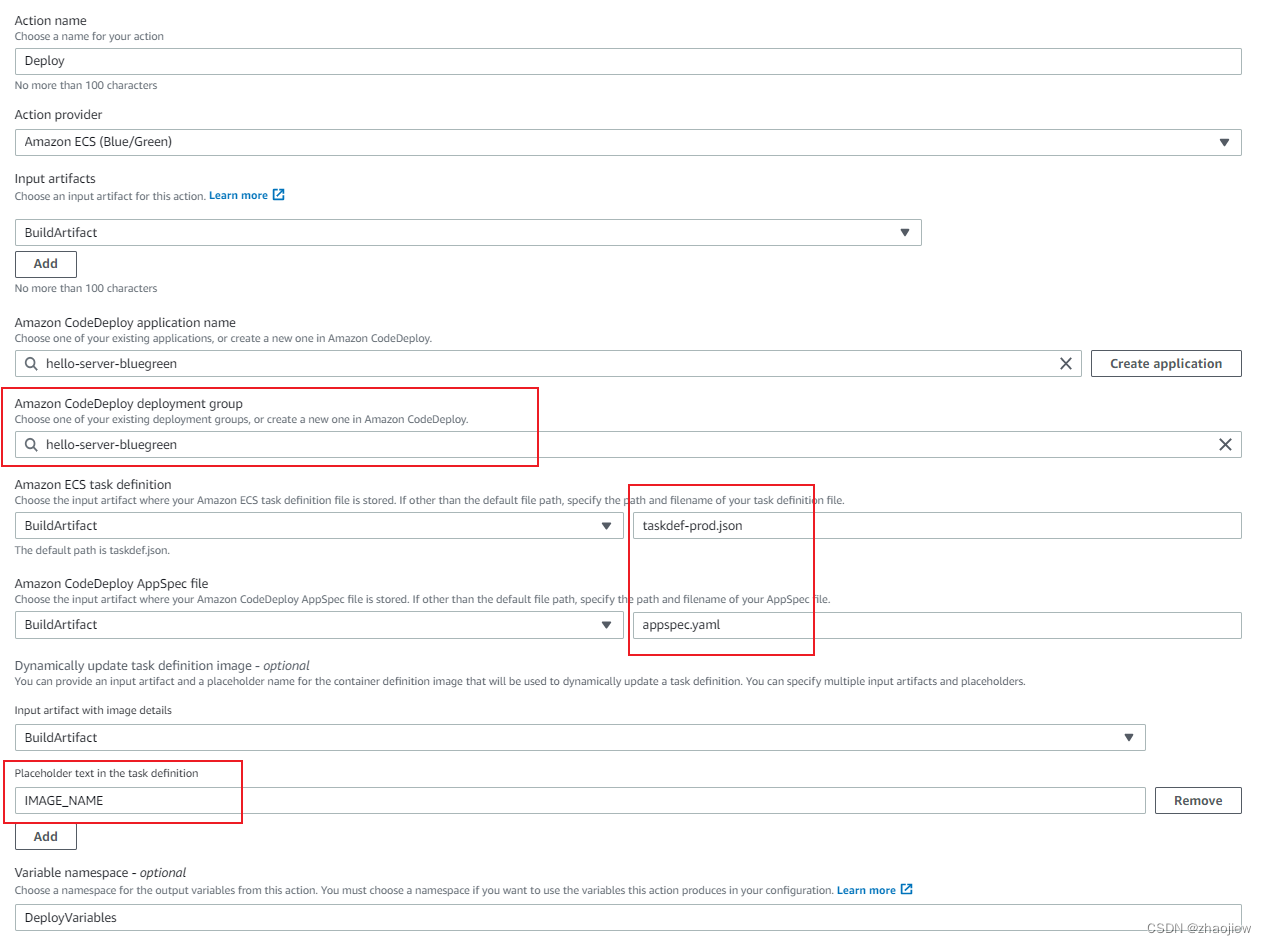
查看codepipeline的deploy阶段配置
填充的内容包括deploy应用和部署组,同时需要填写build阶段输出文件中的参数,以便于动态填充
buildspec.yaml中输出的appspec.yaml
对于
TaskDefinition,请勿更改<TASK_DEFINITION>占位符文本。此值会在管道运行时进行更新。
cat > appspec.yaml << EOF
version: 0.0
Resources:
  - TargetService:
      Type: AWS::ECS::Service
      Properties:
        TaskDefinition: <TASK_DEFINITION>
        LoadBalancerInfo:
          ContainerName: "hello-server"
          ContainerPort: 80
EOF
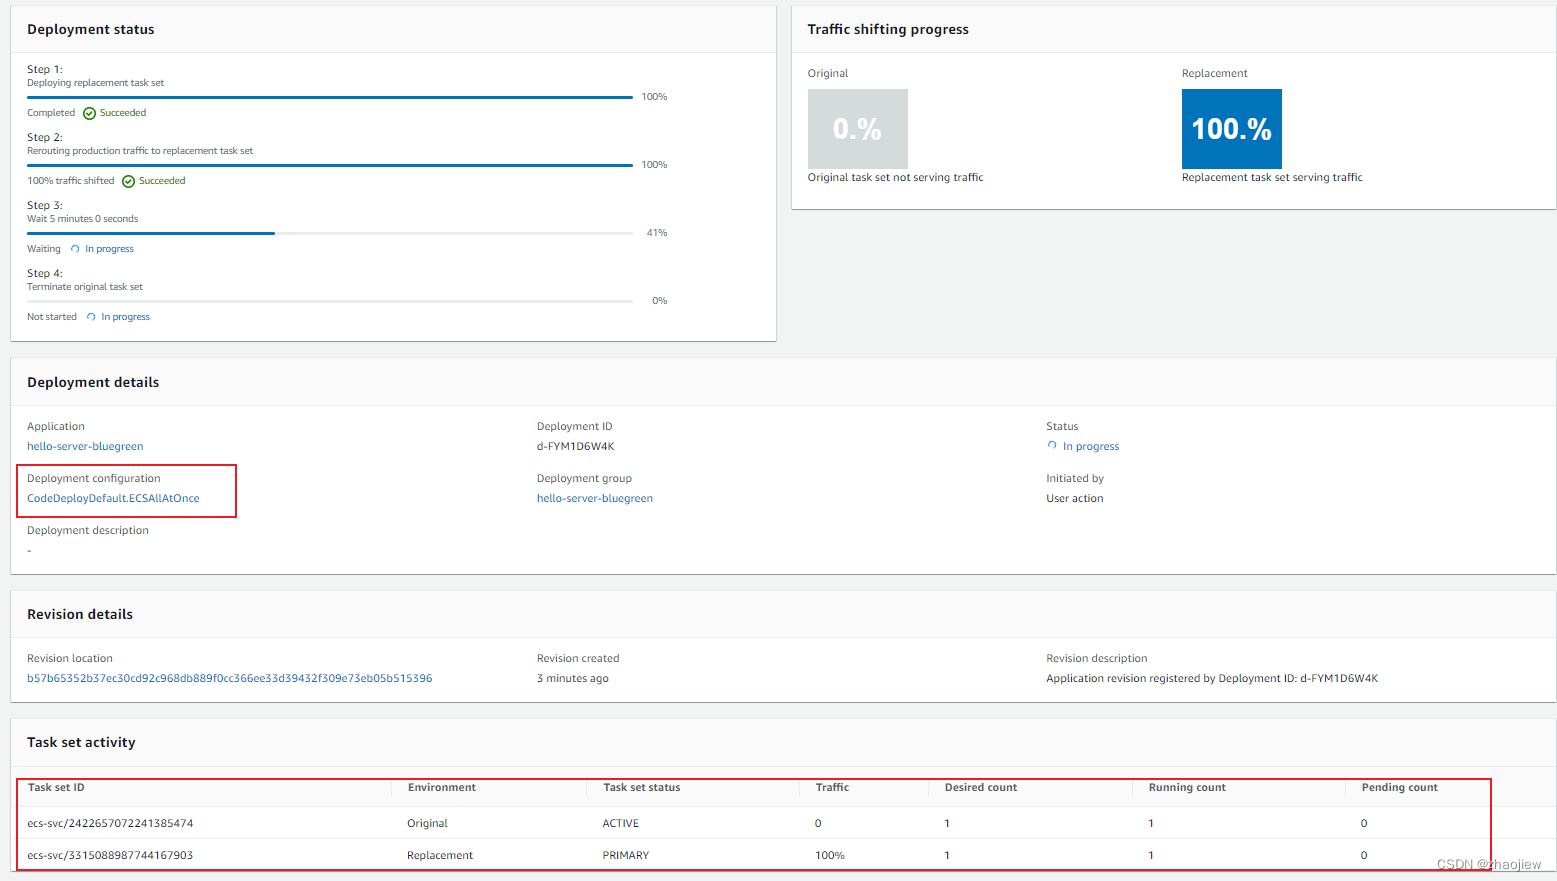
ecs控制台的部署过程
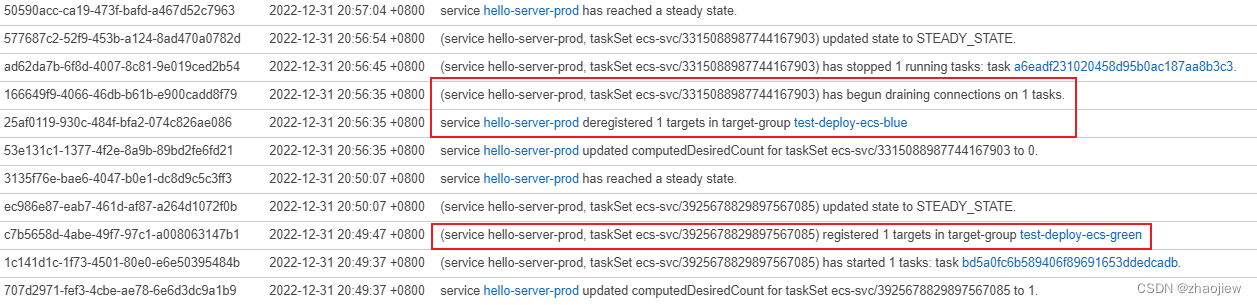
ecs部署配置有以下几个,示例中一次性转移所有流量
- Canary:流量在两次增量中转移。可以设定时间间隔
- Linear:流量使用相等的增量转移,在每次递增之间间隔的分钟数相同。
- AllAtOnce:所有流量均从原始 Amazon ECS 任务集一次性地转移到更新后的 Amazon ECS 任务集。
完整的生命周期如下
| Lifecycle event | Lifecycle event action |
|---|---|
BeforeInstall (a hook for Lambda functions) | Run Lambda functions. |
| Install | Set up the replacement task set. |
AfterInstall (a hook for Lambda functions) | Run Lambda functions. |
| AllowTestTraffic | Route traffic from the test listener to target group 2. |
AfterAllowTestTraffic (a hook for Lambda functions) | Run Lambda functions. |
BeforeAllowTraffic (a hook for Lambda functions) | Run Lambda functions. |
| AllowTraffic | Route traffic from the production listener to target group 2. |
AfterAllowTraffic | Run Lambda functions. |
由于没有指定测试监听器,因此本次不会触发测试阶段


添加测试监听器
通过在codedeploy部署组配置中指定测试监听器,能够在切换蓝/绿组使替换生效之前,验证测试端口上的新(替换)任务集
添加测试阶段后,完整的ecs蓝绿部署过程如下:
修改部署组配置,增加测试监听器

nodejs创建的lambda测试函数
const aws = require('aws-sdk');
const codedeploy = new aws.CodeDeploy({apiVersion: '2014-10-06'});

exports.handler = (event, context, callback) => {
    console.log(event)
    var deploymentId = event.DeploymentId;
    var lifecycleEventHookExecutionId = event.LifecycleEventHookExecutionId;

    /*
     Enter validation tests here.
    */

    var params = {
        deploymentId: deploymentId,
        lifecycleEventHookExecutionId: lifecycleEventHookExecutionId,
        status: 'Succeeded' // status can be 'Succeeded' or 'Failed'
    };

    codedeploy.putLifecycleEventHookExecutionStatus(params, function(err, data) {
        if (err) {
            console.log(err, err.stack);
            // Validation failed.
            callback('Validation test failed');
        } else {
            console.log(data);
            // Validation succeeded.
            callback(null, 'Validation test succeeded');
        }
    });
};
修改appspec.yaml增加hook,test-ecs-bluegreen为lambda函数的名称
cat appspec.yaml
version: 0.0
Resources:
  - TargetService:
      Type: AWS::ECS::Service
      Properties:
        TaskDefinition: <TASK_DEFINITION>
        LoadBalancerInfo:
          ContainerName: "hello-server"
          ContainerPort: 80
Hooks:
  - BeforeAllowTraffic: "test-ecs-bluegreen"
重新git push提交之后触发pipeline,在codedeploy阶段意料之中会卡在BeforeAllowTraffic,转而去执行lambda测试

在lambda调用的cloudwatch log中查看具体的事件内容
{
  "DeploymentId": "d-4VQ95PY4K",
  "LifecycleEventHookExecutionId": "eyJlbmNyeXB0ZWREYXRhIjoid1dEUngzbkU5RjRwZC9PNTIzNzhVTUZyRDhRNnk4ZnlhVi9MYXZJRWE5S1RKRXBUdWN1SUhhSmgvOW1OU0t2NzZsbnpFNDlGdDczVE5BN0JWNlhFRlIvekQycGpvanFPU3RhQWVyM0l4VDlRQ0Fsb3BJNVpoQ2JsRWlUa2JuSTd5UTRldWcraWhRPT0iLCJpdlBhcmFtZXRlclNwZWMiOiJiWDNRSWJqSFZTK2swMUZKIiwibWF0ZXJpYWxTZXRTZXJpYWwiOjF9"
}
lambda中出现以下报错,lambda需要配置执行角色
AccessDeniedException: User: arn:aws-cn:sts::xxxxxxxxxx:assumed-role/test-ecs-bluegreen-role-jsj5bg7k/test-ecs-bluegreen is not authorized to perform: codedeploy:PutLifecycleEventHookExecutionStatus on resource: arn:aws-cn:codedeploy:cn-north-1:xxxxxxxxxx:deploymentgroup:hello-server-bluegreen/hello-server-bluegreen because no identity-based policy allows the codedeploy:PutLifecycleEventHookExecutionStatus action
索性手动发送api通过
aws deploy put-lifecycle-event-hook-execution-status --deployment-id d-4VQ95PY4K --lifecycle-event-hook-execution-id eyJlbmNyeXB0ZWREYXRhIjoid1dEUngzbkU5RjRwZC9PNTIzNzhVTUZyRDhRNnk4ZnlhVi9MYXZJRWE5S1RKRXBUdWN1SUhhSmgvOW1OU0t2NzZsbnpFNDlGdDczVE5BN0JWNlhFRlIvekQycGpvanFPU3RhQWVyM0l4VDlRQ0Fsb3BJNVpoQ2JsRWlUa2JuSTd5UTRldWcraWhRPT0iLCJpdlBhcmFtZXRlclNwZWMiOiJiWDNRSWJqSFZTK2swMUZKIiwibWF0ZXJpYWxTZXRTZXJpYWwiOjF9 --status Succeeded
手动发送之后成功进入下一步,开始线性转移流量生产监听器的流量到green目标组
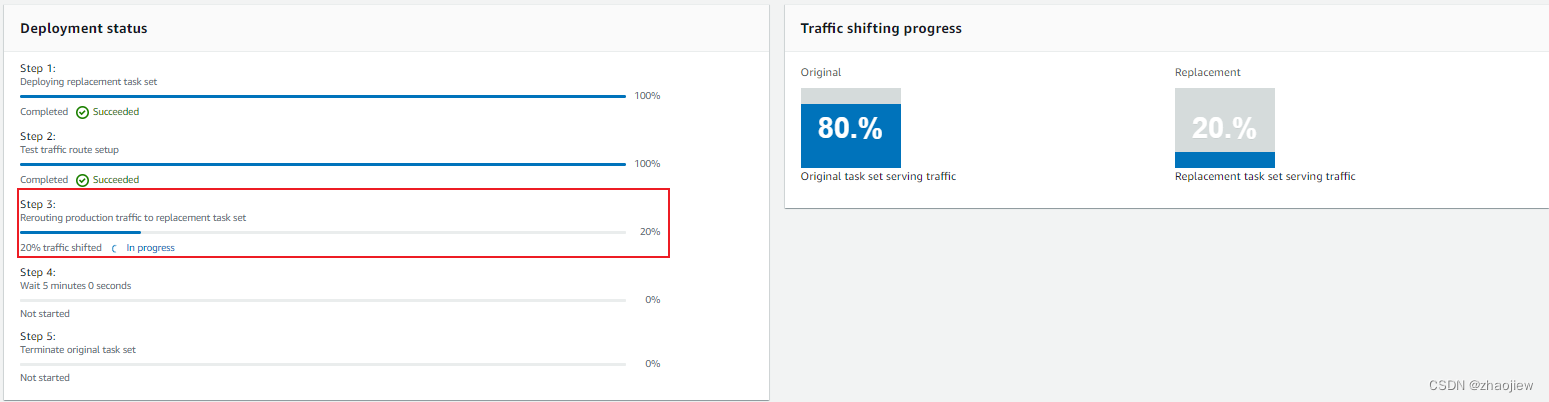
具体是通过在alb中设置权重实现的

50%时进行访问测试,结果符合预期
for i in {1..20} ;do curl http://main-alb-1897344746.cn-north-1.elb.amazonaws.com.cn:8085/hello/test ; done
Hi there is hello-servre blue green ! test lambda test<br>
<i>1672497407811</i>
Hi there is hello-servre blue green ! test lambda test test<br>
<i>1672497407920</i>
Hi there is hello-servre blue green ! test lambda test<br>
<i>1672497408026</i>
Hi there is hello-servre blue green ! test lambda test test<br>
<i>1672497408149</i>
Hi there is hello-servre blue green ! test lambda test test<br>
<i>1672497408262</i>
Hi there is hello-servre blue green ! test lambda test<br>
<i>1672497408356</i>
Hi there is hello-servre blue green ! test lambda test<br>
<i>1672497408487</i>
Hi there is hello-servre blue green ! test lambda test test<br>
<i>1672497408589</i>
Hi there is hello-servre blue green ! test lambda test test<br>
<i>1672497408671</i>