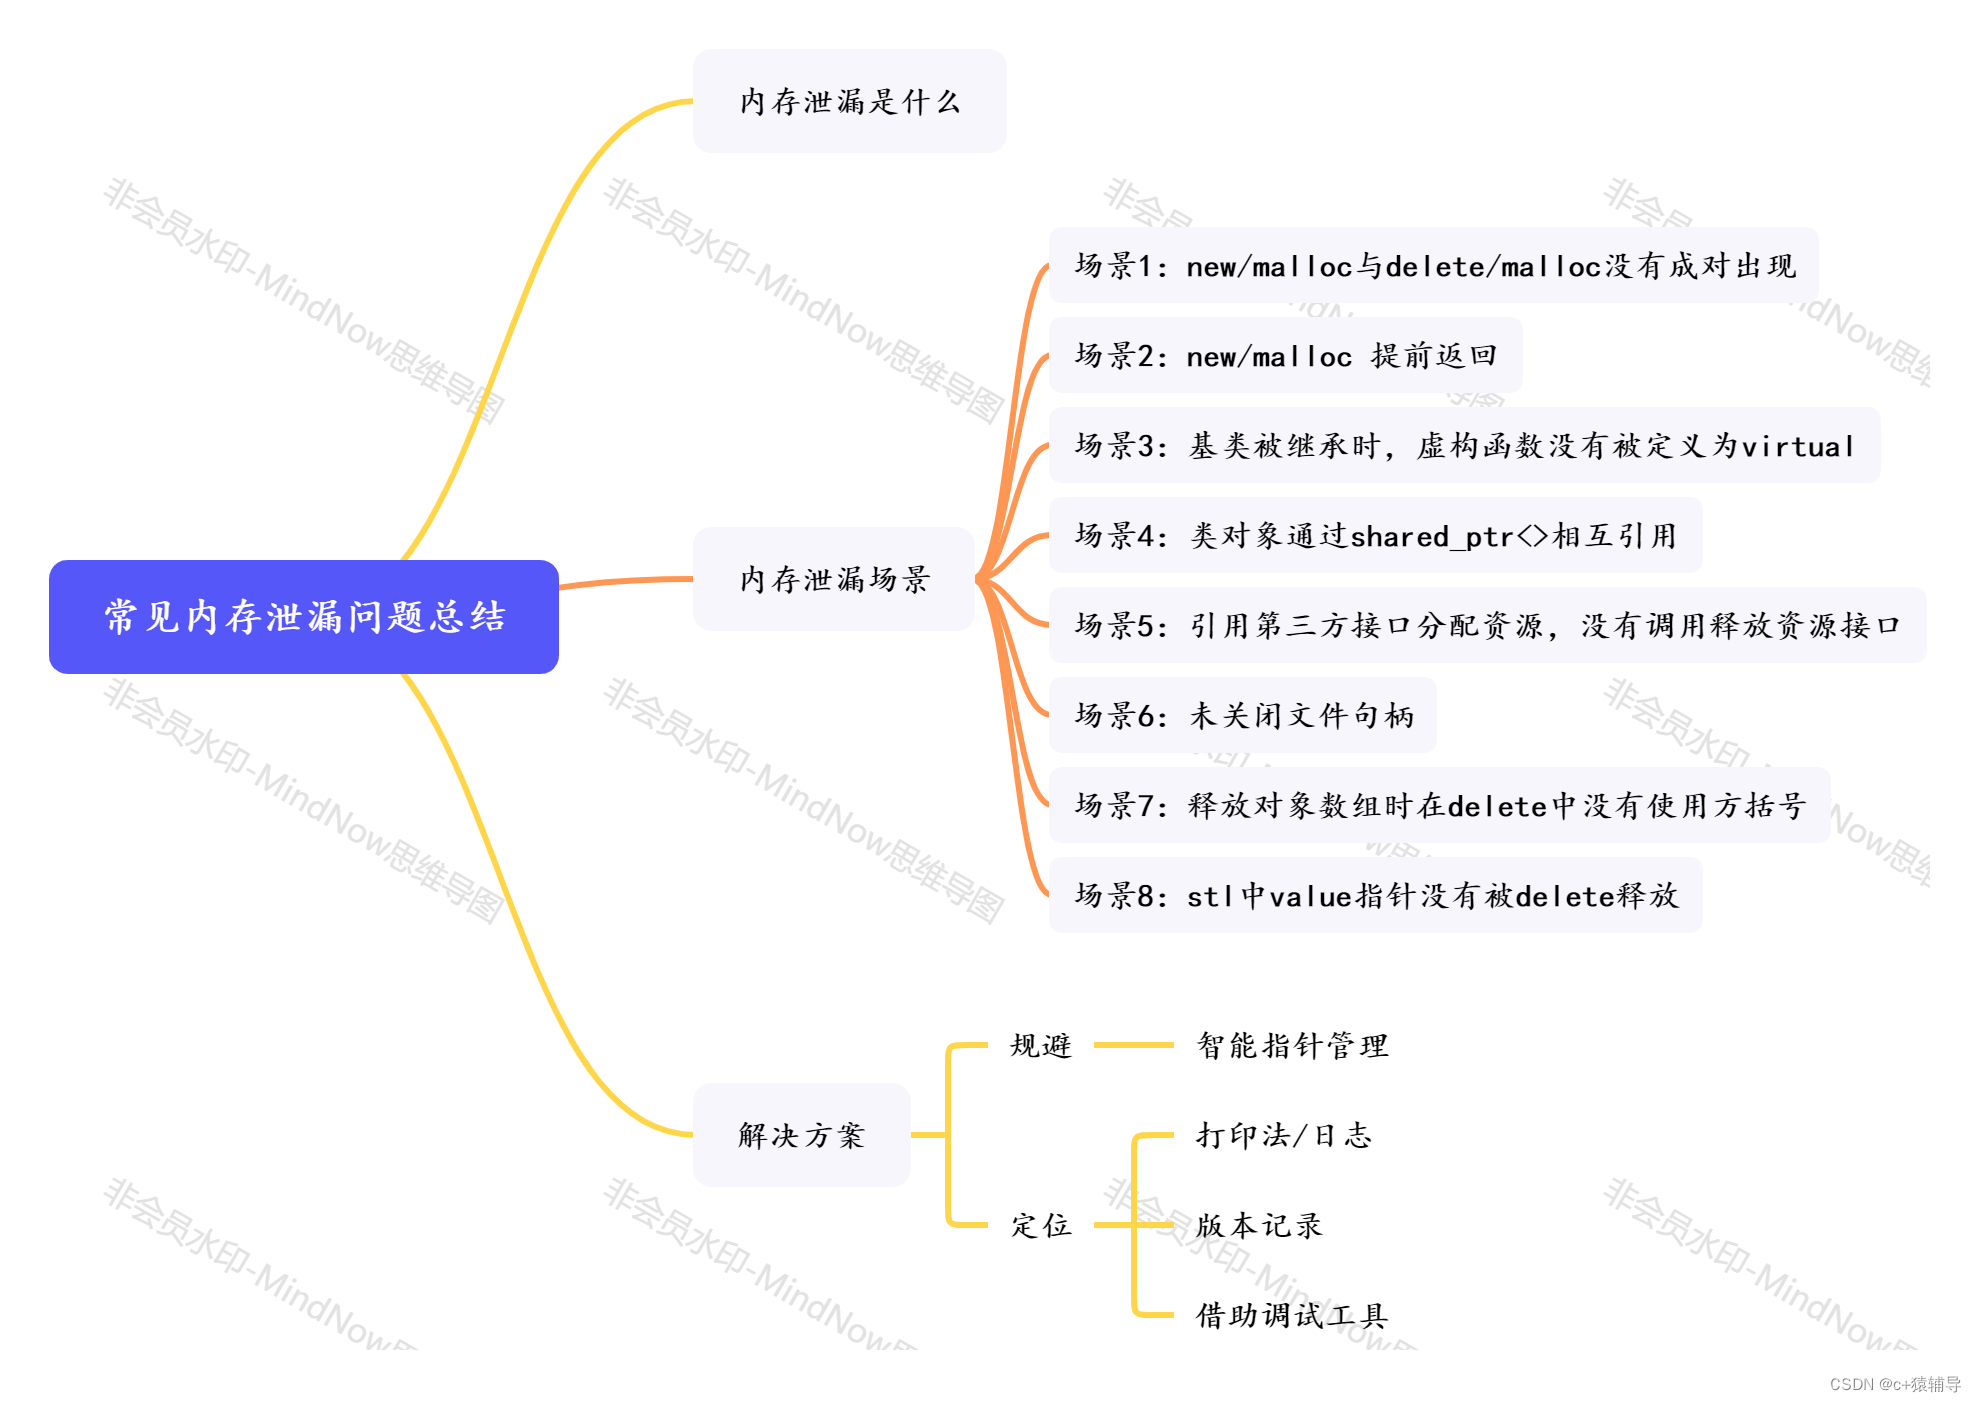
目录
- 1 REST简介
- 2 RESTful入门案例
- 2.1 环境准备
- 2.2 思路分析
- 2.3 修改RESTful风格
- 3 知识点总结
欢迎大家回到《Java教程之Spring30天快速入门》,本教程所有示例均基于Maven实现,如果您对Maven还很陌生,请移步本人的博文《如何在windows11下安装Maven并配置以及 IDEA配置Maven环境》,本文的上一篇为《SpringMVC 之 服务器响应》

1 REST简介
REST(Representational State Transfer),表现形式状态转换,它是一种软件架构风格当我们想表示一个网络资源的时候,可以使用两种方式:
- 传统风格资源描述形式
- http://localhost/user/getById?id=1 查询id为1的用户信息
- http://localhost/user/saveUser 保存用户信息
- REST风格描述形式
- http://localhost/user/1
- http://localhost/user
传统方式一般是一个请求url对应一种操作,这样做不仅麻烦,也不安全,因为会程序的人读取了你的请求url地址,就大概知道该url实现的是一个什么样的操作。
查看REST风格的描述,你会发现请求地址变的简单了,并且光看请求URL并不是很能猜出来该URL的具体功能
所以REST的优点有:
- 隐藏资源的访问行为,无法通过地址得知对资源是何种操作
- 书写简化
但是我们的问题也随之而来了,一个相同的url地址即可以是新增也可以是修改或者查询,那么到底我们该如何区分该请求到底是什么操作呢?
- 按照REST风格访问资源时使用行为动作区分对资源进行了何种操作
- http://localhost/users 查询全部用户信息 GET(查询)
- http://localhost/users/1 查询指定用户信息 GET(查询)
- http://localhost/users 添加用户信息 POST(新增/保存)
- http://localhost/users 修改用户信息 PUT(修改/更新)
- http://localhost/users/1 删除用户信息 DELETE(删除)
请求的方式比较多,但是比较常用的就4种,分别是GET , POST , PUT , DELETE。
按照不同的请求方式代表不同的操作类型。
- 发送GET请求是用来做查询
- 发送POST请求是用来做新增
- 发送PUT请求是用来做修改
- 发送DELETE请求是用来做删除
但是注意:
- 上述行为是约定方式,约定不是规范,可以打破,所以称REST风格,而不是REST规范
- REST提供了对应的架构方式,按照这种架构设计项目可以降低开发的复杂性,提高系统的可伸缩性
- REST中规定GET/POST/PUT/DELETE针对的是查询/新增/修改/删除,但是我们如果非要用GET请求做删除,这点在程序上运行是可以实现的
- 但是如果绝大多数人都遵循这种风格,你写的代码让别人读起来就有点莫名其妙了。描述模块的名称通常使用复数,也就是加s的格式描述,表示此类资源,而非单个资源,例如:users、books、accounts…
清楚了什么是REST风格后,我们后期会经常提到一个概念叫RESTful,那什么又是RESTful呢?
- 根据REST风格对资源进行访问称为RESTful。
后期我们在进行开发的过程中,大多是都是遵从REST风格来访问我们的后台服务,所以可以说咱们以后都是基于RESTful来进行开发的。
2 RESTful入门案例
2.1 环境准备
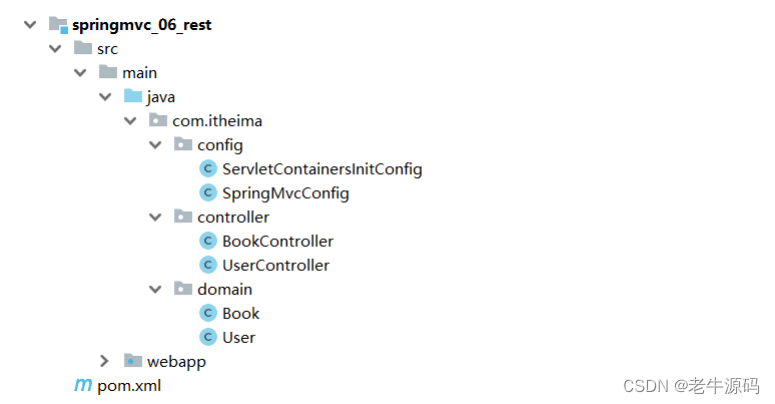
- 创建一个Web的Maven项目
- pom.xml添加Spring依赖
<?xml version="1.0" encoding="UTF-8"?>
<project xmlns="http://maven.apache.org/POM/4.0.0"
xmlns:xsi="http://www.w3.org/2001/XMLSchema-instance"
xsi:schemaLocation="http://maven.apache.org/POM/4.0.0
http://maven.apache.org/xsd/maven-4.0.0.xsd">
	<modelVersion>4.0.0</modelVersion>
	<groupId>com.itheima</groupId>
	<artifactId>springmvc_06_rest</artifactId>
	<version>1.0-SNAPSHOT</version>
	<packaging>war</packaging>
	<dependencies>
		<dependency>
			<groupId>javax.servlet</groupId>
			<artifactId>javax.servlet-api</artifactId>
			<version>3.1.0</version>
			<scope>provided</scope>
		</dependency>
		<dependency>
			<groupId>org.springframework</groupId>
			<artifactId>spring-webmvc</artifactId>
			<version>5.2.10.RELEASE</version>
		</dependency>
		<dependency>
			<groupId>com.fasterxml.jackson.core</groupId>
			<artifactId>jackson-databind</artifactId>
			<version>2.9.0</version>
		</dependency>
	</dependencies>

	<build>
		<plugins>
			<plugin>
				<groupId>org.apache.tomcat.maven</groupId>
				<artifactId>tomcat7-maven-plugin</artifactId>
				<version>2.1</version>
				<configuration>
					<port>80</port>
					<path>/</path>
				</configuration>
			</plugin>
		</plugins>
	</build>
</project>
- 创建对应的配置类
public class ServletContainersInitConfig extends AbstractAnnotationConfigDispatcherServletInitializer {
	protected Class<?>[] getRootConfigClasses() {
		return new Class[0];
	}

	protected Class<?>[] getServletConfigClasses() {
		return new Class[]{SpringMvcConfig.class};
	}

	protected String[] getServletMappings() {
		return new String[]{"/"};
	}

	//乱码处理
	 @Override
	protected Filter[] getServletFilters() {
		CharacterEncodingFilter filter = new CharacterEncodingFilter();
		filter.setEncoding("UTF-8");
		return new Filter[]{filter};
	}
}

@Configuration
@ComponentScan("com.itheima.controller")
//开启json数据类型自动转换
@EnableWebMvc
public class SpringMvcConfig {
}
- 编写模型类User和Book
public class User {
	private String name;
	private int age;
	//getter...setter...toString省略
}

public class Book {
	private String name;
	private double price;
	//getter...setter...toString省略
}
- 编写UserController和BookController
@Controller
public class UserController {
	@RequestMapping("/save")
	@ResponseBody
	public String save(@RequestBody User user) {
		System.out.println("user save..."+user);
		return "{'module':'user save'}";
	}

	@RequestMapping("/delete")
	@ResponseBody
	public String delete(Integer id) {
		System.out.println("user delete..." + id);
		return "{'module':'user delete'}";
	}

	@RequestMapping("/update")
	@ResponseBody
	public String update(@RequestBody User user) {
		System.out.println("user update..." + user);
		return "{'module':'user update'}";
	}

	@RequestMapping("/getById")
	@ResponseBody
	public String getById(Integer id) {
		System.out.println("user getById..." + id);
		return "{'module':'user getById'}";
	}

	@RequestMapping("/findAll")
	@ResponseBody
	public String getAll() {
		System.out.println("user getAll...");
		return "{'module':'user getAll'}";
	}
}


@Controller
public class BookController {

	@RequestMapping(value = "/books",method = RequestMethod.POST)
	@ResponseBody
	public String save(@RequestBody Book book){
		System.out.println("book save..." + book);
		return "{'module':'book save'}";
	}

	@RequestMapping(value = "/books/{id}",method = RequestMethod.DELETE)
	@ResponseBody
	public String delete(@PathVariable Integer id){
		System.out.println("book delete..." + id);
		return "{'module':'book delete'}";
	}

	@RequestMapping(value = "/books",method = RequestMethod.PUT)
	@ResponseBody
	public String update(@RequestBody Book book){
		System.out.println("book update..." + book);
		return "{'module':'book update'}";
	}

	@RequestMapping(value = "/books/{id}",method = RequestMethod.GET)
	@ResponseBody
	public String getById(@PathVariable Integer id){
		System.out.println("book getById..." + id);
		return "{'module':'book getById'}";
	}
	@RequestMapping(value = "/books",method = RequestMethod.GET)
	@ResponseBody
	public String getAll(){
		System.out.println("book getAll...");
		return "{'module':'book getAll'}";
	}
}
最终创建好的项目结构如下:
2.2 思路分析
需求:将之前的增删改查替换成RESTful的开发方式。
1.之前不同的请求有不同的路径,现在要将其修改为统一的请求路径
修改前: 新增: /save ,修改: /update,删除 /delete…
修改后: 增删改查: /users
2.根据GET查询、POST新增、PUT修改、DELETE删除对方法的请求方式进行限定
3.发送请求的过程中如何设置请求参数?
2.3 修改RESTful风格
新增
@Controller
public class UserController {
	//设置当前请求方法为POST,表示REST风格中的添加操作
	@RequestMapping(value = "/users",method = RequestMethod.POST)
	@ResponseBody
	public String save() {
		System.out.println("user save...");
		return "{'module':'user save'}";
	}
}
- 将请求路径更改为/users
- 访问该方法使用 POST: http://localhost/users
- 使用method属性限定该方法的访问方式为POST
- 如果发送的不是POST请求,比如发送GET请求,则会报错

删除
- 如果发送的不是POST请求,比如发送GET请求,则会报错
@Controller
public class UserController {
	//设置当前请求方法为DELETE,表示REST风格中的删除操作
	@RequestMapping(value = "/users",method = RequestMethod.DELETE)
	@ResponseBody
	public String delete(Integer id) {
		System.out.println("user delete..." + id);
		return "{'module':'user delete'}";
	}
}
- 将请求路径更改为/users
- 访问该方法使用 DELETE: http://localhost/users
访问成功,但是删除方法没有携带所要删除数据的id,所以针对RESTful的开发,如何携带数据参数?
传递路径参数
前端发送请求的时候使用: http://localhost/users/1 ,路径中的1就是我们想要传递的参数。
后端获取参数,需要做如下修改:
- 修改@RequestMapping的value属性,将其中修改为/users/{id},目的是和路径匹配
- 在方法的形参前添加@PathVariable注解
@Controller
public class UserController {
	//设置当前请求方法为DELETE,表示REST风格中的删除操作
	@RequestMapping(value = "/users/{id}",method = RequestMethod.DELETE)
	@ResponseBody
	public String delete(@PathVariable Integer id) {
		System.out.println("user delete..." + id);
		return "{'module':'user delete'}";
	}
}
思考如下两个问题:
(1)如果方法形参的名称和路径{}中的值不一致,该怎么办?
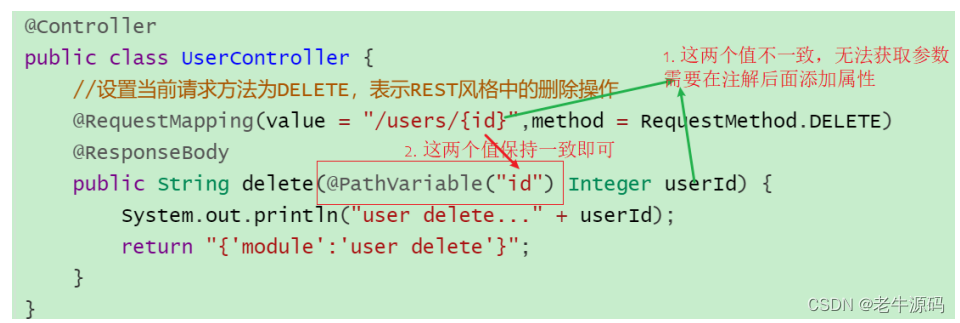
(2)如果有多个参数需要传递该如何编写?
前端发送请求的时候使用: http://localhost/users/1/tom ,路径中的1和tom就是我们想要传递的
两个参数。
后端获取参数,需要做如下修改:
@Controller
public class UserController {
	//设置当前请求方法为DELETE,表示REST风格中的删除操作
	@RequestMapping(value = "/users/{id}/{name}",method =
	RequestMethod.DELETE)
	@ResponseBody
	public String delete(@PathVariable Integer id,@PathVariable String name)
	{
		System.out.println("user delete..." + id+","+name);
		return "{'module':'user delete'}";
	}
}
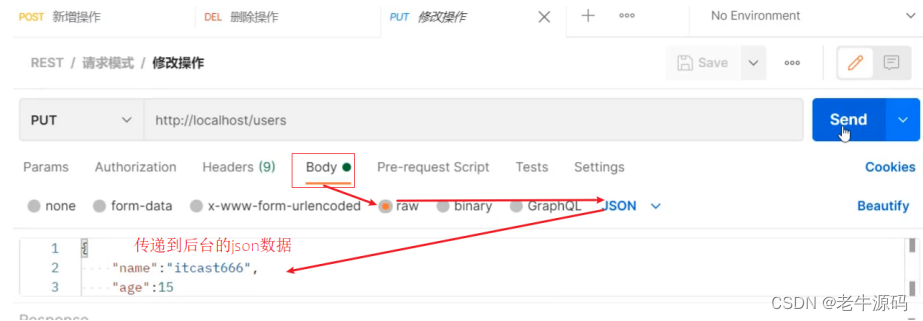
修改
@Controller
public class UserController {
	//设置当前请求方法为PUT,表示REST风格中的修改操作
	@RequestMapping(value = "/users",method = RequestMethod.PUT)
	@ResponseBody
	public String update(@RequestBody User user) {
		System.out.println("user update..." + user);
		return "{'module':'user update'}";
	}
}
- 将请求路径更改为/users
- 访问该方法使用 PUT: http://localhost/users
- 访问并携带参数:
根据ID查询
@Controller
public class UserController {
	//设置当前请求方法为GET,表示REST风格中的查询操作
	@RequestMapping(value = "/users/{id}" ,method = RequestMethod.GET)
	@ResponseBody
	public String getById(@PathVariable Integer id){
		System.out.println("user getById..."+id);
		return "{'module':'user getById'}";
	}
}
将请求路径更改为/users
- 访问该方法使用 GET: http://localhost/users/666
查询所有
@Controller
public class UserController {
	//设置当前请求方法为GET,表示REST风格中的查询操作
	@RequestMapping(value = "/users" ,method = RequestMethod.GET)
	@ResponseBody
	public String getAll() {
		System.out.println("user getAll...");
		return "{'module':'user getAll'}";
	}
}
将请求路径更改为/users
- 访问该方法使用 GET: http://localhost/users
小结
RESTful入门案例,我们需要学习的内容如下:
(1)设定Http请求动作(动词)
@RequestMapping(value=“”,method = RequestMethod.POST|GET|PUT|DELETE)
(2)设定请求参数(路径变量)
@RequestMapping(value=“/users/{id}”,method = RequestMethod.DELETE)
@ReponseBody
public String delete(@PathVariable Integer id){
}
3 知识点总结
知识点1:@PathVariable
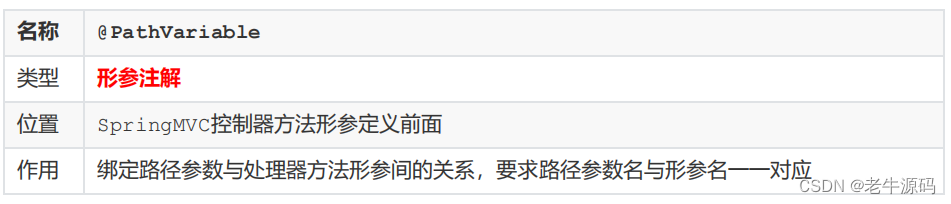
关于接收参数,我们学过三个注解@RequestBody、@RequestParam、@PathVariable ,这三个注解之间的区别和应用分别是什么?
- 区别
- @RequestParam用于接收url地址传参或表单传参
- @RequestBody用于接收json数据
- @PathVariable用于接收路径参数,使用{参数名称}描述路径参数
- 应用
- 后期开发中,发送请求参数超过1个时,以json格式为主,@RequestBody应用较广
- 如果发送非json格式数据,选用@RequestParam接收请求参数
- 采用RESTful进行开发,当参数数量较少时,例如1个,可以采用@PathVariable接收请求路径变量,通常用于传递id值