1 Bean创建的生命周期
Spring bean是Spring运行时管理的对象。Spring Bean的生命周期指的是Bean从创建到初始化再到销毁的过程,这个过程由IOC容器管理。
IOC即控制反转,是面向对象编程中的一种设计原则,通过依赖注入(DI)、依赖查找的方式实现对象之间的松耦合关系。
BeanFactory为IoC容器,ApplicationContext为应用上下文,ApplicationContext容器包括BeanFactory容器的所有功能。
1)创建bean的三种方式
- 基于XML配置文件
- 基于注解,@Component、 @Repository、@Service、@Controller;@Component可以代替@Repository、@Service、@Controller。
- 基于Java类的bean定义,需要提供setter方法
    @Bean
    public Student student(){
        return new Student();;
    }


    public class Student{
        private String name;

        public void SetName(String name){
            this.name = name;
        }
    }
2)bean对象
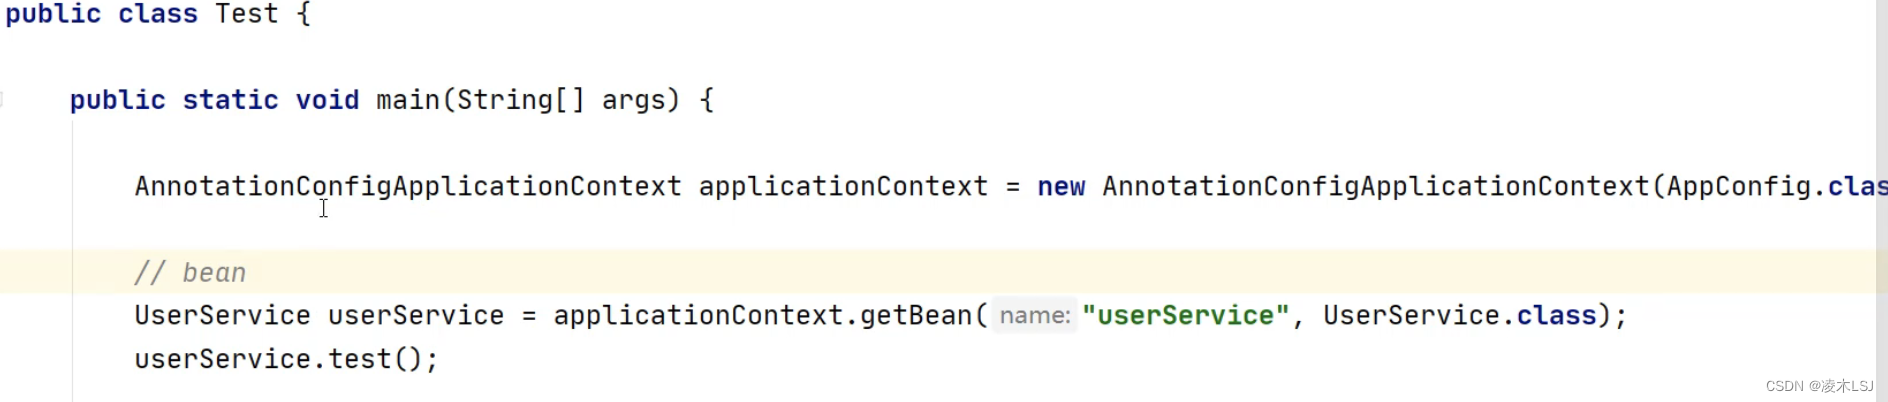
对象不一定是bean,bean一定是对象,bean对象都放在一个MAP里。
![]()
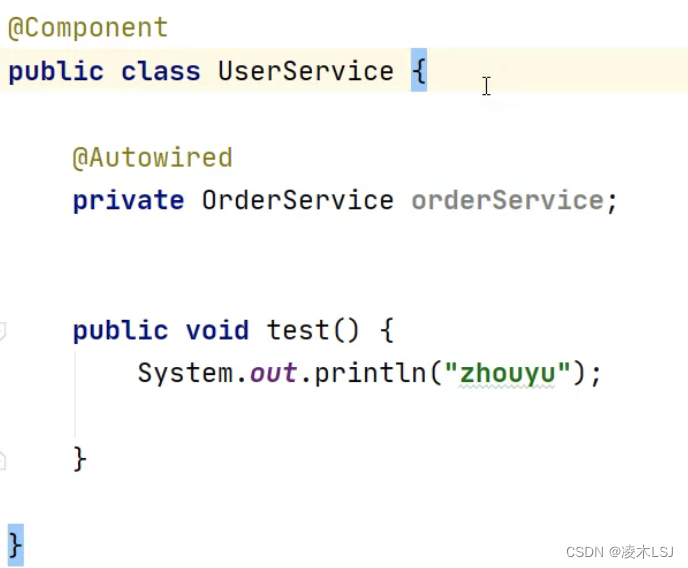
获取对象的方式可以使用构造方法去创建对象,上面的UserService就存在一个默认的构造方法。(如果程序中没有显式定义任何构造方法,那么java语言将自动提供一个隐含的默认构造方法。
spring扫描到@Component等注解时,就会认为这是定义的bean,就会使用此类构造方法获取对象。然后Spring去检查哪些对象存在@Autowired,就给自动进行依赖注入,进行赋值。
UserServie.class--->构造方法--->普通对象--->依赖注入--->放入Map<beanName,Bean对象>
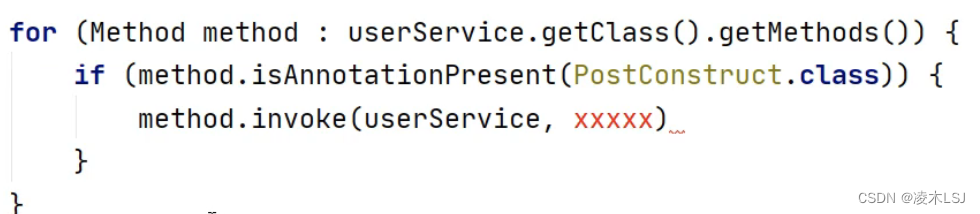
spring会继续去检查哪些方法存在@PostConstruct方法,然后主动执行方法里的内容。
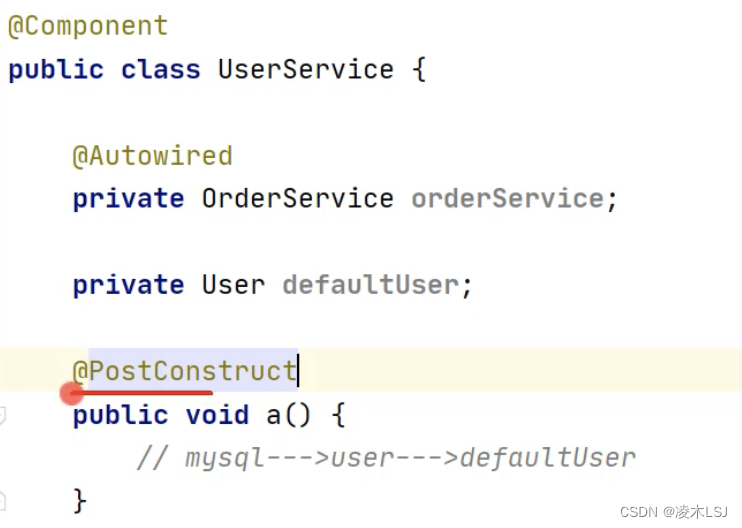
实现逻辑如下:
当然也可以实现InitializingBean接口,用写afterPropertiesSet()方式实现

((InitializingBean)对象).afterPropertiesSet();
UserServie.class--->推断构造方法--->普通对象--->依赖注入--->初始化前(@PostConstruct)--->初始化(InitializingBean)--->初始化后(AOP)--->代理对象--->放入Map<beanName,Bean对象>
推断构造方法:
@Service
public class UserService {
    private final UserRepository userRepository;

    @Autowired
    public UserService(UserRepository userRepository) {
        this.userRepository = userRepository;
    }
}
写了无参构造,则默认使用无参构造依赖注入;
不写无参构造,写多个有参构造,会报错No Default Construct;必须使用@Autowired指定默认是是哪个;
不写无参构造,只写一个有参构造,则会直接使用这个有参构造进行依赖注入;
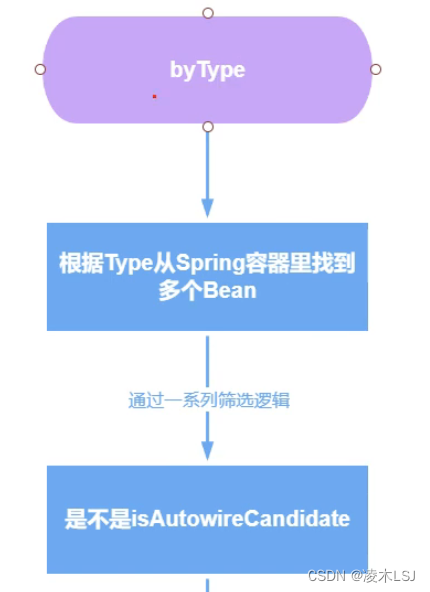
依赖注入完成属性赋值,spring会依据入参的类型、名字去spring IOC容器里的Bean MAP<beanname,bean对象>里寻找bean对象。

1.1 依赖注入
在Java中,DI的实现方式主要有以下几种:
● 构造器注入
● Setter方法注入
● 接口注入
● 注解注入
1)构造器注入(spring框架中在构造方法上添加@Autowired注解)
@Component 标准一个普通的spring Bean类; @Repository标注一个DAO组件类; @Service标注一个业务逻辑组件类。 @Component可以代替@Repository、@Service、@Controller,因为这三个注解是被@Component标注的。
@Service
public class UserService {
    private final UserRepository userRepository;

    @Autowired
    public UserService(UserRepository userRepository) {
        this.userRepository = userRepository;
    }

    public User getUserById(int id) {
        return userRepository.getUserById(id);
    }
}
2)setter方法注入(在setter方法上添加@Autowired注解)
@Service
public class UserService {
    private UserRepository userRepository;

    @Autowired
    public void setUserRepository(UserRepository userRepository) {
        this.userRepository = userRepository;
    }

    public User getUserById(int id) {
        return userRepository.getUserById(id);
    }
}
3)接口注入
@Service
public class UserService {
    private UserRepository userRepository;

    @Autowired
    public void setUserRepositorySetter(UserRepositorySetter userRepositorySetter) {
        userRepositorySetter.setUserRepository(userRepository);
    }

    public User getUserById(int id) {
        return userRepository.getUserById(id);
    }
}
实现对应的接口
public interface UserRepositorySetter {
    void setUserRepository(UserRepository userRepository);
}

@Repository
public class UserRepositoryImpl implements UserRepository, UserRepositorySetter {
    @Override
    public User getUserById(int id) {
        // 实现代码
    }

    @Override
    public void setUserRepository(UserRepository userRepository) {
        // 实现代码
    }
}
4)注解注入
@Service
public class UserService {
    @Autowired
    private UserRepository userRepository;

    public User getUserById(int id) {
        return userRepository.getUserById(id);
    }
}
依赖注入如何寻找是哪个 userRepository?过程如下,从by type 到 by name:


1.2 AOP
认识AOP
AOP 是 Aspect Oriented Programming 的缩写,译为面向切向编程。
设计一个日志打印模块:
- 按 OOP 思想,我们会设计一个打印日志 LogUtils 类,然后在需要打印的地方引用即可。
- 按AOP思想,声明哪些地方需要打印日志,这个地方就是一个切面,AOP 会在适当的时机为你把打印语句插进切面。
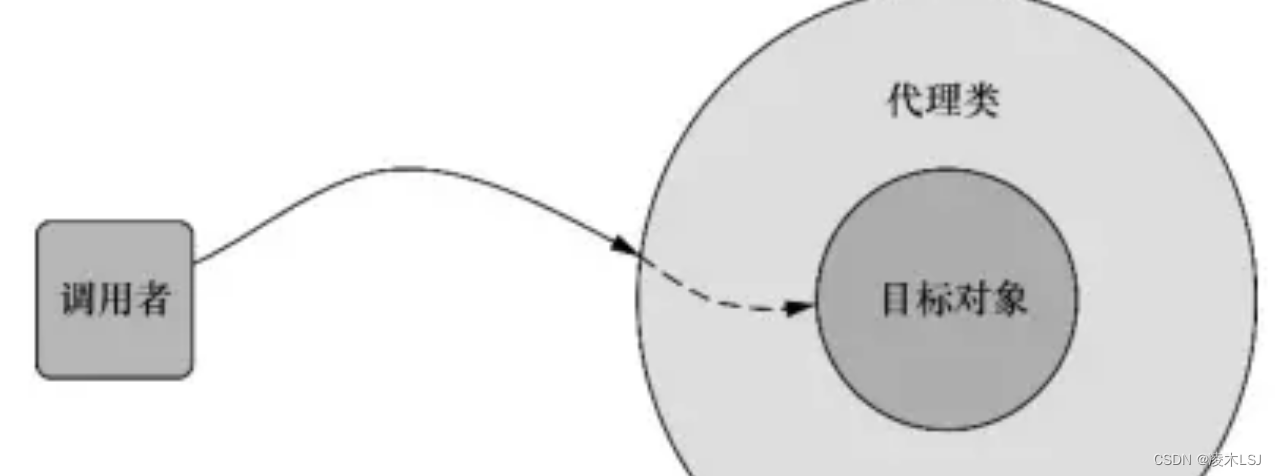
AOP实现的关键在于AOP框架自动创建的AOP代理,以AspectJ为代表的静态代理,以Spring AOP为代表的动态代理。Spring AOP中的动态代理主要有两种方式:JDK动态代理和CGLIB动态代理。
Spring AOP通过在代理类中包裹切面,Spring在运行期把切面织入到Spring管理的bean中。代理类封装了目标类,并拦截被通知方法的调用,再把调用转发给真正的目标bean(目标对象)。
AOP实现技术由APT、AspetJ等,如下:

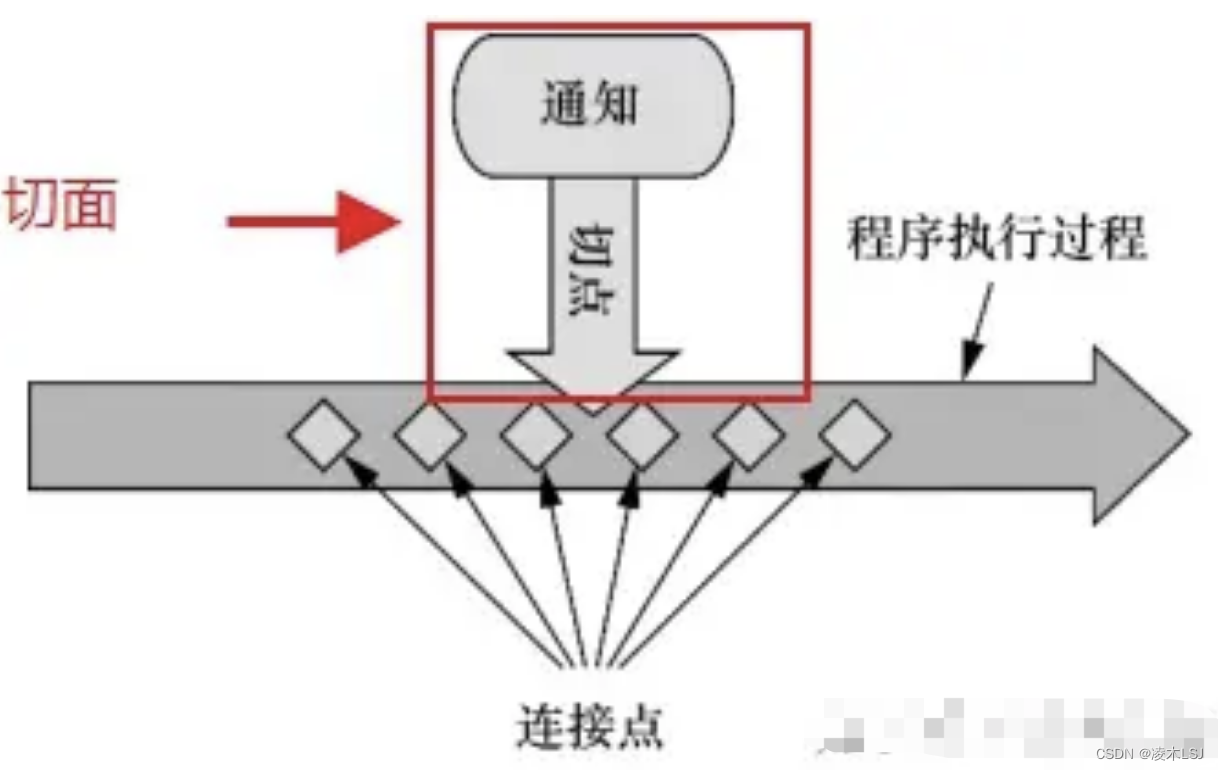
1)横切关注点
跨越应用程序多个模块的方法或功能,如日志、安全、缓存、事务等等。
2)连接点
连接点是在应用执行中能够插入切面的一个点。即程序执行过程中能够应用通知的所有点。
3)通知
切面的工作被称为通知,Spring切面可以应用5种类型的通知:
- 前置通知(Before):在目标方法被调用之前调用通知功能。
- 后置通知(After):在目标方法完成之后调用通知,此时不会关心方法的输出是什么。
- 返回通知(After-returning):在目标方法成功执行之后调用通知。
- 异常通知(After-throwing)):在目标方法抛出异常后调用通知。
- 环绕通知(Around) :通知包裹了被通知的方法,在被通知的方法调用之前和调用之后执行自定义的行为。
1.3 SpringBoot AOP
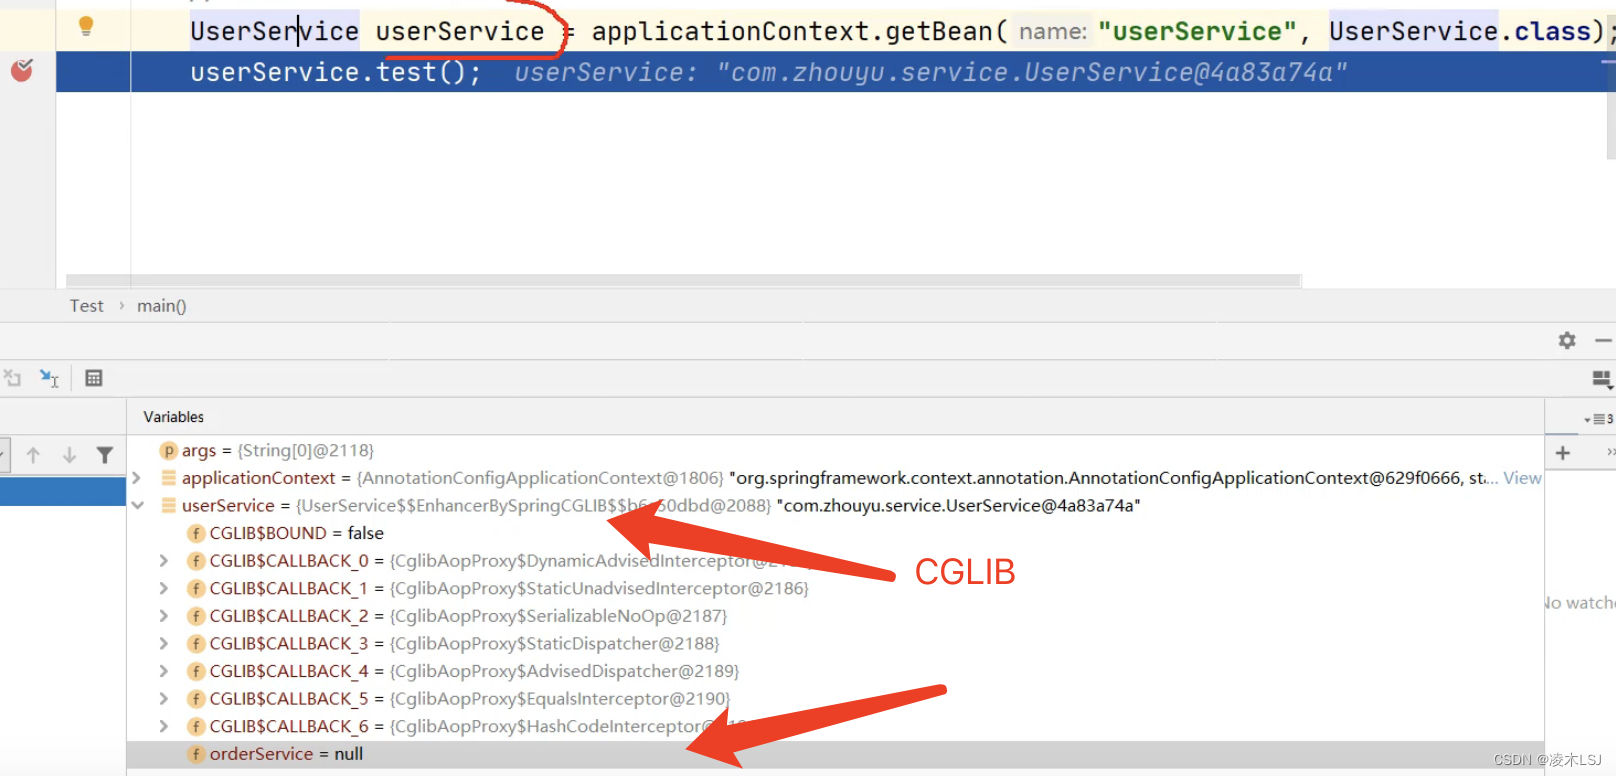
orderService为空?
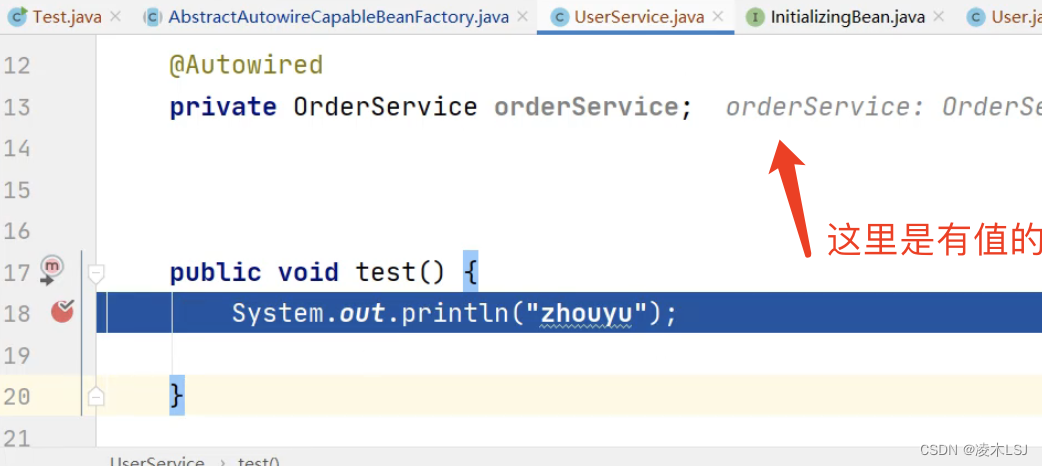
进入test之前,orderServcie是有值的!
1)Spring首先要判断这个对象要不要执行AOP
2)生成一个子类代理类,继承UserService,重写UserService里的test方法
3)子类代理类(代理对象)执行test方法时,先执行切面逻辑,然后执行业务逻辑
4)执行 代理对象.target.test()方法
代理对象.target对象 = 被代理对象 = 普通对象 = 已经经过了依赖注入 = 对象已经属性有值;
但是代理对象没有依赖注入,没有值;他只是为了执行切面逻辑,所以不需要必须去用对象的属性。
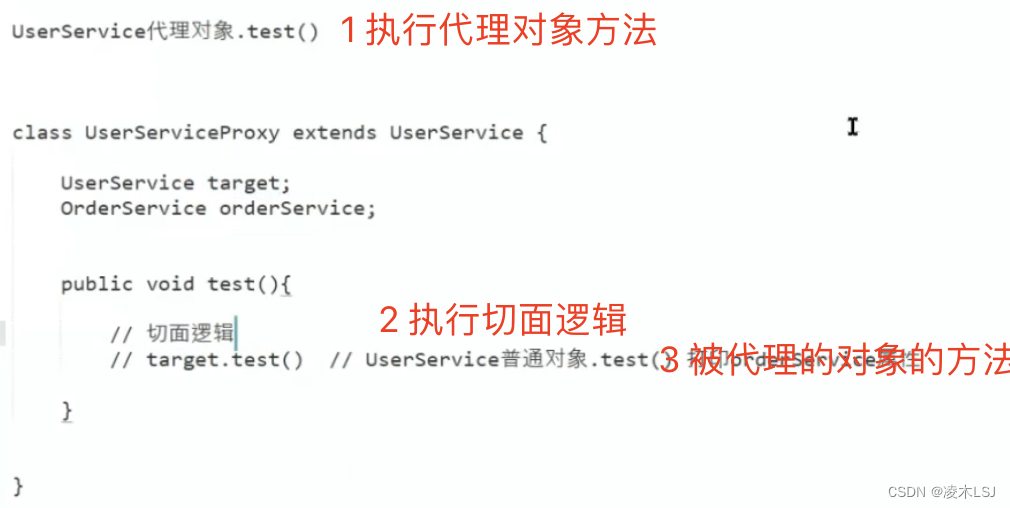

切面逻辑中可以通过获取这个target对象,来获取普通对象

AOP基本使用:
依赖
<dependency>
    <groupId>org.springframework.boot</groupId>
    <artifactId>spring-boot-starter-aop</artifactId>
</dependency>

代码
@Aspect  // 使用@Aspect注解声明一个切面
@Component
public class SysLogAspect {

    @Autowired
    private SysLogService sysLogService;

    @Pointcut("@annotation(com.lmlsj.SysLog)")
    public void logPointCut() {}


    @Before("execution(* com.lmlsj.SysLog.*(..))")
    public void before() {
        System.out.println("MyAspect: 前置增强.....");
    }
}

配置
@Configuration
@EnableAspectJAutoProxy
public class AppConfig {

}
正常流程:【环绕通知-前】-> 【前置通知】-> 【返回通知】-> 【后置通知】->【环绕通知-后】。
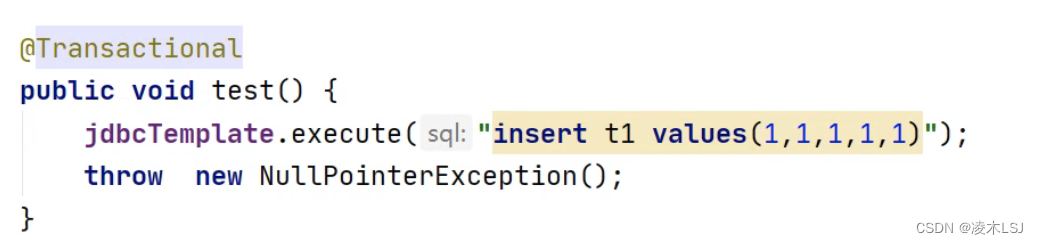
2 事物
1)事物执行逻辑
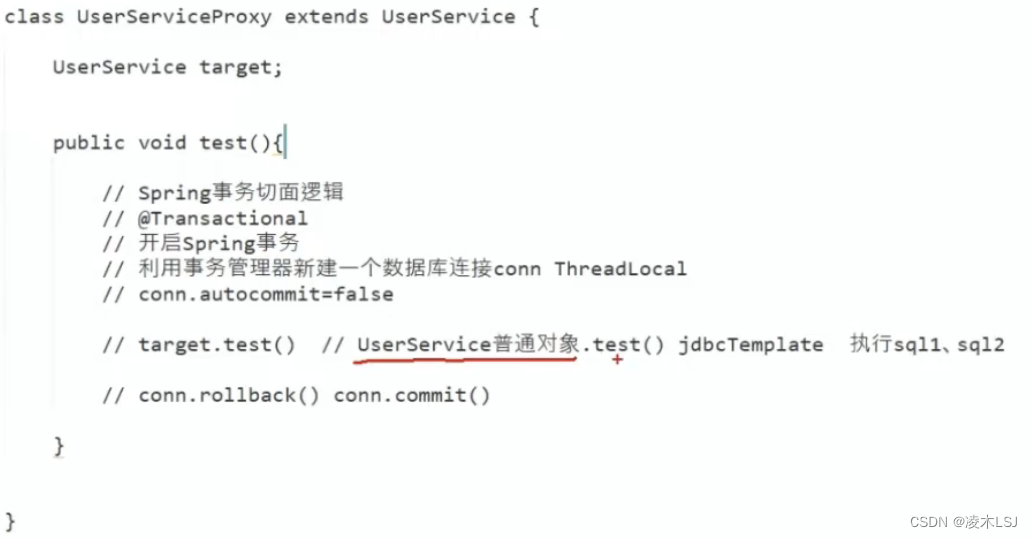
2)普通对象调用,事物失效

这里a()方法是普通对象的,直接执行a()里面的语句,不会去走切面逻辑判断是否有@Transactional注解,事物失效。
3)代理对象调用才会去走切面逻辑
自己注入自己,使用代理对象实现事物正常执行

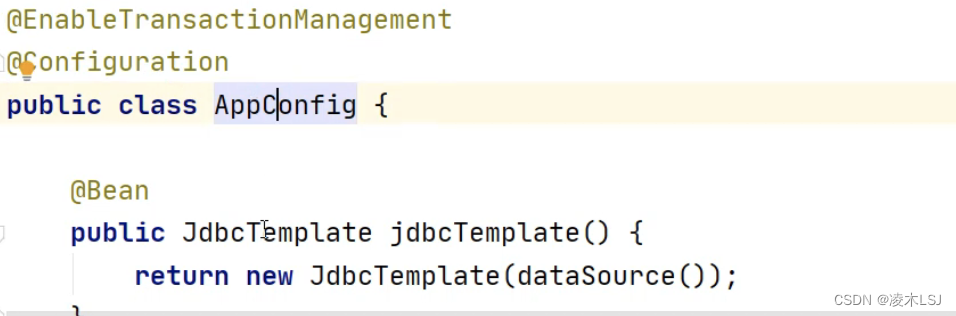
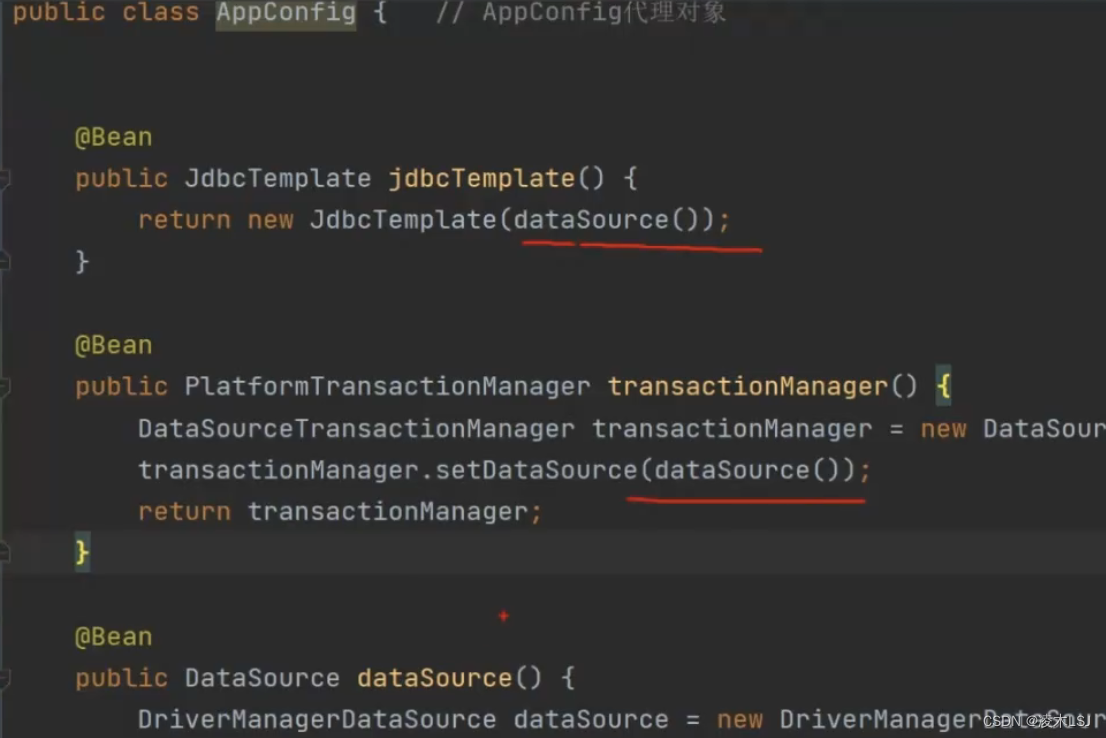
4)@Configuration
加上@Configuration后,Appconfig就是代理对象,才能保证下图两处的dataSource()是同一个对象,才能执行事务。
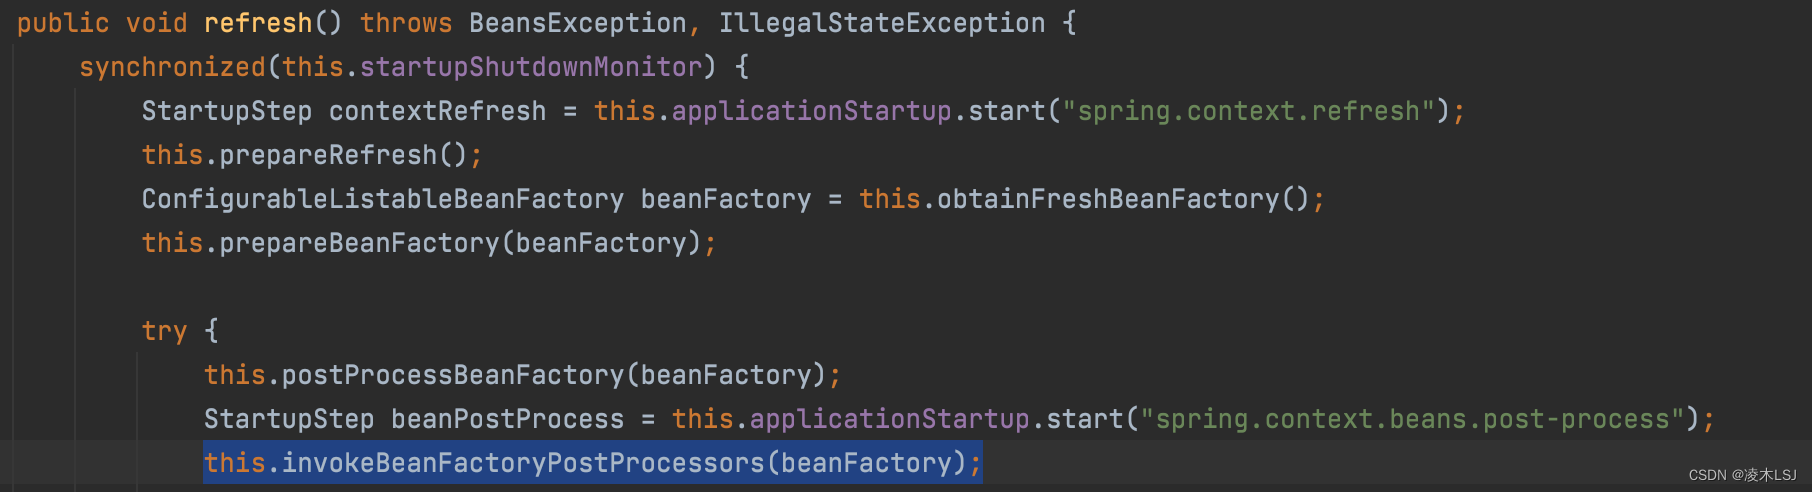
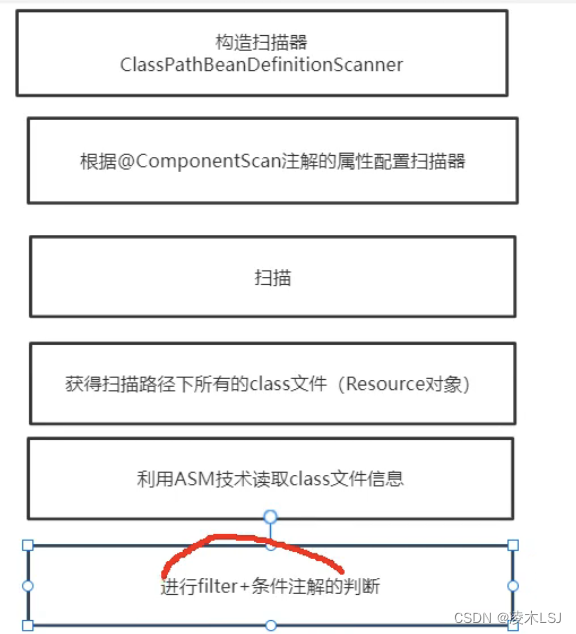
3 扫描
Spring扫描首先Spring根据注解去寻找bean类,非懒加载的bean在Spring容器启动时就创建好,懒加载的bean是用到时再创建。如何寻找注解的实现思路:
1)反射方式:AA.class.isAnnotationPresent(Component.class)
2)ASM技术(Spring使用):编辑CLASS字节码
扫描类的寻找:
AnnotationConfigApplicationContext.java
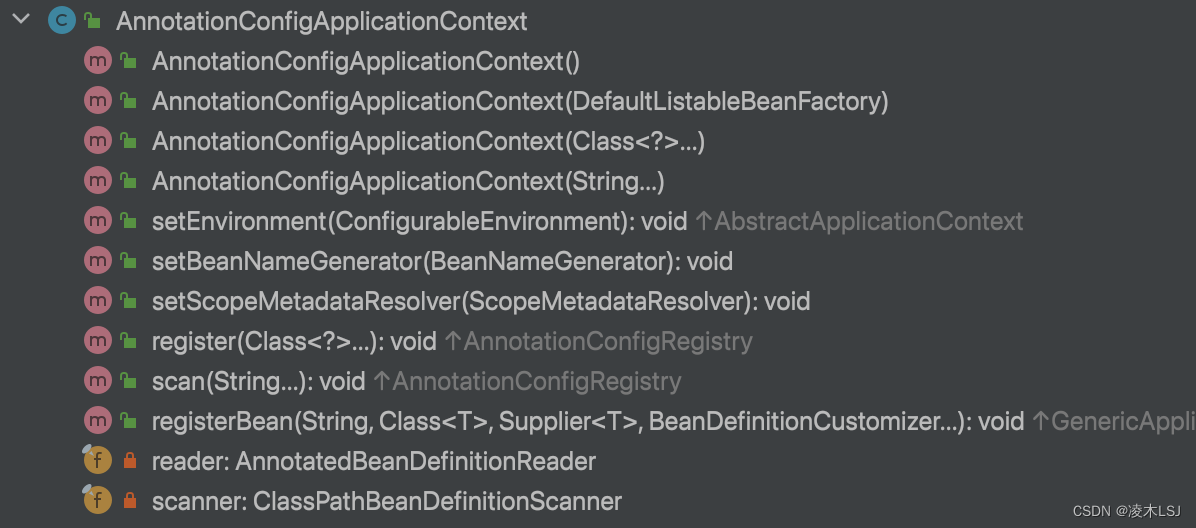


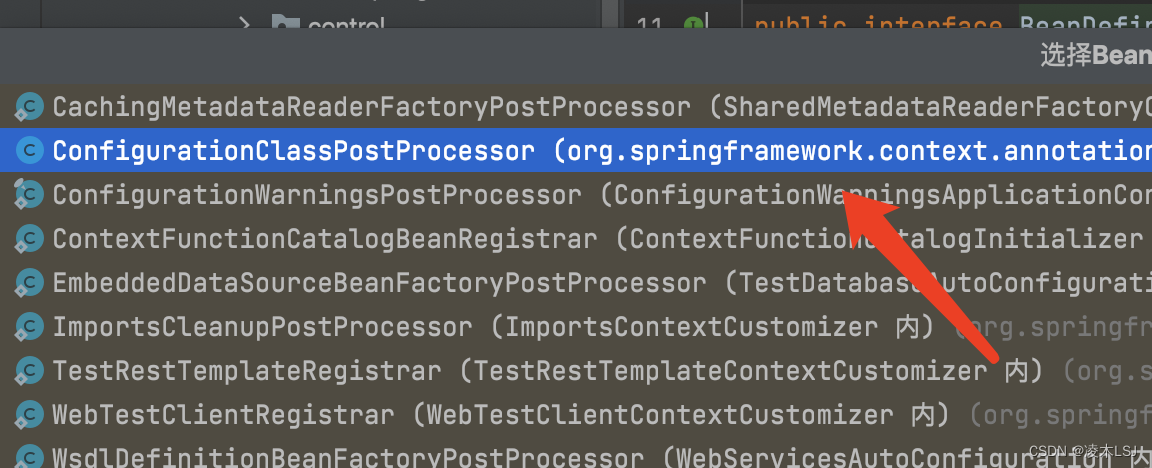


1)处理配置类
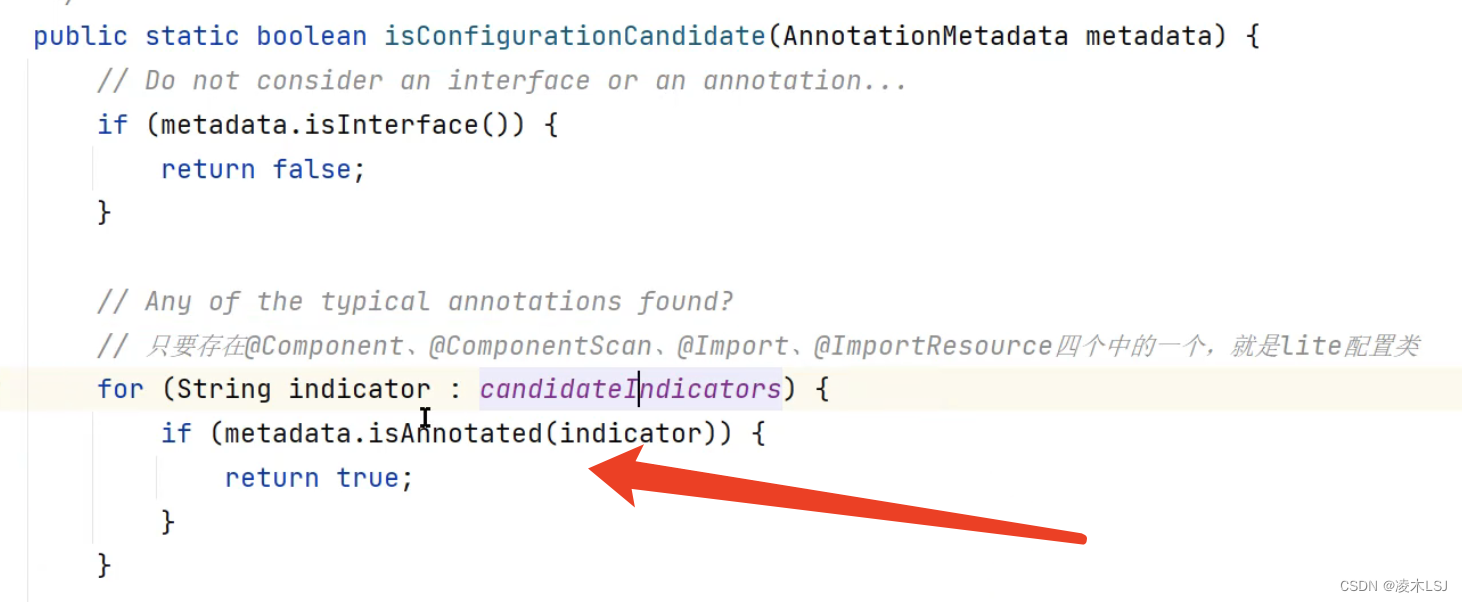
(1)判断Component注解
ConfigurationClassParser.java doProcessConfigurationClass(*)

(2)检查是不是配置类的地方
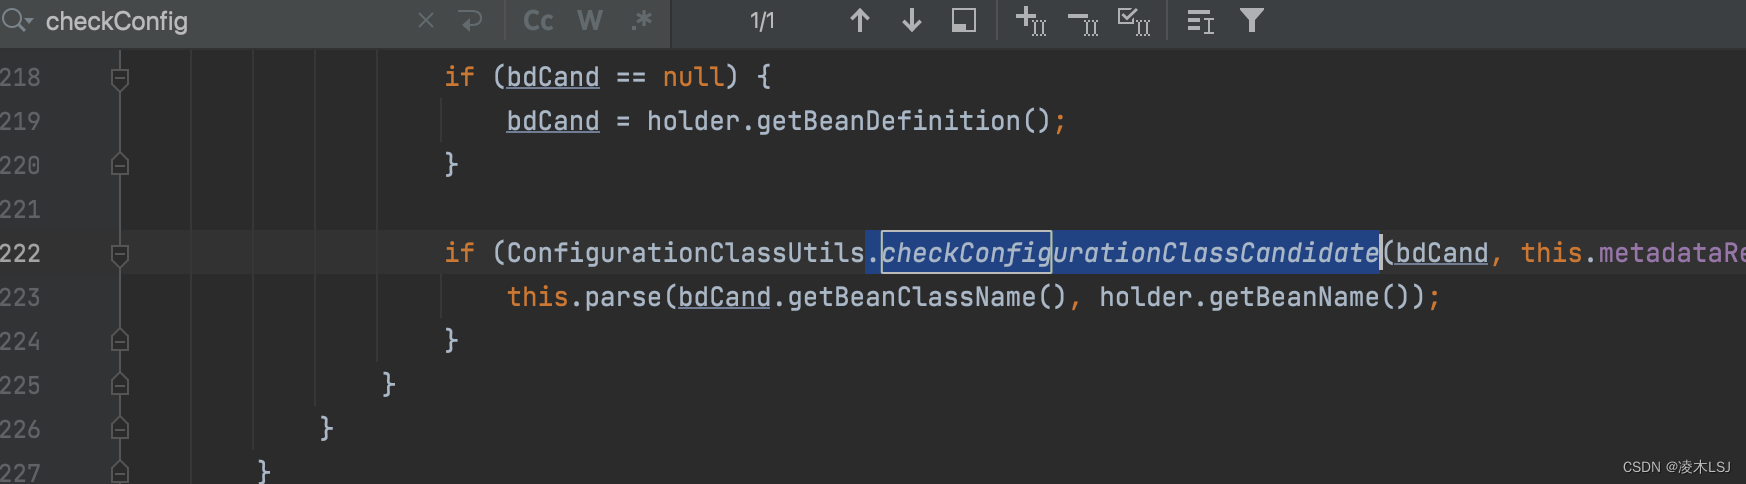


2)ComponentScan
parse解析得到BeanDefinition集合,然后去遍历BeanDefinition这些对象是不是有什么注解、配置

3)parse属性解析过程
ComponentScanAnnotationParser类

this.registry是Spring IOC容器
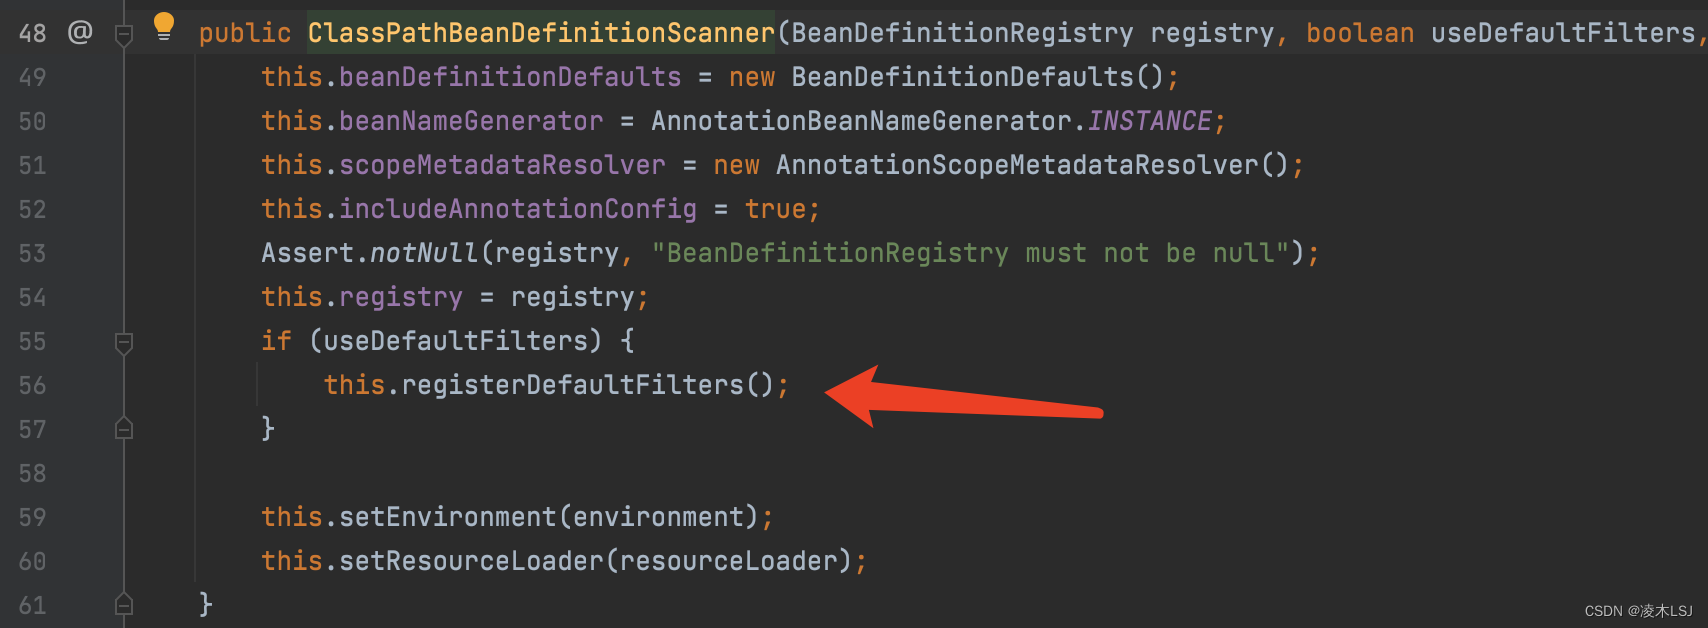
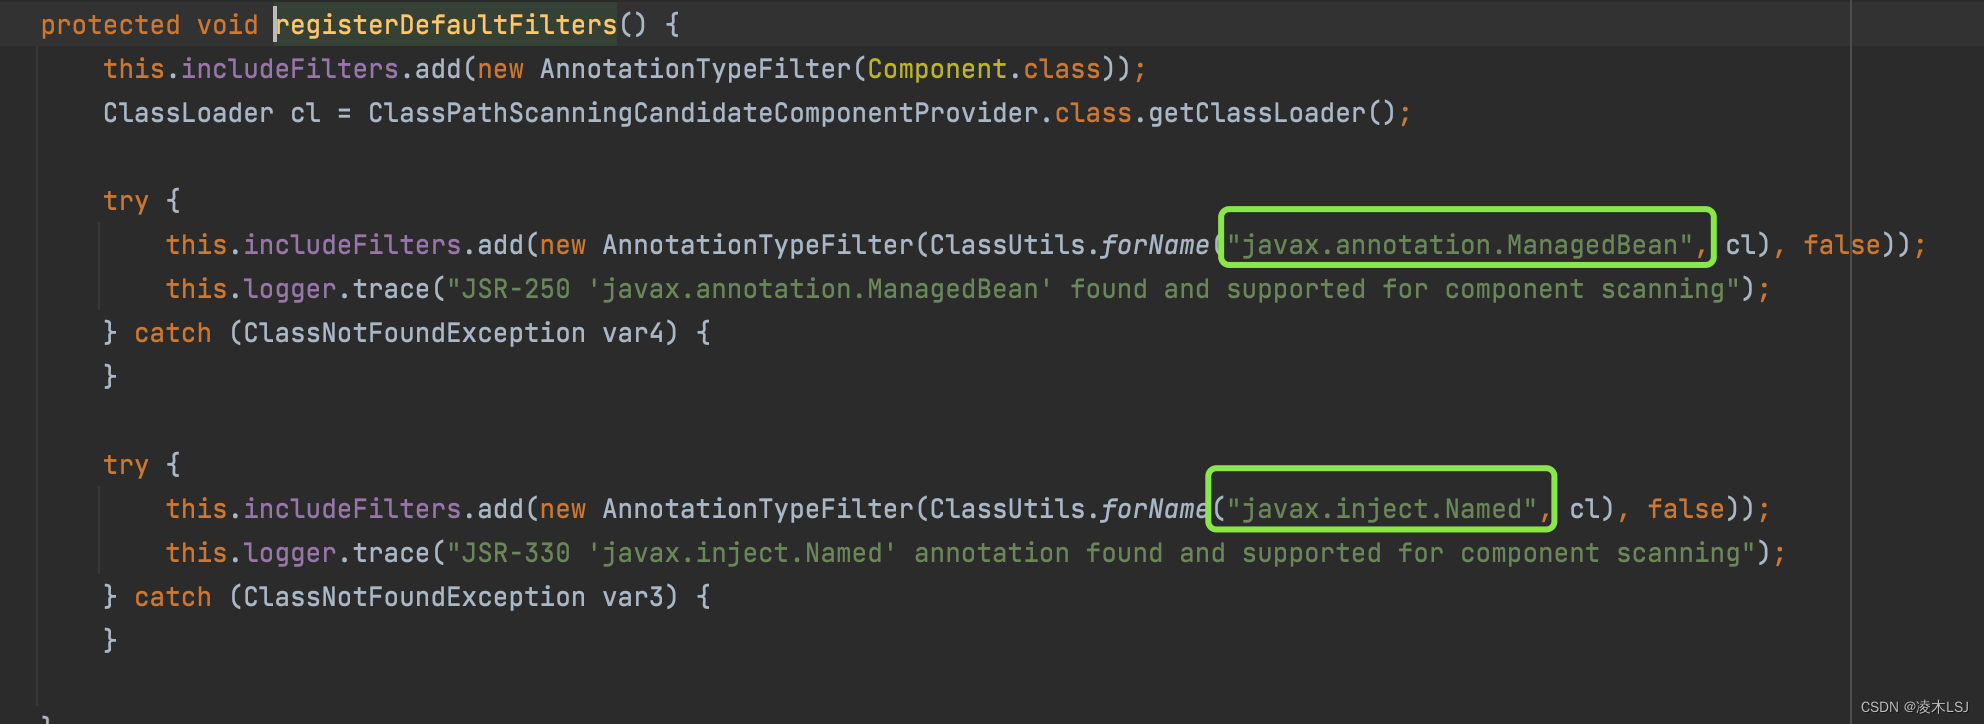
(1) useDefaultFilters属性,注册一些默认的过滤器
(2)ComponentScan的nameGenerator属性
generatorClass是nameGenerator属性的管理,没有设置该属性就使用默认值。
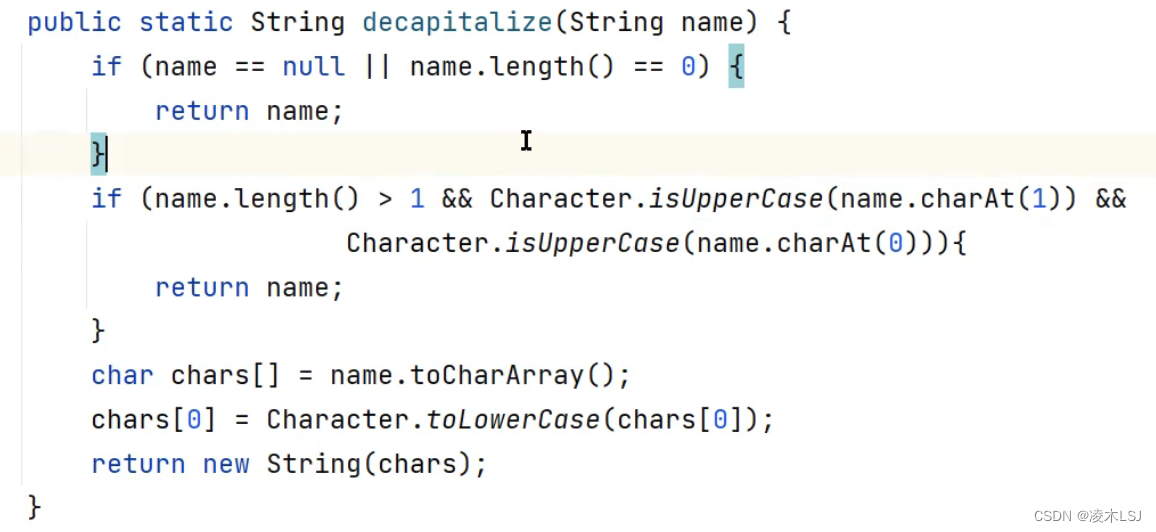
补充:可以根据@Component的value设置bean的名字,没有设置就根据类名进行设置。


前两个字符都是大写,就直接返回;不符合就将第一个字符,设置为小写。
(3)scopeProxy属性设置

作用域在类上设置,在收到请求时再创建bean

同时可以指定代理对象的生成方式


(4)resourcePattern、includeFilters、excludeFilters属性

excludeFilters可以设置某个类不是一个bean,type = FilterType.ASSIGNABLE_TYPE是根据类class来过滤
@ComponentScan(value = "com.lmlsj", excludeFilters = {
@ComponentScan.Filter(type = FilterType.ASSIGNABLE_TYPE, classes = {MyService.class})})
(5)懒加载

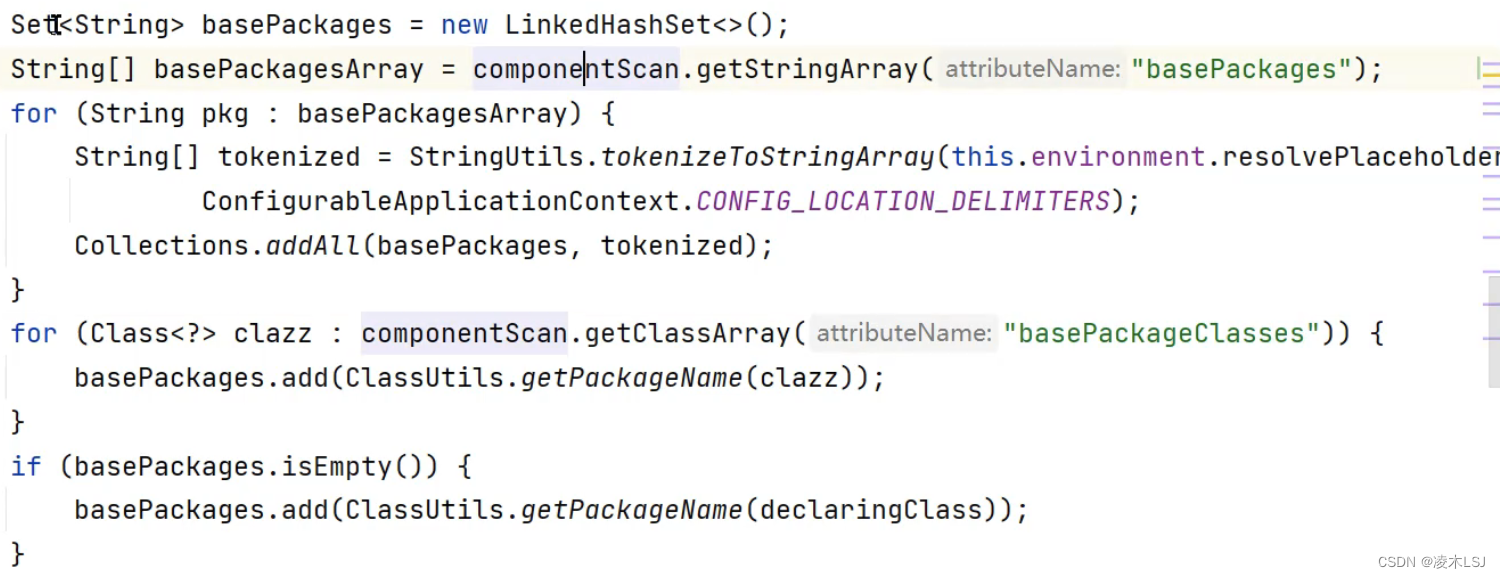
(6)扫描路径属性
根据属性值配置扫描路径,或者根据@ComponentScan注解配置扫描路径
排除器,排除已经设置成bean的类

最后就是doScan真正的扫描开始。
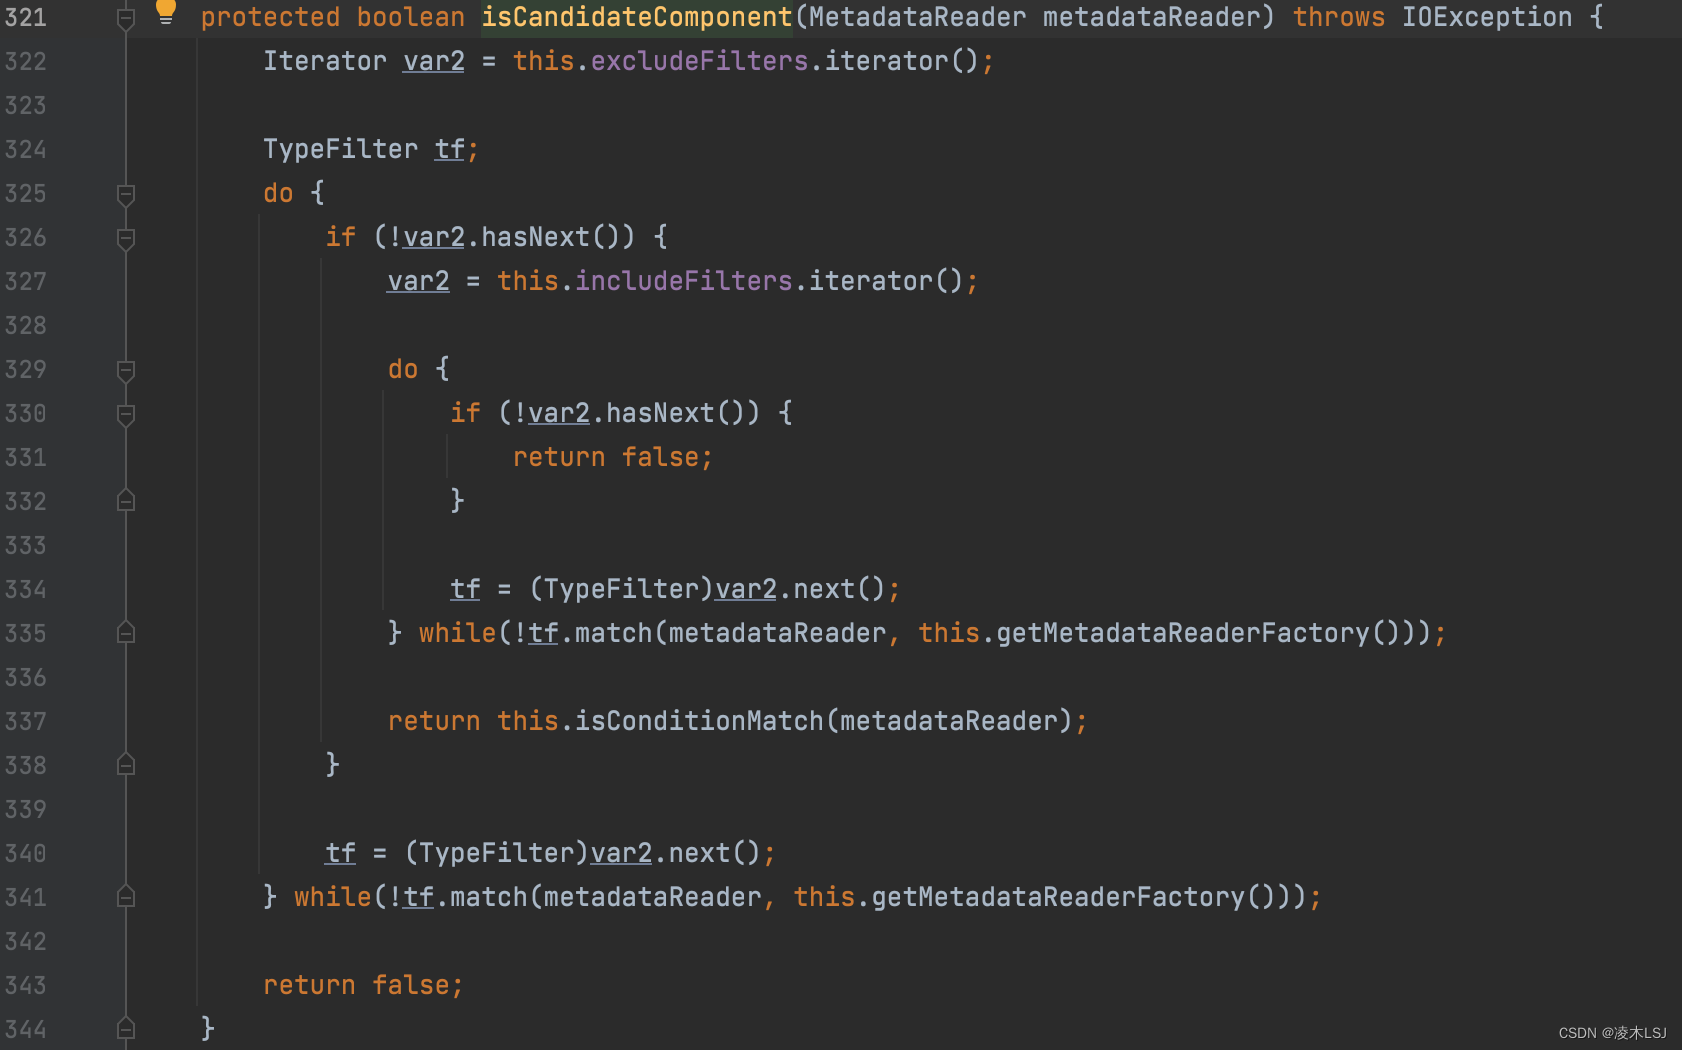
4)doScan扫描
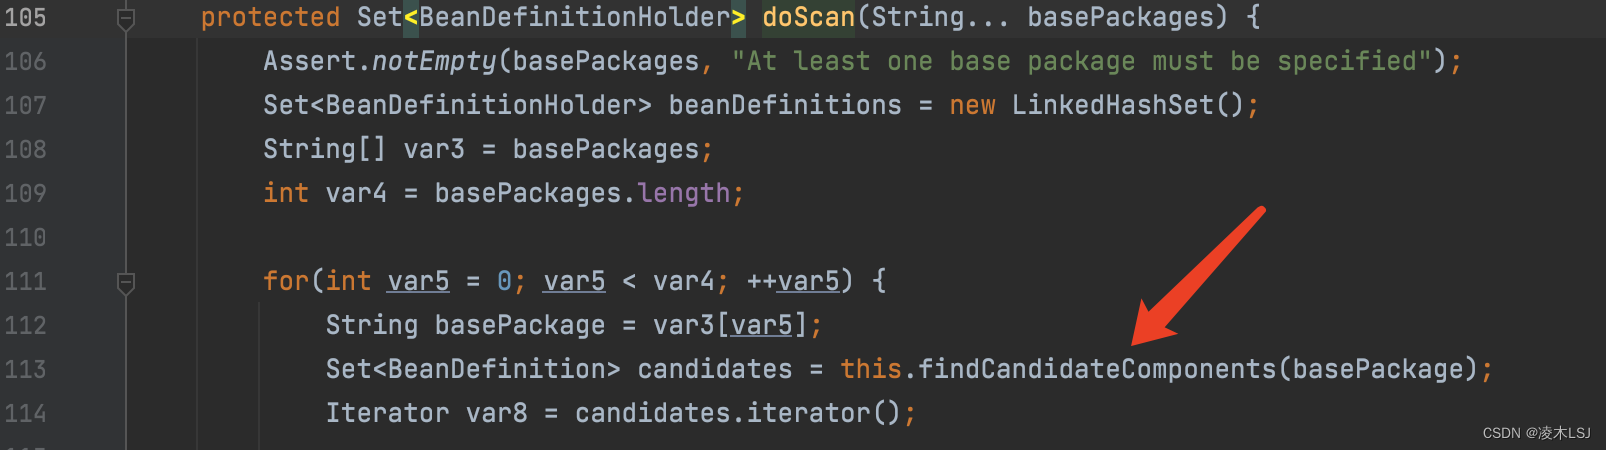
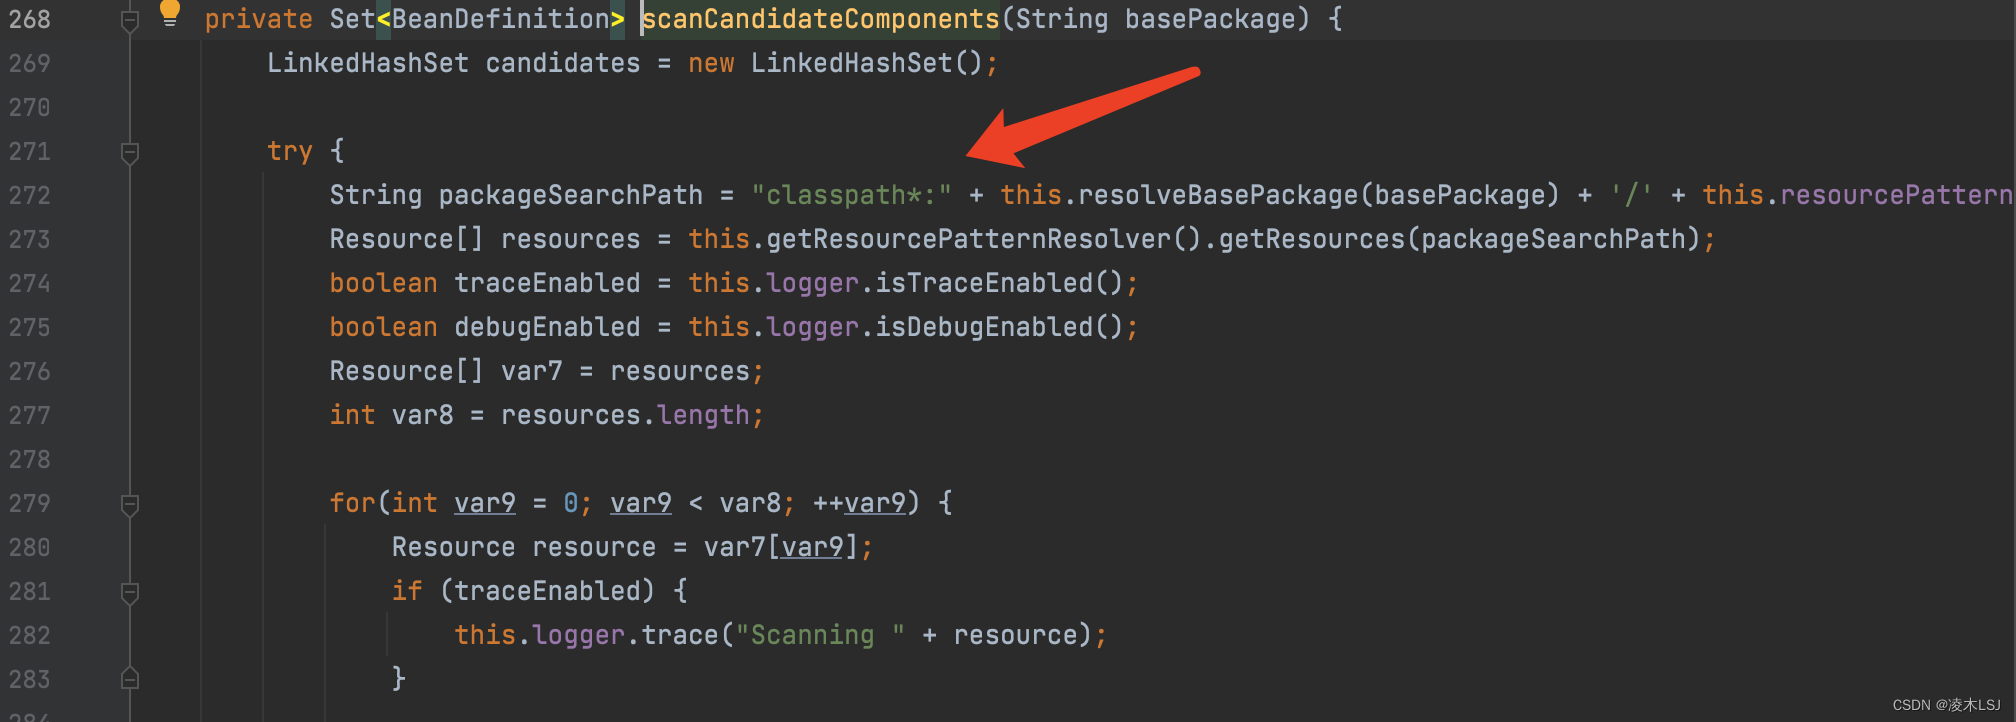
扫描包路径
 public Set<BeanDefinition> findCandidateComponents(String basePackage) {
        return this.componentsIndex != null && this.indexSupportsIncludeFilters()
        ?
        this.addCandidateComponentsFromIndex(this.componentsIndex, basePackage) :
        this.scanCandidateComponents(basePackage);
    }

检查是否在过滤器里
4 Spring启动demo
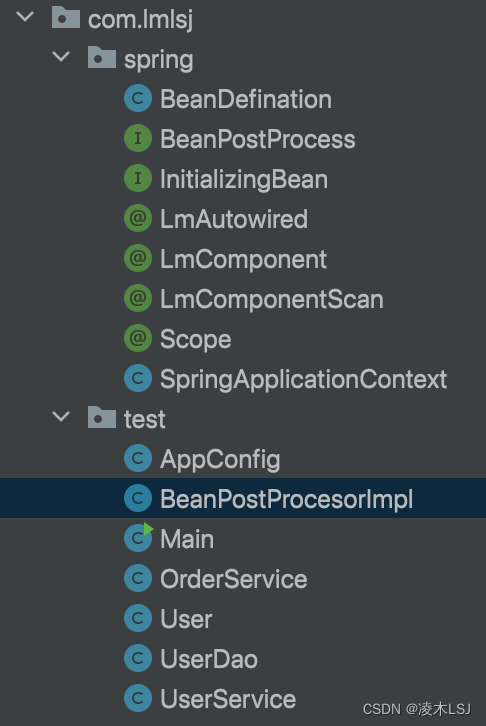
1)SpringApplicationContex
public class SpringApplicationContext {

    private Class configClass;
    private Map<String,BeanDefination> beanDefinationMap = new HashMap<>();
    private Map<String,Object> singletonObjects = new HashMap<>();  //单例池
    private List<BeanPostProcess> beanPostProcessorList = new ArrayList<>();

    public SpringApplicationContext(Class configClass) {
        this.configClass = configClass;
        scan(configClass);              //解析传进来的配置类,生成beanDefination
        preInstantiateSingletons();     //单例bean初始化
    }

    private void preInstantiateSingletons() {
        for(Map.Entry<String,BeanDefination> entry : beanDefinationMap.entrySet()){
            BeanDefination beanDefination = entry.getValue();
            if(beanDefination.getScope().equals("singleton")){
                Object bean = createBean(entry.getKey(), beanDefination);
                singletonObjects.put(entry.getKey(), bean);     //单例bean
            }
        }
    }

    public Object createBean(String beanName, BeanDefination beanDefination){
        Class clazz = beanDefination.getClazz();
        Object instance = null;
        try {
            // 1 对象实例化
            instance = clazz.newInstance();

            // 2 依赖注入 属性赋值
            for(Field field : clazz.getDeclaredFields()){
                if(field.isAnnotationPresent(LmAutowired.class)){
                    String name = field.getName();  // field.getType()  ,by name/ by type
                    Object bean = getBean(name);
                    field.setAccessible(true);
                    field.set(instance,bean);
                }
            }

            // 4 初始化前
            for (BeanPostProcess beanPostProcess : beanPostProcessorList) {
               instance =  beanPostProcess.postProcessBeforeInitialization(instance,beanName);
            }

            // 3 spring初始化数值
            if(instance instanceof InitializingBean){
                try {
                    ((InitializingBean)instance).afterPropertiesSet();
                } catch (Exception e) {
                    e.printStackTrace();
                }
            }

            // 5 初始化后
            for (BeanPostProcess beanPostProcess : beanPostProcessorList) {
               instance =  beanPostProcess.postProcessAfterInitialization(instance,beanName);
            }

        } catch (InstantiationException e) {
            e.printStackTrace();
        } catch (IllegalAccessException e) {
            e.printStackTrace();
        }
        return instance;
    }

    public void scan(Class configClass){
        // 1 解析配置类
        if(configClass.isAnnotationPresent(LmComponentScan.class)){
            LmComponentScan componentScan = (LmComponentScan)configClass.getAnnotation(LmComponentScan.class);
            String path = componentScan.value();
            System.out.println("配置路径: " + path);
            path = path.replace(".","/");

            //2 扫描配置路径下有LmComponent注解的类
            ClassLoader classLoader = SpringApplicationContext.class.getClassLoader();  //app
            URL resource = classLoader.getResource(path);

            File file = new File(resource.getFile()); //获取对应文件夹
            File[] files = file.listFiles();//文件夹下所有的文件

            for (File f : files) {
                String fileName = f.getAbsolutePath();
                if(fileName.endsWith(".class")){
                    String className = fileName.substring(fileName.indexOf("com"),fileName.indexOf(".class"));
                    className = className.replace("/",".");
                    try {
                        Class clazz = classLoader.loadClass(className);
                        //spring是使用ASM去解析字节码文件的,这里简单实现一下
                        if(clazz.isAnnotationPresent(LmComponent.class)){

                            //beanPostProcessorList初始化
                            if(BeanPostProcess.class.isAssignableFrom(clazz)){
                                try {
                                    BeanPostProcess beanPostProcess = (BeanPostProcess) clazz.newInstance();
                                    beanPostProcessorList.add(beanPostProcess);
                                } catch (InstantiationException e) {
                                    e.printStackTrace();
                                } catch (IllegalAccessException e) {
                                    e.printStackTrace();
                                }
                            }

                            LmComponent annotation = (LmComponent) clazz.getAnnotation(LmComponent.class);
                            String beanName = annotation.value();
                            //3 生成beanDefination对象
                            BeanDefination beanDefination = new BeanDefination();

                            beanDefination.setClazz(clazz);

                            if(clazz.isAnnotationPresent(Scope.class)){
                                Scope scope = (Scope) clazz.getAnnotation(Scope.class);
                                beanDefination.setScope(scope.value());
                            }else{
                                beanDefination.setScope("singleton");
                            }

                            beanDefinationMap.put(beanName,beanDefination);
                        }
                    } catch (ClassNotFoundException e) {
                        e.printStackTrace();
                    }
                }
            }
        }else {
            System.out.println("没有LmComponentScan注解");
        }
    }

    public Object getBean(String beanName){
        //1 判断是否已存在bean
        if(beanDefinationMap.containsKey(beanName)){
            BeanDefination beanDefination = beanDefinationMap.get(beanName);
            //2 判断是不是单例bean
            if(beanDefination.getScope().equals("singleton")){
                Object o = singletonObjects.get(beanName);
                return o;
            }else{
                //多例bean
                Object bean = createBean(beanName,beanDefination);
                return bean;
            }
        }else {
            System.out.println("没有找到" + beanName);
            throw new NullPointerException();
        }
    }

}
2)BeanDefination
public class BeanDefination {

    private Class clazz;
    private String scope;

    public Class getClazz() {
        return clazz;
    }

    public void setClazz(Class clazz) {
        this.clazz = clazz;
    }

    public String getScope() {
        return scope;
    }

    public void setScope(String scope) {
        this.scope = scope;
    }

}
3)BeanPostProcess
public interface BeanPostProcess {

    Object postProcessBeforeInitialization(Object bean,String beanName);

    Object postProcessAfterInitialization(Object bean,String beanName);
}
4)InitializingBean
public interface InitializingBean {
    void afterPropertiesSet() throws Exception;
}
5)注解
@Retention(RetentionPolicy.RUNTIME)
@Target(ElementType.FIELD)
public @interface LmAutowired {

    String value() default ""; //属性
}

@Retention(RetentionPolicy.RUNTIME)
@Target(ElementType.TYPE)
public @interface LmComponent {

    String value() default ""; //属性
}

@Retention(RetentionPolicy.RUNTIME)
@Target(ElementType.TYPE)
public @interface LmComponentScan {

    String value() default ""; //属性
}

@Retention(RetentionPolicy.RUNTIME)
@Target(ElementType.TYPE)
public @interface Scope {
    String value() default ""; //属性
}
6)测试类
public class Main {

    public static void main(String[] args){
        //用spring 包里自己写的代码
        SpringApplicationContext springApplicationContext = new SpringApplicationContext(AppConfig.class);

        //多例bean
        UserService userService =  (UserService)springApplicationContext.getBean("userService");
        UserService userService2 =  (UserService)springApplicationContext.getBean("userService");
        UserService userService3 =  (UserService)springApplicationContext.getBean("userService");
        System.out.println(userService);
        System.out.println(userService2);
        System.out.println(userService3);

        userService.test();

        System.out.println("_____________________");
        //单例bean
        OrderService orderService = (OrderService)springApplicationContext.getBean("orderService");
        OrderService orderService2 = (OrderService)springApplicationContext.getBean("orderService");
        OrderService orderService3 = (OrderService)springApplicationContext.getBean("orderService");
        System.out.println(orderService);
        System.out.println(orderService2);
        System.out.println(orderService3);
    }
}
7)BeanPostProcesorImpl
@LmComponent
public class BeanPostProcesorImpl implements BeanPostProcess {
    @Override
    public Object postProcessBeforeInitialization(Object bean, String beanName) {
        if(beanName.equals("orderService")){
            System.out.println("初始化之前");
        }
        return bean;
    }

    @Override
    public Object postProcessAfterInitialization(Object bean, String beanName) {
        //代理AOP在此实现
        return bean;
    }
}
8)AppConfig
@LmComponentScan("com.lmlsj.test")
public class AppConfig {
}
9)其他类
@LmComponent("orderService")
public class OrderService {
}

@LmComponent("userDao")
public class UserDao {
}

@LmComponent("userService")
@Scope("prototype")
public class UserService implements InitializingBean {

    @LmAutowired
    private UserDao userDao;

    private User defaultUser;

    public void test(){
        System.out.println(userDao);
        System.out.println(defaultUser.getName() + ":" + defaultUser.getPass());
    }

    @Override
    public void afterPropertiesSet() throws Exception {
        defaultUser = new User("default","123456");
    }
}
10)测试结果