1.自定义异常捕获处理
定义如下类 可捕获并处理相关异常
package com.imooc.exception;

import com.imooc.utils.IMOOCJSONResult;
import org.springframework.web.bind.annotation.ExceptionHandler;
import org.springframework.web.bind.annotation.RestControllerAdvice;
import org.springframework.web.multipart.MaxUploadSizeExceededException;

@RestControllerAdvice
public class CustomExceptionHandler {

    // 上传文件超过500k,捕获异常:MaxUploadSizeExceededException
    @ExceptionHandler(MaxUploadSizeExceededException.class)
    public IMOOCJSONResult handlerMaxUploadFile(MaxUploadSizeExceededException ex) {
        return IMOOCJSONResult.errorMsg("文件上传大小不能超过500k,请压缩图片或者降低图片质量再上传!");
    }


//    // 上传文件超过500k,捕获异常:MaxUploadSizeExceededException
//    @ExceptionHandler(MyTestException.class)
//    public IMOOCJSONResult handlerMaxUploadFile(MyTestException ex) {
//        return IMOOCJSONResult.errorMsg("错错错 是我的错");
//    }
}
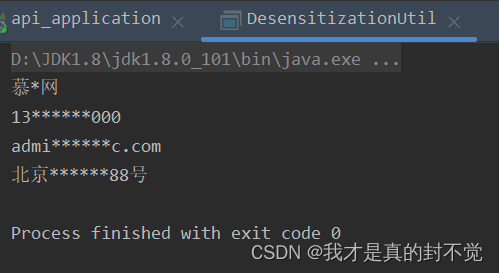
2.脱敏
某些私密信息 如手机号 邮箱等 需要脱敏 如下是示例
package com.imooc.utils;

import sun.applet.Main;

/**
 * 通用脱敏工具类
 * 可用于:
 *      用户名
 *      手机号
 *      邮箱
 *      地址等
 */
public class DesensitizationUtil {

    private static final int SIZE = 6;
    private static final String SYMBOL = "*";

    public static void main(String[] args) {
        String name = commonDisplay("慕课网");
        String mobile = commonDisplay("13900000000");
        String mail = commonDisplay("admin@imooc.com");
        String address = commonDisplay("北京大运河东路888号");

        System.out.println(name);
        System.out.println(mobile);
        System.out.println(mail);
        System.out.println(address);
    }

    /**
     * 通用脱敏方法
     * @param value
     * @return
     */
    public static String commonDisplay(String value) {
        if (null == value || "".equals(value)) {
            return value;
        }
        int len = value.length();
        int pamaone = len / 2;
        int pamatwo = pamaone - 1;
        int pamathree = len % 2;
        StringBuilder stringBuilder = new StringBuilder();
        if (len <= 2) {
            if (pamathree == 1) {
                return SYMBOL;
            }
            stringBuilder.append(SYMBOL);
            stringBuilder.append(value.charAt(len - 1));
        } else {
            if (pamatwo <= 0) {
                stringBuilder.append(value.substring(0, 1));
                stringBuilder.append(SYMBOL);
                stringBuilder.append(value.substring(len - 1, len));

            } else if (pamatwo >= SIZE / 2 && SIZE + 1 != len) {
                int pamafive = (len - SIZE) / 2;
                stringBuilder.append(value.substring(0, pamafive));
                for (int i = 0; i < SIZE; i++) {
                    stringBuilder.append(SYMBOL);
                }
                if ((pamathree == 0 && SIZE / 2 == 0) || (pamathree != 0 && SIZE % 2 != 0)) {
                    stringBuilder.append(value.substring(len - pamafive, len));
                } else {
                    stringBuilder.append(value.substring(len - (pamafive + 1), len));
                }
            } else {
                int pamafour = len - 2;
                stringBuilder.append(value.substring(0, 1));
                for (int i = 0; i < pamafour; i++) {
                    stringBuilder.append(SYMBOL);
                }
                stringBuilder.append(value.substring(len - 1, len));
            }
        }
        return stringBuilder.toString();
    }

}
3.springboot自带定时任务的优劣
优点:
简单易用
缺点:
/**
* 使用定时任务关闭超期未支付订单,会存在的弊端:
* 1. 会有时间差,程序不严谨
* 10:39下单,11:00检查不足1小时,12:00检查,超过1小时多余39分钟
* 2. 不支持集群
* 单机没毛病,使用集群后,就会有多个定时任务
* 解决方案:只使用一台计算机节点,单独用来运行所有的定时任务
* 3. 会对数据库全表搜索,及其影响数据库性能:select * from order where orderStatus = 10;
* 定时任务,仅仅只适用于小型轻量级项目,传统项目
*
* 后续课程会涉及到消息队列:MQ-> RabbitMQ, RocketMQ, Kafka, ZeroMQ...
* 延时任务(队列)
* 10:12分下单的,未付款(10)状态,11:12分检查,如果当前状态还是10,则直接关闭订单即可
*/
在线Cron表达式生成器
package com.imooc.config;

import com.imooc.service.OrderService;
import com.imooc.utils.DateUtil;
import org.springframework.beans.factory.annotation.Autowired;
import org.springframework.scheduling.annotation.Scheduled;
import org.springframework.stereotype.Component;

@Component
public class OrderJob {

    @Autowired
    private OrderService orderService;


//    @Scheduled(cron = "0/3 * * * * ?")
//    @Scheduled(cron = "0 0 0/1 * * ?")
    public void autoCloseOrder() {
        orderService.closeOrder();
        System.out.println("执行定时任务,当前时间为:"
                + DateUtil.getCurrentDateString(DateUtil.DATETIME_PATTERN));
    }

}
4.jsr303 hibernate validator 参数校验
jsr303是个规范 这里我们使用的实现框架是 hibernate validator
如下依赖中自带
<dependency>
    <groupId>org.springframework.boot</groupId>
    <artifactId>spring-boot-starter-web</artifactId>
</dependency>
需要被校验的BO类
package com.imooc.pojo.bo.center;

import io.swagger.annotations.ApiModel;
import io.swagger.annotations.ApiModelProperty;
import org.hibernate.validator.constraints.Length;

import javax.validation.constraints.*;
import java.util.Date;

@ApiModel(value="用户对象", description="从客户端,由用户传入的数据封装在此entity中")
public class CenterUserBO {

    /**
     * Bean Validation 中内置的 constraint
     * @Null 被注释的元素必须为 null
     * @NotNull 被注释的元素必须不为 null
     * @AssertTrue 被注释的元素必须为 true
     * @AssertFalse 被注释的元素必须为 false
     * @Min(value) 被注释的元素必须是一个数字,其值必须大于等于指定的最小值
     * @Max(value) 被注释的元素必须是一个数字,其值必须小于等于指定的最大值
     * @DecimalMin(value) 被注释的元素必须是一个数字,其值必须大于等于指定的最小值
     * @DecimalMax(value) 被注释的元素必须是一个数字,其值必须小于等于指定的最大值
     * @Size(max=, min=) 被注释的元素的大小必须在指定的范围内
     * @Digits (integer, fraction) 被注释的元素必须是一个数字,其值必须在可接受的范围内
     * @Past 被注释的元素必须是一个过去的日期
     * @Future 被注释的元素必须是一个将来的日期
     * @Pattern(regex=,flag=) 被注释的元素必须符合指定的正则表达式
     * Hibernate Validator 附加的 constraint
     * @NotBlank(message =) 验证字符串非null,且长度必须大于0
     * @Email 被注释的元素必须是电子邮箱地址
     * @Length(min=,max=) 被注释的字符串的大小必须在指定的范围内
     * @NotEmpty 被注释的字符串的必须非空
     * @Range(min=,max=,message=) 被注释的元素必须在合适的范围内
     */

    @ApiModelProperty(value="用户名", name="username", example="json", required = false)
    private String username;
    @ApiModelProperty(value="密码", name="password", example="123456", required = false)
    private String password;
    @ApiModelProperty(value="确认密码", name="confirmPassword", example="123456", required = false)
    private String confirmPassword;


    @NotBlank(message = "用户昵称不能为空")
    @Length(max = 12, message = "用户昵称不能超过12位")
    @ApiModelProperty(value="用户昵称", name="nickname", example="杰森", required = false)
    private String nickname;

    @Length(max = 12, message = "用户真实姓名不能超过12位")
    @ApiModelProperty(value="真实姓名", name="realname", example="杰森", required = false)
    private String realname;

    @Pattern(regexp = "^(((13[0-9]{1})|(15[0-9]{1})|(18[0-9]{1}))+\\d{8})$", message = "手机号格式不正确")
    @ApiModelProperty(value="手机号", name="mobile", example="13999999999", required = false)
    private String mobile;

    @Email
    @ApiModelProperty(value="邮箱地址", name="email", example="imooc@imooc.com", required = false)
    private String email;

    @Min(value = 0, message = "性别选择不正确")
    @Max(value = 2, message = "性别选择不正确")
    @ApiModelProperty(value="性别", name="sex", example="0:女 1:男 2:保密", required = false)
    private Integer sex;
    @ApiModelProperty(value="生日", name="birthday", example="1900-01-01", required = false)
    private Date birthday;

    public String getUsername() {
        return username;
    }

    public void setUsername(String username) {
        this.username = username;
    }

    public String getPassword() {
        return password;
    }

    public void setPassword(String password) {
        this.password = password;
    }

    public String getConfirmPassword() {
        return confirmPassword;
    }

    public void setConfirmPassword(String confirmPassword) {
        this.confirmPassword = confirmPassword;
    }

    public String getNickname() {
        return nickname;
    }

    public void setNickname(String nickname) {
        this.nickname = nickname;
    }

    public String getRealname() {
        return realname;
    }

    public void setRealname(String realname) {
        this.realname = realname;
    }

    public String getMobile() {
        return mobile;
    }

    public void setMobile(String mobile) {
        this.mobile = mobile;
    }

    public String getEmail() {
        return email;
    }

    public void setEmail(String email) {
        this.email = email;
    }

    public Integer getSex() {
        return sex;
    }

    public void setSex(Integer sex) {
        this.sex = sex;
    }

    public Date getBirthday() {
        return birthday;
    }

    public void setBirthday(Date birthday) {
        this.birthday = birthday;
    }

    @Override
    public String toString() {
        return "CenterUserBO{" +
                "username='" + username + '\'' +
                ", password='" + password + '\'' +
                ", confirmPassword='" + confirmPassword + '\'' +
                ", nickname='" + nickname + '\'' +
                ", realname='" + realname + '\'' +
                ", mobile='" + mobile + '\'' +
                ", email='" + email + '\'' +
                ", sex=" + sex +
                ", birthday=" + birthday +
                '}';
    }
}
controller类中的方法 可以看到 要校验该BO参数只需要加上@valid注解然后 加上一个
BindingResult result 参数 然后 判断是否通过校验 再进行相应返回
   @ApiOperation(value = "修改用户信息", notes = "修改用户信息", httpMethod = "POST")
    @PostMapping("update")
    public IMOOCJSONResult update(
            @ApiParam(name = "userId", value = "用户id", required = true)
            @RequestParam String userId,
            @RequestBody @Valid CenterUserBO centerUserBO,
            BindingResult result,
            HttpServletRequest request, HttpServletResponse response) {

        // 判断BindingResult是否保存错误的验证信息,如果有,则直接return
        if (result.hasErrors()) {
//            Map<String, String> errorMap = getErrors(result);
//            return IMOOCJSONResult.errorMap(errorMap);
            return IMOOCJSONResult.errorMsg(result.getFieldErrors().get(0).getDefaultMessage());
        }

        Users userResult = centerUserService.updateUserInfo(userId, centerUserBO);

        userResult = setNullProperty(userResult);
        CookieUtils.setCookie(request, response, "user",
                JsonUtils.objectToJson(userResult), true);

        // TODO 后续要改,增加令牌token,会整合进redis,分布式会话

        return IMOOCJSONResult.ok();
    }
5.文件上传基本流程
定义上传相关的路径信息
package com.imooc.resource;

import org.springframework.boot.context.properties.ConfigurationProperties;
import org.springframework.context.annotation.PropertySource;
import org.springframework.stereotype.Component;

@Component
@ConfigurationProperties(prefix = "file")
@PropertySource("classpath:file-upload-dev.properties")
public class FileUpload {

    private String imageUserFaceLocation;
    private String imageServerUrl;

    public String getImageServerUrl() {
        return imageServerUrl;
    }

    public void setImageServerUrl(String imageServerUrl) {
        this.imageServerUrl = imageServerUrl;
    }

    public void setImageUserFaceLocation(String imageUserFaceLocation) {
        this.imageUserFaceLocation = imageUserFaceLocation;
    }

    public String getImageUserFaceLocation() {
        return imageUserFaceLocation;
    }
}
file-upload-dev.properties
file.imageUserFaceLocation=\\workspaces\\images\\foodie\\faces
file.imageServerUrl=http://localhost:8088/foodie/faces
上传 后端示例代码
主要分为如下几步
校验大小及后缀,
文件名生成 这个记得要在里面加个用户id 或者订单id啥的 后面方便找或者删
生成文件
更新到数据库
package com.imooc.controller.center;

import com.imooc.controller.BaseController;
import com.imooc.exception.MyTestException;
import com.imooc.pojo.Users;
import com.imooc.pojo.bo.center.CenterUserBO;
import com.imooc.resource.FileUpload;
import com.imooc.service.UserService;
import com.imooc.service.center.CenterUserService;
import com.imooc.utils.CookieUtils;
import com.imooc.utils.DateUtil;
import com.imooc.utils.IMOOCJSONResult;
import com.imooc.utils.JsonUtils;
import io.swagger.annotations.Api;
import io.swagger.annotations.ApiOperation;
import io.swagger.annotations.ApiParam;
import org.apache.commons.io.IOUtils;
import org.apache.commons.lang3.StringUtils;
import org.springframework.beans.factory.annotation.Autowired;
import org.springframework.validation.BindingResult;
import org.springframework.validation.FieldError;
import org.springframework.web.bind.annotation.*;
import org.springframework.web.multipart.MultipartFile;

import javax.servlet.http.HttpServletRequest;
import javax.servlet.http.HttpServletResponse;
import javax.validation.Valid;
import java.io.File;
import java.io.FileOutputStream;
import java.io.IOException;
import java.io.InputStream;
import java.util.HashMap;
import java.util.List;
import java.util.Map;

@Api(value = "用户信息接口", tags = {"用户信息相关接口"})
@RestController
@RequestMapping("userInfo")
public class CenterUserController extends BaseController {

    @Autowired
    private CenterUserService centerUserService;

    @Autowired
    private FileUpload fileUpload;

    @ApiOperation(value = "用户头像修改", notes = "用户头像修改", httpMethod = "POST")
    @PostMapping("uploadFace")
    public IMOOCJSONResult uploadFace(
            @ApiParam(name = "userId", value = "用户id", required = true)
            @RequestParam String userId,
            @ApiParam(name = "file", value = "用户头像", required = true)
            MultipartFile file,
            HttpServletRequest request, HttpServletResponse response) {

        // .sh .php

        // 定义头像保存的地址
//        String fileSpace = IMAGE_USER_FACE_LOCATION;
        String fileSpace = fileUpload.getImageUserFaceLocation();
        // 在路径上为每一个用户增加一个userid,用于区分不同用户上传
        String uploadPathPrefix = File.separator + userId;

        // 开始文件上传
        if (file != null) {
            FileOutputStream fileOutputStream = null;
            try {
                // 获得文件上传的文件名称
                String fileName = file.getOriginalFilename();

                if (StringUtils.isNotBlank(fileName)) {

                    // 文件重命名  imooc-face.png -> ["imooc-face", "png"]
                    String fileNameArr[] = fileName.split("\\.");

                    // 获取文件的后缀名
                    String suffix = fileNameArr[fileNameArr.length - 1];

                    if (!suffix.equalsIgnoreCase("png") &&
                            !suffix.equalsIgnoreCase("jpg") &&
                            !suffix.equalsIgnoreCase("jpeg")) {
                        return IMOOCJSONResult.errorMsg("图片格式不正确!");
                    }

                    // face-{userid}.png
                    // 文件名称重组 覆盖式上传,增量式:额外拼接当前时间
                    String newFileName = "face-" + userId + "." + suffix;

                    // 上传的头像最终保存的位置
                    String finalFacePath = fileSpace + uploadPathPrefix + File.separator + newFileName;
                    // 用于提供给web服务访问的地址
                    uploadPathPrefix += ("/" + newFileName);

                    File outFile = new File(finalFacePath);
                    if (outFile.getParentFile() != null) {
                        // 创建文件夹
                        outFile.getParentFile().mkdirs();
                    }

                    // 文件输出保存到目录
                    fileOutputStream = new FileOutputStream(outFile);
                    InputStream inputStream = file.getInputStream();
                    IOUtils.copy(inputStream, fileOutputStream);
                }
            } catch (IOException e) {
                e.printStackTrace();
            } finally {
                try {
                    if (fileOutputStream != null) {
                        fileOutputStream.flush();
                        fileOutputStream.close();
                    }
                } catch (IOException e) {
                    e.printStackTrace();
                }
            }

        } else {
            return IMOOCJSONResult.errorMsg("文件不能为空!");
        }

        // 获取图片服务地址
        String imageServerUrl = fileUpload.getImageServerUrl();

        // 由于浏览器可能存在缓存的情况,所以在这里,我们需要加上时间戳来保证更新后的图片可以及时刷新
        String finalUserFaceUrl = imageServerUrl + uploadPathPrefix
                 + "?t=" + DateUtil.getCurrentDateString(DateUtil.DATE_PATTERN);

        // 更新用户头像到数据库
        Users userResult = centerUserService.updateUserFace(userId, finalUserFaceUrl);

        userResult = setNullProperty(userResult);
        CookieUtils.setCookie(request, response, "user",
                JsonUtils.objectToJson(userResult), true);

        // TODO 后续要改,增加令牌token,会整合进redis,分布式会话

//        throw new MyTestException();
        return IMOOCJSONResult.ok();
    }


    private Map<String, String> getErrors(BindingResult result) {
        Map<String, String> map = new HashMap<>();
        List<FieldError> errorList = result.getFieldErrors();
        for (FieldError error : errorList) {
            // 发生验证错误所对应的某一个属性
            String errorField = error.getField();
            // 验证错误的信息
            String errorMsg = error.getDefaultMessage();

            map.put(errorField, errorMsg);
        }
        return map;
    }

    private Users setNullProperty(Users userResult) {
        userResult.setPassword(null);
        userResult.setMobile(null);
        userResult.setEmail(null);
        userResult.setCreatedTime(null);
        userResult.setUpdatedTime(null);
        userResult.setBirthday(null);
        return userResult;
    }

}
6.mybatis pagehelper分页注意事项

前面几点都还好理解
最后一点 意思就是 比如当前 查询结果为订单VO 他又包含许多子订单项VO
分页条数为10 如果你想要页面分页的主体是订单 也就是一个页面 十个订单
这个 时候mapper.xml就应该写成如下俩查询 如果是只用一个查询语句查出所有字段,那么分页就会根据订单项分页,也就是一页十个订单项
<?xml version="1.0" encoding="UTF-8" ?>
<!DOCTYPE mapper PUBLIC "-//mybatis.org//DTD Mapper 3.0//EN" "http://mybatis.org/dtd/mybatis-3-mapper.dtd" >
<mapper namespace="com.imooc.mapper.OrdersMapperCustom" >

  <resultMap id="myOrdersVO" type="com.imooc.pojo.vo.MyOrdersVO">
    <id column="orderId" property="orderId"/>
    <result column="createdTime" property="createdTime"/>
    <result column="payMethod" property="payMethod"/>
    <result column="realPayAmount" property="realPayAmount"/>
      <result column="postAmount" property="postAmount"/>
      <result column="orderStatus" property="orderStatus"/>
      <result column="isComment" property="isComment"/>

    <collection property="subOrderItemList"
                select="getSubItems"
                column="orderId"
                ofType="com.imooc.pojo.vo.MySubOrderItemVO">
      <result column="itemId" property="itemId"/>
      <result column="itemName" property="itemName"/>
      <result column="itemImg" property="itemImg"/>
<!--        <result column="itemSpecId" property="itemSpecId"/>-->
        <result column="itemSpecName" property="itemSpecName"/>
        <result column="buyCounts" property="buyCounts"/>
        <result column="price" property="price"/>
    </collection>
  </resultMap>

  <select id="queryMyOrders" resultMap="myOrdersVO" parameterType="Map">
    SELECT
        od.id as orderId,
        od.created_time as createdTime,
        od.pay_method as payMethod,
        od.real_pay_amount as realPayAmount,
        od.post_amount as postAmount,
        os.order_status as orderStatus,
        od.is_comment as isComment
    FROM
        orders od
    LEFT JOIN
        order_status os
    on od.id = os.order_id
    WHERE
        od.user_id = #{paramsMap.userId}
    AND
        od.is_delete = 0
        <if test="paramsMap.orderStatus != null">
          and os.order_status = #{paramsMap.orderStatus}
        </if>
    ORDER BY
        od.updated_time ASC
  </select>


    <select id="getSubItems" parameterType="String" resultType="com.imooc.pojo.vo.MySubOrderItemVO">

      select
        oi.item_id as itemId,
        oi.item_name as itemName,
        oi.item_img as itemImg,
        oi.item_spec_name as itemSpecName,
        oi.buy_counts as buyCounts,
        oi.price as price
      from
        order_items oi
      where
        oi.order_id = #{orderId}

    </select>

</mapper>
7.环境切换spring.profile.active
比如我们想要配置不同环境的mysql 的url
不同环境给应用配置不同端口
还有mybatis的sql日志 生产环境没必要打印
如果在一个文件中改就很麻烦
如果配置文件基本不改 当然可以设置gitignore然后 提交时不管
比如我们想在不同环境 配置不同的bean
都可以用到这玩意
配置切换示例
application.yml
spring:
  datasource: # 数据源的相关配置
      type: com.zaxxer.hikari.HikariDataSource # 数据源类型:HikariCP
      driver-class-name: com.mysql.jdbc.Driver # mysql驱动
      url: jdbc:mysql://49.235.78.53/foodie?useUnicode=true&useSSL=false&characterEncoding=UTF-8&autoReconnect
      username: root
      password: root
#  profiles:
#    active: dev
application-dev.yml
server:
  port: 8088

spring:
  datasource:                                           # 数据源的相关配置
    url: jdbc:mysql://localhost:3306/foodie-shop-dev?useUnicode=true&characterEncoding=UTF-8&autoReconnect=true
    password: roota

mybatis:
  configuration:
    log-impl: org.apache.ibatis.logging.stdout.StdOutImpl
application-prod.yml
server:
  port: 80

spring:
  datasource:                                           # 数据源的相关配置
    url: jdbc:mysql://localhost:3306/foodie-shop-dev?useUnicode=true&characterEncoding=UTF-8&autoReconnect=true
    password: imooc
bean切换示例
SpringBoot配置文件中spring.profiles.active配置多个bean不同作用环境
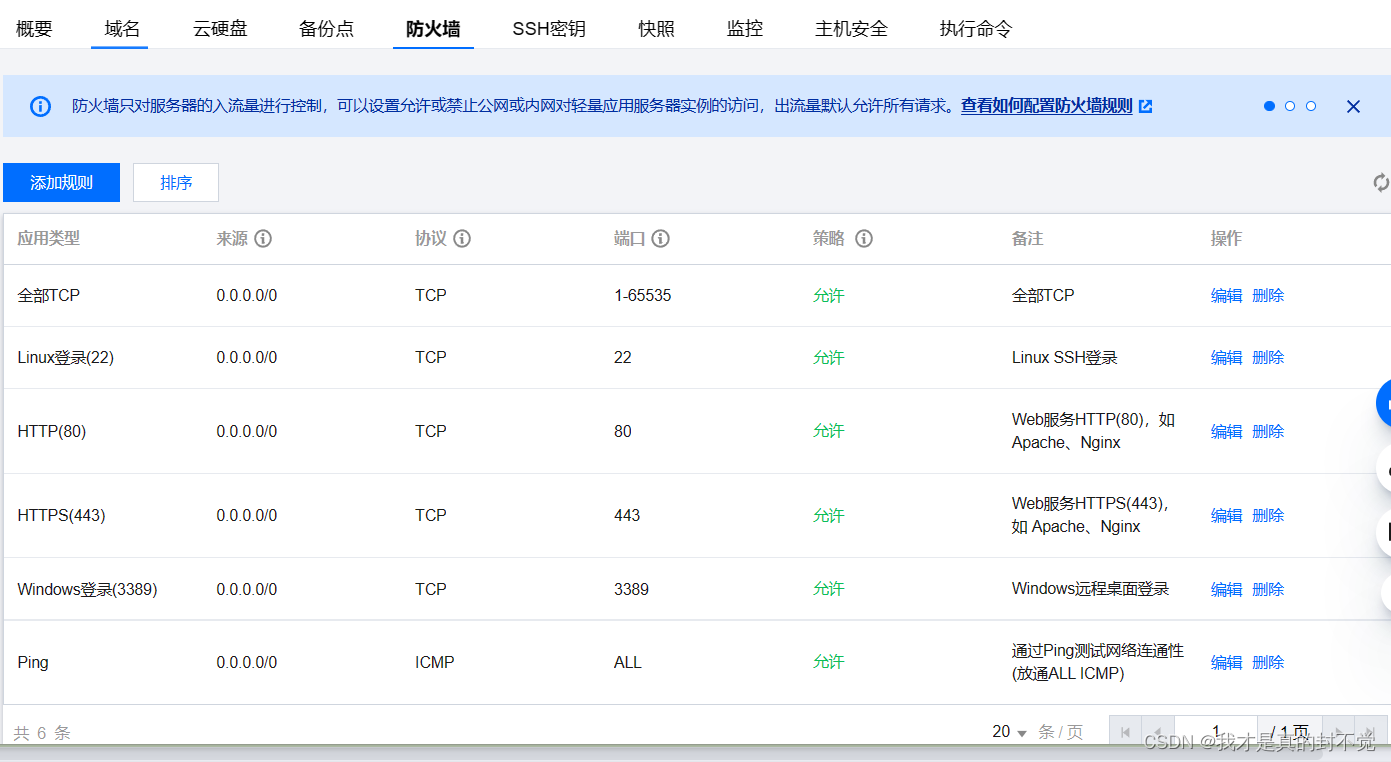
8.云服务器端口开放
这里以腾讯云服务器举例
点击查看详情

点击防火墙,然后添加对应规则 懒得话可以运行访问所有端口
9.jdk上传及环境变量配置
去下载 好后解压jdk
tar -zxvf jdk8.tar.gz

编辑profile文件 添加环境变量

vim /etc/profile

文件最后添加如下三行 /usr/java/jdk1.8.0_191 这个是根据你自己路径来

export JAVA_HOME=/usr/java/jdk1.8.0_191
export PATH=$JAVA_HOME/bin:$PATH
export CLASSPATH=.:$JAVA_HOME/lib/dt.jar:$JAVA_HOME/lib/tools.jar

刷新配置

source /etc/profile

测试环境变量是否生效

java -version
10.部署咱们的单体应用项目并运行
添加这样一个war包的启动类
默认是jar包 后面整到微服务再换成jar

package com.imooc;

import org.springframework.boot.builder.SpringApplicationBuilder;
import org.springframework.boot.web.servlet.support.SpringBootServletInitializer;

// 打包war [4] 增加war的启动类
public class WarStarterApplication extends SpringBootServletInitializer {

    @Override
    protected SpringApplicationBuilder configure(SpringApplicationBuilder builder) {
        // 指向Application这个springboot启动类
        return builder.sources(Application.class);
    }
}
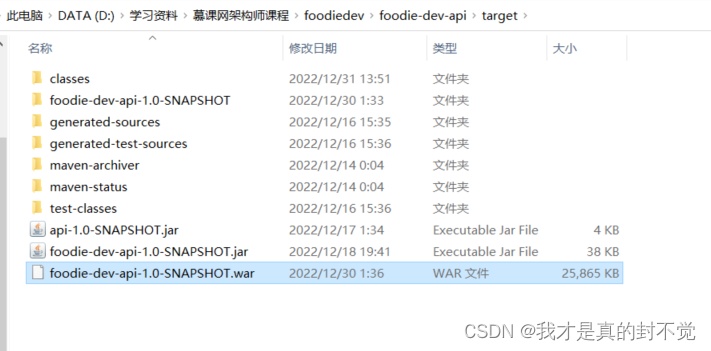
打包方式改成war

点击install 打包到本地
可以看到 target目录下有这样一个war
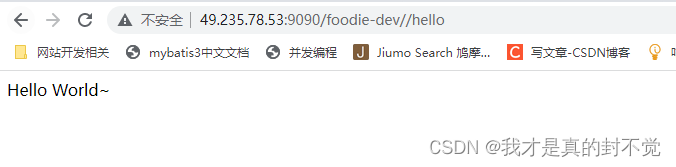
上传两次tomcat 然后 解压然后改名 一个放前端项目 一个放后端项目

把我们的war包上传解压 放到tomcat下webapps目录

修改端口

修改好后启动startup.sh 然后测试 成功
前端项目部署就是直接 把对应俩项目拷贝到 tomcat-frontend下然后启动即可