Cocos Creator:创建棋盘
- 创建地图三部曲:
- 1. 创建layout组件
- 2. 创建预制体Prefab,做好精灵贴图:
- 3. 创建脚本LayoutSprite.ts
- 收尾工作:
创建地图三部曲:
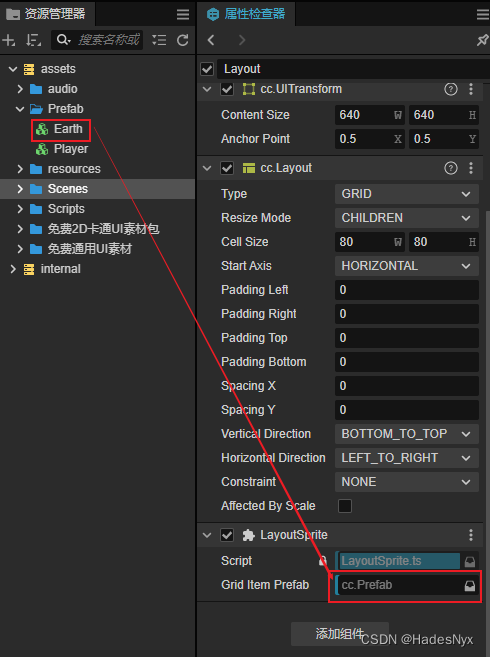
1. 创建layout组件
使用layout进行布局,定义好Grid网格模式,做以下设置:

2. 创建预制体Prefab,做好精灵贴图:

3. 创建脚本LayoutSprite.ts
import { _decorator, Component, Node, instantiate, Prefab} from 'cc';
const { ccclass, property } = _decorator;

@ccclass('LayoutSprite')
export class LayoutSprite extends Component {

    @property({ type: Prefab })
    private gridItemPrefab = null;

    private myuuid = [];

    start() {
        //实例化一个gridItemPrefab
        for (let i = 0; i < 64; i++) {
            let gridCell = instantiate(this.gridItemPrefab);
            this.node.addChild(gridCell);
            this.myuuid.push(gridCell.uuid);
            console.log(gridCell.uuid);
        }
        // console.log(this.myuuid[0]);
        // console.log(this.node.getChildByUuid(this.myuuid[0]));

    }

}
收尾工作:
挂载脚本LayoutSprite.ts到layout组件上(拖上去),挂载预制体prefab到脚本的gridItemPrefab属性上。大功告成!


![[Linux] Apache的配置与运用](https://img-blog.csdnimg.cn/direct/6d6120c323c84f289e04ddb75fa26eb7.png)
![[LeetCode周赛复盘] 第 119 场双周赛20231209](https://img-blog.csdnimg.cn/direct/c44e61c9ea44425a847435a0bbc074ef.png)