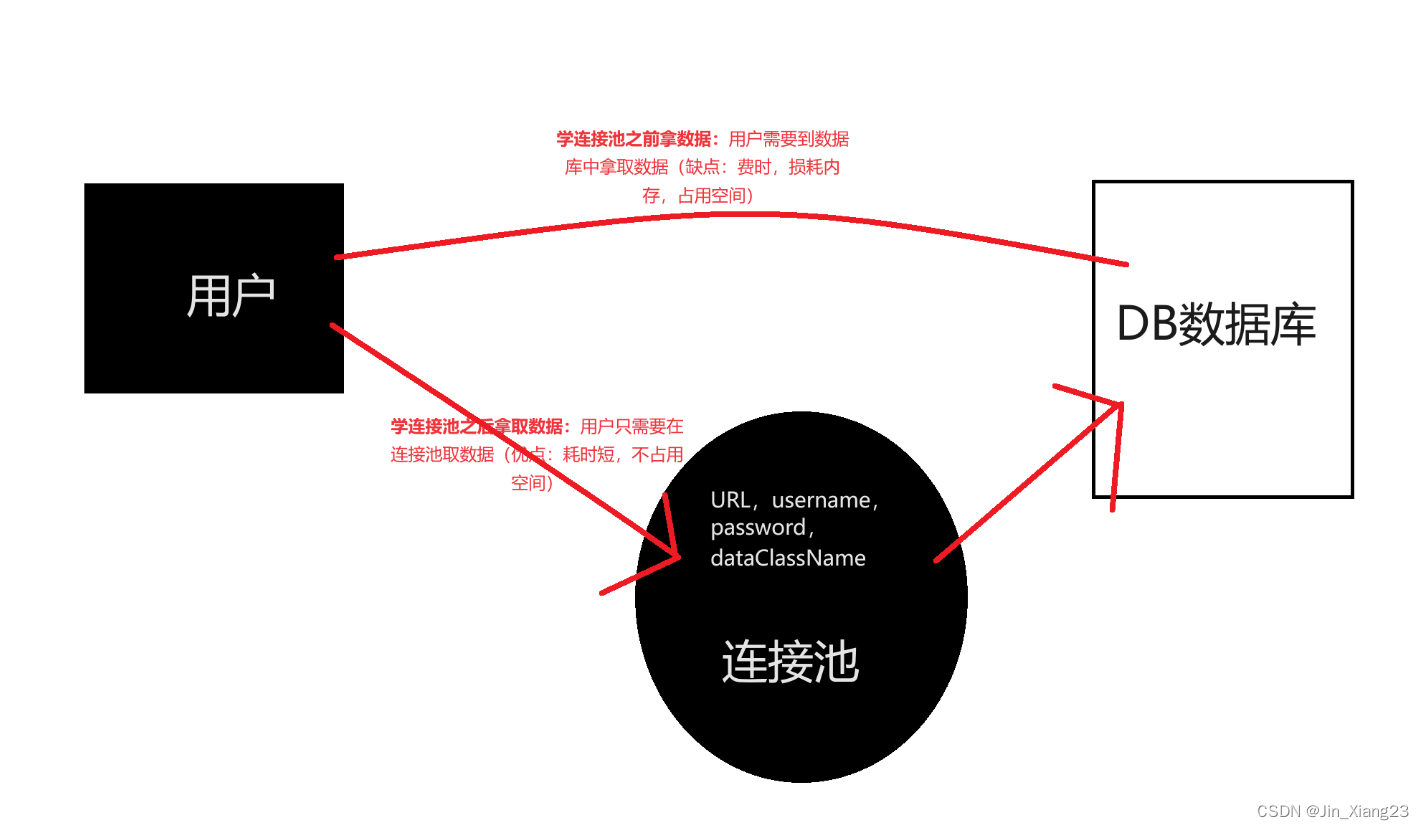
第二天
2.1自定义信号和槽
新建一个Qtclass

自定义信号:返回值是void ,只需要声明,不需要实现,可以有参数,可以重载
自定义槽:返回值void ,需要声明,也需要实现,可以有参数,可以发生重载
首先新建学生和老师的类。在老师的头文件中添加自定义信号,将代码写在signals:下来实现自定义信号(只需要声明不需要实现)
class Teacher  : public QObject
{
    Q_OBJECT
public:
    Teacher(QObject *parent);
    ~Teacher();
//自定义信号写到signals下
//返回值是void ,只需要声明,不需要实现
//可以有参数,可以重载
signals:
    void hungry();
};
在学生类里定义槽返回值void ,需要声明,也需要实现可以有参数,可以发生重载。
class Student  : public QObject
{
public:
 Student(QObject *parent);
 ~Student();
public slots:
 //返回值void ,需要声明,也需要实现
 //可以有参数,可以发生重载
 void treat();
};

void Student::treat()
{
 qDebug("请老师吃饭");
}
现在weidet头文件里新建老师和学生的指针,在到cpp里把他们实例化绑定到父类加入对象树,并且使用connect进行连接。光有连接还不行(=必须要先连接在调用=),需要调用的时机,使用emit来定义触发的时机。写完后就能在输出里看到打印了这段文字。
#include <QtWidgets/QWidget>
#include "ui_widget.h"
#include "Teacher.h"
#include "Student.h"

class widget : public QWidget
{
    Q_OBJECT
public:
    widget(QWidget *parent = nullptr);
    ~widget();
private:
    Ui::widgetClass ui;

    //先申明两个指针
    Teacher* te;
    Student* st;
  //声明调用函数


    void classisover();
};

#include "widget.h"

widget::widget(QWidget *parent)
    : QWidget(parent)
{
    ui.setupUi(this);

    //创建一个老师对象,右边的this是设置父类加入对象树
    this->te = new Teacher(this);

    //创建一个学生对象
    this->st = new Student(this);
    //搭建连接,要先连接在传递信号
    connect(te,&Teacher::hungry,st,&Student::treat);

    classisover();
}

widget::~widget()
{

}

void widget::classisover()
{
    //下课函数,调用后出发老师饿了的信号
    emit te->hungry();
}


![[BJDCTF2020]EzPHP 许多的特性](https://img-blog.csdnimg.cn/direct/09860d80218349dab46afb9ebe0b4784.png)