Nginx实现多虚拟主机配置
Nginx为什么要进行多虚拟主机配置呢?what?
Nginx实现多虚拟主机配置的主要原因是,一个服务器可能会承载多个网站或应用程序,这些网站或应用程序需要使用不同的域名或IP地址来进行访问。如果只有一个虚拟主机配置,只能处理一个域名或IP地址的请求,无法满足多个网站或应用程序的需求。
通过实现多虚拟主机配置,可以使得Nginx能够处理多个域名或IP地址的请求,每个虚拟主机配置都可以有不同的配置信息,例如根目录、日志文件、SSL证书等,从而能够为不同的网站或应用程序提供定制化的服务。
此外,通过使用Nginx作为反向代理服务器,可以将多个应用程序部署在同一台服务器上,并通过不同的虚拟主机配置进行访问,从而提高服务器的利用率和性能。
那就首先来看一下Nginx的配置文件:
worker_processes  1;  #全局指令,在整个nginx中有效
events {
    worker_connections  1024; #括号内为局部指令,只对当前括号内的内容有效
}
#user  nobody;         #nginx启动用户
worker_processes  1;   #nginx工作进程数

#error_log  logs/error.log  info;   #nginx错误日志记录位置

#pid        logs/nginx.pid;         #nginx进程日志记录位置


events {                            #nginx工作进程配置
    use epoll;                      #使用epoll的I/O 模型
    worker_connections 20000;	    #工作进程的最大连接数量
    client_header_buffer_size 4k;   #客户端请求头部的缓冲区大小
    open_file_cache max=2000 inactive=60s; #为打开文件指定缓存,默认是没有启用的,max指定缓存最大数量,建议和打开文件数一致,inactive是指经过多长时间文件没被请求后删除缓存
    open_file_cache_valid 60s;             #这个是指多长时间检查一次缓存的有效信息。
    open_file_cache_min_uses 1;            #open_file_cache指令中的inactive参数时间内文件的最少使用次数,如果超过这个数字,文件描述符一直是在缓存中打开的,如果有一个文件在inactive时间内一次没被使用,它将被移除。

}


http {
    include       mime.types;                  #引入其他文件
    default_type  application/octet-stream;    #默认文件类型,默认为text/plain

	#指定日志格式
    #log_format  main  '$remote_addr - $remote_user [$time_local] "$request" '
    #                  '$status $body_bytes_sent "$http_referer" '
    #                  '"$http_user_agent" "$http_x_forwarded_for"';

	#指定日志位置
    #access_log  logs/access.log  main;

    sendfile        on;  #开启高效文件传输
    #tcp_nopush     on;  #用来提升网络包的传输'效率',sendfile开启才可开启

    #keepalive_timeout  0;
    keepalive_timeout  65;  #连接保持时间

    #gzip  on;             #文件压缩模式

    server {			  #一个服务模块
        listen       80;   #占用端口号
        server_name  localhost; #虚拟服务器的识别标志

        #charset koi8-r;    #设置编码集

		#该服务模块的日志位置
        #access_log  logs/host.access.log  main;

		#请求路径匹配
        location / {
            root   html;
            index  index.html index.htm;
        }

        #error_page  404              /404.html; #错误页面展示
        error_page   500 502 503 504  /50x.html;
        location = /50x.html {
            root   html;
        }
    }
}
多虚拟机配置
基于多端口的虚拟主机配置
- 修改nginx配置文件
[root@localhost /]# vi /tmp/tngx/conf/nginx.conf
#在配置文件添加如下信息
   #添加一个server模块,表示nginx启动之后占用两个端口分别为9999和80
    server {
        listen    9999;
        charset utf-8;
            location /{
                root /baihzi;
            }

    }
    server {
        listen      80;
            server_name  localhost;
            location / {
            root   html;
            index  index.html index.htm;
        }
        error_page   500 502 503 504  /50x.html;
        location = /50x.html {
        	root   html;
        }
    }
- 重启nginx
[root@localhost /]# /tmp/tngx/sbin/nginx -s reload
#访问测试
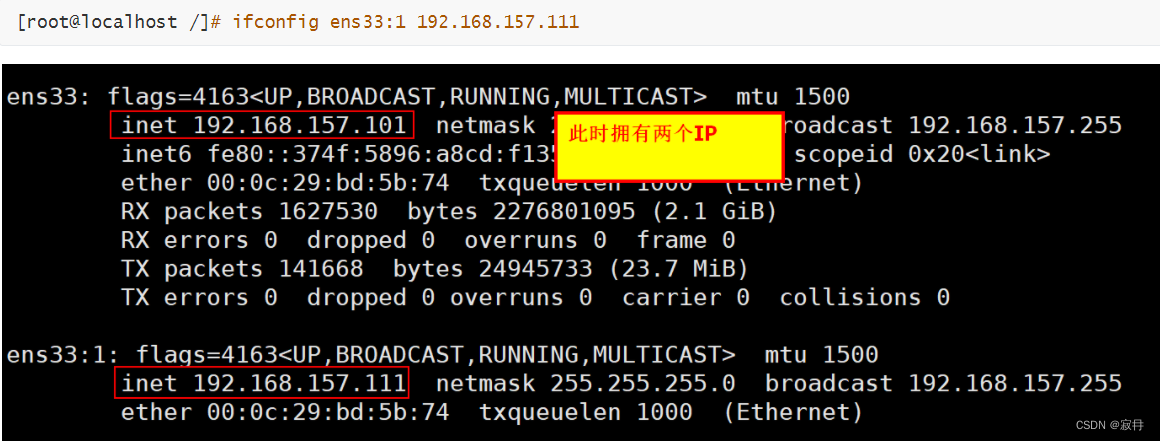
基于多ip的虚拟主机配置
- 为主机添加vip(详细介绍可以看本人另一篇mycat快速搭建)
- 修改配置文件
server {
    listen    192.168.157.101:80;
    charset utf-8;
    location /{
    	root /baihzi;
    }
}
server {
    listen      192.168.157.111:80;
    server_name  localhost;
    location / {
        root   html;
        index  index.html index.htm;
    }
    error_page   500 502 503 504  /50x.html;
    location = /50x.html {
		root   html;
	}
}
- 重启nginx
[root@localhost /]# /tmp/tngx/sbin/nginx -s reload
- 访问nginx
多虚拟主机的日志配置
- 修改配置文件
server {
    listen    192.168.157.101:80;
	access_log  logs/zhangsan/access.log #仅对当前服务生效的日志配置
    charset utf-8;
    location /{
    	root /baihzi;
    }
}
server {
    listen      192.168.157.111:80;
    server_name  localhost;
    access_log  logs/lisi/access.log #仅对当前服务生效的日志配置
    location / {
        root   html;
        index  index.html index.htm;
    }
    error_page   500 502 503 504  /50x.html;
    location = /50x.html {
		root   html;
	}
}
- 重启nginx
[root@localhost lisi]# /tmp/tngx/sbin/nginx -s reload
再补充一下比较常用的nginx.conf的配置
静态资源压缩
#配置文件中开启如下参数
	gzip on;
	gzip_http_version 1.1;
	gzip_comp_level 4;
	gzip_types text/plain application/javascript application/x-javascript text/css application/xml text/javascript application/x-httpd-php image/jpeg image/gif image/png;
目录浏览
location / {
    root /shuaihui;
    # index index.html   #默认访问网页,必须没有此配置,并且指定目录中也不能有index.html
    autoindex on; #添加此内容
}
状态页配置
nginx提供的状态查询模块,用于检测nginx当前状态
该功能需要在编译nginx时添加–with-http-stud-status_module才能使用
在配置文件中添加如下配置

server{
    listen 85; #监听85端口
    location / {
        stub_status on; #开启状态页
        access_log off; #关闭日志
    }
}
location匹配机制
根据用户请求的地址,进行不同的处理
location的不相同写法
location [=|~*|^~] url {
    相应的处理
}

匹配符  匹配规则            优先级(数值越小优先级越高)
 =     精确匹配				 1
 ^~    以某开头,不支持正则	 2
 ~*    支持正则				 3
 空    路径匹配       		4
 /     通配				  5
#案例
server {
    listen 83;
    location / {
        return 401;
    }
    location = /zhangsan {
        return 402;
    }
    location /lisi/ {
        return 403;
    }
    location ^~ /wangwu/ {
        return 404;
    }
    location ~* \.(gif|jpg|jpeg)$ {
        return 500;
    }


}
URL重写
将用户请求的路径再次跳转到指定路径
#语法    rewrite  用户请求路径  跳转路径  匹配规则

server {
    listen 90;
    server_name _;
    location / {
        rewrite ^/(.*) http://www.baidu.com/$1 permanent;
    }
}
rewrite结尾参数如下:
- last 匹配完成后,继续向下匹配
- break 匹配完成后,不再匹配
- redirct 临时重定向,浏览器展示跳转之后的url,爬虫不会更新
- permanent 永久重定向,浏览器展示跳转之后的url,爬虫会会更新
Nginx访问认证
nginx提供访问认证,用户访问时需做登陆验证
#使用linux生成验证文件
[root@localhost /]# yum install -y httpd-tools #下载http工具包

[root@localhost /]# htpasswd -bc 文件位置  用户名 密码
#修改nginx配置
server {
    listen 95;
    server_name _;
    location / {
        root /shuaihui;
        auth_basic "test auth";
        auth_basic_user_file 上面生成的文件位置;
    }
}