文章目录
- 取消标头
- 自定义标题栏
- 导入Resources
- 自定义跳转动画
- 关于底部tabBar导航
- 文本输入(TextInput/TextArea)
- 自定义样式
- 添加事件
- 可以是`onChange`
- 可以是`onSubmit`
- List列表组件
- 设置主轴方向
- 网格布局
- 服务卡片-获取地理位置
- 页面获取地理位置
- 服务卡片获取地理位置
可以先看看,但是自己还没到达这高度(openHarmony的内容)
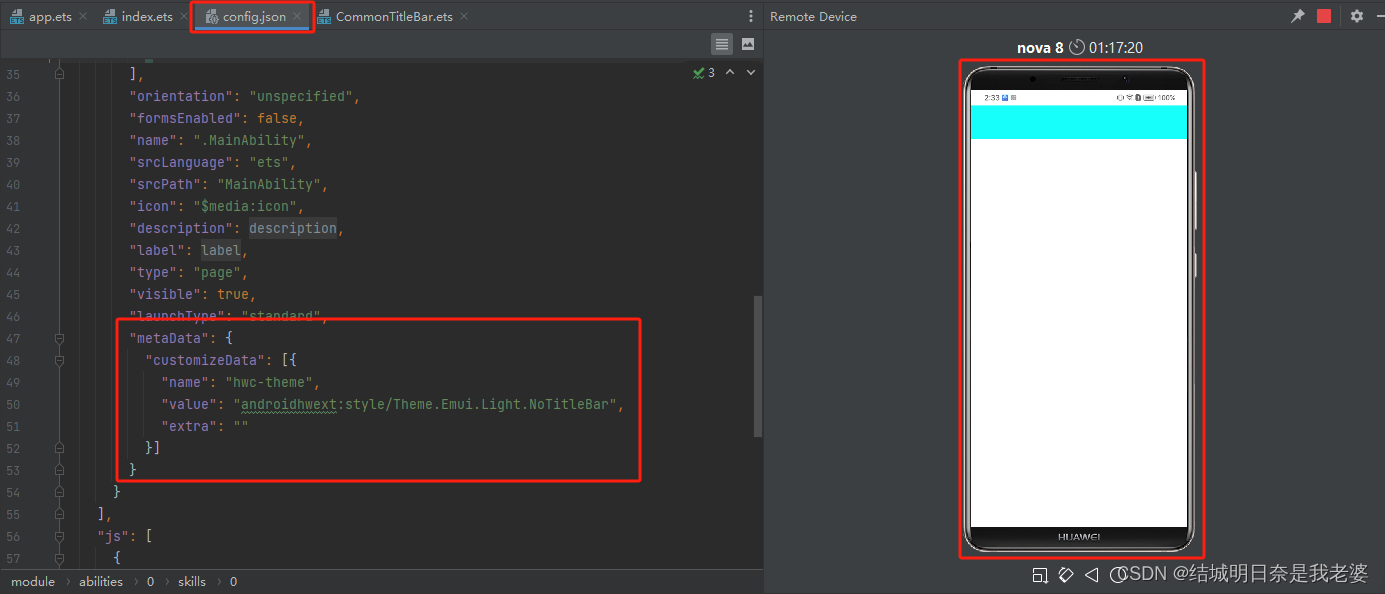
取消标头
//config.json(ets)
{
  //...
  "abilities": [
      {
		//...
        "metaData": { //添加这一段
          "customizeData": [{
            "name": "hwc-theme",
            "value": "androidhwext:style/Theme.Emui.Light.NoTitleBar",
            "extra": ""
          }]
        }
      }
    ],

}
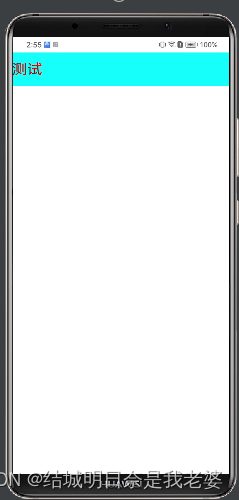
自定义标题栏
因为是使用的是Components组件所以要使用@Props但这是单向的,父传子,可以使用@Link父子双向传输这里还是使用
@Props就可以了
src/main/ets/MainAbility/components/组件名.ets
@Component
export struct CommonTitleBar{
  @Prop user_name:string;
  build(){
    Row(){
      Row(){
        Text(`${this.user_name}`).fontSize(25).fontColor('#f00')
      }.width('100%').height('8%').backgroundColor('#0ff')
    }.width('100%')
  }
}
src/main/ets/MainAbility/pages/组件名.ets
import {CommonTitleBar} from "../components/CommonTitleBar"

@Entry
@Component
struct Index {
  @State message: string = 'Hello World'
  public attribute: CommonTitleBar;
  @State text:string = "测试"
  build() {
    Row(){
      CommonTitleBar({user_name:this.text}) //值传入
    }
  }
}
导入Resources
这里以HarmonyOS的
Image为例子
这里以media为例子----Image组件
Image($r('app.media.user_default')).width('20%').height('80%')
如果是rawfile文档里也有说明
Image($rawfile('图片名'))
注意: 这里的图片类型都是png,如果不是png格式的图片并且出现问题,请另找文章
自定义跳转动画
是基于
ohos.router的跳转来测试的
官方文档
@Entry
@Component
struct myPage{
  build(){
    Column(){
      //components...
    }.height('100%')
  }

  pageTransition() {
    PageTransitionEnter({  })
      .onEnter((type: RouteType, progress: number) => {

      })
    PageTransitionExit({  })
      .onExit((type: RouteType, progress: number) => {

      })
  }
}
当然你可以写很多专场特效,如果你向我上面示例一样什么都不写,则是没有跳转动画的(注:输入pageT会有代码提示,注意区分)
关于底部tabBar导航

就是一个组件,只不过上面的俩组件的大小刚刚好让这个组件在最下面,但是要进行状态的同步,应该是要使用上面提到过的@Link组件
import router from '@ohos.router';
@Component
export struct BottomTabBar{
  @Prop backColor:string

  @Prop Dialog1Name:string;
  @Prop Dialog1Page:string;
  @Prop isDialog1Btn:boolean;
  @Link Dialog1BackColor:string;

  @Prop Dialog2Name:string;
  @Prop Dialog2Page:string;
  @Link Dialog2BackColor:string;
  @Prop isDialog2Btn:boolean;


  build(){
    Row(){
      Column(){
        if(this.isDialog1Btn == true){
          Image($r('app.media.home_selected')).width(30).height(30).position({x:15,y:-30})
        }else if(this.isDialog2Btn == true){
          Image($r('app.media.home')).width(30).height(30).position({x:15,y:-30})
        }
        Text(this.Dialog1Name).fontSize(10).fontColor(this.Dialog1BackColor).position({x:20,y:10})
      }.height('100%').onClick(()=>{
        router.replace({
          url: this.Dialog1Page
        })
      })
      Column(){
        if(this.isDialog1Btn == true){
          Image($r('app.media.my')).width(30).height(30).position({x:295,y:-52})
        }else if(this.isDialog2Btn == true){
          Image($r('app.media.my_selected')).width(30).height(30).position({x:295,y:-52})
        }
        Text(this.Dialog2Name).fontSize(10).fontColor(this.Dialog2BackColor).position({x:300,y:-11})
      }.onClick(()=>{
        router.replace({
          url: this.Dialog2Page
        })
      })
    }.width("100%").height('6%').backgroundColor(this.backColor)
  }
}
这样写可以以假乱真
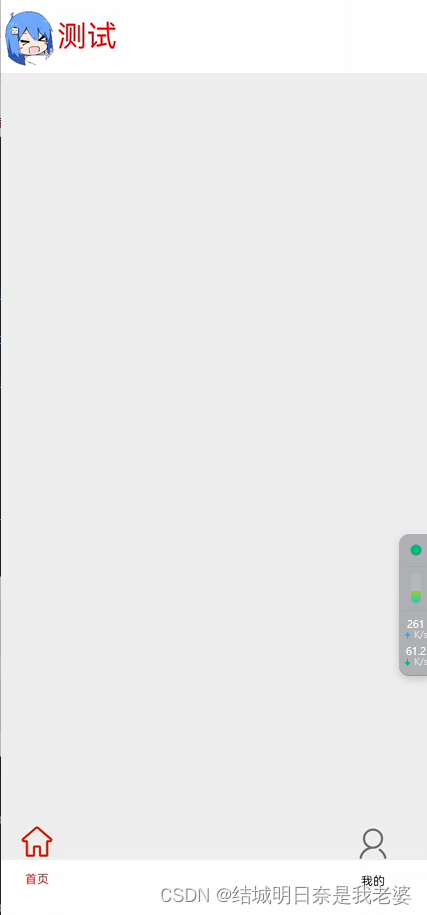
当然如果不想要这么麻烦可以使用TabContent其中涉及到了Tabs
build(){
    Row(){
      Tabs({barPosition:BarPosition.Start,controller: this.controller}){
        TabContent(){
          Column(){
            Text("首页").fontSize(32)
          }.width('100%').height('100%').backgroundColor(Color.Pink)
        }
        TabContent(){
          Column(){
            Text("我的").fontSize(32)
          }.width('100%').height('100%').backgroundColor(Color.Pink)
        }
        TabContent(){
          Column(){}
        }
      }
    }.width("100%").height('6%')
// import router from '@ohos.router';


@Component
export struct BottomTabBar{
  @Prop backColor:string

  @State currentIndex:number = 0;
  @State fontColor: string = 'rgba(0, 0, 0, 0.4)'
  @State selectedFontColor: string = 'rgba(10, 30, 255, 1)'

  @State Tab1Name:string = "首页"
  @State Tab2Name:string = "我的"

  private controller: TabsController = new TabsController()

  @Builder TabBuilder(index: number,ImageUrl:Resource,ImageUrl_Selected:Resource,TabName:string) {
    Column() {
      Image(this.currentIndex === index ? ImageUrl_Selected : ImageUrl)
        .width(24)
        .height(24)
        .margin(6)
        .opacity(this.currentIndex === index ? 1 : 0.4)
        .objectFit(ImageFit.Contain)
      Text(`${TabName}`)
        .fontColor(this.currentIndex === index ? this.selectedFontColor : this.fontColor)
        .fontSize(10)
    }.width('100%')
  }

  build() {
    Row() {
      Tabs({ barPosition: BarPosition.End, controller: this.controller }) {
        TabContent() {
          Column() {
            Text("首页").fontSize(32)
          }.width('100%').height('100%').backgroundColor(Color.Pink)
        }.tabBar(this.TabBuilder(0, $r('app.media.home'), $r('app.media.home_selected'),this.Tab1Name))

        TabContent() {
          Column() {
            Text("我的").fontSize(32)
          }.width('100%').height('100%').backgroundColor(Color.Pink)
        }.tabBar(this.TabBuilder(1, $r('app.media.my'), $r('app.media.my_selected'),this.Tab2Name))
      }
    }.width("100%").height('6%').backgroundColor(this.backColor)
  }
}
文本输入(TextInput/TextArea)
我们这里使用单行输入(TextInput) 你也可以使用多行输入(TextArea)
基础的TextInput
TextInput().width(200).height(25).margin({top:10,left:30,right:0,bottom:10})
确认TextInput类型
TextInput().type(InputType.Normal)//可以是TextInput().type(InputType.Password)
自定义样式
TextInput({placeholder:'陈天羽'}).type(InputType.Normal)
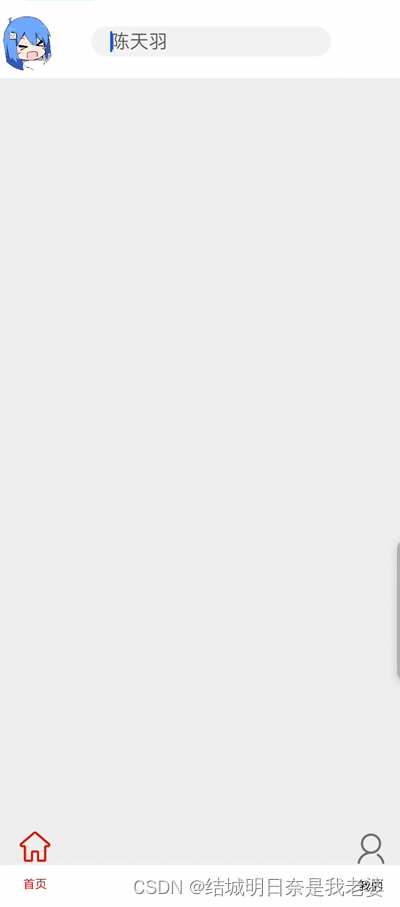
可以请提前输入文本
TextInput({placeholder:'陈天羽',text:'你好'}).type(InputType.Normal)
可以改变TextInput背景颜色
TextInput({placeholder:'陈天羽'}).type(InputType.Normal).backgroundColor(Color.Pink)
添加事件
TextInput()
  .onChange((value: string) => {
    console.info(value);
  })
  .onFocus(() => {
    console.info('获取焦点');
  })
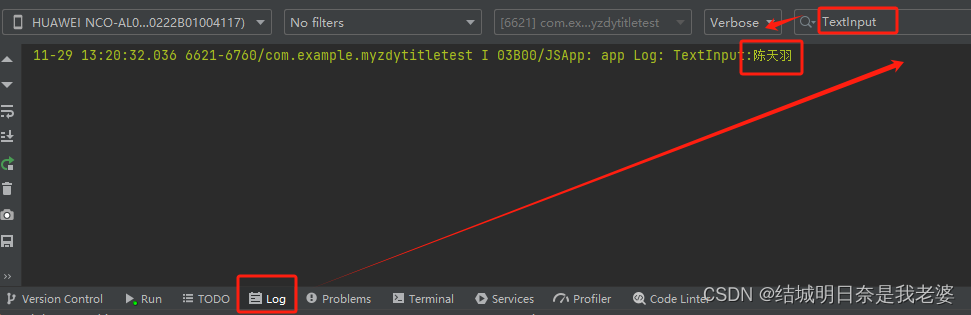
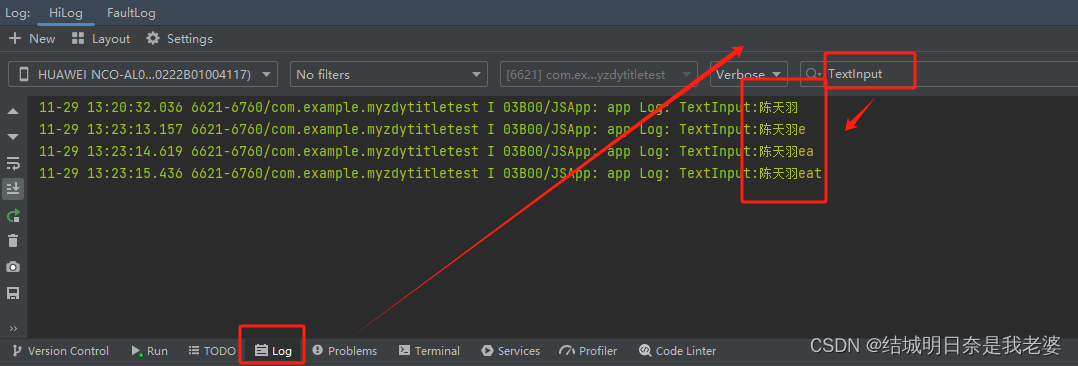
可以是onChange
TextInput({placeholder:'陈天羽'}).type(InputType.Normal).width(200).height(25).margin({top:10,left:30,right:0,bottom:10})
          .onChange((value:string)=>{
            console.info('TextInput:'+value);
          })
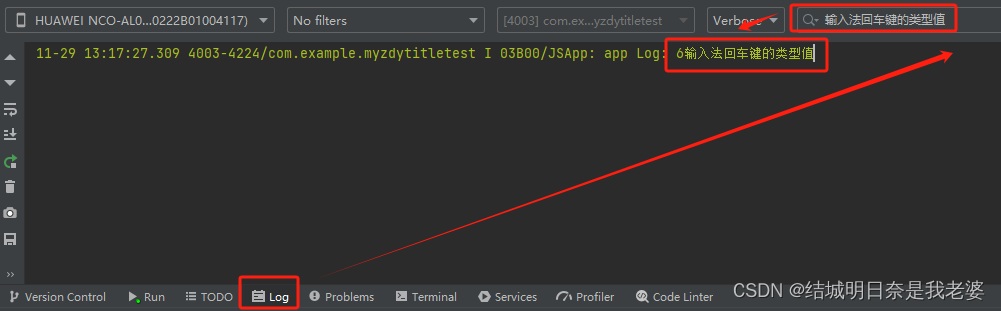
以下图片是键盘输入而获取输入内容,点击一个键,则更新一个内容
可以是onSubmit
TextInput({placeholder:'陈天羽'}).type(InputType.Normal)
	.width(200)
	.height(25)
	.margin({top:10,left:30,right:0,bottom:10})

	.onSubmit((EnterKeyType)=>{
		console.info(EnterKeyType+'输入法回车键的类型值')
	})
下图时按下手机键盘上的
确认按键
List列表组件
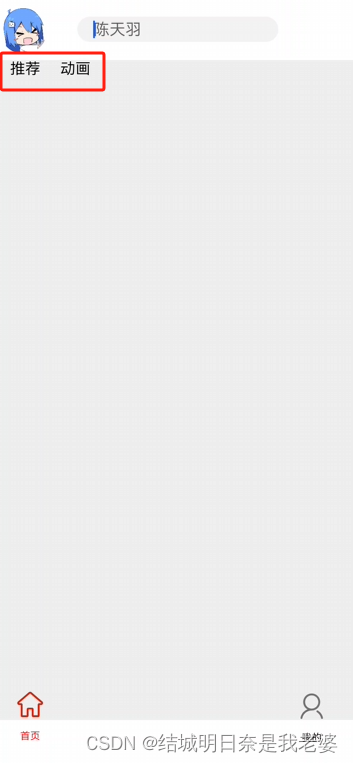
设置主轴方向
我这里设置的是
Horizontal
List(){
    ListItem(){
    	Text('推荐').fontSize(15).margin({top:0,left:10,right:10,bottom:0})
    }
    ListItem(){
    	Text('动画').fontSize(15).margin({top:0,left:10,right:10,bottom:0})
	}
}.listDirection(Axis.Horizontal).width('100%').height('8%')
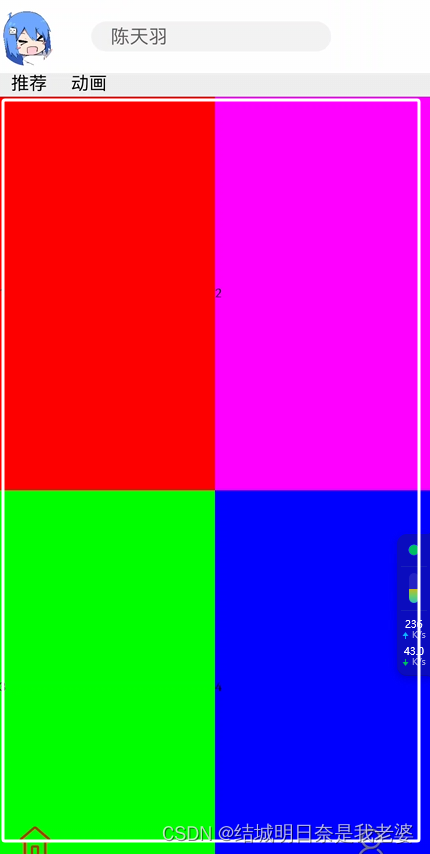
网格布局
Grid(){
        GridItem(){
          Text("1").width('100%').height('100%').backgroundColor('#f00')
        }
        GridItem(){
          Text("2").width('100%').height('100%').backgroundColor('#f0f')
        }
        GridItem(){
          Text("3").width('100%').height('100%').backgroundColor('#0f0')
        }
        GridItem(){
          Text("4").width('100%').height('100%').backgroundColor('#00f')
        }
        GridItem(){
          Text("5").width('100%').height('100%').backgroundColor('#0ff') //当然超出的部分是没有显示的
		}
	}.rowsTemplate('1fr 1fr').columnsTemplate('1fr 1fr')
}.width('100%').height('86%').backgroundColor('#eee')
服务卡片-获取地理位置
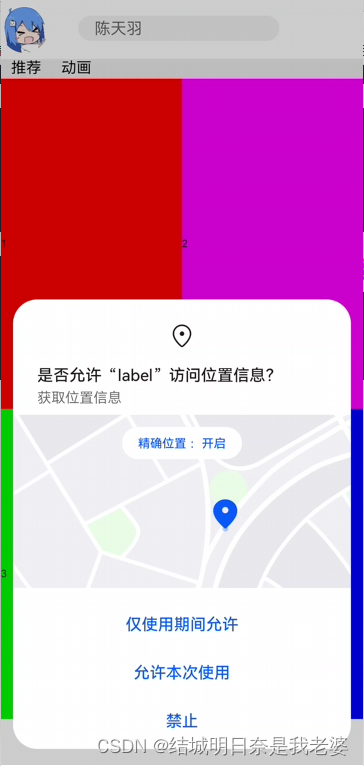
首先我们要确认怎么用ets获取自己的地理位置官方文档-获取设备的位置信息
页面获取地理位置
- 首先我们要获取使用权限
"reqPermissions": [
      {
        "name": "ohos.permission.LOCATION",
        "reason": "$string:reason_description",
        "usedScene": {
          "ability": ["com.example.myzdytitletest.MainAbility"],
          "when": "inuse"
        }
      }
    ]
这里的$string:reason_description在三个
string.json中定义
//base/string.json
{
	"name":"reason_description",
	"value": "get Local"
}
//en_US/string.json
{
	"name":"reason_description",
	"value": "get Local"
}
//zh_CN/string.json
{
	"name":"reason_description",
	"value": "获取地理位置"
}
- 在其中一个组件中定义(这里我们选择初始化的第一个页面
Index.ets)
//...(其他components)
import geolocation from '@ohos.geolocation';

@Entry
@Component
struct Index{
  onPageShow(){
    //获取位置信息
    var requestInfo = {'priority': 0x201, 'timeInterval': 0, 'distanceInterval': 0, 'maxAccuracy': 0};
    var locationChange = (location) => {
      console.log('locationChanger: data: ' + JSON.stringify(location));
    };
    geolocation.on('locationChange', requestInfo, locationChange);
  }
}
结果图
这些都是获取到的地址信息
抓一串数据来看
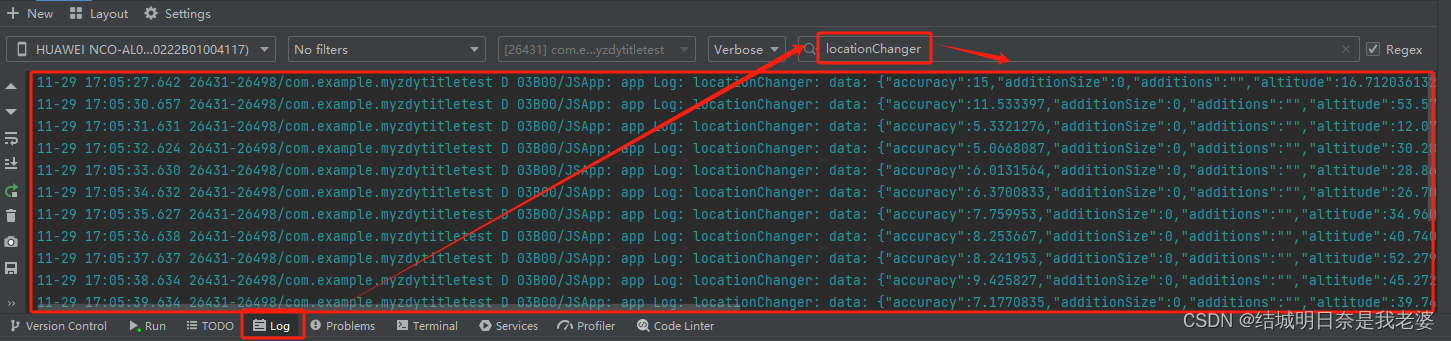
app Log: locationChanger: data: {"accuracy":9.935046,"additionSize":0,"additions":"","altitude":33.40478515625,"direction":0,"isFromMock":false,"latitude":30.02292782,"longitude":119.97146259,"speed":0,"timeSinceBoot":2212104121975933,"timeStamp":1701249020000}
但是我们这样只知道坐标不知道具体位置,所以我们可以使用(逆)地理编码转化来推测出当前位置信息
- 调用
getAddressesFromLocation,坐标转化地理位置信息。
let reverseGeocodeRequest:geolocation.ReverseGeoCodeRequest = {"latitude": 31.12, "longitude": 121.11, "maxItems": 1};
geolocation.getAddressesFromLocation(reverseGeocodeRequest, (err,data) => {
    if (err) {
        console.log('getAddressesFromLocation: err=' + JSON.stringify(err));
    }
	if (data) {
    	console.log('getAddressesFromLocation: data=' + JSON.stringify(data));
	}
});
出现的数据是
getAddressesFromLocation: data=[{"addressUrl":"","administrativeArea":"上海市","countryCode":"CN","countryName":"中国","descriptions":["上海市青浦区金家村路上海龙鼎苗木培育中心"],"descriptionsSize":0,"isFromMock":false,"latitude":31.120929,"locale":"zh_CN","locality":"上海市","longitude":121.110896,"phoneNumber":"","placeName":"金家村路上海龙鼎苗木培育中心","postalCode":"","premises":"","roadName":"青昆路","subAdministrativeArea":"","subLocality":"青浦区","subRoadName":"755号"}]
- 调用
getAddressesFromLocationName位置描述转化坐标。
var geocodeRequest = {"description": "上海市青浦区金家村路上海龙鼎苗木培育中心", "maxItems": 1};
geolocation.getAddressesFromLocationName(geocodeRequest, (data) => {
    console.log('getAddressesFromLocationName: ' + JSON.stringify(data));
});
博主很菜,没有写出实时性获取地址+(逆)地理编码转化。有大佬可以进行拓展(注意以上都可以写在
Pages的onPageShow生命周期钩子里)
服务卡片获取地理位置
服务卡片可以参考这一篇文章接下来我们就开始使用服务卡片获取地理位置
博主很菜,因为是json控制的关系,目前还没写出。。。可以开骂