python -opencv 边缘检测
边缘检测步骤:
第一步:读取图像为灰度图
第二步:进行二值化处理
第三步:使用cv2.findContours对二值化图像提取轮廓
第三步:将轮廓绘制到图中
代码如下:
from ctypes.wintypes import SIZE
from multiprocessing.pool import IMapUnorderedIterator
import cv2
import copy
import math
import matplotlib.pyplot as plt
import matplotlib as mpl
import numpy as np
import os

path=r'D:\learn\photo\cv\res\ballon.png'

img=cv2.imread(path,1)
img_gray=cv2.imread(path,0)


def cv_show(name,img):
    cv2.imshow(name,img)
    #cv2.waitKey(0),接收0,表示窗口暂停
    cv2.waitKey(0)
    #销毁所有窗口
    cv2.destroyAllWindows()


#cv_show('img_gray',img_gray)


#进行二值化处理
ret,binary=cv2.threshold(img_gray,0,255,cv2.THRESH_BINARY+cv2.THRESH_OTSU)


#cv_show('dist',dist)

def BGR_TO_RGB(img):
    return img[:,:, ::-1];
#检测轮廓

countourClose,hierrachyclose=cv2.findContours(binary,cv2.RETR_TREE,cv2.CHAIN_APPROX_SIMPLE)


print("len(countourclose) is",len(countourClose))

#countourClose 轮廓坐标信息
#hierrachyclose 轮廓之间的层次结构


#背景图
result=np.zeros(img.shape,np.uint8)

#绘制轮廓边框
for  i in range(len(countourClose)):
    cnt=countourClose[i]
    #近似多边形
    #第一个参数,表示精度,单位是像素
    #第二个像素表示是否闭合
    approx=cv2.approxPolyDP(cnt,3,True)
    #绘制轮廓
    #-1表示绘制所有轮廓
    #5线条粗细

    cv2.drawContours(result,[approx],-1,(0,0,255),5)
     #绘制矩形
    x,y,w,h=cv2.boundingRect(cnt)
    cv2.rectangle(result,(x,y),(x+w,y+h),(0,255,0),5)
    #绘制最小外接圆
    (x,y),r=cv2.minEnclosingCircle(cnt)
    center=(int(x),int(y))
    r=int(r)
    cv2.circle(result,center,r,(255,255,255),5)


    #

plt.figure(figsize=(400,600))


print(img_gray.shape)
print(img_gray[0][0])
plt.subplot(221)
#img_gray=BGR_TO_RGB(img_gray,'gray')
plt.imshow(img_gray,'gray')
plt.title('img_gray')

plt.subplot(222)
plt.imshow(binary,'gray')
plt.title('binary')
plt.subplot(223)
plt.imshow(result,'gray')
plt.title('result')

plt.show()
os.system("pause")
运行结果如下:
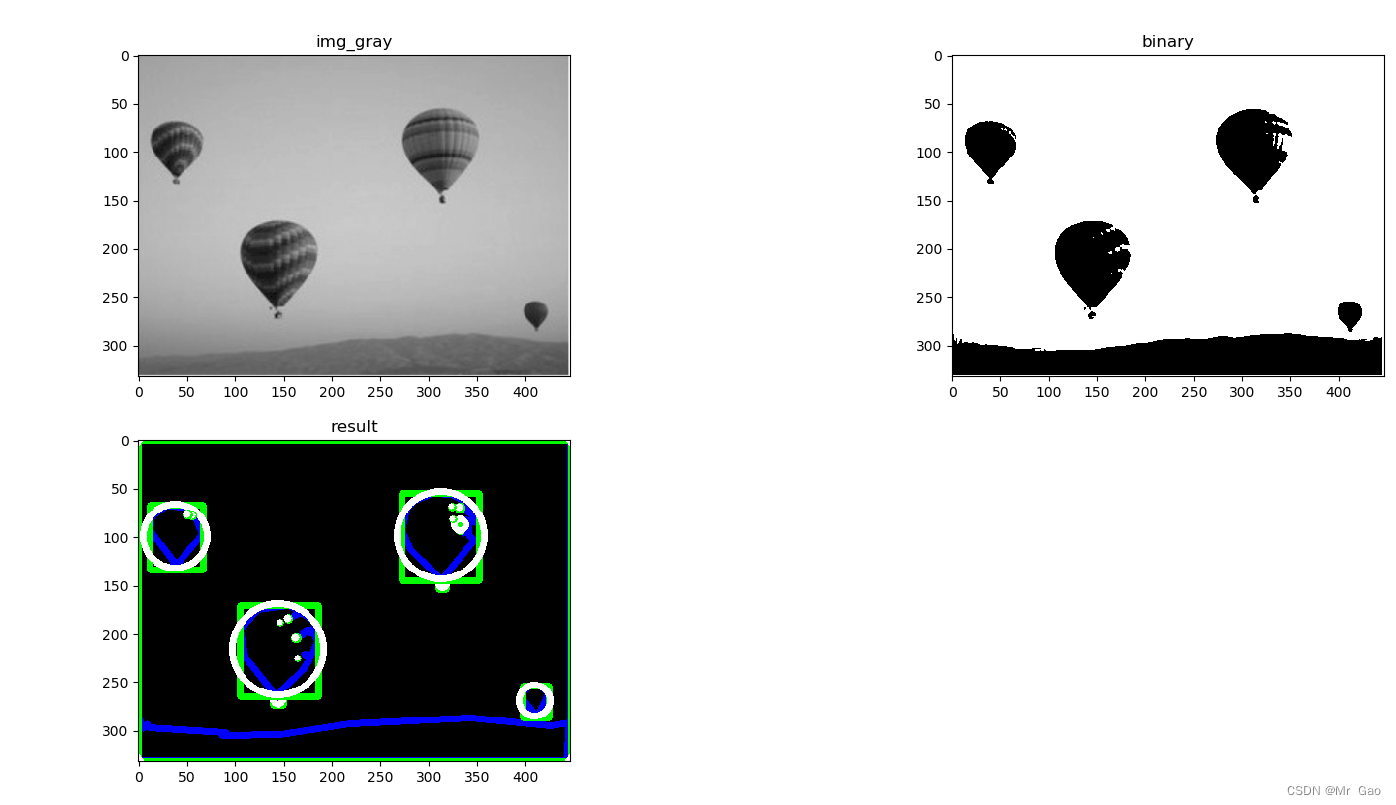


![[OpenAirInterface-01]什么是OAI?OAI在github中源代码的存放结构](https://img-blog.csdnimg.cn/70f75c85713e42cda5a28738426b651b.png)