视频
Vue脚手架学习笔记
- 1. 脚手架设置相关内容
- 1.1 各文件的作用
- 1.2 关闭语法检查
- 2. 组件的使用
- 2.1 单文件组件的使用(组件使用的三个步骤)
- 2.2 prop配置项:父向子传数据
- 2.2.1 数组方式
- 2.2.2 类型限制
- 2.2.3 默认值、必要性
- 2.3 ref :给标签添加名字
- 2.4 mixin:混入,将共有的方法提取
- 2.5 scoped:局部样式
- 2.6 $emit :在组件中自定义事件,子向父传数据
- 2.6.1 通过代码给组件绑定事件
- 2.6.3 自定义事件只执行一次once
- 2.6.4 传递的参数不确定时
- 2.7 $bus 数据总线:任意组件数据传递
- 2.8 pubsub:消息订阅,任意组件传递消息
- 3. axios:Vue中的Ajax
- 4 VueX
- 4.1 安装VueX
- 4.2 store 三大核心的作用:
- 4.2.1 actions
- 4.2.2 mutations
- 4.2.3 state
- 4.2.4 getter 第四个配置项
- 4.3 调用三大核心时的简写形式:映射
- 4.3.1 mapState:在计算属性computed中使用
- 4.3.1.1 v-modle 中不能使用mapState中定义的对象
- 4.3.2 mapGetter:在计算属性computed中使用
- 4.3.1 mapActions:在methods中使用
- 4.3.1 mapMutations:在methods中使用
- 5 Vuex的模块化
- 5.1 export default 和 export const导出的不同
- 5.2 给每个模块创建对应的js文件
- 5.3 在组件中调用
- 5.3.1 state
- 5.3.2 getters
- 5.3.3 actions
- 5.3.4 mutations
- 5.3.5 Vue_a.vue代码
- 6 路由
- 6.1 新建目录和文件
- 6.2 在main.js中导入路由组件
- 6.3 在App.vue中使用路由
- 6.4 多级路由
- 6.4.1query的对象形式在路由传递数据
- 6.4.1.1 完整代码
- 6.4.2 query的字符形式传递数据
- 6.4.3 路由配置中的`name` 属性
- 6.5 编程式导航(浏览器的前进\后退)
- 6.6 $router中的前进\后退
- 6.6 `push` 到达指定路由
- 6.7 keep-alive:页面跳转时组件销毁
- 6.8 路由的两个生命周期
- 6.9 $route中的meta
- 6.10 全局路由守卫
- 6.10.1 全局前置路由守卫
- 6.10.2 全局后置路由守卫 title的设置
- 6.11 局部路由守卫
- 6.11.1 path守卫
- 6.11.2 组件守卫
- 7 发布到服务器
1. 脚手架设置相关内容
安装node版本管理工具nvm
- nvm常用命令
- 下载指定版本的node:nvm install 16.18.1
- 切换指定版本的node:nvm use16.18.1
- 卸载指定版本的node:nvm uninstall 16.18.1
- 显示已安装的node版本:nvm ls 或 nvm list
- 显示nvm版本:nvm v
安装和卸载node
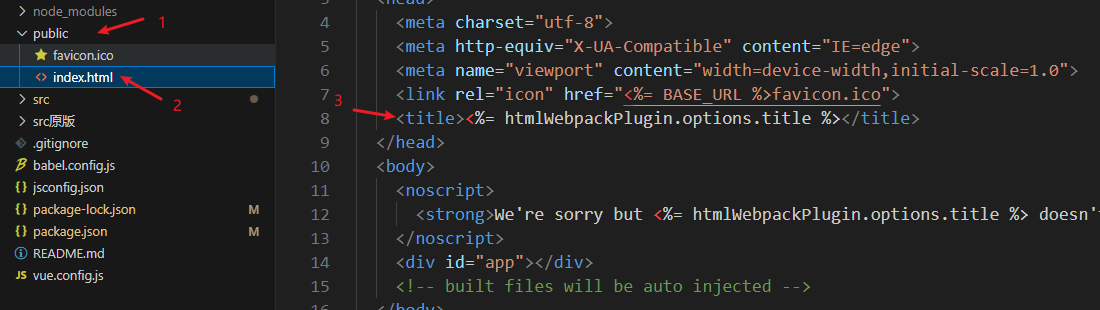
1.1 各文件的作用

1.2 关闭语法检查
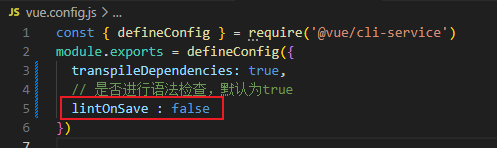
lintOnSave : false
2. 组件的使用
2.1 单文件组件的使用(组件使用的三个步骤)
创建组件–>注册组件–>使用组件
- 在Componets文件中创建文件Car.vue
组件:(html(结构),javascript(交互),css(样式))
<template>
  <div>
    <h3>{{brand}}</h3>
    <h3>{{price}}</h3>
    <h3>{{color}}</h3>
  </div>
</template>

<script>
export default {
  // 在浏览器的VueDevTool中显示的名字
    name : 'CarInfo',
    data(){
        return {
            brand : '宝马520',
            price : '10',
            color : '黑色',
        }
    }
}
</script>
- 在App.vue中注册
<script>
import Car from './components/Car.vue'
// 将组件暴露在外,方便别的组件调用:export default
export default{
name : 'app',
data() {
return {
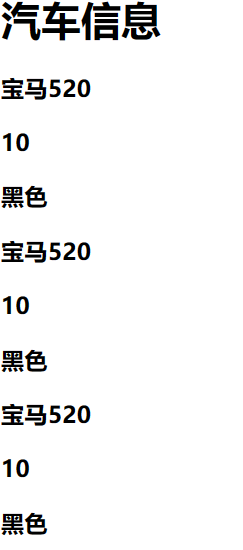
msg: '汽车信息',
};
},
// 2. 下一级组件在这里注册
components : {Car}
}
</script>
- 使用组件
<template>
    <div>
      <h1>{{msg}}</h1>
      <!-- 3. 使用组件 -->
      <car></car>
      <car></car>
      <car></car>
    </div>
</template>
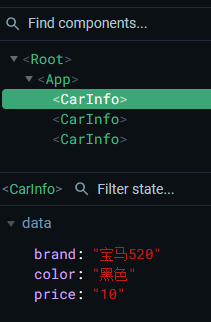
- 最终显示效果
- 在 浏览器插件中显示
2.2 prop配置项:父向子传数据
- 如果传递是data中定义的响应式数据,需要标签的属性使用v-bind,
:属性名='插值' - 在子组件中:配置项
props :['属性名'],来接收 - 如果传递的是一个对象,则需要使用
属性名.key - prop接收后的数据不能修改,因为数据的源在父组件,在子组件修改不会传递到父组件
2.2.1 数组方式
Car.vue
<template>
  <div>
    <h3>{{brand}}</h3>
    <h3>{{price}}</h3>
    <h3>{{color}}</h3>
  </div>
</template>

<script>
export default {
    name : 'CarInfo',
    // 1. 数组方式
    props:['brand','price','color']
}
</script>
App.vue
<template>
    <div>
      <!-- * 数据通过标签的属性来传递,示例中传递的是常量所以属性不用加v-bind -->
      <car brand='宝马520' price=10 color="黑色"></car>
    </div>
</template>
2.2.2 类型限制
car的price限制为数字类型,而传递过来的数据还是string的情况下,程序可以运行,控制台报错:price的类型错误。应该是数字类型10,而传送来的是字符串‘10’
Invalid prop: type check failed for prop “price”. Expected Number with value 10, got String with value “10”.
- 解决办法:传送数据时将标签
price=‘10’改为:v-bind:price='10'简写:price='10' - 这里有一个问题要注意,除数字类的字符串,其他字符类的不能使用
v-bind,会将字符串当成data中的对象去查找。
Car.vue
<script>
export default {
    name : 'CarInfo',
    //2. 添加类型限制
    props : {
      brand : String,
      price : Number,
      color : String,
    }
}
</script>
App.vue
<template>
    <div>
      <h1>{{msg}}</h1>
      <!-- * 数据通过标签的属性来传递 -->
      <car brand='宝马520' :price='10' color="黑色"></car>
      <car brand="比亚迪" :price='20' color="红色"></car>
    </div>
</template>
2.2.3 默认值、必要性
- 默认值:当传递的属性不存在时,会使用默认值(必须是属性都不存在,等于空串也不会使用默认值)
- 必要性:传递的属性必须存在,否则控制台报错:
Missing required prop
App.vue
      <!-- * 数据通过标签的属性来传递 -->
      <car brand='宝马520' :price='10' ></car>
      <car brand="比亚迪" :price='20' color="红色"></car>
Car.vue
<script>
export default {
    name : 'CarInfo',
    //3. 添加配型限制、默认值、必要性)
    props : {
      brand : {
        type:String,
        required : true // 必要性
      },
      price : {
        type:Number,
        required : true // 必要性
      },
      color : {
        type:String,
        default : '红色' // 默认值
      },
    }
}
</script>
2.3 ref :给标签添加名字
- 在任意的标签内添加属性
ref,并赋值 - ref的属性值,必须唯一,否则报错
- 通过
this.$refs.ref的属性值.属性来访问标签内任意属性的属性值
App.vue
<template>
    <div>
      <h1 ref='title'>{{msg}}</h1>
		// 添加ref属性并赋值
      <car brand='宝马520' :price='10' color='黑色' ref="car1"></car>
      <car brand="比亚迪" :price='20' color="红色" ref='car2'></car>

      <button @click='printCarInfo'>ref属性访问子组件的属性</button>
    </div>
</template>

<script>
import Car from './components/Car.vue'

  export default{
    name : 'app',
    data() {
      return {
        msg: '汽车信息',
      };
    },
    methods: {
      printCarInfo() {
        // $refs来访问标签的属性
        console.log(this.$refs.car1);
        console.log(this.$refs.car2.color);
        console.log(this.$refs.title.innerHTML);
      },
    },
    components : { Car }
  }
</script>
2.4 mixin:混入,将共有的方法提取
- 作用:不同的
vue中有相同的方法时,可以提取到mixins.js文件中(文件名随意),在vue中引入就可以使用 - 当
vue和mixins中有同名的方法时,只执行vue中的方法 - 在
main.js中引入mixins中的方法,该方法为全局的方法,所有的vue中都会有此方法Vue.mixin(mix2) - 声明周期函数:
mixins和vue中有相同的声明周期函数时,两个都会执行
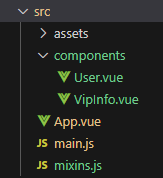
目录结构
// mixins.js
export const mix1 = {
    methods: {
        printUserInfo() {
            console.log('mixin中的方法,打印客户信息',this.username);
        },
    },
}

export const mix2 = {
    // 生命周期:挂载后
    mounted(){
        console.log('mixins中的mounted执行',this);
    }
}
// main.js
import Vue from 'vue'
import App from './App.vue'
// 全局的混入,在所有的vue中都会引入mix2的方法
import { mix2 } from './mixins'
Vue.mixin(mix2)

Vue.config.productionTip = false
new Vue({
  render(h) {
    return h(App)
  }
  // render: h => h(App),
}).$mount('#app')
VipInfo.vue
<template>
    <div>
        <div>{{ username }}</div>
        <button @click="printUserInfo">打印vip信息</button>
    </div>
</template>

<script>
import {mix1, mix2} from '../mixins'
export default {
    name : 'VipInfo',
    data() {
        return {
            username: '李四',
        };
    },
    mixins : [mix1,mix2],
    // 生命周期:mixins和vue中都有同一个生命周期函数时,两个都执行
    mounted(){
        console.log('VipInfo中的mounted执行',this);
    }
/*     methods:{
      printUserInfo(){
        console.log('vip .....method');
      }
    } */
}
</script>
User.vue
<template>
  <div>
      <div>{{username}}</div>
      <button @click='printUserInfo'>打印用户信息</button>
  </div>
</template>

<script>
// 从文件中引入
import { mix1 } from '@/mixins';
export default {
    name : 'UserInfo',
    data() {
      return {
        username: '张三',
      };
    },
// mixin使用时,用数组的方式
    mixins : [mix1],
    methods:{
      // 当mixins和当前vue中都有同一个方法时,执行当前vue中的方法
      printUserInfo(){
        console.log('user.vue中的方法,打印客户信息',this.username);
      }
    }
}
</script>
结果
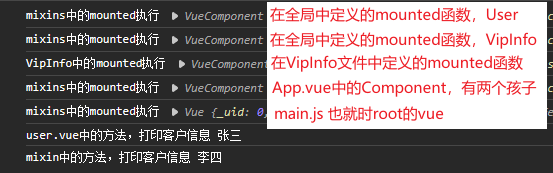
从结果中可以看到生命周期函数mounted函数执行了5次,分别是(先后顺序)
- main.js中的vue,也就时Root的
- App中的Component
- VipInfo中自己定义的mounted函数
- VipInfo中的Component又执行了一次
- User中的Component
2.5 scoped:局部样式
很多的style最后都会汇集到App这个vue中,为了方式样式重名,在style标签内增加scoped属性
<style scoped>

</style>
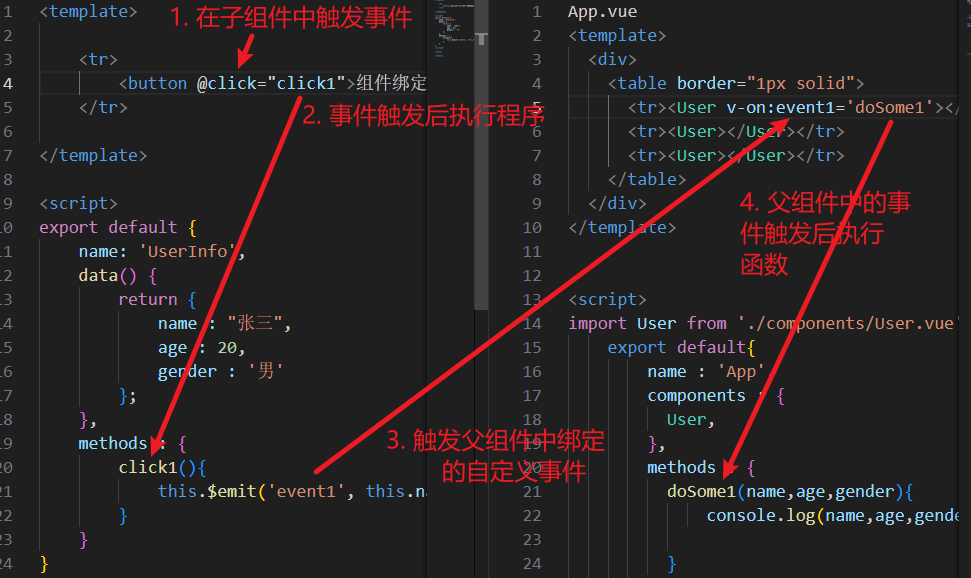
2.6 $emit :在组件中自定义事件,子向父传数据
- 作用:
1.1 子组件可直接执行父组件中的函数,
1.2 子组件可以向父组件传递数据 - 使用:
2.1 在父组件文件中,在子组件的标签上绑定事件v-on:事件名='函数名'
2.2 在父组件中写好执行的函数体
2.3 在子组件文件中,绑定正常的触发事件,在事件的执行函数中this.$emit('父组件中的事件名',参数1,参数2,....)
2.4 当事件触发后,执行父组件中的函数体 - 事件触发后的执行过程,如图:
2.6.1 通过代码给组件绑定事件
- 在父组件中,给子组件的标签
ref赋值 - 在生命周期执行到挂载完成后,
this.$refs.ref的值.$on('子组件中调用的事件名',事件发生后的执行函数)
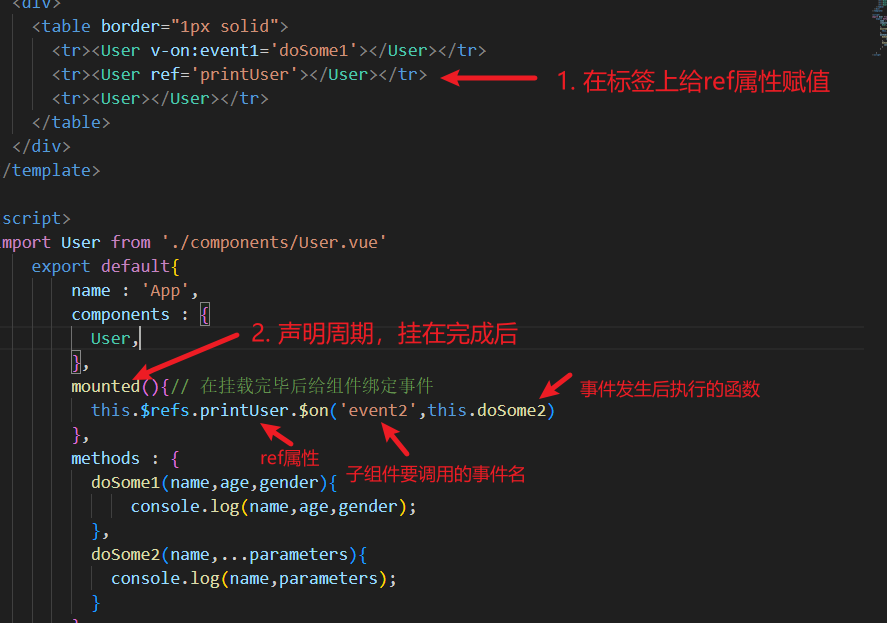
2.6.3 自定义事件只执行一次once
- 在标签中绑定事件时
<User v-on:event1.once='doSome1'></User>
- 通过代码绑定事件
this.$refs.printUser.$once('event2',this.doSome2)
2.6.4 传递的参数不确定时
- 子组件中正常传递
- 父组件中接收时使用
...parameters,以数组的形式接收
doSome2(name,...parameters){
   console.log(name,parameters);
}
//结果
张三  [20, '男']
2.7 $bus 数据总线:任意组件数据传递
原理在视频的P91
- 在main.js中添加代码
main.js
new Vue({
  el : '#app',
  render: h => h(App),
  // 生命周期:创建前
  beforeCreate(){
    // 创建bus总线,用于传递数据
    Vue.prototype.$bus = this
  }
})
- 在接收方添加代码
// 生命周期:挂载完成
mounted () {
	this.$bus.$on('事件名',执行的函数(参数1,参数2))
}
- 在发送方添加代码
this.$emit('事件名',参数1,参数2,...)
- 销毁
beforeDestroy(){
	this.$bus.off(‘事件名’)
}
2.8 pubsub:消息订阅,任意组件传递消息
- 安装pubsub:
npm i pubsub.js - 在订阅消息和发布消息的组件中引入pubsub:
import PubSub from 'pubsub-js'' - 在挂载后订阅消息
        mounted (){
          // 返回值是此订阅消息的ID
          // 参数1:订阅消息的名字,参数2:(订阅消息的名字,返回消息发布数据)
          this.pubsubId = PubSub.subscribe("订阅的消息的名字",(messageName,msg) => {
            console.log(this.pubsubId,messageName,msg);
          })
        },
- 发布消息:
PubSub.publish("订阅的消息的名字","发布的消息") - 销毁订阅
        beforeDestroy(){
          // 销毁时使用ID
          pubsub.unsubscribe(this.pubsubId)
        },
3. axios:Vue中的Ajax
详细教程
- 安装
npm install axios
- 在组件中引入
import axios from 'axios'
Vue.prototype.$axios = axios
- 使用
axios.get('URL').then(
     response => {
          console.log(response .data);
    },
    error => {
          console.log(error.message);
   }
)
4 VueX
4.1 安装VueX
终端中执行命令:
npm i vuex@3
-
在根目录下创建目录和文件(文件名随意)
目录:vuex
在vuex目录中创建文件:store.js -
文件store.js
import Vue from 'vue'
import Vuex from 'vuex'

// 使用vuex插件
Vue.use(Vuex)

// 创建vuex的三大核心

const actions = {}
const mutations = {}
const state = {}

// 创建Vuex的管理者,管理三大核心
const store = new Vuex.Store({action,mutation,state})

// 导出store
export default store
- 在main.js中引入store
import Vue from 'vue'
import App from './App.vue'
// 引入store
import store from './vuex/store'

Vue.config.productionTip = false

new Vue({
  el : '#app',
  // 配置
  store,
   render: h => h(App),
})
- 使用:
在插值语法中{{$store.state.XXX}}
在代码中:this.$stroe.state.XXX
4.2 store 三大核心的作用:
所有的方法和数据可以在所有的组件中使用
4.2.1 actions
- 作用:
- 完成逻辑代码,异步操作,Ajax
- 调用
mutations中的方法,传递处理过的数据
const actions = {
	方法名(context,参数){
		// todo
		//
		context('mutations中的方法名',参数)
	},
}
- 调用
actions中的方法- 使用
$store.dispatch调用
- 使用
this.$store.dispatch('actions中的方法名',参数)
4.2.2 mutations
- 作用:维护
state中的数据 mutations中的方法名:actions中的方法名为addUserName, 则mutations中的方法民为ADD_USER_NAME
const mutations = {
	// 此处的方法名,习惯定义为actions中方法名所有字母大写,并且在单词中间加入下划线_
    方法名(state, val){
        state.数据名 = val
    },
}
- 调用
mutations中的方法- 在
actions中调用
- 在
const actions = {
	方法名(context,参数){
		// todo
		context('mutations中的方法名',参数)
	},
}
- 在组件中使用
$store.commit调用
这种情况适用于业务逻辑非常简单的情况
this.$store.commit('mutations中的方法名',参数)
4.2.3 state
- 作用:相当于组件中的
data部分
const state = {
    key : 'value',
    key1 : ['数组'],
}
4.2.4 getter 第四个配置项
- 作用:类似组件中的计算属性
computed
const getters = {
    方法名(state){
    	// todo
        return 返回值
    }
}
- 使用:
$store.getters.getters中的方法名
4.3 调用三大核心时的简写形式:映射
【视频】原理的视频讲解
【视频】扩展运算符…
4.3.1 mapState:在计算属性computed中使用
- 引入:
import { mapState } from 'vuex'; - 简化
$store.state.xxxxx: - 对象形式。key:组件中使用的名字,value:$store.state中定义的名字
    computed : {
        // 对象形式。key:组件中使用的名字,value:$store.state中定义的名字
         ...mapState({users:'users',vips:'vips',inString:'inString'})
    }
- 数组形式:如果对象中的key和value是相同的,则可以使用数组形式的mapState
        // 数组形式。如果对象中的key和value是相同的,则可以使用数组形式的mapState
        ...mapState(['users','vips','inString'])
- 在插值语法中可以直接使用:
{{XXXXX}},在方法体中使用:this.XXXXX - 如果在组件的
data{}配置项中定义了一个相同名字的对象,则会使用data{}中定义的对象。
4.3.1.1 v-modle 中不能使用mapState中定义的对象
[视频]讲解 21:35
- 在双向数据绑定中,只能使用
$store.state.XXXXX这种形式 - 原因:使用
...mapState这种方式简写,在底层实现时只生成了getter方法,没有setter方法 - 使用简写形式会报错:
Computed property “inString” was assigned to but it has no setter.
4.3.2 mapGetter:在计算属性computed中使用
- 引入:
import { mapGetters, mapState } from 'vuex'; - 简化:
$store.getters.XXXXX
对象形式。key:组件中使用的名字,value:$store.getters中定义的名字
    computed : {
        ...mapGetters({reverseStr:'reverseStr'})
    }
- 数组形式:如果对象中的key和value是相同的,则可以使用数组形式
...mapGetters(['reverseStr'])
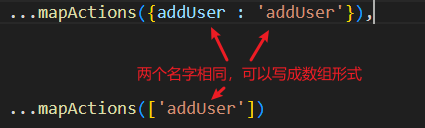
4.3.1 mapActions:在methods中使用
- 引入:
import { mapActions } from 'vuex'; - 如果是某事件触发的方法,并且该事件需要传递参数,则将参数放在事件的表达式中:
@click="addUser(userName)" - 使用:
- 对象形式
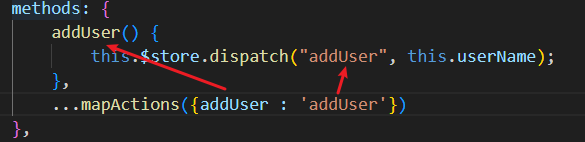
- 数组形式
4.3.1 mapMutations:在methods中使用
- 引入:
import { mapMutations } from 'vuex'; - 和mapActions的使用方法一样,要注意一点,如果要使用数组方式,则只能以mutations中定义的方法名为主,所以如果是事件导致的该方法发生,则需要修改事件中的方法名
5 Vuex的模块化
5.1 export default 和 export const导出的不同
export default 和 export const相关的文章
使用export default和export const定义的对象在导出时用法不同
- 使用export default定义,在一个文件中只能有一个export default定义的对象
// A 文件
export default {
	// 对象
}
// 导入
import 名字随意 from '../文件路径/a'
- 使用export const定义
// B 文件
export const name = {
	// 对象
}
export const email = {
	// 对象
}
// 导入
import { name, email } from '../文件路径/b'
5.2 给每个模块创建对应的js文件
- 在vuex目录中给每个模块创建对应的js文件
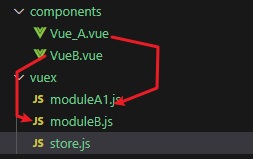
- 代码部分
- namespaced 命名空间,值为true确定开启,默认是false,不开启
- 如果在不同的文件中命名了相同的方法名或者数据名,在调用时会将所有的方法和数据都调用一次,开启命名空间后,在调用时需要指明方法或数据的所属的模块
- 每个模块都有自己的state,actions,mutations,getters
// modelA1文件
export default  {
    // 命名空间
    namespaced : true,
    state : {
         a : 'a'
    },
    getters : {
        getA(state){
            return state.a + '来自 getters'
        }
    },
    actions : {
        actionA(){
            console.log('action A');
            }
    },
    mutations : {
        MUTATION_A(){
            console.log('mutation A');
        }
    }
}
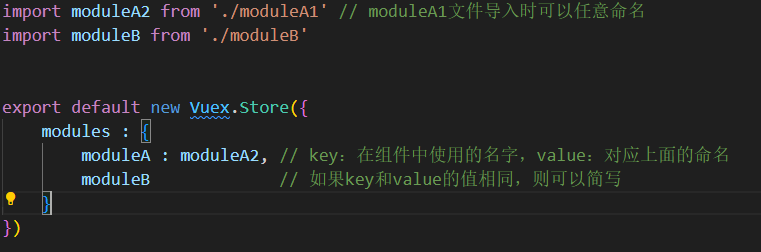
- 在vuex的管理者store所在的文件中导入所有的模块
import Vue from 'vue'
import Vuex from 'vuex'

Vue.use(Vuex)

import moduleA from './moduleA1'
import moduleB from './moduleB'

export default new Vuex.Store({
    modules : {
        moduleA,moduleB
    }
})
5.3 在组件中调用
记得导入map:
import { mapActions, mapGetters, mapMutations, mapState } from 'vuex'
5.3.1 state
- 第一种方法
<div>{{$store.state.moduleA.a}}</div>
- 数据简写形式
<div>{{a}}</div>

computed : {
/*  a(){
      return this.$store.state.moduleA.a
    },*/
    // mapState就是将下面的语句翻译为上面的语句
    ...mapState('moduleA',['a']),
  },
5.3.2 getters
- 第一种方法
<div>{{$store.getters['moduleA/getA']}}</div>
- 数组简写形式
computed : {
	...mapGetters('moduleA',['getA'])
}
5.3.3 actions
html部分:
<button @click='actionA'>VueA click 1</button>
第一种方式:
  methods : {
    actionA(){
      this.$store.dispatch('moduleA/actionA')
    }
  }
- 数组简写形式
  methods : {
    // 开启命名空间,数组形式的缩写
    ...mapActions('moduleA',['actionA']),
  }
5.3.4 mutations
- 第一种:对象简写形式
<button @click='mutationA'>VueB click 2</button>
  methods : {
	// 在module文件中,习惯mutation的文件名全部都是大写字母,这里只能使用对象简写形式
    ...mapMutations('moduleA',{mutationA : 'MUTATION_A'})
  }
-
第二种:数组简写形式
- 修改click中的方法名与mutation的方法名相同
<button @click='MUTATION_A'>VueB click 2</button>
  methods : {
    ...mapMutations('moduleA',['MUTATION_A'])
  }
5.3.5 Vue_a.vue代码
<template>
  <div>
    <button @click='actionA'>VueA click 1</button>
    <button @click='MUTATION_A'>VueB click 2</button>
    <!-- <div>{{$store.state.moduleA.a}}</div> -->
    <div>{{a}}</div>

    <!-- <div>{{$store.getters['moduleA/getA']}}</div> -->
    <div>{{getA}}</div>
  </div>
</template>

<script>
import { mapActions, mapGetters, mapMutations, mapState } from 'vuex'
export default {
  name : 'vueAAA',
  computed : {
    a(){
      return this.$store.state.moduleA.a
    },
    ...mapState('moduleA',['a']),
    ...mapGetters('moduleA',['getA'])
  },
  methods : {
/*
    actionA(){
      this.$store.dispatch('moduleA/actionA')
    },
*/
    // 开启命名空间,数组形式的缩写
    ...mapActions('moduleA',['actionA']),
/*
    mutationA(){
      this.$store.commit('moduleA/mutationA')
    },
     */
    ...mapMutations('moduleA',['MUTATION_A'])
    // ...mapMutations('moduleA',{mutationA : 'MUTATION_A'})
  }
}
</script>
6 路由
- 安装路由插件:
Vue2 安装:npm i vue-router@3
Vue3 安装:npm i vue-router@4
路由:
route,路由器中的一条线路
路由器:router
6.1 新建目录和文件
- 新建目录:route
- 在目录中新建文件:index.js
// 导入路由
import VueRouter from 'vue-router'
// 导入组件
import 组件1 from '../XXXXX'
import 组件2 from '../XXXXX'

// 创建路由器对象
export default new VueRouter({
    routes : [
        {path:'/路径',component:组件1},
        {path:'/路径',component:组件2},
    ]
})
6.2 在main.js中导入路由组件
import Vue from 'vue'
import App from './App.vue'
Vue.config.productionTip = false

// 导入路由器
import VueRouter from 'vue-router'
// 使用路由器
Vue.use(VueRouter)
// 导入路由
import router from './route/index'

new Vue({
  el : '#app',
  // 配置项
  router,
  render: h => h(App),
})
6.3 在App.vue中使用路由
- 路由中的组件不需要在
componets中包含 <router-link>代替<a>标签- 点击
<router-link>标签后,将会在路由中寻找该路径指向的组件,将该组件放置到占位符<router-view的位置
// 需要点击的对象使用router-link标签
<router-link to="/路径">点我</router-link>

// 占位符,当点击标签后,该占位符被路由中上述路径指向的组件代替
<router-view></router-view>
6.4 多级路由
- 在路由
routes中创建子路由 - 在实例中,虽然两个路由指向了同一个组件
Third,路径还是要分开,这样标签的active-class="selected"属性才能分辨出两个标签
    routes : [
        {
            path:'/SecondOne',component:SecondOne,
            children : [
                // path中的路径相同,则active-class="selected"两个都会被显示选中
                {path:'Third',component:Third},
                {path:'Third_1',component:Third},
            ]
        },
6.4.1query的对象形式在路由传递数据
- 通过
<router-link>标签的:to属性传递数据,path:路径,query:要传递的数据,query是对象形式
            <router-link active-class="selected"

                :to="{
                  path : '/SecondOne/Third',
                  query : this.list1_1
                  }"

                >第二级目录:1.1</router-link>
this.$route.query接收数据
        <li v-for="listThird,index in this.$route.query"
        :key="index">{{listThird}}</li>
6.4.1.1 完整代码
index.js文件
// 导入路由
import VueRouter from 'vue-router'

// 导入组件
import SecondOne from '../paths/SecondOne.vue'
import SecondTwo from '../paths/SecondTwo.vue'

import Third from '../paths/Third.vue'
// 创建路由器对象
export default new VueRouter({
    routes : [
        {
            path:'/SecondOne',component:SecondOne,
            children : [
                // path中的路径相同,则active-class="selected"两个都会被显示选中
                {path:'Third',component:Third},
                {path:'Third_1',component:Third},
            ]
        },
        {path:'/SecondTwo',component:SecondTwo},
    ]
})
SecondOne.vue 文件
<template>
  <div class='s1'>
      <div>
        <h3>2级目录</h3>
        <ul >
            <li><router-link active-class="selected"

                :to="{
                  path : '/SecondOne/Third',
                  query : this.list1_1
                  }"

                >第二级目录:1.1</router-link></li>
        </ul>
      </div>
      <div>
        <router-view></router-view>
      </div>
  </div>
</template>

<script>
export default {
    name : 'SecondOne',
    data() {
      return {
        // 目录1.1下的数据
        list1_1 : [
            '第三级目录:1.1.1',
            '第三级目录:1.1.2',
            '第三级目录:1.1.3',
          ]
      }
    },
}
</script>
Third.vue 文件
<template>
<div class='s2'>
<h3>3级目录</h3>
<ul >
<li v-for="listThird,index in this.$route.query"
:key="index">{{listThird}}</li>
</ul>
</div>
</template>
<script>
export default {
name : 'ThirdLevel',
mounted (){
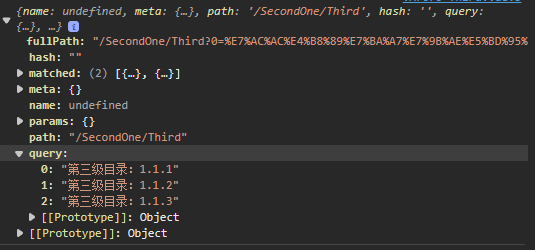
console.log(this.$route);
console.log(this.$route.query);
}
}
</script>
this.$route的结果
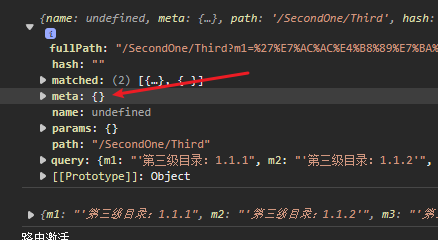
6.4.2 query的字符形式传递数据
以数据形式和对象形式传递参数,在 this.$route.query中接收到的对象是一样的
<-- router-link 标签里面的 to属性 -->
to="/SecondOne/Third?m1='第三级目录:1.1.1&m2='第三级目录:1.1.2'&m3='第三级目录:1.1.3'"
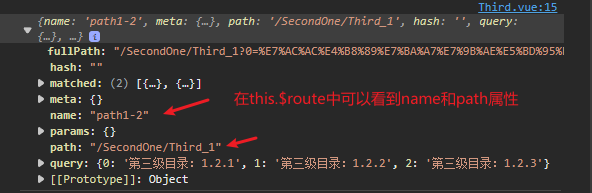
6.4.3 路由配置中的name 属性
- 作用 : 给路径起一个名字,在使用到路径的地方就能用简单的值来代替
- 在路由中加入
name属性
			children : [
                {path:'Third',component:Third},
                {
                    // 使用name属性代替该路径
                    name:'path1-2',
                    // path:'Third_1',
                    component:Third
                },
            ]
- 在
<route-link>中使用
<router-link active-class="selected"
            :to="{
            <-- 使用name代替path:'/SecondOne/Third_1' -->
              name:'path1-2',
              query:this.list1_2}">
            第二级目录:1.2</router-link>
6.5 编程式导航(浏览器的前进\后退)
<router-link>标签在编译完成后是<a>标签,不能用于事件触发的网页跳转
- 事件引起的跳转
<button @click='goThirdPush'>跳转</button>
- 使用编程式导航时,push和replace方法会返回一个promise对象
promise对象期望你能通过参数的方式返回成功和失败两个回调函数
如果没有给这两个参数,连续点击两次按钮会报错
methods : {
      // 使用编程式导航时,push和replace方法会返回一个promise对象
      // promise对象期望你能通过参数的方式返回成功和失败两个回调函数
      // 如果没有给这两个参数,连续点击两次按钮会报错
        goThirdPush(){
          this.$router.push({
              path:'/SecondOne/Third',
              query:this.list1_1
          },()=>{},()=>{})
        },
        goThirdReplace(){
          this.$router.replace({
            name:'path1-2',
            query:this.list1_2
          },()=>{},()=>{})
        }
    }
- push方法和replace方法的区别
浏览器会将点击的网址按栈的方式存储
- 点击新的网址,会将网址压入栈顶
- 点击后退按钮,会向栈底位置移动,读取下面地址的内容
- 无论后退还是前进,栈里面的内容不会清除,只有指针向栈顶或栈底移动
push方法:当前地址压入栈顶
replace方法:当前地址替换栈顶的地址
6.6 $router中的前进\后退
      <button @click='forward'>前进</button>
      <button @click='back'>后退</button>
      <button @click='forwardTwo'>前进2步</button>
      <button @click='backTwo'>后退2步</button>
        methods : {
          forward(){
            this.$router.forward()
          },
          back(){
            this.$router.back()
          },
          forwardTwo(){
            this.$router.go(2)
          },
          backTwo(){
            this.$router.go(-2)
          }
        }
6.6 push 到达指定路由
this.$router.push('/home')
this.$router.push({name: 'Home'})
6.7 keep-alive:页面跳转时组件销毁
- 作用:当页面跳转时,旧的页面中的组件会被销毁,此标签阻止组件被销毁
- 可在页面的生命周期:组件销毁前
beforeDestroy()方法中证明
<keep-alive>的使用
- 路径下的所有组件不被销毁
      <keep-alive>
        <router-view></router-view>
      </keep-alive>
- 路径下的单个组件不被销毁,
include的值是组件的name配置项
      <keep-alive include="SecondOne">
        <router-view></router-view>
      </keep-alive>
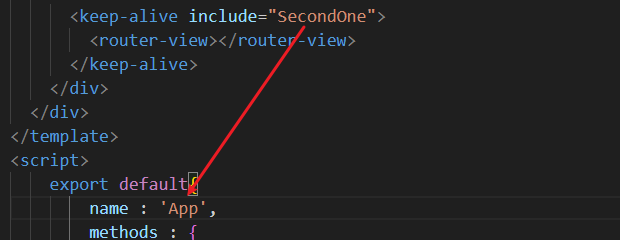
3. 路径下的多个组件不被销毁,数组形式,记得include加冒号
      <keep-alive :include="['SecondOne','SecondTwo']">
        <router-view></router-view>
      </keep-alive>
6.8 路由的两个生命周期
- 有指向此组件的路由被点击后,路由的
activated()执行 - 其他指向的路由被点击后
deactivated()执行
    activated() {
        console.log("路由激活");
    },
    deactivated() {
        console.log("路由切走");
    },
6.9 $route中的meta
可在meta中任意增加对象,对当前路由做标记
            children : [
                // path中的路径相同,则active-class="selected"两个都会被显示选中
                {path:'Third',component:Third},
                {
                    // 使用name属性代替该路径
                    name:'path1-2',
                    path:'Third_1',
                    component:Third,
                    // meta
                    meta : {
                        isAuth : true
                    }
                },
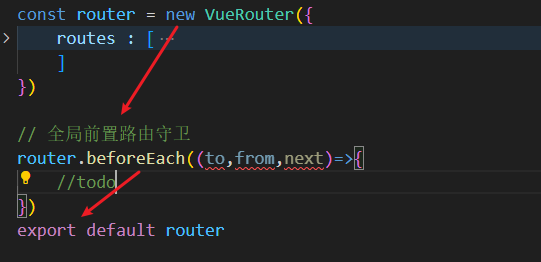
6.10 全局路由守卫
6.10.1 全局前置路由守卫
- 作用:在任一路由被调用之前执行的函数,类似于生命周期的函数
- 位置:此方法必须写在,创建VueRouter对象之后与导出之间
// 全局前置路由守卫
router.beforeEach((to,from,next)=>{
    //todo
})
-
参数
to和from都是route类型,里面有path,name,meta等属性to是跳转之后的路由,from是跳转之前的路由next():执行此方法表示放行,才可跳转到to的路由
-
使用
在需要权限识别的路由上加上一个标志
meta : {
    isAuth : true
}
// 全局前置路由守卫
router.beforeEach((to,from,next)=>{
// 如果要访问的路由需要权限识别,并且该路由的name===path1-2,可以访问
    if(to.meta.isAuth){
        if(to.name==='path1-2'){
            next()
        }else{
            alert('您没有访问该地址的权限')
        }
    }else{
        next()
    }
})
6.10.2 全局后置路由守卫 title的设置
- 只有
to和from两个参数 - 在
meta中给每个路由添加title属性,这样就可以在不同的路由展示不同的标题
router.afterEach((to,from)=>{
    document.title = to.meta.title || '欢迎使用'
})
- 还需要修改另一个地方才能让标题完美
6.11 局部路由守卫
6.11.1 path守卫
- 代码的位置:在路由文件的路由对象中
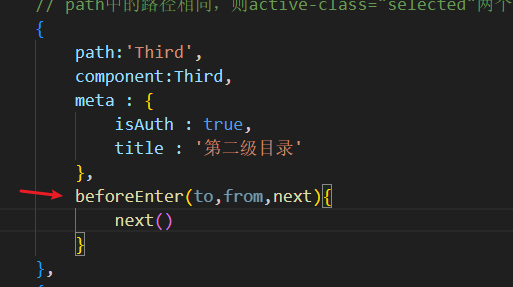
beforeEnter(to,from,next){
  next()
}
- 调用时机:在本身路由执行之前
- 参数:
to就是路由本身,from:跳转之前的路由
6.11.2 组件守卫
- 必须是路由中用到的组件才能使用组件守卫
- 代码的位置:在Vue文件的组件中
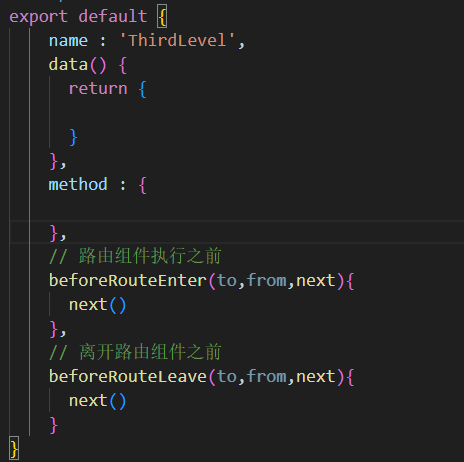
- 执行时机
    // 路由组件执行之前
    beforeRouteEnter(to,from,next){
      next()
    },
    // 离开路由组件之前
    beforeRouteLeave(to,from,next){
      next()
    }
7 发布到服务器
- 下载java,tomcat,并配置到环境变量
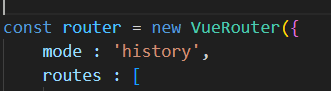
- 在路由中增加属性
mode设置为history模式或者hash模式,默认是hash模式
- 在终端中打包:
npm run build - 将生成的
dist目录中的内容全部拷贝到tomcat的webapp/root目录中
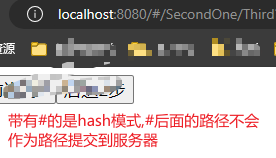
- 路径中带有
#的是hash模式,#后的的内容不会作为路径提交到服务器
- 不带有#的模式是history模式,整个浏览器的内容作为路径提交到服务器,但是服务器中没有路径对应的资源,所以报404错误
- 解决history模式的的404问题
在服务器发布网站的目录root中,新建WEB-INF文件夹,新建web.xml文件,将一下内容复制到文件中
<?xml version="1.0" encoding="UTF-8"?>

<web-app xmlns="https://jakarta.ee/xml/ns/jakartaee"
  xmlns:xsi="http://www.w3.org/2001/XMLSchema-instance"
  xsi:schemaLocation="https://jakarta.ee/xml/ns/jakartaee
                      https://jakarta.ee/xml/ns/jakartaee/web-app_6_0.xsd"
  version="6.0"
  metadata-complete="true">

    <error-page>
        <error-code>404</error-code>
        <location>/index.html</location>
    </error-page>

</web-app>