一、Spring的注解支持
1. 为什么使用Spring注解
在昨天的练习中有这样的一段代码,为了给UserServiceImpl注入UserMapper对象。
2. Spring支持的注解(IoC/DI相关)
下面@Repository、@Service、@Controller、@Configuration都是@Component注解的子注解,作用相同。
主要的区别是语义上的区别。当看到不同的注解放在不同层的类中。但是不按照语义去做,非把@Service用在持久层,也是有效果的。但是这样却是不规范的。
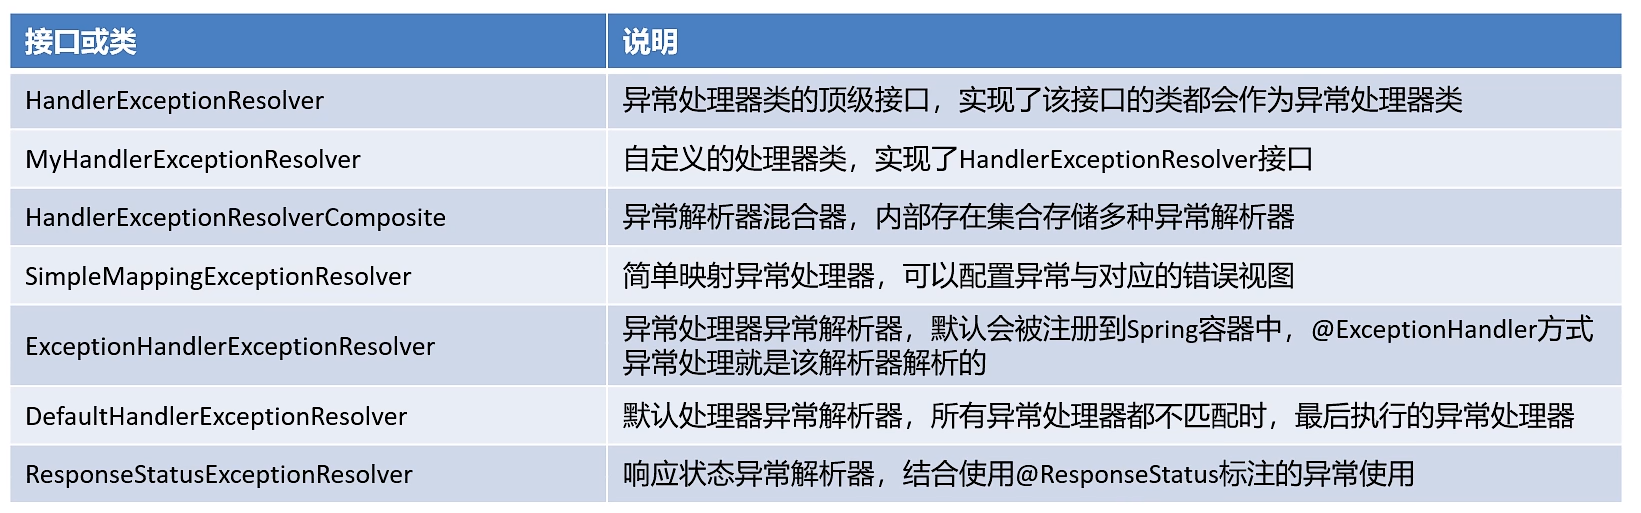
| 注解名称 | 解释 |
|---|---|
| @Component | 实例化Bean,默认名称为类名首字母变小写(类名不要出现类似AServiceImpl)。支持自定义名称 |
| @Repository | @Component子标签,作用和@Component一样,用在持久层。 |
| @Service | @Component子标签,作用和@Component一样,用在业务层。 |
| @Controller | @Component子标签,作用和@Component一样,用在控制器层。 |
| @Configuration | @Component子标签,作用和@Component一样,用在配置类。 |
| @Autowired | 自动注入。默认byType,如果多个同类型bean,使用byName(默认通过属性名查找是否有同名的bean,也可以通过@Qualifier("bean名称"),执行需要注入的Bean名称) |
| @Resource | 非Spring注解。默认byName,如果没找到,使用byType。<dependency> <groupId>javax.annotation</groupId><br/> <artifactId>javax.annotation-api</artifactId><version>1.3.2</version></dependency> |
二、Spring Test 模块
1. 介绍
Spring Test 模块整合了一些常见的单元测试工具,例如Junit。
整合后可以在测试类中直接使用Spring容器中的内容,把测试类也放入到Spring容器中,测试类里面可以直接使用注解注入容器中的bean对象。
同时也可以通过@ContextConfigration注解指定配置文件路径,让测试方法在启动的时候直接加载配置文件。
2. 添加依赖
-
spring-context核心依赖无论使用哪个模块都必须导入的。
-
junit依赖需要导入的,现在使用的就是Spring Test模块整合的junit功能。
-
spring-test 表示spring test模块的依赖,导入后才有@ContextConfiguration这些注解。
<dependencies>
    <dependency>
        <groupId>org.springframework</groupId>
        <artifactId>spring-context</artifactId>
        <version>5.3.16</version>
    </dependency>
    <dependency>
        <groupId>junit</groupId>
        <artifactId>junit</artifactId>
        <version>4.13.2</version>
        <scope>test</scope>
    </dependency>
    <dependency>
        <groupId>org.springframework</groupId>
        <artifactId>spring-test</artifactId>
        <version>5.3.16</version>
        <scope>test</scope>
    </dependency>
</dependencies>
3. 编写测试
该注解会自动创建spring容器,管理MyTest类
@RunWith(SpringJunit4ClassRunner.class)
@ContextConfiguration(locations = "classpath:spring.xml")
public class MyTest {
    @Autowired
    PeopleService peopleService;

    @Test
    public void test2(){
        peopleService.test();
    }
}
三、代理设计模式
1.引入
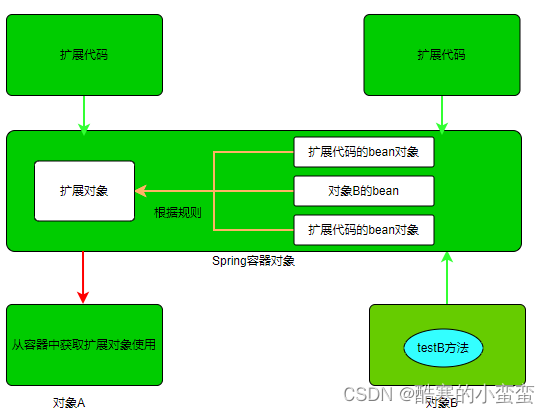
但是在实际生产环境中,我们发现随着公司业务的增长,我们会对现有的功能方法进行功能升级,就是保留原有功能的基础上增加新的逻辑,那么大家最容易想到的方案就是找到要升级的功能方法直接修改,但是如果我们调用的是第三方的功能代码,就没有源码,那么没有办法直接修改了,怎么办?而且就算我们有源码,源码也可能是其他人写的,这时候去修改源码,就需要花费大量的时间去阅读源码的逻辑,非常麻烦,效率又低,怎么办?
我们可以在A和B插入一个对象C,让A不再直接调用B,而是调用对象C,在C中调用对象B的testB方法,在C对象中调用对象B的方法之前和之后可以添加我们的扩展代码即可!

2. 介绍
代理模式是Java常见的设计模式之一。所谓代理模式是指客户端并不直接调用实际的对象,而是通过调用代理,来间接的调用实际的对象。为什么要采用这种间接的形式来调用对象呢?一般是因为客户端不想直接访问实际的对象,或者访问实际的对象存在困难,因此通过一个代理对象来完成间接的访问。
代理设计模式包括:静态代理和动态代理。
静态代理:代理对象由程序员自己编写!
动态代理: 代理对象是动态产生的,动态代理又分为JDK动态代理和Cglib动态代理两种实现方式。其中JDK动态代理是基于接口实现,也就是代理对象和真实对象需要实现相同的接口,JDK动态代理是Java官方提供的技术。Cglib动态代理是基于继承实现的,也就是代理对象需要继承真实对象,Cglib动态代理是第三方的技术,使用的时候需要导入jar包。
静态代理示例
创建接口MyInterface
public interface MyInterface { void testMethod(); }
创建真实对象类
//真实对象 public class MyTrueClass implements MyInterface{
@Override
public void testMethod() {
System.out.println("我是方法.....");
}
}
创建代理对象类
//代理对象 public class MyStaticProxyClass implements MyInterface {
//代理方法
@Override
public void testMethod() {
//其他代码
System.out.println("扩展代码上...");
//调用真实对象的真实方法
MyTrueClass myTrueClass=new MyTrueClass();
myTrueClass.testMethod();
//其他代码
System.out.println("扩展代码下....");
}
}
3. 动态代理示例
3.1 JDK动态代理
JDK动态代理是基于接口来实现的,被代理的类必须实现了接口。首先我们需要创建接口。
创建接口
public interface MyInterfaceJdk {
    void  testJdkMethod();
}
创建实现类
public class MyInterfaceJdkImpl implements MyInterfaceJdk {
    @Override
    public void testJdkMethod() {
        System.out.println("我是真实的方法...");
    }
}
测试代码
public class TestProxy {
    @Test
    public void testJdkProxy(){
        //创建被代理对象
        MyInterfaceJdkImpl myInterfaceJdk = new MyInterfaceJdkImpl();

        //创建代理对象
        /*
         * 参数1: 类加载器。使用指定的类加载器加载动态创建的代理对象。
         * 参数2: 被代理类实现的接口。
         * 参数3: 动态代理对象会自动调用InvocationHandler中的invoke()方法,
         *        需要在invoke方法中编写对应逻辑代码及执行目标对象中的目标方法。
         * */
        MyInterfaceJdk o = (MyInterfaceJdk) Proxy.newProxyInstance(
                TestProxy.class.getClassLoader(),
                new Class[]{MyInterfaceJdk.class},
                new InvocationHandler() {
                    @Override
                    public Object invoke(Object o, Method method, Object[] objects) throws Throwable {
                        System.out.println("目标方法之前执行");
                        method.invoke(myInterfaceJdk, objects);
                        System.out.println("目标方法之后执行");
                        return null;
                    }
                }
        );
        o.testJdkMethod();
    }
}
3.2 Cglib动态代理
Cglig动态是第三方提供的技术,需要导入jar包,并且是基于类的继承。
<dependency>
    <groupId>cglib</groupId>
    <artifactId>cglib</artifactId>
    <version>3.3.0</version>
</dependency>
测试代码
package com.sh;

import com.sh.service.UserService;
import com.sh.service.UserServiceImp;
import net.sf.cglib.proxy.Enhancer;
import net.sf.cglib.proxy.MethodInterceptor;
import net.sf.cglib.proxy.MethodProxy;
import org.junit.Test;

import java.lang.reflect.InvocationHandler;
import java.lang.reflect.Method;
import java.lang.reflect.Proxy;

public class UserTest {

    /*
    *       动态代理: 程序运行时动态创建代理对象
    *
    *       1.JDK动态代理: 基于接口实现: 底层使用反射来创建代理对象
    *           1.为接口创建动态代理对象(实现接口中的方法,相当于实现类的功能)
    *           2.为接口的实现类创建动态的代理对象 (中间调用目标方法,实现功能的增强)
    *
    *
    * */
    //jdk 只能基于接口通过反射来创建代理对象
    @Test
    public void test(){
        //JDK动态代理实现类
        UserService userService = (UserService) Proxy.newProxyInstance(
                //参数一:类加载器
                UserTest.class.getClassLoader(),
                //参数二:被代理类实现的接口数组
                new Class[]{UserService.class},
                //参数三: 运行时底层重写的方法内容
                new InvocationHandler() {
                    @Override
                    public Object invoke(Object proxy, Method method, Object[] args) throws Throwable {
                        //还要完成之前实现类的方法
                        System.out.println("自动实现的方法");
                        return null;
                    }
                }
        );

        userService.select();

    }

    @Test
    public void test2(){
        UserServiceImp usi = new UserServiceImp();
        //JDK动态代理类,扩展方法
        UserService userService = (UserService) Proxy.newProxyInstance(
                //参数一:类加载器
                UserTest.class.getClassLoader(),
                //参数二:被代理类实现的接口数组
                //通过扩展功能的实现类获取实现的接口
                UserServiceImp.class.getInterfaces(),
                new InvocationHandler() {
                    @Override
                    public Object invoke(Object proxy, Method method, Object[] args) throws Throwable {
                        System.out.println("前置扩展");
                        //执行想要扩展功能的实现类原本的方法
                        //需要先创建该对象
                        method.invoke(usi);
                        System.out.println("后置扩展");
                        return null;
                    }
                }
        );

       userService.select();
    }

    @Test
    public void test3(){
        UserServiceImp usi = new UserServiceImp();
        //JDK动态代理类,扩展方法
        UserService userService = (UserService) Proxy.newProxyInstance(
                //参数一:类加载器
                UserTest.class.getClassLoader(),
                //参数二:被代理类实现的接口数组
                //通过扩展功能的实现类获取实现的接口
                UserServiceImp.class.getInterfaces(),
                new InvocationHandler() {
                    @Override
                    public Object invoke(Object proxy, Method method, Object[] args) throws Throwable {
                        System.out.println("前置扩展");
                        //执行想要扩展功能的实现类原本的方法
                        //需要先创建该对象
                        //args传递参数把usi的参数传递给代理对象
                        Object invoke = method.invoke(usi, args);
                        System.out.println("后置扩展");
                        return invoke;
                    }
                }
        );

        String te = userService.te(2);
        System.out.println(te);
    }


    /*
    *       2. cglib动态代理: 基于接口或者继承. 底层通过修改字节码文件来创建代理对象
    *           1.为接口创建代理对象,相当于实现类
    *           2.为接口的实现类创建代理对象,实现功能的增强
    *           3.通过继承给实现类创建代理对象,实现功能的增强
    *  */

    //cglib创建
    //通过接口实现
    //1.为接口创建代理对象
    @Test
    public void test4(){
        //1.创建增强器
        Enhancer enhancer = new Enhancer();

        //2.设置需要创建动态代理对象的接口
        //参数: 接口类对象的数组
        enhancer.setInterfaces(new Class[]{UserService.class});

        //3.设置回调的方法
        /*
        *   程序运行过程中创建接口的代理对象,实现接口中的方法,该过程不可见
        *   在实现的方法中调用指定的方法
        * */
        //参数:Callback是接口,使用匿名内部类来创建
        //MethodInterceptor是Callback的实现类
        enhancer.setCallback(new MethodInterceptor() {
            @Override
            /*
            *  Object o:目标对象
            *  Method method:目标方法对象
            *  Object[] objects:目标方法的参数
            *  MethodProxy methodProxy:代理方法对象
            * */
            public Object intercept(Object o, Method method, Object[] objects, MethodProxy methodProxy) throws Throwable {
                System.out.println("执行了");
                return null;
            }
        });

        //4.获取代理对象
        UserService o = (UserService) enhancer.create();
        o.select();
    }

    //2.为接口的实现类创建代理对象
    @Test
    public void test5(){
        UserServiceImp userServiceImp = new UserServiceImp();
        //1.创建增强器
        Enhancer enhancer = new Enhancer();
        //2.设置接口
        enhancer.setInterfaces(new Class[]{UserService.class});
        //3.设置回调方法
        enhancer.setCallback(new MethodInterceptor() {
            @Override
            public Object intercept(Object o, Method method, Object[] objects, MethodProxy methodProxy) throws Throwable {
                System.out.println("前置增强");
                //通过目标方法对象来调用目标方法
                //参数: Object  目标对象  Object[] 目标对象方法参数
                method.invoke(userServiceImp, objects);
                System.out.println("后置增强");
                return null;
            }
        });

        //4.获取代理对象
        //用接口来接收
        UserService o = (UserService) enhancer.create();
        o.select();
    }

    //3.通过继承实现类创建代理对象
    @Test
    public void test6(){
        //1.创建增强器
        Enhancer enhancer = new Enhancer();
        //2.设置父类
        enhancer.setSuperclass(UserServiceImp.class);
        //3.设置回调方法
        enhancer.setCallback(new MethodInterceptor() {
            @Override
            public Object intercept(Object o, Method method, Object[] objects, MethodProxy methodProxy) throws Throwable {
                System.out.println("执行了");
                //调用实现类的方法
                //通过代理的方法对象调用父类的方法
                //类似super
                methodProxy.invokeSuper(o,objects);
                return null;
            }
        });
        //4.
        UserServiceImp o = (UserServiceImp) enhancer.create();
        o.select();
    }
}
3.3 动态代理总结
-
JDK动态代理机制是委托机制,只能对实现了接口的类生成代理,底层通过反射机制实现。
-
CGLIB动态代理机制是继承机制,针对类生成代理,被代理类和代理类是继承关系,底层通过字节码处理框架asm,修改字节码生成子类。
四、SpringAOP介绍
1. SpringAOP介绍(常见面试题)
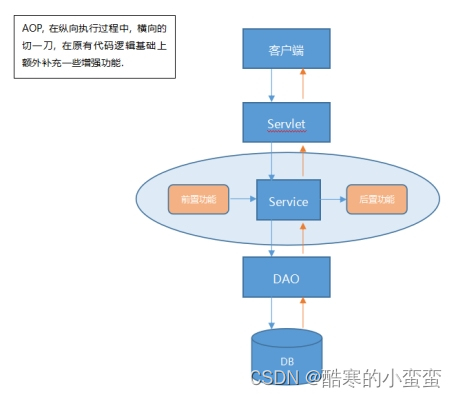
面向切面编程 (AOP) 通过提供另一种思考程序结构的方式来补充面向对象编程 (OOP)。OOP 中模块化的关键单位是类,而 AOP 中模块化的单位是切面。切面能够实现跨越多种类型和对象的关注点(例如事务管理)的模块化。(这种关注点在 AOP 文献中通常被称为“横切”关注点。)
Spring 的关键组件之一是 AOP 框架。虽然 Spring IoC 容器不依赖于 AOP(意味着如果您不想使用 AOP,则不需要使用 AOP),但 AOP 补充了 Spring IoC 以提供一个非常强大的中间件解决方案。
官方在强调AOP时强调了下面几点:
-
AOP 叫做面向切面编程。
-
AOP 是对OOP的补充。
-
AOP的核心是切面。
-
AOP是对IoC的补充。
AOP中的专业术语:
Aspect:切面。为方法添加增强功能的过程。
join point:切入点。就是我们平时说的目标方法,或说对哪个方法做扩展,做增强。
Advice:通知。就是增强内容。
Pointcut:切点表达式(通过切点表达式可以找到需要增强功能的方法),通过表达式说明哪些方法是join point。
AOP Proxy:代理。Spring支持JDK动态代理和cglib动态代理两种方式,可以通过proxy-target-class=true把默认的JDK动态代理修改为Cglib动态代理。
Weaving:织入。织入就是把Advice添加到join point的过程。
如果面试官问:什么是AOP?
AOP叫做面向切面编程,属于对OOP的扩展。其实现是基于动态代理设计模式,在IoC基础上实现的。
AOP就是对某个切入点做了通知进行增强扩展,形成横切面。可以实现在不修改原有代码的情况下,做额外扩展。
2. 实现AOP的两种方式
在Spring中提供了两种方式实现AOP:
-
Schema-based:所有的通知都需要实现特定类型的接口实现通知。
-
AspectJ:可以使用普通Java类结合特定的配置实现通知。
3. AOP底层代理模式
SpringAOP底层默认使用的JDK动态代理,但是同时也支持cglib动态代理。
需要配置Cglib的依赖以及在Spring的配置文件中开启Cglib动态代理。
![]()
五、Schema-based方式实现AOP
1. 在Schema-based方式中通知的分类(面试题)
-
前置通知:在切入点之前执行的增强功能。通知需要实现MethodBeforeAdvice接口。
-
后置通知:在切入点之后执行的增强功能。通知需要实现AfterReturningAdvice接口。
-
环绕通知:一个方法包含了前置通知和后置通知的功能。通知需要实现MethodInterceptor接口。
-
异常通知:如果切入点中出现了异常(绝对不能try...catch解决了异常)就会触发异常通知。通知需要实现ThrowsAdvice接口。
注意:添加新的依赖
<!--支持切点表达式等-->
<dependency>
    <groupId>org.aspectj</groupId>
    <artifactId>aspectjweaver</artifactId>
    <version>1.9.9.1</version>
</dependency>
<dependency>
    <groupId>aopalliance</groupId>
    <artifactId>aopalliance</artifactId>
    <version>1.0</version>
</dependency>
每种通知都需要设置一个对应的通知类
2. 前置通知
前置通知实在切入点之前执行的增强
2.1 新建通知类
重写before方法
public class MyBefore implements MethodBeforeAdvice {
    @Override
    public void before(Method method, Object[] args, Object target) throws Throwable {
        System.out.println("前置通知");
    }
}
3. 后置通知
后置通知是在切入点之后执行的增强。
3.1 新建通知类
重写after方法
public class MyAfter implements AfterReturningAdvice {
    @Override
    public void afterReturning(Object returnValue, Method method, Object[] args, Object target) throws Throwable {
        System.out.println("后置通知");
    }
}
4. 环绕通知
环绕通知可以实现前置通知和后置通知两种功能。
4.1 新建通知类
重写invoke方法
-
invocation:方法调用器。通过invocation可以proceed()方法调用执行点。
public class MyAround implements MethodInterceptor {
    @Override
    public Object invoke(MethodInvocation invocation) throws Throwable {
        System.out.println("环绕通知-前置增强");
        Object result = invocation.proceed();// 执行切入点
        System.out.println("环绕通知-后置增强");
        return result;
    }
}
5.异常通知
异常通知只有在切入点出现异常时才会被触发。如果方法没有异常,异常通知是不会执行的。
5.1 新建通知类
MethodInterceptor接口没有方法,但是我们必须严格提供一个下面的方法:
-
public void afterThrowing:必须相同
-
必须有Exception参数
要自己写一个下面的方法
public class MyThrow implements ThrowsAdvice {
    public void afterThrowing(Exception e){
        System.out.println("异常通知:"+e.getMessage());
    }
}
配置切面
<?xml version="1.0" encoding="UTF-8"?>
<beans xmlns="http://www.springframework.org/schema/beans"
       xmlns:xsi="http://www.w3.org/2001/XMLSchema-instance"
       xmlns:context="http://www.springframework.org/schema/context"
       xmlns:aop="http://www.springframework.org/schema/aop"
       xsi:schemaLocation="http://www.springframework.org/schema/beans
        https://www.springframework.org/schema/beans/spring-beans.xsd
        http://www.springframework.org/schema/context
        https://www.springframework.org/schema/context/spring-context.xsd
        http://www.springframework.org/schema/aop
        https://www.springframework.org/schema/aop/spring-aop.xsd">
	<!-- 配置注解扫描路径 -->
    <context:component-scan base-package="com.sh"/>
	<!-- 配置前置通知对象 -->
    <bean id="mybefore" class="com.sh.advice.MyBefore"/>
    <!-- 配置后置通知对象 -->
    <bean id="myafter" class="com.sh.advice.MyAfter"/>
    <!-- 配置环绕通知对象 -->
    <bean id="myaround" class="com.sh.advice.MyAround"/>
    <!-- 配置异常通知对象 -->
    <bean id="mythrow" class="com.sh.advice.MyThrow"/>
    <aop:config>
        <aop:pointcut id="mypoint" expression="execution(* com.sh.service.impl.PeopleServiceImpl.test())"/>
        <!-- 织入异常通知,将通知的id名改变就是不同的通知,可以配置多个-->
        <aop:advisor advice-ref="mythrow" pointcut-ref="mypoint"/>
    </aop:config>
</beans>
6. Schema-based方式包含多个通知的执行顺序
如果切面中包含多个通知,执行顺序是按照配置顺序执行。
-
前置通知:先配置的先执行。
-
后置通知:先配置的后执行。
六、AspectJ实现AOP
1. 引入介绍
问题:
目前我们已经能够使用Schema-based方式来实现AOP。在使用Schema-based方式实现功能扩展时,发现一个扩展代码就需要声明对应的实现了指定的接口的类,这样造成代码的结构体系过于繁杂。一个通知一个类。
解决:
在一个类中声明所有的通知方法。但是这样又会造成Spring容器无法区分该类中的方法那些是前置,那些是后置,那些是环绕,那些是异常了,怎么办?在配置文件中的切面配置中,指明哪些方法是前置,哪些是后置即可。
实现:
Aspectj方式。
2. AspectJ方式通知类型(面试题)
-
前置通知:before。
-
后置通知:after。
-
after是否出现异常都执行的后置通知。
-
after-returning切入点不出现异常时才执行的后置通知。
-
-
环绕通知:around。
-
异常通知:after-throwing。
3. 代码实现
3.1 创建通知类
Aspectj方式实现AOP的通知类不需要实现任何的接口,直接声明一个普通java类即可,然后在类中直接定义通知方法即可,方法名随意,但是建议方法名见名知意。
public class MyAdvice {
    //前置通知方法
    public void before(){
        System.out.println("我是前置通知方法...");
    }
    //后置通知方法
    public void after(){
        System.out.println("我是后置通知方法...");
    }
    //环绕通知方法
    public Object round(ProceedingJoinPoint pp) throws Throwable {
        System.out.println("环绕---前");
        //放行
        Object proceed = pp.proceed();
        System.out.println("环绕---后");
        return proceed;
    }
    //异常通知方法
    public  void  myThrow(Exception ex){
        System.out.println("我是异常通知......"+ex.getMessage());
    }
}
3.2 配置AOP
<?xml version="1.0" encoding="UTF-8"?>
<beans xmlns="http://www.springframework.org/schema/beans"
       xmlns:xsi="http://www.w3.org/2001/XMLSchema-instance"
       xmlns:aop="http://www.springframework.org/schema/aop"
       xsi:schemaLocation="http://www.springframework.org/schema/beans
                           http://www.springframework.org/schema/beans/spring-beans.xsd
                           http://www.springframework.org/schema/aop
	                       http://www.springframework.org/schema/aop/spring-aop-4.0.xsd">
    <!-- 配置注解扫描路径 -->
    <context:component-scan base-package="com.sh"/>
    <!-- 创建通知对象 -->
    <bean id="myadvice" class="com.sh.advice.MyAdvice"/>
    <aop:config>
        <!-- 基于Aspectj方式配置 -->
        <aop:aspect ref="myadvice">
                <!-- 切点配置 -->
                <aop:pointcut id="mp" expression="execution(* com.sh.service.*.*(..))"/>
                <!-- 配置前置通知 -->
                <aop:before method="before" pointcut-ref="mp"/>
                 <!-- 配置后置通知(没有异常,执行的后置通知 )-->
                <aop:after-returning method="after" pointcut-ref="mp"/>
                <!-- 配置后置通知(是否出现异常,都会执行的后置通知) -->
                <aop:after method="after" pointcut-ref="mp"/>
                <!-- 配置异常通知 throwing="异常参数名"-->
                <aop:after-throwing method="myThrow" pointcut-ref="mp" throwing="ex"/>
        </aop:aspect>
    </aop:config>
</beans>
注意:
after和after-returning,after无论切点是否出现异常都执行的后置通知,after-returning只有在切点正常执行完成,才会触发的通知。
3. 在通知中获取目标方法的参数
/*
	如果希望获取切入点方法的参数,推荐把通知的参数和切入点的参数写成一致。
*/
public class MyAdvice2 {
    public void mybefore(int id1, boolean bool1){
        System.out.println("前置通知"+id1+","+bool1);
    }

    public void myafter(int id1, boolean bool1){
        System.out.println("后置:"+id1+","+bool1);
    }
    public void myafter2(int id1, boolean bool1){
        System.out.println("后置2:"+id1+","+bool1);
    }

    public Object myaround(ProceedingJoinPoint pjp,int id1, boolean bool1) throws Throwable {
        System.out.println("环绕前置");
        Object result = pjp.proceed();
        System.out.println("环绕后置");
        return result;
    }

    public void mythrow(Exception ex,int id1, boolean bool1){
        System.out.println("异常通知:"+ex.getMessage()+",id:"+id1+",bool1:"+bool1);
    }
}
在配置文件中配置
arg-names
<?xml version="1.0" encoding="UTF-8"?>
<beans xmlns="http://www.springframework.org/schema/beans"
       xmlns:xsi="http://www.w3.org/2001/XMLSchema-instance"
       xmlns:context="http://www.springframework.org/schema/context"
       xmlns:aop="http://www.springframework.org/schema/aop"
       xsi:schemaLocation="http://www.springframework.org/schema/beans
        https://www.springframework.org/schema/beans/spring-beans.xsd
        http://www.springframework.org/schema/context
        https://www.springframework.org/schema/context/spring-context.xsd
        http://www.springframework.org/schema/aop
        https://www.springframework.org/schema/aop/spring-aop.xsd">
	<!-- 配置注解扫描路径 -->
    <context:component-scan base-package="com.sh"/>
	<!-- 配置通知对象 -->
    <bean id="myadvice2" class="com.sh.advice.MyAdvice2"></bean>
    <aop:config>
        <!-- 基于Aspectj方式配置 -->
        <aop:aspect ref="myadvice2">
            <!--
                 切点配置
                 args():编写参数名,参数名称和目标方法中参数名称一致。
            -->
            <aop:pointcut id="mypoint" expression="execution(* com.bjsxt.service.impl.PeopleServiceImpl.test(int,boolean)) and args(id1,bool1)"/>
            <aop:before method="mybefore" pointcut-ref="mypoint" arg-names="id1,bool1"/>
            <aop:after-returning method="myafter" pointcut-ref="mypoint" arg-names="id1,bool1"/>
            <aop:after method="myafter2" pointcut-ref="mypoint" arg-names="id1,bool1"/>
            <!-- pjp由Spring自动注入 -->
            <aop:around method="myaround" pointcut-ref="mypoint" arg-names="pjp,id1,bool1"/>
            <aop:after-throwing method="mythrow" pointcut-ref="mypoint" arg-names="ex,id1,bool1" throwing="ex"/>
        </aop:aspect>
    </aop:config>
</beans>
4. Schema-based和Aspectj的区别
Schema-based:基于接口实现的。每个通知都需要实现特定的接口类型,才能确定通知的类型。由于类已经实现了接口,所以配置起来相对比较简单。尤其是不需要在配置中指定参数和返回值类型。
AspectJ方式:是基于配置实现的。通过不同的配置标签告诉Spring通知的类型。AspectJ方式对于通知类写起来比较简单。但是在配置文件中参数和返回值需要特殊进行配置。
因为Schame-based是运行时增强,AspectJ是编译时增强。所以当切面比较少时,性能没有太多区别。但是当切面比较多时,最好选择AspectJ方式,因为AspectJ方式要快很多。
七、注解方式实现AOP
<?xml version="1.0" encoding="UTF-8"?>
<beans xmlns="http://www.springframework.org/schema/beans"
       xmlns:xsi="http://www.w3.org/2001/XMLSchema-instance"
       xmlns:aop="http://www.springframework.org/schema/aop"
       xmlns:context="http://www.springframework.org/schema/context"
       xsi:schemaLocation="http://www.springframework.org/schema/beans
                           http://www.springframework.org/schema/beans/spring-beans.xsd
         http://www.springframework.org/schema/aop
	     http://www.springframework.org/schema/aop/spring-aop-4.0.xsd
	     http://www.springframework.org/schema/context
	     http://www.springframework.org/schema/context/spring-context-4.0.xsd">
    <!--配置注解扫描路径-->
    <context:component-scan base-package="com.bjsxt"/>
    <!--配置AOP注解生效-->
    <aop:aspectj-autoproxy expose-proxy="true"/>
</beans>
@Component
作用:
相当于配置文件的bean标签,将某个类的对象扫描到Spring容器中。此注解一般在普通Java类上用。
@Aspect
作用:声明该类为通知类。
使用:结合@Component在通知类上使用,Spring扫描到容器中并作为通知类。
@Service
作用:
相当于配置文件的bean标签,将某个类的对象扫描到Spring容器中。此注解专门在业务层实体类上使用来表明该类为业务类。
@pointcut
作用:声明切点。
使用:方法上使用。
@Before
作用:声明方法为前置通知方法。
使用:在前置通知方法上声明。
注意:需要在其中声明对应的切点的路径,非同包中需要指定全限定路径。
@After
作用:声明方法为后置通知方法。
使用:在后置通知方法上声明。
@Around
作用:声明方法为环绕通知方法。
使用:在环绕通知方法上声明。
@AfterThrowing
作用:声明方法为异常通知方法。
使用:在异常通知方法上声明。