一、Activity的用法
1. Activity
任何活动都应该重写Activity的onCreate()方法
项目中在res添加任何资源都会在R文件生成一个相应的资源id
所有的活动都要在AndroidManifest.xml中进行注册才能生效
<activity
    android:name=".FirstActivity"
    android:label="This">
        <intent-filter>
            <action android:name="android.intent.action.MAIN"/>
            <category android:name="android.intent.category.LAUNCHER"/>
        </intent-filter>
</activity>
android:label="This" : 指定活动标题栏的内容,并且会成为启动器(Launcher)中应用程序显示的名称
protected void onCreate(Bundle savedInstanceState) {
    super.onCreate(savedInstanceState);
    setContentView(R.layout.first_layout);
}
setContentView(R.layout.first_layout); : setContentView()表示给当前活动加载一个布局
2.Toast
protected void onCreate(Bundle savedInstanceState) {
    super.onCreate(savedInstanceState);
    setContentView(R.layout.first_layout);
    Button button1 = (Button)findViewById(R.id.button_1);
    button1.setOnClickListener(new View.OnClickListener() {
        @Override
        public void onClick(View v) {
            Toast.makeText(FirstActivity.this, "You clicked Button 1", Toast.LENGTH_SHORT).show();
        }
    });
}
FirstActivity.this : 此处要求是一个Context对象。 FirstActivity继承Activity,Activity最后继承Context
3.菜单
创建menu文件夹,并且在文件夹下创建Menu resource file
<?xml version="1.0" encoding="utf-8"?>
<menu xmlns:android="http://schemas.android.com/apk/res/android">
    <item
        android:id="@+id/add_item"
        android:title="Add" />
    <item
        android:id="@+id/remove_item"
        android:title="Remove" />
</menu>
public boolean onCreateOptionsMenu(Menu menu) {
    getMenuInflater().inflate(R.menu.main,menu);
    return true;
}
该方法用于给当前活动创建菜单
getMenuInflater()是父类AppCompatActivity的方法,在继承父类的方法内调用父类的方法时,this可以省略。
返回true表示允许创建的菜单显示出来,返回false表示创建的菜单将无法显示
public boolean onOptionsItemSelected(@NonNull MenuItem item) {
        switch (item.getItemId()) {
        case R.id.add_item:
            Toast.makeText(this, "You clicked Add", Toast.LENGTH_SHORT).show();
            break;

        case R.id.remove_item:
            Toast.makeText(this, "You clicked Remove", Toast.LENGTH_SHORT).show();
            break;
        default:
        }
        return true;
    }
4.销毁一个活动
在活动中直接调用finish()方法可以销毁当前活动
finish()方法其实是MainActivity.this.finish();或者MainActivity.super.finish();
二、Intent
可用于启动活动、启动服务和发送广播等场景
1.使用显示Intent
Intent intent = new Intent(MainActivity.this, SecondActivity.class);
startActivity(intent);
startActivity(intent)是Activity的方法
第一个参数Context要求提供一个启动活动的上下文,第二个参数Class指定想要启动的目标活动
FirstActivity.this是上下文, SecondActivity.class是目的活动
2.使用隐式Intent
<activity android:name=".SecondActivity">
    <intent-filter>
        <action android:name="com.ly.test0712.START_ACTION"/>
        <category android:name="android.intent.category.DEFAULT"/>
    </intent-filter>
</activity>
"android.intent.category.DEFAULT" : 这是一种默认的catagory,调用startActivity()方法时会自动将这个category添加到Intent中
<activity>标签下配置<intent-filter>的内容,只有<action>和<category>中的内容同时匹配Intent中指定的action和category时,活动才能响应该Intent
每个Intent中只能指定一个action,但能指定多个category
Intent intent = new Intent("com.ly.test0712.START_ACTION");
intent.addCategory("com.ly.activitytest.MY_CATEGORY");
startActivity(intent);
3.更多隐式Intent的用法
使用隐式Intent启动其他程序的Activity:
Intent intent = new Intent(Intent.ACTION_VIEW);
intent.setData(Uri.parse("https://www.baidu.com"));
startActivity(intent);
Intent.ACTION_VIEW : Android系统的内置动作,其常量值为android.intent.action.VIEW
<intent-filter>标签里可以再配置一个<data>标签,指定当前活动可以响应什么类型的数据
<activity android:name=".ThirdActivity">
    <intent-filter tools:ignore="AppLinkUrlError">
        <action android:name="android.intent.action.VIEW"/>
        <category android:name="android.intent.category.DEFAULT"/>
        <data android:scheme="https"/>
    </intent-filter>
</activity>
4.向下一个活动传递数据
 // 向下一个活动传递数据
                String data = "Hello SecondActivity";
                Intent intent = new Intent(FirstActivity.this, SecondActivity.class);
                intent.putExtra("extra_data", data);
                // 第一个参数是键, 用于后面从Intent中取值, 第二个参数才是要传递的数据
putExtra()方法可以将数据暂存在Intent中
Intent intent = getIntent();
String data = intent.getStringExtra("extra_data");
Log.d("SecondActivity", data);
传递的数据是String,使用getStringExtra()方法;整形数据使用getIntExtra()方法;布尔型数据使用getBooleanExtra()方法

5.返回数据给上一个活动
// 返回数据给上一个活动
                Intent intent = new Intent(FirstActivity.this, SecondActivity.class);
                startActivityForResult(intent, 1);
                // 请求码是唯一值即可
protected void onActivityResult(int requestCode, int resultCode, @Nullable Intent data) {
        super.onActivityResult(requestCode, resultCode, data);
        switch (requestCode) {
            case 1 :
                if (resultCode == RESULT_OK) {
                    String returnedData = data.getStringExtra("data_return");
                    Log.d("FirstActivity", returnedData);
                }
                break;
            default:
        }
    }
 // 返回数据给上一个活动
        Button button2 = (Button) findViewById(R.id.button_2);
        button2.setOnClickListener(new View.OnClickListener() {
            @Override
            public void onClick(View view) {
                Intent intent = new Intent();
                intent.putExtra("data_return", "Hello FirstActivity");
                setResult(RESULT_OK, intent);
                finish();
            }
        });
// 按下back键返回FirstActivity的方法
    @Override
    public void onBackPressed() {
        super.onBackPressed();
        Intent intent = new Intent();
        intent.putExtra("data_return", "Hello FirstActivity");
        setResult(RESULT_OK, intent);
        finish();
    }

三、活动的生命周期
1.返回栈
栈是一种后进先出的数据结构,活动组成的集合(又称任务)就放在返回栈中
2.活动的四种状态
运行状态
暂停状态
停止状态
销毁状态
3.活动的生存期
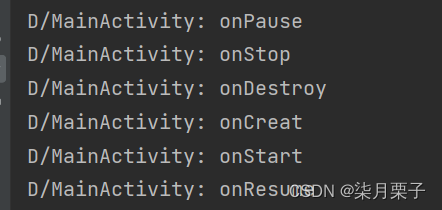
onCreate():活动第一次被创建的时候调用
onStart():活动由不可见变为可见的时候调用
onResume():活动处于栈顶运行状态,准备和用户交互的时候调用
onPause():系统准备去启动或恢复另一个活动时调用
onStop():活动完全不可见的时候调用
onDestroy():活动被销毁的时候调用
onRestart():活动由停止状态变为运行状态的时候调用
活动的三个生存期:
完整生存期:活动在onCreate()和onDestroy()之间所经历的
可见生存期:活动在onStart()和onStop()之间所经历的
前台生存期:活动在onResume()和onPause()之间所经历的

4.体验活动的生命周期

normal_layout
<?xml version="1.0" encoding="utf-8"?>
<LinearLayout xmlns:android="http://schemas.android.com/apk/res/android"
    android:orientation="vertical"
    android:layout_width="match_parent"
    android:layout_height="match_parent">

    <TextView
        android:layout_width="match_parent"
        android:layout_height="wrap_content"
        android:text="This is a normal activity" />

</LinearLayout>
dialog_activity:
<?xml version="1.0" encoding="utf-8"?>
<LinearLayout xmlns:android="http://schemas.android.com/apk/res/android"
android:orientation="vertical"
android:layout_width="match_parent"
android:layout_height="match_parent">
<TextView
android:layout_width="match_parent"
android:layout_height="wrap_content"
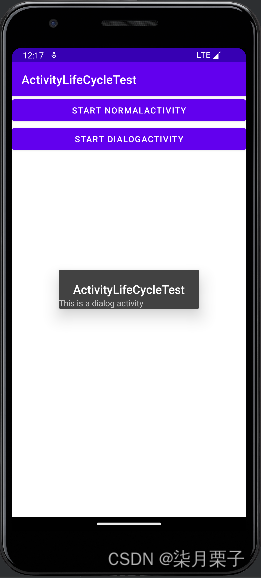
android:text="This is a dialog activity"/>
</LinearLayout>
修改AndroidManif中的:
<activity
            android:name=".DialogActivity"
            android:theme="@style/Theme.AppCompat.Dialog"/>
activity_main:
<?xml version="1.0" encoding="utf-8"?>
<LinearLayout xmlns:android="http://schemas.android.com/apk/res/android"
    android:orientation="vertical"
    android:layout_width="match_parent"
    android:layout_height="match_parent">

    <Button
        android:id="@+id/start_normal_activity"
        android:layout_width="match_parent"
        android:layout_height="wrap_content"
        android:text="Start NormalActivity"/>

    <Button
        android:id="@+id/start_dialog_activity"
        android:layout_width="match_parent"
        android:layout_height="wrap_content"
        android:text="Start DialogActivity"/>


</LinearLayout>
MainActivity:
package com.ly.activitylifecycletest;

import androidx.appcompat.app.AppCompatActivity;

import android.content.Intent;
import android.os.Bundle;
import android.util.Log;
import android.view.View;
import android.widget.Button;

public class MainActivity extends AppCompatActivity {

    public static final String TAG = "MainActivity";

    @Override
    protected void onCreate(Bundle savedInstanceState) {
        super.onCreate(savedInstanceState);
        Log.d(TAG, "onCreat");
        setContentView(R.layout.activity_main);

        Button startNormalActivity = (Button) findViewById(R.id.start_normal_activity);
        Button startDialogActivity = (Button) findViewById(R.id.start_dialog_activity);

        startNormalActivity.setOnClickListener(new View.OnClickListener() {
            @Override
            public void onClick(View view) {
                Intent intent = new Intent(MainActivity.this, NormalActivity.class);
            }
        });
        startDialogActivity.setOnClickListener(new View.OnClickListener() {
            @Override
            public void onClick(View view) {
                Intent intent = new Intent(MainActivity.this, DialogActivity.class);
                startActivity(intent);
            }
        });
    }

    @Override
    protected void onStart() {
        super.onStart();
        Log.d(TAG, "onStart");
    }

    @Override
    protected void onResume() {
        super.onResume();
        Log.d(TAG, "onResume");
    }

    @Override
    protected void onPause() {
        super.onPause();
        Log.d(TAG, "onPause");
    }

    @Override
    protected void onStop() {
        super.onStop();
        Log.d(TAG, "onStop");
    }

    @Override
    protected void onDestroy() {
        super.onDestroy();
        Log.d(TAG, "onDestroy");
    }

    @Override
    protected void onRestart() {
        super.onRestart();
        Log.d(TAG, "onRestart");
    }
}

5.活动被回收了怎么办
Activity提供了一个onSaveInstanceState()回调方法,该方法在活动被回收的时候调用,该方法携带了Bundle类型的参数
Bundle有putString()方法用于保存字符串,putInt()方法用于保存整型数据
也有getString()方法用于取出字符串数据,以此类推
四、活动的启动模式
通过<activity>标签指定android:launchMode属性选择启动模式
1.standard
每次启动都会创建该活动的一个新的实例
this.toString():当前活动的实例
2.singleTop
启动活动时如果发现返回栈的栈顶已经是该活动,则直接使用它,不会创建新的实例
3.singleTask
启动活动时系统会在返回栈检查是否存在该活动的实例,如果发现存在则直接使用该实例,并把该活动之上的所有活动统统出栈
4.singleInstance
指定为singleInstance的活动会启用一个新的返回栈来管理此活动,解决其他应用程序共享活动实例的问题
getTaskId():当前返回栈的id
五、活动的最佳实践
1.知晓当前是在哪一个活动
新建一个类继承AppCompatActivity,重写onCreate()方法,添加Log.d("类的名字",getClass().getSimpleName()),再让所有的活动类继承这个类,通过Log就会打印出当前实例的类名
2.随时随地退出程序
新建一个专门的集合类对所有的活动进行管理
3.启动活动的最佳写法
在每一个活动类中添加一个静态启动方法,方法的参数是Context和需要传递的数据