AutoX.js - openCV多分辨率找图
一、起因
AutoXjs 中有两个找图相关的方法 findImage 和 matchTemplate,之前一直没发现什么问题,但最近在一次测试找图时,明明大图和模板图的轮廓都清晰,却怎么也找不到图,降低阈值参数后找到的结果乱七八糟,我仔细对比图像后发现原因,竟是大图相较于模板抠图时的画面等比缩小了1.2倍,仅仅是0.2倍的整体像素差异,致使搜图失败。
于是我就去翻了AutoX 的具体实现代码,发现这部分代码已是5年前继承于 autojs 的部分代码,具体代码文件在:TemplateMatching.java
其实现原理是借助 opencv的 Imgproc.matchTemplate 方法,以下是部分代码文档:
/**
 * 采用图像金字塔算法快速找图
 *
 * @param img             图片
 * @param template        模板图片
 * @param matchMethod     匹配算法
 * @param weakThreshold   弱阈值。该值用于在每一轮模板匹配中检验是否继续匹配。如果相似度小于该值,则不再继续匹配。
 * @param strictThreshold 强阈值。该值用于检验最终匹配结果,以及在每一轮匹配中如果相似度大于该值则直接返回匹配结果。
 * @param maxLevel        图像金字塔的层数
 * @return
 */
public static List<Match> fastTemplateMatching(Mat img, Mat template, int matchMethod, float weakThreshold, float strictThreshold, int maxLevel, int limit) {
    TimingLogger logger = new TimingLogger(LOG_TAG, "fast_tm");
从中我们可以得知,其采用了“图像金字塔算法快速找图”的处理方式,大体流程是这样的,先将大图和模板图都进行等比缩放,比如宽高都缩小为原来的1/2,如果此时能找到满足阈值的点P1,那么在图像细节更丰富的大图中点P1一定也符合阈值。将图像先等比例缩小,表示图像的矩阵尺寸也就变小,这样执行找图时,整体的计算量减小,找图效率就会大大提高。
这里采用的金字塔算法快速找图,图像尺寸变换就像金字塔,每提高一层图像就变,宽高就缩小一半。方法中的level 参数就是控制起始找图层级的,从 level 层开始从上往下搜图,level=0,即金字塔最底层,也就是原图和模板一比一对比。例如:level=2 就代表从第3层开始往下找图,先在第3层找到 >=threshold 阈值的匹配点就加到最终结果中,剩余 < threshold 且 >=weakThreshold 的疑似匹配点就在第二层中重点关注,以此类推,直到连 >=weakThreshold 的点位也没有就结束找图。

我本以为将level参数调高就能忽略掉大图放大1.2倍的找图问题,但是level过高会导致图像挤成一团,再尝试降低 threshold,虽得到了几个结果,但都是不相干的位置,根本没法用。仔细一想,level参数只是控制找图效率的,这种快速找图的方式根本不适用于大图或模板图分辨率发生变化后的找图场景,而这种情形是很常见的,比如在你手机上开发的脚本放到平板或者别的型号手机上导致找图失败,再比如游戏场景中因双指缩放导致的画面变化。
为了适应大图分辨率可能发生变化的找图场景,我参照 AutoX 中的找图代码,重新用js实现了一版。由于我只看了找图这一部分的相关源码,项目其他的代码不熟悉,就暂时不打算通过提交 PR 为项目做贡献了,有能力的朋友可以完善此部分功能。
二、具体实现
重点部分我已加了文档说明和注释,来不及看也没关系,直接看 main() 方法中的示例,开箱即用。
importClass(org.opencv.imgproc.Imgproc);
importClass(org.opencv.core.Core);
importClass(org.opencv.core.Rect);
importClass(org.opencv.core.Mat);
importClass(org.opencv.core.Point);
importClass(org.opencv.core.Size);
importClass(org.opencv.core.CvType);
importClass(org.opencv.core.Scalar);
importClass(org.opencv.imgcodecs.Imgcodecs);

/**
 * @param {number[]} region 是一个两个或四个元素的数组。
 * (region[0], region[1])表示找色区域的左上角;region[2]*region[3]表示找色区域的宽高。如果只有region只有两个元素,则找色区域为(region[0], region[1])到屏幕右下角。
 * 如果不指定region选项,则找色区域为整张图片。
 * @param {*} img
 * @returns {org.opencv.core.Rect}
 */
function buildRegion(region, img) {
  if (region == undefined) {
    region = [];
  }
  let x = region[0] === undefined ? 0 : region[0];
  let y = region[1] === undefined ? 0 : region[1];
  let width = region[2] === undefined ? img.getWidth() - x : region[2];
  let height = region[3] === undefined ? img.getHeight() - y : region[3];
  if (x < 0 || y < 0 || x + width > img.width || y + height > img.height) {
    throw new Error(
      'out of region: region = [' + [x, y, width, height] + '], image.size = [' + [img.width, img.height] + ']'
    );
  }
  return new Rect(x, y, width, height);
}

/**
 * @param {number} threshold 图片相似度。取值范围为0~1的浮点数。默认值为0.9
 * @param {number[]} region 找图区域
 * @param {number[]} scaleFactors 大图的宽高缩放因子,默认为 [1, 0.9, 1.1, 0.8, 1.2]
 * @param {number} max 找图结果最大数量,默认为5
 * @param {boolean} grayTransform 是否进行灰度化预处理,默认为true。
 * 通常情况下将图像转换为灰度图可以简化匹配过程并提高匹配的准确性,当然,如果你的匹配任务中颜色信息对匹配结果具有重要意义,
 * 可以跳过灰度化步骤,直接在彩色图像上进行模板匹配。
 */
function MatchOptions(threshold, region, scaleFactors, max, grayTransform) {
  this.threshold = threshold;
  this.region = region;
  this.scaleFactors = scaleFactors;
  this.max = max;
  this.grayTransform = grayTransform;
}

const defaultMatchOptions = new MatchOptions(
  0.9,
  undefined,
  [
    [1, 1],
    [0.9, 0.9],
    [1.1, 1.1],
    [0.8, 0.8],
    [1.2, 1.2]
  ],
  5,
  true
);
// 校验参数
MatchOptions.check = function (options) {
  if (options == undefined) {
    return defaultMatchOptions;
  }
  // deep copy
  let newOptions = JSON.parse(JSON.stringify(options));
  if (newOptions.threshold == undefined) {
    newOptions.threshold = defaultMatchOptions.threshold;
  }
  if (newOptions.region && !Array.isArray(newOptions.region)) {
    throw new TypeError('region type is number[]');
  }
  if (newOptions.max == undefined) {
    newOptions.max = defaultMatchOptions.max;
  }
  if (newOptions.scaleFactors == undefined) {
    newOptions.scaleFactors = defaultMatchOptions.scaleFactors;
  } else if (!Array.isArray(newOptions.scaleFactors)) {
    throw new TypeError('scaleFactors');
  }
  for (let index = 0; index < newOptions.scaleFactors.length; index++) {
    let factor = newOptions.scaleFactors[index];
    if (Array.isArray(factor) && factor[0] > 0 && factor[1] > 0) {
      // nothing
    } else if (typeof factor === 'number') {
      newOptions.scaleFactors[index] = [factor, factor];
    } else {
      throw new TypeError('scaleFactors');
    }
  }
  if (newOptions.grayTransform === undefined) {
    newOptions.grayTransform = defaultMatchOptions.grayTransform;
  }

  return newOptions;
};

function Match(point, similarity, scaleX, scaleY) {
  this.point = point;
  this.similarity = similarity;
  this.scaleX = scaleX;
  this.scaleY = scaleY;
}

/**
 * 找图,在图中找出所有匹配的位置
 * @param {Image} img
 * @param {Image} template
 * @param {MatchOptions} options 参数见上方定义
 * @returns {Match[]}
 */
function matchTemplate(img, template, options) {
  if (img == null || template == null) {
    throw new Error('ParamError');
  }
  options = MatchOptions.check(options);
  console.log('参数:', options);

  let largeMat = img.mat;
  let templateMat = template.mat;
  let largeGrayMat;
  let templateGrayMat;
  if (options.region) {
    options.region = buildRegion(options.region, img);
    largeMat = new Mat(largeMat, options.region);
  }
  // 灰度处理
  if (options.grayTransform) {
    largeGrayMat = new Mat();
    Imgproc.cvtColor(largeMat, largeGrayMat, Imgproc.COLOR_BGR2GRAY);
    templateGrayMat = new Mat();
    Imgproc.cvtColor(templateMat, templateGrayMat, Imgproc.COLOR_BGR2GRAY);
  }
  // =================================================
  let finalMatches = [];
  for (let factor of options.scaleFactors) {
    let [fx, fy] = factor;
    let resizedTemplate = new Mat();
    Imgproc.resize(templateGrayMat || templateMat, resizedTemplate, new Size(), fx, fy, Imgproc.INTER_LINEAR);
    // 执行模板匹配,标准化相关性系数匹配法
    let matchMat = new Mat();
    Imgproc.matchTemplate(largeGrayMat || largeMat, resizedTemplate, matchMat, Imgproc.TM_CCOEFF_NORMED);

    let currentMatches = _getAllMatch(matchMat, resizedTemplate, options.threshold, factor, options.region);
    console.log('缩放比:', factor, '可疑目标数:', currentMatches.length);
    for (let match of currentMatches) {
      if (finalMatches.length === 0) {
        finalMatches = currentMatches.slice(0, options.max);
        break;
      }
      if (!isOverlapping(finalMatches, match)) {
        finalMatches.push(match);
      }
      if (finalMatches.length >= options.max) {
        break;
      }
    }
    resizedTemplate.release();
    matchMat.release();
    if (finalMatches.length >= options.max) {
      break;
    }
  }
  largeMat !== img.mat && largeMat.release();
  largeGrayMat && largeGrayMat.release();
  templateGrayMat && templateGrayMat.release();

  return finalMatches;
}

function _getAllMatch(tmResult, templateMat, threshold, factor, rect) {
  let currentMatches = [];
  let mmr = Core.minMaxLoc(tmResult);

  while (mmr.maxVal >= threshold) {
    // 每次取匹配结果中的最大值和位置,从而使结果按相似度指标从高到低排序
    let pos = mmr.maxLoc; // Point
    let value = mmr.maxVal;

    let start = new Point(Math.max(0, pos.x - templateMat.width() / 2), Math.max(0, pos.y - templateMat.height() / 2));
    let end = new Point(
      Math.min(tmResult.width() - 1, pos.x + templateMat.width() / 2),
      Math.min(tmResult.height() - 1, pos.y + templateMat.height() / 2)
    );
    // 屏蔽已匹配到的区域
    Imgproc.rectangle(tmResult, start, end, new Scalar(0), -1);
    mmr = Core.minMaxLoc(tmResult);

    if (rect) {
      pos.x += rect.x;
      pos.y += rect.y;
      start.x += rect.x;
      start.y += rect.y;
      end.x += rect.x;
      end.y += rect.y;
    }
    let match = new Match(pos, value, factor[0], factor[1]);
    // 保存匹配点的大致范围,用于后续去重。设置enumerable为false相当于声明其为私有属性
    Object.defineProperty(match, 'matchAroundRect', { value: new Rect(start, end), writable: true, enumerable: false });
    currentMatches.push(match);
  }

  return currentMatches;
}

/**
 * 判断新检测到的点位是否与之前的某个点位重合。
 * @param {Match[]} matches
 * @param {Match} newMatch
 * @returns {boolean}
 */
function isOverlapping(matches, newMatch) {
  for (let existingMatch of matches) {
    // 也可判断两点间的距离,但是平方、开方运算不如比较范围简单高效
    if (existingMatch.matchAroundRect.contains(newMatch.point)) {
      if (newMatch.similarity > existingMatch.similarity) {
        existingMatch.point = newMatch.point;
        existingMatch.similarity = newMatch.similarity;
        existingMatch.scaleX = newMatch.scaleX;
        existingMatch.scaleY = newMatch.scaleY;
        existingMatch.matchAroundRect = newMatch.matchAroundRect;
      }
      return true;
    }
  }
  return false;
}
/**
 * 根据搜图结果在原图上画框
 * @param {Match[]} matches
 * @param {*} srcMat
 * @param {*} templateMat
 */
function showMatchRectangle(matches, srcMat, templateMat) {
  for (let match of matches) {
    let start = match.point;
    let end = new Point(
      match.point.x + templateMat.width() * match.scaleX,
      match.point.y + templateMat.height() * match.scaleY
    );
    Imgproc.rectangle(srcMat, start, end, new Scalar(0, 0, 255), 3);
  }

  const saveName = '/sdcard/Download/temp.jpg';
  let img2 = images.matToImage(srcMat);
  images.save(img2, saveName);
  app.viewFile(saveName);
  img2.recycle();
}

function main() {
  let largeImage = images.read('/sdcard/Download/large.jpg');
  let template = images.read('/sdcard/Download/template.jpg');

  console.log('大图尺寸:', [largeImage.getWidth(), largeImage.getHeight()]);
  console.log('模板尺寸:', [template.getWidth(), template.getHeight()]);

  let startTs = Date.now();
  let result = matchTemplate(largeImage, template, {
    threshold: 0.85,
    region: [100, 100],
    grayTransform: false,
    scaleFactors: [1, 0.9, 1.1, 0.8, 1.2],
    max: 6
  });
  console.log('找图耗时:', (Date.now() - startTs) / 1000);
  console.log(result);
  // 将结果画框展示
  showMatchRectangle(result, largeImage.mat, template.mat);
  template.recycle();
  largeImage.recycle();
}

// 初始化openCV
runtime.getImages().initOpenCvIfNeeded();
main();
备注说明
-
参数
threhold、region、max跟AutoX中的一样。 -
grayTransform:是否将图像进行灰度预处理,开启可大幅提高找图效率,默认为true。
对于模板匹配任务,通常关注的是图像的纹理和亮度变化,而不是颜色差异。因此,将图像转换为灰度图可以降低计算复杂度,减少模板匹配过程中的噪声干扰,并提高匹配的稳定性和准确性。如果你的模板小图中纹理不明显,或是一团颜色相近的色块,就得关闭该功能。
-
scaleFactors:是对小图模板的缩放因子,数组类型,默认为
[1, 0.9, 1.1, 0.8, 1.2]。每一项可以是数字,表示宽高等比例缩放,也可以是长度为2的数组,表示宽、高对应的缩放比,例如:[0.9, 1, [1.1, 1.2]]这里重点强调一点,我没有在 openCV 里找到可以直接用于忽略图像比例差异的搜图方法,只能手动指定可能的缩放范围,依次对小图模板进行缩放后再搜图。理论上,只要你设置的(不重复)缩放因子足够多,就一定能找到目标,除非图中没有😁。
-
max参数的妙用:搜图过程中,默认在找到前 max 个符合阈值的匹配点就退出,但是可能存在一种情况,例如先在缩放比为 1.1 的情况下找到了相似度为 0.8 的点 P1,此时若还没有找够 max 个匹配点,在后续比例为 1.2 的情况下,检测到点 P1 处的相似度提高到0.9,就将原来 P1 点的信息更新为更准确的信息。理解了这一点,如果你将 max 设置的非常大,我的搜图算法就会按照
scaleFactors中设置的全部缩放因子都检测一遍,不会提前结束,那么最终结果中所有的 Match 对象中保存的都是最佳匹配点的信息,你可以凭借最终结果中的 scaleX、scaleY 信息,动态调整scaleFactors参数,使其优先匹配最佳缩放比,提高后续的找图效率。
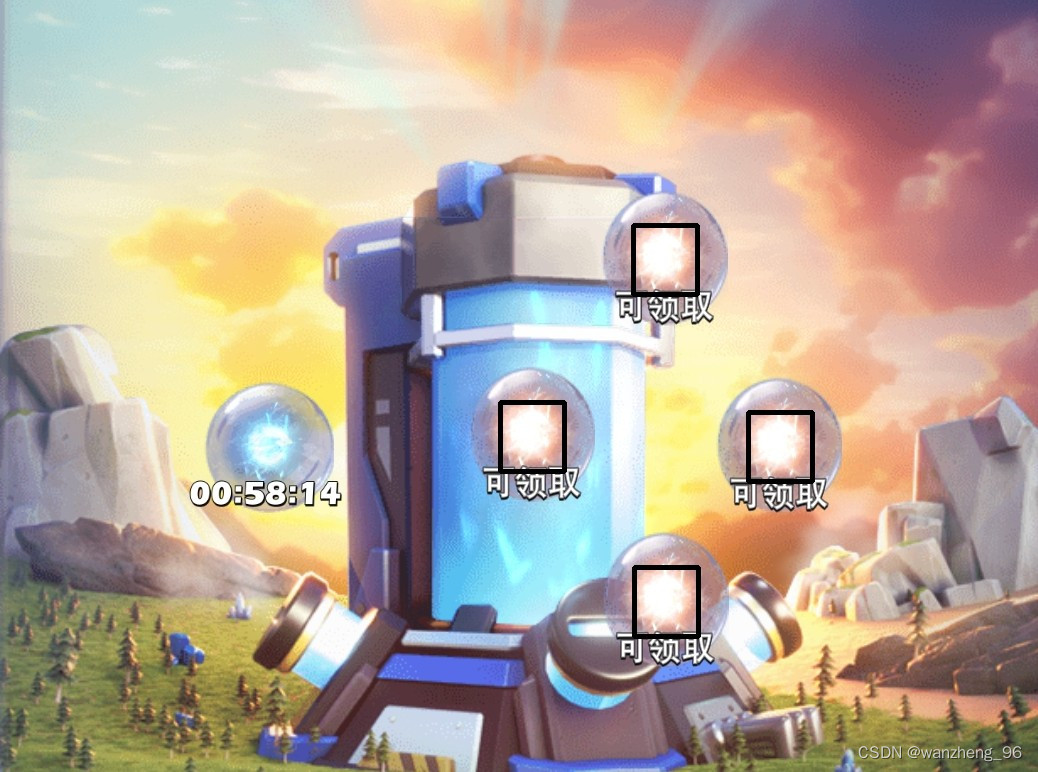
三、测试结果展示
以下是一个测试数据,模板图是一坨近乎白色的光团,对比了 grayTransform 参数开启和关闭的情况,虽然效率相差好几倍,但是此时还是关闭灰度预处理的结果更准确。
希望大家在使用时,清楚每个参数改变所产生的效果。
-
模板小图

-
5个缩放因子下的找图结果

-
开启灰度处理
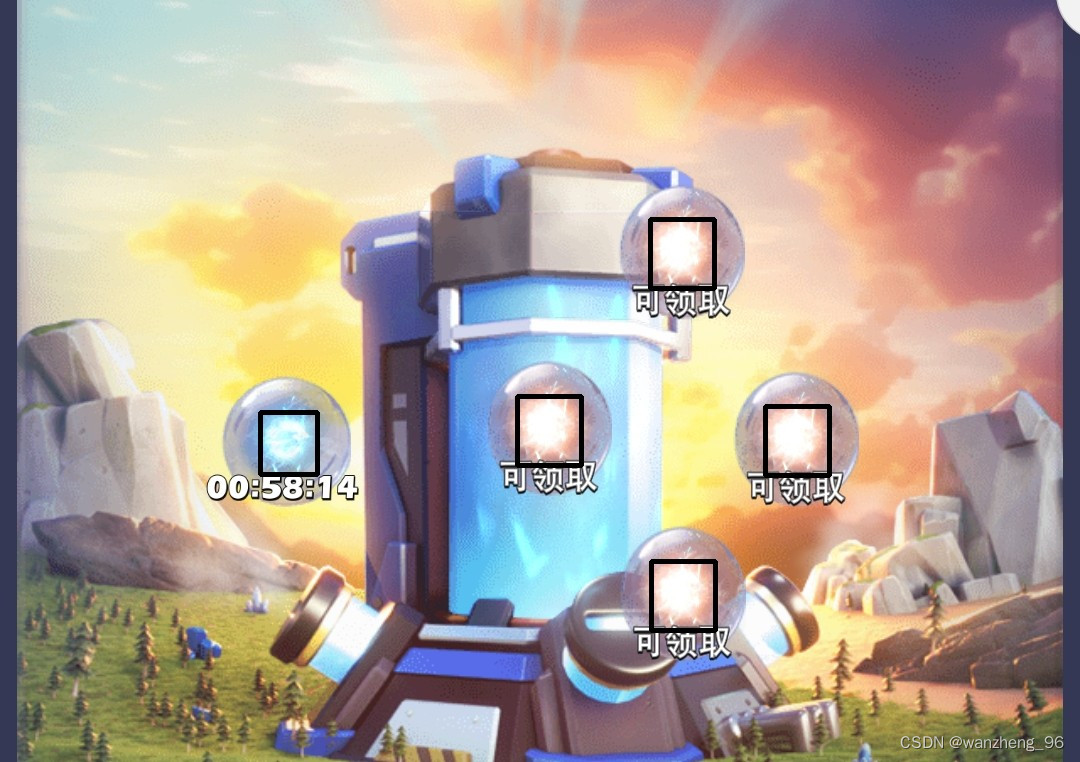
-
未开启灰度处理

![[LeetCode]-27. 移除元素-26.删除有序数组中的重复项-88.合并两个有序数组](https://img-blog.csdnimg.cn/1e3023a966c44f11a9fa2443ed6dac85.png)