当前示例源码github地址:
https://github.com/vilyLei/voxwebgpu/blob/main/src/voxgpu/sample/REntity3DContainerTest.ts
此示例渲染系统实现的特性:
1. 用户态与系统态隔离。
2. 高频调用与低频调用隔离。
3. 面向用户的易用性封装。
4. 渲染数据和渲染机制分离。
5. 用户操作和渲染系统调度并行机制。
关于3D引擎中容器的更多作用请见: 3D系统中可渲染实体容器(Renderable Entity Container)-CSDN博客
当前示例运行效果:
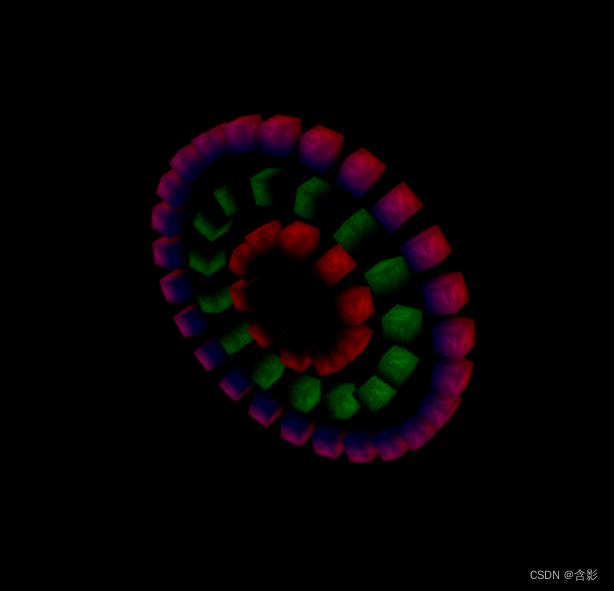
此示例基于此渲染系统实现,当前示例TypeScript源码如下:
export class REntity3DContainerTest {

	private mRscene = new RendererScene();
	geomData = new GeomDataBuilder();
	initialize(): void {
		console.log("REntity3DContainerTest::initialize() ...");

		this.mRscene.initialize();
		this.initEvent();
		this.initScene();
	}
	private initEvent(): void {
		const rc = this.mRscene;
		rc.addEventListener(MouseEvent.MOUSE_DOWN, this, this.mouseDown);
		new MouseInteraction().initialize(rc, 0, false).setAutoRunning(true);
	}

	private mouseDown(evt: MouseEvent): void {
		console.log("mousedown evt call ...");
	}
	private createMaterial(shdSrc: WGRShderSrcType, texDatas?: WGImage2DTextureData[], color?: Color4, blendModes: string[] = ["solid"], faceCullMode = "back"): WGMaterial {

		color = color ? color : new Color4();

		let pipelineDefParam = {
			depthWriteEnabled: true,
			faceCullMode,
			blendModes: [] as string[]
		};


		pipelineDefParam.blendModes = blendModes;

		const texTotal = texDatas ? texDatas.length : 0;

		const material = new WGMaterial({
			shadinguuid: "base-material-tex" + texTotal,
			shaderCodeSrc: shdSrc,
			pipelineDefParam
		});

		let ufv = new WGRStorageValue(new Float32Array([color.r, color.g, color.b, 1]));
		material.uniformValues = [ufv];
		material.addTextureWithDatas(texDatas);

		return material;
	}

	private createGeom(rgd: GeomRDataType, normalEnabled = false): WGGeometry {
		const geometry = new WGGeometry()
			.addAttribute({ shdVarName: "position", data: rgd.vs, strides: [3] })
			.addAttribute({ shdVarName: "uv", data: rgd.uvs, strides: [2] })
			.setIndexBuffer({ name: "geomIndex", data: rgd.ivs });
		if (normalEnabled) {
			geometry.addAttribute({ shdVarName: "normal", data: rgd.nvs, strides: [3] });
		}
		return geometry;
	}
	private mContainers: Entity3DContainer[] = [];
	private createCircle(radius: number, total: number, scale: number, materials: WGMaterial[], geometry: WGGeometry, pv?: Vector3): Entity3DContainer {

		const rc = this.mRscene;

		pv = pv ? pv : new Vector3();

		let mContainer = new Entity3DContainer();
		mContainer.setPosition(pv);
		for (let i = 0; i < total; ++i) {
			const factor = i / total;
			const rad = Math.PI * 2.0 * factor;
			const px = radius * Math.cos(rad);
			const py = radius * Math.sin(rad);

			let entity = new Entity3D();
			entity.materials = materials;
			entity.geometry = geometry;
			entity.transform.setXYZ(px, py, 0);
			entity.transform.setRotationZ(factor * 360.0);
			entity.transform.setScaleAll(scale);

			mContainer.addChild(entity);
		}
		return mContainer;
	}
	private initScene(): void {

		const rc = this.mRscene;

		const geometry = this.createGeom(this.geomData.createCube(80));

		const shdSrc = {
			vertShaderSrc: { code: vertWGSL, uuid: "vertShdCode" },
			fragShaderSrc: { code: fragWGSL, uuid: "fragShdCode" }
		};
		let materials0 = [this.createMaterial(shdSrc, [new WGImage2DTextureData("static/assets/box.jpg")], new Color4(1.0, 0.0, 0.0))];
		let materials1 = [this.createMaterial(shdSrc, [new WGImage2DTextureData("static/assets/box.jpg")], new Color4(0.0, 1.0, 0.0))];
		let materials2 = [this.createMaterial(shdSrc, [new WGImage2DTextureData("static/assets/box.jpg")], new Color4(1.0, 0.0, 1.0))];

		const container0 = this.createCircle(100, 10, 0.5, materials0, geometry);
		const container1 = this.createCircle(180, 15, 0.5, materials1, geometry);
		const container2 = this.createCircle(260, 25, 0.5, materials2, geometry);

		let container = new Entity3DContainer();
		container.addChild(container0);
		container.addChild(container1);
		container.addChild(container2);
		rc.addEntity(container);

		this.mContainers.push(container0, container1, container2, container);
	}

	private mRotValue = 0.0;
	run(): void {

		this.mRotValue += 0.5;

		const ls = this.mContainers;
		ls[0].setRotationZ(this.mRotValue * 1.2);
		ls[1].setRotationZ(this.mRotValue * 0.4 + 15.0);
		ls[2].setRotationZ(this.mRotValue * 0.2 + 30.0);
		ls[3].setRotationY(this.mRotValue * 0.2);
		ls[3].update();

		this.mRscene.run();
	}
}


![[激光原理与应用-72]:PLC架构与工作原理](https://img-blog.csdnimg.cn/bd5280e05ee2496aa889ec922f65eece.png)