🎉🎉欢迎来到我的CSDN主页!🎉🎉
🏅我是Java方文山,一个在CSDN分享笔记的博主。📚📚
🌟推荐给大家我的专栏《微信小程序开发实战》。🎯🎯
👉点击这里,就可以查看我的主页啦!👇👇
Java方文山的个人主页
🎁如果感觉还不错的话请给我点赞吧!🎁🎁
💖期待你的加入,一起学习,一起进步!💖💖

目录
前言
一、Flex弹性布局
1.Flex布局是什么?
2.基本概念
3.容器的属性
3.1 flex-direction属性
3.2 flex-wrap属性
3.3 flex-flow
3.4 justify-content属性
3.5 align-items属性
3.6 align-content属性
二、首页布局搭建
1.底部页面的搭建
2.首页轮播图搭建
2.1.后端接口管理
2.2.Mock模拟数据
2.3.搭建轮播图
3.首页会议信息搭建
3.1.会议信息ajax
3.2.Mock模拟数据
3.3.搭建会议信息
前言
中国政府意识到信息技术的重要性,并开始积极推动信息产业的发展。一系列政策和措施被制定和执行,以促进信息技术的采用和普及,从而推动数字化时代的到来。为了响应国家推行的数字化时代,本篇文章以会议OA系统为背景进行编写。
一、Flex弹性布局
布局的传统解决方案,基于盒状模型,依赖 display属性 + position属性 + float属性。它对于那些特殊布局非常不方便,比如,垂直居中就不容易实现。

2009年,W3C提出了一种新的方案—-Flex布局,可以简便、完整、响应式地实现各种页面布局。目前,它已经得到了所有浏览器的支持,这意味着,现在就能很安全地使用这项功能。
1.Flex布局是什么?
Flex是Flexible Box的缩写,意为”弹性布局”,用来为盒状模型提供最大的灵活性。
任何一个容器都可以指定为Flex布局。
.box{
  display: flex;
}
行内元素也可以使用Flex布局。
.box{
  display: inline-flex;
}
Webkit内核的浏览器,必须加上-webkit前缀。
.box{
  display: -webkit-flex; /* Safari */
  display: flex;
}
注意,设为Flex布局以后,子元素的float、clear和vertical-align属性将失效。
2.基本概念
采用Flex布局的元素,称为Flex容器(flex container),简称”容器”。它的所有子元素自动成为容器成员,称为Flex项目(flex item),简称”项目”。

容器默认存在两根轴:水平的主轴(main axis)和垂直的交叉轴(cross axis)。主轴的开始位置(与边框的交叉点)叫做main start,结束位置叫做main end;交叉轴的开始位置叫做cross start,结束位置叫做cross end。
项目默认沿主轴排列。单个项目占据的主轴空间叫做main size,占据的交叉轴空间叫做cross size。
3.容器的属性
以下6个属性设置在容器上。
- flex-direction
- flex-wrap
- flex-flow
- justify-content
- align-items
- align-content
3.1 flex-direction属性
flex-direction属性决定主轴的方向(即项目的排列方向)。
.box {
  flex-direction: row | row-reverse | column | column-reverse;
}
它可能有4个值。
- row(默认值):主轴为水平方向,起点在左端。
- row-reverse:主轴为水平方向,起点在右端。
- column:主轴为垂直方向,起点在上沿。
- column-reverse:主轴为垂直方向,起点在下沿。
3.2 flex-wrap属性
默认情况下,项目都排在一条线(又称”轴线”)上。flex-wrap属性定义,如果一条轴线排不下,如何换行。

.box{
  flex-wrap: nowrap | wrap | wrap-reverse;
}
它可能取三个值。
(1)nowrap(默认):不换行。

(2)wrap:换行,第一行在上方。
(3)wrap-reverse:换行,第一行在下方。
3.3 flex-flow
flex-flow属性是flex-direction属性和flex-wrap属性的简写形式,默认值为row nowrap。
.box {
  flex-flow: <flex-direction> <flex-wrap>;
}
3.4 justify-content属性
justify-content属性定义了项目在主轴上的对齐方式。
.box {
  justify-content: flex-start | flex-end | center | space-between | space-around;
}
它可能取5个值,具体对齐方式与轴的方向有关。下面假设主轴为从左到右。
- flex-start(默认值):左对齐
- flex-end:右对齐
- center: 居中
- space-between:两端对齐,项目之间的间隔都相等。
- space-around:每个项目两侧的间隔相等。所以,项目之间的间隔比项目与边框的间隔大一倍。
3.5 align-items属性
align-items属性定义项目在交叉轴上如何对齐。
.box {
  align-items: flex-start | flex-end | center | baseline | stretch;
}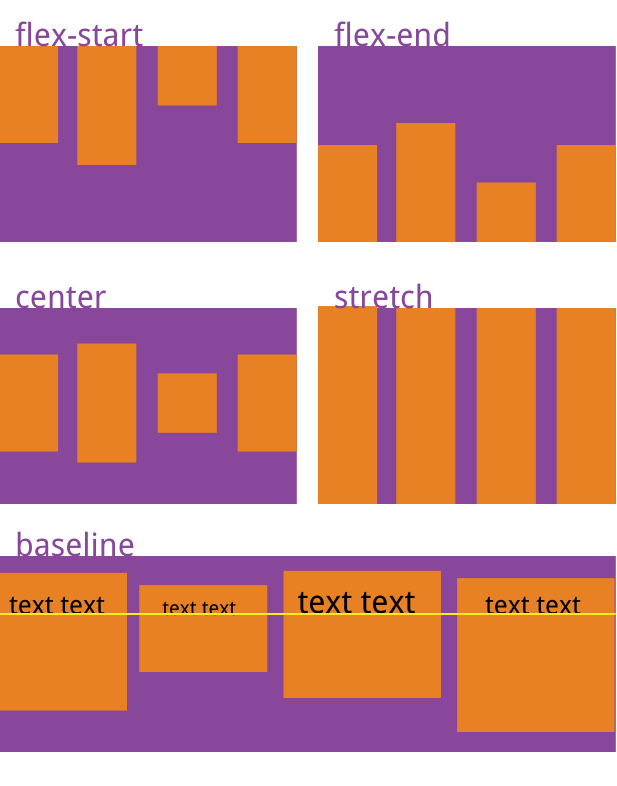
它可能取5个值。具体的对齐方式与交叉轴的方向有关,下面假设交叉轴从上到下。
- flex-start:交叉轴的起点对齐。
- flex-end:交叉轴的终点对齐。
- center:交叉轴的中点对齐。
- baseline: 项目的第一行文字的基线对齐。
- stretch(默认值):如果项目未设置高度或设为auto,将占满整个容器的高度。
3.6 align-content属性
align-content属性定义了多根轴线的对齐方式。如果项目只有一根轴线,该属性不起作用。
.box {
  align-content: flex-start | flex-end | center | space-between | space-around | stretch;
}
该属性可能取6个值。
- flex-start:与交叉轴的起点对齐。
- flex-end:与交叉轴的终点对齐。
- center:与交叉轴的中点对齐。
- space-between:与交叉轴两端对齐,轴线之间的间隔平均分布。
- space-around:每根轴线两侧的间隔都相等。所以,轴线之间的间隔比轴线与边框的间隔大一倍。
- stretch(默认值):轴线占满整个交叉轴。
二、首页布局搭建
1.底部页面的搭建
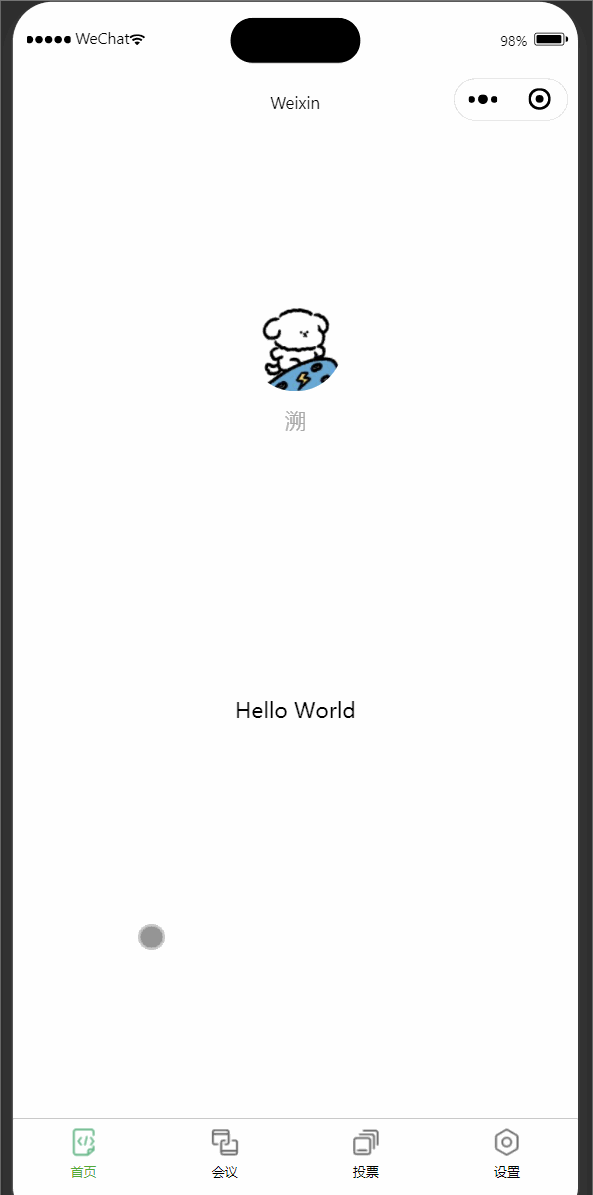
一个微信小程序必不可少的就是底部导航栏,所以我们先搭建一个底部导航栏 ,根据微信小程序的开发者文档可知,底部导航栏需要在api.json定义tabBar并做好相应的配置(注意先在pages做好页面的定义)。

底部导航栏没有图标是显得非常单调的,所以我们还要创建一个文件夹名为static用来存放图片
继续在static文件夹下创建一个文件名为tabBar,将我们所需的图标放入,搭配属性iconPath引用图标即可。
// app.json部分代码展示
"pages":[
"pages/index/index",
"pages/meeting/list/list",
"pages/vote/list/list",
"pages/ucenter/index/index",
"pages/logs/logs"
],
"tabBar": {
"list": [{
"pagePath": "pages/index/index",
"text": "首页",
"iconPath": "/static/tabBar/coding.png",
"selectedIconPath": "/static/tabBar/coding-active.png"
},
{
"pagePath": "pages/meeting/list/list",
"iconPath": "/static/tabBar/sdk.png",
"selectedIconPath": "/static/tabBar/sdk-active.png",
"text": "会议"
},
{
"pagePath": "pages/vote/list/list",
"iconPath": "/static/tabBar/template.png",
"selectedIconPath": "/static/tabBar/template-active.png",
"text": "投票"
},
{
"pagePath": "pages/ucenter/index/index",
"iconPath": "/static/tabBar/component.png",
"selectedIconPath": "/static/tabBar/component-active.png",
"text": "设置"
}]
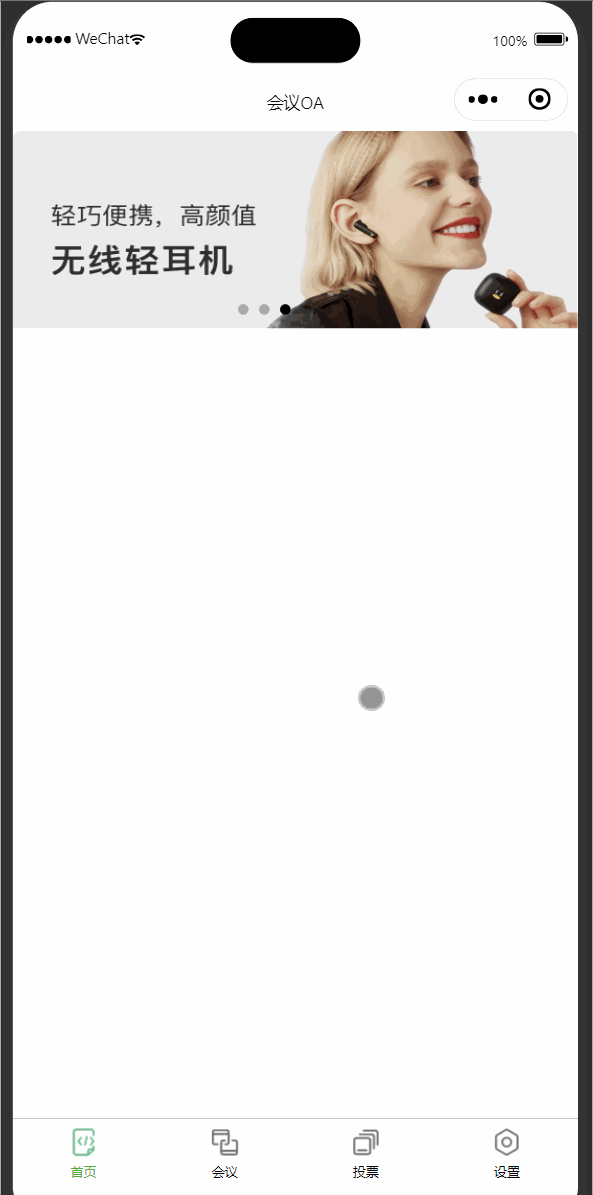
}效果展示:
2.首页轮播图搭建
2.1.后端接口管理
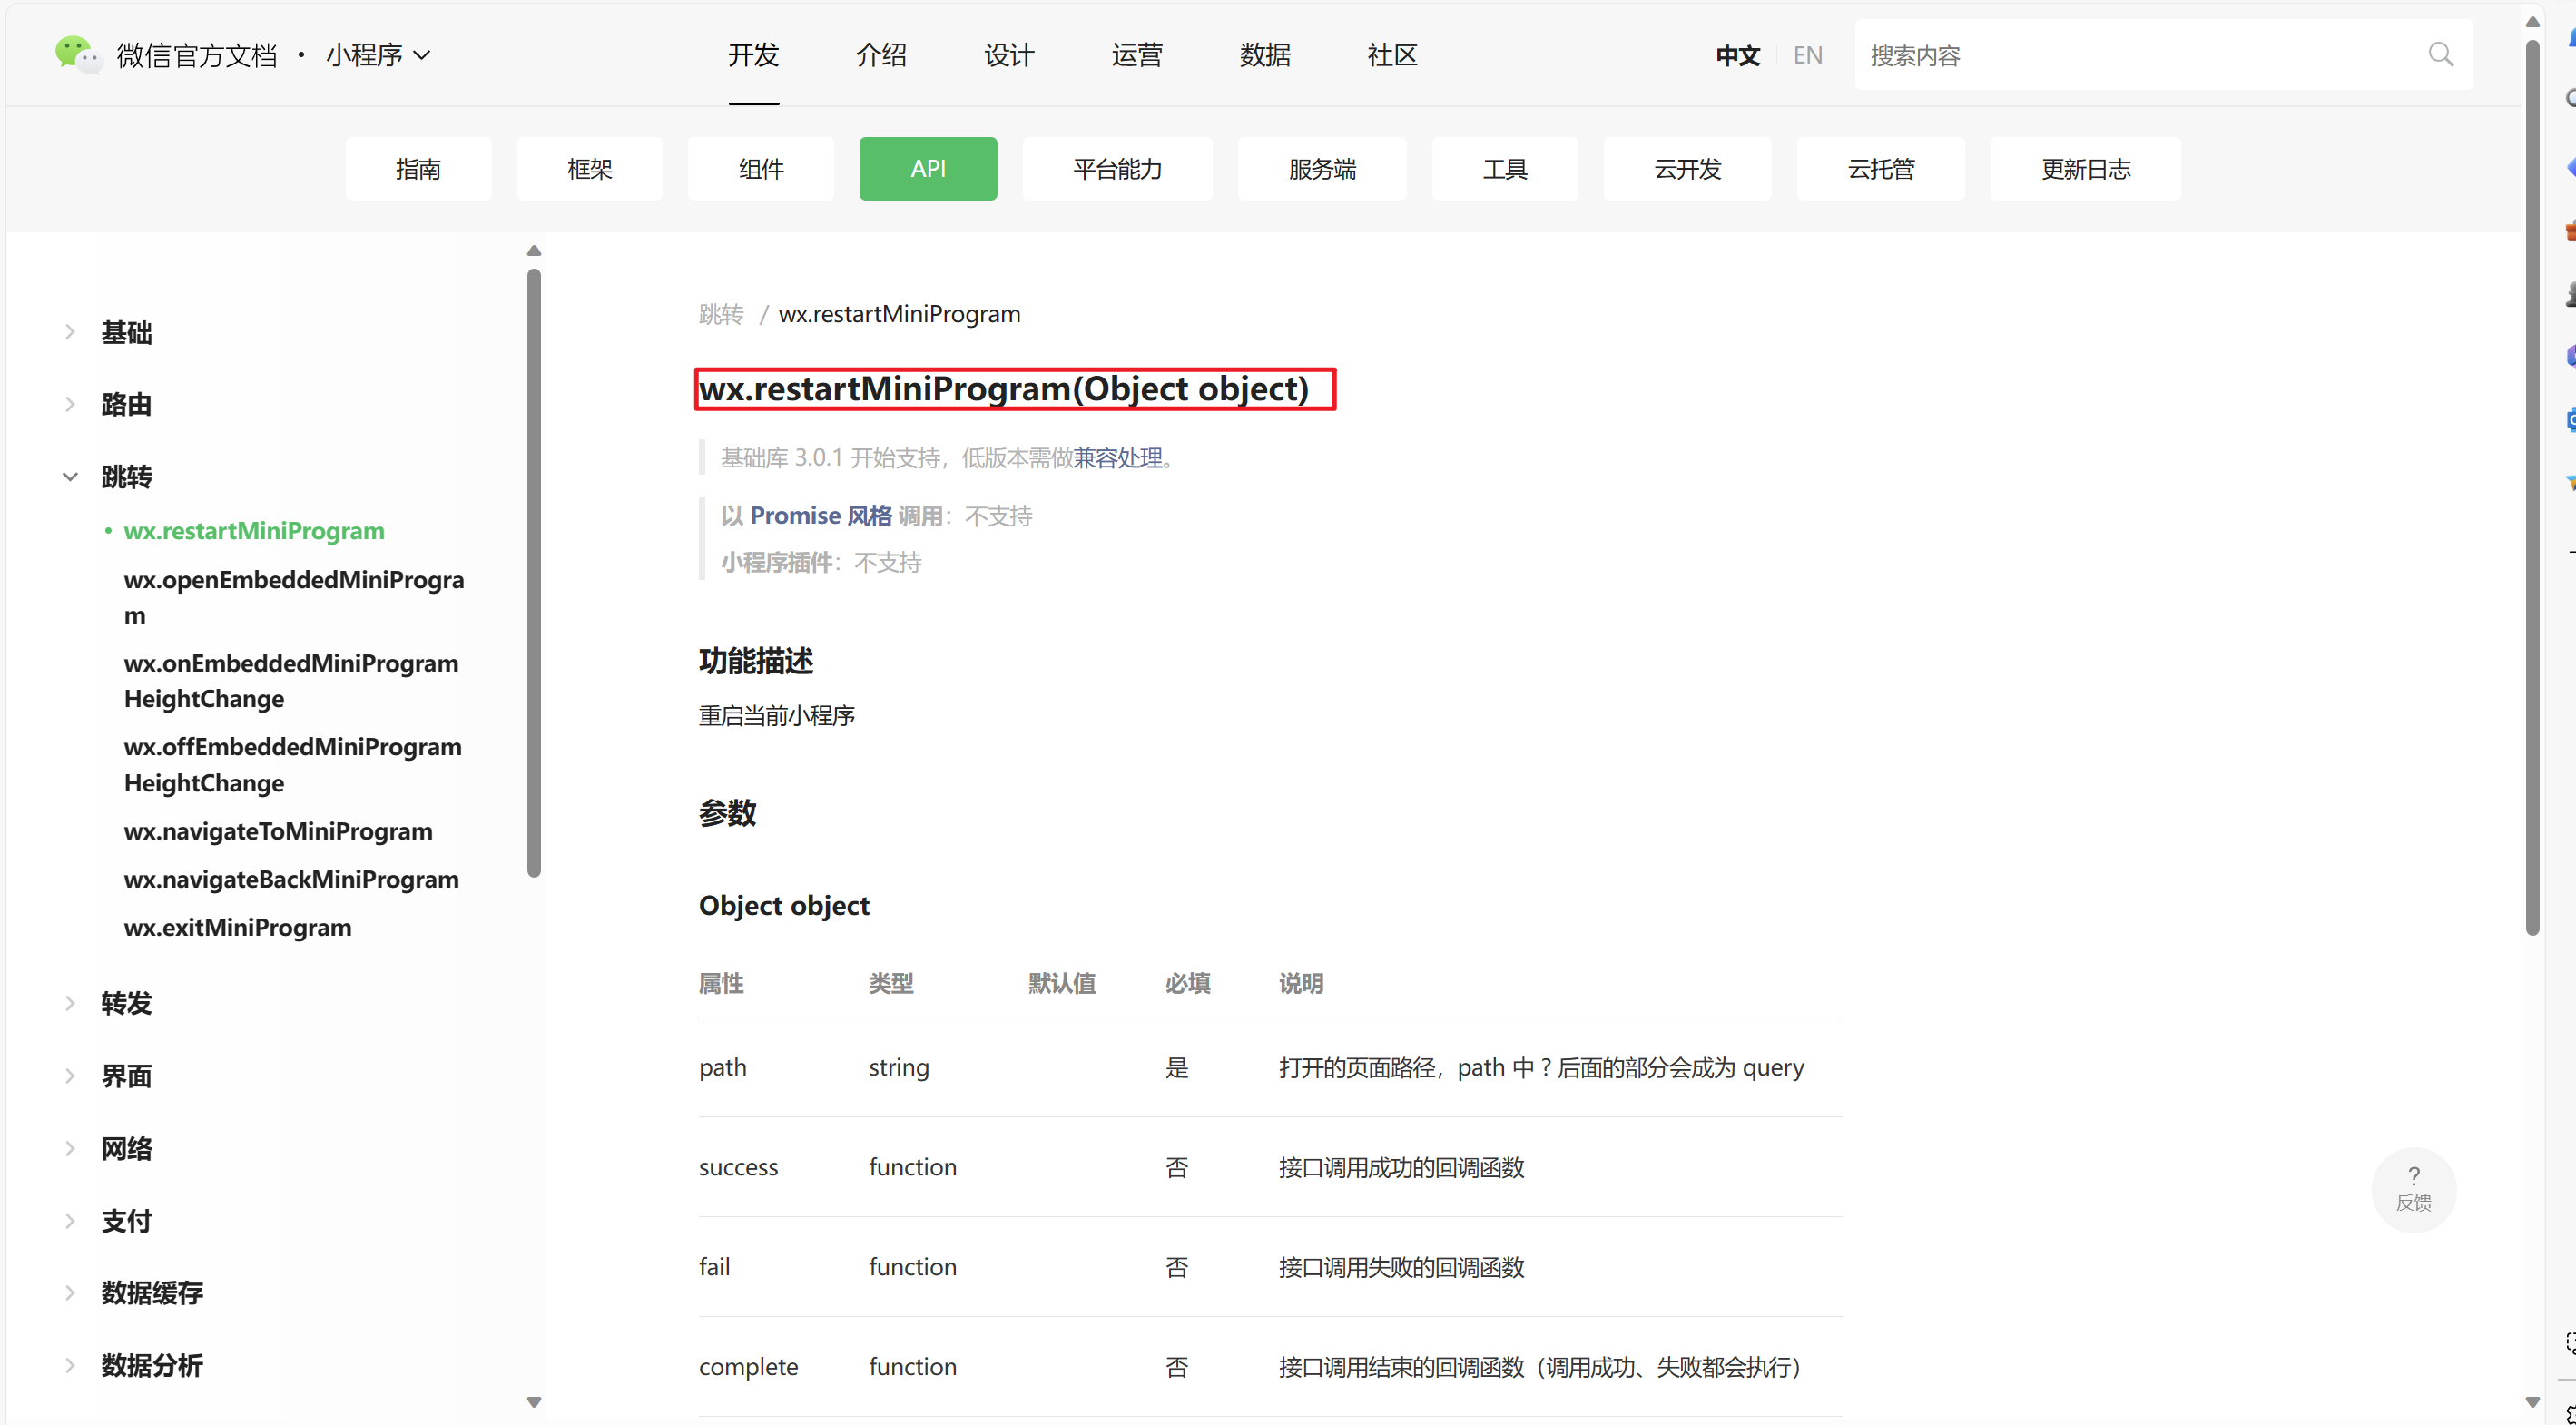
轮播图这种资源一定是从数据库来的数据,那么我们怎么通过微信小程序开发获取后端呢?
还是一样看官网,通过官网可知我们发送ajax请求是wx.restartMiniProgram(Object object)
其他的东西还是基本与我们发送ajax请求一致的。
为了后期方便维护我们先将所有的后端接口通过一个文件来保存,在根目录下新建config文件夹随后建立api.js文件。
// 以下是业务服务器API地址
 // 本机开发API地址
 var WxApiRoot = 'http://localhost:8080/demo/wx/';
 // 测试环境部署api地址
 // var WxApiRoot = 'http://192.168.0.101:8070/demo/wx/';
 // 线上平台api地址
 //var WxApiRoot = 'https://www.oa-mini.com/demo/wx/';

 module.exports = {
   IndexUrl: WxApiRoot + 'home/index', //首页数据接口
   SwiperImgs: WxApiRoot+'swiperImgs', //轮播图
   MettingInfos: WxApiRoot+'meeting/list', //会议信息
 };
还是一样先定义本机开发的API地址,具体的请求在下面定义方便管理。
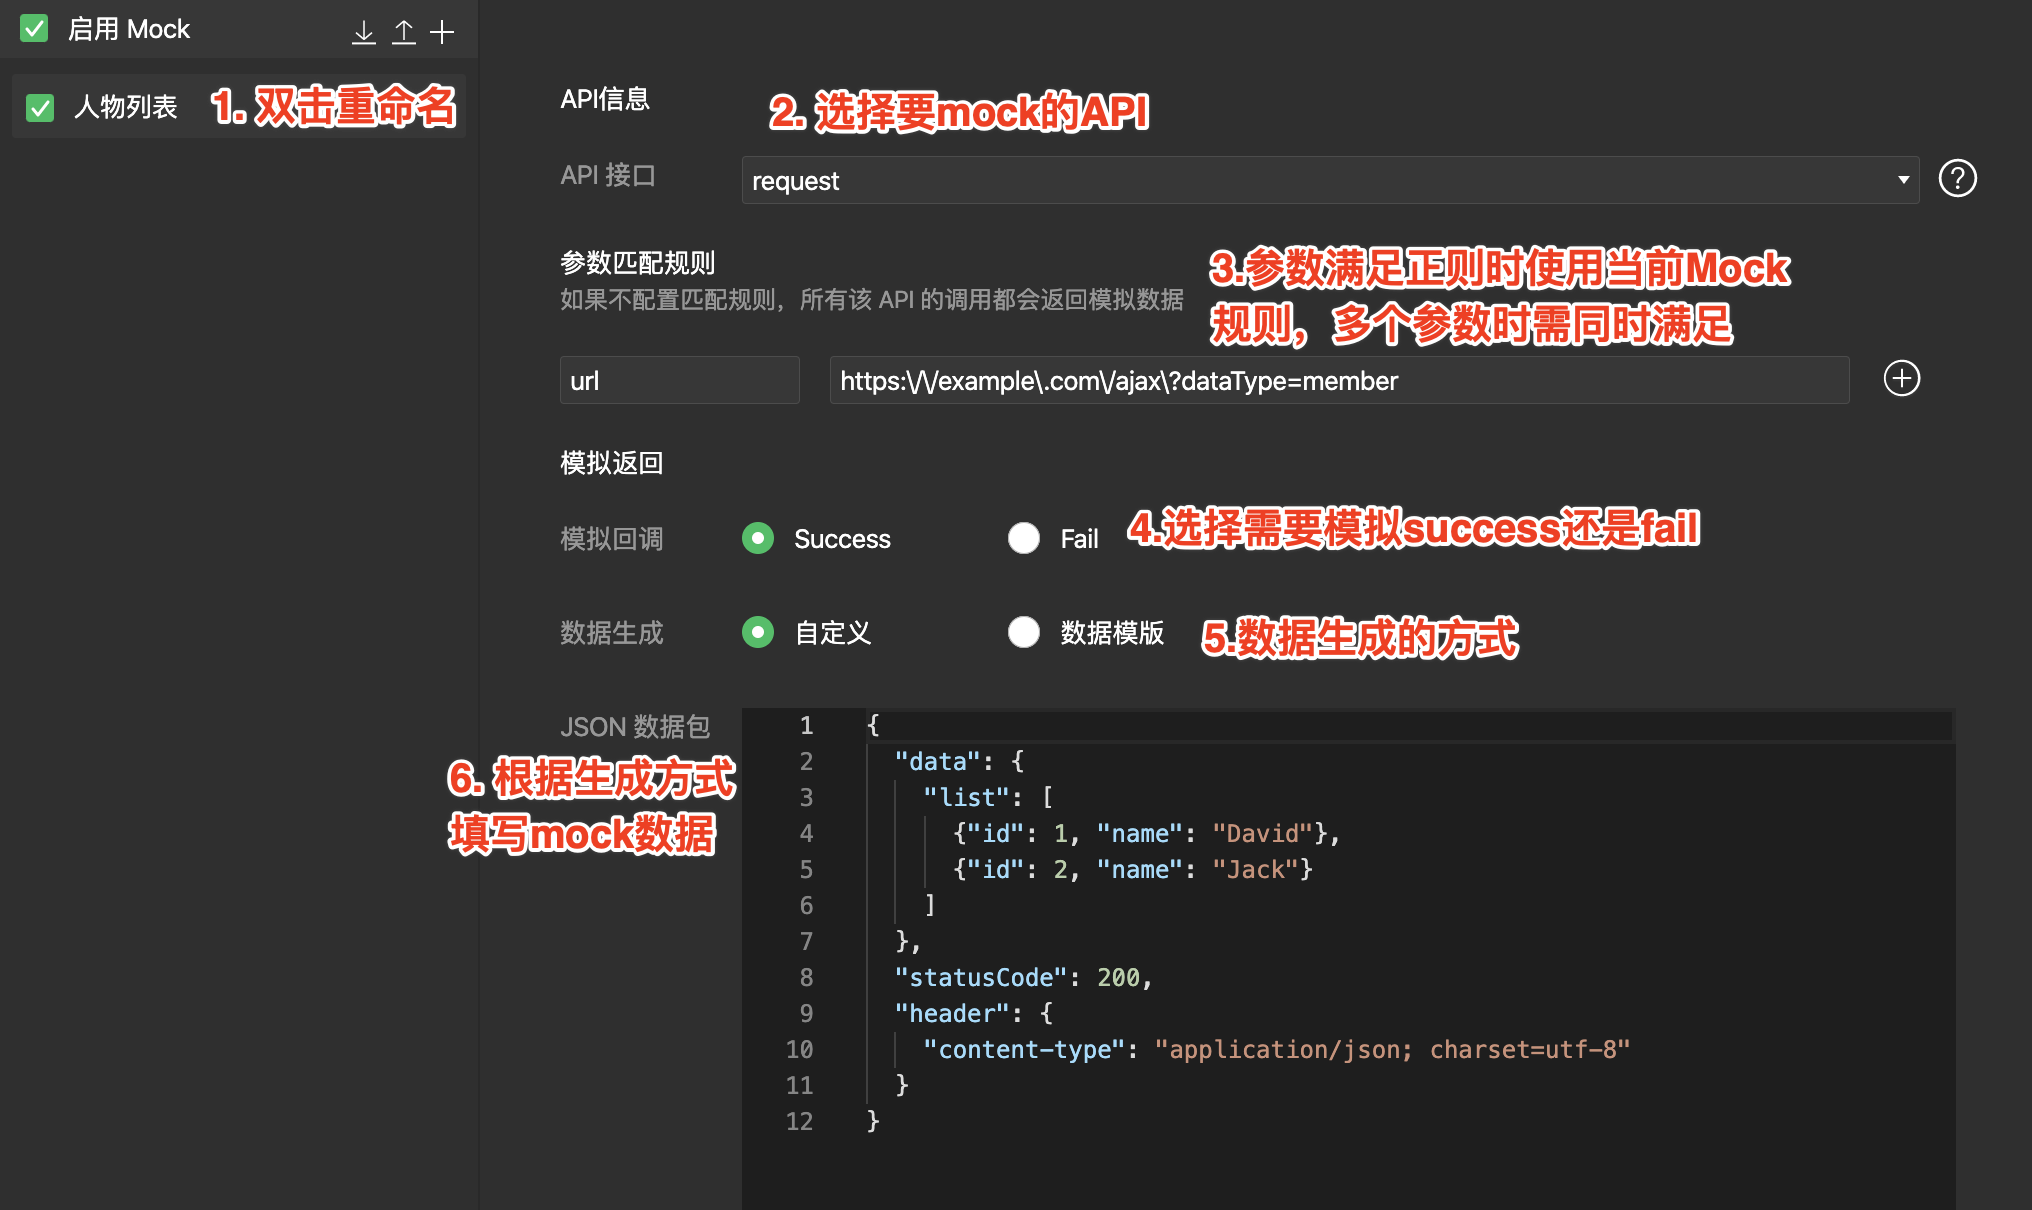
2.2.Mock模拟数据
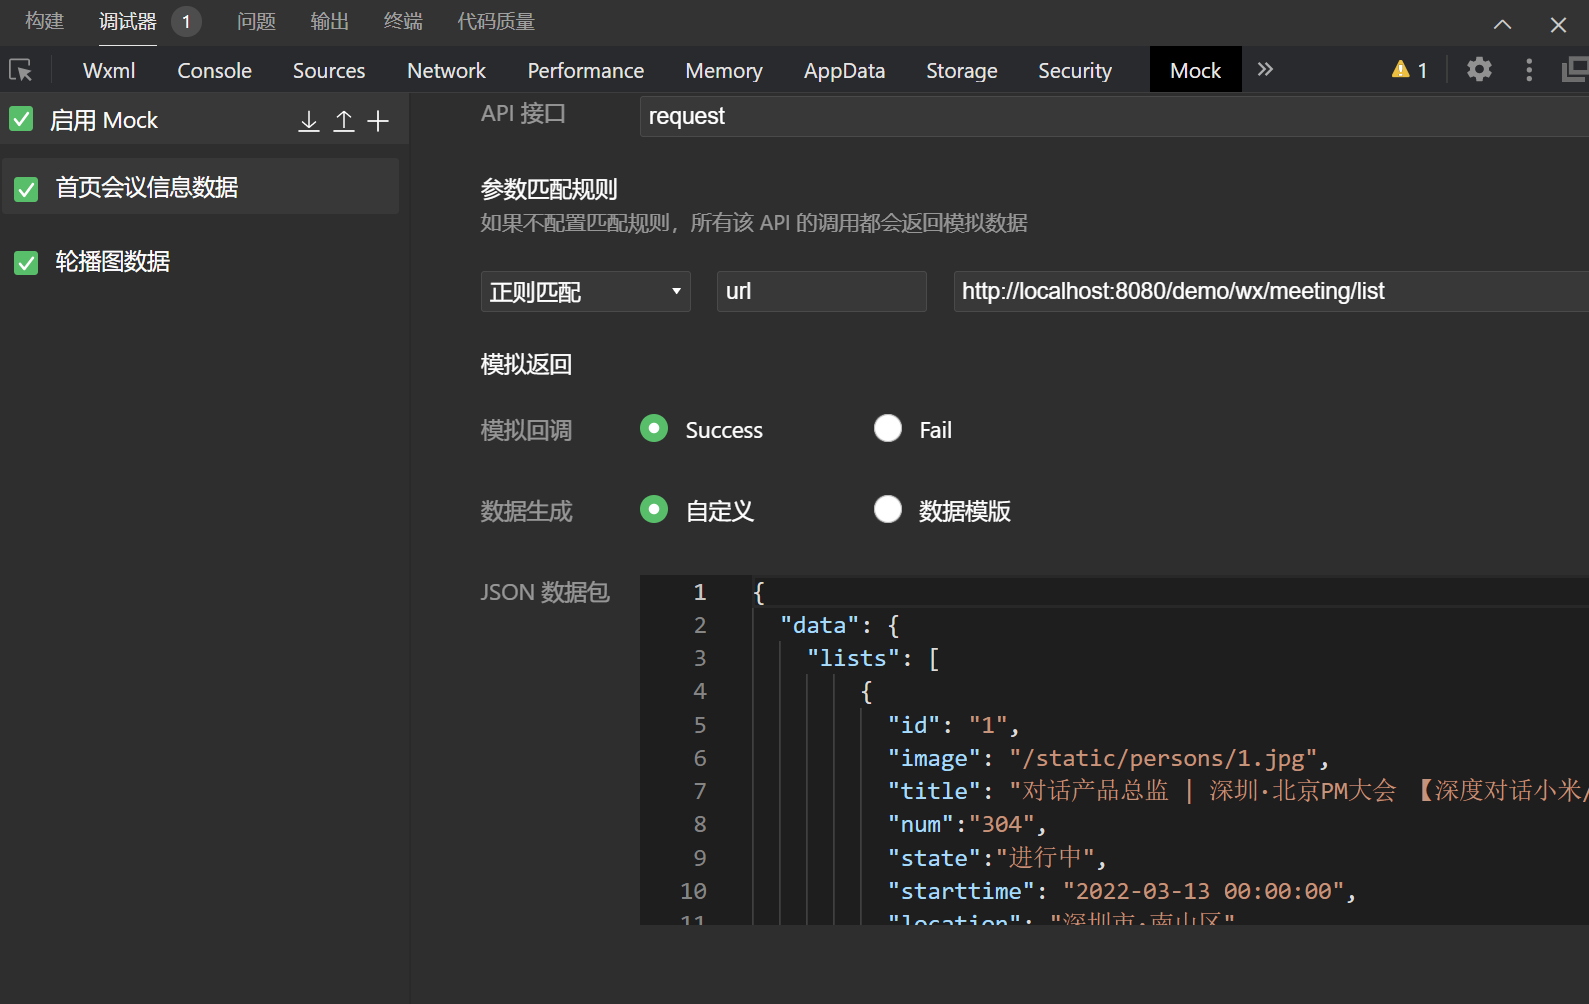
今天不带大家展示请求后端所以我们利用Mock来制造一些“假数据”来模拟一下。
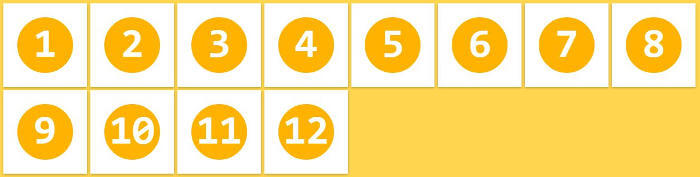
Mock 的入口在工具调试面板顶部的 Tab,点 + 新建规则

规则示例
运行如下代码:
// index.js部分代码展示
const api = require("../../config/api")
loadSwiperImgs(){
let that=this;
wx.request({
url: api.SwiperImgs,
dataType: 'json',
success(res) {
console.log(res)
that.setData({
imgSrcs:res.data.images
})
}
})
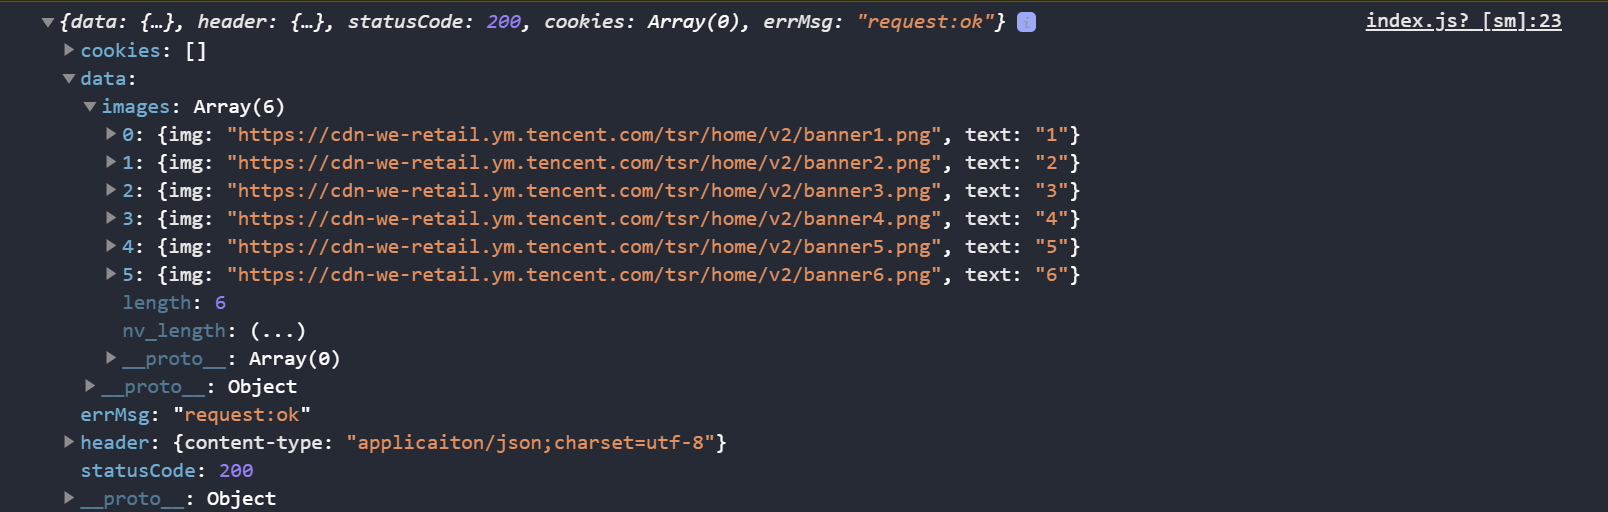
}Mock模拟的轮播图数据:
{
  "data": {
    "images":[
  {
    "img": "https://cdn-we-retail.ym.tencent.com/tsr/home/v2/banner1.png",
    "text": "1"
  },
  {
    "img": "https://cdn-we-retail.ym.tencent.com/tsr/home/v2/banner2.png",
    "text": "2"
  },
  {
    "img": "https://cdn-we-retail.ym.tencent.com/tsr/home/v2/banner3.png",
    "text": "3"
  },
  {
    "img": "https://cdn-we-retail.ym.tencent.com/tsr/home/v2/banner4.png",
    "text": "4"
  },
  {
    "img": "https://cdn-we-retail.ym.tencent.com/tsr/home/v2/banner5.png",
    "text": "5"
  },
  {
    "img": "https://cdn-we-retail.ym.tencent.com/tsr/home/v2/banner6.png",
    "text": "6"
  }
]
  },
  "statusCode": "200",
  "header": {
    "content-type":"applicaiton/json;charset=utf-8"
  }
}注意在onLoad函数中调用该方法,并且在data中定义属性imgSrcs;
将命中上面的规则,得到以下数据:
小贴士:
有一部分的友友可能遇到以下问题: http://localhost:8080 不在以下 request 合法域名列表中
因为我们现在的小程序开发默认检查安全证书(域名为https)所以我们的请求过不去,我们只需点击微信小程序开发中的详情按钮,再继续点击本地设置将不校验合法域名选项打开。


2.3.搭建轮播图
根据我们官网提供的组件swiper进行搭建轮播图。

<!--index.wxml-->
<view>
    <d autoplay="true" indicator-dots="true">
        <block wx:for="{{imgSrcs}}" wx:key="text">
            <swiper-item>
                <view>
                    <image src="{{item.img}}" class="swiper-item" />
                </view>
            </swiper-item>
        </block>
    </swiper>
</view>
/**index.wxss**/
.swiper-item {
height: 300rpx;
width: 100%;
border-radius: 10rpx;
}v效果展示:
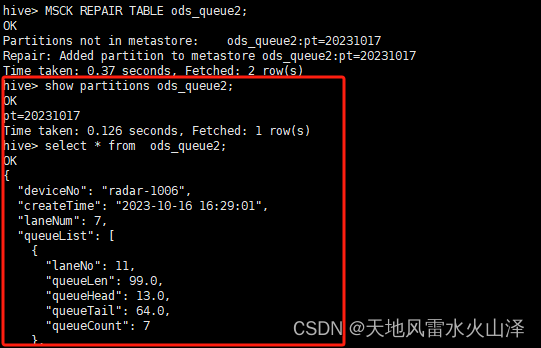
3.首页会议信息搭建
我们照猫画虎,和我们轮播图的流程一样,定义接口发送ajax再利用Mock模拟数据根据官网提供的组件进行完善。
3.1.会议信息ajax
  //首页会议信息的ajax
  loadMeetingInfos(){
    let that=this;
    wx.request({
        url: api.MettingInfos,
        dataType: 'json',
        success(res) {
          console.log(res)
          that.setData({
              lists:res.data.lists
          })
        }
      })
  }
注意在data中定义属性lists和onLoad函数中调用该方法。
3.2.Mock模拟数据
Mock模拟的会议信息数据:
{
  "data": {
    "lists": [
        {
          "id": "1",
          "image": "/static/persons/1.jpg",
          "title": "对话产品总监 | 深圳·北京PM大会 【深度对话小米/京东/等产品总监】",
          "num":"304",
          "state":"进行中",
          "starttime": "2022-03-13 00:00:00",
          "location": "深圳市·南山区"
        },
        {
          "id": "1",
          "image": "/static/persons/2.jpg",
          "title": "AI WORLD 2016世界人工智能大会",
          "num":"380",
          "state":"已结束",
          "starttime": "2022-03-15 00:00:00",
          "location": "北京市·朝阳区"
        },
        {
          "id": "1",
          "image": "/static/persons/3.jpg",
          "title": "H100太空商业大会",
          "num":"500",
          "state":"进行中",
          "starttime": "2022-03-13 00:00:00",
          "location": "大连市"
        },
        {
          "id": "1",
          "image": "/static/persons/4.jpg",
          "title": "报名年度盛事,大咖云集!2016凤凰国际论坛邀您“与世界对话”",
          "num":"150",
          "state":"已结束",
          "starttime": "2022-03-13 00:00:00",
          "location": "北京市·朝阳区"
        },
        {
          "id": "1",
          "image": "/static/persons/5.jpg",
          "title": "新质生活 · 品质时代 2016消费升级创新大会",
          "num":"217",
          "state":"进行中",
          "starttime": "2022-03-13 00:00:00",
          "location": "北京市·朝阳区"
        }
      ]
  },
  "statusCode": "200",
  "header": {
    "content-type":"applicaiton/json;charset=utf-8"
  }
}
3.3.搭建会议信息
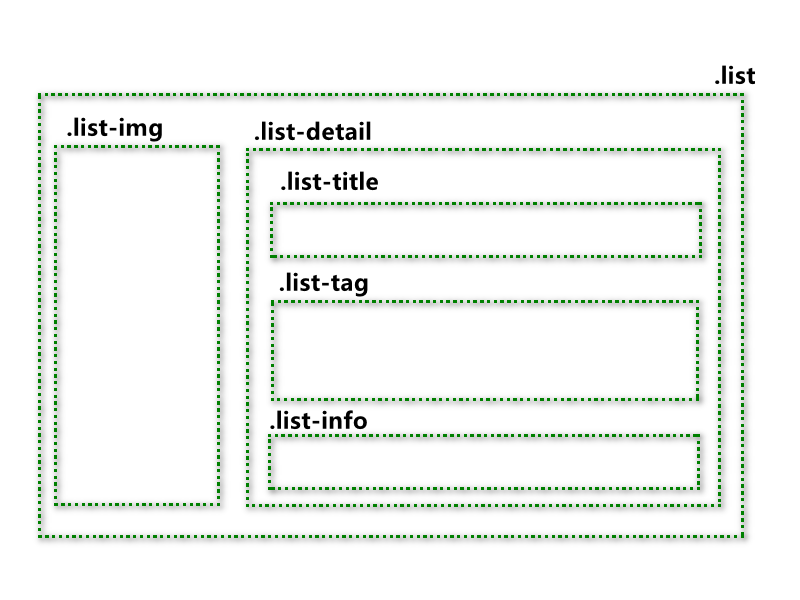
首先分析我们的页面需要怎么样展示,再根据布局进行弹性布局调节达到我们预期效果。
下面这个图是我为大家准备的详解图,方便大家理解!!
index.wxml
<view class="mobi-title">
  <text class="mobi-icon"></text>
  <text class="mobi-text">会议信息</text>
</view>
<block wx:for-items="{{lists}}" wx:for-item="item" wx:key="item.id">
  <view class="list" data-id="{{item.id}}">
    <view class="list-img">
      <image class="video-img" mode="scaleToFill" src="{{item.image}}"></image>
    </view>
    <view class="list-detail">
      <view class="list-title"><text>{{item.title}}</text></view>
      <view class="list-tag">
        <view class="state">{{item.state}}</view>
        <view class="join"><text class="list-num">{{item.num}}</text>人报名</view>
      </view>
      <view class="list-info"><text>{{item.location}}</text>|<text>{{item.starttime}}</text></view>
    </view>
  </view>
</block>
<view class="section">
  <text>到底啦</text>
</view>
效果展示:
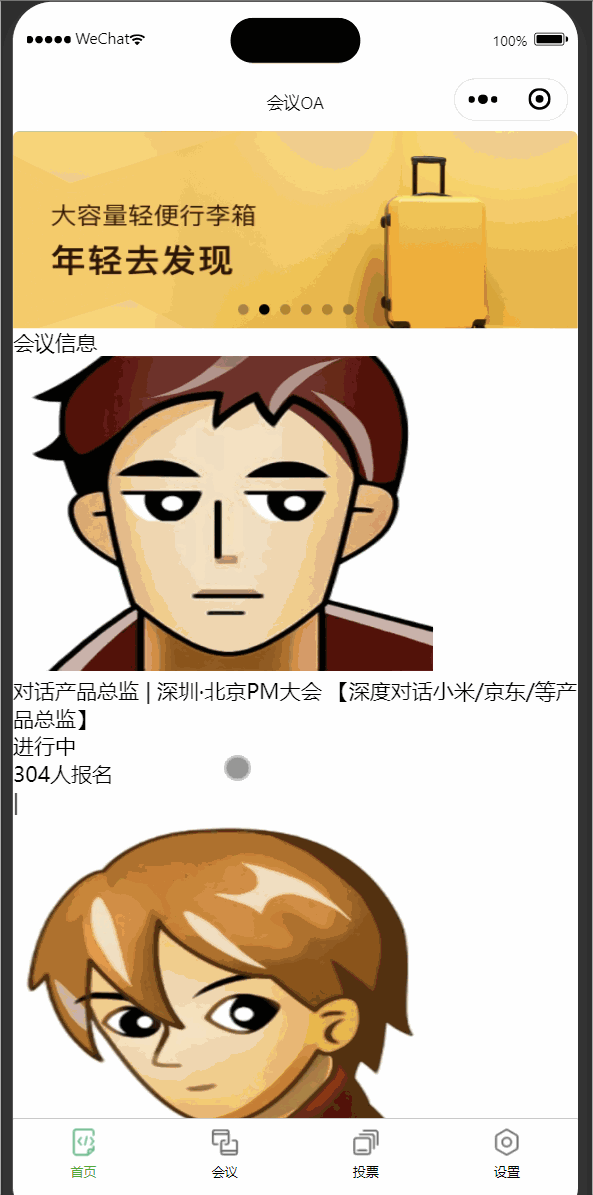
这是我们没有进行样式调节的样子,下面我们调节一下看会变成什么样吧!!
index.wxss
/**index.wxss**/
.section{
color: #aaa;
display: flex;
justify-content: center;
}
.list-info {
color: #aaa;
}
.list-num {
color: #e40909;
font-weight: 700;
}
.join {
padding: 0px 0px 0px 10px;
color: #aaa;
}
.state {
margin: 0px 6px 0px 6px;
border: 1px solid #93b9ff;
color: #93b9ff;
}
.list-tag {
padding: 3px 0px 10px 0px;
display: flex;
align-items: center;
}
.list-title {
display: flex;
justify-content: space-between;
font-size: 11pt;
color: #333;
font-weight: bold;
}
.list-detail {
display: flex;
flex-direction: column;
margin: 0px 0px 0px 15px;
}
.video-img {
width: 80px;
height: 80px;
}
.list {
display: flex;
flex-direction: row;
border-bottom: 1px solid #6b6e74;
padding: 10px;
}
.mobi-text {
font-weight: 700;
padding: 15px;
}
.mobi-icon {
border-left: 5px solid #e40909;
}
.mobi-title {
background-color: rgba(158, 158, 142, 0.678);
margin: 10px 0px 10px 0px;
}
.swiper-item {
height: 300rpx;
width: 100%;
border-radius: 10rpx;
}
.userinfo {
display: flex;
flex-direction: column;
align-items: center;
color: #aaa;
}
.userinfo-avatar {
overflow: hidden;
width: 128rpx;
height: 128rpx;
margin: 20rpx;
border-radius: 50%;
}
.usermotto {
margin-top: 200px;
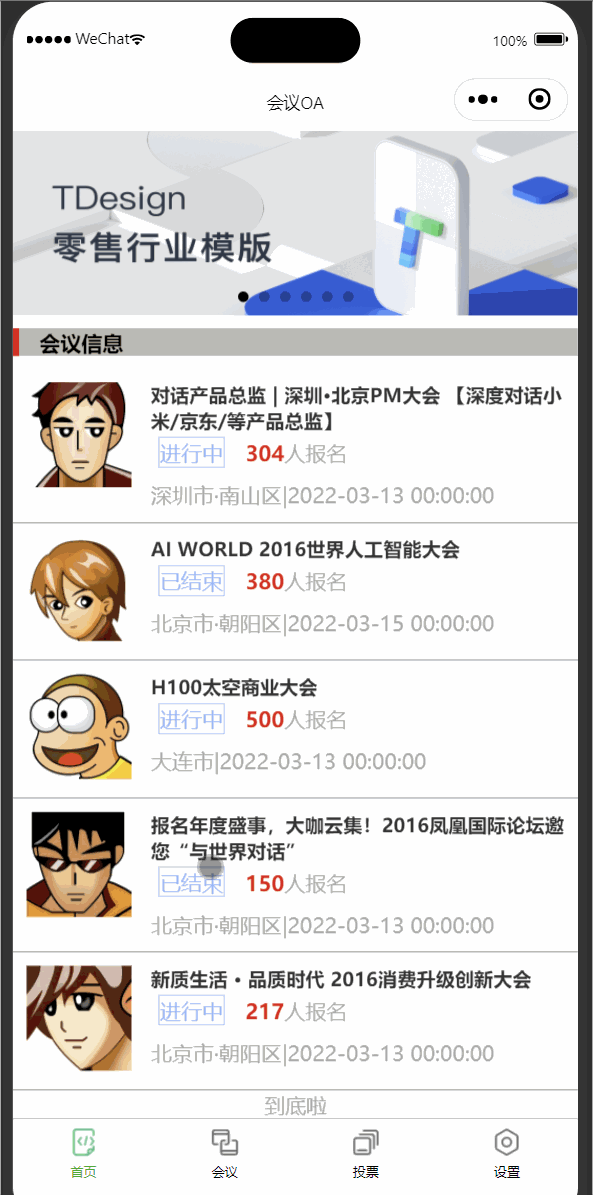
}效果演示:
到这里我的分享就结束了,欢迎到评论区探讨交流!!
💖如果觉得有用的话还请点个赞吧 💖


![leetcode209. 长度最小的子数组 [滑动窗口] 待更正](https://img-blog.csdnimg.cn/39f8e9fb3f9343ac8e5a9548a65569ae.png)