动态蛇形卷积模块DySnakeConv
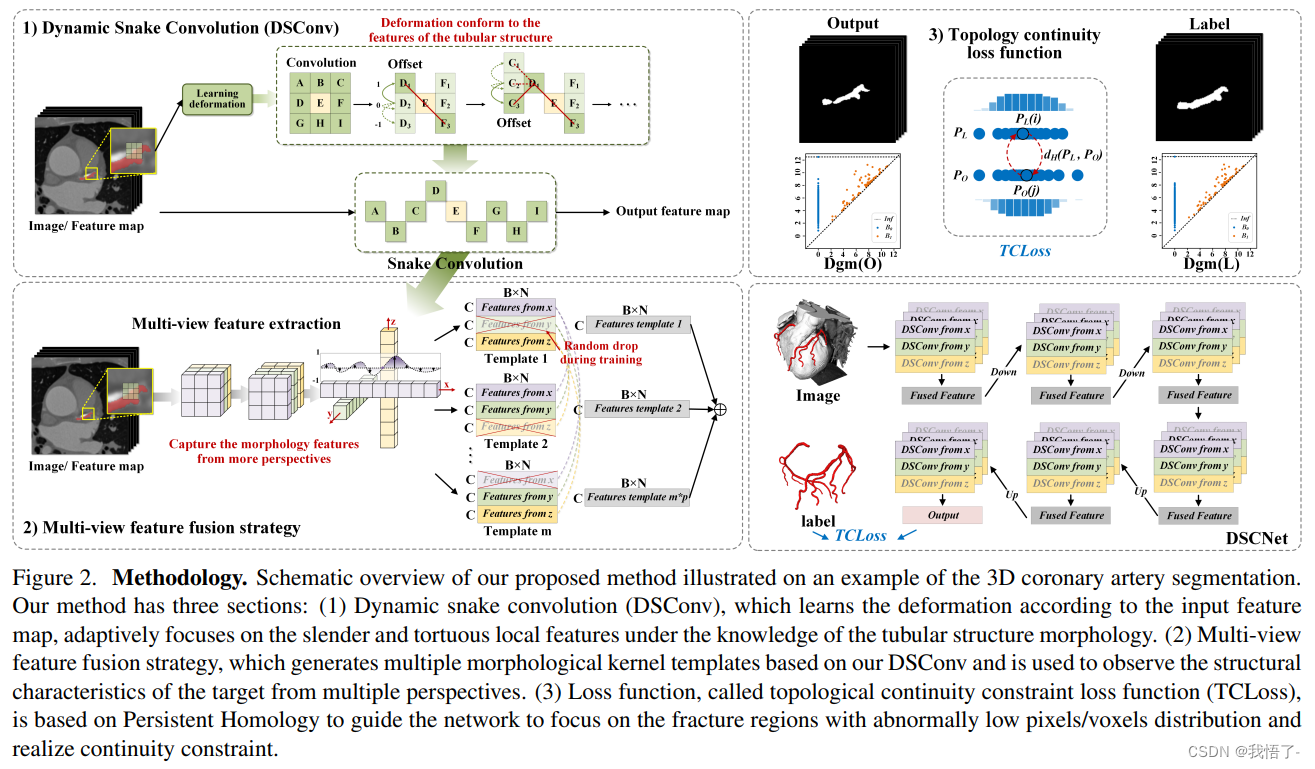
血管、道路等拓扑管状结构的精确分割在各个领域都至关重要,确保下游任务的准确性和效率。 然而,许多因素使任务变得复杂,包括薄的局部结构和可变的全局形态。在这项工作中,我们注意到管状结构的特殊性,并利用这些知识来指导我们的 DSCNet 在三个阶段同时增强感知:特征提取、特征融合、 和损失约束。 首先,我们提出了一种动态蛇卷积,通过自适应地关注细长和曲折的局部结构来准确捕获管状结构的特征。 随后,我们提出了一种多视图特征融合策略,以补充特征融合过程中多角度对特征的关注,确保保留来自不同全局形态的重要信息。 最后,提出了一种基于持久同源性的连续性约束损失函数,以更好地约束分割的拓扑连续性。 2D 和 3D 数据集上的实验表明,与多种方法相比,我们的 DSCNet 在管状结构分割任务上提供了更好的准确性和连续性。 我们的代码是公开的。
主要的挑战源于细长微弱的局部结构特征与复杂多变的全局形态特征。本文关注到管状结构细长连续的特点,并利用这一信息在神经网络以下三个阶段同时增强感知:特征提取、特征融合和损失约束。分别设计了动态蛇形卷积(Dynamic Snake Convolution),多视角特征融合策略与连续性拓扑约束损失。
原文地址:Dynamic Snake Convolution based on Topological Geometric Constraints for Tubular Structure Segmentation
pytorch代码实现
import torch
import torch.nn as nn

class DySnakeConv(nn.Module):
    def __init__(self, inc, ouc, k=3, act=True) -> None:
        super().__init__()

        self.conv_0 = Conv(inc, ouc, k, act=act)
        self.conv_x = DSConv(inc, ouc, 0, k)
        self.conv_y = DSConv(inc, ouc, 1, k)
        self.conv_1x1 = Conv(ouc * 3, ouc, 1, act=act)

    def forward(self, x):
        return self.conv_1x1(torch.cat([self.conv_0(x), self.conv_x(x), self.conv_y(x)], dim=1))

class DSConv(nn.Module):
    def __init__(self, in_ch, out_ch, morph, kernel_size=3, if_offset=True, extend_scope=1):
        """
        The Dynamic Snake Convolution
        :param in_ch: input channel
        :param out_ch: output channel
        :param kernel_size: the size of kernel
        :param extend_scope: the range to expand (default 1 for this method)
        :param morph: the morphology of the convolution kernel is mainly divided into two types
                        along the x-axis (0) and the y-axis (1) (see the paper for details)
        :param if_offset: whether deformation is required, if it is False, it is the standard convolution kernel
        """
        super(DSConv, self).__init__()
        # use the <offset_conv> to learn the deformable offset
        self.offset_conv = nn.Conv2d(in_ch, 2 * kernel_size, 3, padding=1)
        self.bn = nn.BatchNorm2d(2 * kernel_size)
        self.kernel_size = kernel_size

        # two types of the DSConv (along x-axis and y-axis)
        self.dsc_conv_x = nn.Conv2d(
            in_ch,
            out_ch,
            kernel_size=(kernel_size, 1),
            stride=(kernel_size, 1),
            padding=0,
        )
        self.dsc_conv_y = nn.Conv2d(
            in_ch,
            out_ch,
            kernel_size=(1, kernel_size),
            stride=(1, kernel_size),
            padding=0,
        )

        self.gn = nn.GroupNorm(out_ch // 4, out_ch)
        self.act = Conv.default_act

        self.extend_scope = extend_scope
        self.morph = morph
        self.if_offset = if_offset

    def forward(self, f):
        offset = self.offset_conv(f)
        offset = self.bn(offset)
        # We need a range of deformation between -1 and 1 to mimic the snake's swing
        offset = torch.tanh(offset)
        input_shape = f.shape
        dsc = DSC(input_shape, self.kernel_size, self.extend_scope, self.morph)
        deformed_feature = dsc.deform_conv(f, offset, self.if_offset)
        if self.morph == 0:
            x = self.dsc_conv_x(deformed_feature.type(f.dtype))
            x = self.gn(x)
            x = self.act(x)
            return x
        else:
            x = self.dsc_conv_y(deformed_feature.type(f.dtype))
            x = self.gn(x)
            x = self.act(x)
            return x


# Core code, for ease of understanding, we mark the dimensions of input and output next to the code
class DSC(object):
    def __init__(self, input_shape, kernel_size, extend_scope, morph):
        self.num_points = kernel_size
        self.width = input_shape[2]
        self.height = input_shape[3]
        self.morph = morph
        self.extend_scope = extend_scope  # offset (-1 ~ 1) * extend_scope

        # define feature map shape
        """
        B: Batch size  C: Channel  W: Width  H: Height
        """
        self.num_batch = input_shape[0]
        self.num_channels = input_shape[1]

    """
    input: offset [B,2*K,W,H]  K: Kernel size (2*K: 2D image, deformation contains <x_offset> and <y_offset>)
    output_x: [B,1,W,K*H]   coordinate map
    output_y: [B,1,K*W,H]   coordinate map
    """

    def _coordinate_map_3D(self, offset, if_offset):
        device = offset.device
        # offset
        y_offset, x_offset = torch.split(offset, self.num_points, dim=1)

        y_center = torch.arange(0, self.width).repeat([self.height])
        y_center = y_center.reshape(self.height, self.width)
        y_center = y_center.permute(1, 0)
        y_center = y_center.reshape([-1, self.width, self.height])
        y_center = y_center.repeat([self.num_points, 1, 1]).float()
        y_center = y_center.unsqueeze(0)

        x_center = torch.arange(0, self.height).repeat([self.width])
        x_center = x_center.reshape(self.width, self.height)
        x_center = x_center.permute(0, 1)
        x_center = x_center.reshape([-1, self.width, self.height])
        x_center = x_center.repeat([self.num_points, 1, 1]).float()
        x_center = x_center.unsqueeze(0)

        if self.morph == 0:
            """
            Initialize the kernel and flatten the kernel
                y: only need 0
                x: -num_points//2 ~ num_points//2 (Determined by the kernel size)
                !!! The related PPT will be submitted later, and the PPT will contain the whole changes of each step
            """
            y = torch.linspace(0, 0, 1)
            x = torch.linspace(
                -int(self.num_points // 2),
                int(self.num_points // 2),
                int(self.num_points),
            )

            y, x = torch.meshgrid(y, x)
            y_spread = y.reshape(-1, 1)
            x_spread = x.reshape(-1, 1)

            y_grid = y_spread.repeat([1, self.width * self.height])
            y_grid = y_grid.reshape([self.num_points, self.width, self.height])
            y_grid = y_grid.unsqueeze(0)  # [B*K*K, W,H]

            x_grid = x_spread.repeat([1, self.width * self.height])
            x_grid = x_grid.reshape([self.num_points, self.width, self.height])
            x_grid = x_grid.unsqueeze(0)  # [B*K*K, W,H]

            y_new = y_center + y_grid
            x_new = x_center + x_grid

            y_new = y_new.repeat(self.num_batch, 1, 1, 1).to(device)
            x_new = x_new.repeat(self.num_batch, 1, 1, 1).to(device)

            y_offset_new = y_offset.detach().clone()

            if if_offset:
                y_offset = y_offset.permute(1, 0, 2, 3)
                y_offset_new = y_offset_new.permute(1, 0, 2, 3)
                center = int(self.num_points // 2)

                # The center position remains unchanged and the rest of the positions begin to swing
                # This part is quite simple. The main idea is that "offset is an iterative process"
                y_offset_new[center] = 0
                for index in range(1, center):
                    y_offset_new[center + index] = (y_offset_new[center + index - 1] + y_offset[center + index])
                    y_offset_new[center - index] = (y_offset_new[center - index + 1] + y_offset[center - index])
                y_offset_new = y_offset_new.permute(1, 0, 2, 3).to(device)
                y_new = y_new.add(y_offset_new.mul(self.extend_scope))

            y_new = y_new.reshape(
                [self.num_batch, self.num_points, 1, self.width, self.height])
            y_new = y_new.permute(0, 3, 1, 4, 2)
            y_new = y_new.reshape([
                self.num_batch, self.num_points * self.width, 1 * self.height
            ])
            x_new = x_new.reshape(
                [self.num_batch, self.num_points, 1, self.width, self.height])
            x_new = x_new.permute(0, 3, 1, 4, 2)
            x_new = x_new.reshape([
                self.num_batch, self.num_points * self.width, 1 * self.height
            ])
            return y_new, x_new

        else:
            """
            Initialize the kernel and flatten the kernel
                y: -num_points//2 ~ num_points//2 (Determined by the kernel size)
                x: only need 0
            """
            y = torch.linspace(
                -int(self.num_points // 2),
                int(self.num_points // 2),
                int(self.num_points),
            )
            x = torch.linspace(0, 0, 1)

            y, x = torch.meshgrid(y, x)
            y_spread = y.reshape(-1, 1)
            x_spread = x.reshape(-1, 1)

            y_grid = y_spread.repeat([1, self.width * self.height])
            y_grid = y_grid.reshape([self.num_points, self.width, self.height])
            y_grid = y_grid.unsqueeze(0)

            x_grid = x_spread.repeat([1, self.width * self.height])
            x_grid = x_grid.reshape([self.num_points, self.width, self.height])
            x_grid = x_grid.unsqueeze(0)

            y_new = y_center + y_grid
            x_new = x_center + x_grid

            y_new = y_new.repeat(self.num_batch, 1, 1, 1)
            x_new = x_new.repeat(self.num_batch, 1, 1, 1)

            y_new = y_new.to(device)
            x_new = x_new.to(device)
            x_offset_new = x_offset.detach().clone()

            if if_offset:
                x_offset = x_offset.permute(1, 0, 2, 3)
                x_offset_new = x_offset_new.permute(1, 0, 2, 3)
                center = int(self.num_points // 2)
                x_offset_new[center] = 0
                for index in range(1, center):
                    x_offset_new[center + index] = (x_offset_new[center + index - 1] + x_offset[center + index])
                    x_offset_new[center - index] = (x_offset_new[center - index + 1] + x_offset[center - index])
                x_offset_new = x_offset_new.permute(1, 0, 2, 3).to(device)
                x_new = x_new.add(x_offset_new.mul(self.extend_scope))

            y_new = y_new.reshape(
                [self.num_batch, 1, self.num_points, self.width, self.height])
            y_new = y_new.permute(0, 3, 1, 4, 2)
            y_new = y_new.reshape([
                self.num_batch, 1 * self.width, self.num_points * self.height
            ])
            x_new = x_new.reshape(
                [self.num_batch, 1, self.num_points, self.width, self.height])
            x_new = x_new.permute(0, 3, 1, 4, 2)
            x_new = x_new.reshape([
                self.num_batch, 1 * self.width, self.num_points * self.height
            ])
            return y_new, x_new

    """
    input: input feature map [N,C,D,W,H];coordinate map [N,K*D,K*W,K*H]
    output: [N,1,K*D,K*W,K*H]  deformed feature map
    """
    def _bilinear_interpolate_3D(self, input_feature, y, x):
        device = input_feature.device
        y = y.reshape([-1]).float()
        x = x.reshape([-1]).float()

        zero = torch.zeros([]).int()
        max_y = self.width - 1
        max_x = self.height - 1

        # find 8 grid locations
        y0 = torch.floor(y).int()
        y1 = y0 + 1
        x0 = torch.floor(x).int()
        x1 = x0 + 1

        # clip out coordinates exceeding feature map volume
        y0 = torch.clamp(y0, zero, max_y)
        y1 = torch.clamp(y1, zero, max_y)
        x0 = torch.clamp(x0, zero, max_x)
        x1 = torch.clamp(x1, zero, max_x)

        input_feature_flat = input_feature.flatten()
        input_feature_flat = input_feature_flat.reshape(
            self.num_batch, self.num_channels, self.width, self.height)
        input_feature_flat = input_feature_flat.permute(0, 2, 3, 1)
        input_feature_flat = input_feature_flat.reshape(-1, self.num_channels)
        dimension = self.height * self.width

        base = torch.arange(self.num_batch) * dimension
        base = base.reshape([-1, 1]).float()

        repeat = torch.ones([self.num_points * self.width * self.height
                             ]).unsqueeze(0)
        repeat = repeat.float()

        base = torch.matmul(base, repeat)
        base = base.reshape([-1])

        base = base.to(device)

        base_y0 = base + y0 * self.height
        base_y1 = base + y1 * self.height

        # top rectangle of the neighbourhood volume
        index_a0 = base_y0 - base + x0
        index_c0 = base_y0 - base + x1

        # bottom rectangle of the neighbourhood volume
        index_a1 = base_y1 - base + x0
        index_c1 = base_y1 - base + x1

        # get 8 grid values
        value_a0 = input_feature_flat[index_a0.type(torch.int64)].to(device)
        value_c0 = input_feature_flat[index_c0.type(torch.int64)].to(device)
        value_a1 = input_feature_flat[index_a1.type(torch.int64)].to(device)
        value_c1 = input_feature_flat[index_c1.type(torch.int64)].to(device)

        # find 8 grid locations
        y0 = torch.floor(y).int()
        y1 = y0 + 1
        x0 = torch.floor(x).int()
        x1 = x0 + 1

        # clip out coordinates exceeding feature map volume
        y0 = torch.clamp(y0, zero, max_y + 1)
        y1 = torch.clamp(y1, zero, max_y + 1)
        x0 = torch.clamp(x0, zero, max_x + 1)
        x1 = torch.clamp(x1, zero, max_x + 1)

        x0_float = x0.float()
        x1_float = x1.float()
        y0_float = y0.float()
        y1_float = y1.float()

        vol_a0 = ((y1_float - y) * (x1_float - x)).unsqueeze(-1).to(device)
        vol_c0 = ((y1_float - y) * (x - x0_float)).unsqueeze(-1).to(device)
        vol_a1 = ((y - y0_float) * (x1_float - x)).unsqueeze(-1).to(device)
        vol_c1 = ((y - y0_float) * (x - x0_float)).unsqueeze(-1).to(device)

        outputs = (value_a0 * vol_a0 + value_c0 * vol_c0 + value_a1 * vol_a1 +
                   value_c1 * vol_c1)

        if self.morph == 0:
            outputs = outputs.reshape([
                self.num_batch,
                self.num_points * self.width,
                1 * self.height,
                self.num_channels,
            ])
            outputs = outputs.permute(0, 3, 1, 2)
        else:
            outputs = outputs.reshape([
                self.num_batch,
                1 * self.width,
                self.num_points * self.height,
                self.num_channels,
            ])
            outputs = outputs.permute(0, 3, 1, 2)
        return outputs

    def deform_conv(self, input, offset, if_offset):
        y, x = self._coordinate_map_3D(offset, if_offset)
        deformed_feature = self._bilinear_interpolate_3D(input, y, x)
        return deformed_feature


#### YOLOV5
class Bottleneck_DySnake(nn.Module):
    # Standard bottleneck
    def __init__(self, c1, c2, shortcut=True, g=1, e=0.5):  # ch_in, ch_out, shortcut, groups, expansion
        super().__init__()
        c_ = int(c2 * e)  # hidden channels
        self.cv1 = Conv(c1, c_, 1, 1)
        self.cv2 = DySnakeConv(c_, c2, 3)
        self.add = shortcut and c1 == c2

    def forward(self, x):
        return x + self.cv2(self.cv1(x)) if self.add else self.cv2(self.cv1(x))

class C3_DySnake(C3):
    # C3 module with DySnakeConv
    def __init__(self, c1, c2, n=1, shortcut=True, g=1, e=0.5):
        super().__init__(c1, c2, n, shortcut, g, e)
        c_ = int(c2 * e)
        self.m = nn.Sequential(*(Bottleneck_DySnake(c_, c_, shortcut, g, e=1.0) for _ in range(n)))