文章目录
- 版权声明
- 自定义指令
- 指令初识
- 指令中配置项
- 指令语法
- 指令值
- v-loading指令的封装
- 分析
- 实现
- 插槽
- 默认插槽
- 插槽默认值
- 具名插槽
- 作用域插槽
- 使用步骤
- 完整案例
版权声明
- 本博客的内容基于我个人学习黑马程序员课程的学习笔记整理而成。我特此声明,所有版权属于黑马程序员或相关权利人所有。本博客的目的仅为个人学习和交流之用,并非商业用途。
- 我在整理学习笔记的过程中尽力确保准确性,但无法保证内容的完整性和时效性。本博客的内容可能会随着时间的推移而过时或需要更新。
- 若您是黑马程序员或相关权利人,如有任何侵犯版权的地方,请您及时联系我,我将立即予以删除或进行必要的修改。
- 对于其他读者,请在阅读本博客内容时保持遵守相关法律法规和道德准则,谨慎参考,并自行承担因此产生的风险和责任。本博客中的部分观点和意见仅代表我个人,不代表黑马程序员的立场。
自定义指令
指令初识
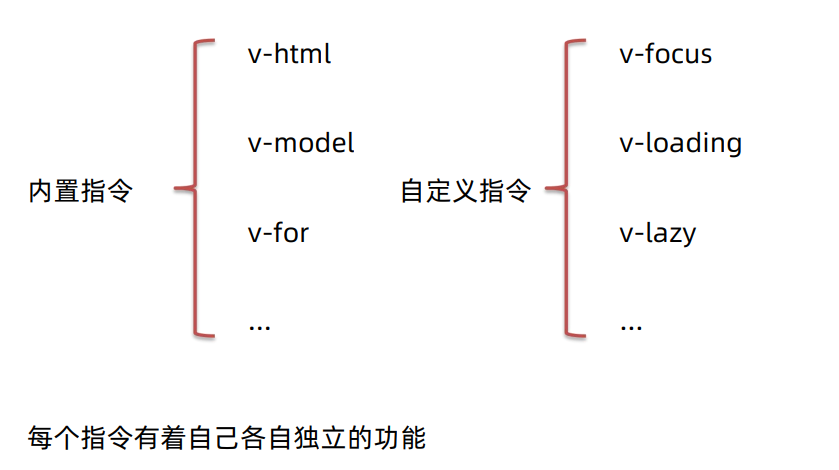
-
内置指令:v-html、v-if、v-bind、v-on… 这都是Vue给咱们内置的一些指令,可以直接使用
-
自定义指令:同时Vue也支持让开发者,自己注册一些指令。这些指令被称为自定义指令
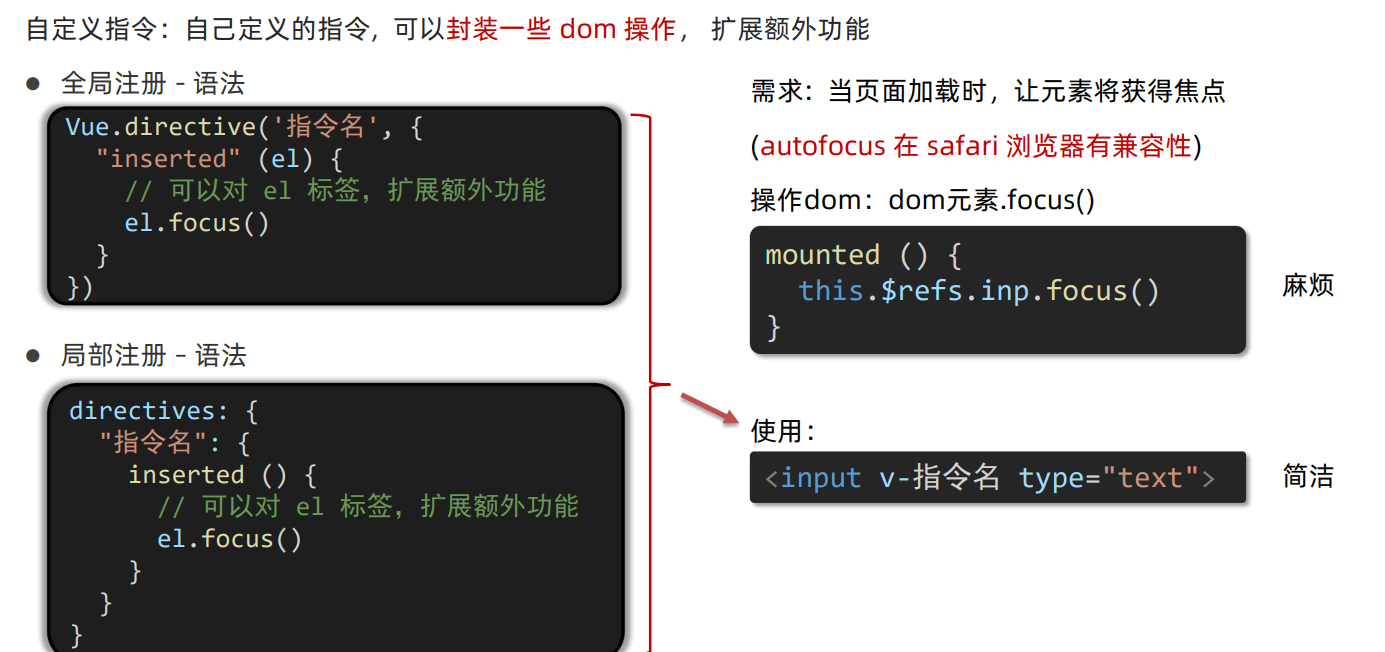
指令中配置项
- inserted:被绑定元素插入父节点时调用的钩子函数
- el:使用指令的那个DOM元素
指令语法
- 全局注册
//在main.js中
Vue.directive('指令名', {
  "inserted" (el) {
    // 可以对 el 标签,扩展额外功能
    el.focus()
  }
})
- 局部注册
//在Vue组件的配置项中
directives: {
 "指令名": {
   inserted () {
     // 可以对 el 标签,扩展额外功能
     el.focus()
   }
 }
}
-
注意:在使用指令的时候,一定要先注册,再使用,否则会报错
-
使用指令语法: v-指令名。如:
<input type="text" v-focus/>注册指令时不用加v-前缀,但使用时一定要加v-前缀
指令值
- 需求
- 实现一个 color 指令 - 传入不同的颜色, 给标签设置文字颜色
- 语法
- 在绑定指令时,可以通过“等号”的形式为指令 绑定 具体的参数值
<div v-color="color">我是内容</div>
- 通过 binding.value 可以拿到指令值,指令值修改会 触发 update 函数
directives: {
  color: {
    inserted (el, binding) {
      el.style.color = binding.value
    },
    update (el, binding) {
      el.style.color = binding.value
    }
  }
}
- 示例
<template>
  <div>
    <h1 v-color="color1">指令的值1测试</h1>
    <h1 v-color="color2">指令的值2测试</h1>
  </div>
</template>

<script>
export default {
  data () {
    return {
      color1: 'red',
      color2: 'orange'
    }
  },
  directives: {
    color: {
      // 1. inserted 提供的是元素被添加到页面中时的逻辑
      inserted (el, binding) {
        el.style.color = binding.value
      },
      // 2. update 指令的值修改的时候触发,提供值变化后,dom更新的逻辑
      update (el, binding) {
        console.log('指令的值修改了');
        el.style.color = binding.value
      }
    }
  }
}
</script>
v-loading指令的封装
- 实际开发过程中,发送请求需要时间,在请求的数据未回来时,页面会处于空白状态 => 用户体验不好
- 需求:封装一个 v-loading 指令,实现加载中的效果
分析
-
本质 loading效果就是一个蒙层,盖在了盒子上
-
数据请求中,开启loading状态,添加蒙层
-
数据请求完毕,关闭loading状态,移除蒙层
实现
- 准备一个 loading类,通过伪元素定位,设置宽高,实现蒙层
.loading:before { content: ''; position: absolute; left: 0; top: 0; width: 100%; height: 100%; background: #fff url('./loading.gif') no-repeat center; } - 开启关闭 loading状态(添加移除蒙层),本质只需要添加移除类即可
- inserted 钩子中,binding.value 判断指令的值,设置默认状态
- update 钩子中,binding.value 判断指令的值,更新类名状态
data () {
    return {
      list: [],
      isLoading: true,
      isLoading2: true
    }
  }
- 结合自定义指令的语法进行封装复用
<template>
  <div class="main">
    <div class="box" v-loading="isLoading">
      <ul>
        <li v-for="item in list" :key="item.id" class="news">

          <div class="left">
            <div class="title">{{ item.title }}</div>
            <div class="info">
              <span>{{ item.source }}</span>
              <span>{{ item.time }}</span>
            </div>
          </div>

          <div class="right">
            <img :src="item.img" alt="">
          </div>
        </li>
      </ul>
    </div>
    <div class="box2" v-loading="isLoading2"></div>
  </div>
</template>

<script>
// 安装axios =>  yarn add axios
import axios from 'axios'

export default {
  data () {
    return {
      list: [],
      isLoading: true,
      isLoading2: true
    }
  },
  async created () {
    // 1. 发送请求获取数据
    const res = await axios.get('http://hmajax.itheima.net/api/news')

    setTimeout(() => {
      // 2. 更新到 list 中,用于页面渲染 v-for
      this.list = res.data.data
      this.isLoading = false
    }, 2000)
  },
  directives: {
    loading: {
      inserted (el, binding) {
        binding.value ? el.classList.add('loading') : el.classList.remove('loading')
      },
      update (el, binding) {
        binding.value ? el.classList.add('loading') : el.classList.remove('loading')
      }
    }
  }
}
</script>

<style>
.loading:before {
  content: '';
  position: absolute;
  left: 0;
  top: 0;
  width: 100%;
  height: 100%;
  background: #fff url('./loading.gif') no-repeat center;
}

.box2 {
  width: 400px;
  height: 400px;
  border: 2px solid #000;
  position: relative;
}

.box {
  width: 800px;
  min-height: 500px;
  border: 3px solid orange;
  border-radius: 5px;
  position: relative;
}
.news {
  display: flex;
  height: 120px;
  width: 600px;
  margin: 0 auto;
  padding: 20px 0;
  cursor: pointer;
}
.news .left {
  flex: 1;
  display: flex;
  flex-direction: column;
  justify-content: space-between;
  padding-right: 10px;
}
.news .left .title {
  font-size: 20px;
}
.news .left .info {
  color: #999999;
}
.news .left .info span {
  margin-right: 20px;
}
.news .right {
  width: 160px;
  height: 120px;
}
.news .right img {
  width: 100%;
  height: 100%;
  object-fit: cover;
}
</style>
插槽
默认插槽
- 作用:让组件内部的一些 结构 支持 自定义
- 插槽的基本语法
- 组件内需要定制的结构部分,改用
<slot></slot>占位 - 使用组件时, ****标签内部, 传入结构替换slot
- 给插槽传入内容时,可以传入纯文本、html标签、组件
- 组件内需要定制的结构部分,改用
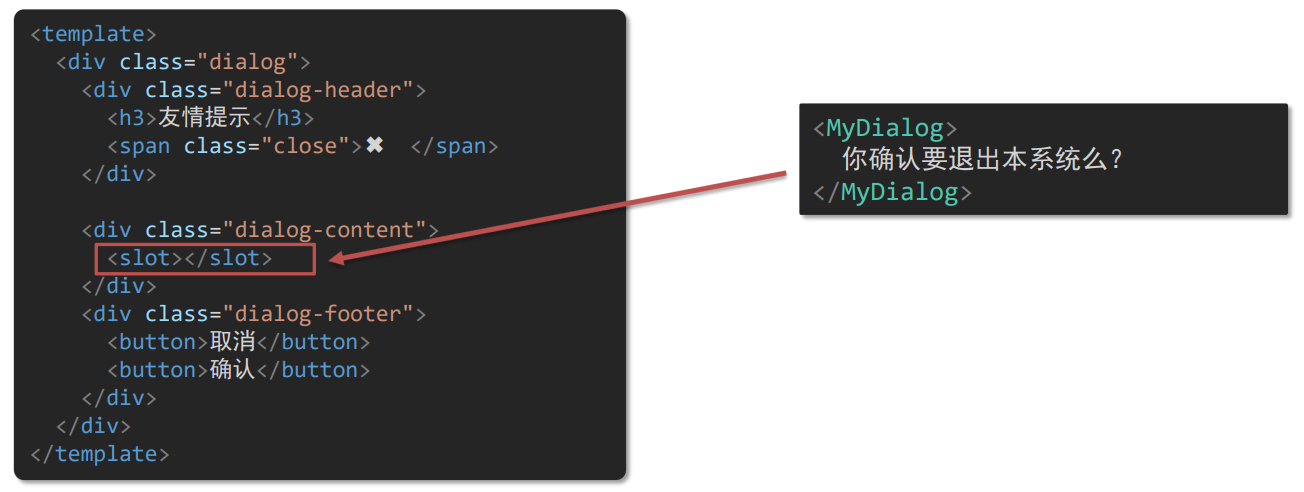
- 插槽组件
<template>
  <div class="dialog">
    <div class="dialog-header">
      <h3>友情提示</h3>
      <span class="close">✖️</span>
    </div>

    <div class="dialog-content">
      <!-- 1. 在需要定制的位置,使用slot占位 -->
      <slot></slot>
    </div>
    <div class="dialog-footer">
      <button>取消</button>
      <button>确认</button>
    </div>
  </div>
</template>
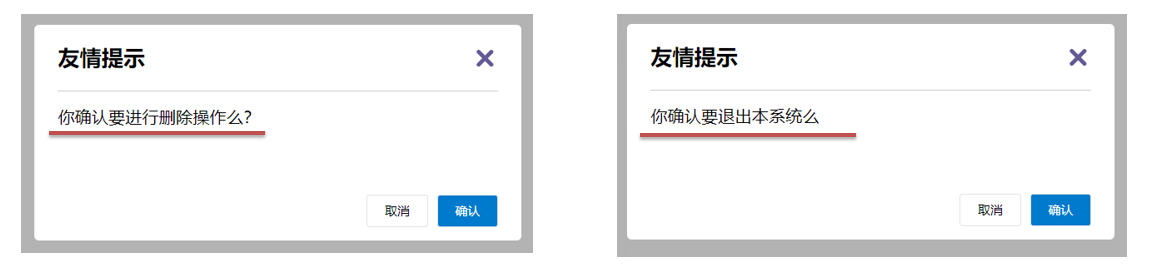
- App.vue
<template>
  <div>
    <!-- 2. 在使用组件时,组件标签内填入内容 -->
    <MyDialog>
      <div>你确认要删除么</div>
    </MyDialog>

    <MyDialog>
      <p>你确认要退出么</p>
    </MyDialog>
  </div>
</template>

<script>
import MyDialog from './components/MyDialog.vue'
export default {
  data () {
    return {

    }
  },
  components: {
    MyDialog
  }
}
</script>
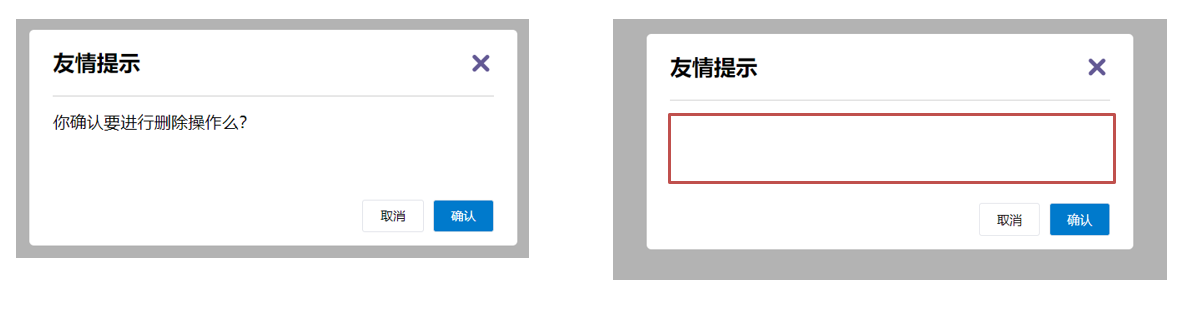
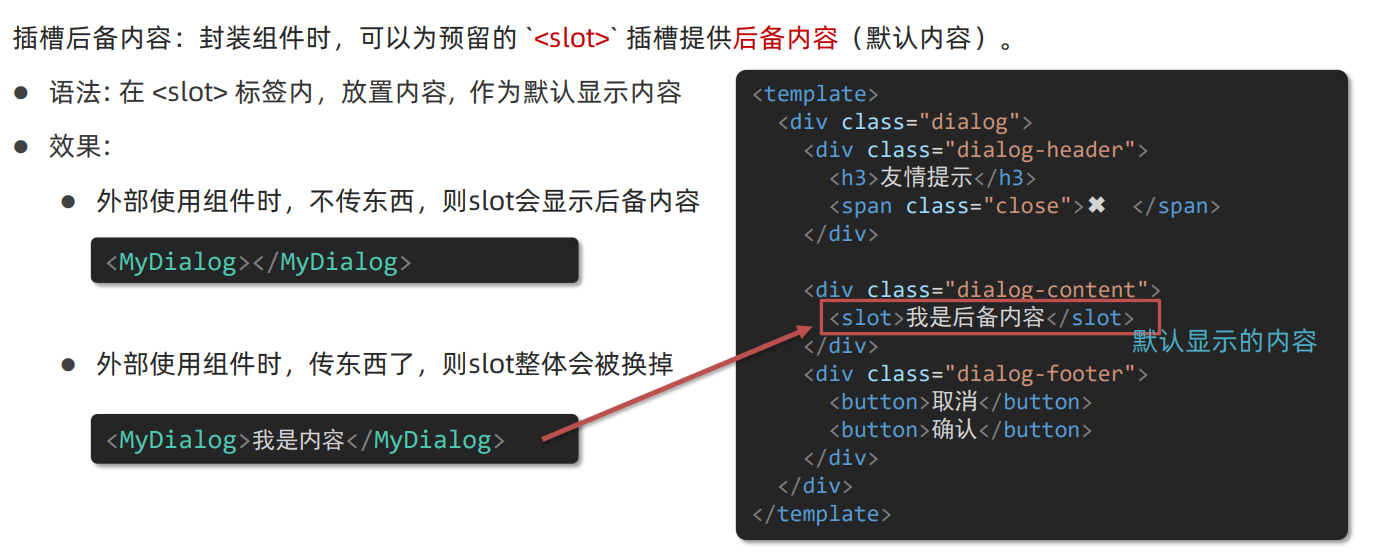
插槽默认值
- 通过插槽完成了内容的定制,传什么显示什么, 但是如果不传,则是空白
具名插槽
- 默认插槽:一个的定制位置。如果一个组件内有多处结构,需要外部传入标签,进行定制
- 具名插槽语法
- 多个slot使用name属性区分名字
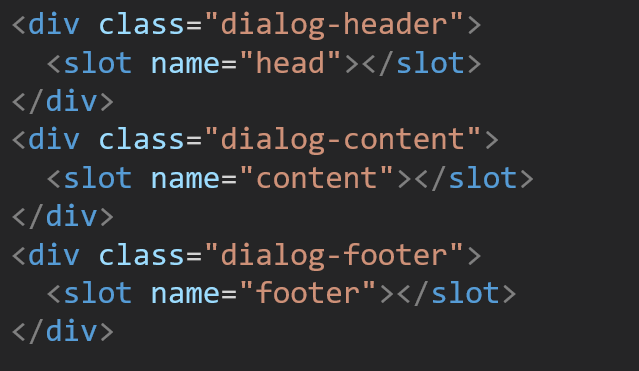
- template配合v-slot:名字来分发对应标签
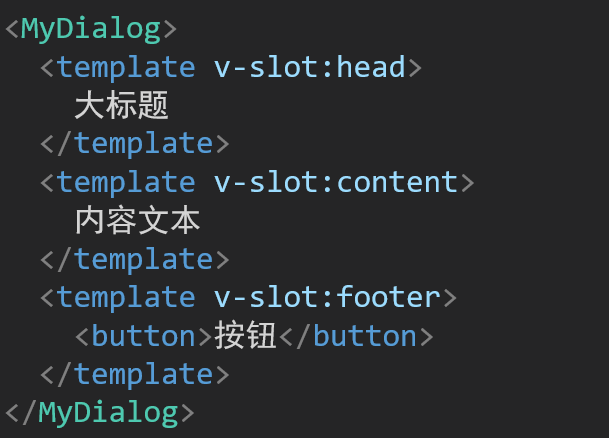
- 多个slot使用name属性区分名字
- v-slot的简写:v-slot写起来太长,vue给我们提供一个简单写法 v-slot —> #
    <template #footer>
      <button>取消</button>
      <button>确认</button>
    </template>
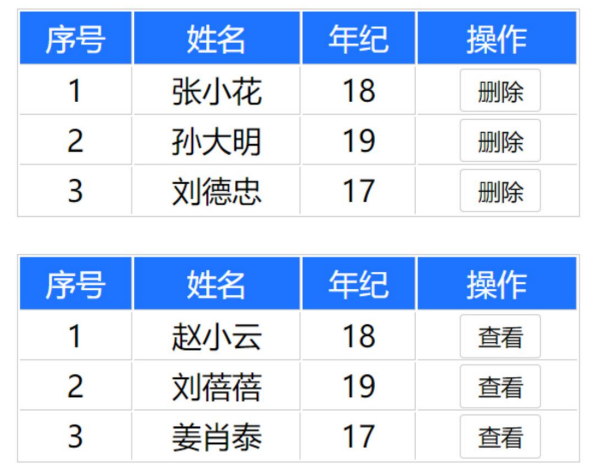
作用域插槽
- 插槽只有两种——默认插槽&具名插槽,作用域插槽不属于插槽的一种分类。
- 作用域插槽:定义slot 插槽的同时, 是可以传值的。给 插槽 上可以 绑定数据,将来 使用组件时可以用
- 场景:封装表格组件
使用步骤
-
给 slot 标签, 以 添加属性的方式传值
<slot :id="item.id" msg="测试文本"></slot> -
所有添加的属性, 都会被收集到一个对象中
{ id: 3, msg: '测试文本' } -
在template中, 通过
#插槽名= "obj"接收,默认插槽名为 default<MyTable :list="list"> <template #default="obj"> <button @click="del(obj.id)">删除</button> </template> </MyTable>
完整案例
- MyTable.vue
<template>
  <table >
    <thead>
      <tr>
        <th>序号</th>
        <th>姓名</th>
        <th>年纪</th>
        <th>操作</th>
      </tr>
    </thead>
    <tbody>
      <tr v-for="(item, index) in data" :key="item.id">
        <td>{{ index + 1 }}</td>
        <td>{{ item.name }}</td>
        <td>{{ item.age }}</td>
        <td>
          <!-- 1. 给slot标签,添加属性的方式传值 -->
          <slot :row="item" msg="测试文本"></slot>
        </td>
      </tr>
    </tbody>
  </table>
</template>

<script>
export default {
  props: {
    data: Array
  }
}
</script>
- App.vue
<template>
  <div>
    <MyTable :data="list">
      <!-- 3. 通过template #插槽名="变量名" 接收 -->
      <template #default="obj">
        <button @click="del(obj.row.id)">
          删除
        </button>
      </template>
    </MyTable>

    <MyTable :data="list2">
      <template #default="{ row }">
        <button @click="show(row)">查看</button>
      </template>
    </MyTable>
  </div>
</template>

<script>
import MyTable from './components/MyTable.vue'
export default {
  data () {
    return {
      list: [
        { id: 1, name: '张小花', age: 18 },
        { id: 2, name: '孙大明', age: 19 },
        { id: 3, name: '刘德忠', age: 17 },
      ],
      list2: [
        { id: 1, name: '赵小云', age: 18 },
        { id: 2, name: '刘蓓蓓', age: 19 },
        { id: 3, name: '姜肖泰', age: 17 },
      ]
    }
  },
  methods: {
    del (id) {
      this.list = this.list.filter(item => item.id !== id)
    },
    show (row) {
      alert(`姓名:${row.name}; 年纪:${row.age}`)
    }
  },
  components: {
    MyTable
  }
}
</script>
![[python 刷题] 143 Reorder List](https://img-blog.csdnimg.cn/95929960d9cb42e4a8a0035bb10444d0.jpeg#pic_center)


![2023年全球及中国多肽CDMO市场发展概述分析:CDMO头部企业将拓展至多肽领域[图]](https://img-blog.csdnimg.cn/img_convert/95111679129fb081eefe42f531fbd70c.png)