目录
1.可视化数据集
2.标签中像素类别的对应
3.预处理数据
4.定义数据集类
5.创建模型
5.1 固定模型参数
5.2 修改成FCN(全卷积层)
5.3 初始化转置卷积层
6.训练模型
6.1 optim.lr_scheduler.StepLR
6.2 torch.set_grad_enabled(bool:)
6.3 训练模型代码
7.测试模型
1.可视化数据集
注意:在语义分割数据集中,标签也是一个图片。在标签中,白色与黑色分别代表图像中的边框和背景,其他颜色代表不同类别。
from PIL import Image
import matplotlib.pyplot as plt
# 读取voc图像
def read_voc_image(root='./data/VOCdevkit/VOC2012', isTrain=True, max_num=None):
txt_file_name = '%s/ImageSets/Segmentation/%s' % (root, 'train.txt' if isTrain else 'val.txt')
with open(txt_file_name, 'r') as file:
images = file.read().split() # 一次性读取文件的全部内容
if max_num:
images = images[:min(max_num, len(images))] # 最多取多少张图片
features, labels = [None] * len(images), [None] * len(images) # 初始化features与labels
# 读数据并转换为RGB格式
for i, fname in enumerate(images):
features[i] = Image.open('%s/JPEGImages/%s.jpg' % (root, fname)).convert('RGB')
labels[i] = Image.open('%s/SegmentationClass/%s.png' % (root, fname)).convert('RGB')
return features, labels
# 可视化数据
def show_images(images, rows, cols):
fig, axes = plt.subplots(rows, cols, figsize=(6, 3))
for i in range(rows):
for j in range(cols):
axes[i][j].imshow(images[i * cols + j])
# 隐藏坐标
axes[i][j].axes.get_xaxis().set_visible(False)
axes[i][j].axes.get_yaxis().set_visible(False)
plt.show()
return axes
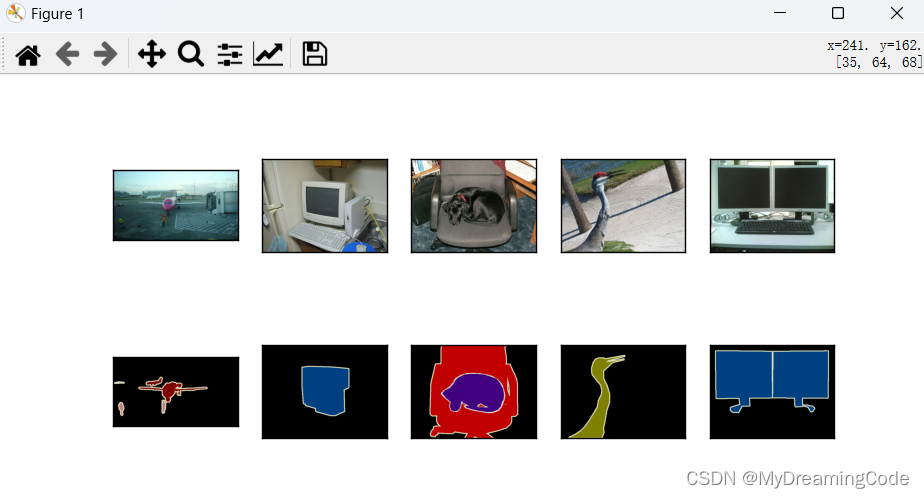
train_features, train_labels = read_voc_image(max_num=10)
display_num = 5
imgs_display = train_features[0:display_num] + train_labels[0:display_num]
show_images(imgs_display, 2, display_num)
运行:
2.标签中像素类别的对应
说明:定义好每个RGB所对应的标签种类,然后将数据集标签中的每一个像素都对应好相应的类别,以类别矩阵的形式输出。
# 标签中每个RGB所代表的类别
VOC_COLOR = [[0, 0, 0], [128, 0, 0], [0, 128, 0], [128, 128, 0],
[0, 0, 128], [128, 0, 128], [0, 128, 128], [128, 128, 128],
[64, 0, 0], [192, 0, 0], [64, 128, 0], [192, 128, 0],
[64, 0, 128], [192, 0, 128], [64, 128, 128], [192, 128, 128],
[0, 64, 0], [128, 64, 0], [0, 192, 0], [128, 192, 0],
[0, 64, 128]]
VOC_CLASSES = ['background', 'aeroplane', 'bicycle', 'bird', 'boat',
'bottle', 'bus', 'car', 'cat', 'chair', 'cow',
'diningtable', 'dog', 'horse', 'motorbike', 'person',
'potted plant', 'sheep', 'sofa', 'train', 'tv/monitor']
colorMap2Label = torch.zeros(256 ** 3, dtype=torch.uint8) # uint8是8位的,表示十进制数0-255
for i, color in enumerate(VOC_COLOR):
# 将rgb tuple元组换算成一个整数
colorMap2Label[(color[0] * 256 + color[1]) * 256 + color[2]] = i
# 构造标签矩阵
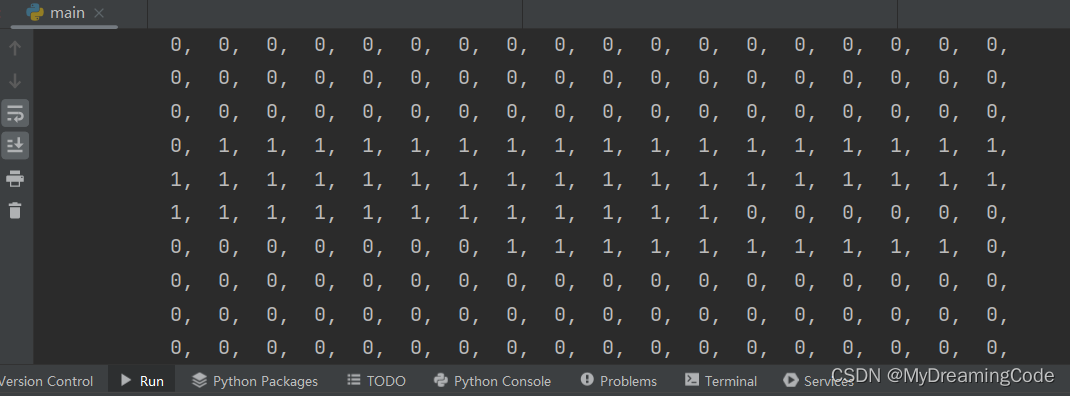
def voc_label_matrix(colormap, colormap2label):
colorMap = np.array(colormap.convert('RGB')).astype('int32')
val = (colorMap[:, :, 0] * 256 + colorMap[:, :, 1]) * 256 + colorMap[:, :, 2]
# print(colormap2label[val]) # 标签类矩阵
# print(colormap2label[val].shape) # torch.Size([320, 480])
return colormap2label[val]
# 读取voc图像
def read_voc_image(root='./data/VOCdevkit/VOC2012', isTrain=True, max_num=None):
txt_file_name = '%s/ImageSets/Segmentation/%s' % (root, 'train.txt' if isTrain else 'val.txt')
with open(txt_file_name, 'r') as file:
images = file.read().split() # 一次性读取文件的全部内容
if max_num:
images = images[:min(max_num, len(images))] # 最多取多少张图片
features, labels = [None] * len(images), [None] * len(images) # 初始化features与labels
# 读数据并转换为RGB格式
for i, fname in enumerate(images):
features[i] = Image.open('%s/JPEGImages/%s.jpg' % (root, fname)).convert('RGB')
labels[i] = Image.open('%s/SegmentationClass/%s.png' % (root, fname)).convert('RGB')
return features, labels
train_features, train_labels = read_voc_image(max_num=10)
# 返回标签train_labels[0]中的每一个像素所对应的类别索引,即为VOC_CLASSES中的下标
colorMapResult = voc_label_matrix(train_labels[0], colorMap2Label)
print(colorMapResult)部分显示:
3.预处理数据
注意:输入图像与对应标签应裁剪相同区域。
# 读取voc图像
def read_voc_image(root='./data/VOCdevkit/VOC2012', isTrain=True, max_num=None):
    txt_file_name = '%s/ImageSets/Segmentation/%s' % (root, 'train.txt' if isTrain else 'val.txt')
    with open(txt_file_name, 'r') as file:
        images = file.read().split()  # 一次性读取文件的全部内容
    if max_num:
        images = images[:min(max_num, len(images))]  # 最多取多少张图片
    features, labels = [None] * len(images), [None] * len(images)  # 初始化features与labels
    # 读数据并转换为RGB格式
    for i, fname in enumerate(images):
        features[i] = Image.open('%s/JPEGImages/%s.jpg' % (root, fname)).convert('RGB')
        labels[i] = Image.open('%s/SegmentationClass/%s.png' % (root, fname)).convert('RGB')
    return features, labels

# 可视化数据
def show_images(images, rows, cols):
    fig, axes = plt.subplots(rows, cols, figsize=(6, 3))
    for i in range(rows):
        for j in range(cols):
            axes[i][j].imshow(images[i * cols + j])
            # 隐藏坐标
            axes[i][j].axes.get_xaxis().set_visible(False)
            axes[i][j].axes.get_yaxis().set_visible(False)
    plt.show()
    return axes

# 随机裁剪图像
def voc_rand_crop(feature, label, height, width):
    # output_size 指定裁剪后的输出大小
    # i,j,h,w 裁剪左上角的位置i:top,j:left 以及裁剪后的高宽(h,w)
    i, j, h, w = transforms.RandomCrop.get_params(feature, output_size=(height, width))
    feature_crop = transforms.functional.crop(feature, i, j, h, w)
    label_crop = transforms.functional.crop(label, i, j, h, w)
    return feature_crop, label_crop

# 显示5次随机裁剪的数据集与标签
images = []
crop_num = 5
train_features, train_labels = read_voc_image(max_num=10)
for _ in range(crop_num):
    images += voc_rand_crop(train_features[0], train_labels[0], 200, 300)
# images[::2]从0开始步长为2,[1::2]从1开始步长为2
show_images(images[::2] + images[1::2], 2, crop_num)
运行结果:
4.定义数据集类
知识点
__getitem__:用于在生成实例时,引用索引可直接输出值
__len__:返回len长度
class Person:
    def __init__(self, name, age):
        self.name = name
        self.age = age

    def __getitem__(self, item):
        print(item, 'xxx')

    def __len__(self):
        return 1

person1 = Person('zs', 18)
person1[6]  # 6 xxx
print(len(person1))  # 1
drop_last:对于最后未匹配的batch_size来说(即未能整除时),drop_last为True时,会将这部分数据丢掉。
class VocSegDataset(torch.utils.data.Dataset):
    def __init__(self, is_train, crop_size, color_map_2_label, max_num=None):
        # 对输入图像的RGB三通道分别做标准化,用来移除共同部分,凸显个体差异
        self.rgb_mean = np.array([0.485, 0.456, 0.406])
        self.rgb_std = np.array([0.229, 0.224, 0.225])
        self.transform = transforms.Compose([
            transforms.ToTensor(),
            transforms.Normalize(mean=self.rgb_mean, std=self.rgb_std)
        ])
        self.crop_size = crop_size  # (h,w)
        features, labels = read_voc_image(is_train=is_train, max_num=max_num)
        self.features = self.filter(features)
        self.labels = self.filter(labels)
        self.colorMap2Label = color_map_2_label
        print('Read:' + str(len(self.features)) + ' valid data!')

    # 过滤掉图像尺寸小于随机裁剪所输出尺寸大小的图像
    def filter(self, images):
        return [image for image in images if image.size[0] >= self.crop_size[1] and image.size[1] >= self.crop_size[0]]

    # 索引
    def __getitem__(self, idx):
        feature, label = voc_rand_crop(self.features[idx], self.labels[idx], *self.crop_size)  # *是对list解包
        return self.transform(feature), voc_label_matrix(label, self.colorMap2Label)

    # 长度
    def __len__(self):
        return len(self.features)

# 读取数据集
batch_size = 32
crop_size = (320, 480)
max_num = 20000  # 最多从本地读取多少张图片

# train data & val data
voc_train = VocSegDataset(is_train=True, crop_size=crop_size, color_map_2_label=colorMap2Label, max_num=max_num)
voc_val = VocSegDataset(is_train=False, crop_size=crop_size, color_map_2_label=colorMap2Label, max_num=max_num)

# 设置迭代器
train_loader = torch.utils.data.DataLoader(voc_train, batch_size, shuffle=True, drop_last=True, num_workers=0)
val_loader = torch.utils.data.DataLoader(voc_val, batch_size, shuffle=False, drop_last=True, num_workers=0)
dataLoaders = {
    'train': train_loader,
    'val': val_loader
}
dataSizes = {
    'train': len(voc_train),
    'val': len(voc_val)
}
print(dataLoaders['train'])
print(dataSizes['train'])
运行结果:

5.创建模型
说明:使用基于ImageNet数据集预训练的ResNet18网络来提取图像特征。
5.1 固定模型参数
由于ResNet18已经在ImageNet上做了预训练,那么我们可以固定好ResNet18提取特征层的那些参数,即不会有梯度的更新。
device = torch.device('cuda:0' if torch.cuda.is_available() else 'cpu')
num_classes = 21  # 共有21个分类
model_pre = resnet18(pretrained=True)  # pretrained为True表示加载resnet18在ImageNet上预训练的模型
# 固定参数(梯度不更新)
for param in model_pre.parameters():
    param.requires_grad = False
5.2 修改成FCN(全卷积层)
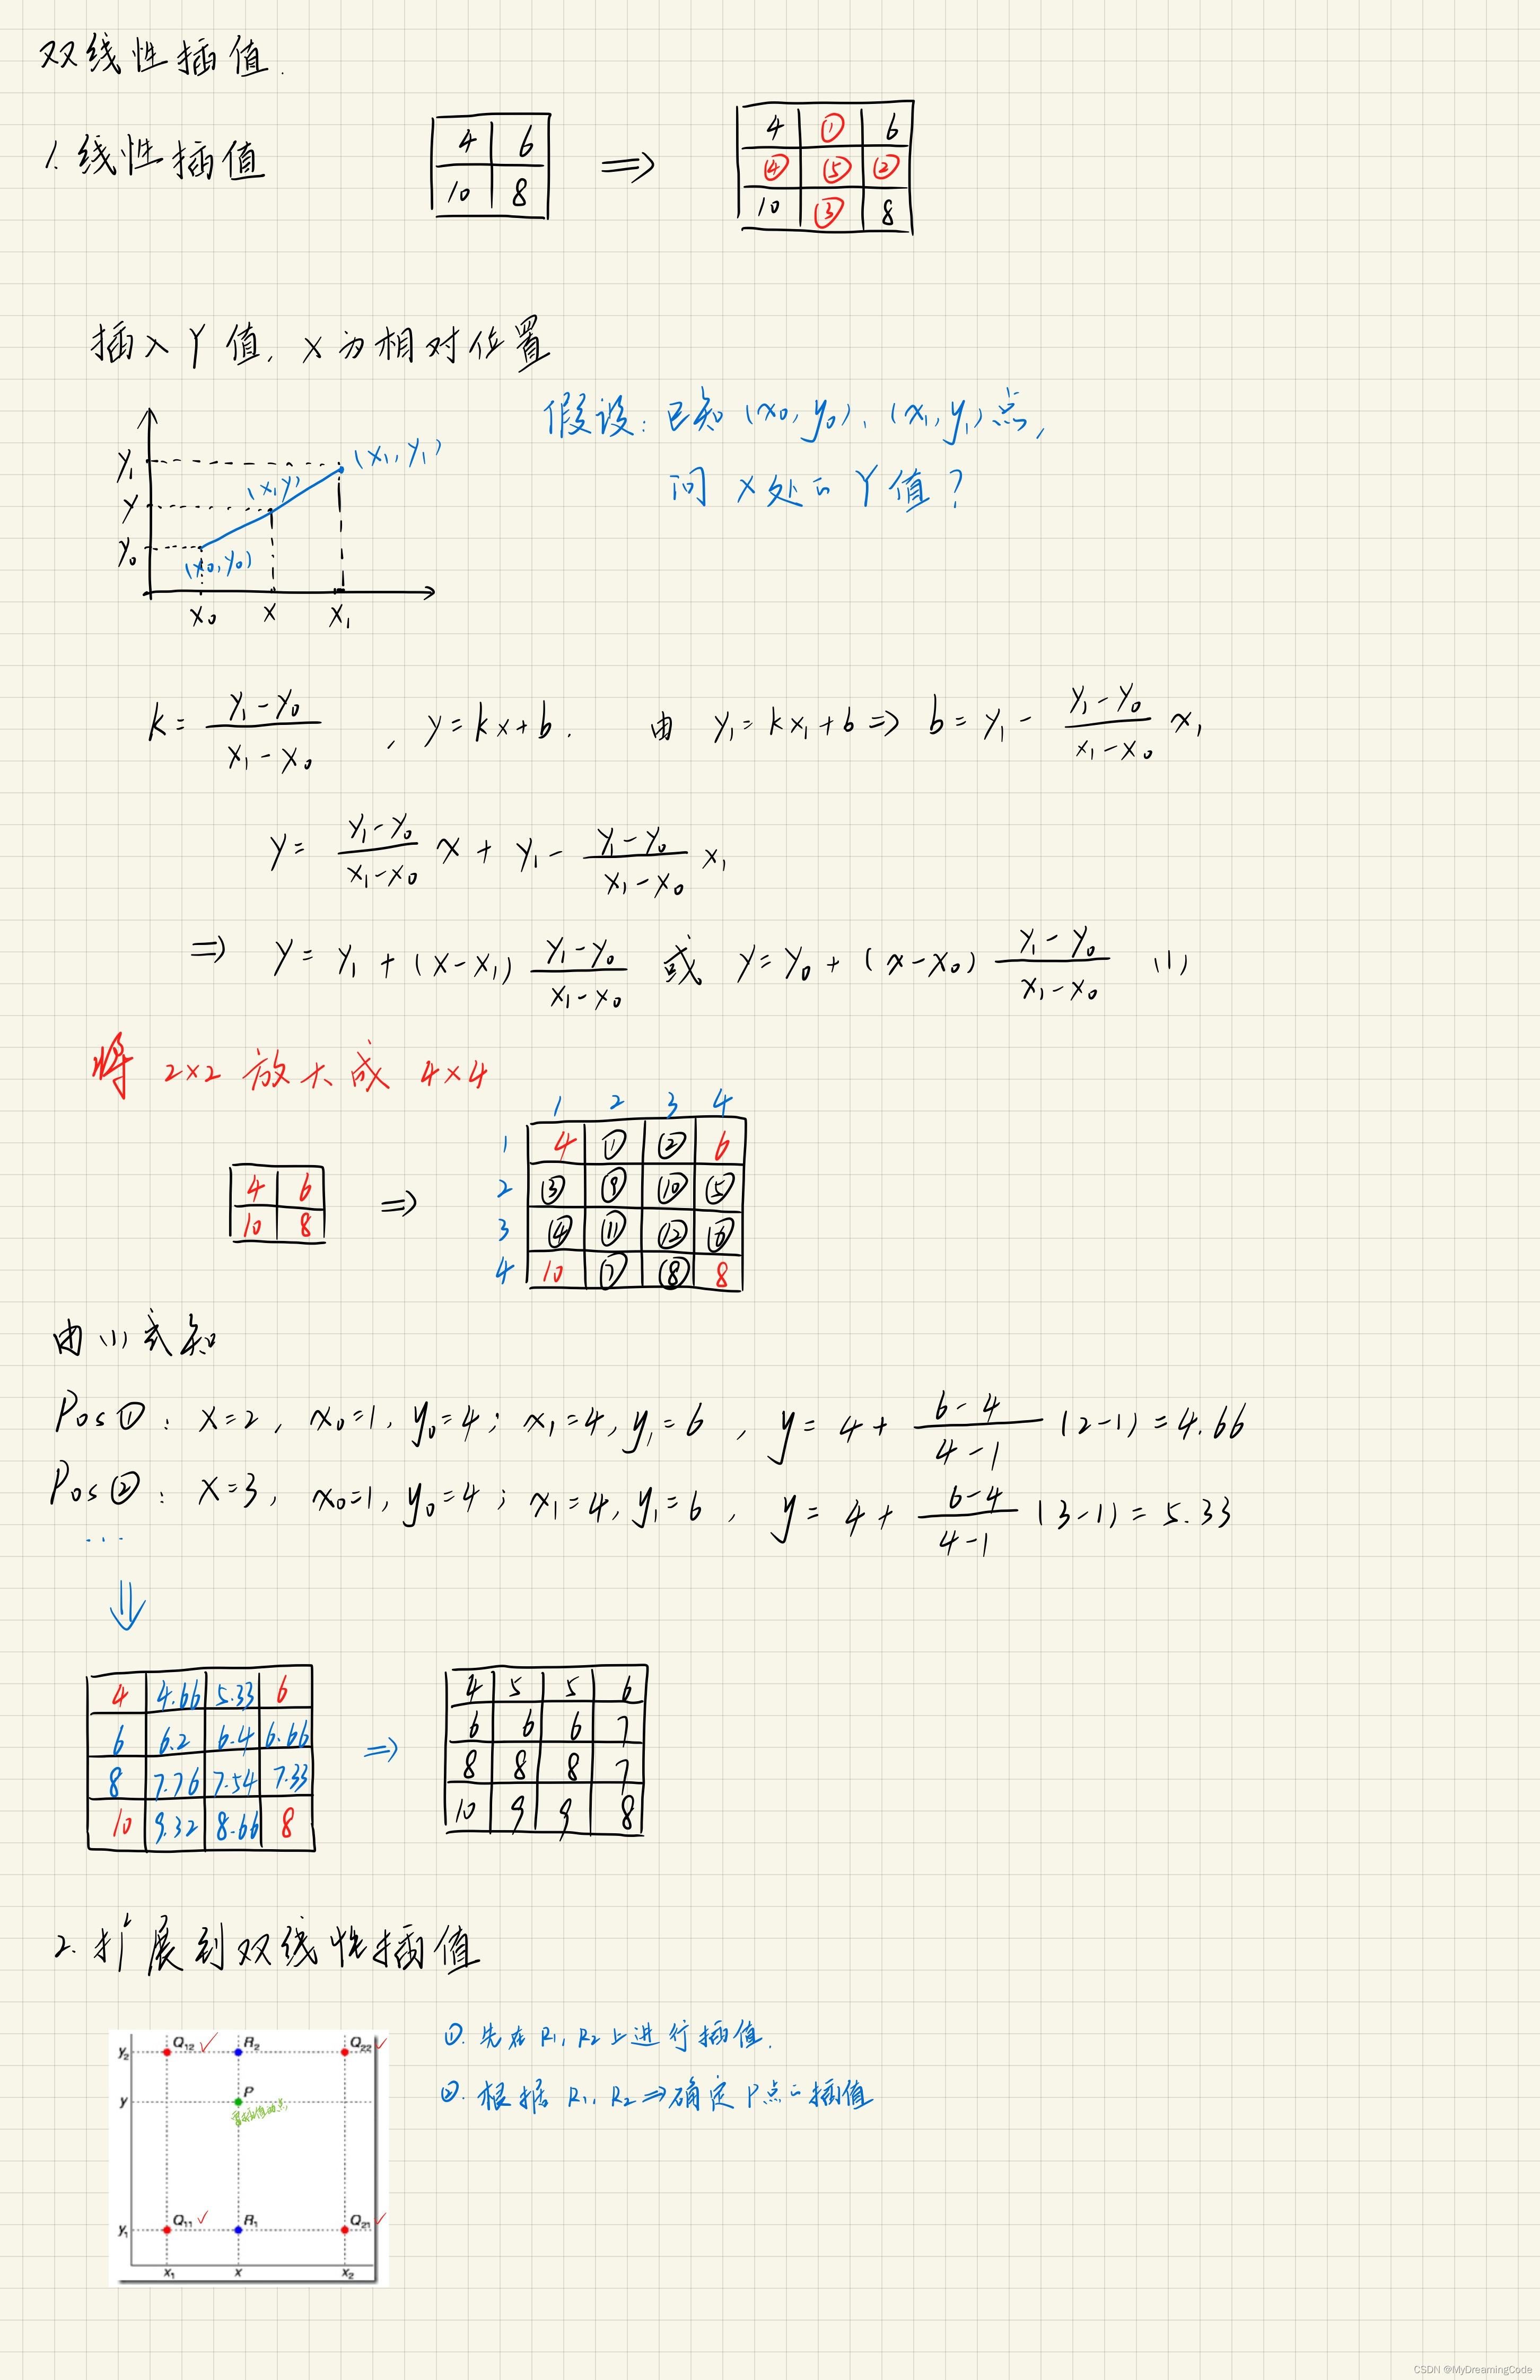
转置卷积:又称为反卷积,为上采样的方法。可以将小分辨率图映射成大分辨率图。对于正常的卷积而言,使用多对一的映射关系(感受野)。在使用反卷积时,可以建立一对多的映射关系。

计算公式:output=stride*(input-1)+kernel_size-2*padding
由上述公式可知,当stride为S,padding为S/2,卷积核大小为2S时,输出的宽高为输入宽高的S倍。
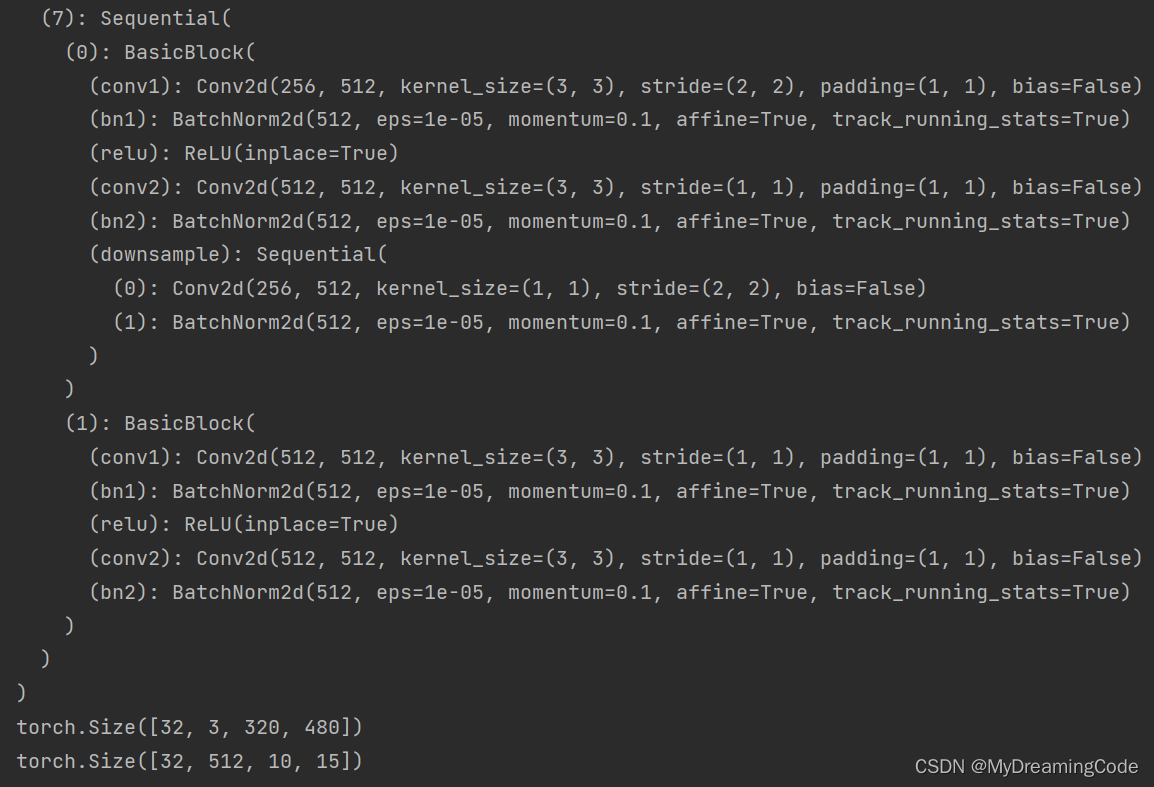
由于使用FCN全卷积层,所以我们将resnet18的最后非卷积层的两层进行修改。 移除最后两层:
# 修改成FCN层(修改model_pre的最后两层)
model_pre = nn.Sequential(*list(model_pre.children())[:-2])
print(model_pre)

# 测试输入输出大小
x = torch.rand((32, 3, 320, 480), device=device)
print(x.shape)
y = model_pre(x)
print(y.shape)
打印结果:
加入转置卷积层
# 修改成FCN层(修改model_pre的最后两层)
# 转置卷积层,使图像映射为输入图像的大小
model_pre = nn.Sequential(*list(model_pre.children())[:-2],  # 移除最后两层
                          nn.Conv2d(512, num_classes, kernel_size=1),  # 改变输出通道大小
                          nn.ConvTranspose2d(num_classes, num_classes, kernel_size=64, stride=32, padding=16)).to(
    device)
print(model_pre)

# 测试输入输出大小
x = torch.rand((32, 3, 320, 480), device=device)
print(x.shape)
y = model_pre(x)
print(y.shape)
打印结果:

5.3 初始化转置卷积层
双线性插值:初始化转置卷积层的卷积核。
根据这篇CSDN:上采样之双线性插值法_双线性上采样-CSDN博客
6.训练模型
6.1 optim.lr_scheduler.StepLR
torch.optim.lr_scheduler.StepLR(optimizer, step_size, gamma=0.1, last_epoch=-1)
注意:每step_size个epoch后,会做一次更新。
参数:
optimizer:更改学习率的优化器
step_size:每step_size个epoch后,会更新一次参数
gamma:更新学习率的乘法因子
last_epoch:指最后一个epoch加载到的index索引。若训练时中断,再继续训练时这个值就等于加载的模型的epoch。默认为-1,表示从头开始学习,即epoch为1。
6.2 torch.set_grad_enabled(bool:)
这个函数可以用于修改网络中一些参数的required_grad,与with.torch.no_grad()一样,可以影响网络的自动求导机制。
bool值为True时,允许在这个范围内进行梯度运算
bool值为False时,不允许在这个范围内进行梯度运算
6.3 训练模型代码
# 初始化转置卷积层的卷积核
def bilinear_kernel(in_channels, out_channels, kernel_size):
factor = (kernel_size + 1) // 2
if kernel_size % 2 == 1:
center = factor - 1
else:
center = factor - 0.5
og = np.ogrid[:kernel_size, :kernel_size]
filt = (1 - abs(og[0] - center) / factor) * (1 - abs(og[1] - center) / factor)
weight = np.zeros((in_channels, out_channels, kernel_size, kernel_size), dtype='float32')
weight[range(in_channels), range(out_channels), :, :] = filt
weight = torch.Tensor(weight)
weight.requires_grad = True
return weight
# 初始化权重
nn.init.xavier_normal_(model_pre[-2].weight.data, gain=1) # 服从正态分布
model_pre[-1].weight.data = bilinear_kernel(num_classes, num_classes, 64).to(device) # 初始化反卷积核
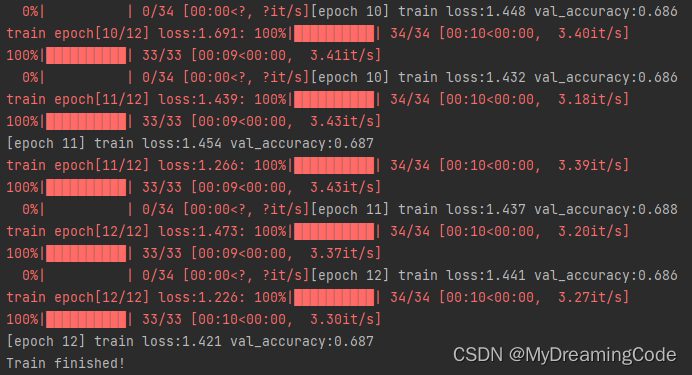
# 模型训练函数
# 变量名后加冒号“:”为类型注解的情况
def train_model(model: nn.Module, cost_function, optim, lr_scheduler, num_epoch=25):
save_path = 'best_weight.pth'
best_acc = 0.0
train_steps = len(train_loader)
val_steps = len(val_loader)
for epoch in range(num_epoch):
for stage in ['train', 'val']:
if stage == 'train':
lr_scheduler.step()
model.train()
else:
model.eval()
running_loss = 0.0
running_acc = 0.0
handle_bar = tqdm(dataLoaders[stage])
for inputs, labels in handle_bar:
inputs, labels = inputs.to(device), labels.to(device)
optim.zero_grad()
# 前向传播
with torch.set_grad_enabled(stage == 'train'):
# print(inputs.shape) # torch.Size([32, 3, 320, 480])
predict = model(inputs) # predict:torch.Size([32, 21, 320, 480])
loss = cost_function(predict, labels.long()) # labels.long()为向下取整
# 反向传播
if stage == 'train':
loss.backward()
optim.step()
# 统计loss&acc
running_loss += loss.item() * inputs.size(0) # 计算整个batch_size的总损失
# 直接是单通道的比较了,因为labels为标签类矩阵
# print(labels.shape) # torch.Size([32, 320, 480])
# print(labels) # 标签类矩阵
running_acc += torch.sum(torch.argmax(predict, dim=1) == labels) / (480 * 320)
handle_bar.desc = '{} epoch[{}/{}] loss:{:.3f}'.format(stage, epoch + 1, num_epoch, loss.item())
epoch_loss = running_loss / dataSizes[stage]
epoch_acc = running_acc.double() / dataSizes[stage]
print('[epoch %d] %s loss:%.3f val_accuracy:%.3f' % (epoch + 1, stage, epoch_loss, epoch_acc))
# 保存最好的模型参数
if stage == 'val' and epoch_acc >= best_acc:
best_acc = epoch_acc
torch.save(model.state_dict(), save_path)
print('Train finished!')
# 开始训练
epochs_num = 12
lost_function = nn.CrossEntropyLoss()
# momentum可以考虑到上一次更新的方向
optimizer = optim.SGD(model_pre.parameters(), lr=0.001, weight_decay=1e-4, momentum=0.9)
# 每step_size个epochs衰减学习率
lr_scheduler = optim.lr_scheduler.StepLR(optimizer, step_size=3, gamma=0.1)
train_model(model_pre, lost_function, optimizer, lr_scheduler, epochs_num)模型训练结果:
7.测试模型
# 预测
model_pre.load_state_dict(torch.load('best_weight.pth', map_location=device))
model = model_pre
def label2img(pred):
colorMap = torch.tensor(VOC_COLOR, device=device, dtype=int)
x = pred.long()
return colorMap[x, :].data.cpu().numpy()
def predict(img, model):
transform = transforms.Compose([
transforms.ToTensor(),
transforms.Normalize(mean=[0.485, 0.456, 0.406], std=[0.229, 0.224, 0.225])
])
tsf_img = transform(img).unsqueeze(0).to(device) # 增加batch_size通道
# print(tsf_img.shape) # torch.Size([1, 3, 320, 480])
pred = torch.argmax(model(tsf_img), dim=1)
# print(pred.shape) # torch.Size([1, 320, 480])
return pred.reshape(pred.shape[1], pred.shape[2]) # [320,480]
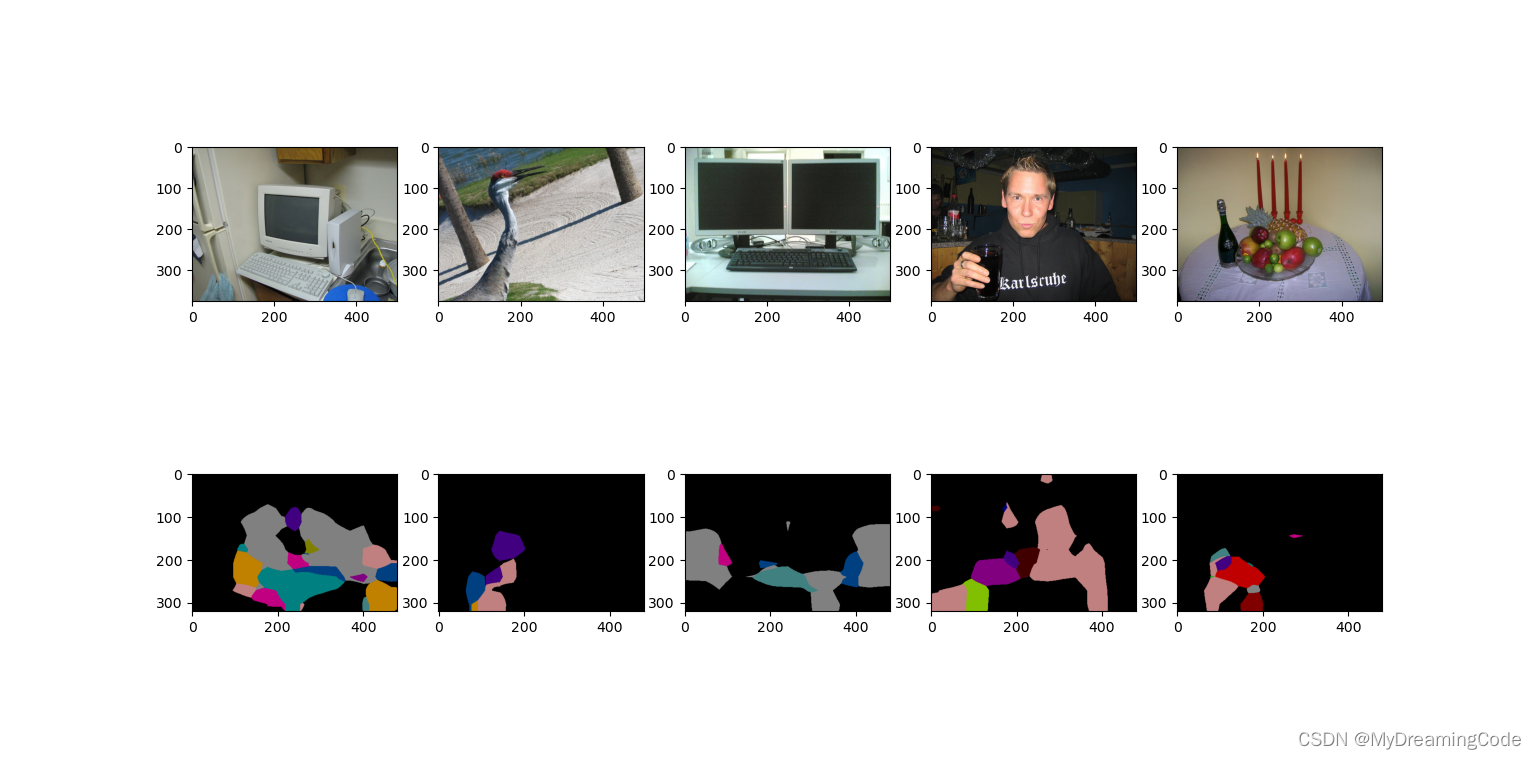
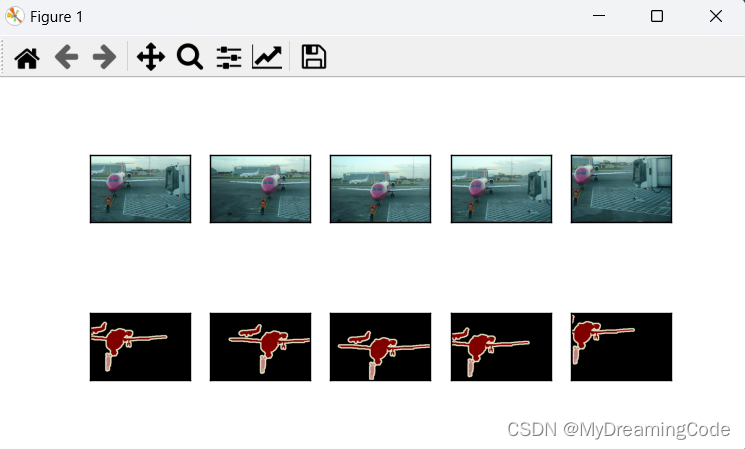
def show_predict(model: nn.Module):
model.eval()
dir = 'data/VOCdevkit/VOC2012/JPEGImages/'
test_image_dir = ['2007_000039.jpg', '2007_000068.jpg', '2007_000121.jpg','2007_000170.jpg','2007_000250.jpg']
test_image_list = []
test_pred_list = []
for i in range(len(test_image_dir)):
test_image = Image.open(dir + test_image_dir[i]).convert('RGB')
test_image_list.append(test_image)
i, j, h, w = transforms.RandomCrop.get_params(test_image, output_size=(320, 480))
test_crop = transforms.functional.crop(test_image, i, j, h, w)
pred = label2img(predict(test_crop, model))
test_pred_list.append(pred)
fig, axes = plt.subplots(2, 5, figsize=(6, 4))
for i in range(len(test_image_list)):
axes[0][i].imshow(test_image_list[i])
axes[1][i].imshow(test_pred_list[i])
plt.show()
show_predict(model)语义分割结果: