一、新增员工
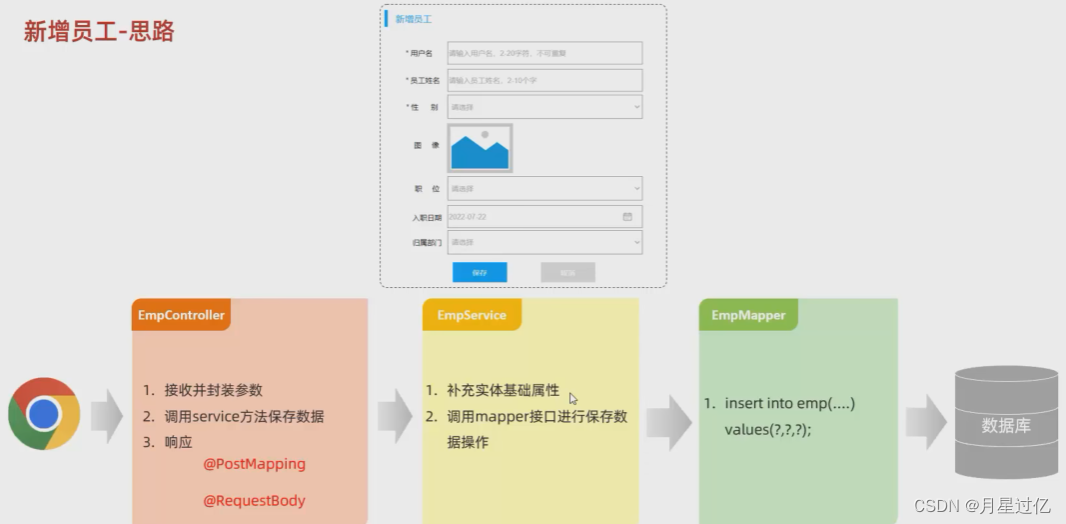
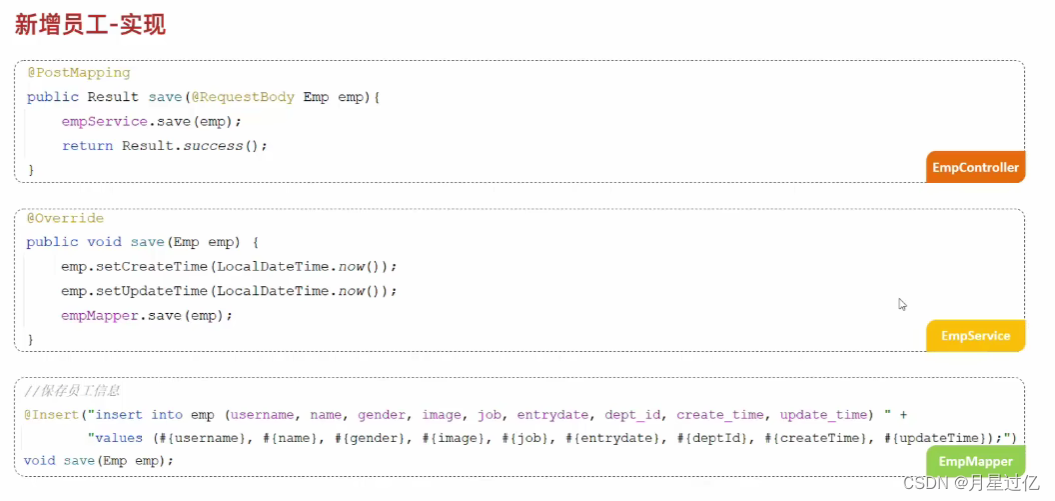
1.Controller层
 @PostMapping
    public Result save(@RequestBody Emp emp){
    log.info ( "新增员工,emp:{}",emp );
    empService.save(emp);


        return Result.success ();
    }
2.Service层
    @Override
    public void save(Emp emp) {
        emp.setCreateTime ( LocalDateTime.now ()  );
        emp.setUpdateTime ( LocalDateTime.now () );
        empMapper.save(emp);
    }
3.Mapper层
 /**
     * 添加员工
     * @param emp
     */
    @Insert ( "insert into emp(username,name,gender,image,job,entrydate,dept_id,create_time,update_time)" +
            "values (#{username},#{name},#{gender},#{image},#{job},#{entrydate},#{deptId},#{createTime},#{updateTime })" )
    void save(Emp emp);
二、文件上传
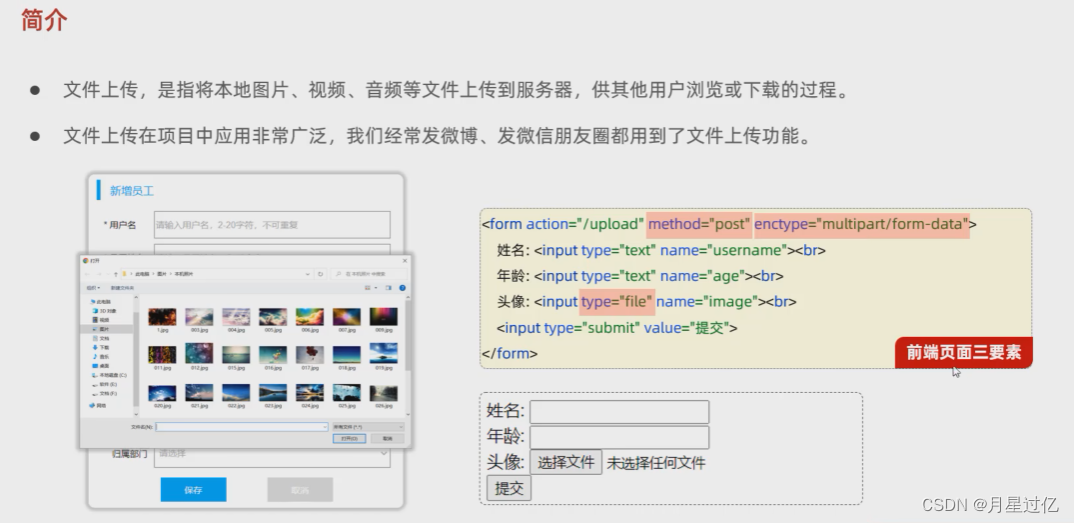
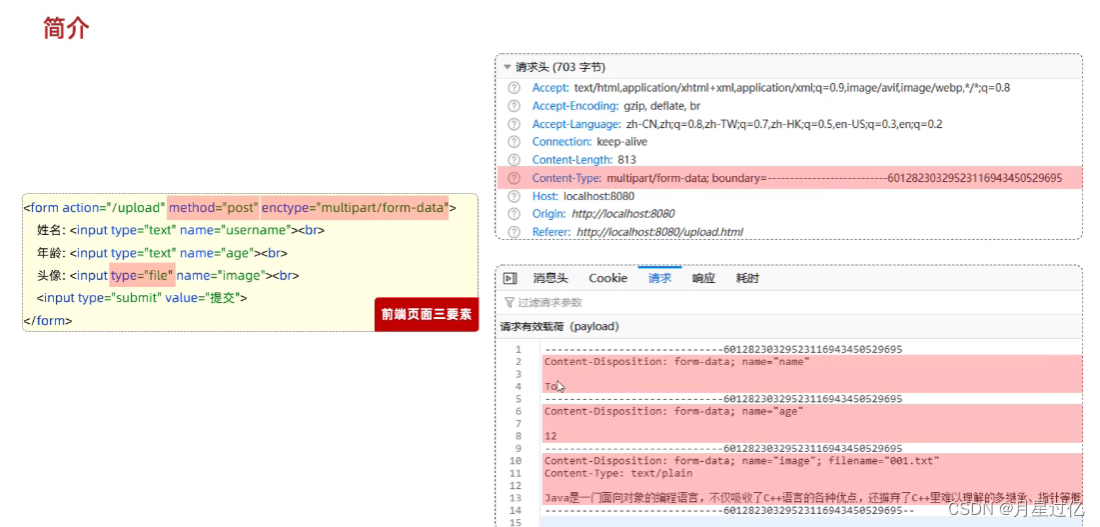
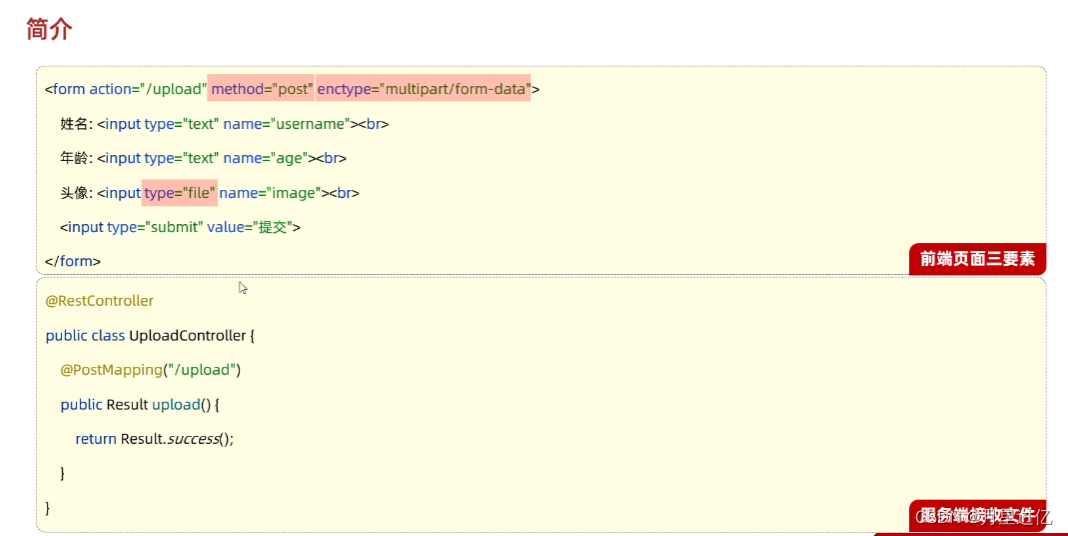
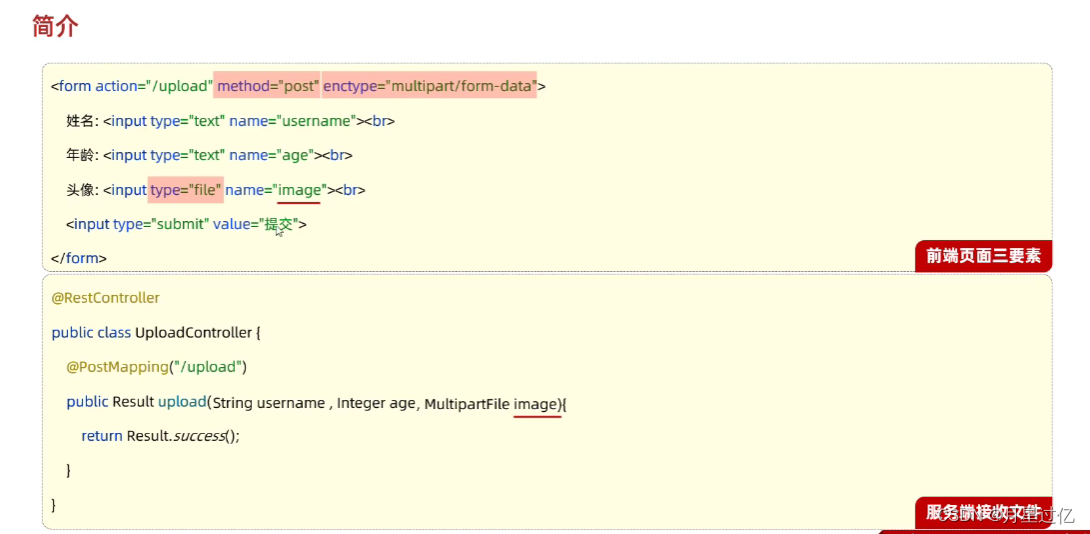
与表单的文字项不同时的解决办法
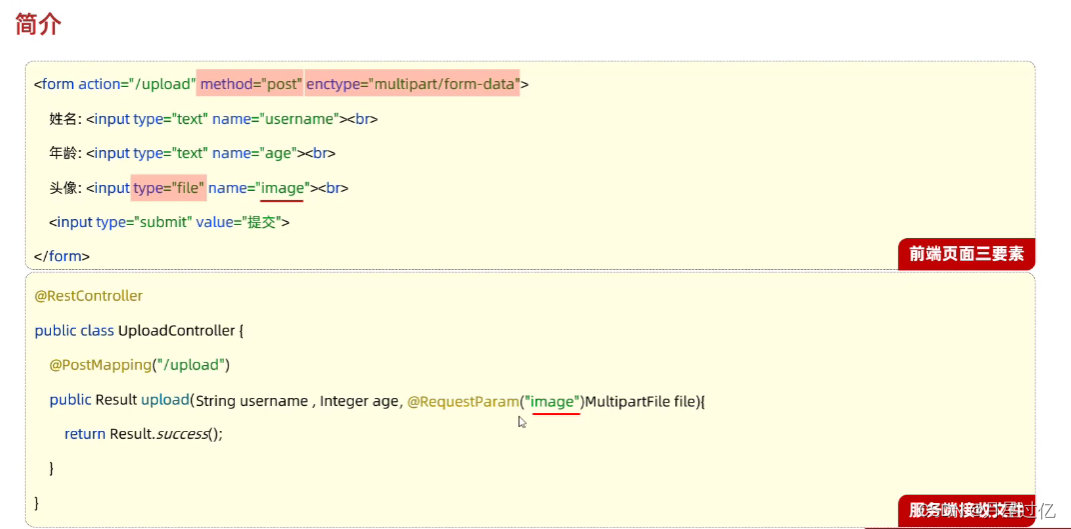
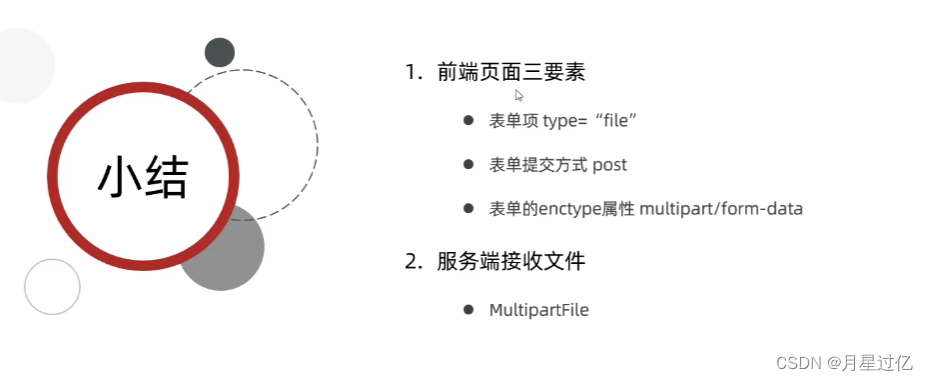
1.Controller层
import com.itheima.pojo.Result;
import lombok.extern.slf4j.Slf4j;
import org.springframework.web.bind.annotation.PostMapping;
import org.springframework.web.bind.annotation.RestController;
import org.springframework.web.multipart.MultipartFile;
@Slf4j
@RestController
public class UploadController {

    @PostMapping("/upload")
    public Result upload(String username, Integer age, MultipartFile image){
        log.info ( "文件上传:{},{},{}",username,age,image );

        return Result.success ();
    }
}
2.网页代码
<!DOCTYPE html>
<html lang="en">
<head>
    <meta charset="UTF-8">
    <title>上传文件</title>
</head>
<body>

    <form action="/upload" method="post" enctype="multipart/form-data">
        姓名: <input type="text" name="username"><br>
        年龄: <input type="text" name="age"><br>
        头像: <input type="file" name="image"><br>
        <input type="submit" value="提交">
    </form>

</body>
</html>
三、文件上传-本地存储

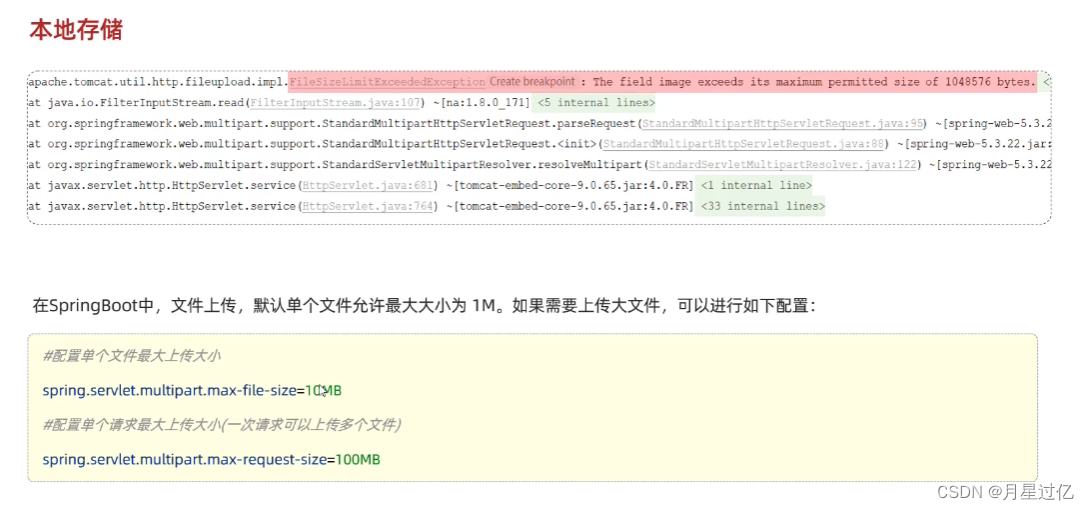
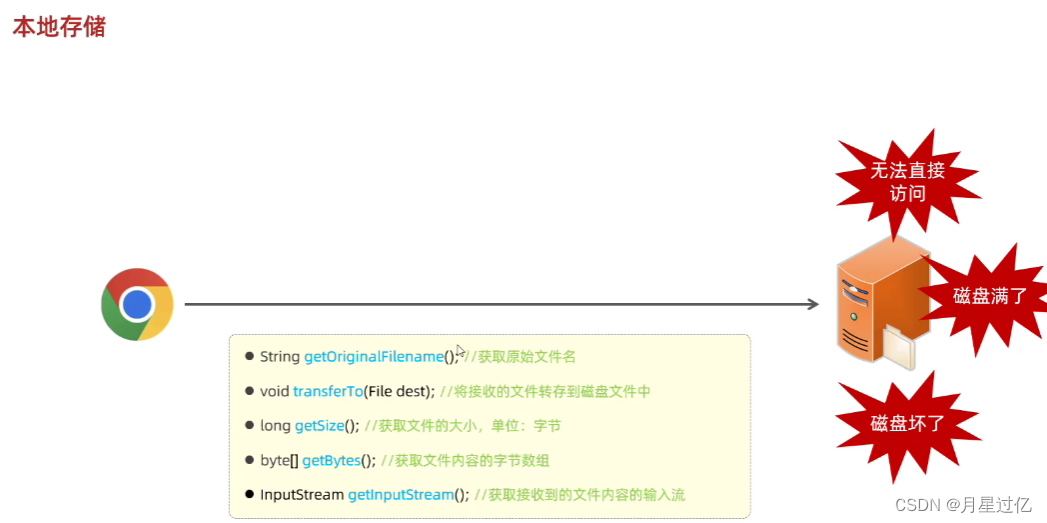
1.Controller层
import com.itheima.pojo.Result;
import lombok.extern.slf4j.Slf4j;
import org.springframework.web.bind.annotation.PostMapping;
import org.springframework.web.bind.annotation.RestController;
import org.springframework.web.multipart.MultipartFile;

import java.io.File;
import java.io.IOException;
import java.util.UUID;

@Slf4j
@RestController
public class UploadController {

    @PostMapping("/upload")
    public Result upload(String username, Integer age, MultipartFile image) throws Exception {
        log.info ( "文件上传:{},{},{}",username,age,image );
        //获取原始的文件名
        String originalFilename = image.getOriginalFilename ();
        //可能会产生覆盖(新上传的文件和其他文件重复)
        //构造唯一的文件名 不能重复 --uuid(通用唯一识别码)b423d96c-14f0-46a3-a8a3-2a364ce4aa94
        int index = originalFilename.lastIndexOf ( "." );
        //截取得到文件的拓展名
        String extname = originalFilename.substring ( index );
        String newFileName = UUID.randomUUID ().toString () + extname;
        log.info ( "新的文件名:{ }",newFileName );


        //将文件存储在服务器的磁盘目录中
        image.transferTo ( new File ( "E:\\images\\"+newFileName ) );
        return Result.success ();
    }
}
2.文件大小配置
# 配置单个文件的上传大小
spring.servlet.multipart.max-file-size=10MB
#配置单个请求最大大小的显示(一次请求中是可以上传多个文件的)
spring.servlet.multipart.max-request-size=100MB
四、阿里云OSS
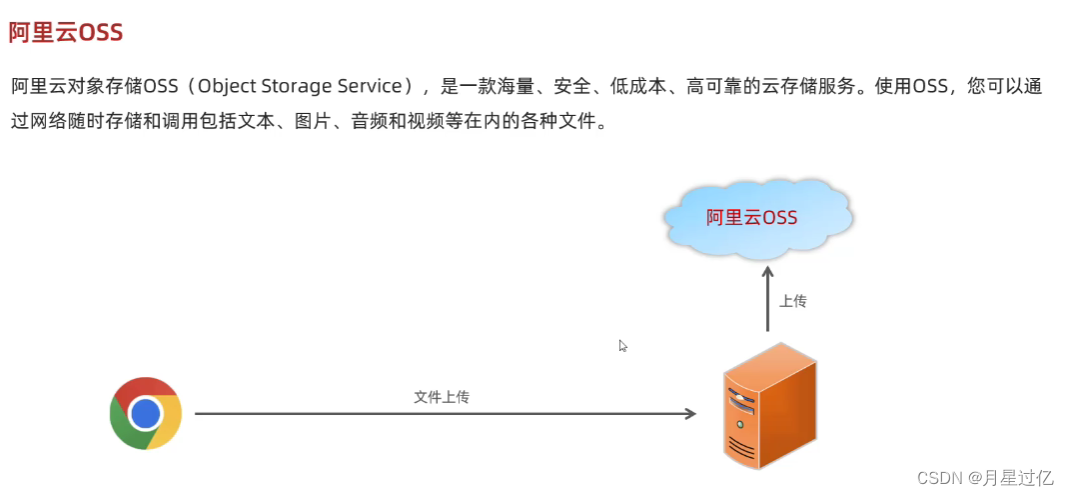
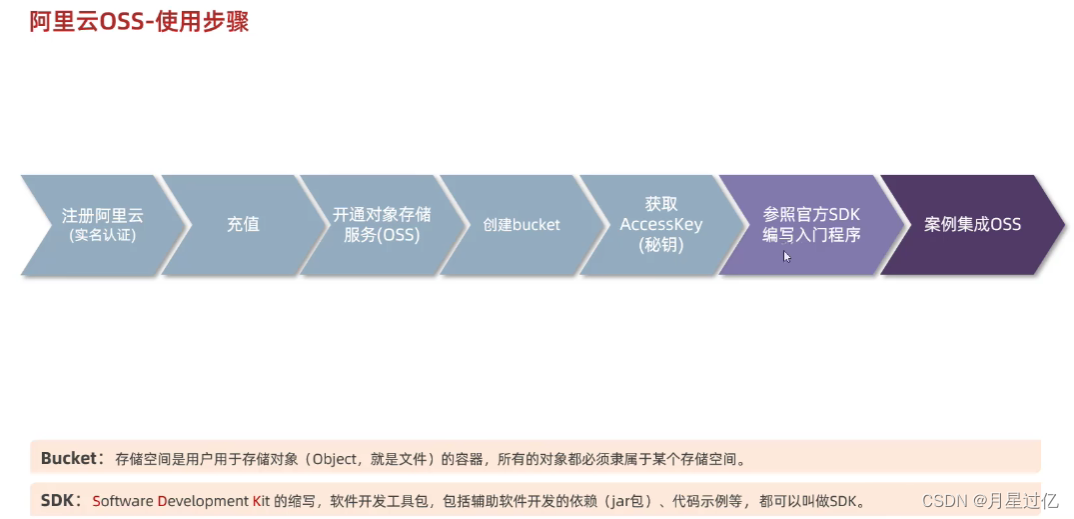
1.编写入门程序
import com.aliyun.oss.ClientException;
import com.aliyun.oss.OSS;
import com.aliyun.oss.common.auth.*;
import com.aliyun.oss.OSSClientBuilder;
import com.aliyun.oss.OSSException;
import com.aliyun.oss.model.PutObjectRequest;
import com.aliyun.oss.model.PutObjectResult;
import java.io.FileInputStream;
import java.io.InputStream;

public class Demo {

    public static void main(String[] args) throws Exception {
        // Endpoint以华东1(杭州)为例,其它Region请按实际情况填写。
        String endpoint = "https://oss-cn-beijing.aliyuncs.com";
        // 从环境变量中获取访问凭证。运行本代码示例之前,请确保已设置环境变量OSS_ACCESS_KEY_ID和OSS_ACCESS_KEY_SECRET。
        EnvironmentVariableCredentialsProvider credentialsProvider = CredentialsProviderFactory.newEnvironmentVariableCredentialsProvider();
        // 填写Bucket名称,例如examplebucket。
        String bucketName = "hzleadnews-01";
        // 填写Object完整路径,完整路径中不能包含Bucket名称,例如exampledir/exampleobject.txt。
        String objectName = "1.jpg";
        // 填写本地文件的完整路径,例如D:\\localpath\\examplefile.txt。
        // 如果未指定本地路径,则默认从示例程序所属项目对应本地路径中上传文件流。
        String filePath= "E:\\images\\66.jpg";

        // 创建OSSClient实例。
        OSS ossClient = new OSSClientBuilder().build(endpoint, credentialsProvider);

        try {
            InputStream inputStream = new FileInputStream(filePath);
            // 创建PutObjectRequest对象。
            PutObjectRequest putObjectRequest = new PutObjectRequest(bucketName, objectName, inputStream);
            // 创建PutObject请求。
            PutObjectResult result = ossClient.putObject(putObjectRequest);
        } catch (OSSException oe) {
            System.out.println("Caught an OSSException, which means your request made it to OSS, "
                    + "but was rejected with an error response for some reason.");
            System.out.println("Error Message:" + oe.getErrorMessage());
            System.out.println("Error Code:" + oe.getErrorCode());
            System.out.println("Request ID:" + oe.getRequestId());
            System.out.println("Host ID:" + oe.getHostId());
        } catch (ClientException ce) {
            System.out.println("Caught an ClientException, which means the client encountered "
                    + "a serious internal problem while trying to communicate with OSS, "
                    + "such as not being able to access the network.");
            System.out.println("Error Message:" + ce.getMessage());
        } finally {
            if (ossClient != null) {
                ossClient.shutdown();
            }
        }
    }
}
2.需要加入的依赖
<dependency>
            <groupId>com.aliyun.oss</groupId>
            <artifactId>aliyun-sdk-oss</artifactId>
            <version>3.15.1</version>
        </dependency>
        <dependency>
            <groupId>javax.xml.bind</groupId>
            <artifactId>jaxb-api</artifactId>
            <version>2.3.1</version>
        </dependency>
        <dependency>
            <groupId>javax.activation</groupId>
            <artifactId>activation</artifactId>
            <version>1.1.1</version>
        </dependency>
        <!-- no more than 2.3.3-->
        <dependency>
            <groupId>org.glassfish.jaxb</groupId>
            <artifactId>jaxb-runtime</artifactId>
            <version>2.3.3</version>
        </dependency>
3.需要设置本地环境变量
OSS_ACCESS_KEY_ID,OSS_ACCESS_KEY_SECRET

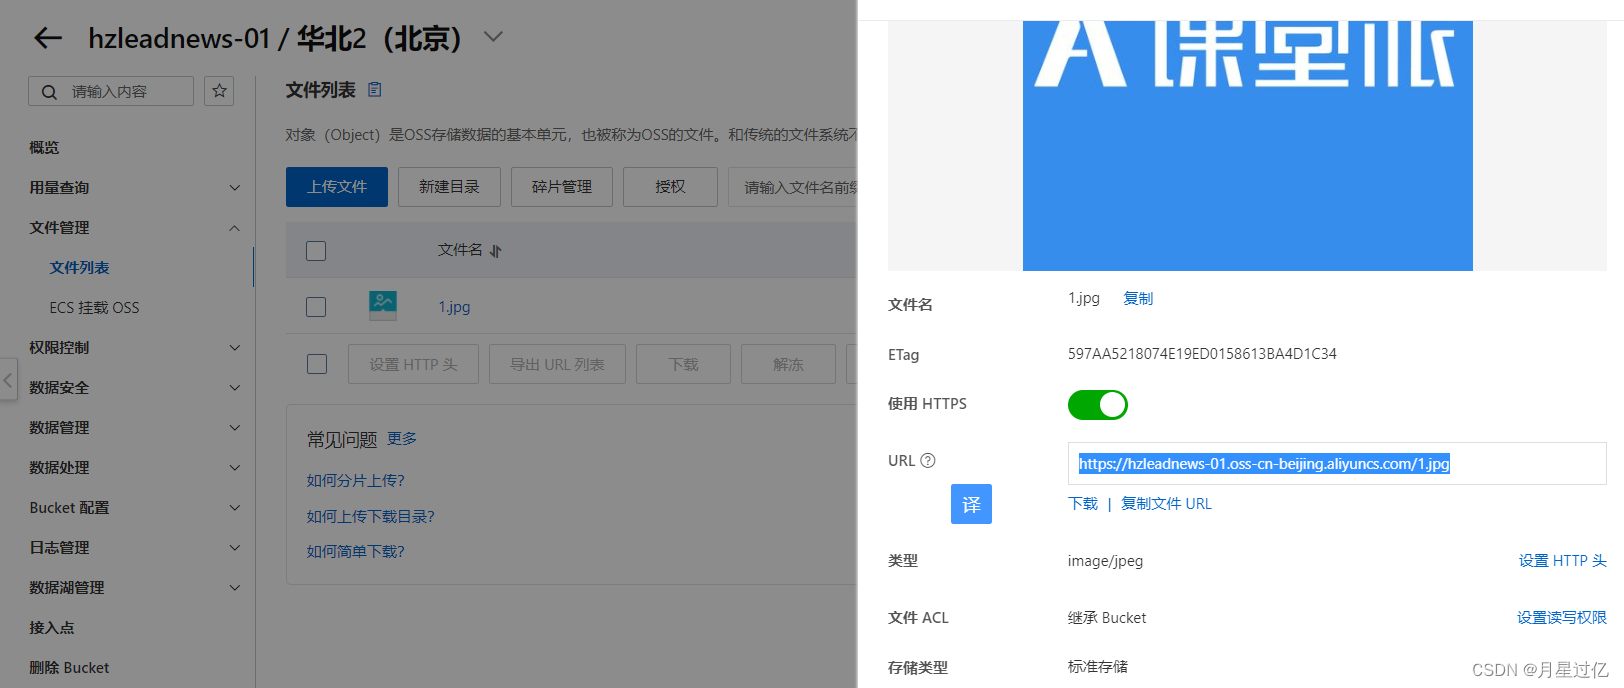
4.运行程序上传文件到阿里云
会自动为文件赋值一个URL(可以直接通过网络来访问的URL)
五、案例集成阿里云OSS
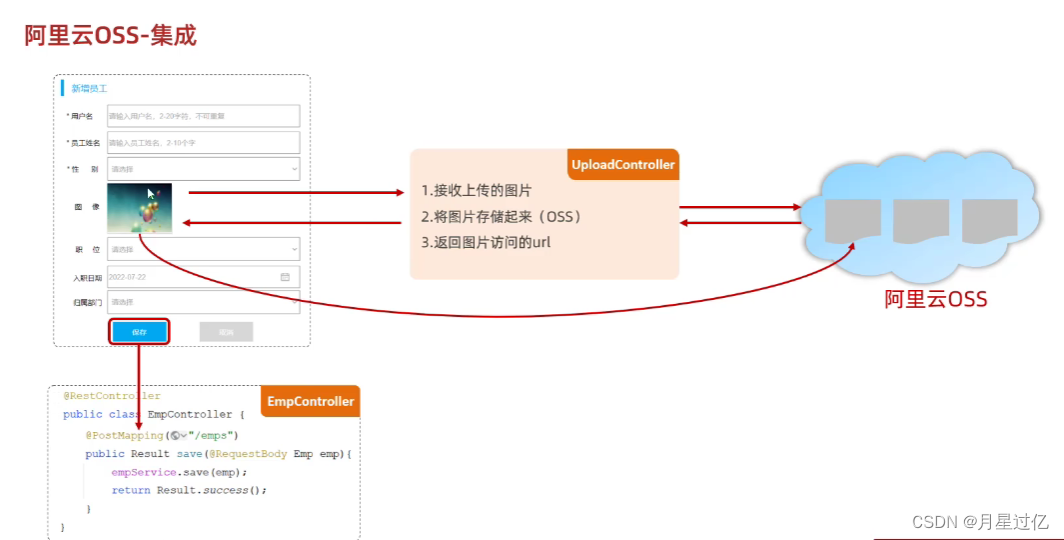

1.引入aliOOSUtils(为aliOOSUtils添加@Component 交给IOC容器管理)
import com.aliyun.oss.OSS;
import com.aliyun.oss.OSSClientBuilder;
import com.aliyun.oss.common.auth.CredentialsProviderFactory;
import com.aliyun.oss.common.auth.EnvironmentVariableCredentialsProvider;
import com.aliyuncs.exceptions.ClientException;
import org.springframework.stereotype.Component;
import org.springframework.web.multipart.MultipartFile;
import java.io.*;
import java.util.UUID;

/**
 * 阿里云 OSS 工具类
 */
@Component
public class AliOSSUtils {

    private String endpoint = "https://oss-cn-beijing.aliyuncs.com";
    private String bucketName = "hzleadnews-01";


    /**
     * 实现上传图片到OSS
     */
    public String upload(MultipartFile file) throws Exception {
        EnvironmentVariableCredentialsProvider credentialsProvider = CredentialsProviderFactory.newEnvironmentVariableCredentialsProvider();
        // 获取上传的文件的输入流
        InputStream inputStream = file.getInputStream();

        // 避免文件覆盖
        String originalFilename = file.getOriginalFilename();
        String fileName = UUID.randomUUID().toString() + originalFilename.substring(originalFilename.lastIndexOf("."));

        //上传文件到 OSS
        OSS ossClient = new OSSClientBuilder().build(endpoint, credentialsProvider);
        ossClient.putObject(bucketName, fileName, inputStream);

        //文件访问路径
        String url = endpoint.split("//")[0] + "//" + bucketName + "." + endpoint.split("//")[1] + "/" + fileName;
        // 关闭ossClient
        ossClient.shutdown();
        return url;// 把上传到oss的路径返回
    }

}
2.注入依赖,完成文件上传云端的功能
import com.itheima.pojo.Result;
import com.itheima.utils.AliOSSUtils;
import lombok.extern.slf4j.Slf4j;
import org.springframework.beans.factory.annotation.Autowired;
import org.springframework.web.bind.annotation.PostMapping;
import org.springframework.web.bind.annotation.RestController;
import org.springframework.web.multipart.MultipartFile;

import java.io.File;
import java.io.IOException;
import java.util.UUID;

@Slf4j
@RestController
public class UploadController {
    /**
     * 本地存储文件的方法
     */
 @Autowired
 private AliOSSUtils aliOSSUtils;

//    @PostMapping("/upload")
//    public Result upload(String username, Integer age, MultipartFile image) throws Exception {
//        log.info ( "文件上传:{},{},{}",username,age,image );
//        //获取原始的文件名
//        String originalFilename = image.getOriginalFilename ();
//        //可能会产生覆盖(新上传的文件和其他文件重复)
//        //构造唯一的文件名 不能重复 --uuid(通用唯一识别码)b423d96c-14f0-46a3-a8a3-2a364ce4aa94
//        int index = originalFilename.lastIndexOf ( "." );
//        //截取得到文件的拓展名
//        String extname = originalFilename.substring ( index );
//        String newFileName = UUID.randomUUID ().toString () + extname;
//        log.info ( "新的文件名:{ }",newFileName );
//
//
//        //将文件存储在服务器的磁盘目录中
//        image.transferTo ( new File ( "E:\\images\\"+newFileName ) );
//        return Result.success ();
//    }
    @PostMapping("/upload")
    public Result upload(MultipartFile image) throws Exception {
        log.info ( "文件上传,文件名:{}",image.getOriginalFilename () );
        //调用阿里云OSS工具类进行文件上传
        String url = aliOSSUtils.upload ( image );
        log.info ( "文件上传完成,文件的访问路径的url:{}",url );
        return Result.success (url);

    }
}
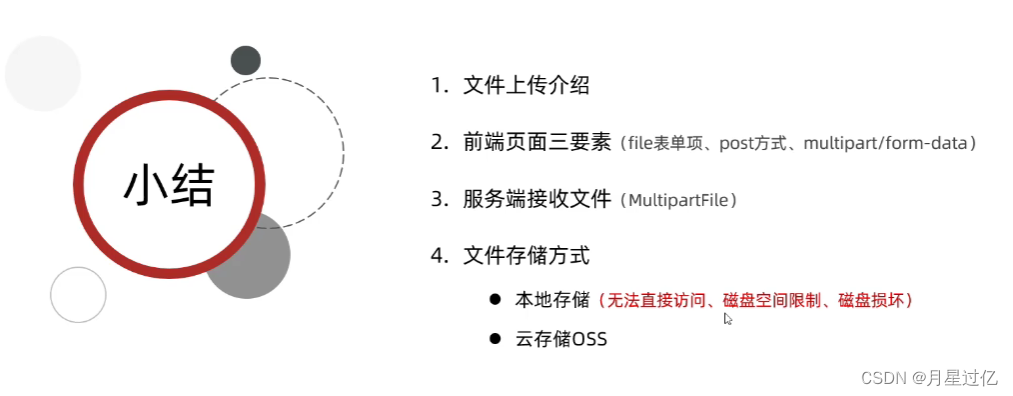
六、修改员工
1.查询回显
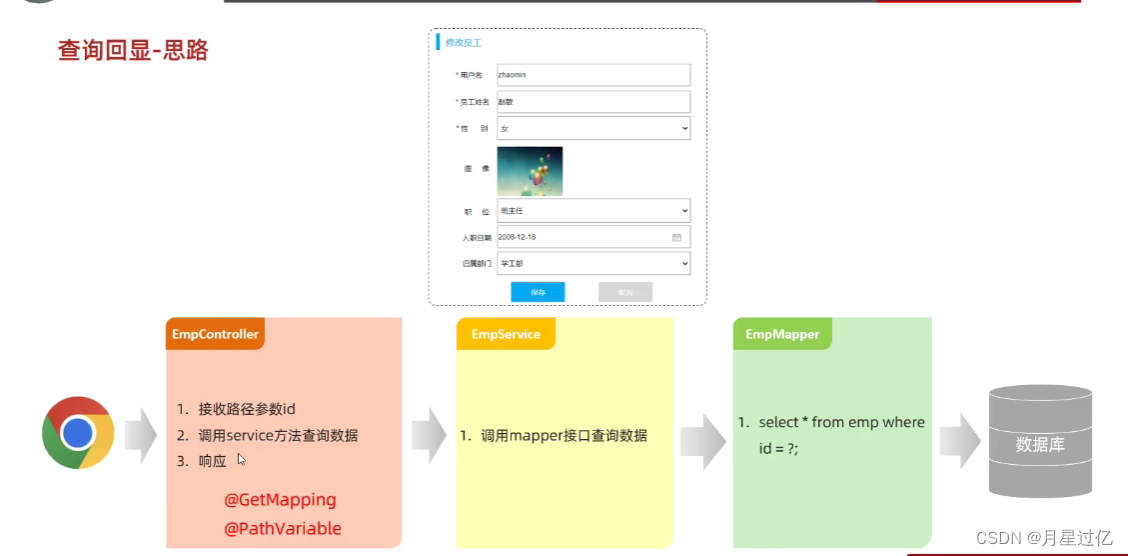
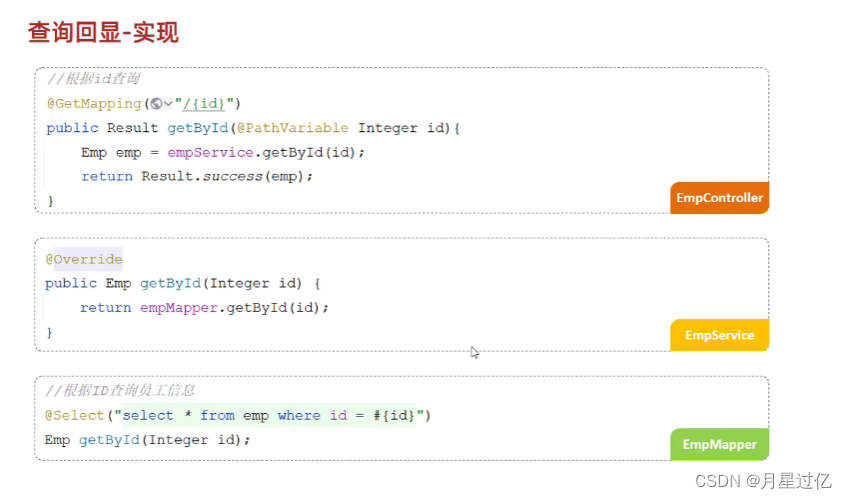
1.Controller 层
    @GetMapping("/{id}")
    public Result getById(@PathVariable Integer id){
        log.info ( "根据id 查询员工信息,id:{}",id );
       Emp emp  =  empService.getById(id);
       return    Result.success (emp);


    }
2.Service层
    /**
     * 根据ID查询员工信息
     * @param id
     * @return
     */

    @Override
    public Emp getById(Integer id) {
    return empMapper.getById(id);
    }
3.Mapper层
      /**
     * 根据id查询员工信息
     * @param id
     * @return
     */
    @Select ( "select * from emp where id = #{id}" )
    Emp getById(Integer id);
2.修改员工
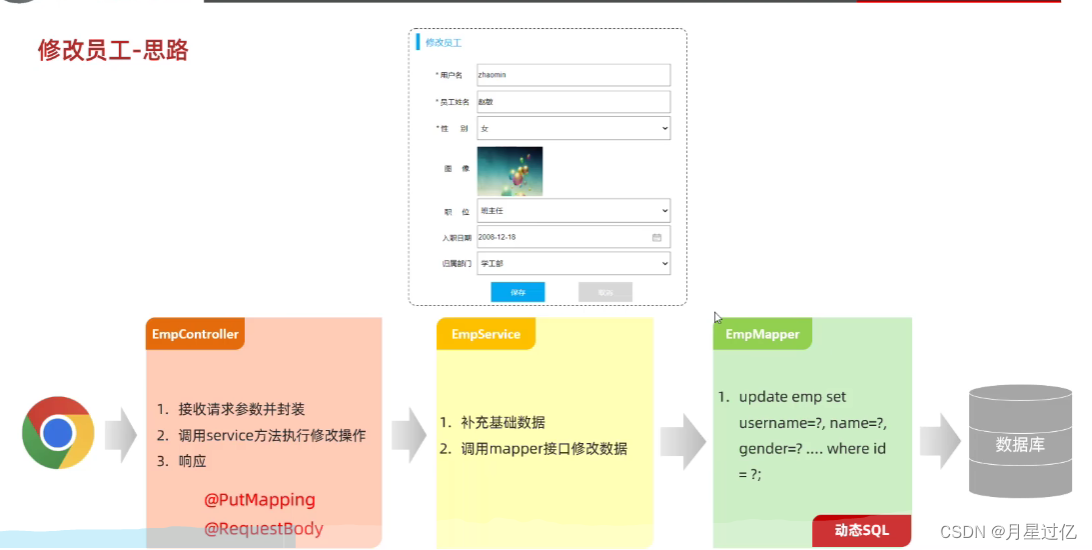
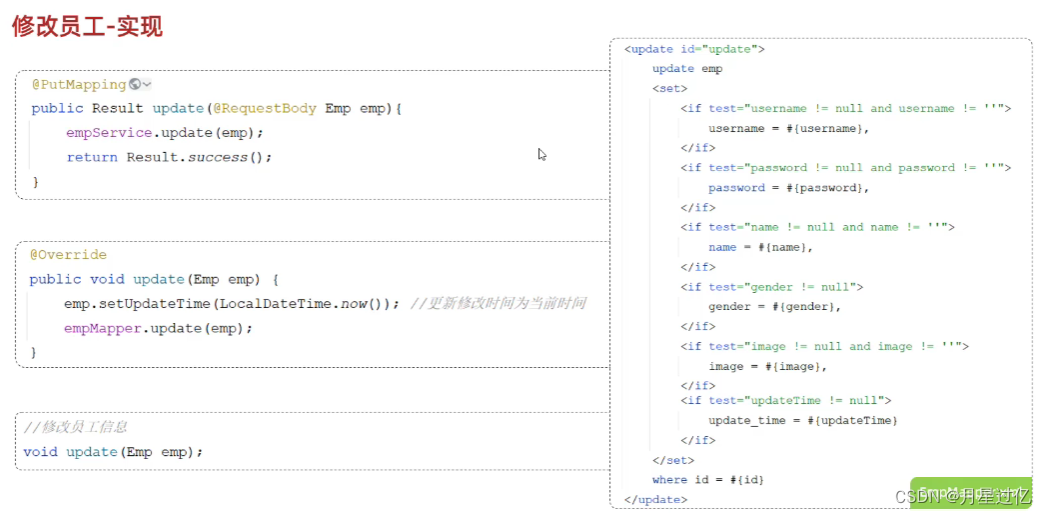
1.Controller层
    @PutMapping
    public Result update(@RequestBody Emp emp){
        log.info ( "更新员工信息:{}",emp );
        empService.update(emp);
        return Result.success ();
    }
2.Service层
    /**
     * 更新员工
     * @param emp
     */
    @Override
    public void update(Emp emp) {
        emp.setUpdateTime ( LocalDateTime.now () );
        empMapper.update(emp);
    }
3.Mapper层
<!--    更新员工-->
    <update id="update">
update emp
    <set>
    <if test="username!=null and username!=''">username=#{username},</if>
    <if test="password!=null and password!=''">password=#{password},</if>
    <if test="name!=null and name!=''">name =#{name},</if>
    <if test="gender!=null ">gender=#{gender},</if>
    <if test="image!=null and image!=''"> image=#{image},</if>
    <if test="job!=null ">job=#{job},</if>
    <if test="entrydate!=null "> entrydate=#{entrydate},</if>
    <if test="deptId!=null ">dept_id=#{deptId},</if>
    <if test="updateTime!=null ">update_time=#{updateTime}</if>
    </set>
    where id =#{id}

    </update>
