instanceof
引用类型,判断一个对象是什么类型
使用方法:
System.out.println(X instanceof Y);
代码理解:
public class Application {
    public static void main(String[] args) {
        //Obiect>String
        //Obiect>Person>Teacher
        //Obiect>Person>Student
        Object object=new Student();
        System.out.println(object instanceof Student);
        System.out.println(object instanceof Person);
        System.out.println(object instanceof Object);
        System.out.println(object instanceof Teacher);
        System.out.println(object instanceof String);
        System.out.println("==========================");
        Person person=new Student();
        System.out.println(person instanceof Student);
        System.out.println(person instanceof Person);
        System.out.println(person instanceof Object);
        System.out.println(person instanceof Teacher);
        //System.out.println(person instanceof String);编译报错
        System.out.println("=========================");
        Student student=new Student();
        System.out.println(student instanceof Student);
        System.out.println(student instanceof Person);
        System.out.println(student instanceof Object);
        /*System.out.println(student instanceof Teacher);
        System.out.println(student instanceof String);编译报错*/

    }
}
其Person是Student与Teacher的父类
类型转换
父类的引用指向子类的对象
把子类转换为父类,向上转型
把父类转换为子类,向下转换:强制转换
方便方法调用,减少重复的代码
强制转换:
package com.oop.demo06;

public class Application {
    public static void main(String[] args) {
        //类型之间的转换
        //子类转换为父类可能丢失自己本来的一些方法
        Person obj=new Student();
        //student将这个对象转换为Student类型,我们就可以使用Student类型的方法了
        Student student=(Student)obj;
        student.go();
    }
}
package com.oop.demo06;

public class Student extends Person {
    public void go(){
        System.out.println("go");
    }

}
也可以这样写
package com.oop.demo06;

public class Application {
    public static void main(String[] args) {
        //类型之间的转换
        //子类转换为父类可能丢失自己本来的一些方法
        Person obj=new Student();
        //student将这个对象转换为Student类型,我们就可以使用Student类型的方法了
        Student student=(Student)obj;
        ((Student) obj).go();
    }
}
低转高自动转换
package com.oop.demo06;

public class Application {
    public static void main(String[] args) {
        Student student=new Student();
        student.go();
        Person person=student;


    }
}
static关键字详解
非静态的方法可以调用静态里面的方法
静态方法只能调用静态方法的
package com.oop.demo07;
//static
public class Student {
    private static int age;//静态变量
    private double score;//非静态变量
    public void run(){
        go();//非静态的方法可以调用静态里面的方法
    }
    public static void go(){

    }

    public static void main(String[] args) {
        go();//静态方法只能调用静态方法的
        new Student().run();
    }
}
关于static的静态代码块
package com.oop.demo07;

public class Person {
    {
        System.out.println("匿名代码块");//代码块(匿名代码块)
    }
    static{
        System.out.println("静态代码块");
        //静态代码块
    }

    public Person() {
        System.out.println("构造方法");
    }

    public static void main(String[] args) {
        Person person=new Person();
        System.out.println("================");
        Person person1=new Person();
    }
}
运行结果
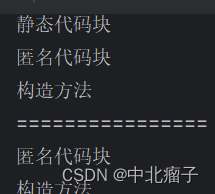
由此可见静态代码块先执行且只执行依次,匿名代码块可以用来赋初始值
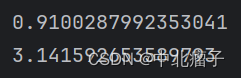
静态导入包
package com.oop.demo07;

public class Text {
    public static void main(String[] args) {
        System.out.println(Math.random());//随机生成一个数
    }
}
使用静态导入包
package com.oop.demo07;
import static java.lang.Math.random;
import static java.lang.Math.PI;

public class Text {
    public static void main(String[] args) {
        System.out.println(random());
        System.out.println(PI);
    }
}
运行结果
注意:通过final修饰的类不能被继承,也就是没有子类
抽象类
package com.oop.demo09;
//abstract 抽象类 extend:单继承 接口可以多继承
public abstract class Action {
    //约束,有人帮实现
    //abstract 抽象方法,只有方法名字没有方法的实现
    public abstract void doSomething();
}
package com.oop.demo09;
//抽象类的所有方法,继承了它的子类,都必须要实现它的方法
public class A extends Action{
    @Override
    public void doSomething() {

    }
}
1.不能new这个抽象类,只能靠子类区实现他
2.抽象类中可以写普通方法
3.抽象方法必须在抽象类中
接口
普通类:只有具体实现
抽象类:具体实现和规范(抽象方法)都有
接口:只有规范,自己无法写方法。专业的约束,约束和实现分离
接口的本质是契约,就像是人间的法律一样,制定好之后大家都遵守
声明类的关键字是class,声明接口的关键字是interface
实现了接口的类就需要重写接口中的方法,并且可以利用接口实现多继承
如下代码拥有两个接口,每个接口拥有多个方法
package com.oop.demo10;
//interface
public interface UserService {
    //接口中的所有定义其实都是抽象的 public abstract
    int AGE=99;
    void add(String name);
    void delete(String name);
    void update(String name);
    void query(String name);
}
package com.oop.demo10;
public interface TimeService {
void timer();
}
package com.oop.demo10;
//抽象类:extends
//类 可以实现接口 implements 接口
//实现了接口的类就需要重写接口中的方法
//利用接口实现多继承
public class UserServiceImpl implements UserService,TimeService{
    @Override
    public void query(String name) {

    }

    @Override
    public void update(String name) {

    }

    @Override
    public void delete(String name) {

    }

    @Override
    public void add(String name) {

    }

    @Override
    public void timer() {

    }
}
作用:
1.约束
2.定义一些方法,让不同的人实现
3.接口不能被实例化,接口中没有构造方法
4.implements可以实现多个接口
5.必须重写接口中的方法
内部类
内部类就是在一个类的内部再定义一个类,比如,A类中定义一个B类,那么B类相对A类来说就称为内部类,而A类相对B类来说就是外部类了
1.成员内部类
package com.oop.demo11;

public class Outer {
    private int id=10;
    public void out(){
        System.out.println("这是外部类的方法");
    }
    public class Inner{
        public void in(){
            System.out.println("这是内部类的方法");
        }
        //获得外部类的私有属性
        public void getID(){
            System.out.println(id);
        }
    }
}
package com.oop.demo11;

public class Application {
    public static void main(String[] args) {
        Outer outer=new Outer();
        //通过这个外部类来实例化内部类
        Outer.Inner inner=outer.new Inner();
        inner.getID();
    }
}
2.静态内部类:使用static修饰,则无法获得外部类的私有属性
package com.oop.demo11;

public class Outer {
    private int id=10;
    public void out(){
        System.out.println("这是外部类的方法");
    }
    public static class Inner{
        public void in(){
            System.out.println("这是内部类的方法");
        }
        //获得外部类的私有属性

    }
}
局部内部类
package com.oop.demo11;

public class Outer {
    public void method(){
        class Inner{
            public void in(){

            }
        }
    }
}
与局部变量相似
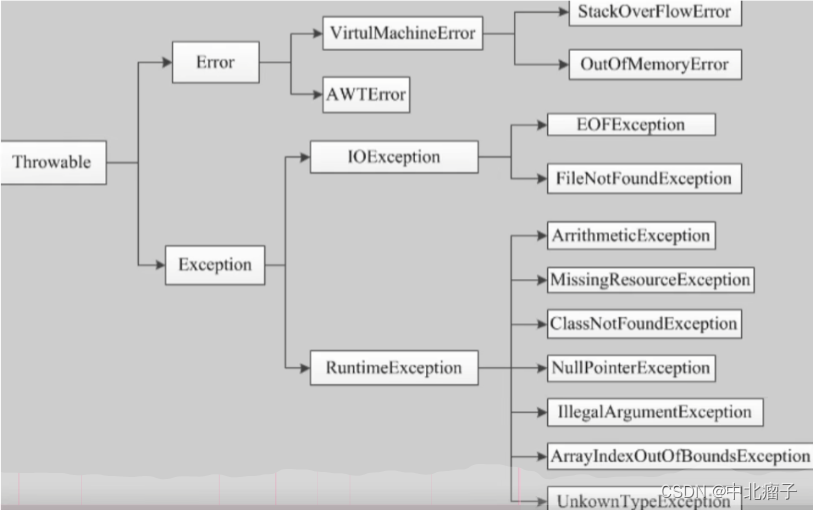
异常处理机制
这是一个错误代码,因为0不能作为除数
package com.oop.exception;

public class Test {
    public static void main(String[] args) {
        int a=1;
        int b=0;
        System.out.println(a/b);
    }
}
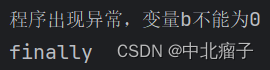
使用catch捕获异常:
package com.oop.exception;

public class Test {
    public static void main(String[] args) {
        int a=1;
        int b=0;
        try {
            System.out.println(a/b);
        }catch (ArithmeticException e){//catch 捕获异常
            System.out.println("程序出现异常,变量b不能为0");
        }finally {//处理善后工作
            System.out.println("finally");
        }

    }
}
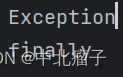
假设要捕获多个异常:从小到大
package com.oop.exception;

public class Test {
    public static void main(String[] args) {
        int a=1;
        int b=0;
        try {
            System.out.println(a/b);
        }catch (Error e){//catch 捕获异常
            System.out.println("Error");
        }catch (Exception e){
            System.out.println("Exception");
        }catch (Throwable t){
            System.out.println("Throwable");
        }finally {
            System.out.println("finally");
        }

    }
}
快捷键ctrl+alt+t,快速将代码块使用功能包裹
主动抛出异常:
package com.oop.exception;

public class Test {
    public static void main(String[] args) {
        int a=1;
        int b=0;
        try {
            if (b==0){
                throw new ArithmeticException();
            }
            System.out.println(a/b);
        }catch (Exception e){
            System.out.println("Exception");
        }finally {
            System.out.println("finally");
        }

    }
}
运行结果:
在方法中抛出异常:
package com.oop.exception;

public class Test {
    public static void main(String[] args) {
        new Test().test(1,0);
    }
  public void test(int a,int b){
        if (b==0){
            throw new ArithmeticException();//主动抛出异常,一般在方法中使用
        }
      //System.out.println(a/b);
  }

}
可见即使不用输出也可以抛出异常
自定义异常
这里自定义一个传递数字的异常,如果传递的数字大于10则抛出异常
package com.oop.demo12;
//自定义的异常类
public class MyException extends Exception{
    //传递数字,大于10抛异常
    private int detail;

    public MyException(int a) {
        this.detail=a;
    }
    //toString异常的打印信息
    @Override
    public String toString() {
        return "MyException{"+detail+'}';
    }
}
package com.oop.demo12;
public class Test {
//可能会存在异常的方法
static void test(int a) throws MyException {
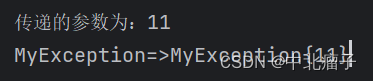
System.out.println("传递的参数为:"+a);
if (a > 10) {
throw new MyException(a);
}
System.out.println("OK");
}
public static void main(String[] args) {
try {
test(11);
}catch (MyException e){
System.out.println("MyException=>"+e);
}
}
}可见我们此时传递的数字为11,此时抛出我们自定义的异常
经验总结
◆处理运行时异常时,采用逻辑去合理规避同时辅助try-catch处理
◆在多重catch块后面,可以加一个catch (Exception) 来处理可能会被遗漏的异常
◆对于不确定的代码,也可以加上try-catch,处理潜在的异常
◆尽量去处理异常,切忌只是简单地调用printStackTrace() 去打印输出
◆具体如何处理异常,要根据不同的业务需求和异常类型去决定
◆尽量添加finally语句块去释放占用的资源
在此狂神java基础笔记全部结束,用时一个月左右学完,也不能说是学完,算是看完吧,真的很喜欢狂神的java基础课,仍然记得狂神的那句话:学编程是为了更好得建模这个世界。愿我们与月作伴的日子不要忘记自己的初心。路漫漫其修远兮,吾将上下而求索!
狂神哔哩哔哩主页:遇见狂神说的个人空间-遇见狂神说个人主页-哔哩哔哩视频