环境说明
jdk1.8
maven3.6.3
mysql8
idea2022
spring cloud2022.0.8
微服务案例的搭建
新建父工程
打开IDEA,File->New ->Project,填写Name(工程名称)和Location(工程存储位置),选择Java语言和Maven,点击Create创建maven工程,该工程为所有工程的父工程

官方查看Spring Cloud与Spring Boot的版本匹配问题
Spring Cloud

Spring Boot2.7.x匹配的Spring Cloud的版本为2021.0.x
修改pom.xml
<?xml version="1.0" encoding="UTF-8"?>
<project xmlns="http://maven.apache.org/POM/4.0.0"
         xmlns:xsi="http://www.w3.org/2001/XMLSchema-instance"
         xsi:schemaLocation="http://maven.apache.org/POM/4.0.0 http://maven.apache.org/xsd/maven-4.0.0.xsd">
    <modelVersion>4.0.0</modelVersion>

    <groupId>org.example</groupId>
    <artifactId>spring-cloud-bk-2023</artifactId>
    <version>1.0-SNAPSHOT</version>

    <properties>
        <maven.compiler.source>8</maven.compiler.source>
        <maven.compiler.target>8</maven.compiler.target>
        <project.build.sourceEncoding>UTF-8</project.build.sourceEncoding>
    </properties>

    <parent>
        <groupId>org.springframework.boot</groupId>
        <artifactId>spring-boot-starter-parent</artifactId>
        <version>2.7.12</version>
    </parent>

    <dependencies>
        <dependency>
            <groupId>org.springframework.boot</groupId>
            <artifactId>spring-boot-starter-web</artifactId>
        </dependency>
        <dependency>
            <groupId>org.springframework.boot</groupId>
            <artifactId>spring-boot-starter-logging</artifactId>
        </dependency>
        <dependency>
            <groupId>org.springframework.boot</groupId>
            <artifactId>spring-boot-starter-test</artifactId>
            <scope>test</scope>
        </dependency>
        <dependency>
            <groupId>org.projectlombok</groupId>
            <artifactId>lombok</artifactId>
            <version>1.18.4</version>
            <scope>provided</scope>
        </dependency>
    </dependencies>


    <dependencyManagement>
        <dependencies>
            <dependency>
                <groupId>org.springframework.cloud</groupId>
                <artifactId>spring-cloud-dependencies</artifactId>
                <version>2021.0.8</version>
                <type>pom</type>
                <scope>import</scope>
            </dependency>
        </dependencies>
    </dependencyManagement>

    <repositories>
        <repository>
            <id>spring-snapshots</id>
            <name>Spring Snapshots</name>
            <url>http://repo.spring.io/libs-snapshot-local</url>
            <snapshots>
                <enabled>true</enabled>
            </snapshots>
        </repository>
        <repository>
            <id>spring-milestones</id>
            <name>Spring Milestones</name>
            <url>http://repo.spring.io/libs-milestone-local</url>
            <snapshots>
                <enabled>false</enabled>
            </snapshots>
        </repository>
        <repository>
            <id>spring-releases</id>
            <name>Spring Releases</name>
            <url>http://repo.spring.io/libs-release-local</url>
            <snapshots>
                <enabled>false</enabled>
            </snapshots>
        </repository>
    </repositories>
    <pluginRepositories>
        <pluginRepository>
            <id>spring-snapshots</id>
            <name>Spring Snapshots</name>
            <url>http://repo.spring.io/libs-snapshot-local</url>
            <snapshots>
                <enabled>true</enabled>
            </snapshots>
        </pluginRepository>
        <pluginRepository>
            <id>spring-milestones</id>
            <name>Spring Milestones</name>
            <url>http://repo.spring.io/libs-milestone-local</url>
            <snapshots>
                <enabled>false</enabled>
            </snapshots>
        </pluginRepository>
    </pluginRepositories>

    <build>
        <plugins>
            <plugin>
                <groupId>org.springframework.boot</groupId>
                <artifactId>spring-boot-maven-plugin</artifactId>
            </plugin>
        </plugins>
    </build>

</project>
- 父工程引入公共的依赖,例如:所有微服务模块均需要用到spring boot,spring boot依赖版本为2.7.12
- 同时声明spring cloud的依赖。spring cloud依赖版本为2021.0.8,声明依赖后,以后子工程就不需要再指定spring cloud的相关版本了。
- dependencies标签配置远程仓库地址
注意:添加依赖后,需要刷新依赖。

微服务模块
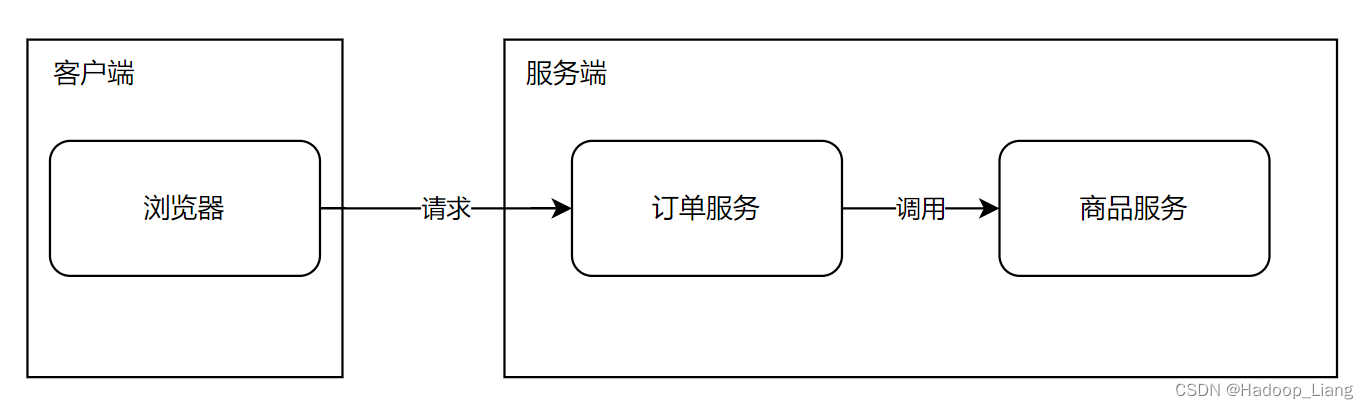
父工程创建好之后,接下来就搭建各个微服务模块,这里以product-service(商品服务)和order-service(订单服务)为例。实现用户下订单的功能。
用户下订单业务流程如下:用户通过浏览器下订单,浏览器发起请求到订单服务,订单服务通过调用商品服务得到商品信息。
product-service(商品服务)
创建子工程
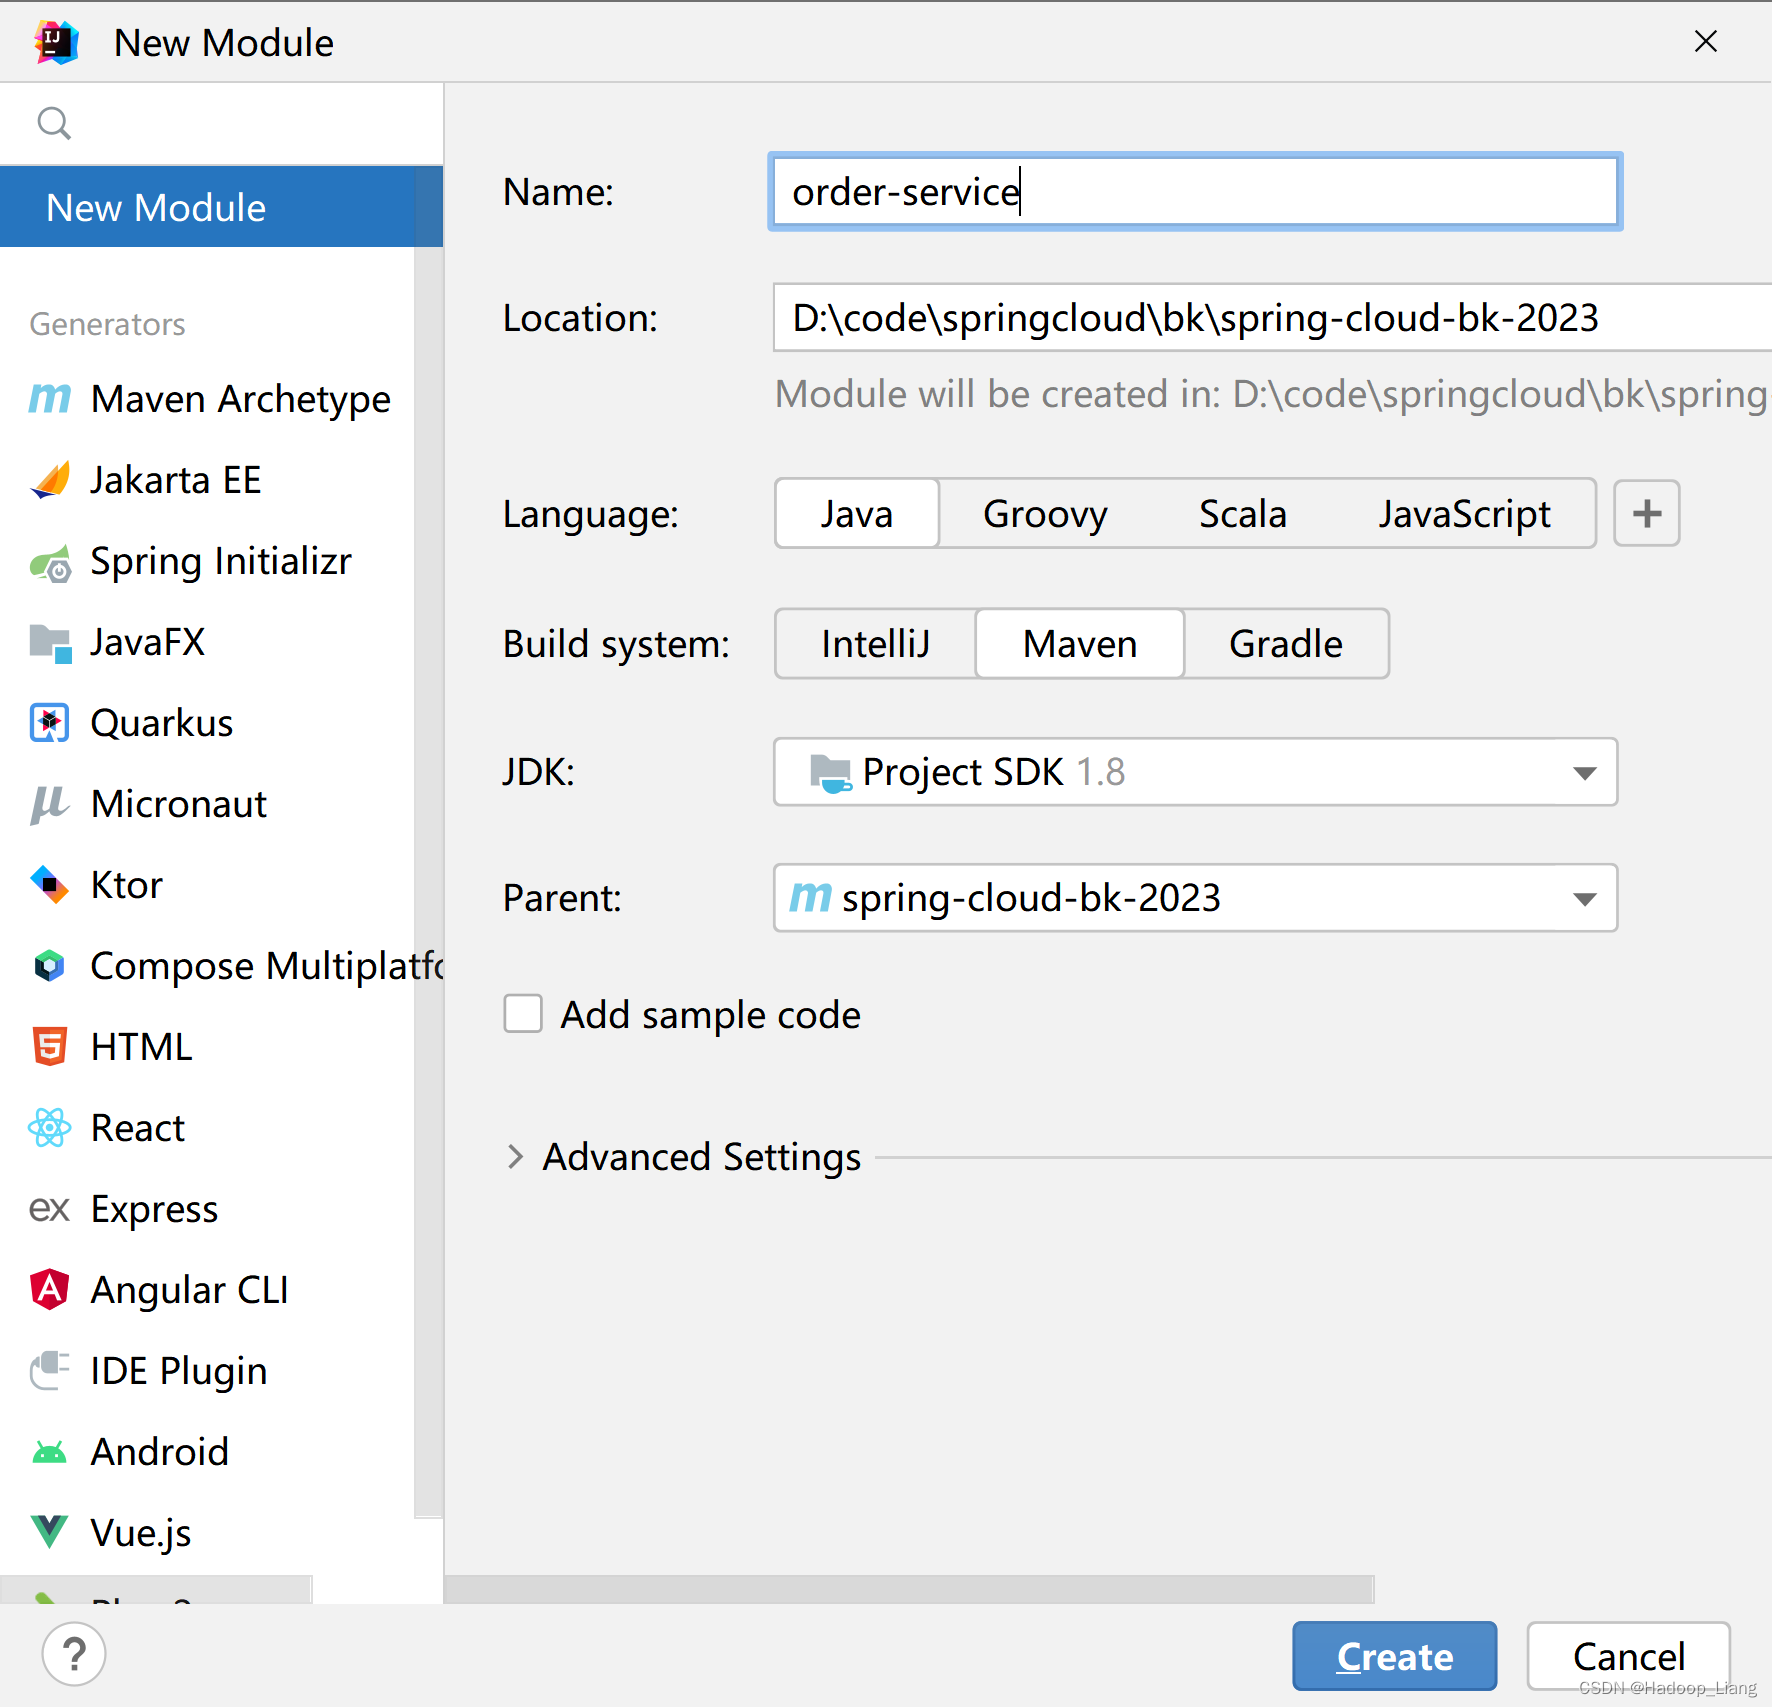
创建product-service子模块,右键父工程->New->Module

填写模块名称:product-service,选择Java,Maven,点击创建,如下图:

添加依赖
修改product-service的pom.xml,在</project>的上方添加如下依赖
    <dependencies>
        <dependency>
            <groupId>mysql</groupId>
            <artifactId>mysql-connector-java</artifactId>
            <version>8.0.33</version>
        </dependency>
        <dependency>
            <groupId>org.springframework.boot</groupId>
            <artifactId>spring-boot-starter-data-jpa</artifactId>
        </dependency>
    </dependencies>
刷新依赖
商品模块业务开发
代码结构如下

实体类
package org.example.product.entity;

import lombok.Data;

import javax.persistence.Entity;
import javax.persistence.Id;
import javax.persistence.Table;
import java.math.BigDecimal;

/**
 * 商品实体类
 */
@Data
@Entity
@Table(name="tb_product")
public class Product {
    @Id
    private Long id;
    private String productName;
    private Integer status;
    private BigDecimal price;
    private String productDesc;
    private String caption;
    private Integer inventory;
}
Dao接口
package org.example.product.dao;

import org.example.product.entity.Product;
import org.springframework.data.jpa.repository.JpaRepository;
import org.springframework.data.jpa.repository.JpaSpecificationExecutor;

public interface ProductDao extends JpaRepository<Product, Long>, JpaSpecificationExecutor<Product> {

}
Service接口
package org.example.product.service;

import org.example.product.entity.Product;

public interface ProductService {
    /**
     * 根据id查询
     */
    Product findById(Long id);

    /**
     * 保存
     */
    void save(Product product);
    /**
     * 更新
     */
    void update(Product product);
    /**
     * 删除
     */
    void delete(Long id);
}
Service接口实现类
package org.example.product.service.impl;

import org.example.product.dao.ProductDao;
import org.example.product.entity.Product;
import org.example.product.service.ProductService;
import org.springframework.beans.factory.annotation.Autowired;
import org.springframework.stereotype.Service;

@Service
public class ProductServiceImpl implements ProductService {

    @Autowired
    private ProductDao productDao;

    @Override
    public Product findById(Long id) {
        return productDao.findById(id).get();
    }

    @Override
    public void save(Product product) {
        productDao.save(product);
    }

    @Override
    public void update(Product product) {
        productDao.save(product);
    }

    @Override
    public void delete(Long id) {
        productDao.deleteById(id);
    }
}
Controller类
package org.example.product.controller;

import org.example.product.entity.Product;
import org.example.product.service.ProductService;
import org.springframework.beans.factory.annotation.Autowired;
import org.springframework.beans.factory.annotation.Value;
import org.springframework.web.bind.annotation.*;

@RestController
@RequestMapping("/product")
public class ProductController {
    @Autowired
    private ProductService productService;

    @Value("${server.port}")
    private String port;

    @Value("${client.ip-address}")
    private String ip;

    @RequestMapping(value = "/{id}",method = RequestMethod.GET)
    public Product findById(@PathVariable Long id) {
        Product product = productService.findById(id);
        product.setProductName("访问的服务地址:"+ip + ":" + port);
        return product;
    }

    @RequestMapping(value = "",method = RequestMethod.POST)
    public String save(@RequestBody Product product) {
        productService.save(product);
        return "保存成功";
    }

}
启动类
package org.example.product;

import org.springframework.boot.SpringApplication;
import org.springframework.boot.autoconfigure.SpringBootApplication;
import org.springframework.boot.autoconfigure.domain.EntityScan;

@SpringBootApplication
@EntityScan("org.example.product.entity")
public class ProductApplication {
    public static void main(String[] args) {
        SpringApplication.run(ProductApplication.class, args);
    }
}
application.yml配置
server:
  port: 9001
spring:
  application:
    name: service-product
  datasource:
    driver-class-name: com.mysql.cj.jdbc.Driver
    url: jdbc:mysql://localhost:3306/shop1?useUnicode=true&characterEncoding=utf-8&serverTimezone=GMT%2B8
    username: root
    password: 123
  jpa:
    database: MySQL
    show-sql: true
    open-in-view: true
    generate-ddl: true #自动创建表

client:
  ip-address: 10.111.50.229
注意修改数据库信息,例如url、username、password
创建业务数据库
使用mysql创建数据库:shop1
create database shop1;测试
运行启动类:ProductApplication.java
因为application.yml的spring.jpa.generate-ddl 配置为true会自动创建表,启动成功后,刷新数据库能看到tb_product表,表还没有具体数据

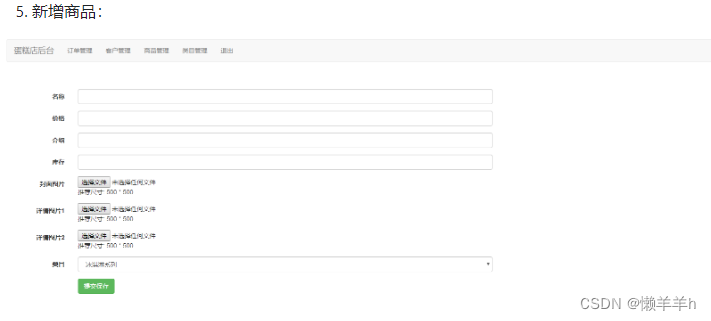
手动为tb_product表添加两行测试数据,例如:

浏览器访问
http://localhost:9001/product/1
访问到了数据库的数据

order-service(订单服务)
创建子工程
子模块:order-service
添加依赖
修改order-service的pom.xml,在</project>的上方添加如下依赖
	<dependencies>
        <dependency>
            <groupId>mysql</groupId>
            <artifactId>mysql-connector-java</artifactId>
            <version>8.0.33</version>
        </dependency>
        <dependency>
            <groupId>org.springframework.boot</groupId>
            <artifactId>spring-boot-starter-data-jpa</artifactId>
        </dependency>
    </dependencies>
刷新依赖
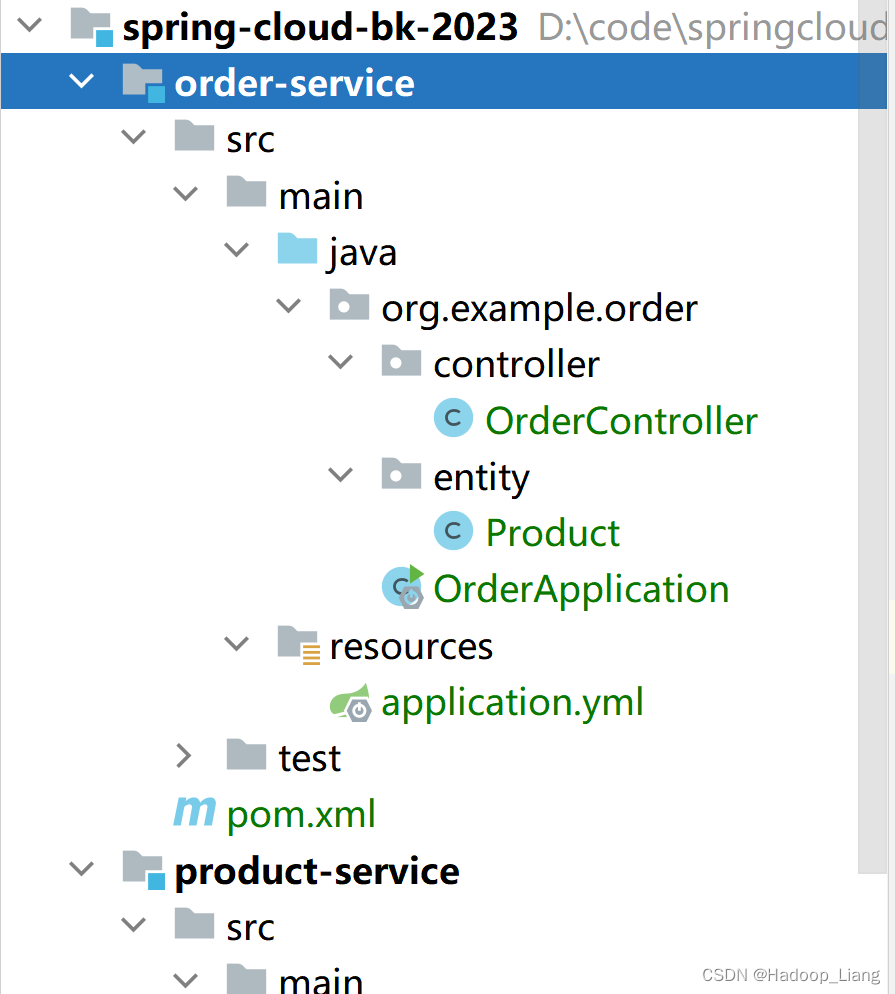
订单模块业务开发
代码结构如下:
实体类
package org.example.order.entity;

import lombok.Data;

import javax.persistence.Entity;
import javax.persistence.Id;
import javax.persistence.Table;
import java.math.BigDecimal;

/**
 * 商品实体类
 */
@Data
@Entity
@Table(name="tb_product")
public class Product {
    @Id
    private Long id;
    private String productName;
    private Integer status;
    private BigDecimal price;
    private String productDesc;
    private String caption;
    private Integer inventory;
}
控制类
package org.example.order.controller;

import org.example.order.entity.Product;
import org.springframework.beans.factory.annotation.Autowired;
import org.springframework.beans.factory.annotation.Value;
import org.springframework.web.bind.annotation.*;
import org.springframework.web.client.RestTemplate;

@RestController
@RequestMapping("/order")
public class OrderController {

    @Autowired
    private RestTemplate restTemplate;

    @RequestMapping(value = "/buy/{id}", method = RequestMethod.GET)
    public Product findById(@PathVariable Long id){
        Product product = null;

        //调用其他微服务,get请求用getXxx post请求用postXxx
        product  = restTemplate.getForObject("http://localhost:9001/product/1", Product.class);


        return product;
    }

}
启动类
package org.example.order;

import org.springframework.boot.SpringApplication;
import org.springframework.boot.autoconfigure.SpringBootApplication;
import org.springframework.boot.autoconfigure.domain.EntityScan;
import org.springframework.context.annotation.Bean;
import org.springframework.web.client.RestTemplate;

@SpringBootApplication
@EntityScan("org.example.order.entity")
public class OrderApplication {

    /**
     * 使用spring提供的RestTemplate发送http请求到商品服务
     *      1.创建RestTemplate对象交给容器管理
     *      2.在使用的时候,调用其方法完成操作 (getXX,postxxx)
     */
    @Bean
    public RestTemplate restTemplate(){
        return new RestTemplate();
    }


    public static void main(String[] args) {
        SpringApplication.run(OrderApplication.class,args);
    }
}
application.yml配置
server:
  port: 9002
spring:
  application:
    name: service-order
  datasource:
    driver-class-name: com.mysql.cj.jdbc.Driver
    url: jdbc:mysql://localhost:3306/shop1?useUnicode=true&characterEncoding=utf-8&serverTimezone=GMT%2B8
    username: root
    password: 123
  jpa:
    database: MySQL
    show-sql: true
    open-in-view: true
    generate-ddl: true #自动创建表

client:
  ip-address: 10.111.50.229
注意修改数据库信息。
测试
运行启动类:OrderApplication.java
浏览器访问
http://localhost:9002/order/buy/1
效果如下

和之前直接访问product服务返回一致,说明order服务调用了product服务
http://localhost:9001/product/1

代码总结:
- 在order启动类,创建RestTemplate对象交给Spring容器管理
- 在order控制类,注入restTemplate对象,在具体方法里调用商品服务:restTemplate.getForObject("http://localhost:9001/product/1", Product.class);
注册中心的使用
搭建注册中心
把服务注册到注册中心
用服务列表名称进行调用
Eureka的高可用
完成!enjoy it!
![[NSSRound#1 Basic]sql_by_sql - 二次注入+布尔盲注||sqlmap](https://img-blog.csdnimg.cn/1a354c46fcba480b93818bcbebb011de.png)
![[NISACTF 2022]hardsql - quine注入](https://img-blog.csdnimg.cn/92ade43e66904c1c94bb34670285d7b1.png)